The Ship Model Forum

The Ship Modelers Source
It is currently Fri Apr 19, 2024 10:27 pm

All times are UTC - 6 hours [ DST ]


Post new topic Reply to topic  [ 83 posts ]  Go to page Previous  1, 2, 3, 4, 5  Next
Author Message
PostPosted: Sat Nov 27, 2021 1:59 pm 
Offline

Joined: Fri Sep 17, 2010 5:49 pm
Posts: 447
Thanks Jim,

I've got a little more that I want to do to the inside of this mast, but not much.
I just can't be sure what is actually there. Some photos show things there and other photos show nothing is there. Also, it's just too tight. I will have to remove the floor supports for the 4th floor. The other detail I want to add won't fit with that level's supports in place. I would like to do the floors in mesh etch but it will probably just be thin plastic sheet.(at least in areas where there isn't already dedicated etch made.)

Dan


Report this post
Top
 Profile  
Reply with quote  
PostPosted: Mon Nov 29, 2021 9:16 pm 
Offline

Joined: Fri Sep 17, 2010 5:49 pm
Posts: 447
Part 17.

I have finished my improvements to the rear mast. Almost destroyed the mast in the process.

Yellow--- A couple vertical pipes at the rear left corner. They go up to the third floor then out to the sides. Excess length and angle will be fine tuned later.

Blue--- A vertical rectangular piece running up the front center inside the frame. I had to remove the 4th floor supports to fit it into position.

Purple--- The corrected shape and locations of the front and rear platforms not included by Trumpeter.

Green--- The near disaster. The front lower platform is attached between the 1st and 2nd floor. If it had been at the first floor there wouldn't have been a problem. But being where it is,I decided to embed it within the posts. So I cut across the front of the mast. Unfortunately, the stress of the cutting was too great and all 4 mast segments above the new platform broke off. I managed to replace the 4 posts with plastic rod. They aren't quite the right size, length, or position. I think they will stand out more once they are painted. Nearly chucked the whole project at this point.
Image
Image

Image
Image

Image
Image

Next will be to try and figure out more accurate size and shape of the various floors.

I am going to combine GMM and Trumpeter etch. The Trumpeter etch I had purchased was defective so I am currently waiting for a replacement.

Thanks for looking.

Dan


Report this post
Top
 Profile  
Reply with quote  
PostPosted: Mon Dec 06, 2021 10:59 pm 
Offline

Joined: Fri Sep 17, 2010 5:49 pm
Posts: 447
I didn't get anything done this weekend.

Between Christmas decorations, preparing a new laptop, and my wife banishing my hobby from the kitchen bar countertop for the holidays, I didn't stand a chance.

There isn't any eta on the replacement etch yet, so I think I will move on to the forward superstructure for the time being.

Dan


Report this post
Top
 Profile  
Reply with quote  
PostPosted: Mon Dec 13, 2021 8:12 pm 
Offline

Joined: Fri Sep 17, 2010 5:49 pm
Posts: 447
Part 18

I've started work on the forward superstructure.

For the bridge, I'm in the process of thinning the inside of the walls to make it easier to open up all the bridge windows. I hadn't noticed it before but Trumpeter made a mistake and didn't include a doorway from the bridge out onto the deck. That will have to be fixed, but I'm not to that point yet.

The middle square has been assembled but is unchanged.

On the flat piece I filled in the two small notches that aren't supposed to be there at the back for a tighter fit around the stack.

Image

Inside the main structure you can see two white rectangle blocks. They are there because Trumpeter didn't include any support for the floor on that side. Probably not really needed but I didn't want to take a chance.

I'm enlarging the bridge wing platforms because the originals are too small.

I attached the forward structure to the main structure now to be sure that I got a good alignment between the sections.

I filled in the four white dots because Chabanenko doesn't seem to have the two smaller boxes, just the two larger inner boxes(or lockers).

The ladders have been sanded off to make the red/white stripe easier. Etch ladders will be added back later.

A small platform has been added to the front of the assembly. A vertical pole will go there, but I haven't seen anything ever mounted to the top of the pole so it is apparently unused. The door at the front of the assembly(below the new platform) has been sanded off. It doesn't seem to actually be there. I've placed a new etch door (not visible in my pic) on the front left wall. Reference photos are fuzzy but it looks like there might be one there.

Image

The replacement etch has arrived and is not defective this time. So next week I will probably go back to working on the main mast and set this assembly aside for a while.

Thanks for looking.

Dan


Report this post
Top
 Profile  
Reply with quote  
PostPosted: Wed Dec 22, 2021 12:21 am 
Offline

Joined: Fri Sep 17, 2010 5:49 pm
Posts: 447
Part 19

With time off for the holidays, I will hopefully be able to get this main mast done. Although it is still slow going.

This is the basic layout that I'm doing for the various levels.

Image

I had to cut off the vertical rectangle at the first level in order to fit the floor in. Then I glued the part back in below the level. It actually ended up being easier than my original idea of cutting a notch to fit the floor around the rectangular pillar. I added support rods below the first level.

There isn't anything on the 2nd level, so I just did a basic triangle.

It took a while to get the ladders in place but they finally made it, except for a short one needed from the first level up to the lowest front platform. I just couldn't get access to make it fit. I'll add the Trumpeter electronics parts later. For now, I still have one antenna to make for the rear platform on level 3.

I also managed to break off one of the main posts at the very top. That'll have to be fixed when the time comes.

Image

Image

Image

Image

Thanks for looking.

Dan


Report this post
Top
 Profile  
Reply with quote  
PostPosted: Mon Dec 27, 2021 6:05 pm 
Offline

Joined: Fri Sep 17, 2010 5:49 pm
Posts: 447
Part 20

I've made what I think is some really good progress.

I added the railings around the various decks and made the two antenna for the forward platform above the first level.

I planned to rest the etch scaffolding on the fourth level, but it seemed to end up sitting a little too low. I raised it up about 1mm and have it lifted by the large angled support beams. The 5th level etch now looks to be about right at halfway between the 4th level and the top.

With the fifth level etch in place, photos show some sort of boxed structure taking up about 50% of the remaining height. I closed up the top of the main structure. The two front corner beams aren't supposed to meet at the top at all. They are now separated in the box structure. It makes me suspect that the entire tapered angle of Trumpeter's front of the assembly is wrong and closes in too sharply.
Image

Around the back, I've done what I could to make the strange tapered box antenna. I cut out a linked section of four sections out of a spare chunk of landing pad etch and folded them together. I know it's over sized, but I couldn't make it any smaller.
Image

Image

I've added other etch and plastic bits cut off the original part to get a more accurate look to the etch for the 6th and final level. There was going to be a couple more bits of plastic added, but they went flying away at some point.
Image

I've added the etch for the Strut Pair radar and started adding the plastic parts for the other electronics on the mast Along with beginning what will hopefully be the final round(s) of painting for this assembly as well.
Image

Thanks for looking.

Dan


Last edited by California Bound on Wed Jan 12, 2022 9:39 pm, edited 1 time in total.

Report this post
Top
 Profile  
Reply with quote  
PostPosted: Sat Jan 01, 2022 6:22 pm 
Offline

Joined: Fri Sep 17, 2010 5:49 pm
Posts: 447
Part 21

I've added the rear ladder from the 3rd level up to the underside of the 6th level, ladders down from the 6th level to the 5th, and the railing around the 6th level.
Image

Around the front, I added the final 2 platforms and electronics to the ends. I've tried to position all the front platforms pointing outward at about 30 degrees off center. I tried 45 degrees at first, but it seemed too far out.
Image

I am calling this assembly done now. I was going to paint the ladders in a lighter gray to set them off, but photos show that they should be dark like everything else. so I did the ladders in black except for the ones around the base of the mast. And added a railing around the base of the mast.
Image

Image

It's back to the forward superstructure and forward mast now. The main issues look to be the missing bridge doors, supports for the cross sword platform, and adding details to the forward mast. Thankfully, the forward mast doesn't look as complicated as the main mast was.

Thanks for looking.

Dan


Report this post
Top
 Profile  
Reply with quote  
PostPosted: Mon Jan 10, 2022 12:15 am 
Offline

Joined: Fri Sep 17, 2010 5:49 pm
Posts: 447
Part 22

Progress is going even slower now. I haven't got much interest in this part of the ship and my mind is wandering to other things.

First a minor correction. Earlier I had mentioned adding etch for the strut pair radar. That's wrong, it was for the Top Plate radar. The Strut Pair goes on the forward mast.

Latest progress.

I've assembled the main missile launchers. It was nice of Trumpeter to get the correct numbers on the front of the hatches, but I will probably fill them in and use decals. Numbers will also be needed on the back of the tubes as well.
Image

A view from underneath shows the new layout of the bridge walls.
Image

I've added a small plastic square to the top of the kite screech platform. I don't know if a cover is actually there or not but I figure that there should be a cover over the opening to the ladder below.
Image

I've never used them before, but decided to use the window wipers for once. Based on photos, it looks like every window doesn't have a wiper. Some are blank and some look to have had one at one point but just a stub is there now where the wiper arm used to be attached. A couple sink holes had to be filled in the bridge roof as well.
Image

It looks like it will be time to start painting.

Thanks for looking.

Dan


Report this post
Top
 Profile  
Reply with quote  
PostPosted: Thu Jan 20, 2022 11:27 am 
Offline

Joined: Fri Sep 17, 2010 5:49 pm
Posts: 447
I'm putting this project on hold for a few weeks while I deal with some long term water leaks and it's damage that I've discovered in my laundry room.

Dan


Report this post
Top
 Profile  
Reply with quote  
PostPosted: Thu Feb 03, 2022 8:01 pm 
Offline

Joined: Fri Sep 17, 2010 5:49 pm
Posts: 447
The damage was worse than expected. Floor, wall, pipes, faucet, sink, washing machine, and hot water tank all had to be fixed or replaced. It's close enough to being done now that I can get back to this project this weekend.

I know I've "gone off the deep end" on this one. I guess old habits don't die. They just get suppressed for a while.

I've decided that this project and my remaining three others will all be for family members. That will hopefully be enough incentive.

So, the project will continue, as will whatever corrections and improvements I'm able to do.

Dan


Report this post
Top
 Profile  
Reply with quote  
PostPosted: Mon Feb 07, 2022 10:59 pm 
Offline

Joined: Fri Sep 17, 2010 5:49 pm
Posts: 447
Part 23

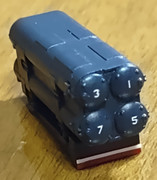
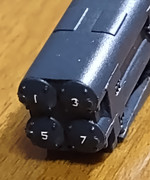
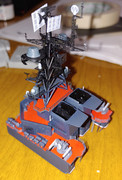
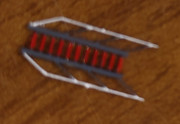
The anti ship missile launchers are done. They have been painted, striped, and numbered. The number decals are from Hawk Graphics. I needed white numbers and these are actually hi-vis black and white, but the dark ship color does a good job of hiding the black.
Image
Image

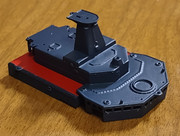
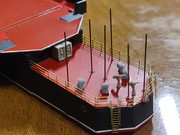
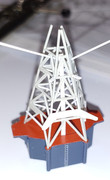
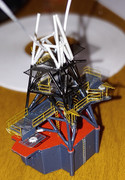
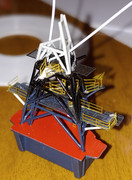
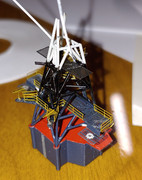
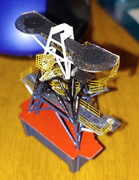
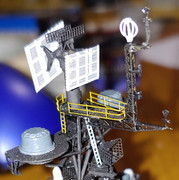
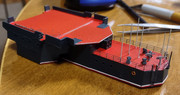
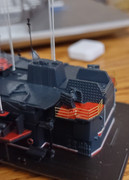
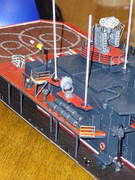
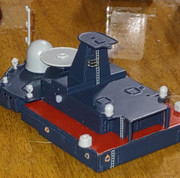
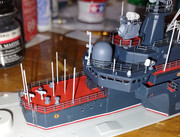
Basic initial painting is done on the upper superstructure assembly. It seems odd for that red deck to be there, but that's what the photo I'm using for reference shows. Other photos show different red locations. So its just pic a photo and go with it. This assembly is going to be pretty cluttered so I plan to keep it as a separate assembly as long as I can. And since it will take the most work, I'm going to move on to the lower half of the assembly and then the bow anti air missile launchers first, before doing this area any further.
Image

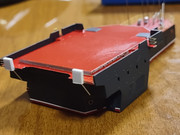
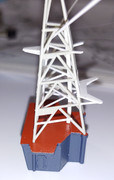
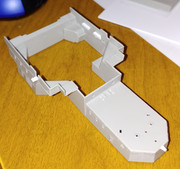
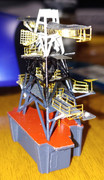
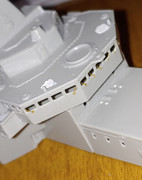
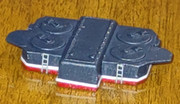
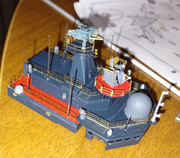
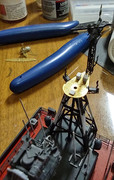
The lower assembly is coming along nicely. At the back, I've added a couple missing boxes that I assume are for signal flag storage, and a couple structural support rods that were also missing, along with a little bit of etch railing at the back and the small bridge wings.
Image

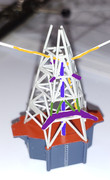
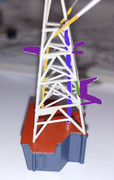
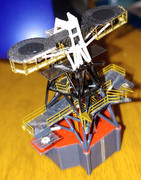
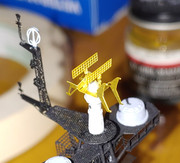
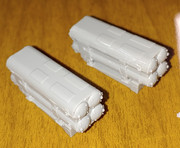
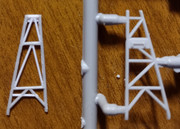
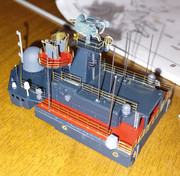
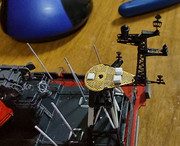
I've done what I can at the front. There appear to be six antenna up front. Its hard to see their layout in photos, and different drawings don't agree on the placement of the rear middle antenna. It could be here, or further back than the other two in its row. Some 3d printing has solved my countermeasure appearance problem. I attempted to make a cross between a ladder and a staircase, to make a ladder with railings. And plastic rod for the unused post at the front of the assembly.

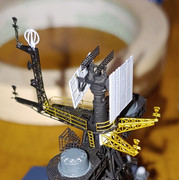
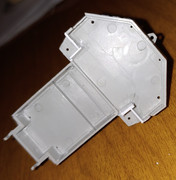
There are a couple mistakes here in the front area. Just like the landing pad area, I saw them but it never clicked in my head until it was too late. The countermeasure launchers locations aren't mirrored from side to side like they should be, and the front ones have an unneeded hump under them. They could still be fixed, but I'd have to strip it all down and I think the correction isn't worth the amount of trouble it'd cost to do it at this point.
Image

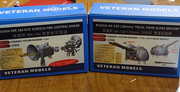
What will hopefully be the last batch of improvement parts have arrived from Freetime Hobbies.
Image

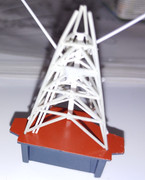
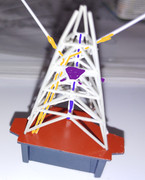
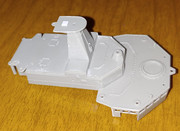
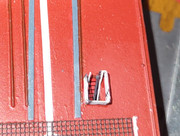
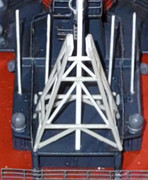
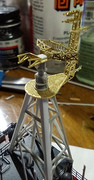
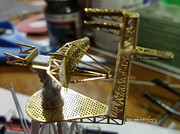
The Kite Screech will be added near the end of the upper superstructure assembly. The turret won't be attempted until I get to doing the main deck corrections. I've tried to build this turret twice before. I end up using slightly over half the parts. So each box of two turrets has only given me one attempt. Past results haven't been good. I keep adjusting my methods, and I hope I'll finally be getting a successful (good enough to use it) result.

Thanks for looking

Dan


Report this post
Top
 Profile  
Reply with quote  
PostPosted: Mon Feb 14, 2022 11:20 pm 
Offline

Joined: Fri Sep 17, 2010 5:49 pm
Posts: 447
Part 24

Too much was going on so I didn't get much done this weekend. I finished painting the lower half of the forward superstructure.
Image

I still want to add windows. My plan is to use a stiffer clear plastic sheet and cover it in a light green peel and stick window tint sheet. I'll cut it into small pieces and glue them behind the window openings. I plan to do the same thing to the bridge windows to.
Image

I've done a little work on the forward missile launcher. Extra silo hatch details have been sanded off. It has quite a few spots where seams have to be taken care of. I've ground off the small box on each side near the front. It looked like it was bulging out a little too much so I am going to put a flatter one there. I will also make it a little smaller just so that I can create more clearance for my red/white stripe.
Image

Lastly. I've started to work on the forward mast. At first I thought that it was much better than the rear mast but I was wrong. It looks to actually be worse. Here is a comparison view. On the left, is a view of the left side of the new left side piece. On the right side is the unchanged right side assembly. My horizontal addition for supports of level 1 near the bottom is a little crooked but its not that bad and shouldn't be too noticeable. Mainly, the correct shape shouldn't have the zig zag support pattern, and there doesn't seem to actually be a second floor level. Just levels 1, 3, and top. Also, I had to shorten the back leg at the bottom because the rear mounting hole for each side is formed poorly. The right side rear hole is partially filled with waste sprue, and the left side rear hole and surrounding material is completely missing. I quick check shows that as far as I can tell, it is absolutely impossible to fit the single piece Trumpeter etch upper yardarm assembly through even the unchanged area without making some cuts. A person would have to assemble the yardarm first and then build the tower around it. Even then a small piece of the Trumpeter etch would have to be cut off.
Image

I'm not sure what part of this assembly I'll work on next. I guess it'll depend on my mood.

Thanks for looking.

Dan


Report this post
Top
 Profile  
Reply with quote  
PostPosted: Mon Feb 21, 2022 5:46 pm 
Offline

Joined: Fri Sep 17, 2010 5:49 pm
Posts: 447
Part 25

I made some assorted progress this weekend.

For the bow missile launchers, I added a pair of small white boxes. They are less accurate in size and shape than the ones I sanded off, but are more accurate in the flat boxy shape aspect. Just needs to be painted and striped now.
Image

I've started adding details to the upper half of the front superstructure. Supports are still needed under the cross sword platform. The tweezers launched two of the search lights away, but I actually managed to find them both. On the side wall of the assembly you can see the small counter measure launcher. Trumpeter says to mount them facing out and forward. Photos show that they should be facing out and towards the back like this. I will probably be building the sword assembly first, then the mast and finally kite screech assembly, with other parts added along the way.
Image

With the success of finding the two parts, I was in a good mood and decided to give another try at the cable railings around the launchers on the rear assembly. They actually went down pretty good on the first try.
Image

Lastly, for this week, I wanted to go ahead and add the staircases for the landing pad. I was both surprised(not in a good way), and annoyed. The etch ones provided by Trumpeter are very basic and not much to look at so I didn't want to use them. I wanted to use at the relief etched ones by GMM or even the nicer types with actual steps that you have to fold out. It turned out that none of the GMM staircases were long enough to reach from the landing pad to the deck below. So I went on to the nicer "Russian Navy" staircases made by 5 Star. They didn't fit either, their longest ones were still to short. I was looking through all my etch to try and find some sort of staircase, any staircase, that would fit. As it turned out, the ones that ended up being long enough were the 5 Star "American Navy" staircases, go figure...

I saw this color combination in an old photo, or video, I don't remember which. I decided to do it for this project. Especially since the ship has the red colored decks. Back, front, and installed. The white safety railing could definitely have been shaped to fit better, but was as close as I could get it.
Image
Image
Image

Thanks for looking.

Dan


Report this post
Top
 Profile  
Reply with quote  
PostPosted: Mon Mar 07, 2022 5:08 pm 
Offline

Joined: Fri Sep 17, 2010 5:49 pm
Posts: 447
Part 26

Work has been taking up more time lately, and to be honest, I haven't been in much of a mood to work on this. But, I have continued to work on it slowly and have been making some progress.

I went back and added some more etch railings to the hanger assembly. It is now definitely up to the hull attachment stage before any more can be done to it.
Image

The front missile launcher assembly is finished. All painted and striped.
Image

A little bit of railing was added to the back of the kite screech tower before I went on to painting the plastic bits.
Image

This is where I am currently at. I've painted most of the plastic parts and have been adding more bits of etch. In the process of looking at photos to see which parts are lighter colored than other parts, I noticed that there were a couple mistakes on the bridge roof. It turns out that Chabanenko doesn't have the two spot lights at the front of the bridge roof, so I cut them off with a razor blade and covered the damage with some dark paint. It also turns out that the light pole at the front is too tall. I had to cut 3mm of the bottom to correct it. It took much longer than I expected just to get the six support posts under the cross sword platform. I've tossed my planning out the window and just sort of adding parts here and there where the mood sends me. It is also surprising that the railings aren't always out at the edge of the levels.
Image

There seems to be quite a bit left to do on this section. It's more involved than I thought.

Thanks for looking.

Dan


Report this post
Top
 Profile  
Reply with quote  
PostPosted: Mon Mar 21, 2022 5:07 pm 
Offline

Joined: Fri Sep 17, 2010 5:49 pm
Posts: 447
Part 27

Progress continues slowly even though I just can't seem to get interested in this sub assembly.

I've added everything to this section except for the mast and the bridge windows. I haven't done anything on those yet.

I lost track of how many times I ended up stabbing myself in the finger while trying to cut the metal antenna rods. The snapping force from the wire cutters was pretty strong. A lot of wires ended up either in my finger or somewhere across the room. I'm not sure of the exact location, size, or overall quantity of antenna rods. This is just a guess on my part.

I've also added a small post and white dome to the left side of the bridge roof. All the photos of this ship are old. I don't think the ship has been in the ocean in almost 10 years. But one of the "newer" old photos show that this white dome had been added. And a twin of it will be on the right side of the forward mast.
Image
Image

And here it is after painting and a flat coat.

Image
Image

Luckily, the dark areas of touch up paint aren't as visible to the eye as they are to the camera.

Thanks for looking.

Dan


Report this post
Top
 Profile  
Reply with quote  
PostPosted: Tue Mar 22, 2022 7:39 am 
Offline
User avatar

Joined: Wed May 06, 2020 4:02 am
Posts: 69
Interesting build of a ship I have never heard of before. Good job on the radars :thumbs_up_1:

_________________
Under construction: KMS Bismarck 1/350


Report this post
Top
 Profile  
Reply with quote  
PostPosted: Sun Apr 10, 2022 6:28 pm 
Offline

Joined: Fri Sep 17, 2010 5:49 pm
Posts: 447
Part 28

Thanks IJNfan.

As usual, extra hours at work took away from my sleep and led to getting worn out and sick. I'm mostly back to normal and can start working on this again.

I originally thought that if anything, the window tint would be too light. It ended up being too dark. I settled for just gluing clear plastic sheet behind the open windows and giving them a coat of clear gloss. It's not really much of an improvement without adding a source of interior lighting. I probably wouldn't go to the trouble of opening up the windows again. I've now glued the upper and lower parts of the superstructure together. Again, the dark touch up paint around the edges isn't as visible as the camera makes it appear to be.
Image

The last thing I need to do before moving on to the main deck is the forward mast. It is quite a little mess to assemble when there aren't mounting holes available for all four corners. Both sides now match and I've also corrected the back side. I kept the original parts up to the first level. After that, I cut out everything up to the third level, removing the second level completely, and just making a new pair of diagonal supports up to the original third level horizontal piece. I made a new horizontal beam and diagonal supports for the fourth level, placing it a little lower to let the eventual etch slide in above it. Lastly, a rectangle rod has been added on the inside of the rear wall, the top hasn't been trimmed to length yet.
Image

The front face still has to be done. It'll be almost identical to the rear face except that the fourth level will be at the very top, and it will still have a partial horizontal beam representing the location of the missing second level.

Progress is slower than I'd like. I've thought about starting my next project while the slow bits of this project are taking so long, but if I set it aside and clear off the messy table to start another project, I'd probably never come back and finish this one.

Thanks for looking.

Dan


Report this post
Top
 Profile  
Reply with quote  
PostPosted: Mon Apr 18, 2022 3:56 pm 
Offline

Joined: Fri Sep 17, 2010 5:49 pm
Posts: 447
Part 29

I finished the assembly of the front face of the mast. The partial support at what would have been the second level is visible, with the diagonal supports forming a large "A". I added flat strips to the front and sides of the forward corner posts. Looking closer at the photos, I've now realized that that was a mistake. There should have been a square corner post next to each front corner post, not the existing one covered to look square. But that's too late now.

The mast assembly is too delicate and small to work with comfortably, so I had to glue it to the superstructure earlier than I wanted to.

For whatever reason, I've started working on the etch at the top first instead of the bottom. I added an extension to the top of the etch tower and tried to add the strange forward pointing platforms. I'm not really happy with it. The platforms don't look right and I made the extension to tall. Again, it's too late and there isn't much I can do about it anyway. There is another dish to add, along with some probable access hole covers, extra ledges, more sensors, and railings. I think the mast will have to be painted after all the top etch has been attached, but before the 1st and 3rd level etch is added.
Image

Image

I didn't realize until looking at the pics just now that I missed the dish mounting notch in the feed horn. Magnifying glasses didn't even see what the camera did. Oops...

Thanks for looking.

Dan.


Report this post
Top
 Profile  
Reply with quote  
PostPosted: Sun Apr 24, 2022 9:23 pm 
Offline

Joined: Fri Sep 17, 2010 5:49 pm
Posts: 447
Part 30

Just a little bit more progress this week. The main radar hadn't been glued in place yet so I removed it to make the work area less cluttered for now. I've added a final ledge pointing to the back at the very top of the forward mast. Along with a few bits of plastic and etch details to the mast. Some of the mast has been painted in spots where I think it will be harder to paint after the etch has been added.
Image

I've added a couple small platforms to the sides of the top level main radar platform. Their size and attachment angle is just a best guess on my part.
Image

Currently, my plan is to add the railing around the radar platform, then add the main ladder running up the entire front of the mast, then the forward extension of the radar platform. After that it should be down to the first level platform before finishing up at the third level details. Of course, my plans almost always end up changing.

Thanks for looking.

Dan


Report this post
Top
 Profile  
Reply with quote  
PostPosted: Mon Apr 25, 2022 9:20 am 
Offline
User avatar

Joined: Sun Mar 13, 2005 11:51 am
Posts: 2407
Location: Belgium
Typical cold war complexity! Love what you're doing and quite a demonstration of patience! :heh: Looking forward to the assembly of this gorgeous ship.

_________________
The merchant shipyard


Report this post
Top
 Profile  
Reply with quote  
Display posts from previous:  Sort by  
Post new topic Reply to topic  [ 83 posts ]  Go to page Previous  1, 2, 3, 4, 5  Next

All times are UTC - 6 hours [ DST ]


Who is online

Users browsing this forum: No registered users and 138 guests


You can post new topics in this forum
You can reply to topics in this forum
You cannot edit your posts in this forum
You cannot delete your posts in this forum
You cannot post attachments in this forum

Jump to:  
Powered by phpBB® Forum Software © phpBB Group