The Ship Model Forum

The Ship Modelers Source
It is currently Wed Apr 24, 2024 3:23 am

All times are UTC - 6 hours [ DST ]


Post new topic Reply to topic  [ 24 posts ]  Go to page 1, 2  Next
Author Message
PostPosted: Wed Feb 09, 2022 6:38 pm 
Offline
User avatar

Joined: Fri Sep 13, 2013 11:19 pm
Posts: 57
Location: Livorno, Italy
An USS De Haven kit from Tenhoart Models purchased by me at least ten years ago. After so much time sitting on the shelf and after having lost the anti skid decal sheet from a move to another. I decided to build this model as a vessel painted in the very attractive Measure 31-16D camouflage (probably i'll go for the "USS Lowry" DD-770 as in 1944-45 timeframe). The kit can be built basically out from the box into a nice model but I see some room for add even furter details myself so...lets get started! Cheers

Alessandro


Attachments:
File comment: The real USS Lowry in Measure 31/16D as in 1944-45
USS_Lowry_(DD-770)_off_San_Pedro,_California_(USA),_on_5_August_1944_(19-N-69905).jpg
USS_Lowry_(DD-770)_off_San_Pedro,_California_(USA),_on_5_August_1944_(19-N-69905).jpg [ 160.64 KiB | Viewed 2399 times ]
File comment: major resin piece dry fitted on hull.
IMG_20220117_082805.jpg
IMG_20220117_082805.jpg [ 89.71 KiB | Viewed 2399 times ]
File comment: original propeller struts from the kit
IMG_20220124_124045.jpg
IMG_20220124_124045.jpg [ 68.1 KiB | Viewed 2399 times ]
File comment: real life strut appearence
0572473.jpg
0572473.jpg [ 63.19 KiB | Viewed 2399 times ]
File comment: strut reshaped to a more realistic apparence
IMG_20220209_222202.jpg
IMG_20220209_222202.jpg [ 59.63 KiB | Viewed 2399 times ]
IMG_20220209_222249.jpg
IMG_20220209_222249.jpg [ 48.75 KiB | Viewed 2399 times ]
File comment: proppellers guards made from brass and steel wire compared to the original photoetched part kit
IMG_20220209_222440.jpg
IMG_20220209_222440.jpg [ 50.64 KiB | Viewed 2399 times ]
File comment: The kit waterway was placed too outboard compared to real ship and plans and must be replaced with a one made from plasticard, placed more inboard.
IMG_20220209_222858.jpg
IMG_20220209_222858.jpg [ 38.19 KiB | Viewed 2399 times ]
File comment: the plastic strips of 0.25x0.5mm must be lowered to 0.25mm height. Original waterway was 2 inch tall (50.8 mm) so 0.25 is approximately correct. To help have a costant height a 0.25mm sheet was used as a gouge while sanding down
IMG_20220131_114712.jpg
IMG_20220131_114712.jpg [ 42.18 KiB | Viewed 2399 times ]
File comment: final piece appearence.
IMG_20220209_222557.jpg
IMG_20220209_222557.jpg [ 36.66 KiB | Viewed 2399 times ]

_________________
Don't waste your time or time will waste you
Report this post
Top
 Profile  
Reply with quote  
PostPosted: Thu Feb 10, 2022 6:26 pm 
Offline
Model Monkey
Model Monkey

Joined: Sat Aug 20, 2005 9:27 pm
Posts: 3954
Location: USA
Very nice!

_________________
Have fun, Monkey around.™

-Steve L.

Complete catalog: - https://www.model-monkey.com/
Follow Model Monkey® on Facebook: - https://www.facebook.com/modelmonkeybookandhobby


Report this post
Top
 Profile  
Reply with quote  
PostPosted: Sat Feb 12, 2022 9:05 pm 
Offline

Joined: Wed Jan 02, 2013 1:15 am
Posts: 5012
The change from the single rudders was a big improvement from the Fletchers which had a tactical diameter as bad as an Iowa, and Alaska and other much larger ships. Such agility became more important for ASW which assumed a larger role postwar.

Looks good!

Tom


Report this post
Top
 Profile  
Reply with quote  
PostPosted: Sun Feb 13, 2022 4:58 pm 
Offline

Joined: Mon Apr 17, 2017 2:43 am
Posts: 196
quote: "the plastic strips of 0.25x0.5mm must be lowered to 0.25mm height. Original waterway was 2 inch tall (50.8 mm) so 0.25 is approximately correct. To help have a costant height a 0.25mm sheet was used as a gouge while sanding down"

Very clever, excellent result! Great progress so far, keep it up!

Cheers,

SG

_________________
http://www.3xblackcats.wordpress.com


Report this post
Top
 Profile  
Reply with quote  
PostPosted: Sun Feb 20, 2022 5:30 pm 
Offline
User avatar

Joined: Fri Sep 13, 2013 11:19 pm
Posts: 57
Location: Livorno, Italy
Small update: drilled portholes, scraped away some superstructures details and added internal support structure to the lateral bulwarks based on plans and photographic evidence.

Alessandro


Attachments:
IMG_20220220_230554.jpg
IMG_20220220_230554.jpg [ 168.79 KiB | Viewed 2119 times ]
IMG_20220220_230215.jpg
IMG_20220220_230215.jpg [ 182.05 KiB | Viewed 2119 times ]
IMG_20220220_230904.jpg
IMG_20220220_230904.jpg [ 112.86 KiB | Viewed 2119 times ]

_________________
Don't waste your time or time will waste you
Report this post
Top
 Profile  
Reply with quote  
PostPosted: Sun Apr 03, 2022 4:47 pm 
Offline
User avatar

Joined: Fri Sep 13, 2013 11:19 pm
Posts: 57
Location: Livorno, Italy
In the past weeks I worked mainly on superstructure details, brass decks, watertight doors, canvas cover for bofors antiaircraft ammo, air intakes, round section pillars and more fine details on rudders and base plates for propellers strut and propellers guard.
In the next weeks i'll start adding more fine and delicate details to the superstructure in the appropriate location for USS Lowry, based on photographic evidence. Cheers!

Alessandro


Attachments:
IMG_20220403_223449.jpg
IMG_20220403_223449.jpg [ 73.88 KiB | Viewed 2006 times ]
IMG_20220403_223512.jpg
IMG_20220403_223512.jpg [ 64.29 KiB | Viewed 2006 times ]
IMG_20220403_223647.jpg
IMG_20220403_223647.jpg [ 76.08 KiB | Viewed 2006 times ]
IMG_20220403_220850.jpg
IMG_20220403_220850.jpg [ 62.51 KiB | Viewed 2006 times ]
IMG_20220403_223840.jpg
IMG_20220403_223840.jpg [ 67.81 KiB | Viewed 2006 times ]
IMG_20220403_223908.jpg
IMG_20220403_223908.jpg [ 61.34 KiB | Viewed 2006 times ]
IMG_20220403_224030.jpg
IMG_20220403_224030.jpg [ 56.11 KiB | Viewed 2006 times ]
IMG_20220403_224141.jpg
IMG_20220403_224141.jpg [ 63.11 KiB | Viewed 2006 times ]
IMG_20220403_221654_1.jpg
IMG_20220403_221654_1.jpg [ 41.72 KiB | Viewed 2006 times ]
IMG_20220403_224259.jpg
IMG_20220403_224259.jpg [ 81.57 KiB | Viewed 2006 times ]

_________________
Don't waste your time or time will waste you
Report this post
Top
 Profile  
Reply with quote  
PostPosted: Sun Oct 16, 2022 5:30 pm 
Offline
User avatar

Joined: Fri Sep 13, 2013 11:19 pm
Posts: 57
Location: Livorno, Italy
After the parenthesis of USS Ward in 1/350 built in the last months i've resumed this project, mainly concentrating on detailing superstructures and build small accessories like handrails, vent pipes, pillars, gun turrets, deck fittings and others.
Obviously there is still a lot of work to do but i hope you enjoy this update. More in the coming weeks! Regards

Alessandro


Attachments:
File comment: main turrets detailing
IMG_20221016_231354.jpg
IMG_20221016_231354.jpg [ 66.98 KiB | Viewed 1797 times ]
File comment: small vent e tube pipes
IMG_20221016_231620.jpg
IMG_20221016_231620.jpg [ 46.26 KiB | Viewed 1797 times ]
IMG_20221016_230659.jpg
IMG_20221016_230659.jpg [ 51.87 KiB | Viewed 1797 times ]
File comment: the pilot house, an example of hand rails
IMG_20221016_231315.jpg
IMG_20221016_231315.jpg [ 42.33 KiB | Viewed 1797 times ]
File comment: handwheels, handrails and boxes
IMG_20221016_230903_1.jpg
IMG_20221016_230903_1.jpg [ 43.47 KiB | Viewed 1797 times ]
File comment: a general view of bow deck fittings, mainly the deck hatch with associated davit in work position
IMG_20221015_225228.jpg
IMG_20221015_225228.jpg [ 34.59 KiB | Viewed 1797 times ]
File comment: davit on secured position
IMG_20221008_184626_1.jpg
IMG_20221008_184626_1.jpg [ 47.53 KiB | Viewed 1797 times ]
File comment: open urinal
IMG_20220918_173917.jpg
IMG_20220918_173917.jpg [ 37.95 KiB | Viewed 1797 times ]
IMG_20220918_173458.jpg
IMG_20220918_173458.jpg [ 50.44 KiB | Viewed 1797 times ]
File comment: single step ladders from eduard 1/200 Missouri photoetched set
IMG_20221016_230802.jpg
IMG_20221016_230802.jpg [ 37.11 KiB | Viewed 1797 times ]

_________________
Don't waste your time or time will waste you
Report this post
Top
 Profile  
Reply with quote  
PostPosted: Mon Oct 17, 2022 9:12 am 
Offline
User avatar

Joined: Fri Sep 13, 2013 11:19 pm
Posts: 57
Location: Livorno, Italy
DavidP wrote:
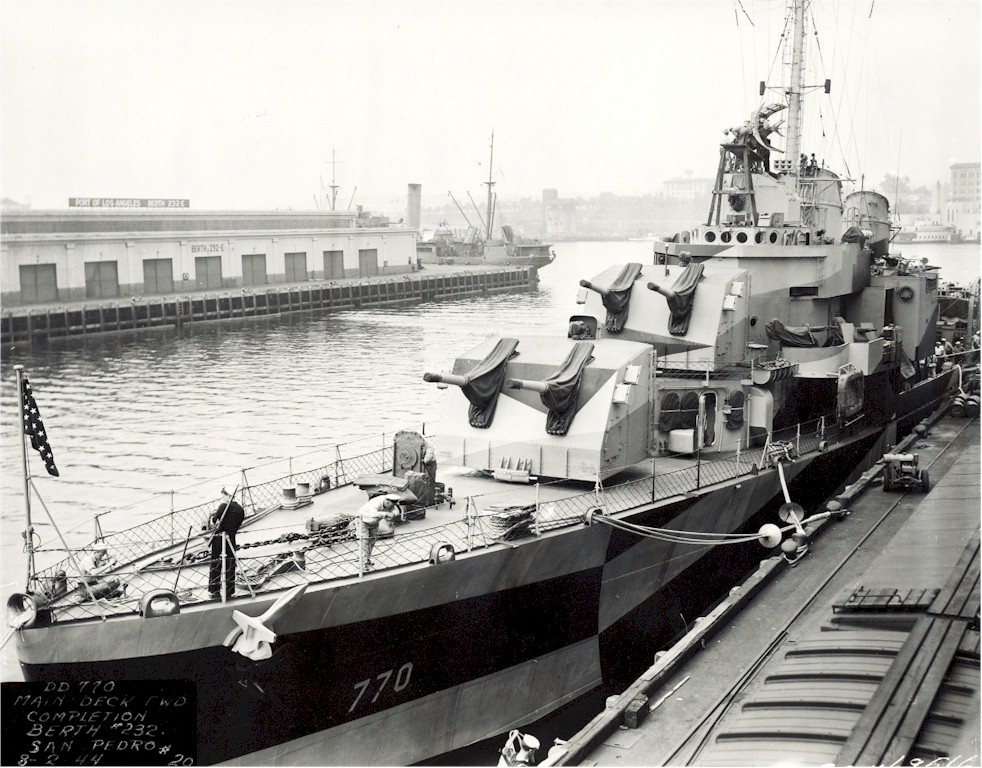
what is with the white plastic panels mounted on the left side of the 5" gun mounts & what thickness are they? do you know what mark the turret mounts are as the vertical face below the gun barrels seems to tall for a mark 38?
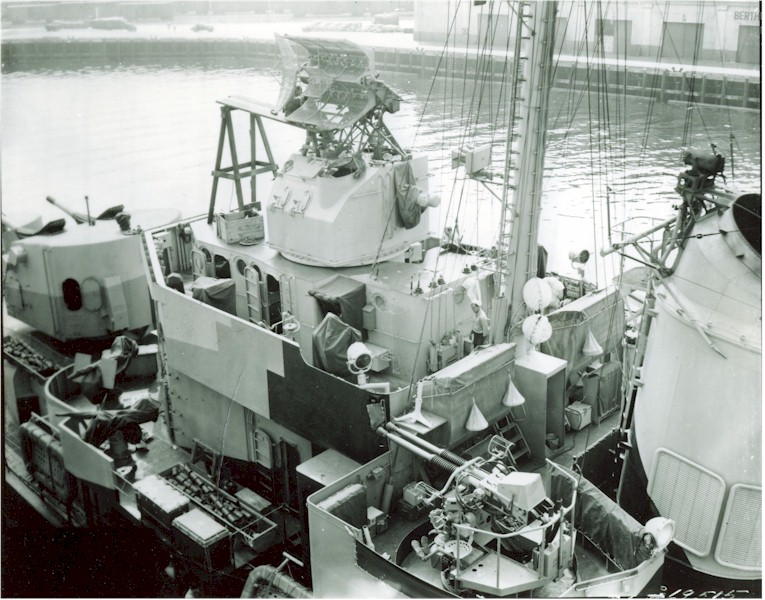
http://archive.hnsa.org/doc/guncat/cat-0460.htm
http://www.navsource.org/archives/05/pix1/0577033.jpg
your mark 37 director seems to be riding high from the deck. http://www.navsource.org/archives/05/pix1/0577022.jpg
http://www.navsource.org/archives/05/770.htm


The panels on the left side of the 5'' gun mounts your refer are clearly visible on Uss Lowry and some other ship of the same class but i simply ignore the purpose of this feature or the real thicknes of the plate, some photos have these pop up clearly and in others are barely visible (see photo below). At firts, in my build I opted for a 0.25mm thick plastic sheet but i planned a later replacement to 0.13 mm thick plate, perhaps more "in scale".
The vertical plate under the gun barrels was simply too high caused by the wrong shape of the original resin piece. I noticed the same thing while adding the four plastic strip under the guns but at this stage i have too chose by reshape all the turrets or live with that mistake in place. I choose the latter, being aware that even the hull is 4mm too short I decided to adding as mach detail as possible working on that scale but not to dramatically change the shape of any major component of this model, so I had to live with that.
I didn't notice the director sitting to high but reducing the ring on the pilot house's roof can be rather simply to do.
Thank you David for your interest and your very keen eye. Cheers!

Alessandro


Attachments:
11083313bis.jpg
11083313bis.jpg [ 76.72 KiB | Viewed 1749 times ]
0577212bis.jpg
0577212bis.jpg [ 33.56 KiB | Viewed 1749 times ]

_________________
Don't waste your time or time will waste you
Report this post
Top
 Profile  
Reply with quote  
PostPosted: Mon Oct 17, 2022 1:15 pm 
Offline

Joined: Mon Apr 17, 2017 2:43 am
Posts: 196
Wow! :cool_2:

_________________
http://www.3xblackcats.wordpress.com


Report this post
Top
 Profile  
Reply with quote  
PostPosted: Sat Oct 22, 2022 12:58 pm 
Offline

Joined: Wed Jan 02, 2013 1:15 am
Posts: 5012
Indeed the twin mounts for the destroyers are considerably different in shape and detail from the Battleship ones. Note that vertical ladders are used instead of rungs on the thin plate and the entry hatches more approximate a W/T door type closure than aa flush armored type, at the front bottom is a training buffer and the side plate acts a little bit as a skirt on the sides. The biggest difference being of course the noted profile of the front sloping. Some incorporated external reinforcements though I don't know this was an add on or part of the original design at some point.

A bit fascinated by the presence of a urinal on one of the weather decks near the bridge?

Enjoy your project! Regards: Tom


Report this post
Top
 Profile  
Reply with quote  
PostPosted: Mon Oct 24, 2022 5:28 pm 
Offline
User avatar

Joined: Fri Sep 13, 2013 11:19 pm
Posts: 57
Location: Livorno, Italy
Last days i studied us navy 5-inch twin naval gun turrets and i came to the conclusion that tehnoart used an mk 28 design instead of the more appropriate mk 38 mounted os Sumner/Gearing class destroyers, so my only reasonable option was to order the correct design produced by model monkey in 1/192 scale.
At this stage i finished building the hull by adding last small bitts/details then it was time for priming (one of my favourites modelling stage...). First of hall the hull was washed with a brush and soapy water/tap water, then metal parts where spayed with a coat of Mr. Metal Primer (Mr. Hobby) thinned with Mr. Color Leveling Thinner. Later I airbrushed my pre-thinned Mr Surfacer 1200. To help get a smoth finish two steps were crucial. One: when the primer is dry to the touch I gerally spray all the surface with pure lacquer thinner (again Mr. color thinner...), this reduced a lot areas of primer affected by orange peel texture and provided an uniform, sligtly satin, finish that help to highligth even the smallest mistakes on the surface. Two: with the help of 1000 grit sandpaper (heavy work), 1500 grit abrasive sponge (light/finishing work), and epoxy putty I take care of the surface imperfections.
Later the hull will be respayed only in area where primer was damaged but that's a story for next time update! Cheers.

Alessandro


Attachments:
File comment: How to bent a small handweel to a more 3D appearance with a pencil eraser
IMG_20221015_191859.jpg
IMG_20221015_191859.jpg [ 80.12 KiB | Viewed 1560 times ]
File comment: Press the handweel against into the eraser with the point of a file or something small with a blunt nose
IMG_20221015_191921.jpg
IMG_20221015_191921.jpg [ 48.97 KiB | Viewed 1560 times ]
IMG_20221015_132959.jpg
IMG_20221015_132959.jpg [ 28.1 KiB | Viewed 1560 times ]
File comment: last hull details
IMG_20221022_212229.jpg
IMG_20221022_212229.jpg [ 39.87 KiB | Viewed 1560 times ]
IMG_20221022_212254_1.jpg
IMG_20221022_212254_1.jpg [ 45.41 KiB | Viewed 1560 times ]
IMG_20221022_212247_1.jpg
IMG_20221022_212247_1.jpg [ 35.29 KiB | Viewed 1560 times ]
IMG_20221022_212444_1.jpg
IMG_20221022_212444_1.jpg [ 40.41 KiB | Viewed 1560 times ]
File comment: washing stage
IMG_20221023_120337.jpg
IMG_20221023_120337.jpg [ 62.36 KiB | Viewed 1560 times ]
File comment: After first layer of primer.
IMG_20221023_222149.jpg
IMG_20221023_222149.jpg [ 40.09 KiB | Viewed 1560 times ]

_________________
Don't waste your time or time will waste you
Report this post
Top
 Profile  
Reply with quote  
PostPosted: Wed Oct 26, 2022 1:27 am 
Offline

Joined: Mon Apr 17, 2017 2:43 am
Posts: 196
Wow, the primed model looks great! Thanks for sharing your PE bending and priming tips. Top notch :cool_2:

_________________
http://www.3xblackcats.wordpress.com


Report this post
Top
 Profile  
Reply with quote  
PostPosted: Wed Oct 26, 2022 2:19 am 
Offline

Joined: Wed Jan 02, 2013 1:15 am
Posts: 5012
Nice work, especially the paint preparation. Brass is very good to work with when appropriate, especially for bulwarks etc. I scratch built two larger ships in 1:192, Missouri and Alaska and enjoyed the scale. Since I got into my own 3D work many parts have been upgraded. It's a good thing to have in the quiver, though not a universal solution.

Bets regards: Tom


Report this post
Top
 Profile  
Reply with quote  
PostPosted: Wed Oct 26, 2022 5:54 pm 
Offline
User avatar

Joined: Fri Sep 13, 2013 11:19 pm
Posts: 57
Location: Livorno, Italy
After fixing the inevitable small ( and no so small...) mistakes, hull was re-primed with a lighter coat of Mr Surfacer and then resprayed with pure lacquer thinner to eliminate orange peel or overspray effect of paint surface. Note the slightly shine effect of the finish.
Now it's time to work on hull and superstructure by adding and cecking connection points of various fittings...Cheers!

Alessandro


Attachments:
IMG_20221026_175705.jpg
IMG_20221026_175705.jpg [ 37.76 KiB | Viewed 1466 times ]
IMG_20221026_181006.jpg
IMG_20221026_181006.jpg [ 42.1 KiB | Viewed 1466 times ]
IMG_20221026_181057.jpg
IMG_20221026_181057.jpg [ 63.06 KiB | Viewed 1466 times ]
IMG_20221026_181449.jpg
IMG_20221026_181449.jpg [ 67.96 KiB | Viewed 1466 times ]
IMG_20221026_175757_1.jpg
IMG_20221026_175757_1.jpg [ 41.64 KiB | Viewed 1466 times ]
File comment: The two airbrush type choose to paint this model: tamiya for large covers, iwata for smaller work.
IMG_20221026_181243.jpg
IMG_20221026_181243.jpg [ 95.91 KiB | Viewed 1466 times ]
File comment: connection point for cable reels
IMG_20221026_224330.jpg
IMG_20221026_224330.jpg [ 62.83 KiB | Viewed 1466 times ]
IMG_20221026_224359_1.jpg
IMG_20221026_224359_1.jpg [ 49.08 KiB | Viewed 1466 times ]

_________________
Don't waste your time or time will waste you
Report this post
Top
 Profile  
Reply with quote  
PostPosted: Fri Nov 25, 2022 1:11 pm 
Offline
User avatar

Joined: Fri Sep 13, 2013 11:19 pm
Posts: 57
Location: Livorno, Italy
This time I'm focused on adding more details on superstructure. Next step will'be on priming this piece and start working on funnels, mast and other structures. Armament and other small fittings will be added later. Saluti!

Alessandro


Attachments:
IMG_20221124_215859.jpg
IMG_20221124_215859.jpg [ 42.16 KiB | Viewed 1237 times ]
IMG_20221124_221911.jpg
IMG_20221124_221911.jpg [ 49.83 KiB | Viewed 1237 times ]
IMG_20221124_222148.jpg
IMG_20221124_222148.jpg [ 55.71 KiB | Viewed 1237 times ]
IMG_20221124_222100.jpg
IMG_20221124_222100.jpg [ 45.44 KiB | Viewed 1237 times ]
IMG_20221124_221706.jpg
IMG_20221124_221706.jpg [ 47.66 KiB | Viewed 1237 times ]
IMG_20221124_221753.jpg
IMG_20221124_221753.jpg [ 55.77 KiB | Viewed 1237 times ]
IMG_20221124_221832.jpg
IMG_20221124_221832.jpg [ 62.06 KiB | Viewed 1237 times ]
IMG_20221124_221309.jpg
IMG_20221124_221309.jpg [ 49.75 KiB | Viewed 1237 times ]
IMG_20221124_221240.jpg
IMG_20221124_221240.jpg [ 32.65 KiB | Viewed 1237 times ]

_________________
Don't waste your time or time will waste you
Report this post
Top
 Profile  
Reply with quote  
PostPosted: Wed Nov 30, 2022 9:18 pm 
Offline

Joined: Tue Jul 28, 2009 1:47 pm
Posts: 336
Location: Texas
Beautiful job! I also have a Tehnoart 1/192 Dehaven. I trying to decide whether I will model the Dehaven or another ship...

_________________
Completed: Trumpeter 1/200 USS Arizona
Current Project: Trumpeter1/200 scale HMS Hood
Future Project: TBD


Report this post
Top
 Profile  
Reply with quote  
PostPosted: Wed Dec 07, 2022 7:25 pm 
Offline
User avatar

Joined: Fri Sep 13, 2013 11:19 pm
Posts: 57
Location: Livorno, Italy
After having painted lower hull section, masked it and primed superstructure i started to work on funnels and oerlikons support structure, detailing the inner walls and making from scratch support pillars and other small details. Now it's time to think on painting decks and upper hull. That's all for now...cheers!

Alesandro


Attachments:
IMG_20221207_191750.jpg
IMG_20221207_191750.jpg [ 50.53 KiB | Viewed 1054 times ]
IMG_20221207_192036_1.jpg
IMG_20221207_192036_1.jpg [ 59.01 KiB | Viewed 1054 times ]
IMG_20221208_001048.jpg
IMG_20221208_001048.jpg [ 80.55 KiB | Viewed 1054 times ]
IMG_20221207_192015_1.jpg
IMG_20221207_192015_1.jpg [ 61.86 KiB | Viewed 1054 times ]
IMG_20221207_192440_1.jpg
IMG_20221207_192440_1.jpg [ 67.68 KiB | Viewed 1054 times ]
IMG_20221207_191951.jpg
IMG_20221207_191951.jpg [ 55.21 KiB | Viewed 1054 times ]

_________________
Don't waste your time or time will waste you
Report this post
Top
 Profile  
Reply with quote  
PostPosted: Sun Dec 18, 2022 6:04 pm 
Offline
User avatar

Joined: Fri Sep 13, 2013 11:19 pm
Posts: 57
Location: Livorno, Italy
Finally some paint is on...at least on hull. Next days i try to camouflage the main superstructure which at the moment had only painted orizontal surfaces and haze gray portion. Cheers!

Alessandro


Attachments:
IMG_20221210_121009.jpg
IMG_20221210_121009.jpg [ 94.22 KiB | Viewed 927 times ]
IMG_20221218_231413.jpg
IMG_20221218_231413.jpg [ 58.32 KiB | Viewed 927 times ]
IMG_20221218_231646.jpg
IMG_20221218_231646.jpg [ 39.17 KiB | Viewed 927 times ]
IMG_20221218_231707.jpg
IMG_20221218_231707.jpg [ 44.43 KiB | Viewed 927 times ]
IMG_20221218_231544.jpg
IMG_20221218_231544.jpg [ 51.87 KiB | Viewed 927 times ]
IMG_20221218_231720.jpg
IMG_20221218_231720.jpg [ 50.63 KiB | Viewed 926 times ]

_________________
Don't waste your time or time will waste you
Report this post
Top
 Profile  
Reply with quote  
PostPosted: Tue Dec 20, 2022 2:47 pm 
Offline
User avatar

Joined: Sun Mar 13, 2005 11:51 am
Posts: 2407
Location: Belgium
Great Paint job! Coming together nicely, very crisp build. :thumbs_up_1:

_________________
The merchant shipyard


Report this post
Top
 Profile  
Reply with quote  
PostPosted: Wed Dec 21, 2022 12:40 pm 
Offline

Joined: Tue Feb 06, 2007 10:24 am
Posts: 2498
Location: Belgium
Beautiful work! Excellent construction and detailing, and very neat paint work. :thumbs_up_1: :thumbs_up_1: :thumbs_up_1:
Will you be adding any weathering?


Report this post
Top
 Profile  
Reply with quote  
Display posts from previous:  Sort by  
Post new topic Reply to topic  [ 24 posts ]  Go to page 1, 2  Next

All times are UTC - 6 hours [ DST ]


Who is online

Users browsing this forum: Bing [Bot], Joachim and 90 guests


You can post new topics in this forum
You can reply to topics in this forum
You cannot edit your posts in this forum
You cannot delete your posts in this forum
You cannot post attachments in this forum

Jump to:  
Powered by phpBB® Forum Software © phpBB Group