The Ship Model Forum

The Ship Modelers Source
It is currently Tue Jun 24, 2025 4:39 pm

All times are UTC - 6 hours [ DST ]


Post new topic Reply to topic  [ 39 posts ]  Go to page 1, 2  Next
Author Message
PostPosted: Sun Jun 23, 2024 1:33 pm 
Offline
User avatar

Joined: Sun Jan 17, 2021 3:33 am
Posts: 91
Greetings! :wave_1:

A new (actually one of many started projects..) warship: 1/350 Trumpeter SMS Viribus Unitis.

I'll be honest, in primary school approx. 25 years ago, I was very shocked when I first read about the battleship Szent István in an informative newspaper. It was shocking because, as most of you know, Hungary has no coast, no fleet, and as a child I was just amazed that there used to be a warship named by a Hungarian king, because very few people here know about this things... (Actually, the country never had a coastline, whatever the nationalists also say, as a country of the Hungarian Crown, Croatia was the only one, or if we look at the bigger picture, then the Habsburg Empire, and even the empire of Louis the Great did not have 3 seas as the legends says... but, there was the port of Fiume, so... ehh).

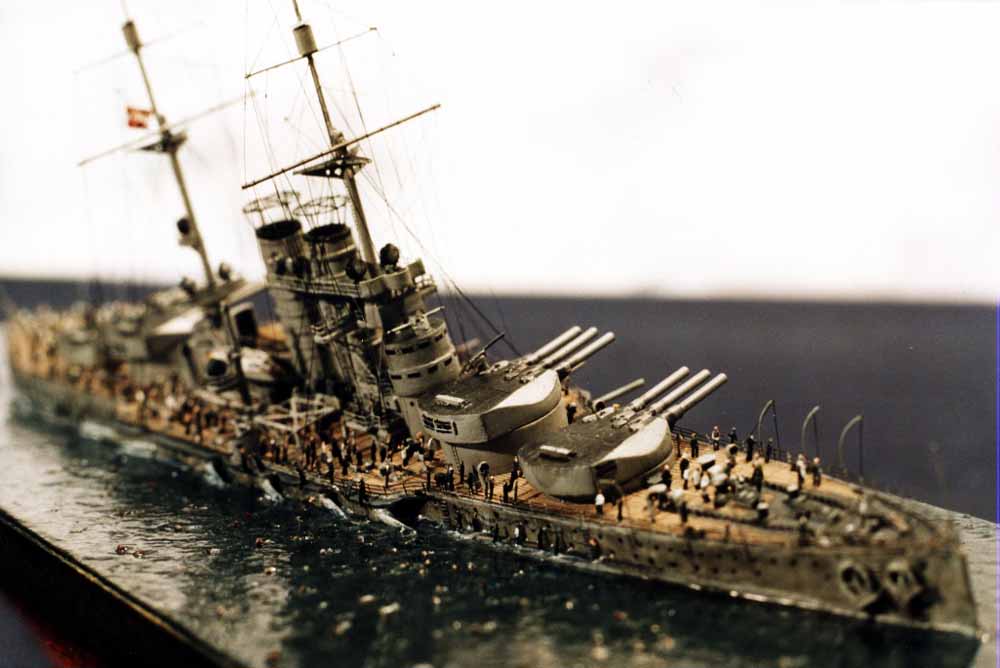
The point is that after I saw the first pictures and drawings, I immediately fell in love with the shape of the ships, sleek superstructure, symmetrical appearance, and the triple gun turrets: they are simply beautiful! Sorry, but now look at how a turret of an English or German dreadnought compares to these, Skoda never produced anything more beautiful than these...

When Trumpeter released the Viribus Unitis and Szent István I immediately bought both of them, along with Master Model and Eduard sets. I am very lucky because I also have two very great books, Friedrich Prasky's "Die Tegetthoff-Klasse" and another picture book published under the same title from 1981, with lots of very useful and beautiful archive photos + Prasky's blueprints :cool_1: .

I started with the Viribus Unitis because of the great resources. Based on the drawings and pictures, I have already replaced a few things on the hull: the eaves above the windows, or e.g. those pair of fans on the side of the ship. On board, after I saw that there was also a discourse about this, I sealed all the small joints of the decking as a test, and then scratched again to make the excess disappear. Before gluing the deck, I created the balcony of the admiral's salon. There is a good picture of the museum model showing an armchair and a small flower. I also put a couple of windows and doors on the wall. After final assembly, nothing will be visible from this either, but I like to have fun with such things :D
I put on the gun turrets what Eduard offered, but then a few more small things need to be add.

That's it for now, I'll show you the results when I have them!


Attachments:
1.jpg
1.jpg [ 221.35 KiB | Viewed 2938 times ]
2.jpg
2.jpg [ 373.41 KiB | Viewed 2938 times ]
3.jpg
3.jpg [ 116.07 KiB | Viewed 2938 times ]
4.jpg
4.jpg [ 403.6 KiB | Viewed 2938 times ]
5.jpg
5.jpg [ 180.91 KiB | Viewed 2938 times ]
Report this post
Top
 Profile  
Reply with quote  
PostPosted: Sun Jun 23, 2024 3:39 pm 
Offline

Joined: Tue Apr 10, 2018 9:28 am
Posts: 187
Location: Cincinnati
This is looking exciting! Will be following along :thumbs_up_1:

_________________
In the shipyard - Trumpeter 1/350 USS Kitty Hawk


Report this post
Top
 Profile  
Reply with quote  
PostPosted: Sat Jun 29, 2024 9:57 am 
Offline
User avatar

Joined: Sun Jan 17, 2021 3:33 am
Posts: 91
Hi!

My basic idea is that the ship will be anchored in Pola, so most deck hatches will be open. The first two openings seemed so large that the observer could easily see into the empty hull, so I thought I would add at least 1 deck where needed. This small piece was made based on the drawings and the 1:50 scale model. When I tried it on, however, it turned out that not so much will be visible, so placing many more details after painting will not make sense. I will also install the stairs once the post office finally brings them...


Attachments:
1.jpg
1.jpg [ 165.77 KiB | Viewed 2831 times ]
IMG_20240629_162824.jpg
IMG_20240629_162824.jpg [ 150.25 KiB | Viewed 2831 times ]
IMG_20240629_163116.jpg
IMG_20240629_163116.jpg [ 79.16 KiB | Viewed 2831 times ]
IMG_20240629_163240.jpg
IMG_20240629_163240.jpg [ 111.42 KiB | Viewed 2831 times ]
Report this post
Top
 Profile  
Reply with quote  
PostPosted: Sun Jun 30, 2024 1:37 am 
Offline

Joined: Mon Apr 17, 2017 2:43 am
Posts: 300
Excellent work and research! many lovely details such as the admiral's salon. Are you going to recreate those complex window frames too? :big_grin: well done with sealing those plank gaps. Looking forward to the next update :cool_2:

_________________
http://www.3xblackcats.wordpress.com


Report this post
Top
 Profile  
Reply with quote  
PostPosted: Tue Jul 02, 2024 1:50 pm 
Offline
User avatar

Joined: Sun Jan 17, 2021 3:33 am
Posts: 91
SG1! Fortunately, there will be no problem with the windows, because Trumpeter provides the window frames as etching :cool_1:

In the meantime, I cut out almost every hatch on the deck. What remained closed I found closed in most of the pictures.

Not all hatches need stairs, and there are places where 1-1 ventilation shafts lead down into the hull (the last and the very first hatches are just like that). I also made the side walls of these, so if someone looks in from the side, they can see this as well.

I made another larger section in the stern, under the deck, but not more, because in the various photos of the ships the hatches are fully opened here, and there are openings around the gun turrets that are only a crack open, so nobody even see anything under them.


Attachments:
1.jpg
1.jpg [ 434.07 KiB | Viewed 2714 times ]
2.jpg
2.jpg [ 404.33 KiB | Viewed 2714 times ]
3.jpg
3.jpg [ 667.6 KiB | Viewed 2714 times ]
Report this post
Top
 Profile  
Reply with quote  
PostPosted: Sat Jul 06, 2024 8:33 am 
Offline
User avatar

Joined: Mon Jan 10, 2005 5:30 pm
Posts: 5568
Location: Nr Southampton England
EXCELLENT !! I look forwards to seeing more images and following with interest!

useful link...

http://www.viribusunitis.ca/gallery-vu3d.html

useful book by the same artist
https://www.super-hobby.co.uk/products/ ... eship.html

Attachment:
8314_rd.jpg
8314_rd.jpg [ 83.17 KiB | Viewed 2626 times ]


Beware of Italian Torpdeo boats.... look what happened to her sister.... !


Image

_________________
....I buy them at three times the speed I build 'em.... will I live long enough to empty my stash...?
http://www.modelshipgallery.com/gallery ... index.html

IPMS UK SIG (special interest group) www.finewaterline.com


Report this post
Top
 Profile  
Reply with quote  
PostPosted: Sat Jul 06, 2024 12:05 pm 
Offline

Joined: Tue Oct 23, 2018 2:00 pm
Posts: 616
JIM BAUMANN wrote:

Beware of Italian Torpedo boats.... look what happened to her sister.... !

Image


Be even more wary of Italian Manned Torpedoes / Frogmen in Pola Harbour. Look what happened to Viribus Unitis herself!


Lovely work by the way Sszabi, looking forward to further updates. Such an unusual subject, great to see her available as a plastic kit. Along with Szent István.


Report this post
Top
 Profile  
Reply with quote  
PostPosted: Sun Jul 07, 2024 10:42 am 
Offline
User avatar

Joined: Sun Jan 17, 2021 3:33 am
Posts: 91
Thank you gentlemen, I will try to be as precise as I can :thumbs_up_1:

The last few days looking at the photos, and I realized that not just the hatches on the deck were open, but some or almost all of the larger windows on the stern were also open. I didn't open all of them, (because I’m lazy...) I drilled and carved a couple of windows to make them square. For the opening, I cut window frames from the Eduard ladder PE set and made the cover from a thin plastic sheet. I drilled the location of the windows on the covers. Loooong sooo looong work…


Attachments:
1.jpg
1.jpg [ 145.86 KiB | Viewed 2549 times ]
2.jpg
2.jpg [ 355.93 KiB | Viewed 2549 times ]
Report this post
Top
 Profile  
Reply with quote  
PostPosted: Sun Sep 22, 2024 1:48 pm 
Offline
User avatar

Joined: Sun Jan 17, 2021 3:33 am
Posts: 91
Hello!

Lately, there have been no spectacular results: I glued the deck in place, sealed the gaps, then sealed a little, and then a little more to seal some more...

I detailed the bow a bit. Based on pictures and the Prasky blueprint, missing elements were added: rings, fasteners used to fix the anchor chain or other things on board. I tried to bend these rings as finely as possible, this was the thinnest copper wire I could loop around the smallest drill bit...

I did not try to replace the anti-slip plates with copper etching, based on the photos, the pattern is so small that any similar sheet placed on the model would be overscale.

Before priming, I try to glue as much as possible to the hull (although it is more vulnerable this way).


Attachments:
1.jpg
1.jpg [ 159.59 KiB | Viewed 2203 times ]
2.jpg
2.jpg [ 975.48 KiB | Viewed 2203 times ]
Report this post
Top
 Profile  
Reply with quote  
PostPosted: Tue Sep 24, 2024 9:22 am 
Offline
User avatar

Joined: Thu Jun 23, 2005 3:47 pm
Posts: 436
This will be another excellent and inspiring build, after such a great start I´m keen on your further progress!

_________________
AKA "Doc Bear" (a bear of very little brain ...)
VMF'06 - German Gamblers
Veritable Modelling Friends 2006, Germany


Report this post
Top
 Profile  
Reply with quote  
PostPosted: Tue Sep 24, 2024 11:10 am 
Offline

Joined: Tue Jan 11, 2005 10:56 am
Posts: 8817
Location: New York City
Great project, great attention to details.


Report this post
Top
 Profile  
Reply with quote  
PostPosted: Tue Sep 24, 2024 2:21 pm 
Offline
User avatar

Joined: Sun Oct 12, 2008 3:55 am
Posts: 613
Location: Budapest, Hungary
Your meticulous attention to detail is admirable!
Looking forward to updates.


Report this post
Top
 Profile  
Reply with quote  
PostPosted: Fri Oct 11, 2024 1:07 pm 
Offline
User avatar

Joined: Sun Jan 17, 2021 3:33 am
Posts: 91
Thank you gentlemen!

I didn't make much progress in the last few weeks: I glued the connectors of the rods holding the torpedo protection nets and the pavements/sidewalks(?) of the torpedo protection net from the Eduard set, which unfortunately did not match the hull everywhere. There are places where it separated so much that I had to cut it into pieces and glue the smaller part to it. After that, it was quite nerve-wracking to glue the braces of this sidewalk...

I looped the connectors of the support rods from thin wire. I don't know yet, how can I hook the rods into these, but I working on it.

I always find small things on the hull that need to be repaired, so it came up, e.g. that thin little rim that runs around the edges of the hull. I also solved this with stretched sprue. I'm slowly getting to the point where you can stick the little things from the Eduard set.


Attachments:
1.jpg
1.jpg [ 353.12 KiB | Viewed 1962 times ]
2.jpg
2.jpg [ 228.35 KiB | Viewed 1962 times ]
3.jpg
3.jpg [ 170 KiB | Viewed 1962 times ]
Report this post
Top
 Profile  
Reply with quote  
PostPosted: Fri Oct 11, 2024 2:45 pm 
Offline
User avatar

Joined: Mon Jan 10, 2005 5:30 pm
Posts: 5568
Location: Nr Southampton England
well done--its the nitty gritty detail that well make the end model shine

Keep persevering with your current tenacity-- on a complex ship ioke this you will the endurance !

but the Teggethof are fine ships! and worthy of your maximum effort--!

Best wishes
Jim Baumann :wave_1:

_________________
....I buy them at three times the speed I build 'em.... will I live long enough to empty my stash...?
http://www.modelshipgallery.com/gallery ... index.html

IPMS UK SIG (special interest group) www.finewaterline.com


Report this post
Top
 Profile  
Reply with quote  
PostPosted: Sat Oct 12, 2024 7:14 am 
Offline

Joined: Mon Apr 17, 2017 2:43 am
Posts: 300
Excellent progress and scratchbuilding! following with utmost interest :cool_2:

_________________
http://www.3xblackcats.wordpress.com


Report this post
Top
 Profile  
Reply with quote  
PostPosted: Mon Nov 04, 2024 1:35 pm 
Offline
User avatar

Joined: Sun Jan 17, 2021 3:33 am
Posts: 91
Thank you gentlemen! :smallsmile:

I didn't make much progress (in the meantime, my model railway is also being developed :cool_1: ), but I detailed the 2 anchors on the stern. Curved barriers have also been added around the secondary artillery, although they may be oversized, too high and thick compared to what you see in the pictures, but I haven't found a better solution now, I've run out of usable railing etchings... Plus I added a few missing parts.


Attachments:
1.jpg
1.jpg [ 108.74 KiB | Viewed 1745 times ]
2.jpg
2.jpg [ 211.29 KiB | Viewed 1745 times ]
3.jpg
3.jpg [ 155.32 KiB | Viewed 1745 times ]
Report this post
Top
 Profile  
Reply with quote  
PostPosted: Tue Nov 05, 2024 7:26 am 
Offline

Joined: Tue Apr 10, 2018 9:28 am
Posts: 187
Location: Cincinnati
You’re Excellent at capturing details of the ship and recreating them! Everything looks like it will draw people in to look closer and closer at what you have added.

_________________
In the shipyard - Trumpeter 1/350 USS Kitty Hawk


Report this post
Top
 Profile  
Reply with quote  
PostPosted: Fri Dec 13, 2024 2:47 pm 
Offline
User avatar

Joined: Sun Jan 17, 2021 3:33 am
Posts: 91
Hello! :wave_1:
Thanks Themongoose! I'll try to build what I can ;)

Recently I glued the small holders for the torpedo protection nets and the holders for the rods. There was a bit of a mess here, because the last 4-4 holders on the stern were too long, I had to cut them off. Also, this holders placement wasn't good either, they were placed according to the blueprint, so in theory it's accurate.

The Eduard etching isn't perfect, but I won't buy the Ship Yard Work set, I don't have the money for it (by the way, there are some pretty wild things in it that have nothing to do with reality..).

After that, I started assembling the “grid” that holds the boats above the deck. First, I simply glued the model parts together. I wasn't really happy with it... And because I has sick ideas, I started to bent a very thin sheet of metal and cut it to size to form the small beams, which I then glued to the superstructure and to each other with instant glue. Compared to the drawings, these turned out to be a little wider, but I didn't have a thinner, sharp-edged metal template for this operation. I decided to install the support columns only after the final installation, but that's still a long way off...


Attachments:
1.jpg
1.jpg [ 354.39 KiB | Viewed 1492 times ]
2.jpg
2.jpg [ 348.82 KiB | Viewed 1492 times ]
3.jpg
3.jpg [ 142.03 KiB | Viewed 1492 times ]
4.jpg
4.jpg [ 552.11 KiB | Viewed 1492 times ]
5.jpg
5.jpg [ 347.27 KiB | Viewed 1492 times ]
6.jpg
6.jpg [ 1.42 MiB | Viewed 1492 times ]
Report this post
Top
 Profile  
Reply with quote  
PostPosted: Sun Dec 15, 2024 6:45 am 
Offline

Joined: Mon Apr 17, 2017 2:43 am
Posts: 300
Excellent progress Sszabi! Very cool :cool_2:

_________________
http://www.3xblackcats.wordpress.com


Report this post
Top
 Profile  
Reply with quote  
PostPosted: Sat Dec 21, 2024 2:15 pm 
Offline
User avatar

Joined: Sun Jan 16, 2005 10:45 am
Posts: 150
Location: Pecs, Hungary
Keep up the good work! :thumbs_up_1:

_________________
Non sibi sed patriae


Report this post
Top
 Profile  
Reply with quote  
Display posts from previous:  Sort by  
Post new topic Reply to topic  [ 39 posts ]  Go to page 1, 2  Next

All times are UTC - 6 hours [ DST ]


Who is online

Users browsing this forum: Bing [Bot], TF17Greg and 16 guests


You can post new topics in this forum
You can reply to topics in this forum
You cannot edit your posts in this forum
You cannot delete your posts in this forum
You cannot post attachments in this forum

Jump to:  
Powered by phpBB® Forum Software © phpBB Group