1/700 Amagi diorama

Moderators: MartinJQuinn, JIM BAUMANN, Jon, Dan K

marijn van gils
Posts: 2686
Joined: Tue Feb 06, 2007 10:24 am
Location: Belgium

Re: 1/700 Amagi diorama

Post by marijn van gils »

Thanks Mike!

And in turn I'm enjoying learning a lot from the ship modelling side of the hobby myself too!
By the way, I feel you are one of the ship modelers that pays a lot of attention to painting too, and succeeds to get it to feel really in-scale. That has been very inspiring for me too!
Chris doesn't count, as he comes from armor modelling like me� :big_grin:

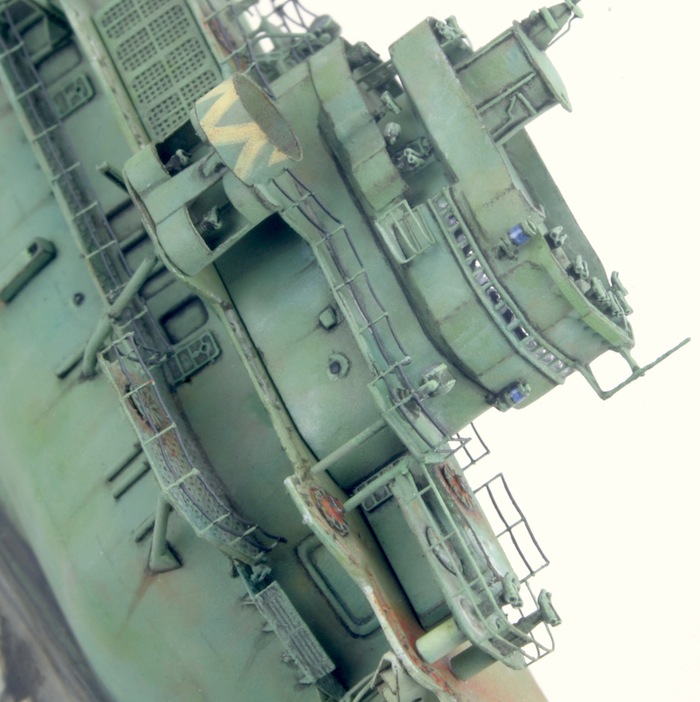
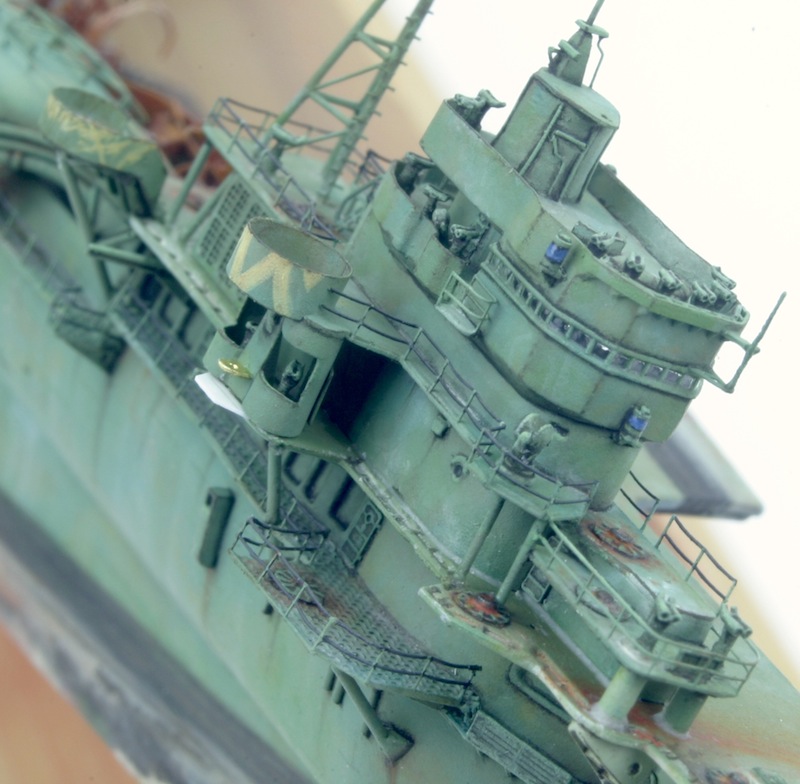
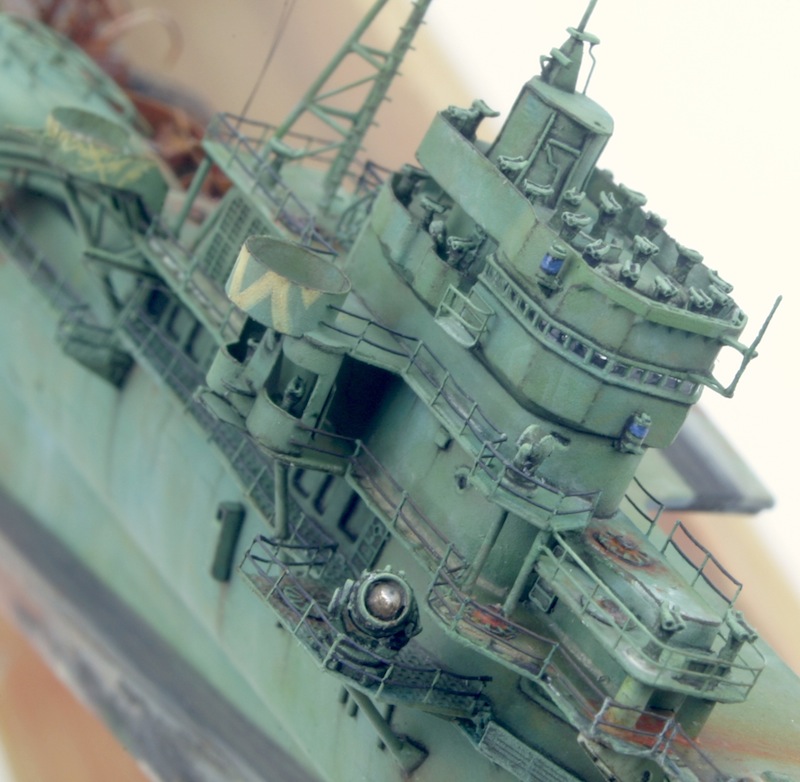
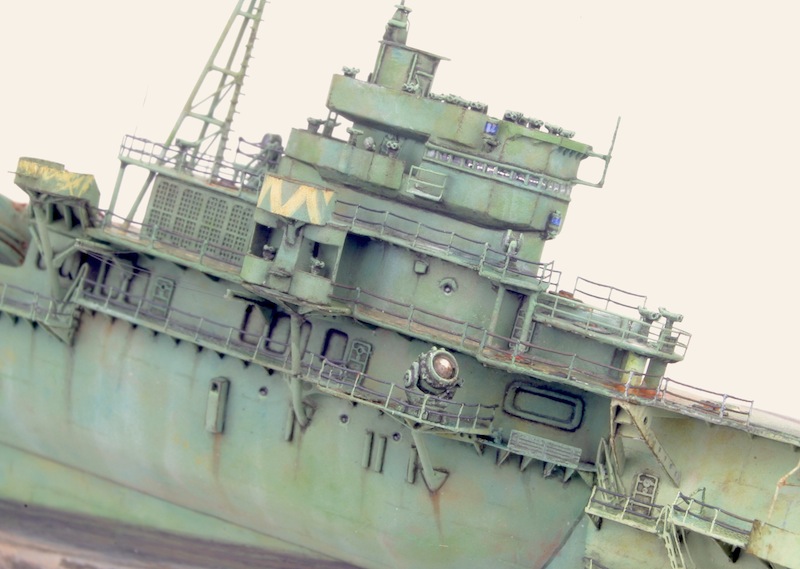
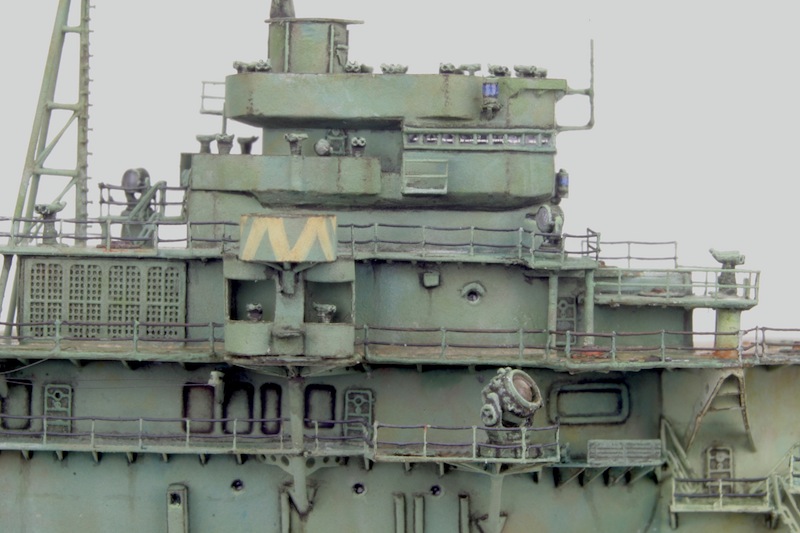
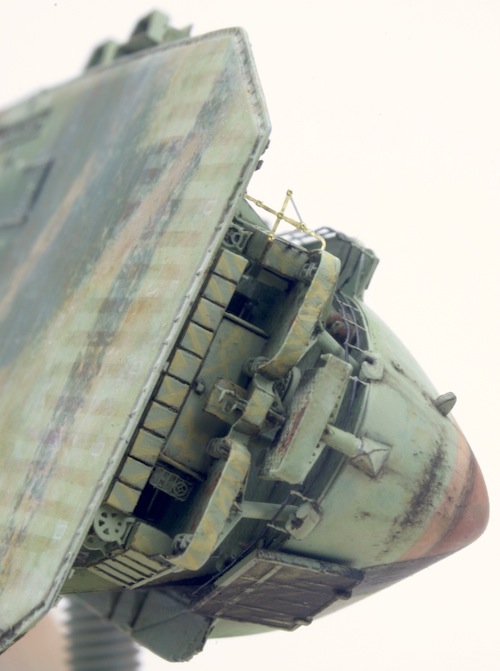
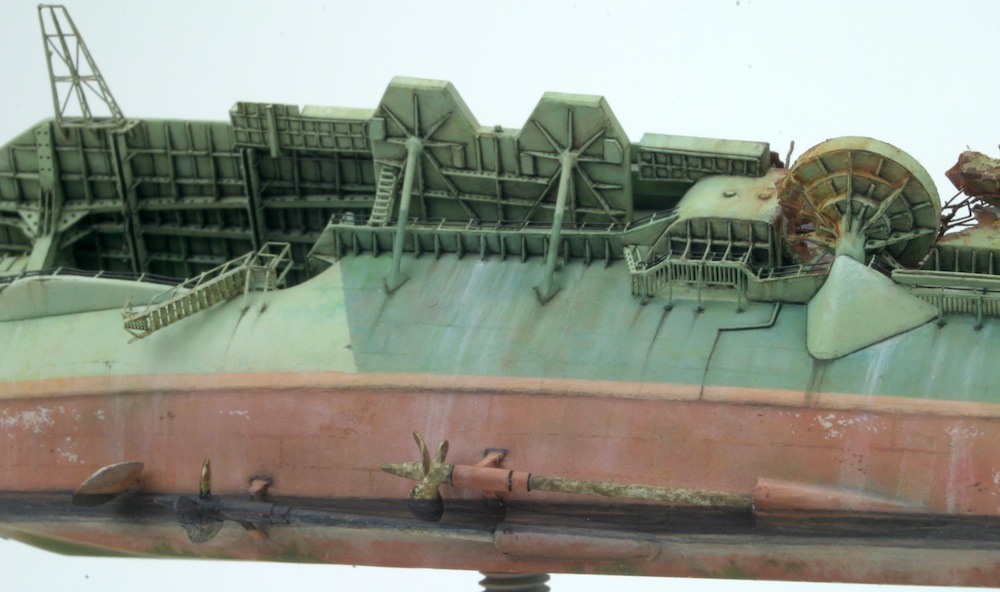
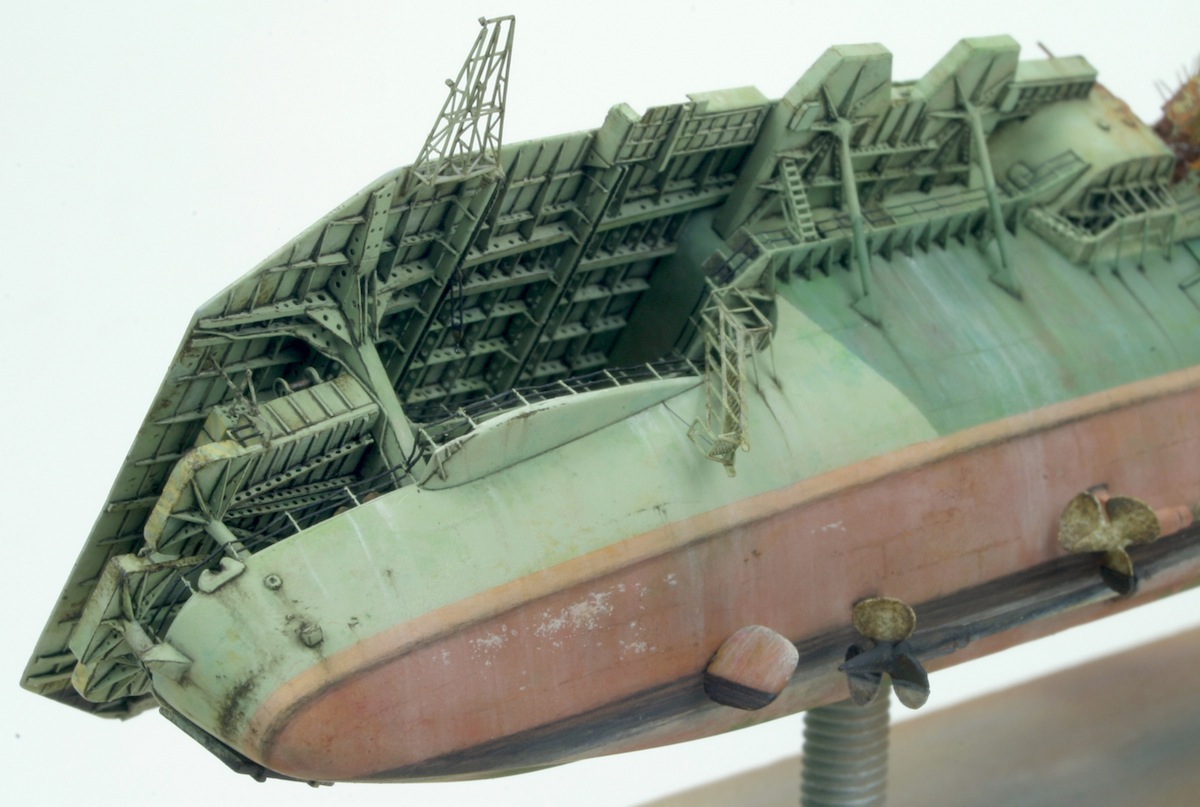
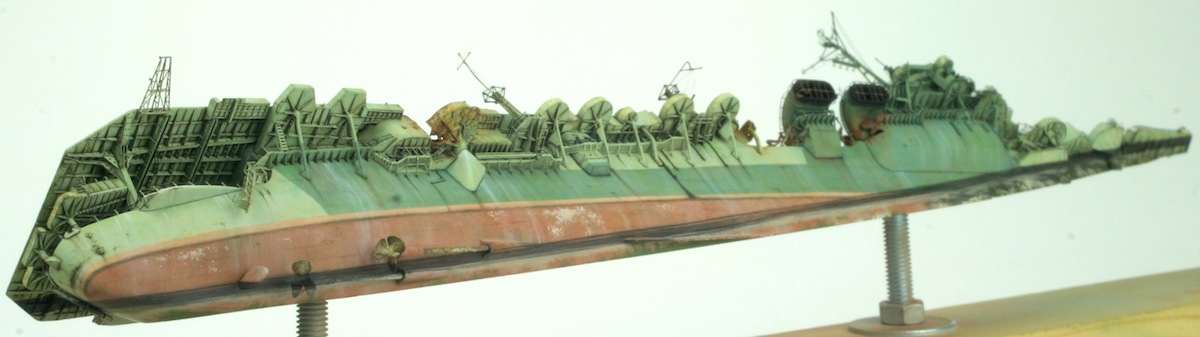
Meanwhile, I painted on some plating effect. Historic photos clearly show the individual steel plates to be quite visible on the hull, so I wanted to add this to the model too. I also like how it adds some sense of detail to otherwise large flat surfaces.

In 1/700 scale, I feel the effect needs to be subtle: visible when seen up close, but not jumping at you directly. This is why I prefer not to add it during construction (scribing panel lines or such), but merely paint it on.

It did this with the colour I used for shading (raw umber oil paint + black enamel) and a fine brush, using some tape as a guide only for the first lines to keep it strait. I thinned the paint very much in order to only produce very faint lines. They were blended further and/or softened even more with a brush moistened with clean White Spirit.

I still found I exaggerated in the area I started, so I reduced the effect by overpainting a lot of the lines with the base green. I ended up liking the feel of this, so I decided to overpaint with the green on the rest of the hull too.

After that, I added a couple of smaller chips here and there by brush, and some more dirty vertical streaking.

Image

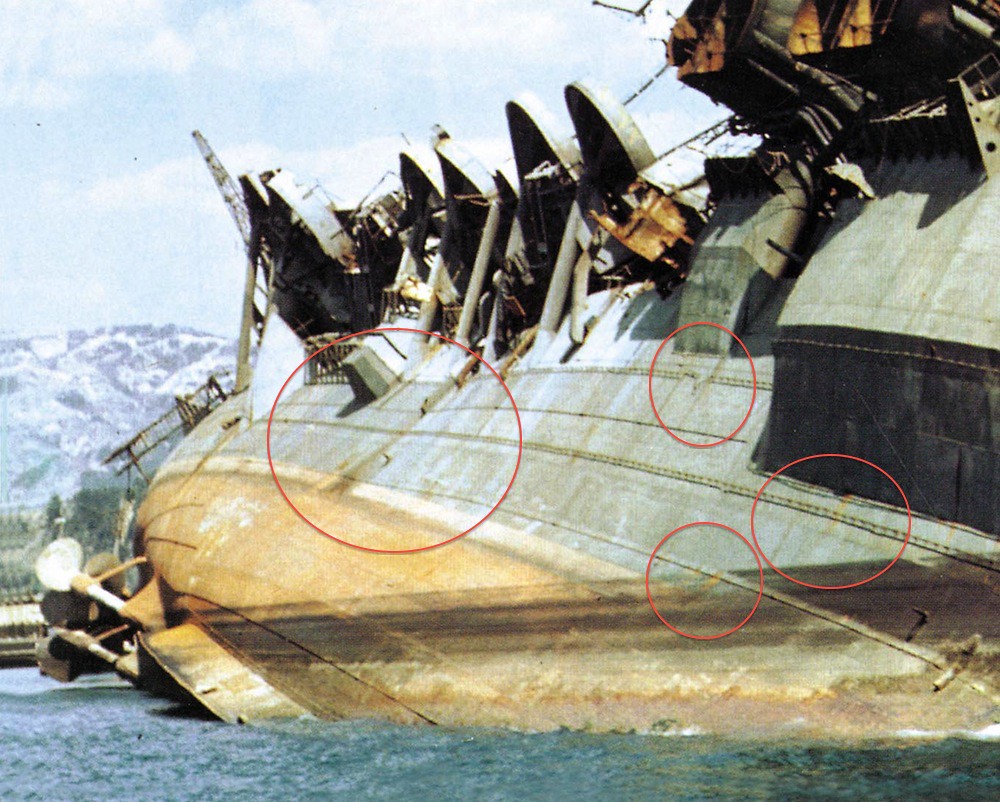
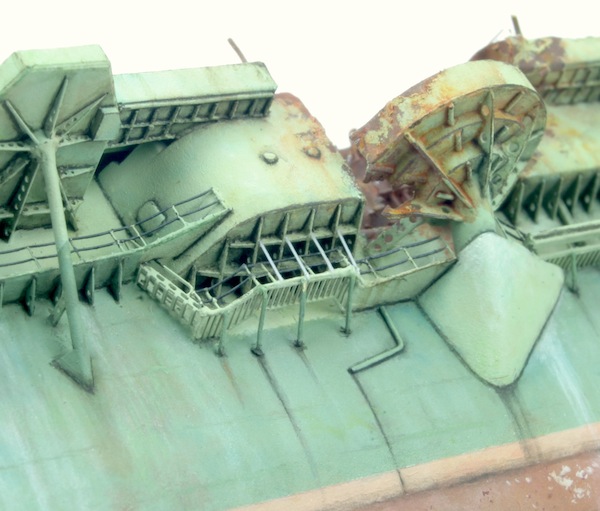
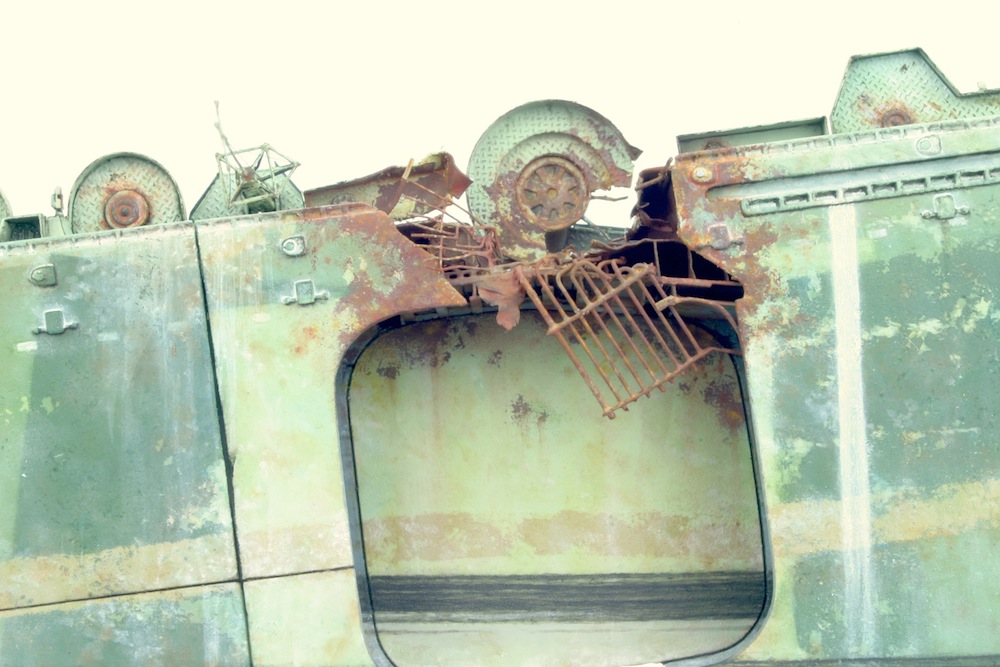
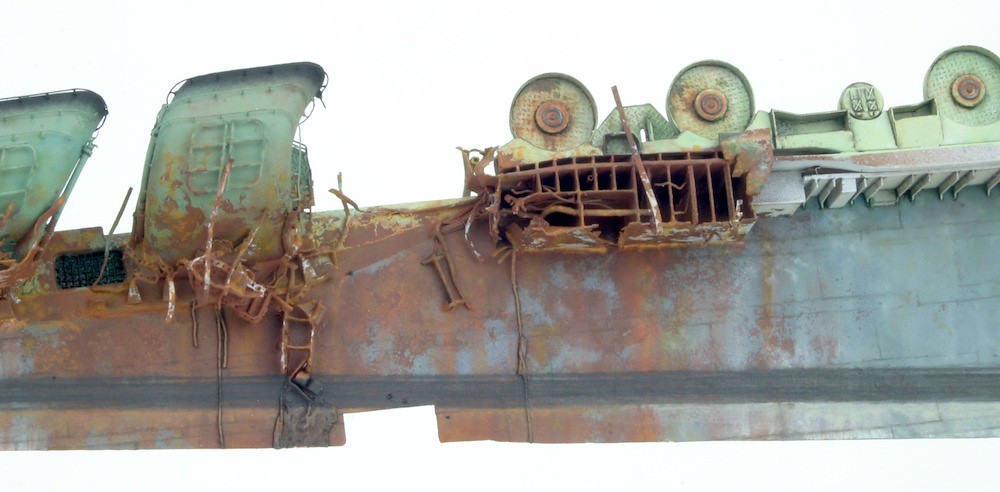
Historic photos show quite a lot of abrasion/chipping at the stern, in an area right above the waterline, so this was added by brush too:
Image

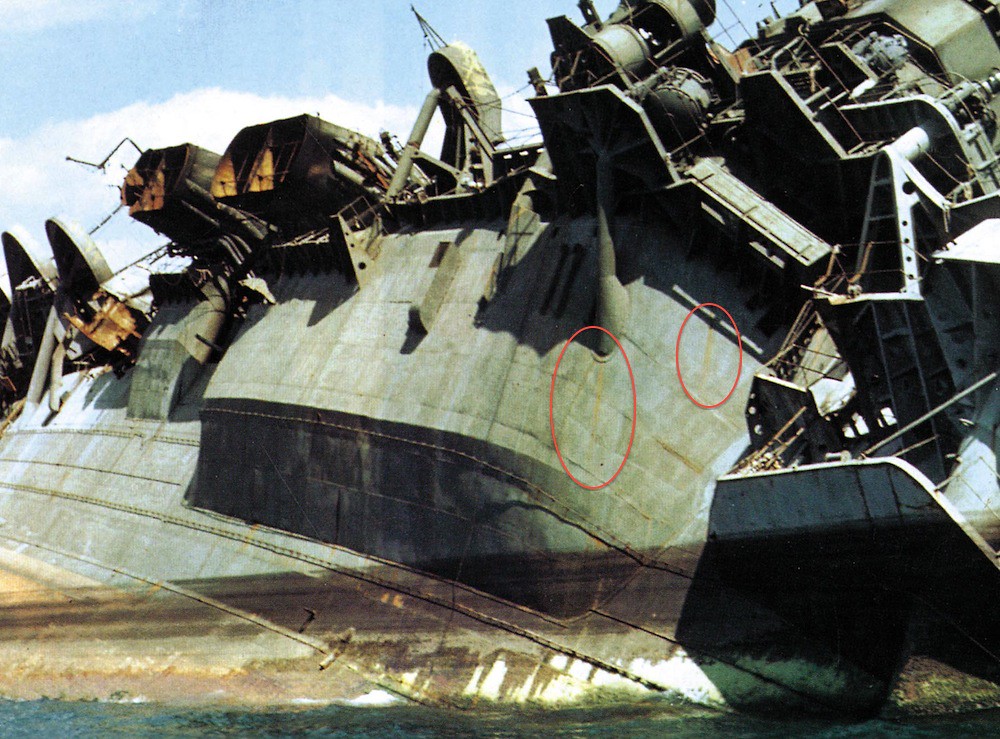
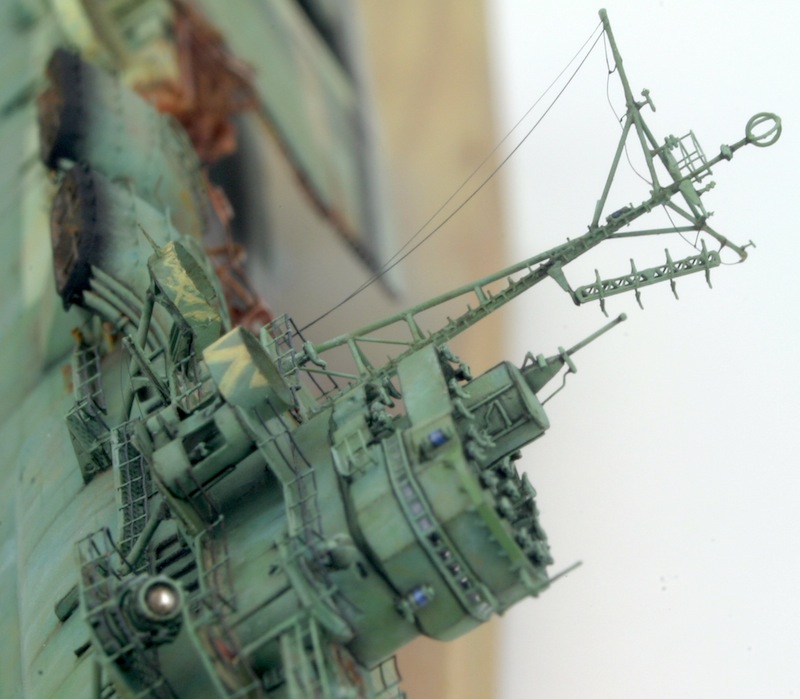
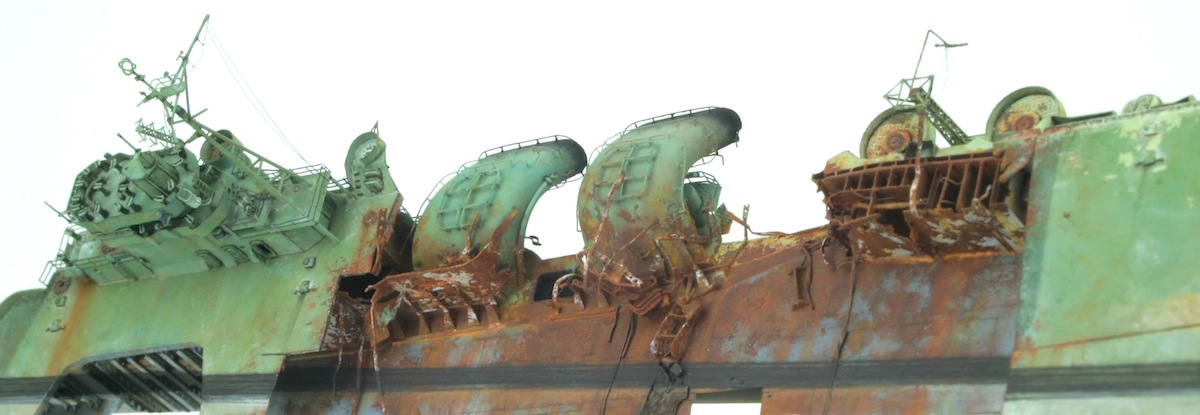
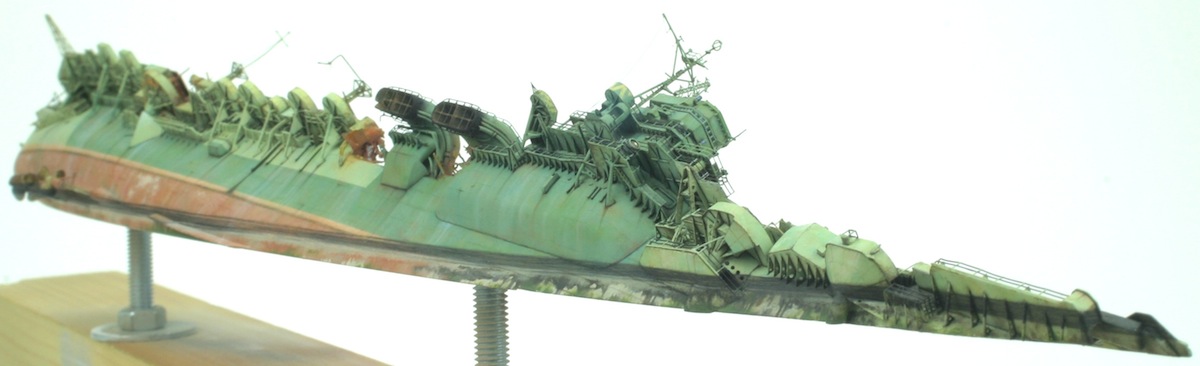
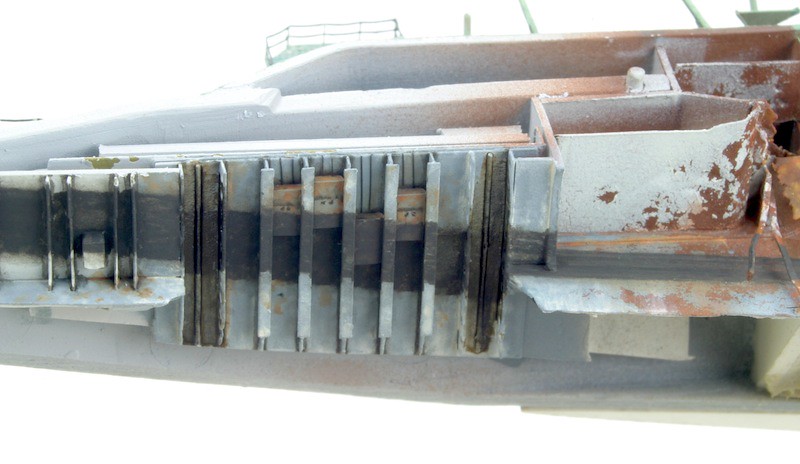
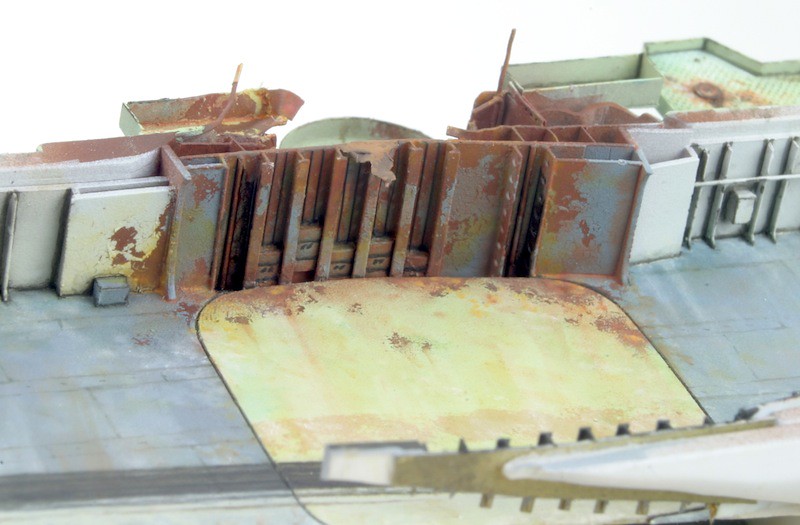
Also some of the AA platform supports received some plating detail:
Image

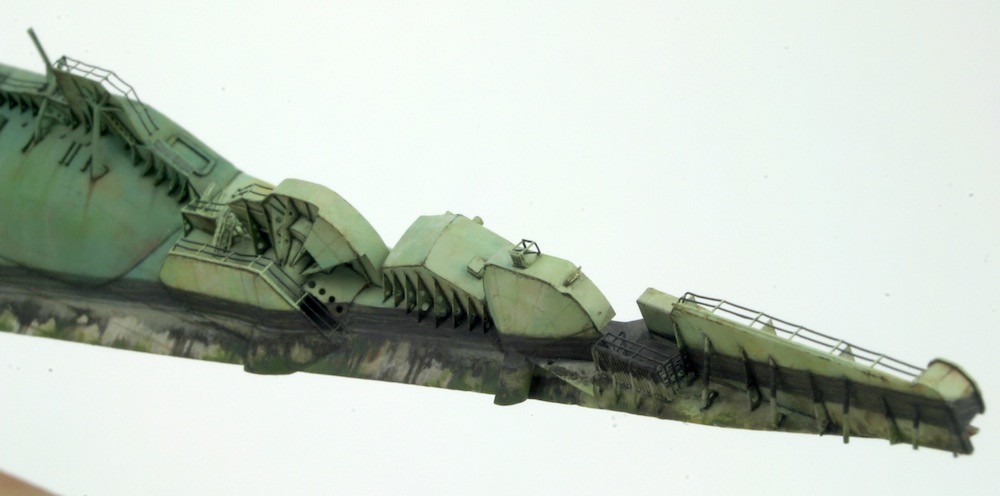
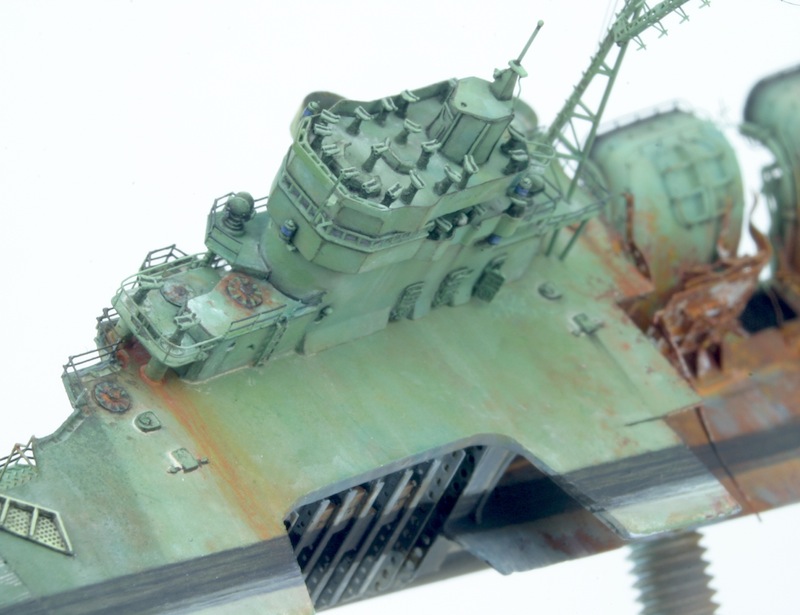
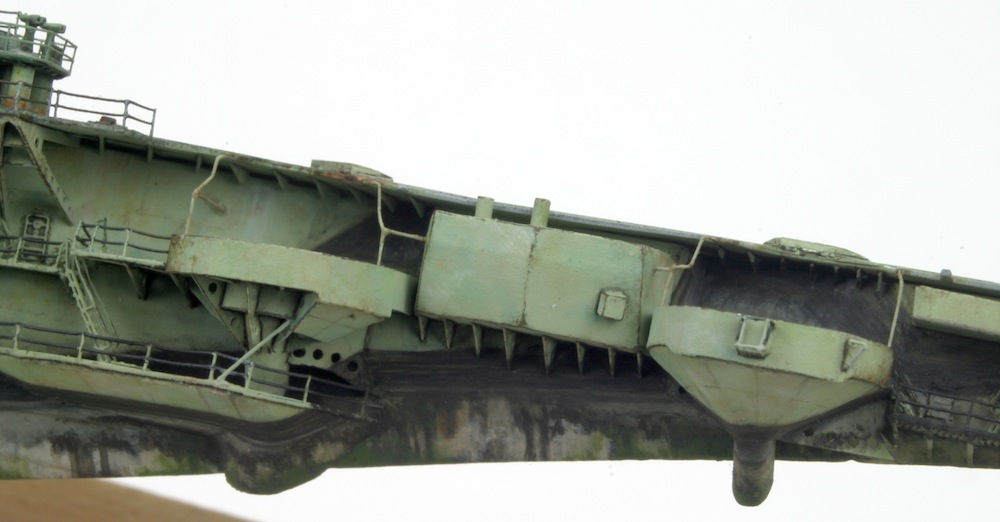
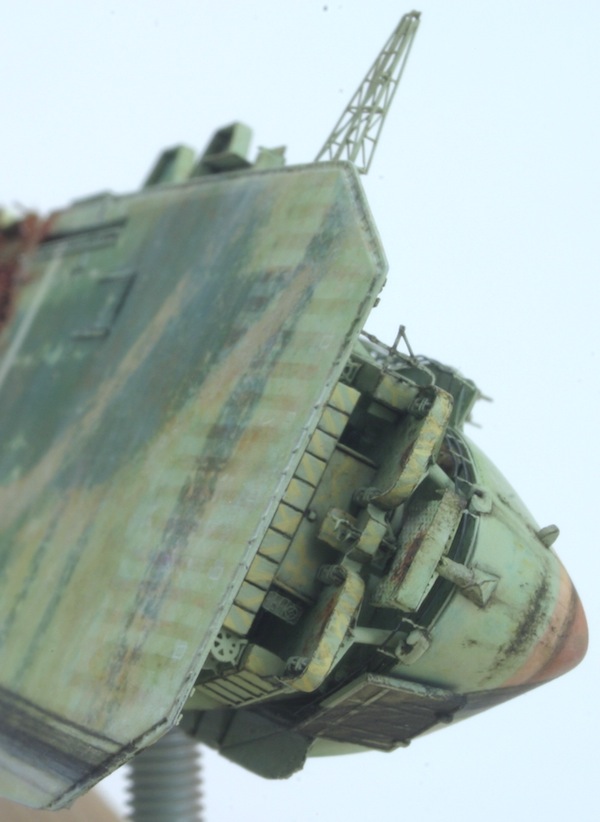
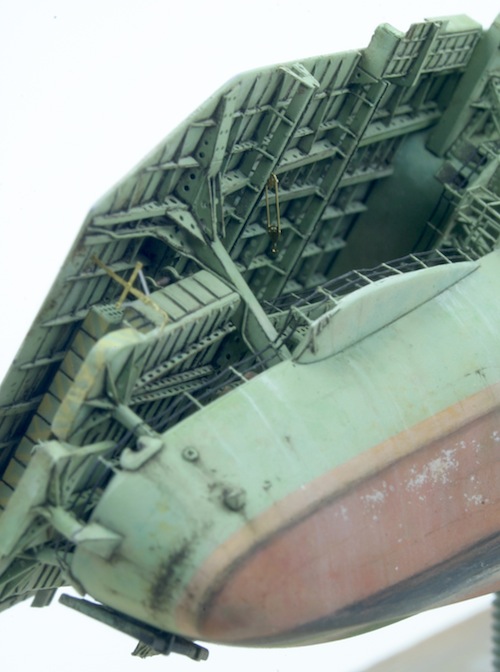
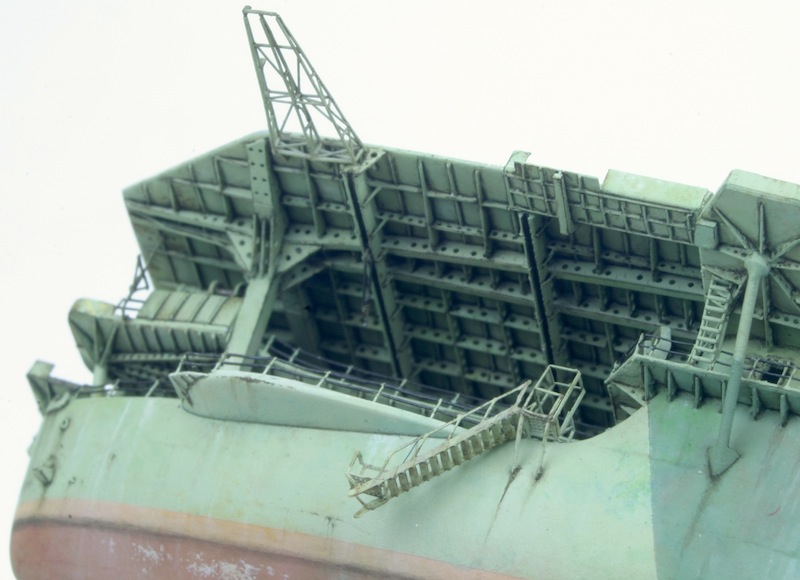
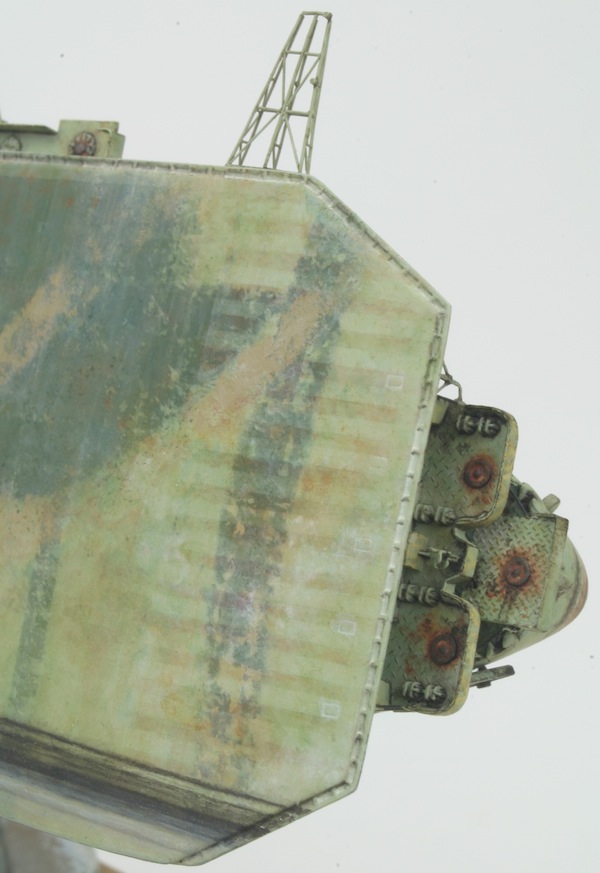
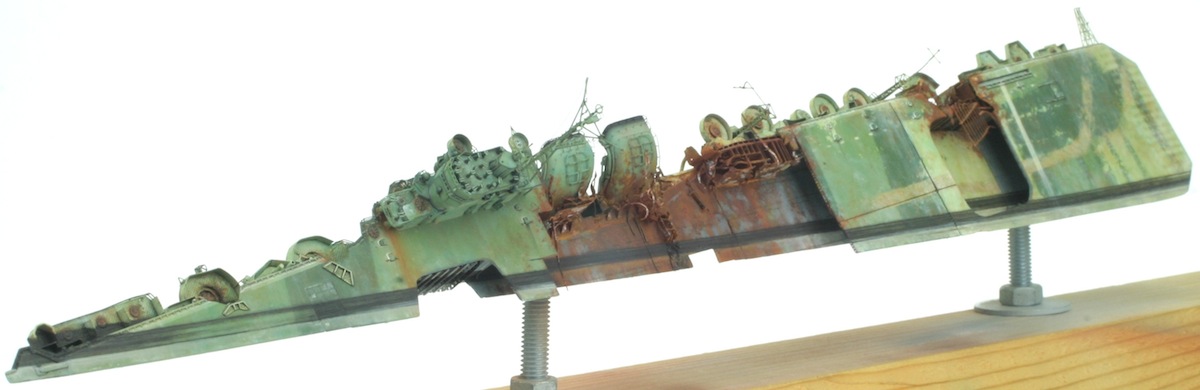
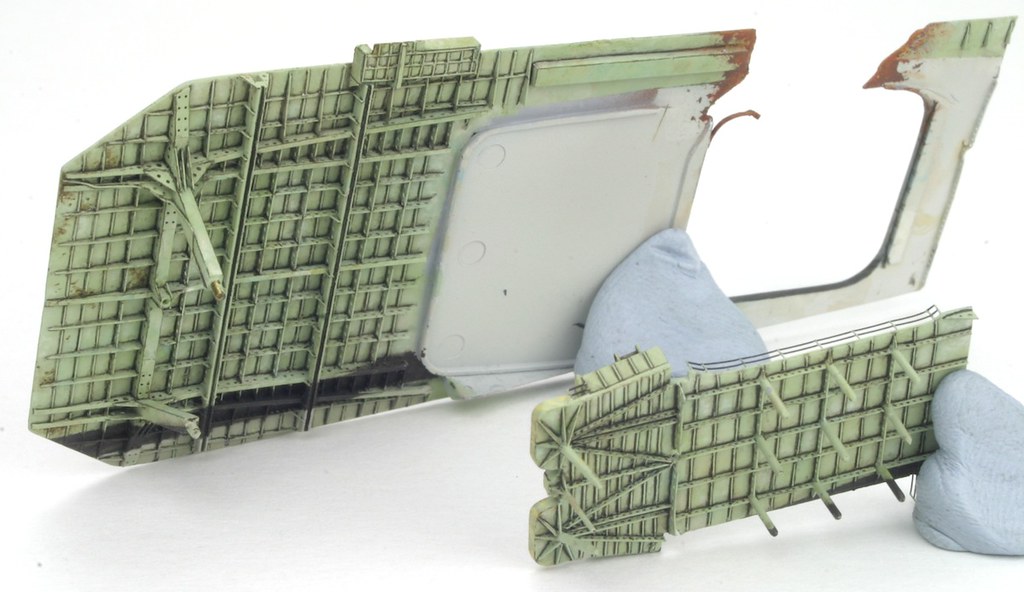
The individual floor plates of the hangar deck were showing clearly too, so these were also painted. I exaggerated a bit on the right, as the flight deck will overhang this area, reducing visibility.
Image

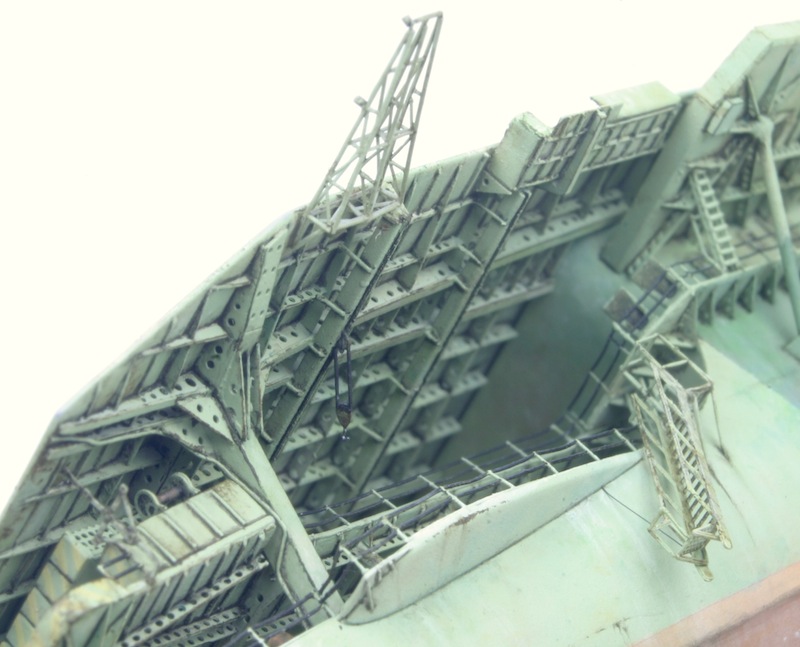
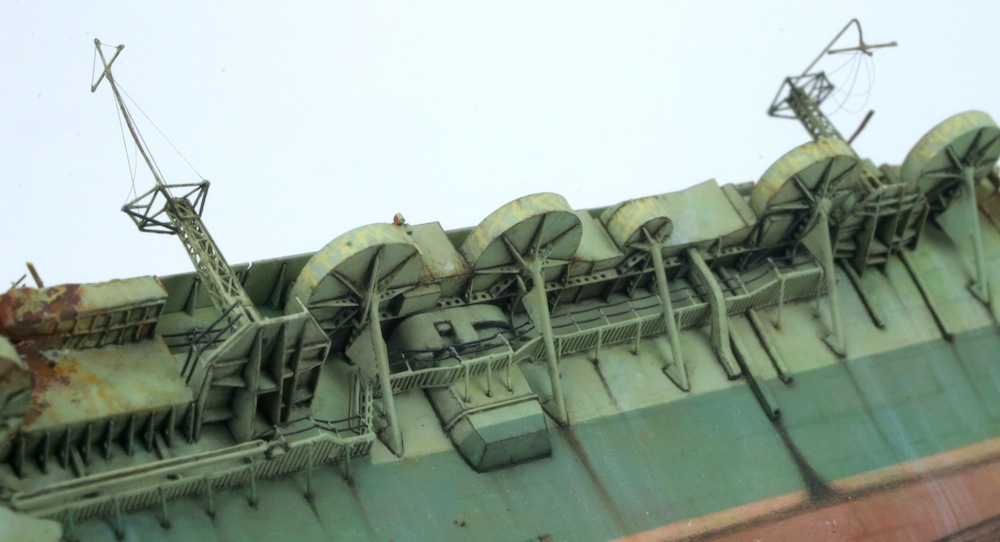
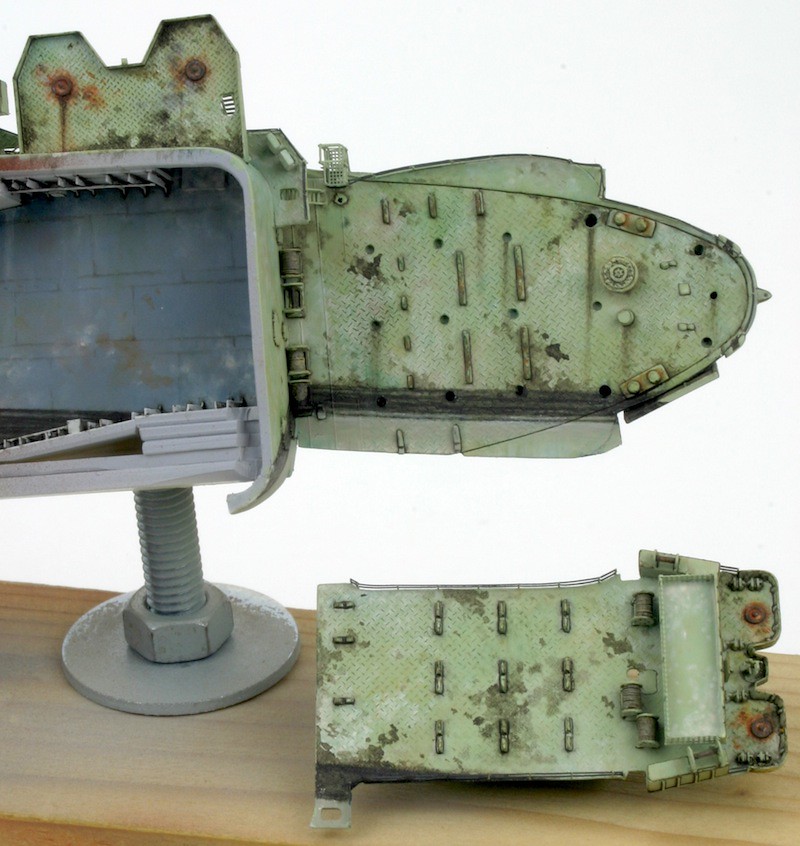
I also added the cables to the elevator counterweights. This will be almost invisible due to the angle of the ship, but when peeking from �sea-level� you can just make it out.
The detail on the counterweights is added with paint only.
Image

Image

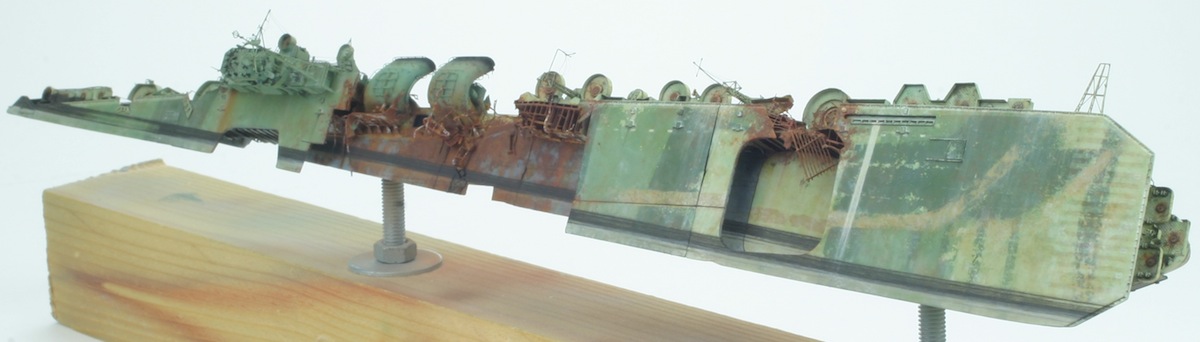
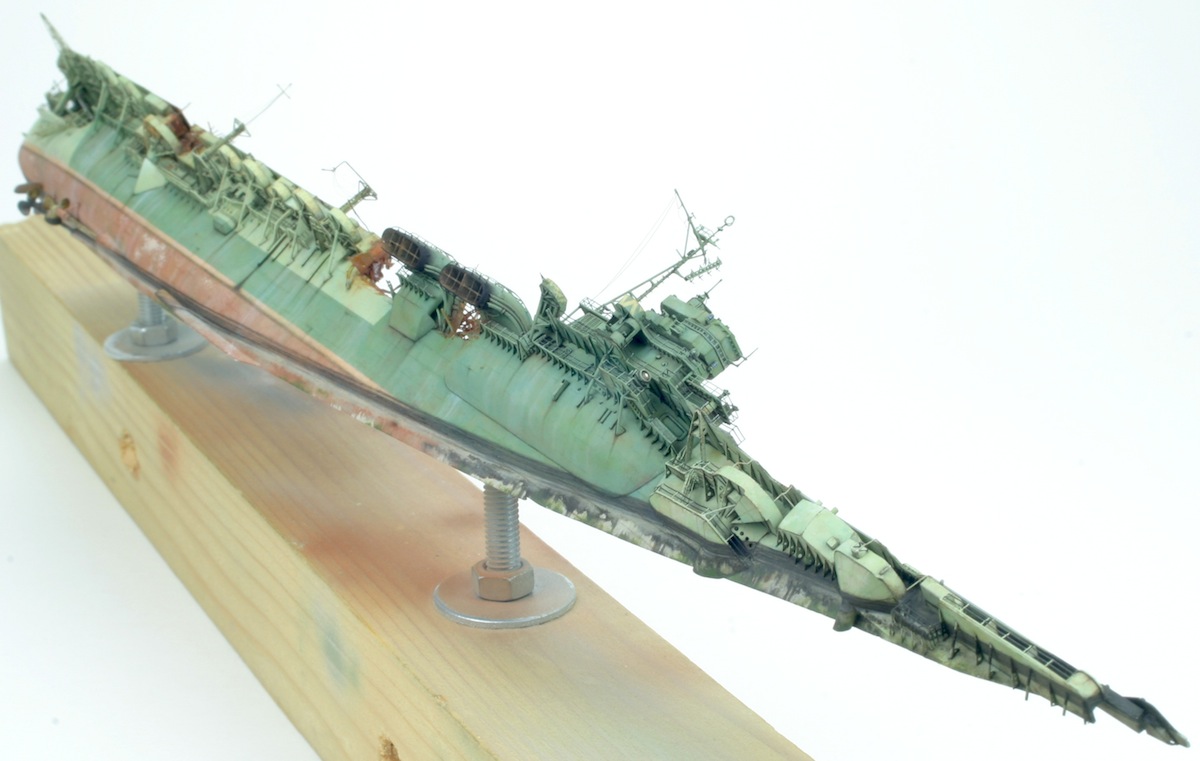
I also added some dirty spots and smudges on many of the horizontal surfaces, again with the shading colour, diluted in varying degrees. I exaggerated in the places that will be barely visible, like the stern main and boat decks:
Image

And to round of, a pic of the undersides of the flight and boat decks, right before gluing them to the hull:
Image

Cheers!

Marijn
Koppalakki
Posts: 581
Joined: Wed Aug 22, 2012 6:19 pm
Location: Finland

Re: 1/700 Amagi diorama

Post by Koppalakki »

Very nice!

I also think by doing the plating effect with painting is the best approach!

Now that I think of it I need to test this and maybe incorporate it to my project for even more ooomph!

Cheers! :thumbs_up_1:
marijn van gils
Posts: 2686
Joined: Tue Feb 06, 2007 10:24 am
Location: Belgium

Re: 1/700 Amagi diorama

Post by marijn van gils »

Good idea!
The combination of techniques might make the end result look even more natural, as the individual techniques will become less 'recogniseable'.
I'm looking forward to that! :)

Cheers,

Marijn
EJFoeth
Posts: 2915
Joined: Wed Jan 21, 2009 1:51 pm

Re: 1/700 Amagi diorama

Post by EJFoeth »

Nice! It certainly breaks up the "huge" surfaces. Also, if you look at the shadow lines at the larger sponsons (e.g., beneath the funnels): these "heavy" shadowlines now blend in much better in the overall appearance :thumbs_up_1:
marijn van gils
Posts: 2686
Joined: Tue Feb 06, 2007 10:24 am
Location: Belgium

Re: 1/700 Amagi diorama

Post by marijn van gils »

Thanks for noticing that Evert-Jan, as that was the plan all along (the dark 'dirty' streaking also contributes to this). In the words of Hannibal Smith: I love it when a plan comes together! :big_grin:
User avatar
Jabberwock
Posts: 502
Joined: Thu Mar 31, 2016 1:52 pm
Location: Inverness

Re: 1/700 Amagi diorama

Post by Jabberwock »

Sorry Marijn and I may be wrong, please don't take this as criticism and I hate to say this, but, in the first photo of the last lot of photos, should the streaks not be vertical to the waterline rather than the hull?

If you compare that image with the 3rd photo and the third from last, the streaks coming off the platform support and the holes appear correct to the eye, vertical to the water.

Cheers, Jabb
HMS Hood, the big one!

I used to be indecisive, now I'm not so sure.
Chris Meddings
Ship Modeller Magazine
Posts: 148
Joined: Tue Apr 26, 2016 3:52 am
Contact:

Re: 1/700 Amagi diorama

Post by Chris Meddings »

Way have I not been following this :(

Incredible work Marijn, I will not repeat my mistake and will follow loyally from now on so I can rip off, or I mean study your ideas
User avatar
Bangor lad
Posts: 47
Joined: Sat Dec 20, 2014 6:22 am

Re: 1/700 Amagi diorama

Post by Bangor lad »

This isn't model making. This is artistry at its best.
Simply stunning!
Dave
Currently on the workbench: Tamiya USS Enterprise; Airfix 1/1200 Ark Royal
User avatar
JimVarnellABH2USN
Posts: 1287
Joined: Sun Mar 18, 2012 7:31 pm
Location: Macclesfield NC

Re: 1/700 Amagi diorama

Post by JimVarnellABH2USN »

Bangor lad wrote:This isn't model making. This is artistry at its best.
Simply stunning!
Yeap, that's exactly what I was thinking, just said it before I could. Simply fantastic work.
Jim Varnell
ABH2 USN/RET.
89-00

Eastern NC Modelworks

Up coming projects:
1/700 scale rebuild of diorama project 960 square feet.
(Table 1 underway)Feb.2017
1/350 USS ALASKA CB-1(started Aug. 2017) 70% completed
marijn van gils
Posts: 2686
Joined: Tue Feb 06, 2007 10:24 am
Location: Belgium

Re: 1/700 Amagi diorama

Post by marijn van gils »

Many thanks guys! :)
Chris Meddings wrote:... so I can rip off, or I mean study your ideas
:big_grin: Please do Chris! It is the best compliment you could give me, and I know I'm constantly ripping off, I mean being inspired by, other modelers too! :)
Jabberwock wrote:Sorry Marijn and I may be wrong, please don't take this as criticism and I hate to say this, but, in the first photo of the last lot of photos, should the streaks not be vertical to the waterline rather than the hull?

If you compare that image with the 3rd photo and the third from last, the streaks coming off the platform support and the holes appear correct to the eye, vertical to the water.

Cheers, Jabb
No need to apologize Jabb! Constructive comments like this is what I need more! :thumbs_up_1: :thumbs_up_1: :thumbs_up_1:
And you spotted this very well indeed. :)

To be honest, I have considered this, but visually balancing it has been difficult.
On the decks, it was simple. Since they were horizontal when the ship was floating upright, streaks could have only formed after the ship had capsized. Therefore, on the flight deck, AA-platforms, etc., I painted every streak perpendicular to the waterline.

On the sides of the hull, it was not so simple, as the historic photos show mostly streaking perpendicular to the hull.
The big dirty streak coming from the shute on this (cropped) pic (left red circle) obviously has formed before the ship capsized, as it stops on the dirty waterline mark which formed when the ship was upright. But also towards the right, dirty and rusty streaks are visible that are perpendicular to the hull plating and not the waterline.

Image

On this B&W photo, also streaking is visible around the stack sponson that is perpendicular to the hull:
Image

I can only assume this streaking had already formed when the ship was still upright.
The antifouling red shows a lot of sun-bleaching in that thin strip above the dirty waterline mark, so I guess enough time has passed for the elements to have quite an effect on the ship before it capsized and sank.

0n the other hand, it is only logical that some extra streaking must have formed after the ship capsized too.
I see less of this in the historic photos, but here it is pretty visible:
Image

The visual balance on the model becomes difficult however when I would like to do both on the same spot. Streaks in two different directions would look pretty weird�
So I decided to follow the general idea of what I could see on the photos: mostly perpendicular to the hull, but in a couple of spots (like on that third photo from the last) perpendicular to the waterline.
But to be honest I'm also feeling in doubt about this. As it is hard to judge the final 'feel' of it on photo,I'll ask some advice from the guys in my club when I show it to them in the flesh. But please give your opinion too if you like!

Thanks for starting up a very interesting discussion Jabb! :)

Cheers,

Marijn
User avatar
Goodwood
Posts: 1257
Joined: Mon Nov 11, 2013 11:01 pm
Location: Detroit area

Re: 1/700 Amagi diorama

Post by Goodwood »

Marijn,

Just from looking at the photos and reading your explanation, it seems to me that you're on the right track keeping the streaking to perpendicular to the hull. Trying to do both might indeed contribute to a bit of visual confusion, but not only that, those streaks that are perpendicular to the waterline are so faint (relatively speaking), that in 1/700 scale they might not really even be visible.

Love the build, and I am eagerly awaiting more progress!
Sean Nash, ACG (aircraft camo gestapo)

On the ways:
1/200 Trumpeter HMS Nelson
1/700 Tamiya USS Yorktown CV-5

In the stash:
1/35 Italiari PT-109
1/35 Tamiya "Pibber" Patrol Boat
1/350 Trumpeter USS Yorktown CV-10
User avatar
GewoonWouter
Posts: 225
Joined: Sat Mar 26, 2016 2:58 am
Location: Belgium

Re: 1/700 Amagi diorama

Post by GewoonWouter »

Good to see another update Marijn, it sure was worth waiting for it!

Cheers
warspite63
Posts: 197
Joined: Wed Feb 21, 2007 4:46 pm

Re: 1/700 Amagi diorama

Post by warspite63 »

Y'know, I've been coming to this site for a few years and have been privileged to see some truly amazing craftsmanship - I won't list names 'cos I'm bound to miss one, but I'm sure you know who I'm talking about :-).....but I don't think I've ever seen a model - in any scale alone 1/700 - that looks so, well, so REAL........this build is just phenomenal

Bravo, sir
:-)
marijn van gils
Posts: 2686
Joined: Tue Feb 06, 2007 10:24 am
Location: Belgium

Re: 1/700 Amagi diorama

Post by marijn van gils »

Many thanks guys! That's some extremely high praise! :smallsmile: :cool_2: :smallsmile:

Cheers,

Marijn
User avatar
Jabberwock
Posts: 502
Joined: Thu Mar 31, 2016 1:52 pm
Location: Inverness

Re: 1/700 Amagi diorama

Post by Jabberwock »

I see now how your mind works and I agree with your interpretation of the photos.

How could I doubt you! :wink_3.gif

Cheers, Jabb
HMS Hood, the big one!

I used to be indecisive, now I'm not so sure.
NOVA73
Posts: 186
Joined: Mon Mar 02, 2009 3:18 am
Location: Savoie - France

Re: 1/700 Amagi diorama

Post by NOVA73 »

Hello

Superb as a result. A magnificent work of artist. I would like to know how to make such delicate painting.

Best regards
Alain.
hypno7
Posts: 377
Joined: Tue Sep 17, 2013 12:16 pm

Re: 1/700 Amagi diorama

Post by hypno7 »

That plating effect is superb! I tried to do it before, but it didn't go as intended (failed miserably)

You are an artist Marijn!
Silenoz
Posts: 208
Joined: Thu Jan 26, 2017 8:30 am

Re: 1/700 Amagi diorama

Post by Silenoz »

stunning, simply stunning, if it wasn't for the scale and detail alone, but the paintwork adds so much more...
marijn van gils
Posts: 2686
Joined: Tue Feb 06, 2007 10:24 am
Location: Belgium

Re: 1/700 Amagi diorama

Post by marijn van gils »

Many thanks guys! :)

Nono Jabb, please doubt me! That's the best way to keep learning and evolving... ;)
NOVA73 wrote:I would like to know how to make such delicate painting.
With a lot of patience and a lifetime of experience... :) :big_grin:

And I would like to know how to build a 1/350 scale capital ship dioramas, including home-designed PE, in only 1 year time! :big_grin:


Erick, please don't be discouraged and try again next time. Practice makes perfect!
For me, the 'tricks' are:
- high quality fine brushes (I use Winsor & Newton series 7, size 000);
- diluting the paint very much, so it is very transparent and the effect can be built up slowly over successive passes;
- not drawing full lines, but only suggesting them by painting interrupted lines;
- constantly correcting and refining the painted 'lines' with a clean brush moistened with white spirit (when working with oils and/or enamels).

Cheers,

Marijn
marijn van gils
Posts: 2686
Joined: Tue Feb 06, 2007 10:24 am
Location: Belgium

Re: 1/700 Amagi diorama

Post by marijn van gils »

Final assembly and details! :) :cool_2: :)

I finally glued the boat and flight deck sections in place, and installed the island.
The fit was pretty good, but there was a very slight gap under the island:
Image

I filled the gap with Magic Sculp, and added some last details:
Image

And those details and the filled gap were painted. After that I installed and painted the railings at the flight deck level.
Image

I also glued the last bunch of binoculars on the top the island. They are from Shelf Oddity and are absolutely great!
Image

The big searchlight is also from Shelf Oddity, with equally fantastic detail. The lens is a 1mm diameter lens from AK, with a brown wash to tone down its shininess a bit.
Image

Image

On the historic photos, I could only see the footropes and one set of hallyards left from the rigging, so that�s what I installed on the model, using stretched sprue. For the footropes, I used Jim Baumann�s technique. Thanks Jim for your threads on the subject! ?
A couple more hallyards will be added later, hanging loose in the water.
Image

The 28cm deflector bars could only be added after hull and deck were joined. I used 0,1mm metal wire.
Image

And painted:
Image

I also added 4 support bars here (stretched sprue): left unpainted, right painted. They would have blocked painting access to the area behind them if I would have added them earlier.
Image Image

This cross-shaped item connects between the flight deck and boatdeck, so could also only be added at this stage. What is it by the way?
Image Image

Even though I can�t see it on the photos of Amagi, I couldn�t resist adding one of the crane hooks for handling the boats. Note that I also attached the platform structure on the flight deck edge (scratchbuilt from stretched sprue).
Image Image

� and an accommodation ladder, like the pics of Amagi�s wreck show:
Image

The props and rudder were installed, and the dirty tidemarks added to them:
Image

Image

The central, sternmost AA platform was painted separately and now installed:
Image

Finally, an overview of the stern area:
Image

The collapsible masts were painted and rigged separately and now installed. They are part of the Lionroar Unryu update set.
Image

Image

Image

The last separate items of burned wreckage were attached to the rear elevator well:
Image

And finally some overviews of the finished model:
Image

Image

Image

Image

Image

Image

Image

With Amagi now finished, I�m looking forward to painting the rest of the diorama!
Alas, that will have to wait until after the holidays� ?

Cheers!

Marijn
Last edited by marijn van gils on Sat Dec 23, 2017 3:08 pm, edited 7 times in total.
Post Reply

Return to “Completed Models”