1/700 Amagi diorama
Moderators: MartinJQuinn, JIM BAUMANN, Jon, Dan K
-
Chris Meddings
- Ship Modeller Magazine

- Posts: 148
- Joined: Tue Apr 26, 2016 3:52 am
- Contact:
Re: 1/700 Amagi diorama
this just gets more and more sublime. Bravo Marijn
-
Daytona675R
- Posts: 293
- Joined: Tue Dec 08, 2015 10:37 am
- Location: Prague, Czech Republic
-
Bangor lad

- Posts: 47
- Joined: Sat Dec 20, 2014 6:22 am
Re: 1/700 Amagi diorama
Stunning and inspirational in equal measure!
Dave
Currently on the workbench: Tamiya USS Enterprise; Airfix 1/1200 Ark Royal
Currently on the workbench: Tamiya USS Enterprise; Airfix 1/1200 Ark Royal
-
JIM BAUMANN

- Posts: 5686
- Joined: Mon Jan 10, 2005 5:30 pm
- Location: Nr Southampton England
Re: 1/700 Amagi diorama
This is very very sharp modelmaking Marjinn-
-it is mighty impressive!
You have captured the feel of the desolate nature of the area and depicted it most effectively.
tyre tracks are very believable... colouring subtle.!

JIM B
-it is mighty impressive!
You have captured the feel of the desolate nature of the area and depicted it most effectively.
tyre tracks are very believable... colouring subtle.!
JIM B
....I buy them at three times the speed I build 'em.... will I live long enough to empty my stash...?
http://www.modelshipgallery.com/gallery ... index.html
IPMS UK SIG (special interest group) www.finewaterline.com
http://www.modelshipgallery.com/gallery ... index.html
IPMS UK SIG (special interest group) www.finewaterline.com
-
marijn van gils
- Posts: 2686
- Joined: Tue Feb 06, 2007 10:24 am
- Location: Belgium
Re: 1/700 Amagi diorama
Many thanks everyone!
The tire tracks were something that I was not sure about beforehand, but it came together much easier than I imagined. I simply used the lightest dust colour I had used for the terrain, and painted them on in thin layers with a fine brush.
Cheers,
Marijn
The tire tracks were something that I was not sure about beforehand, but it came together much easier than I imagined. I simply used the lightest dust colour I had used for the terrain, and painted them on in thin layers with a fine brush.
Cheers,
Marijn
-
Rui Matos

- Posts: 418
- Joined: Wed Nov 22, 2006 4:42 pm
- Location: Lisbon, Portugal
Re: 1/700 Amagi diorama
Hey Marijn
Excellent "blending" on the terrain, very convincing and "in scale".
And now for one question:
Would that railroad still be in use? You could add some shine to the metal tracks if in use.. or leave it to rust forever

Carry on!
Cheers
Rui
Excellent "blending" on the terrain, very convincing and "in scale".
And now for one question:
Would that railroad still be in use? You could add some shine to the metal tracks if in use.. or leave it to rust forever
Carry on!
Cheers
Rui
Ship Modelers of the World UNITE
-
gscott
- Posts: 250
- Joined: Thu Jan 10, 2013 9:25 pm
Re: 1/700 Amagi diorama
...just shaking my head in awe. Don't know whether I should be inspired to try harder or just junk everything now.  Incredible model-making on so many levels. Bravo!
- Greg
-
Benva

- Posts: 19
- Joined: Tue Jun 28, 2016 6:39 pm
- Location: S�o Paulo
- Contact:
Re: 1/700 Amagi diorama
incredible microscopic!
-
J. Soca

- Posts: 2161
- Joined: Sun Dec 03, 2006 5:36 pm
- Location: About 50 miles away from the Gulf of Mexico ( traveling W is you do so :)
Re: 1/700 Amagi diorama
Very impressive!!
Jose
Jose
-
marijn van gils
- Posts: 2686
- Joined: Tue Feb 06, 2007 10:24 am
- Location: Belgium
Re: 1/700 Amagi diorama
Many thanks guys!
Rui, well spotted! I put a metal shine on the top of the tracks with pencil, but it doesn't really show in in the photo's. I still have a railcar to place on it, so it must still be in use...
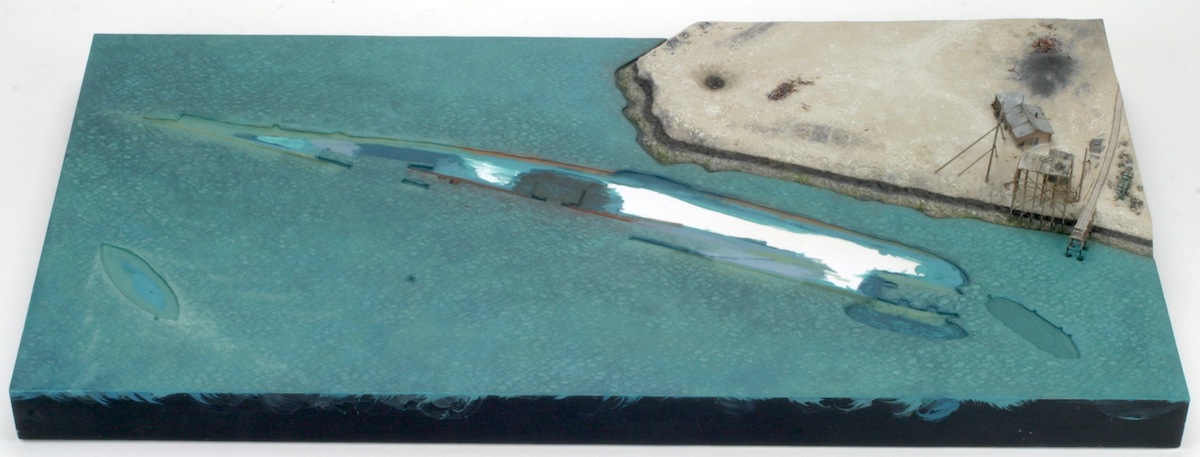
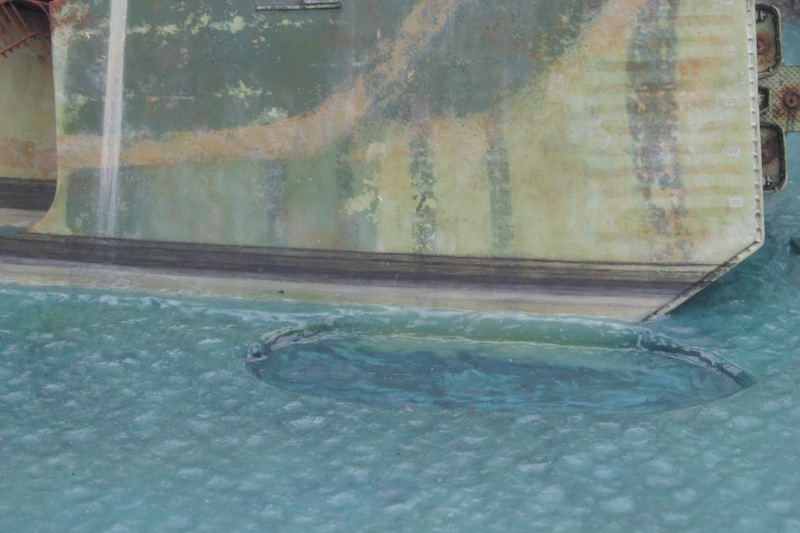
Meanwhile, I started the seascape. I find this to be one of the most difficult challenges in small-scale ship modelling. But that makes it fun too, no?
For the colour, I took inspiration from the youtube-video, which has some variation of blueish and greenish tones.
I started by applying a slightly too light and bright basecoat by brush on the textured watercolour paper I used for the sea:
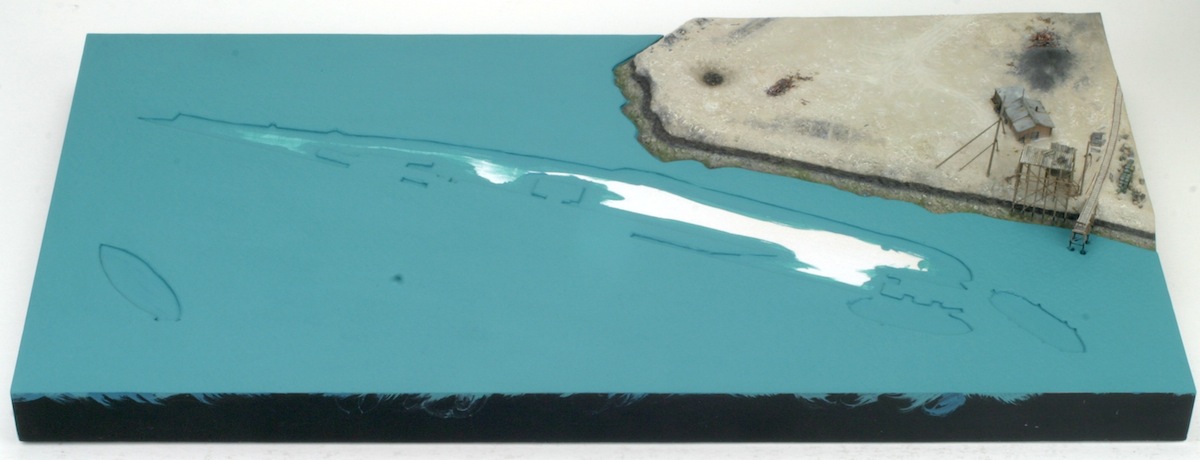
Next, I applied multiple layers of paint to locally change this basecoat, and to get more depth and variation.
Close to the ship and the island, I worked the colours of the ship and the island into the sea-colours for the illusion of depth and translucency. The process is hard to describe as I had to mess around a lot to get the result I was after, constantly test-placing Amagi in position so I could judge the colours by eye. I used acrylic paints by brush, usually heavily diluted and applied as washes or glazes. I often wetted the surface with plain water before applying the paints so I could blend the edges.
In close-up, it is easier to see the effect. Basecoat:
And fully painted. Multiple greens and blues were added for depth, often letting them flow in the texture of the paper. Brown tones were added near the island. Keep in mind that this surface is still matt.
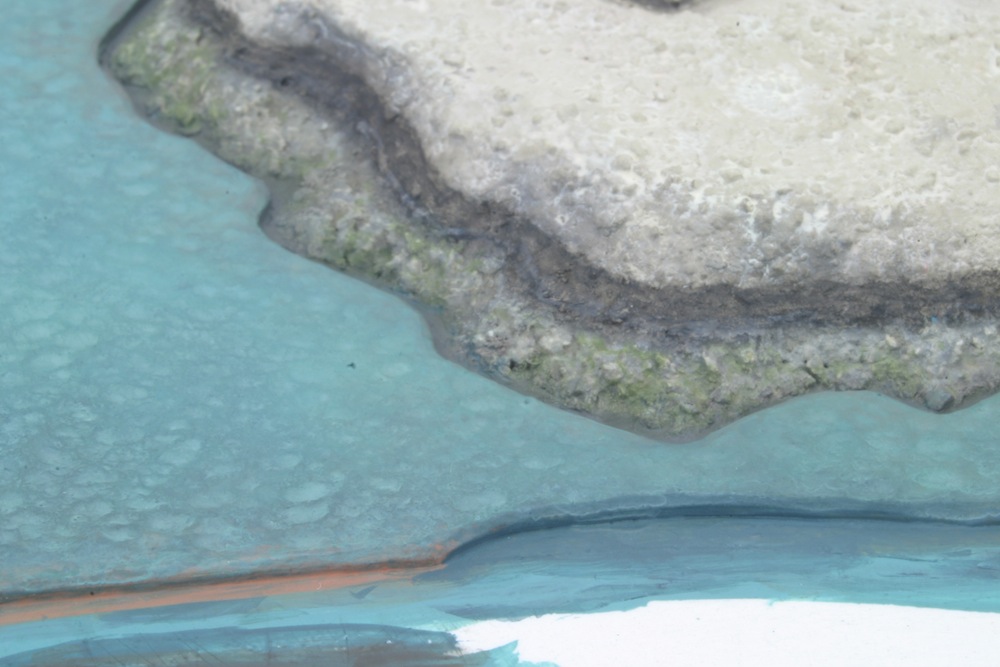
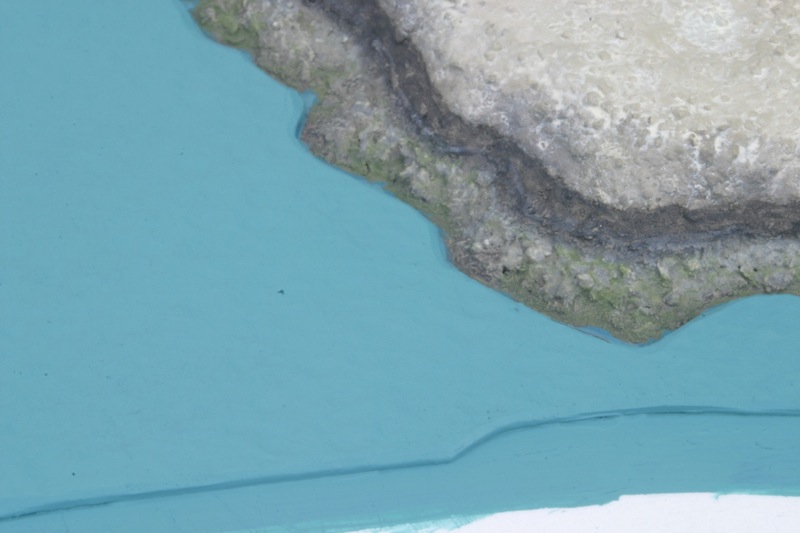
Next, gloss varnish was brushed on top of this. After drying, the gap between the watercolour paper and the island was filled with a mixture of AK 8002 Water Gel (transparent) and acrylic paint. This provides a slightly transparent depth effect near the island. The stuff shrinks, so it took 5 or 6 layers to fill the gap completely.
Next, the border of the paper and the filling was disguised with some more paint. The conspicuous difference in surface texture will be eliminated by the next step.
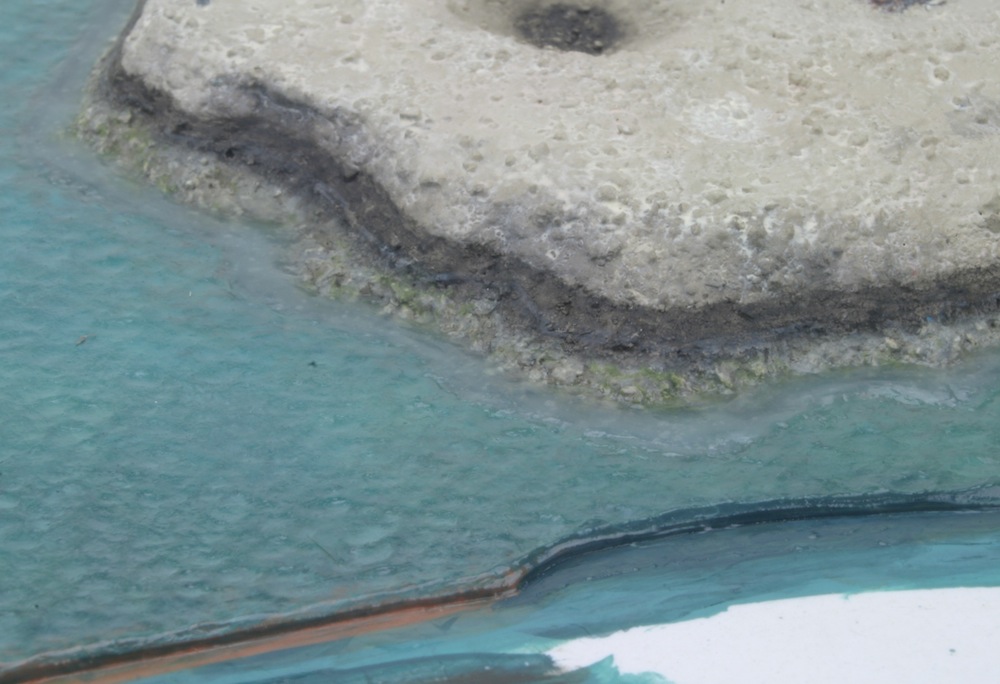
And that step is the application of pure transparent AK water gel in a thin layer, dappling the gel with a brush to create wavelets. I always liked the effect David Griffith gets, but my own experiments with acrylic gels always resulted in too sharp wavelets. I tried different brands, but even with the softest gels I wasn�t happy. But then I followed the advice Won Hui Lee gives in his water tutorial to try the AK water gel, and it works perfectly! I think the stuff is also an acrylic gel, but thinned down (the smell has a hint of vinegar to it?) just enough so the wavelets settle down without showing obvious brush-marks.
The watercolour paper can also give a nice wavelet-texture by itself, but the gel gives more sense of depth and looks simply more �watery�.
I will apply one or two coats of gloss varnish on top of it to tone down the texture of the wavelets further (also did some tests with that), but I can only do that after everything is integrated in the seascape.
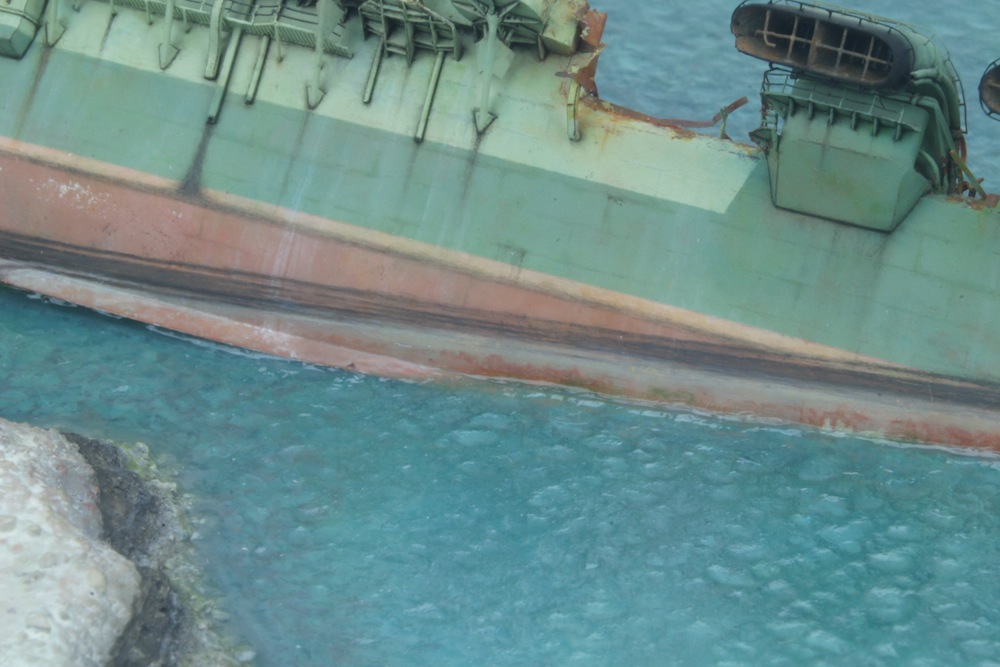
Before the wavelets were added, I glued Amagi in her final position:

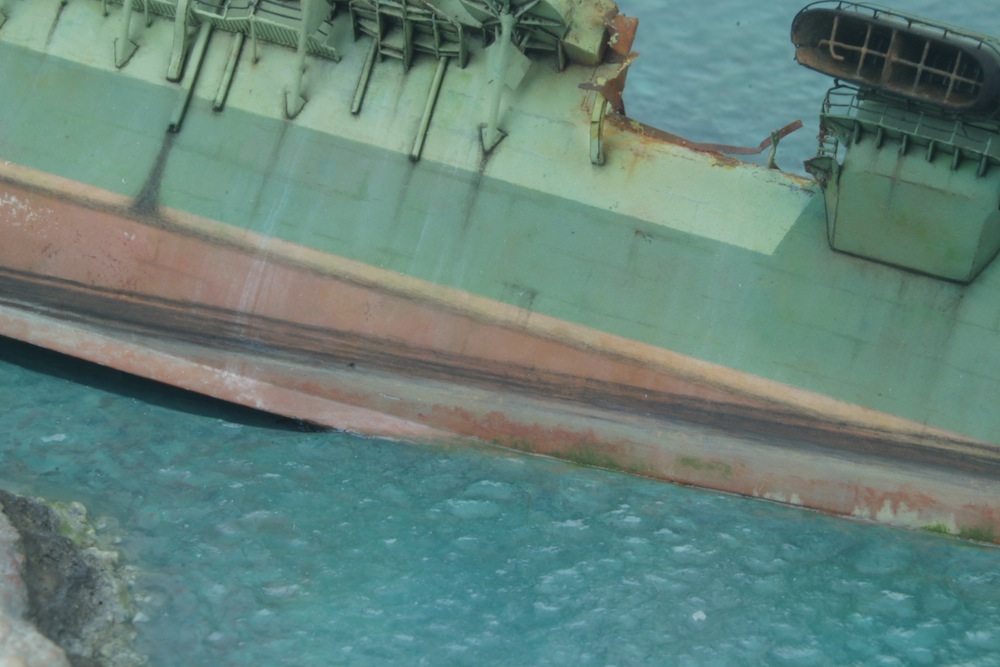
Unfortunaltely, I had not taken enough care to get everything perfectly level at the sea-level. But I have to admit that that was very difficult to achieve, because the deck sections remained separate during construction and painting. Anyway, the result is gaps in need of filling:
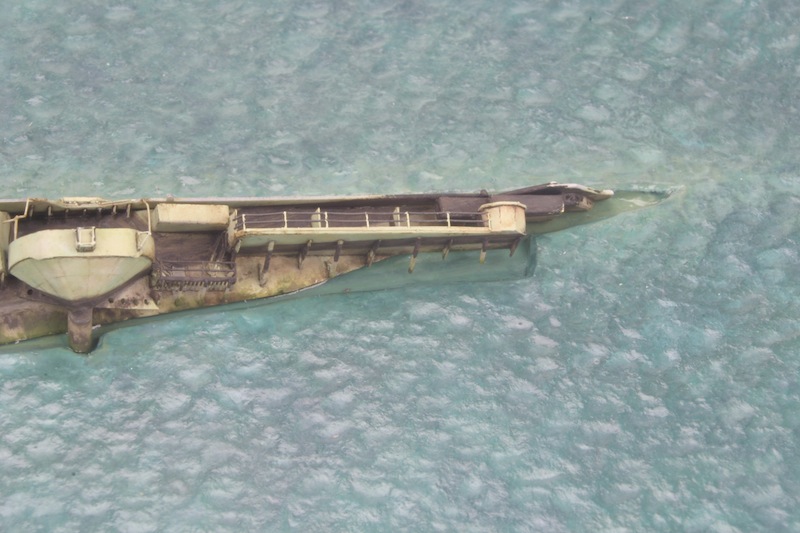
I filled the gaps with Magic Sculp. The bilge keel was also extended with this two part putty. As I had cut the front edge of the ship a bit too optimistically, I had to extend this a bit too, which I did with some left-over flight deck edge from the plastic kit.
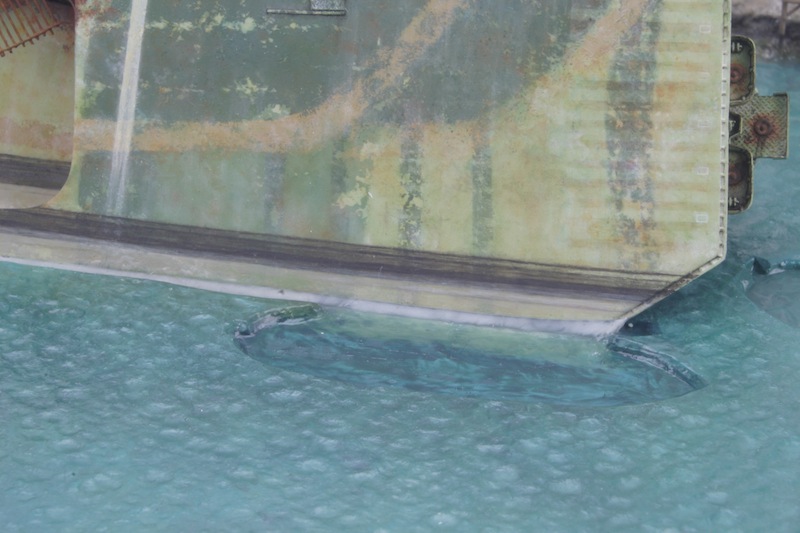
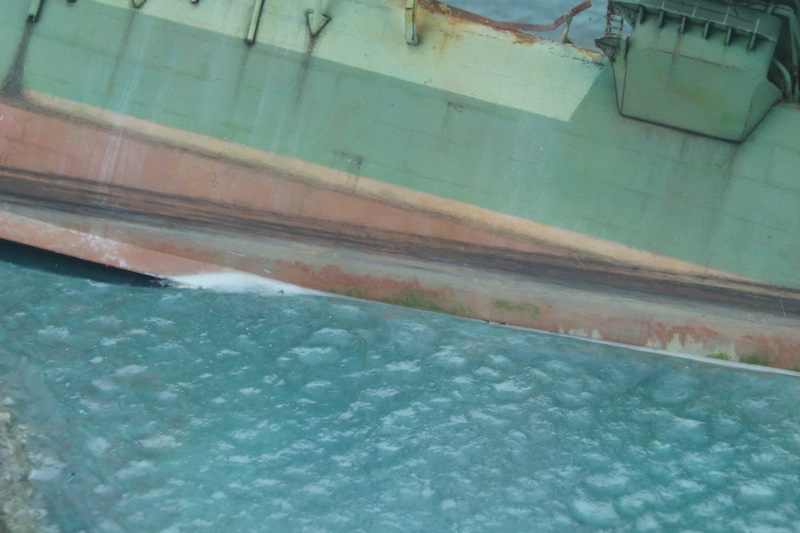
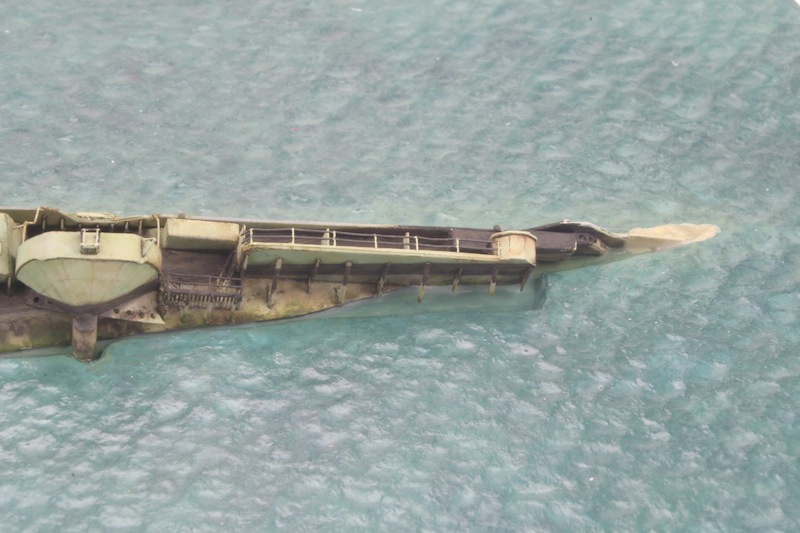
The filled gaps of course needed to be painted:
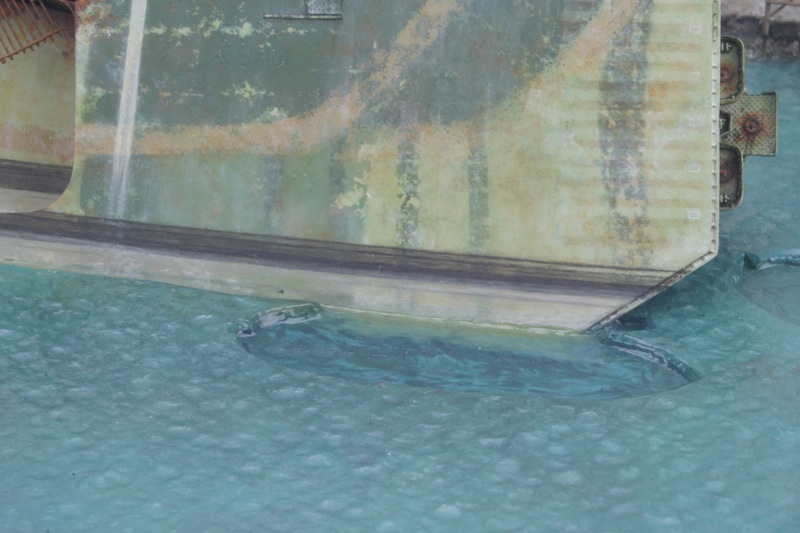

Now, the gaps between paper and ship could be filled like described above:
And finally wavelets were added. As mentioned before, their texture will still be toned down a bit with one or more layers of gloss varnish.
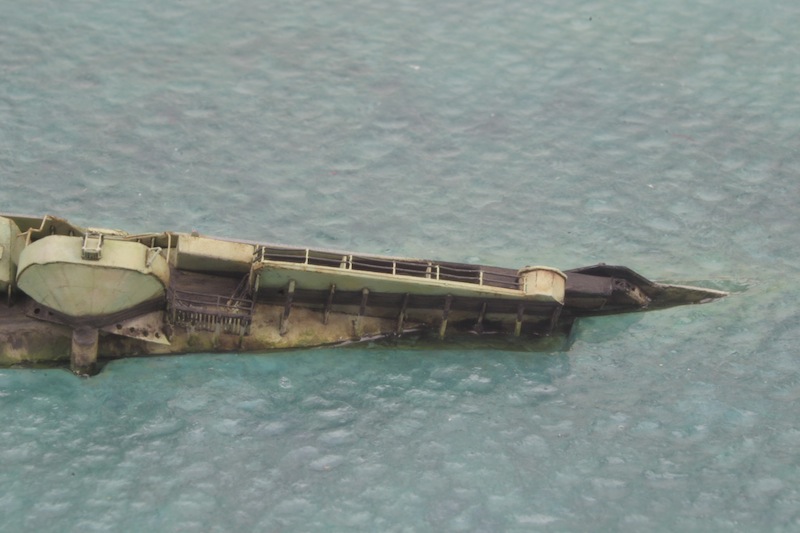
And an overview. The lighter still needs to be integrated further.
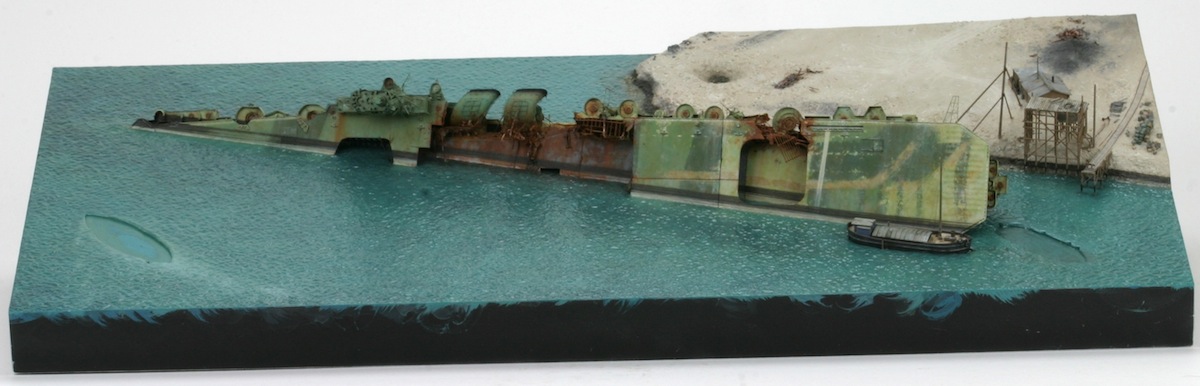
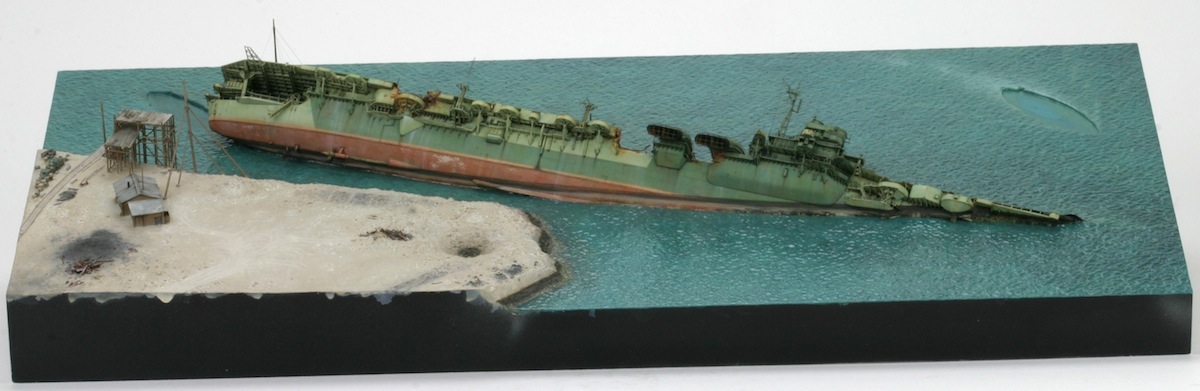
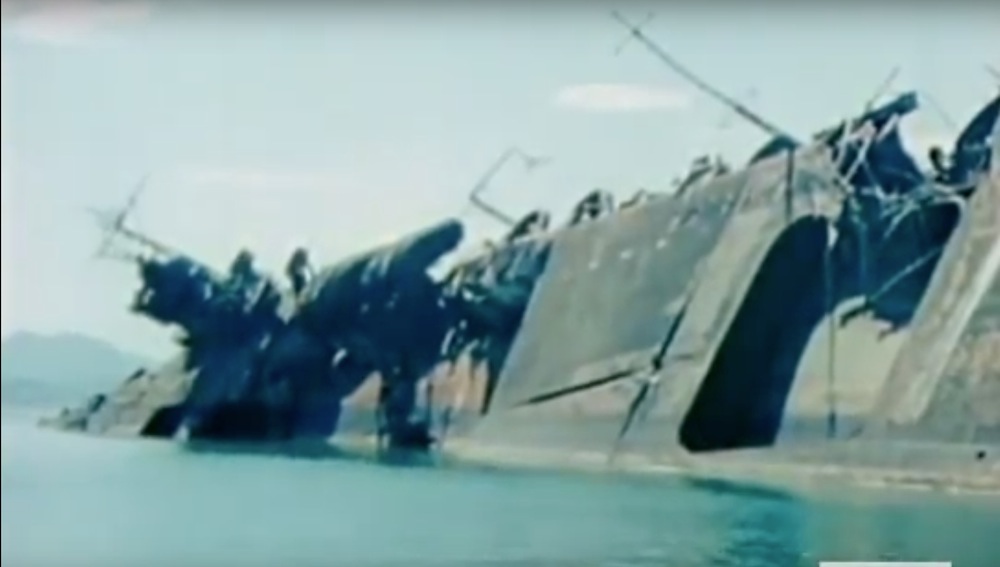
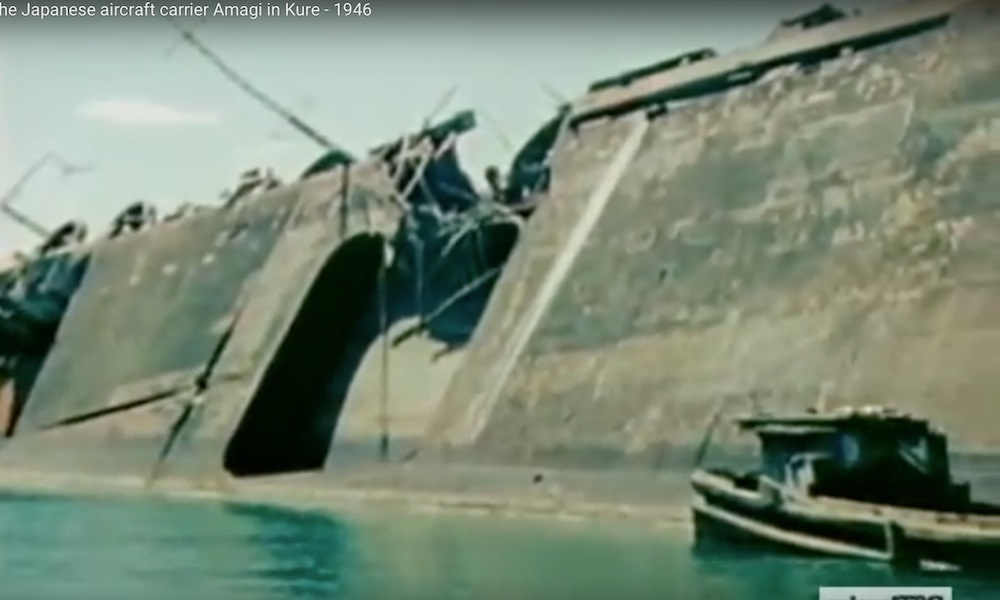
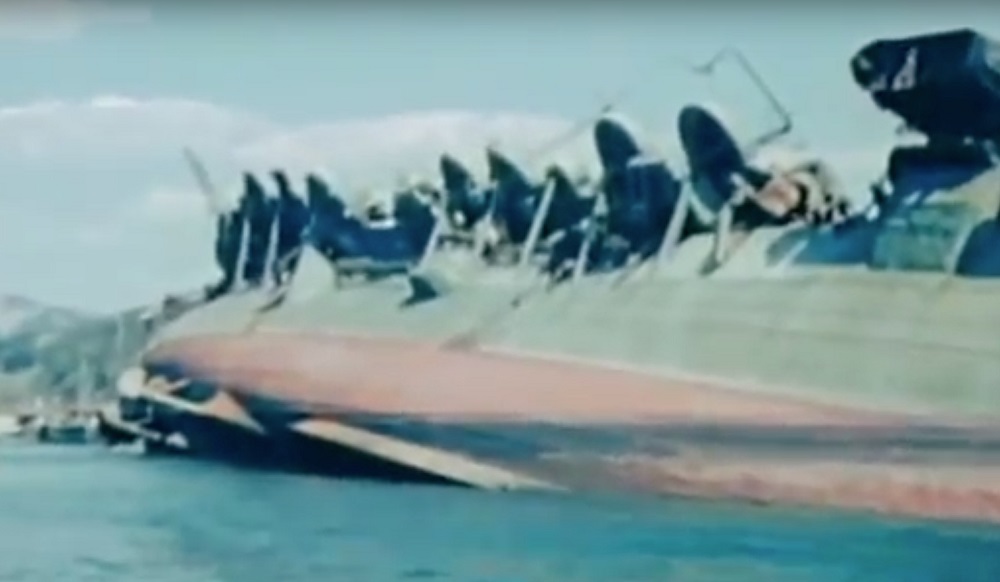
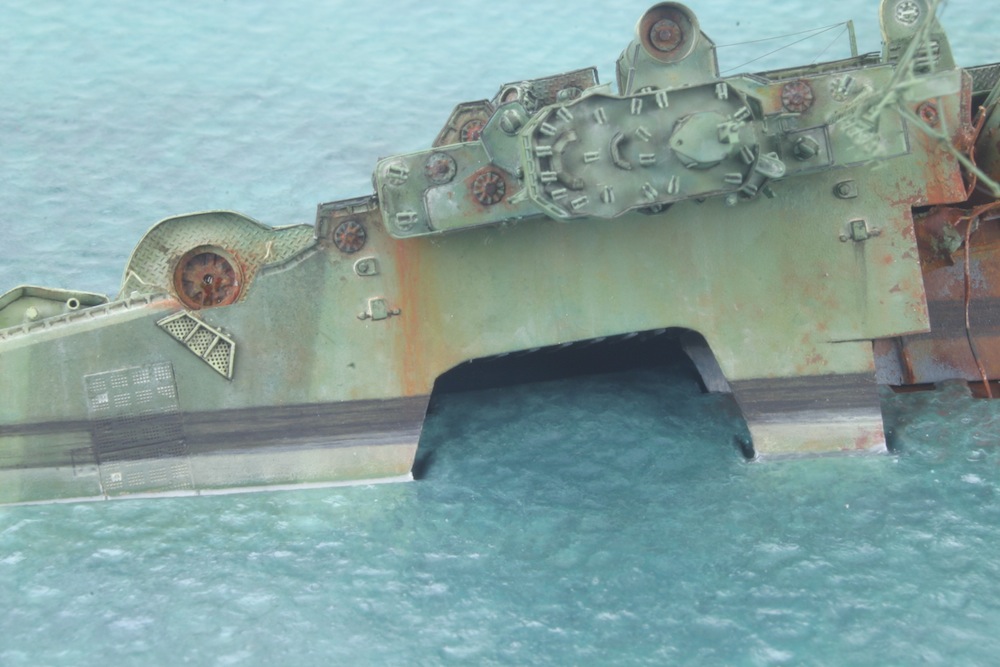
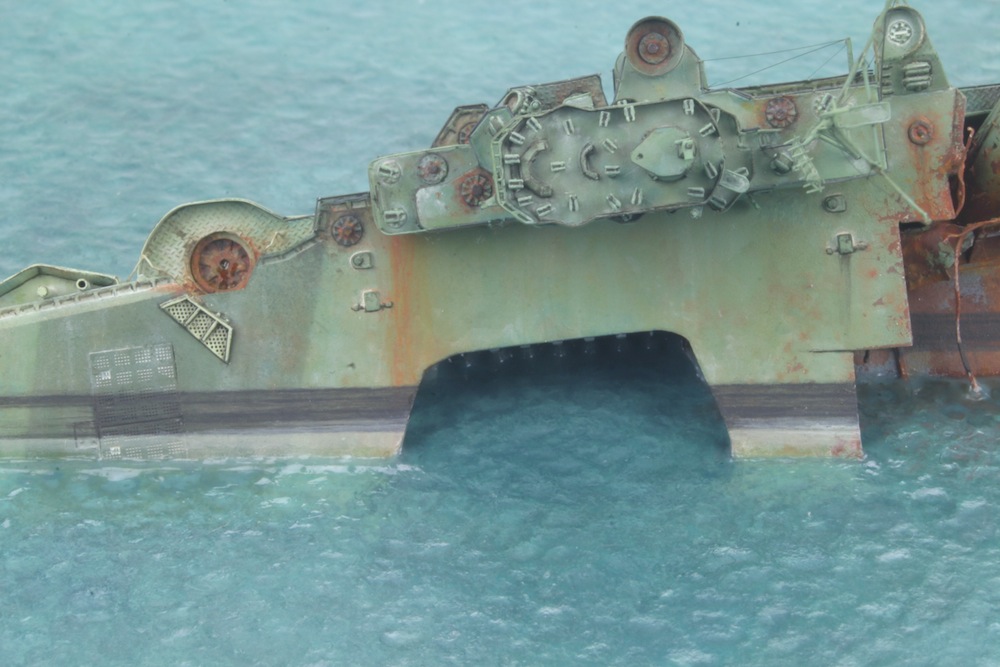
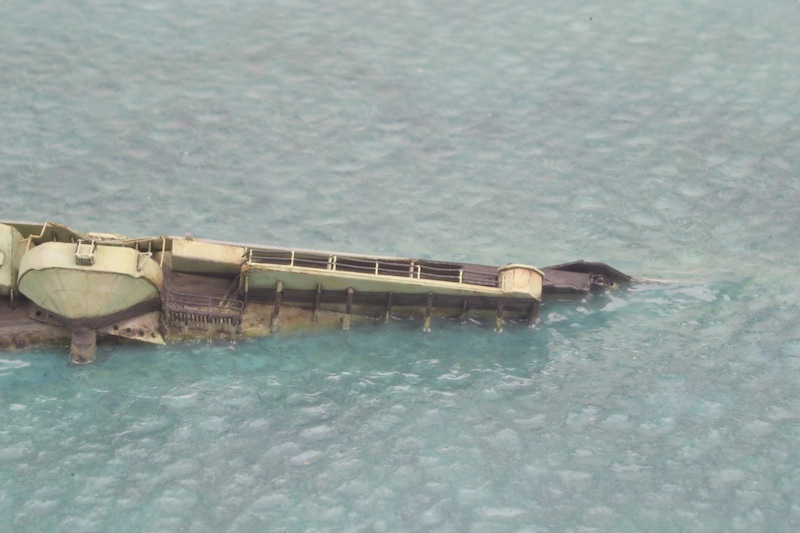
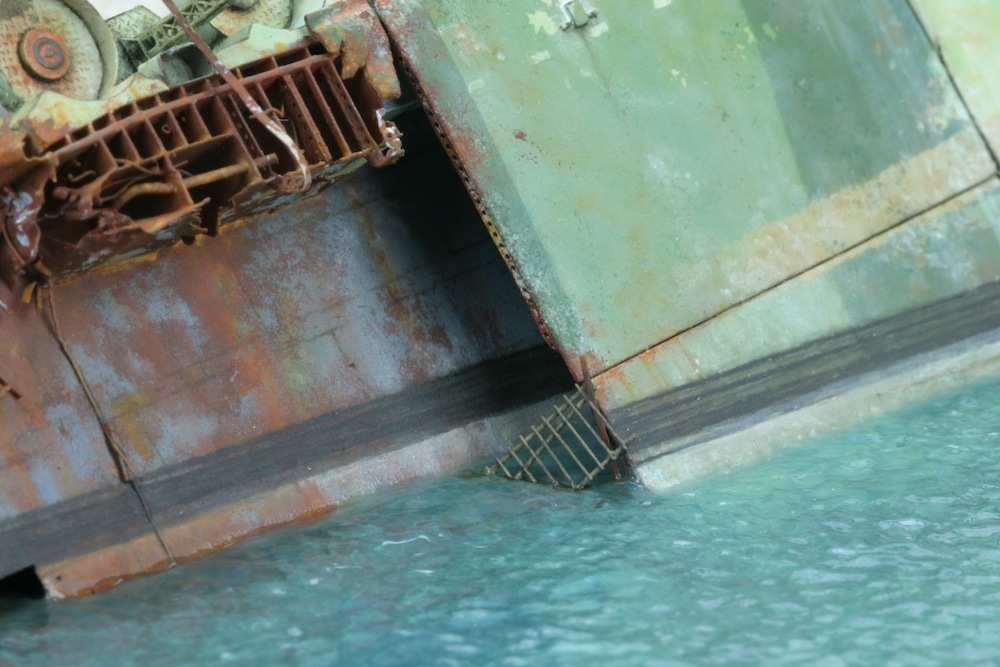
As you can see in the photo�s above, I added a couple of strips of wreckage to the sea in the forward elevator area at this point, following the period photographs. I also added another structure against the aft flight deck section, according to these photographs:
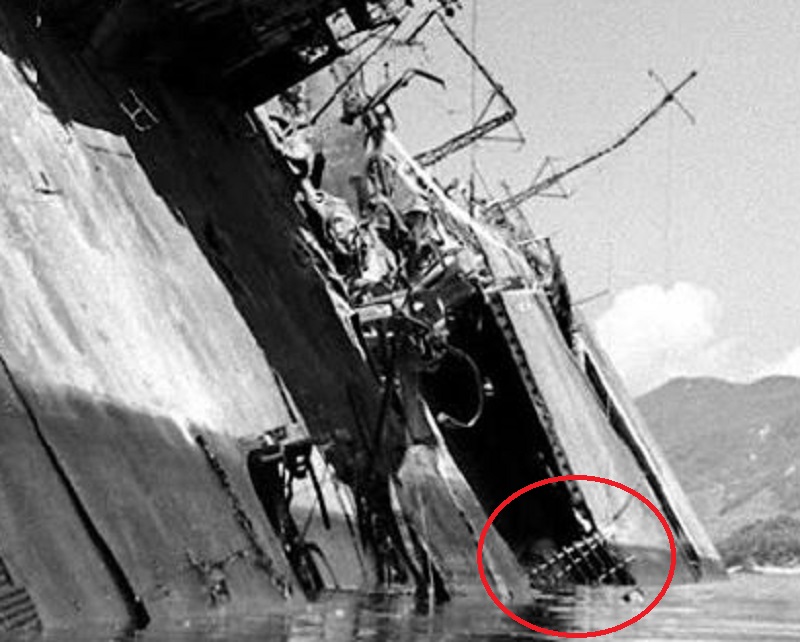
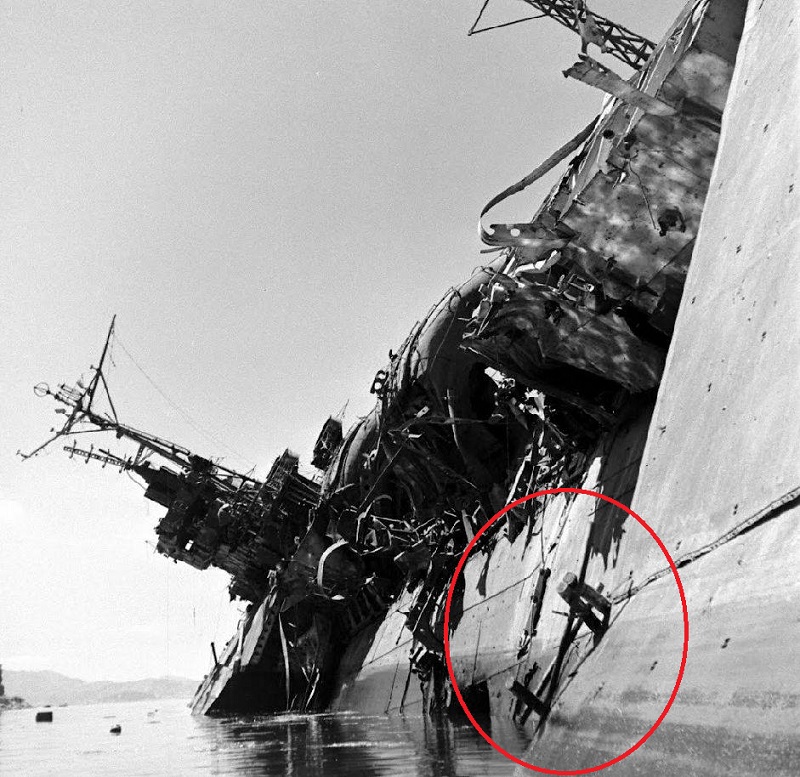
I�m not sure what it is, but the last photo indicates it is made from wood. Is it a kind of ladder, placed in this position after the first air raid, when the flight deck was blown out but the ship was still floating upright? Or is it a piece of one of the fake houses or other structures which were used on the flight deck as camouflage?
Whatever it is, I just tried to copy the photo�s:
I have been working on the small ships too, so I hope to post them soon.
Cheers!
Marijn
Rui, well spotted! I put a metal shine on the top of the tracks with pencil, but it doesn't really show in in the photo's. I still have a railcar to place on it, so it must still be in use...
Meanwhile, I started the seascape. I find this to be one of the most difficult challenges in small-scale ship modelling. But that makes it fun too, no?
For the colour, I took inspiration from the youtube-video, which has some variation of blueish and greenish tones.
I started by applying a slightly too light and bright basecoat by brush on the textured watercolour paper I used for the sea:
Next, I applied multiple layers of paint to locally change this basecoat, and to get more depth and variation.
Close to the ship and the island, I worked the colours of the ship and the island into the sea-colours for the illusion of depth and translucency. The process is hard to describe as I had to mess around a lot to get the result I was after, constantly test-placing Amagi in position so I could judge the colours by eye. I used acrylic paints by brush, usually heavily diluted and applied as washes or glazes. I often wetted the surface with plain water before applying the paints so I could blend the edges.
In close-up, it is easier to see the effect. Basecoat:
And fully painted. Multiple greens and blues were added for depth, often letting them flow in the texture of the paper. Brown tones were added near the island. Keep in mind that this surface is still matt.
Next, gloss varnish was brushed on top of this. After drying, the gap between the watercolour paper and the island was filled with a mixture of AK 8002 Water Gel (transparent) and acrylic paint. This provides a slightly transparent depth effect near the island. The stuff shrinks, so it took 5 or 6 layers to fill the gap completely.
Next, the border of the paper and the filling was disguised with some more paint. The conspicuous difference in surface texture will be eliminated by the next step.
And that step is the application of pure transparent AK water gel in a thin layer, dappling the gel with a brush to create wavelets. I always liked the effect David Griffith gets, but my own experiments with acrylic gels always resulted in too sharp wavelets. I tried different brands, but even with the softest gels I wasn�t happy. But then I followed the advice Won Hui Lee gives in his water tutorial to try the AK water gel, and it works perfectly! I think the stuff is also an acrylic gel, but thinned down (the smell has a hint of vinegar to it?) just enough so the wavelets settle down without showing obvious brush-marks.
The watercolour paper can also give a nice wavelet-texture by itself, but the gel gives more sense of depth and looks simply more �watery�.
I will apply one or two coats of gloss varnish on top of it to tone down the texture of the wavelets further (also did some tests with that), but I can only do that after everything is integrated in the seascape.
Before the wavelets were added, I glued Amagi in her final position:
Unfortunaltely, I had not taken enough care to get everything perfectly level at the sea-level. But I have to admit that that was very difficult to achieve, because the deck sections remained separate during construction and painting. Anyway, the result is gaps in need of filling:
I filled the gaps with Magic Sculp. The bilge keel was also extended with this two part putty. As I had cut the front edge of the ship a bit too optimistically, I had to extend this a bit too, which I did with some left-over flight deck edge from the plastic kit.
The filled gaps of course needed to be painted:
Now, the gaps between paper and ship could be filled like described above:
And finally wavelets were added. As mentioned before, their texture will still be toned down a bit with one or more layers of gloss varnish.
And an overview. The lighter still needs to be integrated further.
As you can see in the photo�s above, I added a couple of strips of wreckage to the sea in the forward elevator area at this point, following the period photographs. I also added another structure against the aft flight deck section, according to these photographs:
I�m not sure what it is, but the last photo indicates it is made from wood. Is it a kind of ladder, placed in this position after the first air raid, when the flight deck was blown out but the ship was still floating upright? Or is it a piece of one of the fake houses or other structures which were used on the flight deck as camouflage?
Whatever it is, I just tried to copy the photo�s:
I have been working on the small ships too, so I hope to post them soon.
Cheers!
Marijn
-
MartinJQuinn

- Posts: 8530
- Joined: Tue Jan 11, 2005 1:40 pm
- Location: New Jersey
Re: 1/700 Amagi diorama
This completely blows me away. This is modeling art at it's finest. Simply out-f**king-standing work.
Martin
"Tomorrow is the most important thing in life. Comes into us at midnight very clean. It's perfect when it arrives and it puts itself in our hands. It hopes we've learned something from yesterday." John Wayne
Ship Model Gallery
"Tomorrow is the most important thing in life. Comes into us at midnight very clean. It's perfect when it arrives and it puts itself in our hands. It hopes we've learned something from yesterday." John Wayne
Ship Model Gallery
-
Goodwood

- Posts: 1257
- Joined: Mon Nov 11, 2013 11:01 pm
- Location: Detroit area
Re: 1/700 Amagi diorama
Wonderful. Absolutely wonderful! 
Sean Nash, ACG (aircraft camo gestapo)
On the ways:
1/200 Trumpeter HMS Nelson
1/700 Tamiya USS Yorktown CV-5
In the stash:
1/35 Italiari PT-109
1/35 Tamiya "Pibber" Patrol Boat
1/350 Trumpeter USS Yorktown CV-10
On the ways:
1/200 Trumpeter HMS Nelson
1/700 Tamiya USS Yorktown CV-5
In the stash:
1/35 Italiari PT-109
1/35 Tamiya "Pibber" Patrol Boat
1/350 Trumpeter USS Yorktown CV-10
-
Vladi

- Posts: 810
- Joined: Mon Feb 21, 2011 6:38 am
- Location: Czech Republic
- Contact:
Re: 1/700 Amagi diorama
Wowwwww!
Battle of Savo Island Collection (all 1/700)
Recently completed: HMAS Australia | USS Patterson DD-392
At works: USS Astoria CA-34
Prep stage: USS Vincennes CA-44 | Yubari | Kako
Recently completed: HMAS Australia | USS Patterson DD-392
At works: USS Astoria CA-34
Prep stage: USS Vincennes CA-44 | Yubari | Kako
-
marijn van gils
- Posts: 2686
- Joined: Tue Feb 06, 2007 10:24 am
- Location: Belgium
Re: 1/700 Amagi diorama
Many thanks for the nice words guys! That's very encouraging for the last bits�
Cheers,
Marijn
Cheers,
Marijn
-
Bangor lad
- Posts: 47
- Joined: Sat Dec 20, 2014 6:22 am
Re: 1/700 Amagi diorama
Sublime craftsmanship, Marijn.
Dave
Currently on the workbench: Tamiya USS Enterprise; Airfix 1/1200 Ark Royal
Currently on the workbench: Tamiya USS Enterprise; Airfix 1/1200 Ark Royal
-
LE BOSCO

- Posts: 2261
- Joined: Thu Aug 27, 2009 11:05 am
- Location: Paris France
Re: 1/700 Amagi diorama
HI Marjin
this is the diorama the more realistic it was given me to see....just incredible
I repeat myself, but you are one of the greatest model maker in the world .... the first I think
cheers
Nicolas
this is the diorama the more realistic it was given me to see....just incredible
I repeat myself, but you are one of the greatest model maker in the world .... the first I think
cheers
Nicolas
Last edited by LE BOSCO on Sat Mar 31, 2018 8:35 am, edited 1 time in total.
-
StevenVD
- Posts: 616
- Joined: Fri Dec 27, 2013 6:32 pm
Re: 1/700 Amagi diorama
Marijn, it seems another one of these wooden structures hangs flat on the hangar deck close to the island. It has four crossbeams and can be seen on the picture looking to the front. I see you interpreted this as the bulkhead structure and built it in already, so maybe I'm wrong...
-
Joe Simon
- Posts: 825
- Joined: Sat Jan 24, 2009 5:16 pm
- Location: Wisconsin
Re: 1/700 Amagi diorama
My entire family of 5 including my 7 year old is blown away by what you have done. We also discussed your next project, Hyuga sunken in harbor! 
-
Benva
- Posts: 19
- Joined: Tue Jun 28, 2016 6:39 pm
- Location: S�o Paulo
- Contact:
Re: 1/700 Amagi diorama
Thing of the cinema. Congratulation.
Benva
Benva