The Ship Model Forum

The Ship Modelers Source
It is currently Wed Apr 24, 2024 2:31 pm

All times are UTC - 6 hours [ DST ]


Post new topic Reply to topic  [ 68 posts ]  Go to page Previous  1, 2, 3, 4  Next
Author Message
PostPosted: Wed Oct 22, 2014 7:44 pm 
Offline

Joined: Tue Jun 16, 2009 12:18 pm
Posts: 8
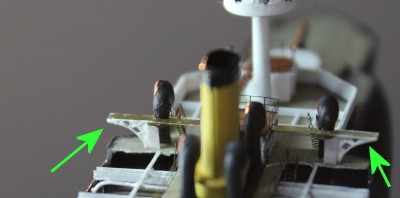
Looks like a mooring boom.


Report this post
Top
 Profile  
Reply with quote  
PostPosted: Thu Oct 23, 2014 3:56 am 
Looks like .... a rotatory torpedo tube :thinking: ?


Report this post
Top
  
Reply with quote  
PostPosted: Thu Oct 23, 2014 8:09 am 
Offline

Joined: Sat Mar 30, 2013 7:57 am
Posts: 87
jim,

I always enjoy reading thru Your building reports - what a great selection of weird subjects!...once more this time as I started my own Gangut only on Oct. 19th, with the small difference that my whole model measures the length of a 12" barrell in 1/700th scale...

Image

You did a stunning job on her - can't wait to see more!
Bye + keep it up!

Christian.


Report this post
Top
 Profile  
Reply with quote  
PostPosted: Thu Oct 23, 2014 9:40 am 
Offline

Joined: Mon Jan 10, 2005 2:08 pm
Posts: 942
Well Jim... I have this:
Image
but I doubt if it will be of much help :) Have you tried web search in Russian?

From the photo it indeed appears that the forward skids are squared to allow davit to project outboard. No idea about "vaulted structures" and the mysterious thingy aft.... could it be as simple as that?
Image

Looks like Royaloakmin gets a cigar :)

_________________
"On some great and glorious day the plain folks of the land will reach their heart's desire at last and the White House will be adorned by a downright moron." H. L. Mencken


Last edited by DariusP on Fri Oct 24, 2014 3:16 pm, edited 1 time in total.

Report this post
Top
 Profile  
Reply with quote  
PostPosted: Fri Oct 24, 2014 1:16 pm 
Offline
User avatar

Joined: Tue Aug 18, 2009 11:02 am
Posts: 552
Location: Poland, Wroclaw
As always I follow your thread with attention and also with enjoyment... :thumbs_up_1: :wave_1:

_________________
...in my shipyard...
Image


Report this post
Top
 Profile  
Reply with quote  
PostPosted: Tue Nov 11, 2014 2:03 pm 
Offline
User avatar

Joined: Mon Jan 10, 2005 5:30 pm
Posts: 5386
Location: Nr Southampton England
Too much Business , some rather unusually fine weather and classic cars conspired to keep me away from the modelbench quite a lot of the time this year...

so much so that ... for the first time in 15 years I did not have a new model finished in time for the Telford Model competition ...

so I will endeavour to remedy my shortcomings and try and up my modelship production so that normal service resumes!

Onwards...

Having pulled off all the kit supplied rendition of the boat deck.. and spending a while studying plans and glimpses of photos--kindly supplied by Peppe and Darius

I have been quite busy rebuilding all the boatskids entirely from scratch... using in part relief etched coupling rods from a model railway locomotive fret ( dated 1976 (!!)
chunk stuff but suitable for my purposes.

Attachment:
gangut new 001.jpg
gangut new 001.jpg [ 100.83 KiB | Viewed 1465 times ]


The gantry and its legs for operating the midships davits-hard to figure from both plans ( side elevation and overhead elevation do not make these clear
and in the photos as they are almost invisible...- though there is a sectional drawing--which does not quite correspond to the relative heights vis-a-vis the funnel...

Attachment:
gangut new 003.jpg
gangut new 003.jpg [ 103.93 KiB | Viewed 1465 times ]


Attachment:
012.jpg
012.jpg [ 92.7 KiB | Viewed 1465 times ]


The skids on this vessel in particular were in pairs --so that the davits could swing and articulate through the slots-- ==> double the amount of work...

Attachment:
gangut new 010.jpg
gangut new 010.jpg [ 125.1 KiB | Viewed 1465 times ]


Attachment:
gangut new 011..jpg
gangut new 011..jpg [ 102.01 KiB | Viewed 1465 times ]


Attachment:
gangut new 013.jpg
gangut new 013.jpg [ 135.13 KiB | Viewed 1465 times ]


The resin Davits supplied by Combrig -while having a fair shape--were rather too low when attached and deployed

I made some longer replacements adapted from some Norths Star davits

Attachment:
gangut new 005.jpg
gangut new 005.jpg [ 136.88 KiB | Viewed 1465 times ]


The pilot house |I had previously made did not have sufficient "eyebrow" for my liking..

I remedied this by wrapping some copper wire around its lower perimeter--and then infilling the gap with white glue -this gave a better overhang

Attachment:
gangut new 006.jpg
gangut new 006.jpg [ 148.83 KiB | Viewed 1465 times ]


The first small version of aft skylight- was removed --

and the larger version ( which was obscured in the overhead view by boats and virtually invisible in the initial low-res plans I had-)

was re-made and installed

Attachment:
gangut new 008.jpg
gangut new 008.jpg [ 104.6 KiB | Viewed 1465 times ]


Attachment:
gangut new 011-..jpg
gangut new 011-..jpg [ 166.91 KiB | Viewed 1465 times ]


so now just to push on ....

Jim Baumann :wave_1:

_________________
....I buy them at three times the speed I build 'em.... will I live long enough to empty my stash...?
http://www.modelshipgallery.com/gallery ... index.html

IPMS UK SIG (special interest group) www.finewaterline.com


Report this post
Top
 Profile  
Reply with quote  
PostPosted: Tue Nov 11, 2014 2:10 pm 
Offline
User avatar

Joined: Tue Jan 11, 2005 1:40 pm
Posts: 8179
Location: New Jersey
Great work, Jim.

The clamp you use to hold the model, do you leave the model on their the whole time you are building, or take it off at the end of each work session?

_________________
Martin

"Tomorrow is the most important thing in life. Comes into us at midnight very clean. It's perfect when it arrives and it puts itself in our hands. It hopes we've learned something from yesterday." John Wayne

Ship Model Gallery


Report this post
Top
 Profile  
Reply with quote  
PostPosted: Thu Nov 13, 2014 7:04 pm 
Offline
User avatar

Joined: Mon Jan 10, 2005 5:30 pm
Posts: 5386
Location: Nr Southampton England
Hi Martin!

thank you for looking in!


The clamp is fixed to the screw in the base of the hull

I the have another clamp which I clip onto the ' vertical' clamp--that way I can place down the model if I need both hands free

Attachment:
gangut new 020.jpg
gangut new 020.jpg [ 190.13 KiB | Viewed 1387 times ]


I leave the clamp on until I am ready to mount the model in water( but the model on its the clamps stay under a glass case twixt sessions)

Attachment:
gangut new 023.jpg
gangut new 023.jpg [ 162.05 KiB | Viewed 1387 times ]


The manufacturing of the aft boatskids-at least my rendition thereof- is now almost completed...

there are still vertical supports and gussets to be made and fitted,,,

progress so far


Attachments:
gangut new 024.jpg
gangut new 024.jpg [ 151.51 KiB | Viewed 1387 times ]
gangut new 027.jpg
gangut new 027.jpg [ 143.98 KiB | Viewed 1387 times ]

_________________
....I buy them at three times the speed I build 'em.... will I live long enough to empty my stash...?
http://www.modelshipgallery.com/gallery ... index.html

IPMS UK SIG (special interest group) www.finewaterline.com
Report this post
Top
 Profile  
Reply with quote  
PostPosted: Thu Nov 13, 2014 8:40 pm 
Offline

Joined: Tue Jan 11, 2005 10:56 am
Posts: 8577
Location: New York City
What a great build, Jim. Just lovely.


Report this post
Top
 Profile  
Reply with quote  
PostPosted: Fri Nov 14, 2014 11:25 am 
Offline
User avatar

Joined: Tue Jan 11, 2005 1:40 pm
Posts: 8179
Location: New Jersey
Thanks Jim. Was wondering how you did that. Great work - love the way the ship looks with the revisions.

_________________
Martin

"Tomorrow is the most important thing in life. Comes into us at midnight very clean. It's perfect when it arrives and it puts itself in our hands. It hopes we've learned something from yesterday." John Wayne

Ship Model Gallery


Report this post
Top
 Profile  
Reply with quote  
PostPosted: Fri Nov 14, 2014 4:36 pm 
Offline
User avatar

Joined: Thu Aug 27, 2009 11:05 am
Posts: 2261
Location: Paris France
Hello Jim

always a work of surgical precision :thumbs_up_1: a delight to follow
cheers
Nicolas

_________________
https://ladiagonaledubosco.blogspot.fr/


Report this post
Top
 Profile  
Reply with quote  
PostPosted: Sat Nov 15, 2014 2:38 am 
Offline

Joined: Tue Feb 06, 2007 10:24 am
Posts: 2498
Location: Belgium
Many thanks for this detailed step-by-step build log Jim!
It is a pleasure to see a great model of a most interesting ship come alive.

Cheers,

Marijn


Report this post
Top
 Profile  
Reply with quote  
PostPosted: Tue Nov 18, 2014 4:10 pm 
As always, a great job, Jim.

I was wondering if you can reduce yourself to model in the way you do :worship_1: :big_grin: .

Regards,

Santi


Report this post
Top
  
Reply with quote  
PostPosted: Mon Nov 24, 2014 4:34 pm 
Offline
User avatar

Joined: Mon Jan 10, 2005 5:30 pm
Posts: 5386
Location: Nr Southampton England
still actually making progress--albeit at a snails pace--I

spend 75% looking at photos--20% of the time thinking about it and 5% actually making the bits!

This time it was the turn of the fwd davits--again using the chunky etched railway connecting rods

Attachment:
gangut new 063.jpg
gangut new 063.jpg [ 75.56 KiB | Viewed 1197 times ]


I surprisingly had to bend quite a few sets to get four that were almost identical!!!!

Attachment:
gangut new 064.jpg
gangut new 064.jpg [ 57.29 KiB | Viewed 1197 times ]


between the mast and the pilot-house there was another skylight to be made and installed

Attachment:
gangut new 070.jpg
gangut new 070.jpg [ 127.92 KiB | Viewed 1197 times ]


At last I was able to make of brass strip and add the small flying bridge from the conning-tower to pilothouse roof as well as the footway 'twixt the aft davit's operating gantry.

Attachment:
gangut new 074.jpg
gangut new 074.jpg [ 142.85 KiB | Viewed 1197 times ]


after this was all done I noticed 2 x missing cable reels-these were made of fine PE ( North star PE )

-these were fiddly to place accurately underneath the spider web of boat skid structure !


I am hoping to start installing some of the handrails on conning tower, pilot house and gangways

thereafter a few struts, vents and boats and some yard arms... and voila...(!!?) hehehehh!

famous last words !! :big_grin: :smallsmile:

lot more torture to come :big_grin:

Jim Baumann


Attachments:
gangut new 077.jpg
gangut new 077.jpg [ 132.76 KiB | Viewed 1197 times ]

_________________
....I buy them at three times the speed I build 'em.... will I live long enough to empty my stash...?
http://www.modelshipgallery.com/gallery ... index.html

IPMS UK SIG (special interest group) www.finewaterline.com
Report this post
Top
 Profile  
Reply with quote  
PostPosted: Thu Nov 27, 2014 5:51 am 
Again, an awesome work, Jim.

You keep mu eyes glued to PC screen.

Regards,

Santi


Report this post
Top
  
Reply with quote  
PostPosted: Thu Nov 27, 2014 11:35 am 
Offline
User avatar

Joined: Wed Nov 19, 2014 5:13 pm
Posts: 134
Location: Russia, Novgorod
JIM BAUMANN wrote:
and whilst endlessly asking questions...


what is this?

Attachment:
The attachment 0111.jpg is no longer available


any ideas

Cheers

JB


This boat shot (semi-geek) to get on the boat.


Attachments:
QIP Shot - Screen 143.png
QIP Shot - Screen 143.png [ 71.32 KiB | Viewed 1109 times ]
Report this post
Top
 Profile  
Reply with quote  
PostPosted: Wed Jan 07, 2015 4:09 pm 
Offline
User avatar

Joined: Mon Jan 10, 2005 5:30 pm
Posts: 5386
Location: Nr Southampton England
back again at the bench at last-- Christmas abroad, New Year and family et al notwithstanding!

thank you Alexey--that helps! :thumbs_up_1:

meanwhile...

the seemingly endless boat skids and their vertical supports are now pretty much completed...

at last it was time to start adding some railings-- pleasurable :cool_1: ..(?!_)

I used the WEM ultrafine--and they are....

not as easy or as quick as I anticipated--requiring lots of snipping and cut-and-shut to get stanchions in corners and feasible locations

Attachment:
jb new 016.jpg
jb new 016.jpg [ 142.01 KiB | Viewed 1012 times ]


Attachment:
jb new 017.jpg
jb new 017.jpg [ 133.65 KiB | Viewed 1012 times ]


small platforms in the corners for Q/F guns were added of PE scraps

and in-filled with white glue to make level

Attachment:
jb new 018.jpg
jb new 018.jpg [ 161.88 KiB | Viewed 1012 times ]


The fwd bridge wings were made of brass strip--and had the cut outs for the fwd vents cut in with a drill bit, and the extension circular walkways (to clear the vents)
added with brass circles

Attachment:
jb new 029.jpg
jb new 029.jpg [ 146.5 KiB | Viewed 1012 times ]


the under-deck bracing for the bridge wings

Attachment:
jb-new braces.jpg
jb-new braces.jpg [ 186.35 KiB | Viewed 1012 times ]


was adapted from some lattice work PE ( Combrig Henri IV ) and had the not-required-gaps filled with white glue

( since the pics were taken its had a second layer and is now level)

Attachment:
jb new 034.jpg
jb new 034.jpg [ 146.76 KiB | Viewed 1012 times ]


Attachment:
jb new 024.jpg
jb new 024.jpg [ 168.85 KiB | Viewed 1012 times ]


Attachment:
jb new 037.jpg
jb new 037.jpg [ 121.61 KiB | Viewed 1012 times ]


Thereafter the very delicate and thin railings were made -- again by joining many small parts so as to get stanchions symmetrical and on the apex of the corners.

Attachment:
jb new 046.jpg
jb new 046.jpg [ 123.29 KiB | Viewed 1012 times ]


Attachment:
jb new 047.jpg
jb new 047.jpg [ 124.36 KiB | Viewed 1012 times ]


the large blister like hawse-pipe openings were enhanced with a raised ring and drilled out.

later on the anchor chain will exit from here and the hawse-pipe lids left partially open

Attachment:
jb new 021.jpg
jb new 021.jpg [ 167.49 KiB | Viewed 1012 times ]


lots of time-- not much tangible progress but

overall its looking quite attractive

Attachment:
jb new 050.jpg
jb new 050.jpg [ 126.29 KiB | Viewed 1012 times ]


Attachment:
jb new 052.jpg
jb new 052.jpg [ 132.76 KiB | Viewed 1012 times ]


Attachment:
jb new 054.jpg
jb new 054.jpg [ 129.5 KiB | Viewed 1012 times ]


the bridge areas will next get chart table, stowage lockers etc etc to assist in breaking up the lino area...

adding the various davist and boats will give more vertical accented interest to the model as well!!


I am hoping to mount the ship to her waterline base next week--that will make it less vulnerable to potential damage threats when handling !

more soon

Jim Baumann :wave_1: :wave_1:

_________________
....I buy them at three times the speed I build 'em.... will I live long enough to empty my stash...?
http://www.modelshipgallery.com/gallery ... index.html

IPMS UK SIG (special interest group) www.finewaterline.com


Report this post
Top
 Profile  
Reply with quote  
PostPosted: Wed Jan 07, 2015 4:29 pm 
Offline
User avatar

Joined: Tue Jan 11, 2005 1:40 pm
Posts: 8179
Location: New Jersey
JIM BAUMANN wrote:
lots of time-- not much tangible progress but

overall its looking quite attractive


Seems to me you made LOTS of progress, and yes, she is very attractive and eye catching. Great work, Jim.

_________________
Martin

"Tomorrow is the most important thing in life. Comes into us at midnight very clean. It's perfect when it arrives and it puts itself in our hands. It hopes we've learned something from yesterday." John Wayne

Ship Model Gallery


Report this post
Top
 Profile  
Reply with quote  
PostPosted: Wed Jan 07, 2015 4:32 pm 
Offline
User avatar

Joined: Thu Aug 27, 2009 11:05 am
Posts: 2261
Location: Paris France
Woohoo Jim !
In seeing your hands next to your model , we realize the prowess that you perform to add details on this boat :thumbs_up_1:
just perfect
cheers
Nicolas

_________________
https://ladiagonaledubosco.blogspot.fr/


Report this post
Top
 Profile  
Reply with quote  
PostPosted: Sat Jan 17, 2015 5:39 pm 
Offline
User avatar

Joined: Mon Jan 10, 2005 5:30 pm
Posts: 5386
Location: Nr Southampton England
More progress--albeit slow.... :wave_1:

I needed to make some small mooring bits( bollards) for mid-ships and aft

I made these using chunky old PE ladderstock and some small black tape...

with paint they are quite effective and delicate

Attachment:
jb new 072.jpg
jb new 072.jpg [ 176.3 KiB | Viewed 886 times ]


The large ( huge!) bow scrolls ( imperial eagles it seems - twice )

were cobbled together out of a variety of PE scraps..
looks a bit like scrambled egge but quite effective at 1/1 real life viewing distances
still needs be made subtler -- washing down with black and edging and re-colouring with some darker gold

Attachment:
jb new 079.jpg
jb new 079.jpg [ 127.93 KiB | Viewed 886 times ]


Attachment:
jb new 082.jpg
jb new 082.jpg [ 151.66 KiB | Viewed 886 times ]


BREAKTHROUGH !!


at last ............

I have mounted the ship--this makes it easier to handle and less vulnerable...

Attachment:
jb new 114.jpg
jb new 114.jpg [ 161.8 KiB | Viewed 886 times ]


(I made the boot-top/ underwater using a "TL-decal " stripe )


I added some reinforced apertures I could identify on photos

Attachment:
jb new 117.jpg
jb new 117.jpg [ 199.83 KiB | Viewed 886 times ]


and mounted the ship to my usual watercolour paper method as described here

viewtopic.php?f=4&t=37223
( smooth Baltic sea with little wind ! )


now the processing of acres of small boats begins to start covering up all the boat-racks...

Attachment:
jb new 115.jpg
jb new 115.jpg [ 230.82 KiB | Viewed 886 times ]


ship is looking rather more attractive now she is mounted

Attachment:
jb new 119.jpg
jb new 119.jpg [ 183.21 KiB | Viewed 886 times ]


Cheers

JIM B

_________________
....I buy them at three times the speed I build 'em.... will I live long enough to empty my stash...?
http://www.modelshipgallery.com/gallery ... index.html

IPMS UK SIG (special interest group) www.finewaterline.com


Report this post
Top
 Profile  
Reply with quote  
Display posts from previous:  Sort by  
Post new topic Reply to topic  [ 68 posts ]  Go to page Previous  1, 2, 3, 4  Next

All times are UTC - 6 hours [ DST ]


Who is online

Users browsing this forum: No registered users and 45 guests


You can post new topics in this forum
You can reply to topics in this forum
You cannot edit your posts in this forum
You cannot delete your posts in this forum
You cannot post attachments in this forum

Jump to:  
Powered by phpBB® Forum Software © phpBB Group