The Ship Model Forum

The Ship Modelers Source
It is currently Sat Apr 20, 2024 8:15 am

All times are UTC - 6 hours [ DST ]


Post new topic Reply to topic  [ 74 posts ]  Go to page 1, 2, 3, 4  Next
Author Message
PostPosted: Wed May 28, 2008 12:20 am 
Offline
User avatar

Joined: Sat Feb 26, 2005 7:32 pm
Posts: 960
Location: Seattle, Wa.
I'm building the USS Intrepid for the "Spring aircraft carrier group build" and for the 2009 "Seattle Spring Show" next April.

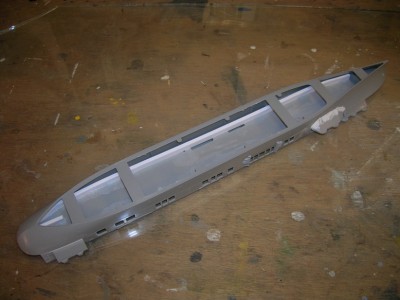
I will be useing the parts left over from my USS Boxer build. I had ordered Dragon's USS Randolph CV-15 kit and their USS Bon Homme Richard kit for that build. The Randoph kit was perfect. The BHR kit sucked. The hull and hangar deck were warped.
I e-mailed Dragon about replacement parts.
Dragon wanted pictures.
I sent pictures.
They sent replacement parts. These parts were warped worse than the original parts.
I e-mailed Dragon again with pictures of original and replacement parts side by side at different angles.
Dragon e-mailed me back and said they would replace the replacements. They were not happy with my request. Their e-mail said that "if the replacement replacements were were bad then maybe I should" That's how the e-mail ended. I guess they wanted me to get some exercise. I figured they wanted me to take a hike or maybe they want me to buy Trumpeter kits.
I used the original parts.
Attachment:
intrepid 2 001.jpg
intrepid 2 001.jpg [ 110.92 KiB | Viewed 2047 times ]
Attachment:
intrepid 2 002.jpg
intrepid 2 002.jpg [ 107.79 KiB | Viewed 2027 times ]

Here's some pictures of the reinforcement I used to straighten out warped hangar deck. I used Evergreen strip .125x.250 to reinforce the hangar deck. I would glue about two inches at a time and clamp down with clothespins. When the glue set, I would do another two inches and so it went on until I was done. There's only one bad spot on the port side I couldn't fix. The forcastle and thwe same problem.


Attachments:
intrepid 2 003.jpg
intrepid 2 003.jpg [ 122.99 KiB | Viewed 2057 times ]

_________________
Gordon


"Then there was one patched-up carrier...."
Vice Admiral Thomas A. Kinkaid


Last edited by Gordon Bjorklund on Sat Sep 06, 2008 5:39 pm, edited 16 times in total.
Report this post
Top
 Profile  
Reply with quote  
PostPosted: Wed May 28, 2008 12:40 am 
Offline
User avatar

Joined: Sat Feb 26, 2005 7:32 pm
Posts: 960
Location: Seattle, Wa.
With the hangar deck installed, it's time to go to the outside of the hull. Work begins on the port side forward 40mm sponson.
Attachment:
intrepid 4 001.jpg
intrepid 4 001.jpg [ 106.17 KiB | Viewed 2066 times ]
Attachment:
Intrepid 5 002.jpg
Intrepid 5 002.jpg [ 88.11 KiB | Viewed 2047 times ]


The small platform aft of the sponson are .015x.060 plastic strips.


Attachments:
intrepid 2 004.jpg
intrepid 2 004.jpg [ 110.27 KiB | Viewed 2045 times ]

_________________
Gordon


"Then there was one patched-up carrier...."
Vice Admiral Thomas A. Kinkaid
Report this post
Top
 Profile  
Reply with quote  
PostPosted: Wed May 28, 2008 12:53 am 
Offline
User avatar

Joined: Sat Feb 26, 2005 7:32 pm
Posts: 960
Location: Seattle, Wa.
more port side sponson pics.
Attachment:
File comment: sponsons shields are .010x.040
Intrepid 7 002.jpg
Intrepid 7 002.jpg [ 82 KiB | Viewed 2100 times ]


Starboard side 40mm sponsons and cat walks.


Attachments:
intrepid 4 002.jpg
intrepid 4 002.jpg [ 108.62 KiB | Viewed 2033 times ]
File comment: catwalks are .015x.060 plastic strip
Intrepid 5 001.jpg
Intrepid 5 001.jpg [ 86.68 KiB | Viewed 2058 times ]

_________________
Gordon


"Then there was one patched-up carrier...."
Vice Admiral Thomas A. Kinkaid
Report this post
Top
 Profile  
Reply with quote  
PostPosted: Wed May 28, 2008 8:30 am 
Offline
User avatar

Joined: Tue Jan 11, 2005 1:40 pm
Posts: 8175
Location: New Jersey
Super work, as always, Gordon. Looking forward to seeing this build progress.

_________________
Martin

"Tomorrow is the most important thing in life. Comes into us at midnight very clean. It's perfect when it arrives and it puts itself in our hands. It hopes we've learned something from yesterday." John Wayne

Ship Model Gallery


Report this post
Top
 Profile  
Reply with quote  
PostPosted: Wed May 28, 2008 10:14 pm 
Offline
User avatar

Joined: Sat Feb 26, 2005 7:32 pm
Posts: 960
Location: Seattle, Wa.
Dragon's Essex class carriers have their fit problems. This is the most obvious one to me. I have sanded and cut the side of the ship to conform with the cut out on the flight deck. I then cut a piece of .030x.080 plastic strip to fit the hole behind the quad 40mm platform.
Attachment:
File comment: You can see the hole to be filled.
Intrepid 7 003.jpg
Intrepid 7 003.jpg [ 76.7 KiB | Viewed 2061 times ]
Attachment:
File comment: The hole filled with .030x.080 plastic strip.
Intrepid 8 002.jpg
Intrepid 8 002.jpg [ 82.92 KiB | Viewed 2049 times ]
Attachment:
File comment: The end results of sanding, cutting and filling.
Intrepid 8 003.jpg
Intrepid 8 003.jpg [ 77.69 KiB | Viewed 2036 times ]


The flight deck is next.

_________________
Gordon


"Then there was one patched-up carrier...."
Vice Admiral Thomas A. Kinkaid


Report this post
Top
 Profile  
Reply with quote  
PostPosted: Wed May 28, 2008 10:38 pm 
Offline
User avatar

Joined: Sat Feb 26, 2005 7:32 pm
Posts: 960
Location: Seattle, Wa.
The top of Dragon's flight deck is nicely detailed but the bottom is just bare flat plastic. I added some generic detail to the bottom of the flight deck using .010x.030 plastic strip. The ship will be mounted to a base and that will make seeing any detail under the flight deck very hard. The same generic detail will be done to the hangar deck. You know someone at the show will break out their mini-mag flashlight and look into the hangar deck. That's why I try to put plane by every opening just to block their view.
Attachment:
File comment: outer edge detail
Intrepid 5 003.jpg
Intrepid 5 003.jpg [ 84.45 KiB | Viewed 2033 times ]
Attachment:
File comment: Using the trianglr to keep lines straight
Intrepid 5 004.jpg
Intrepid 5 004.jpg [ 85.23 KiB | Viewed 2030 times ]
Attachment:
File comment: I scribed lines to keep hangar deck detail straight.
Intrepid 6 001.jpg
Intrepid 6 001.jpg [ 91.7 KiB | Viewed 2034 times ]

_________________
Gordon


"Then there was one patched-up carrier...."
Vice Admiral Thomas A. Kinkaid


Report this post
Top
 Profile  
Reply with quote  
PostPosted: Wed May 28, 2008 10:44 pm 
Offline
User avatar

Joined: Sat Feb 26, 2005 7:32 pm
Posts: 960
Location: Seattle, Wa.
Attachment:
File comment: Hangar deck and bottom of flight deck primed.
Intrepid 11 002.jpg
Intrepid 11 002.jpg [ 93.66 KiB | Viewed 2116 times ]
Attachment:
File comment: Done
Intrepid 7 001.jpg
Intrepid 7 001.jpg [ 89.61 KiB | Viewed 2046 times ]
More flight deck work.
Attachment:
File comment: half done
Intrepid 6 002.jpg
Intrepid 6 002.jpg [ 84.2 KiB | Viewed 2029 times ]

_________________
Gordon


"Then there was one patched-up carrier...."
Vice Admiral Thomas A. Kinkaid


Report this post
Top
 Profile  
Reply with quote  
PostPosted: Wed May 28, 2008 11:08 pm 
Offline
User avatar

Joined: Sat Feb 26, 2005 7:32 pm
Posts: 960
Location: Seattle, Wa.
20mm galleries for the outer edge of the flight. I knew that I needed to scratch build a couple of 20mm galleries when I started this build. The two kits had different types of galleries. Some of these had square corners and the others had rounded corners. I decided to scratch build all of the galleries. I needed to build the following for the catwalk galleries along the flight deck. The bases were made from .030x.060 plastic strip and the shields were made from .010x.080 strip.
1- 10 gun placement
1- 7 gun placement
3- 6 gun placement
1- 5 gun placement
3- 2 gun placement
Attachment:
Intrepid 8 001.jpg
Intrepid 8 001.jpg [ 88.34 KiB | Viewed 2046 times ]
Attachment:
File comment: Holding things together while glue sets
Intrepid 9 002.jpg
Intrepid 9 002.jpg [ 87.18 KiB | Viewed 2030 times ]
Attachment:
Intrepid 9 003.jpg
Intrepid 9 003.jpg [ 87.52 KiB | Viewed 2050 times ]

_________________
Gordon


"Then there was one patched-up carrier...."
Vice Admiral Thomas A. Kinkaid


Report this post
Top
 Profile  
Reply with quote  
PostPosted: Thu May 29, 2008 8:16 am 
Offline
User avatar

Joined: Tue Jan 09, 2007 12:55 pm
Posts: 296
Location: Terzo di Aquileia - Udine - Italy
:thumbs_up_1: :thumbs_up_1: :thumbs_up_1:
Ciao
Luciano

_________________
Best Regard from Italy
http://www.navymodeling.com/


Report this post
Top
 Profile  
Reply with quote  
PostPosted: Thu May 29, 2008 11:39 pm 
Offline
User avatar

Joined: Sat Feb 26, 2005 7:32 pm
Posts: 960
Location: Seattle, Wa.
The island. The rear 20mm gallery was modified by cutting the shield off and replacing it with .030x.080 plastic strip. The forward one was made with .030x.125 strip for the base and again .010x.080 sor the shield.
Attachment:
intrepid 002.jpg
intrepid 002.jpg [ 91.96 KiB | Viewed 2029 times ]
Attachment:
Intrepid 10 002.jpg
Intrepid 10 002.jpg [ 82.44 KiB | Viewed 2038 times ]


Attachments:
File comment: 20 mm galleries
Intrepid 10 001.jpg
Intrepid 10 001.jpg [ 84.7 KiB | Viewed 2013 times ]

_________________
Gordon


"Then there was one patched-up carrier...."
Vice Admiral Thomas A. Kinkaid
Report this post
Top
 Profile  
Reply with quote  
PostPosted: Thu May 29, 2008 11:46 pm 
Offline
User avatar

Joined: Sat Feb 26, 2005 7:32 pm
Posts: 960
Location: Seattle, Wa.
The Island.
Attachment:
Intrepid 10 003.jpg
Intrepid 10 003.jpg [ 78.91 KiB | Viewed 2006 times ]
Attachment:
Intrepid 12 003.jpg
Intrepid 12 003.jpg [ 91.63 KiB | Viewed 2050 times ]
Attachment:
Intrepid 11 004.jpg
Intrepid 11 004.jpg [ 89.76 KiB | Viewed 2071 times ]


The last picture shows all progess todate. Intrepid is today.

_________________
Gordon


"Then there was one patched-up carrier...."
Vice Admiral Thomas A. Kinkaid


Report this post
Top
 Profile  
Reply with quote  
PostPosted: Sat May 31, 2008 12:29 am 
Offline
User avatar

Joined: Sat Feb 26, 2005 7:32 pm
Posts: 960
Location: Seattle, Wa.
Some progress on the island details.The doors and hatches are from GMM"s Watertight door set #700-22. The vents and piping are .030,.025,.020,.015 and .010 plastic rod.
Attachment:
Intrepid 13 001.jpg
Intrepid 13 001.jpg [ 82.11 KiB | Viewed 2064 times ]
Attachment:
Intrepid 13 002.jpg
Intrepid 13 002.jpg [ 87.45 KiB | Viewed 2046 times ]


No modeling tomorrow. I have to go and spend the day up north in Everson.

_________________
Gordon


"Then there was one patched-up carrier...."
Vice Admiral Thomas A. Kinkaid


Report this post
Top
 Profile  
Reply with quote  
PostPosted: Sun Jun 01, 2008 1:33 pm 
Offline
User avatar

Joined: Sat Feb 26, 2005 7:32 pm
Posts: 960
Location: Seattle, Wa.
The road trip is over so now I can get back to modeling. I got a little more work done on the island. The doors, hatches, vents, piping and wind deflectors are on. The deflectors look a little big but if it was any smaller, I would not be able to see it.
The deflectors are are made from .010x.020 plastic strip. The supports are .010x.010 plastic strip. I used a chiesel blade to cut off the excess plastic. I used the smoothest side for the bottom and the rough side for the top. Once the deflectors were glued on and set, I lightly sanded the upper portion smooth. I cut a piece of tape to the size that the deflector need to be and used that to determine the lenght of the deflector. It was the cut to the lenght of the tape.
Attachment:
Intrepid 14 001.jpg
Intrepid 14 001.jpg [ 91.92 KiB | Viewed 2042 times ]
Attachment:
Intrepid 14 002.jpg
Intrepid 14 002.jpg [ 86.47 KiB | Viewed 2018 times ]
Attachment:
Intrepid 14 003.jpg
Intrepid 14 003.jpg [ 91.69 KiB | Viewed 2020 times ]

_________________
Gordon


"Then there was one patched-up carrier...."
Vice Admiral Thomas A. Kinkaid


Report this post
Top
 Profile  
Reply with quote  
PostPosted: Sun Jun 01, 2008 1:38 pm 
Offline
User avatar

Joined: Sat Feb 26, 2005 7:32 pm
Posts: 960
Location: Seattle, Wa.
6-1 update continued
Attachment:
Intrepid 14 004.jpg
Intrepid 14 004.jpg [ 90.52 KiB | Viewed 2024 times ]
Attachment:
Intrepid 14 005.jpg
Intrepid 14 005.jpg [ 87.21 KiB | Viewed 2064 times ]


I will add the platfroms to the stack after I paint the island. Next id s the tripod and masts for the radar.

_________________
Gordon


"Then there was one patched-up carrier...."
Vice Admiral Thomas A. Kinkaid


Report this post
Top
 Profile  
Reply with quote  
PostPosted: Sun Jun 01, 2008 7:04 pm 
Offline
User avatar

Joined: Sat Nov 25, 2006 11:14 pm
Posts: 564
Location: San Diego, California
Beautiful Gordon!! fantastic progress...... it makes me think I build to slow. :wave_1:

_________________
Dan
Field Artillery, King of Battle
Please check out the Secret Society of Model Builders on facebook.


Report this post
Top
 Profile  
Reply with quote  
PostPosted: Sat Jun 07, 2008 2:57 pm 
Offline
User avatar

Joined: Sat Feb 26, 2005 7:32 pm
Posts: 960
Location: Seattle, Wa.
Masts and radar update.

I ordered Tom's #757 Essex class carriers pe for this build. This set is very delicate and bends very easy. This set doesn't come with a yardarm. I should have remembered that from my Lexington CV-16 build. The set seems to have everything else one needs to do an Essex class carrier. The SG radar seems to be a little to large in my opinion. For this build I need an SK,SG (2),YE,SC-2,SM and Mk 4 radars. I found it hard to work with this set because it was to delicate for me, others will probably have no trouble working with it. I used some parts out of the spares box.

The other pe sets I used pieces from are as follows.

Tom's #705 misc. US radar set. SK,YE and Mk4 radar.

Gold Medal Models' #700-1 Naval ship set. SG (1) This set comes with four SG radars but I had used three of them on other builds. The second SG radar on the main mast is the support for a TDY Radar. It's small like the GMM SG radar and when painted it will be hard to tell the difference.

I will order GMM's #700-7 to get a yardarm. This set dosen't come with an SG radar.
Attachment:
File comment: main mast is .030 plastic rod
intrepid 19 003.jpg
intrepid 19 003.jpg [ 72.57 KiB | Viewed 2034 times ]
Attachment:
File comment: foremast is .020 plastic rod
intrepid 19 004.jpg
intrepid 19 004.jpg [ 68.47 KiB | Viewed 2007 times ]
Attachment:
File comment: SK radar base is .030 plasic rod with a .025 hole drilled for SK support.
intrepid 19 005.jpg
intrepid 19 005.jpg [ 68.19 KiB | Viewed 2030 times ]

_________________
Gordon


"Then there was one patched-up carrier...."
Vice Admiral Thomas A. Kinkaid


Last edited by Gordon Bjorklund on Mon Jun 09, 2008 10:17 pm, edited 2 times in total.

Report this post
Top
 Profile  
Reply with quote  
PostPosted: Sat Jun 07, 2008 3:05 pm 
Offline
User avatar

Joined: Sat Feb 26, 2005 7:32 pm
Posts: 960
Location: Seattle, Wa.
A little more progress. I primed everything with Tamiya's spay primer.
Attachment:
File comment: Hull, flight deck and things primed
Intrepid 20 012.jpg
Intrepid 20 012.jpg [ 146.26 KiB | Viewed 2008 times ]
Attachment:
File comment: Flight deck painted w/MM Acryl Dark Tan #4709
Intrepid 21 001.jpg
Intrepid 21 001.jpg [ 142.92 KiB | Viewed 2026 times ]
Attachment:
File comment: Flight deck painted w/MM Acryl (Naval) Flt Deck Stain 21 #4242
intrepid 22.jpg
intrepid 22.jpg [ 133.34 KiB | Viewed 1992 times ]

_________________
Gordon


"Then there was one patched-up carrier...."
Vice Admiral Thomas A. Kinkaid


Last edited by Gordon Bjorklund on Wed Jun 25, 2008 11:56 pm, edited 2 times in total.

Report this post
Top
 Profile  
Reply with quote  
PostPosted: Sat Jun 07, 2008 9:06 pm 
Offline
User avatar

Joined: Sat Sep 30, 2006 9:30 pm
Posts: 363
Location: Richmond TX
Looking good Gordon! Do you have any info or references on Antietam? I'm getting nowhere looking for pics or info. :faint:


Report this post
Top
 Profile  
Reply with quote  
PostPosted: Thu Jun 12, 2008 10:08 am 
Offline

Joined: Thu May 15, 2008 6:28 pm
Posts: 4
Hi Gordon

Thanks for the detailed build with photos, especially the PE recommendations, a great help to those of us starting a DML Essex Class.

Richard


Report this post
Top
 Profile  
Reply with quote  
PostPosted: Thu Jun 26, 2008 10:21 pm 
Offline
User avatar

Joined: Sat Feb 26, 2005 7:32 pm
Posts: 960
Location: Seattle, Wa.
It's been a while since the last update so here is where I'm at now on Intrepid. The hangar deck and flight deck have been primed and painted. It is now time to stripe the flight deck. I use paper, Tamiya tape ( I find that it sticks more to it's self and my fingers than it does to painted plastic.), straight edge and a hobby knife for this.

I first make sure my fingernails are cut before I start laying tape. I have learned from experience that they will mar a painted finish and not care at all about doing so.
Attachment:
File comment: Locating the inner edge of the stripes
Intrepid 23 001.jpg
Intrepid 23 001.jpg [ 104.94 KiB | Viewed 1985 times ]


In this case I'm using paper and tape fo a straight edge. I don't want to use a plastic or metal straight that might mar the paint.
Attachment:
File comment: Using paper and tape as a straight edge.
Intrepid 23 004.jpg
Intrepid 23 004.jpg [ 136.56 KiB | Viewed 1987 times ]


Next I added the small tape strips that have been cut to the width I want the stripes.
Attachment:
File comment: Adding the width strips of tape.
Intrepid 23 006.jpg
Intrepid 23 006.jpg [ 135.05 KiB | Viewed 1987 times ]

_________________
Gordon


"Then there was one patched-up carrier...."
Vice Admiral Thomas A. Kinkaid


Report this post
Top
 Profile  
Reply with quote  
Display posts from previous:  Sort by  
Post new topic Reply to topic  [ 74 posts ]  Go to page 1, 2, 3, 4  Next

All times are UTC - 6 hours [ DST ]


Who is online

Users browsing this forum: No registered users and 10 guests


You can post new topics in this forum
You can reply to topics in this forum
You cannot edit your posts in this forum
You cannot delete your posts in this forum
You cannot post attachments in this forum

Jump to:  
Powered by phpBB® Forum Software © phpBB Group