Joined: Mon Jan 10, 2005 11:57 pm
Posts: 541
Location: Jacksonville, Florida
|
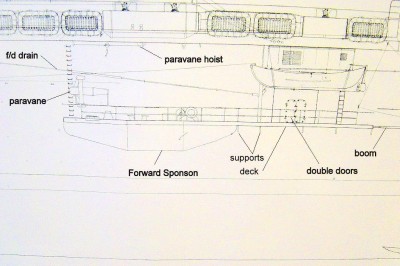
Hello again all  Now that the hulls have been sealed with resin and gelcoat, I'll move on to details on the sides of the CVE hull. Since the carrier is a bit more involved than the DE, I felt I would start here 1st, putting the DE on hold for now. In this post, I thought I would go through the sequence of construction on these hull details for the CVE. The first place to start is with the drawings....Lets take a tour.......... Attachment:
File comment: One of the more challenging aspects here are the sponsons along the side of the hull. This is a top view of the sponsons and the midships platform, stb. side. I'll use these patterns for the styrene decks that are mounted to the sponsons.
 DSC04170.JPG [ 144.06 KiB | Viewed 3327 times ]
Attachment:
File comment: Here's the aft sponson from portside. I've noted some details that I will add.
 DSC04171.JPG [ 203.36 KiB | Viewed 3327 times ]
Attachment:
File comment: The forward sponson layout, again from port side.
 DSC04172.JPG [ 126.85 KiB | Viewed 3327 times ]
Attachment:
File comment: Midships platform from port.
 DSC04173.JPG [ 130.15 KiB | Viewed 3327 times ]
Attachment:
File comment: I have transferred the drawings to poster board, then cut them out as shown here. These will be the patterns for the decks and the sponsons themselves.
 DSC04174.JPG [ 230.63 KiB | Viewed 3327 times ]
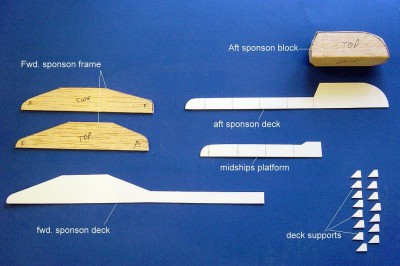
Attachment:
File comment: Using the patterns, I have cut out the parts from the materials I'll be using here. Balsa for the sponsons, .030 styrene for the decks, platform and supports.
 DSC04175.JPG [ 139.61 KiB | Viewed 3327 times ]
Attachment:
File comment: Again using the drawings for reference, I have drawn out the working lines here on the stb. side of the CVE hull. This is the aft sponson area.
 DSC04176.JPG [ 130.7 KiB | Viewed 3327 times ]
Attachment:
File comment: Same procedure used here for the fwd. sponson area.
 DSC04177.JPG [ 92.27 KiB | Viewed 3327 times ]
Attachment:
File comment: An overall view of the working lines, from stb. side.
 DSC04178.JPG [ 172.52 KiB | Viewed 3327 times ]
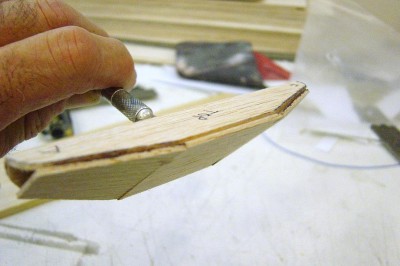
Attachment:
File comment: I'll begin the forward sponson by gluing the back and the top together. Note the small jig used here to get the correct angle of the hull.
 DSC04179.JPG [ 115.19 KiB | Viewed 3327 times ]
Attachment:
File comment: Here I have added 1/16" balsa sheet between the back and the top sides to get the basic shape. I'll true this up a bit with 80 grit sandpaper before proceeding.
 DSC04182.JPG [ 77.59 KiB | Viewed 3327 times ]
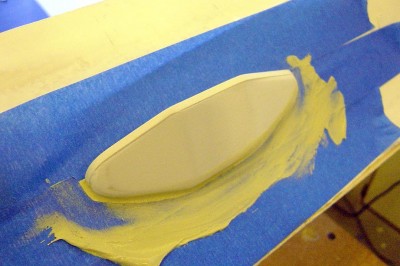
Attachment:
File comment: Next, I have prepared some autobody filler and smoothed it all over the rough shape of this sponson. Before the filler is completly cured, sort of rubbery, I'll shape this out again using 80 grit paper, then follow with 220.
 DSC04183.JPG [ 91.82 KiB | Viewed 3327 times ]
Attachment:
File comment: Sponson now shaped and sanded. I have added a strip of .010 x .125 styrene along the top edge.
 DSC04186.JPG [ 80.63 KiB | Viewed 3327 times ]
Attachment:
File comment: Here's an end view, looking fwd.
 DSC04187.JPG [ 79.56 KiB | Viewed 3327 times ]
Attachment:
File comment: The aft sponson is a bit less complex in shape than the forward one. Here I have shaped a balsa block for the aft sponson, adding the styrene strip as before. Shown here in it's relative position along the hull.
 DSC04190.JPG [ 99.67 KiB | Viewed 3327 times ]
Attachment:
File comment: Another view here.
 DSC04191.JPG [ 79.57 KiB | Viewed 3327 times ]
Attachment:
File comment: Both sponsons now shaped, sanded and primed and ready for installation.
 DSC04192.JPG [ 85.17 KiB | Viewed 3327 times ]
Attachment:
File comment: Another view here.
 DSC04193.JPG [ 74.2 KiB | Viewed 3327 times ]
Attachment:
File comment: Along the hull sides, there are several recessed openings. Two are above the fwd. and aft sponsons, and are access ways to the hanger deck via double w/t doors. The others, 4 in all, are louvers which have fans behind them for hanger deck ventilation. I have marked their locations along the hull, and will now cut these out.
 DSC04195.JPG [ 101.5 KiB | Viewed 3327 times ]
Attachment:
File comment: Using a Dremel with a small router bit, I carefully cut out the openings using my lines for a reference.
 DSC04197.JPG [ 73.07 KiB | Viewed 3327 times ]
Attachment:
File comment: The opening for the double w/t doors now cut out and trued up with a file.
 DSC04199.JPG [ 68.44 KiB | Viewed 3327 times ]
Attachment:
File comment: To make the recessed areas for the doors, I fabricated a simple box from .030 styrene, leaving one side open. I then added a small flange around three sides of the box, from.010 styrene, then the two w/t doors, resin cast by me. I'll make four of these all together, two on each side. This is now ready to install.
 DSC04200.JPG [ 69.23 KiB | Viewed 3327 times ]
Attachment:
File comment: Here is one of the louver openings. The louver itself is a Lego part, works great here. I'll glue this behind the opening. There are eight of these in total, four on each side.
 DSC04202.JPG [ 87.47 KiB | Viewed 3327 times ]
Attachment:
File comment: Doors and louvers now installed.
 DSC04204.JPG [ 85.89 KiB | Viewed 3327 times ]
Attachment:
File comment: I'll now add the flightdeck drain pipe. 3/32" styrene tube used here.
 DSC04205.JPG [ 81.87 KiB | Viewed 3327 times ]
Attachment:
File comment: Drainpipe installed.
 DSC04206.JPG [ 72.97 KiB | Viewed 3327 times ]
Attachment:
File comment: Discharge tubes added along the hull sides.
 DSC04207.JPG [ 80.67 KiB | Viewed 3327 times ]
Attachment:
File comment: Next, I'll add the refueling hoses above the aft sponson deck and the midships platform. .040 styrene strip and .047 rod used here.
 DSC04208.JPG [ 78.3 KiB | Viewed 3327 times ]
Attachment:
File comment: Aft sponson installed using 2 part, 6 minute epoxy.
 DSC04213.JPG [ 65.98 KiB | Viewed 3327 times ]
Attachment:
File comment: Another view here.
 DSC04210.JPG [ 66.37 KiB | Viewed 3327 times ]
Attachment:
File comment: Forward sponson installed. Note those recessed openings.
 DSC04212.JPG [ 63.21 KiB | Viewed 3327 times ]
Attachment:
File comment: Another view.
 DSC04211.JPG [ 52.45 KiB | Viewed 3327 times ]
Attachment:
File comment: Due to the shape of the hull, the fwd. sponson does not fit quite right. I have masked it off here and have applied filler to get rid of any small gaps between the sponson and the hull side joint.
 DSC04214.JPG [ 96.2 KiB | Viewed 3327 times ]
Attachment:
File comment: With the sponsons installed, I now add the supports under the decks and the midship platform, shown here.
 DSC04215.JPG [ 66.12 KiB | Viewed 3327 times ]
Attachment:
File comment: Contact cement used here to attach the decks. This is the top of the fwd. sponson.
 DSC04217.JPG [ 99.89 KiB | Viewed 3327 times ]
Attachment:
File comment: Apply the cement to the bottom of the decks, also.
 DSC04219.JPG [ 93.61 KiB | Viewed 3327 times ]
Attachment:
File comment: Midships platform now installed. I have added an ABS railing.
 DSC04221.JPG [ 90.1 KiB | Viewed 3327 times ]
Attachment:
File comment: Fwd. sponson deck installed and railings added.
 DSC04223.JPG [ 93.55 KiB | Viewed 3327 times ]
Attachment:
File comment: Aft sponson deck installed and railings added.
 DSC04224.JPG [ 84.02 KiB | Viewed 3327 times ]
Attachment:
File comment: Accomodation ladder added, as well as w/t door and ladder. I fabricated the acc. ladder from some spare parts.
 DSC04226.JPG [ 76.02 KiB | Viewed 3327 times ]
Attachment:
File comment: Ladders and a cast metal lifering added to fwd. sponson area.
 DSC04227.JPG [ 81.92 KiB | Viewed 3327 times ]
Attachment:
File comment: Lastly, I have added the 35' boat boom. Tapered wood dowel used here. Pinstripe tape used to simulate the metal rings around the boom and some small steel eyelets added.
 DSC04229.JPG [ 85.82 KiB | Viewed 3327 times ]
Attachment:
File comment: This and the following photos show everything completed and primed, ready soon for final paintwork. A few small details to be added as soon as I get them.
 DSC04230.JPG [ 88.73 KiB | Viewed 3327 times ]
Attachment:
 DSC04231.JPG [ 88.03 KiB | Viewed 3327 times ]
Attachment:
 DSC04232.JPG [ 94.01 KiB | Viewed 3327 times ]
Attachment:
 DSC04233.JPG [ 108.22 KiB | Viewed 3327 times ]
Attachment:
 DSC04234.JPG [ 90.84 KiB | Viewed 3327 times ]
Attachment:
 DSC04235.JPG [ 78.62 KiB | Viewed 3327 times ]
Attachment:
 DSC04238.JPG [ 135.8 KiB | Viewed 3327 times ]
Attachment:
 DSC04239.JPG [ 161.2 KiB | Viewed 3327 times ]
Attachment:
 DSC04236.JPG [ 44.97 KiB | Viewed 3327 times ]
Attachment:
 DSC04237.JPG [ 58.65 KiB | Viewed 3327 times ]
Attachment:
 DSC04240.JPG [ 85.25 KiB | Viewed 3327 times ]
Well, there you have it. A step by step procedure on the hull sides. Not the only way to do this, just thought I would show how I do it. Stay tuned....more to come......I continue on............ 
_________________
Waldorf Productions / Museum Quality Model Warships
Custom Building Services Available
|
|


 your moving very rapidly, a very nice build so far.


 Good step by step how to .