Let me see if I can answer some questions about the 1/200 Arizona.
First, as I have stated before, it is quite tricky to line up the printed pattern with the laser cutter. If you are off even the tiniest amount, then things won't line up properly. Picture a barbette ring where it is three times as thick on one side of the barbette versus the other side. I don't think any of you would tolerate that, because I know I would not. So if it's not lined up, then I have just junked up an entire 11x17 sheet of wood. That gets real expensive real fast.
So right now we are working on completely locking down an alignment technique. Once I get the results back from that, then we'll be able to make some decisions as to how much detail we want to print into the deck.
Things like standard deck planking, uniformly applied (even tinted) are no problem as the pattern does not have to be precisely aligned with the cut; wherever the planks end up is just fine for these purposes. Once you start talking about deck fittings then the whole scenario changes.
On the I-400, for example, there were metal bars inlaid into the deck to form a non-skid tread around the gun mounts. And on the Konig there were rails (much like railroad tracks) laid into the deck for moving the boats around. In both of these instances we have printed a standard plank pattern on the wood, cut the wood as appropriate, then gone back and airbrushed in the metal components in gray over the planked wood being careful to line up these features with the cuts. So that solved that problem at least for now, and allows us to release product.
Once you start talking about edge planking, or barbette planking, or that crazy patchwork stuff on the modern New Jersey we are talking about an entirely different situation. In these instances, the plank pattern would have to be printed, and the cuts would have to line up precisely with those planked patterns. Anything less than perfect alignment is not going to be acceptable. The problem is not in printing the detail, the problem is in getting the cutter to precisely align with the detail. Throw in the issue were the laser printer wasn't maintaining a good grip on the wood, and therefore the image would "stretch" or "compress" inconsistently every time and you can see why attempting to do anything other than linear planking prior to cutting was hopeless.
With the inkjet, the stretch/compress problem is eliminated. There is a minor ink bleed problem that the toner didn't have, but I think that is all manageable. So, for most kits I am pretty confident that I will be able to offer four materials: Natural light maple, natural rich teak, tinted wood (probably maple, but maybe basswood or black gum) and photo paper. (Photo paper would allow me to get really precise, and I am hoping that the burning laser will brown the edges so that there is no white visible at the cuts. If God loves me then the physics of the laser cut will solve that problem and the coloration of the paper after the burn will closely match the tan of the deck or at least be a pleasing shade of brown representing a shadow. But when it comes to the cut, and the pattern, the material that we print on isn't really the issue. So let's take a look at the next steps.
Right now we are worrying about the cut instructions for the laser. This is, by far, the most time-consuming part of the entire process. We want to make sure that our decks are snug up against every fitting, and that all the features line up. If there is too much distance between two features - let's say barbettes just to keep it obvious - then the wood deck would warp or bunch up in that area. Too little distance and the wood would tear. So the distance has to be exactly right, and we're aiming for somewhere in the neighborhood of .010 inch accuracy. (A note here to answer one of your questions: as we are doing alignment, sometimes we work with slightly larger holes so that we can view the fit to make sure that the deck hole is perfectly centered in our cut hole - and if it is, in the final fitting cycle we simply reduce the size of the cut hole because we know that the center is dead on.)
Once we are satisfied with the test cut on cardstock, and we know that it lays down flat without tearing and that everything lines up, then we will replicate any duplicate parts and lay out a final sheet so that it fits nicely on the sheet of wood and so that the wood will fit nicely in a mailer. (Unlike some other manufacturers, we usually sell you the entire sheet to keep all the pieces in place, and then you can cut them loose as you need them much like cutting brass or molded parts from the sprue.) Only after we have the final layout done do we start to worry about coming up with a planking pattern.
At this point (and we are pretty close to this now with the Arizona) we would decide what features we may need to print on the wood, and incorporate that into a pattern that will be printed prior to cutting. And here's where those octagonal hatches come into play. We can print anything on the wood that we like, or we may decide to print nothing on the wood at all to not attempt to render a feature that we feel would be nedlessly out of scale and therefore just "wrong." We would try to come up with patterns that are pleasing to the eye and look right, even if they don't measure out right exacty to scale. So, for the Arizona, we would hit the reference materials and try to come up with something right for those areas of the deck. AND, let me offer this, if you want to send a drawing of exactly how you think it should be to
johnd@scaledecks.com, then I'd be deligted to take a look at that and see if it squares with the reference photos available and use that as the basis for our pattern.
As for other areas, such as edge planking, I think we will have a large enough area to play with to attempt this on the Arizona. And... YES, I was planning to attempt the zig-zag lines so that each plank ends properly into the outer edge plank. I was also planning on doing "frames" around the prominent deck fittings as well, but I am waiting to see the final cuts before I decide about that. If I can do a frame around the barbettes and have a reasonable result then I will do that, too. At 1/200 scale a 4 inch plank is 1/50 of an inch wide so look at a ruler and picture one-third of 1/16 inch or one-half of 1mm. It's very small. Would frames that wide around fittings look bad? I won't know until I try to print them, and more importantly until we try to line them up with the laser cutting process.
As for accuracy of the inkjet, the specs say that I can go to 4800x2400 dpi resolution. The human eye can't detect anything less than 1/1000 for the most part - so the resolution is there to get a good result. And yes, this is better and finer than I was able to get with the laser printer - and the advantage of being able to work with different tints and colors to fool the eye is also a huge plus. I think the results will be great.
Oh, one other thing to mention too is the Scharnhorst. On that kit we are doing parts for the Werker Boats, and a lot of those used darker woods for some of the features. Now with the inket our plan would be to lay down a solid, darker layer (or pehaps a variety of darker tints) to deepen the color of the wood parts that should be darker wood. We can do the same thing for pilot houses and other wood features on other kits that require darker woods, too. We don't think that anybody else is offering that feature. (And for us it's easy; since we're printing on the wood anyway, and we don't have to precisely align the dark features, we can just print a large area or areas and tint that darker, then cut all of the darker pieces out of that zone.) We are also playing with sending different "sprues" for some special kits - say the 1/225 Oregon with the deck cut from one sheet of wood and the pilot house cut from a darker sheet of wood. If the tinting doesn't look right then we'll probably end up doing that for larger features on larger scale kits; I don't think it would make a whole lot of difference on the 1/350 Scharnhorst, but we'll see and we'll do what's right.
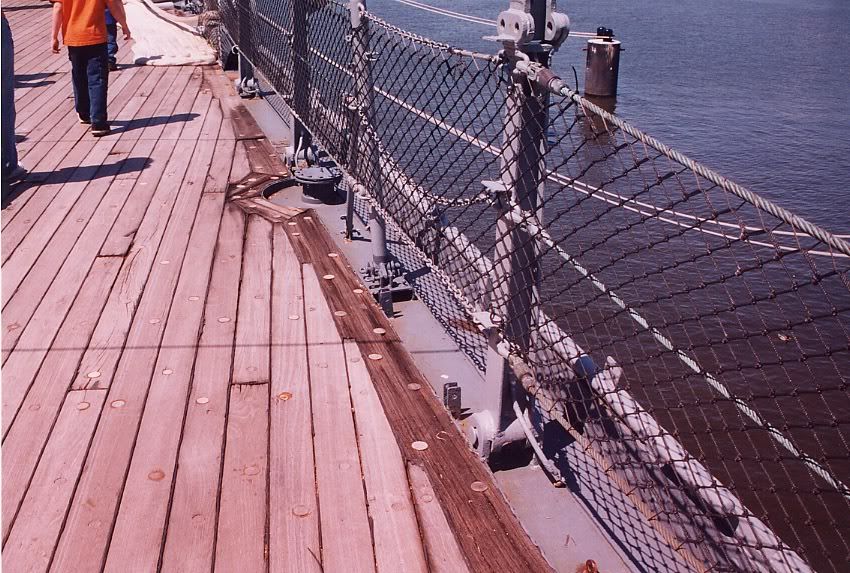
As for the edge planking, failing somebody telling me that this approach would be "all wrong" for the Arizona, (and my copy of Stillwell's book is with my engineer right now) I would think that I will attempt to do an edge joint with intersections something like this photo from the previous page:
As always, everybody's opinions are always welcome and appreciated.
-- John D. --


 )
)