The Ship Model Forum

The Ship Modelers Source
It is currently Fri Apr 19, 2024 1:15 am

All times are UTC - 6 hours [ DST ]


Post new topic Reply to topic  [ 4 posts ] 
Author Message
PostPosted: Sun Oct 02, 2022 7:13 pm 
Offline
ION Model
ION Model

Joined: Tue Jan 04, 2022 8:14 am
Posts: 33
This guide is for non professional photographers. You can do all without expensive professional equipment. If you have a great model, you also need great pictures to present it on a good level. If you don’t own a good camera you can ask your friend to help you. Good picture will help you win and will be also a nice memento for yourself.

Background
1. Use plain background (white, grey, blue, black)
2. Size of the background has to be bigger than your model, the bigger the background the more flexibility you will have picturing it and less movement of the model needed
3. To avoid visible edge on the picture (for example between two sheets of paper) the best is to use one big background and bend.
4. Remember to place it steady, use tape, clips or heavy objects to keep it on one place, you don’t want to destroy the model especially before showing it ;)
5. For bigger models (50-70cm) try to use at least A1/B1 paper size.
6. If you don’t have and can’t buy a big paper you can still use a white wall. Just be sure the model is far enough so you don’t catch the wall texture, the goal is to have the viewer
focusing on your model not the surroundings.

Lighting
1. As a modeller you probably have a good lamp, or a set of lamps so use them for the pictures.
2. The more light – the better it will give you more room to setup the camera with better settings.
3. If the light is too hard, creating strong shadows with visible edge it’s good to diffuse the light. You can use: 80g printing paper, a kitchen paper towel (for 3 layered papers remove
at least one layer). Don’t worry if you need to tape a few towels to each other this will not create unnecessary shadows on the model
4. Do not use different light source with different temperature (for example it's usually not good to mix natural sunlight with a lamp, or two different lamps with different bulb type)
This is to prevent having warm and cold light in one picture. It's easier to have warm light so the camera can compensate the temperature on it's own
5. Put the light on top and slightly in the front of the model (If you have two lamps, put them on 45 degrees on each side in the front of the model)
6. If you don’t own a good lighting, you can still use natural light. The main rule is try not to use direct sunlight (unless you go for hard shadows). Cloudy sky is a great natural light source.

Camera
1. You can use your mobile phone (most of the new models can give you enough quality).
2. Almost any DSLR will work for you.
3. Try to use a tripod, if you don't own one and don't want to buy, you can try to lean your hand on something stiff (for example a desk)

Camera settings
1. If possible, shoot with RAW, this will give you freedom to adjust the pictures afterwards.
2. If you want to go with manual mode you can definitely play with it but it's not recommended for beginners
3. All settings depend on the conditions you have (the more light, the bigger aperture and lower ISO you can set)
4. Semi auto settings might help you without learning too much about the photography:
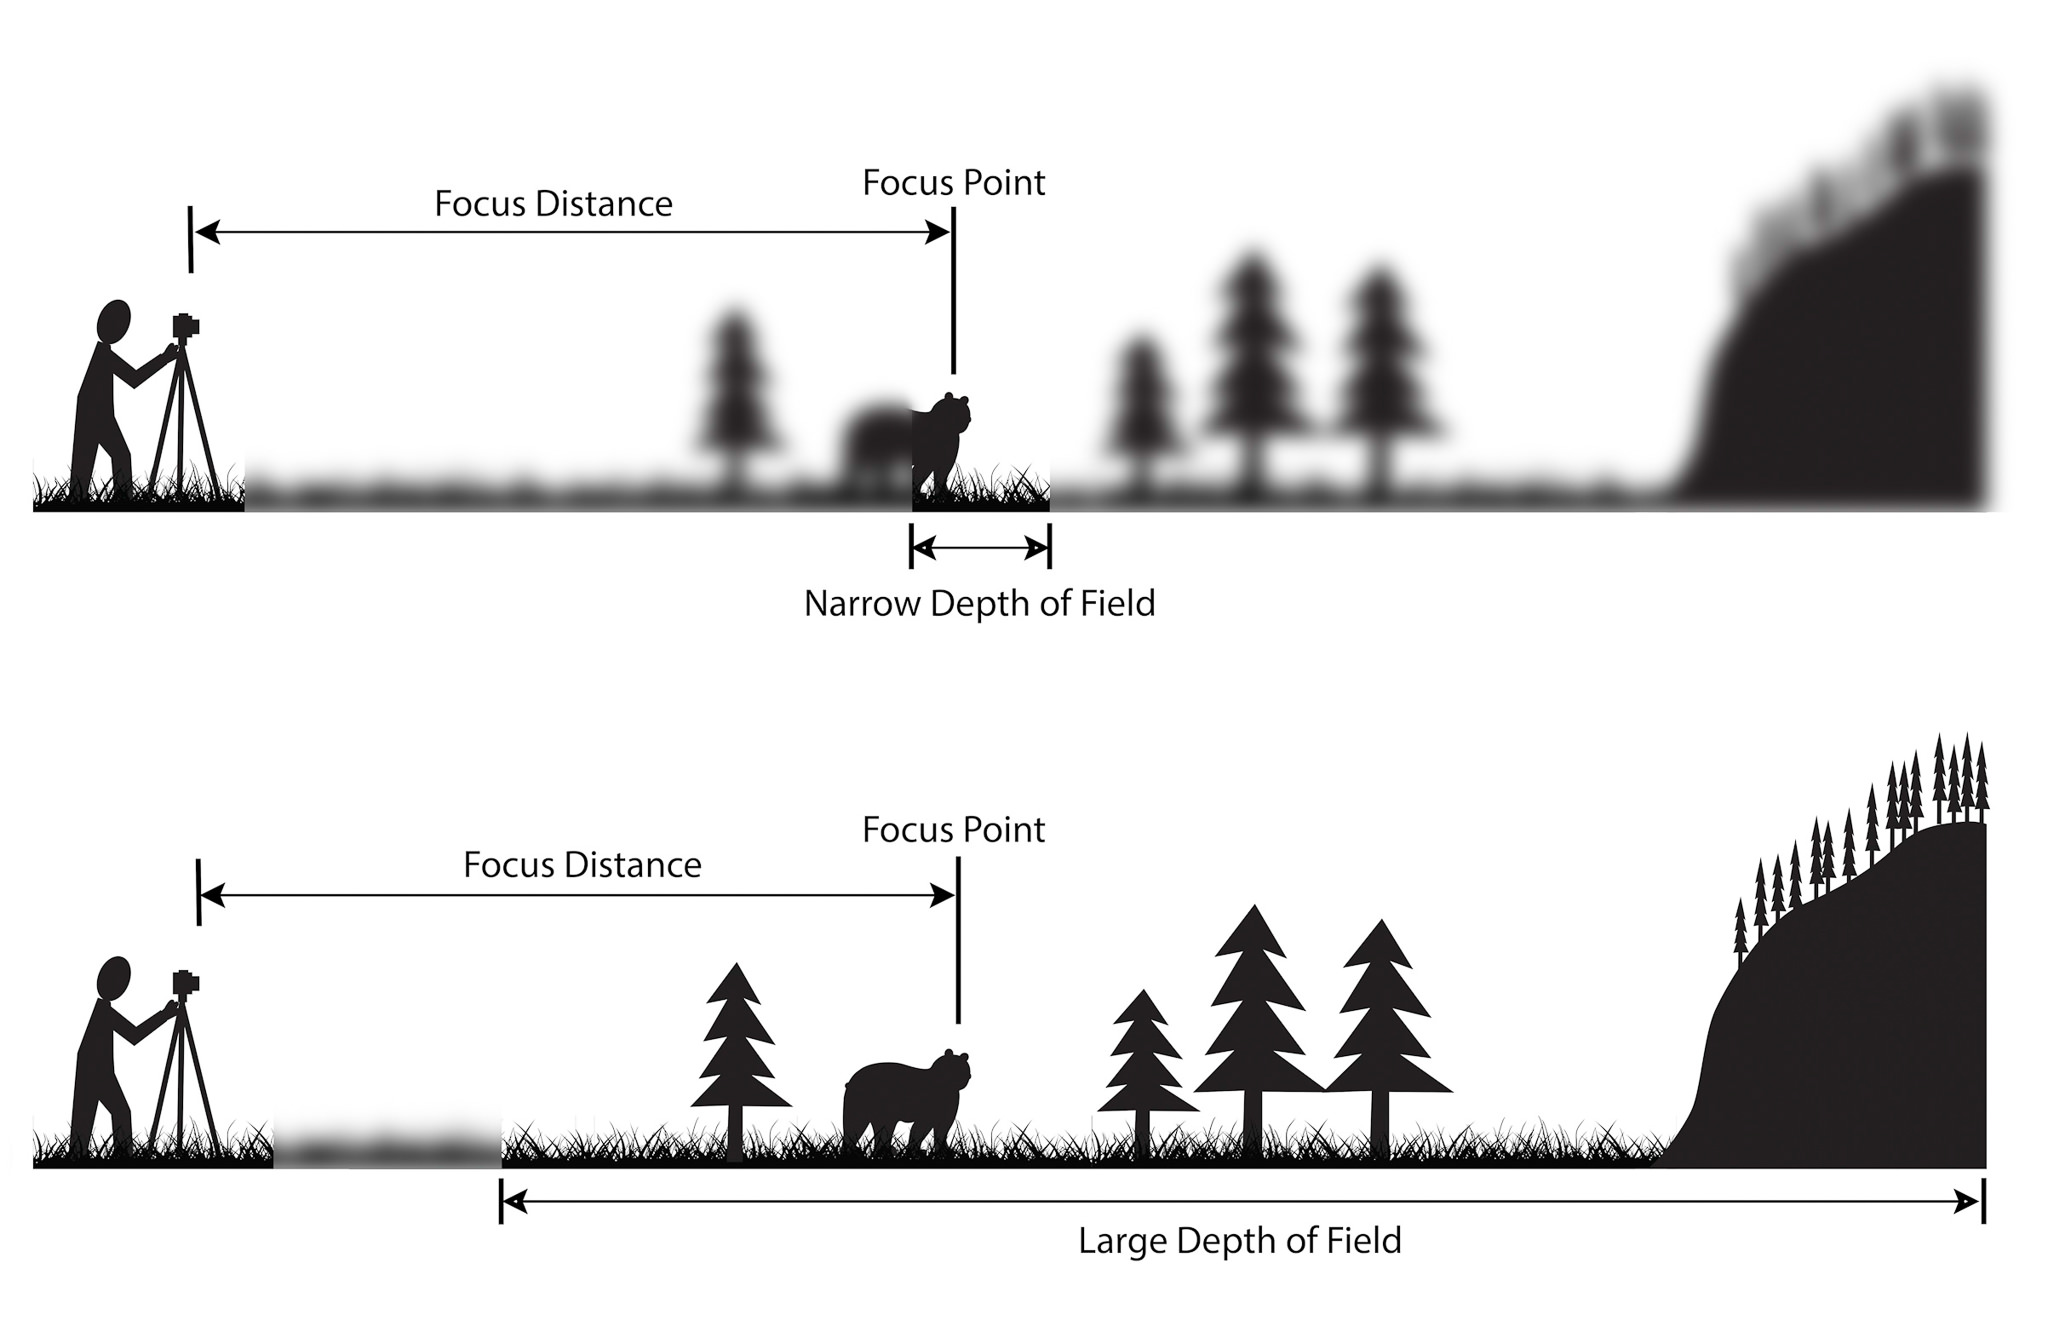
a) Aperture priority (A,AV), it means you setup the aperture to control depth of field and the camera will fit the rest of the settings accordingly. The lower the aperture, the more blur
you will have (F1.4 – more blur, less details , F21 – less blur, more details). This one is recommended because gives more control what the viewer will see on the picture.
https://photographylife.com/wp-content/ ... sketch.jpg Sometimes this mode impact getting darker pictures what you can compensate later in editing
software.
5. Try to use a tripod, this will allow to increase the shutter speed to get more light into the camera and give you more freedom using different settings
6. The framing is important but some lens need some distance to make sharp images, you can crop the picture later if necessary.

Photo editing
1. The most important is to make a good picture, the better picture the less touch it will need in editing software, editing is a task for rather experienced users so first try to focus on
setting up the "studio"
2. You can use any software (Adobe, Gimp, etc.) to edit pictures (if necessary)
3. If you are editing the picture, the goal is to make it as close as possible to the real model. Please try not style the picture, try not to change the contrast, saturation, tint, etc. The
pictures might seem cool but it will make more difficult to judge the model properly.
4. Main settings that will help you achieve the best and realistic results:
a) temperature (if your camera is not set on auto mode or you get to warm or cold pictures)
b) exposure (this will allow you to compensate the light to make it bright enough, try not to blow out whites, if you use white background it can be grey on the picture, thats fine,
the light on the model is more important)
c) crop, it is essential to frame the model correctly, it's better to get the right picture in one go but framing in post production is totally fine
d) contrast, this is rather for advanced users but you can play a little with it, just try no to make shadows black and light areas too bright

If you are wondering what settings should work the best (but all depends on the conditions):
1. RAW or JPEG with max quality
2. ISO: 100 or 200
3. White balance: Auto (you can try other settings for artificial lighting or daylight)
4. Aperture: F16+
5. Focal length 50mm+
6. Shutter speed, adjusted to the conditions

For some more guidance:

Great tips here ----> https://www.warhammer-community.com/201 ... 3evkj96GnU
https://www.youtube.com/watch?v=SerUulVqEZ8&t=1s
https://www.youtube.com/watch?v=YlkzRE33Lb0
https://www.youtube.com/watch?v=di4fH3-ag1o
https://www.youtube.com/watch?v=FpHYU7O48as&t=640s
https://www.youtube.com/watch?v=WMd1QFv06oo

If you have any questions, feel free to post them here.

_________________
https://ionmodel.com figures for battleships in 1/350 & 1/700 scales: US Navy, Royal Navy, IJN, Kriegsmarine and more


Report this post
Top
 Profile  
Reply with quote  
PostPosted: Mon Oct 03, 2022 4:00 am 
Offline
ION Model
ION Model

Joined: Tue Jan 04, 2022 8:14 am
Posts: 33
We are working on making more simple version ;) so stay tunned.

_________________
https://ionmodel.com figures for battleships in 1/350 & 1/700 scales: US Navy, Royal Navy, IJN, Kriegsmarine and more


Report this post
Top
 Profile  
Reply with quote  
PostPosted: Mon Oct 03, 2022 7:38 am 
Offline
ION Model
ION Model

Joined: Tue Jan 04, 2022 8:14 am
Posts: 33
Making pictures with a phone? No problem, here's a simple version of the guide:

Background
1. Use plain background (white, grey, blue, black)
2. Size of the background has to be bigger than your model, the bigger the background the more flexibility you will have picturing it and less movement of the model needed
3. To avoid visible edges on the picture (for example between two sheets of paper) the best is to use one big background and bend.
4. Remember to place it steady, use tape, clips or heavy objects to keep it on one place, you don’t want to destroy the model especially before showing it
5. For bigger models (50-70cm) try to use at least A1/B1 paper size.
6. If you don’t have and can’t buy a big paper you can still use a white wall. Just be sure the model is far enough so you don’t catch the wall texture, the goal is to have the viewer
focusing on your model, not the surroundings.

Lighting
1. As a modeler you probably have a good lamp, or a set of lamps so use them for the pictures.
2. The more light – the better it will give you more room to set up the camera with better settings.
3. If the light is too hard, creating strong shadows with visible edge it’s good to diffuse the light. You can use: 80g printing paper, a kitchen paper towel (for 3 layered papers remove
at least one layer). Don’t worry if you need to tape a few towels to each other this will not create unnecessary shadows on the model
4. Do not use different light source with different temperature (for example it's usually not good to mix natural sunlight with a lamp, or two different lamps with different bulb type)
This is to prevent having warm and cold light in one picture. It's easier to have warm light so the camera can compensate the temperature on it's own
5. Put the light on top and slightly in the front of the model (If you have two lamps, put them on 45 degrees on each side in the top front of the model)
6. If you don’t have good lighting, you can still use natural light. The main rule is try not to use direct sunlight (unless you go for hard shadows). Cloudy sky is a great natural light source.

Phone settings, this is just general advice, you can use auto mode but if your phone has manual mode - play with it. This will not only help you make a good picture but will help you take better pictures from your vacation and family meetings.

Photo editing
1. The most important is to make a good picture, the better picture the less touch it will need in editing software, editing is a task for rather experienced users so first try to focus on
setting up the "studio"
2. You can use any software (Adobe, Gimp, etc.) to edit pictures (if necessary)
3. If you are editing the picture, the goal is to make it as close as possible to the real model. Please try not to style the picture, try not to change the contrast, saturation, tint, etc. The
pictures might seem cool but it will make it more difficult to judge the model properly.
4. Main settings that will help you achieve the best and realistic results:
a) temperature (if your camera is not set on auto mode or you get to warm or cold pictures)
b) exposure (this will allow you to compensate the light to make it bright enough, try not to blow out whites, if you use white background it can be grey on the picture, that's fine,
the light on the model is more important)
c) crop, it is essential to frame the model correctly, it's better to get the right picture in one go but framing in post production is totally fine
d) contrast, this is rather for advanced users but you can play a little with it, just try no to make shadows black and light areas too bright

Questions? Ideas for improvment? Feel free to comment

_________________
https://ionmodel.com figures for battleships in 1/350 & 1/700 scales: US Navy, Royal Navy, IJN, Kriegsmarine and more


Report this post
Top
 Profile  
Reply with quote  
PostPosted: Sun Oct 09, 2022 12:22 pm 
Offline
ION Model
ION Model

Joined: Tue Jan 04, 2022 8:14 am
Posts: 33
This is the shortest option I could make :) But pay attention especially to the last one: explore, try more, learn. This will help you in you future projects :)


Attachments:
Frame-9.jpg
Frame-9.jpg [ 540.47 KiB | Viewed 496 times ]

_________________
https://ionmodel.com figures for battleships in 1/350 & 1/700 scales: US Navy, Royal Navy, IJN, Kriegsmarine and more
Report this post
Top
 Profile  
Reply with quote  
Display posts from previous:  Sort by  
Post new topic Reply to topic  [ 4 posts ] 

All times are UTC - 6 hours [ DST ]


Who is online

Users browsing this forum: No registered users and 1 guest


You can post new topics in this forum
You can reply to topics in this forum
You cannot edit your posts in this forum
You cannot delete your posts in this forum
You cannot post attachments in this forum

Jump to:  
Powered by phpBB® Forum Software © phpBB Group