Page 1 of 19

1/96 H.M.S. VICTORIOUS for R/C

Posted: Fri Mar 03, 2006 6:27 pm
by Victorious
Most people would class, that building a ship from a manufactured hull, is Semi Scratchbuilding and not Scratchbuilding in the true sense of the word.

I totally agree. :thumbs_up_1: I bought this hull, to save time, as it is such a large one, that it would have taken me about six months to build it and would have cost me nigh on as much money in materials.

Having said that, this hull has to have lot's of preparation work done to it, before I can actually start scratchbuilding the rest of the ship. All the upper and lower gallery deck openings have to be cut out, and a lightweight, but strong internal framework put in place.

I have already put in the Keelsom, which is made from 1" x 5/8" pine, bonded to the flat bottom with epoxy two part car body filler, with anchoring screws, screwed into the side of the wood along the bottom edge. These screws protrude 1/2" allowing the filler to be moulded around them and keeping the keel firmly bonded to the ships bottom.
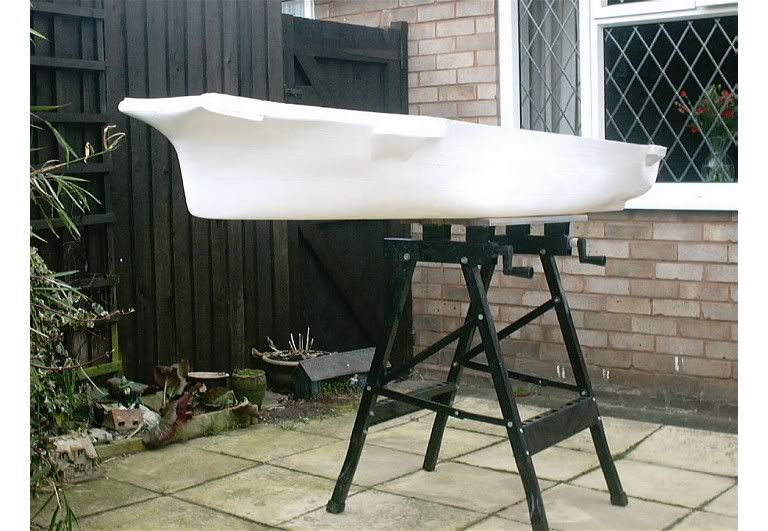
Image

Keelsom in place

Image

Fitting in a framework on a model such as a Carrier, is not as straight forward as it would be with say a Battleship or Cruiser. A Carrier hull, has lots of openings along it's length on both sides, so I thought before I start to put in the framework, it would be better to cut out all the gallery deck openings, so I could at least know where I needed to place the internal bulkheads, which will form part of the framework and support the vairious gallery decks.

Using a small mini drill, I drilled holes all the way round the edge of each opening, then finished off, using a fine cutting disc in another mini drill.

(I have about four of these mini drills, each one set up with a different attachment, to save keep changing the tool needed for the job in hand).

Here is the work done so far, I have laid a peice of yellow foam inside the hull, which highlights the openings I have cut out.

Image

Image

Image

You have seen the LARGE, let me intoduce you to the LITTLE. I bought this kit of the Illustrious, which I am using for 3D reference purposes . This will help me when it comes to fitting the prop shafts and other parts where I may need to see how it looks.

http://i42.photobucket.com/albums/e347/ ... 1_0005.jpg

Work will continue on the hull over the next week or so and once all the framework is in place, it will be put in the Holding Area, whilst work on Marlborough continues.

Enjoy :thumbs_up_1: Victorious

Posted: Fri Mar 03, 2006 6:35 pm
by ARH
Very nice geoff, It should look good against NC. :woo_hoo: :woo_hoo: :jump_1: :jump_1: :wave_1: :thumbs_up_1:

Posted: Fri Mar 03, 2006 6:42 pm
by Dave Wooley
Hi Geoff Looking superb I guess a dream in the making . As Ron said your Victorious alongside the NC. Are you going to have any working features to plan for?
Dave Wooley

Posted: Fri Mar 03, 2006 7:14 pm
by Victorious
I would like to have the rear lift working and (don't laugh) a working catapult that would launch a plane, attached to a long length of nylon fishing line. This would cause the plane to ditch in the lake, but would be then towed by the moving ship, brought alongside and repositioned back on the cat for another launch.
This could be fired by the power of elastic, using the cat track with a firing pin held taught. A servo relaeasing the pin would then allow the elastic to launch the plane.

Another feature I will be doing, is putting in deck landing and take off lights, using fibre optics from an old Christmas tree. There are a row of multicoloured lights that run across the deck at the rear and by having ( three fibres to each light ) a revolving coloured spectacle ( Red, White, Green, passing over the light source, which then alternates the colour showing.
Same at the bow end, there is a line of lights that run along the starboard flight deck, opposite the catapult track.

Posted: Fri Mar 03, 2006 7:18 pm
by ARH
You could stand it in the corner at christmas, saves buying a tree, :woo_hoo: :woo_hoo: :lol_3: :lol_3: :thumbs_up_1:

Posted: Fri Mar 03, 2006 7:53 pm
by Guest
I like the idea of a working catapult. You will need a srtong plane to use for that purpose, otherwise it will get damaged. The landing lights are a good idea too, fibre optics are ideal for something like deck lights, but no good for lighting interiors as you only see the fibre tip lit up.
Best of luck with this build, it sounds interesting to say the least.

Posted: Fri Mar 03, 2006 8:06 pm
by Dave Wooley
hi Geoff interesting ideas In one of the chapters in the book there is a series of pictures illustrating some of the methods used on a number of carrier models for bringing aircraft from the hanger up to the flight deck and down again plus many other types working features.
Dave Wooley

Posted: Sat Mar 04, 2006 6:11 am
by Victorious
Dave Wooley wrote:hi Geoff interesting ideas In one of the chapters in the book there is a series of pictures illustrating some of the methods used on a number of carrier models for bringing aircraft from the hanger up to the flight deck and down again plus many other types working features.
Dave Wooley
I take it that the book you are refering to, is the one you are preparing.

I look forward to buying a copy of your book Dave. :thumbs_up_1:

Mind you, there is a long way to go before I start adding any working features. :lol_3:

Posted: Sat Mar 04, 2006 6:22 am
by Ships R Us
I don't envy you cutting out all those openings in the hull, just take your time, it is easy to slip with those mini cutting discs. :heh:

Are you drilling out all the portholes too? If you do, I should make sure you bond some clear plastic sheet behind the ones close to the waterline.

Good luck with it. I remember the Victorious, but she had been modernised. A truly adorable carrier.

Posted: Sun Mar 05, 2006 4:38 am
by Victorious
Everything cut out now on the starboard side. Portholes will eventually be drilled out, but there are well over two hundred of them.

Posted: Sun Mar 05, 2006 6:22 pm
by Victorious
Done abit more work on the hull today, I may post some pictures tomorrow :thumbs_up_1:

Posted: Mon Mar 06, 2006 3:27 am
by middle_watch
I came across some pictures of the Ark firing a car off the catapult on families day!

Will you be scratch building the aircraft?

Posted: Mon Mar 06, 2006 5:02 am
by Victorious
middle_watch wrote:I came across some pictures of the Ark firing a car off the catapult on families day!

Will you be scratch building the aircraft?
Maybe I will have to, if Dean's new 1/96 aircraft are not ready in time, failing that, I could scratchbuild a couple of clapped out Mini's to fire off my catapult. :lol_3: :lol_3: :lol_3:

Posted: Mon Mar 06, 2006 8:59 am
by klein loewietje
Geoff, wouldn't 1/100 scale aircraft help?
Or are is the difference to big?
If I'm not mistaken, there are a lot of 1/100 aircraft manufactors, although I don't know if there are any who sell FAA aircraft.
Good luck with both HMS Marlborough and HMS Victorious!! :thumbs_up_1:

greetz, Johan :wave_1:

Posted: Mon Mar 06, 2006 4:46 pm
by Victorious
1/100 scale would be okay, but most of the aircraft in this scale are all modern jets. No good for Wartime Victorious. Thanks for your concern. :thumbs_up_1: :thumbs_up_1:

Posted: Mon Mar 06, 2006 5:43 pm
by klein loewietje
Model power has die cast models of hurricanes, corsairs and skyraiders, can't be too hard to change them in FAA ones. I think they're about 5-6� a piece.

If I come along some more, I'll tell!

Greetz, Johan :wave_1:

Posted: Mon Mar 06, 2006 6:52 pm
by Victorious
klein loewietje wrote:Model power has die cast models of hurricanes, corsairs and skyraiders, can't be too hard to change them in FAA ones. I think they're about 5-6� a piece.

If I come along some more, I'll tell!

Greetz, Johan :wave_1:
Hurricanes and Corsairs would be okay, where can you get these from?

Work is continuing with the hull, but I am saving the pictures until it's completed, then I will post what's been done. :thumbs_up_1:

Posted: Mon Mar 06, 2006 7:19 pm
by klein loewietje

Posted: Mon Mar 06, 2006 7:21 pm
by Victorious
klein loewietje wrote:http://www.hobbylinc.com/diecast/airpla ... -scale.htm

Greetz, Johan :wave_1:
Thanks Johan :thumbs_up_1:

Posted: Tue Mar 07, 2006 4:55 pm
by Victorious
Some of the main frames are now in place and all the gallery deck, quarter deck and cabledeck openings have been cut out, except the Port side Cable Deck openings they will be marked to match the Starboard side, once the deck is set level. All the rest just need tidying up with a small file, to ensure that they are all looking neat.

The hull won't need a lot of frames, as it is quite ridgid already, with just three per side, I will be fitting two more aft tomorrow and that should be suffice. I have cut out the Cable Deck & Quarterdeck, and these are in place., the latter will be removable to enable access to the rudder linkage.

I have also fitted the front section of the Flight Deck and formed the round down where it joins the deck, using car body filler.

Here is a view of the frames

Image

This is the Quarterdeck

Image

And the Cable Deck

Image

Round Down

Image

Forward edge of Flightdeck

Image

Full length veiw, with round down sanded to final finish

Image

Bow shot

Image

Enjoy :thumbs_up_1: Victorious