Page 1 of 12
WEM H.M.S. Barham 25.11.1941.
Posted: Fri Nov 25, 2016 4:57 pm
by zs180
Today is the 75th anniversary of the sinking of H.M.S. Barham.
I deemed it appropriate to start this thread today as it will deal with the construction of this famous battleship.
It�s been quite some time since I last made an appearance here. I moved into a new home and it�s taken more time than anticipated to establish the circumstances suitable for building models.
Although still not completely furnished, I now have a separate room devoted to my hobby which is a great improvement over the conditions that prevailed in my previous one-room-flat. With considerably more room available now it is even possible to think about 1:350 scale construction�
This time however I still hold on to 1:700 scale. Many years ago I was fortunate enough to purchase a kit of H.M.S. Barham from Waveline. At that time it was among the best resin kits in 1:700 with delicate castings. On the other hand smaller parts were made of less than pleasant white metal and (in my example) no photoetch was included. Later I decided to depict her shortly before that fateful torpedo attack, accompanied by H.M.S. Valiant and H.M.S. Griffin.
In the meantime Trumpeter�s Version of Barham became available. It was inexpensive so I bought one and made up my mind to build this instead of the Waveline kit because the deck pattern of the latter is quite irregular. At last year�s Scale Modelworld show at Telford I had a chat with Jim Baumann about my plans and he persuaded me to have a go at WEM�s Barham which (being available) he generously sent me later.
Now I�m in the enviable position of possessing all three 1:700 versions of the ship.
In the picture below from up to down the Trumpeter, Waveline and WEM versions (the latter with Admiralty Models main turrets) are shown.
Books and plans used for refence:
Photoetch sets from various manufacturers including WEM, Gold Medal Models, Artist Hobby, Flyhawk, Lion Roar,Starling Models, Five Star and Rainbow many of which will only supply one or two components and brass barrels from Master, (resin parts from Admiralty Modelworks also planned tu utilize not shown):
Prior to commencing construction I always make a plan summarizing the solutions chosen upon scrutinizing available sources. It�s an old fashioned hand drawn sequence with a text (for some strange tradition, myself being Hungarian) in English. It may look like a fool�s diary but proved extremely useful to keep myself organized and prevent me from missing anything out during the lengthy building process. This plan took me about a week to prepare (after working hours, in my free time).
While planning the construction I relied on the superb builds of Mike McCabe, Geonsup Yoon and, most notably on the lovely 1:350 scratchbuilt work of Dino Carancini. Thank you making accessible pictures of your excellent models!
The pictures were shot by my Canon EOS 450D camera and will be reduced in size to conform the rules of this forum.
I must warn anyone interested that this is going to be a really protracted build report � the amount of my free time has not increased so I will proceed slowly this time as well.
George P�k
Re: WEM H.M.S. Barham 25.11.1941.
Posted: Fri Nov 25, 2016 6:29 pm
by simon b
Popcorn at the ready

Re: WEM H.M.S. Barham 25.11.1941.
Posted: Fri Nov 25, 2016 7:12 pm
by MartinJQuinn
Your journal is incredible. No wonder your models are so precise. I will be watching this with great interest. I have a 1/2 built Waveline Barham on the shelf of doom. Good luck!
Re: WEM H.M.S. Barham 25.11.1941.
Posted: Fri Nov 25, 2016 9:28 pm
by medicmike
Great subject. Looking forward to following this one

Re: WEM H.M.S. Barham 25.11.1941.
Posted: Sat Nov 26, 2016 4:07 pm
by zs180
Simon, Martin, Mike,
thank you for your interest in my work.
In fact I did the preparations and some preliminary work this spring in my old appartment but then had to wrap everything up and wait for some months to recommence the build at my new place.
The WEM kit has a large �plate� of resin cast on the underside perhaps to reinforce the hull and prevent it from warping � a phenomenon often seen in their models. This plate is supposed to be sanded off but I decided to to leave it there and sand it flush with the ship�s sides to gain extra freeboard which will allow me to position the model into rather than on the seascape.
The following pictures illustrate this process with the bulge�s fore end being sanded level with the hull.
Re: WEM H.M.S. Barham 25.11.1941.
Posted: Mon Nov 28, 2016 4:31 pm
by JIM BAUMANN
.... I decided to to leave it there and sand it flush with the ship�s sides to gain extra freeboard which will allow me to position the model into rather than on the seascape.....
what a good idea-- !
GREAT to see you commencing the build of Barham!--the methodical approach you have is admirable!...
Bravo and may you progress!
JIM B

Re: WEM H.M.S. Barham 25.11.1941.
Posted: Mon Nov 28, 2016 8:35 pm
by RichardP
Awesome!!!!!
I've been drifting through a 1/350 (Academy) Warspite to Barham conversion since early spring this year and could do with some motivation....
Re: WEM H.M.S. Barham 25.11.1941.
Posted: Tue Dec 06, 2016 8:31 am
by hypno7
This is going to be another stunning model George! Good start, and I see you have plenty of extras and bibliography to work with, but what blew me away is your notes... that looks sick (in a good way I mean).
Re: WEM H.M.S. Barham 25.11.1941.
Posted: Thu Dec 29, 2016 9:26 am
by zs180
Thank you Jim, Richard and Eryck!
Re: WEM H.M.S. Barham 25.11.1941.
Posted: Thu Dec 29, 2016 9:34 am
by zs180
An update at last.
Construction has been delayed by the delivery of my new modelling desk. Once installed it provides much improved working conditions, though.
The ship�s hull has been screwed to my old temporary base. Portholes have been drilled out (perhaps too big, but these old dreadnoughts seem to have had larger portholes than later ships). The armour strakes were simulated by masking with strips of tape then applying coats of Mr. Surfacer.
I did not mask the decks but there was just a little overspray. The bulges have dozens of vents which are not present in the kit. Upon studying photographs I stated that these vents were flush with the surrounding plates, or even somewhat recessed. I put small rectangular pieces of masking tape the appropriate locations before spraying the primer and reinforced the outline with a pin after the primer had dried. It hasn�t turned out very regular and uniform in shape� If I knew then what was available, I wouldn�t have gone through all this.
Re: WEM H.M.S. Barham 25.11.1941.
Posted: Thu Dec 29, 2016 10:04 am
by zs180
Re: WEM H.M.S. Barham 25.11.1941.
Posted: Thu Dec 29, 2016 10:10 am
by zs180
Well into the construction I was made aware of the existence of FlyHawk�s superset for the 1:700 Warspite
(
and Queen Elizabeth (sadly no Barham here) by Trumpeter - I didn�t hesitate to order both (my next ship will be Valiant, almost identical to QE at this time). Even in this early stage I could benefit from this marvellous set by utilising the finely etched blast covers for the bulge which improved my scratchbuilt ones tremendously.
Next I will cut almost everything off the main and forecastle decks and pour all the brass I have on them.
Re: WEM H.M.S. Barham 25.11.1941.
Posted: Thu Dec 29, 2016 11:08 am
by JIM BAUMANN
Wow--you have been busy!
The brass PE lids have tidied up the vents!
On my 1/700 Royal Oak build ( seems like eons back but a mere 13 tears ago! ) from the WSW base...
I also concluded the lids on the bulge were flush--
and I recall I suggested them with a paint tone differential outlined in pencil see images x 2 below
If I was going to do it again-
-I would make a small metal blade punch ( out of a strip stainless steel PE waste; edge sanded into a blade )
bent into suitable desired shape, then pressed into a blob of filler paste ( to stabilise the shape and make a handle)
and press this cutting punch( with a small hammer tap ) onto black or grey decal strip
==> apply the hatches as a decal and later paint over the whole lot
could work!?
JB
Re: WEM H.M.S. Barham 25.11.1941.
Posted: Thu Dec 29, 2016 2:50 pm
by PetrolGator
I always love following your builds. I learn so much from the excellent work you put into these vessels.
Re: WEM H.M.S. Barham 25.11.1941.
Posted: Thu Dec 29, 2016 2:55 pm
by LE BOSCO
as usual ..a great work
cheers
Nicolas
Re: WEM H.M.S. Barham 25.11.1941.
Posted: Thu Dec 29, 2016 5:17 pm
by zs180
Chris & Nicolas, thank you very much!
Jim, with hindsight I am glad that I initially made a shallow recess for those bulge vents. I also sanded down the backside of the PE covers. This way they don't really protrude from the surface surrounding them.
The method outlined in your post is truly ingenious - I am sure it works.
I have two Royal Oaks in my stash - one from WSW and one from Samek.
I will use your beautiful model as an inspiration when it comes to building them although I think they will be completed as other members of the R class.
Re: WEM H.M.S. Barham 25.11.1941.
Posted: Sun Jan 15, 2017 5:41 pm
by zs180
Some progress to report:
after almost everything has been shaved off the forecastle deck
the ground tackle and the fittings surrounding it have been rebuilt using various detail sets and some scratchbuilt parts. The the rest of the forecastle deck and the quarterdeck will be treated similarly.
Re: WEM H.M.S. Barham 25.11.1941.
Posted: Sun Jan 15, 2017 10:55 pm
by Aop Aur
Great project of a handsome ship! I'll be watching for more progress!
Aop
Re: WEM H.M.S. Barham 25.11.1941.
Posted: Sun May 21, 2017 5:37 am
by zs180
It�s been a long time since I last posted an update. Alas I�ve been extremely busy with work and the progress I have made is moderate at best.
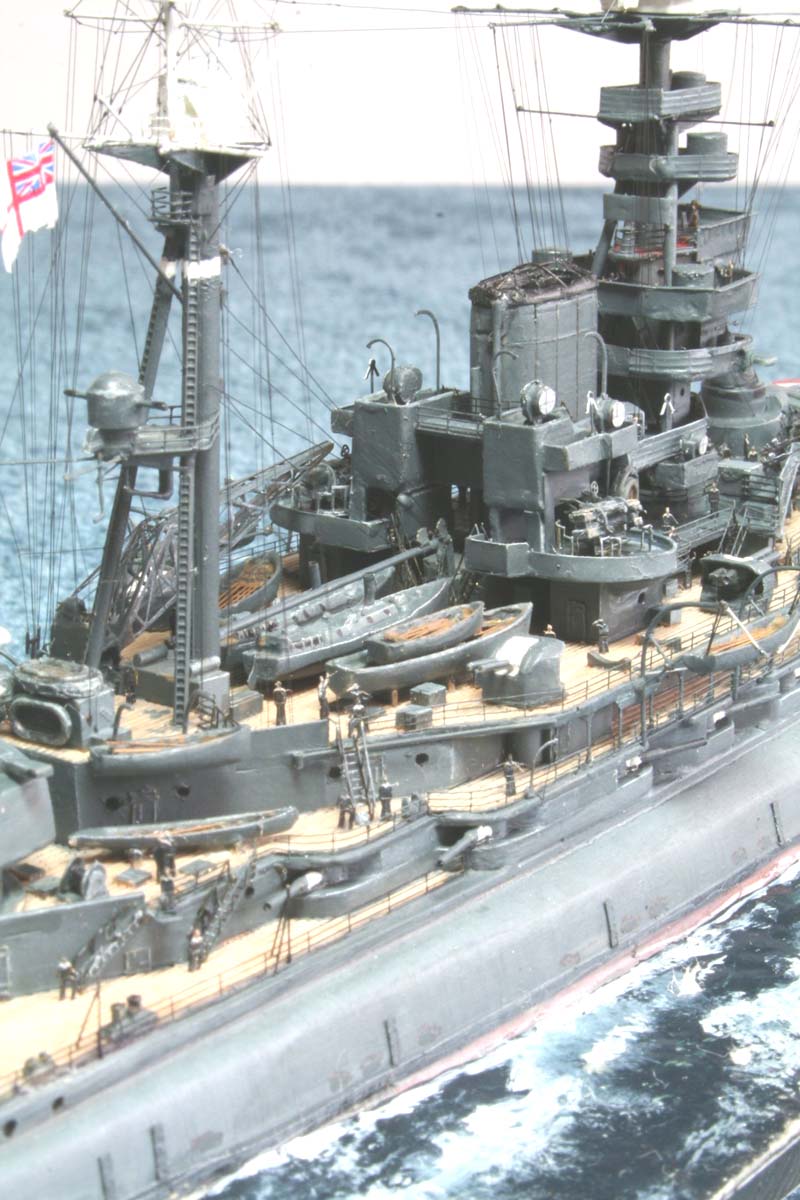
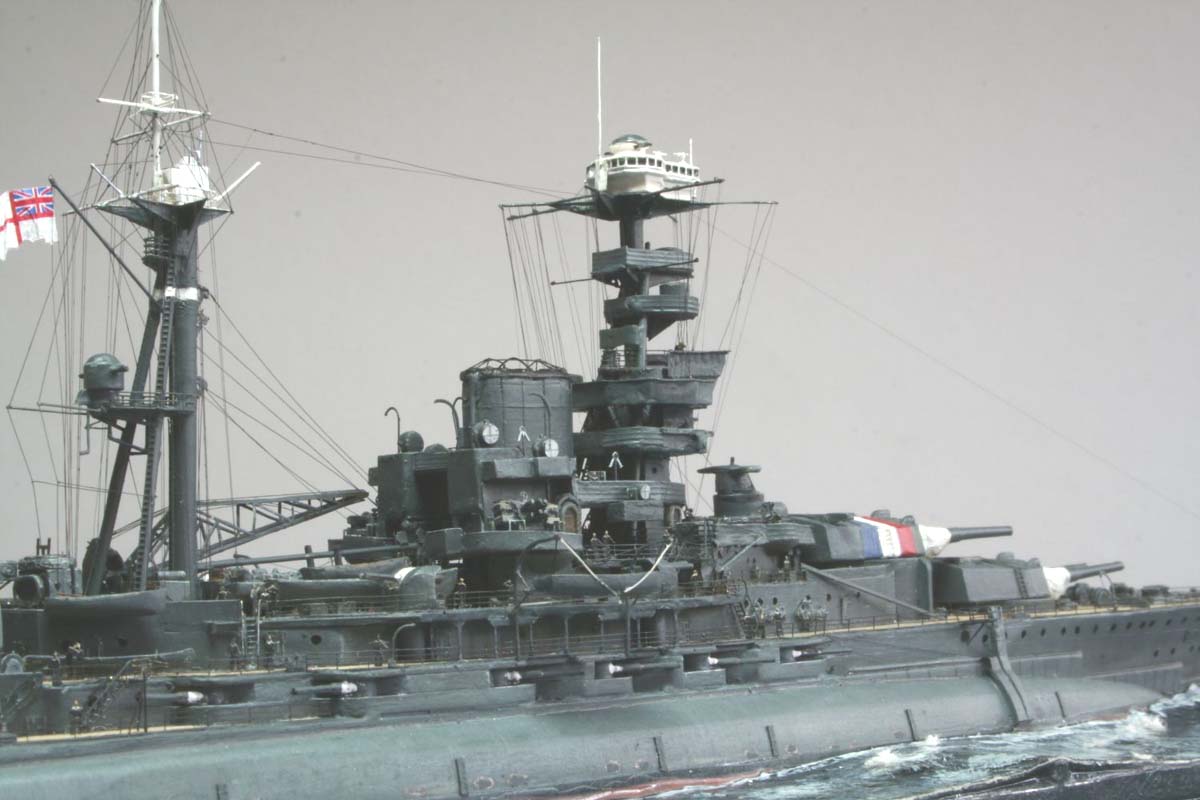
I carried on with the detailing of the deck fittings. Barham had less superstructure than the other members of the class (in their rebuilt configuration). Consequently there is quite a lot of equipment on the forecastle deck and quarterdeck. I tried to use the most accurate items of the photoetched details at my disposal. Unfortunately the state depicted (as sunk) is poorly documented (at least I was unable to unearth good quality photographs aside from a nice, high-res starboard view). On the other hand even the most respected plans contain errors. The only commercially available plan containing every detail to scratchbuild a 1:350 scale replica, the Profile Morskie booklet should be interpreted with caution. I adopted a policy of confirming every detail with other sources, correcting not- too- infrequent errors and only accepting info from that booklet when no picture or drawing from the detail in question was available (to me).
Thus I assembled eight washdeck lockers, 21 small and four large skylights plus two night lifebuoy casings from the Artist Hobby set of RN deck fittings which I found the most accurate and impressive of all that I had.
I glued them along with a total of 82 mushroom vents of three sizes from two manufacturers (FyHawk and Rainbow)
to two pieces of cardboard for the two camouflage colours (AP 507B and C) to make pre-assembly painting convenient.
The quarterdeck skylights in various stages of assembly:
There are 14 four inch ammunition lockers - these were folded to shape using the Lion Roar caisson and store box set with very nice relief etched front plate.
11 cable reels were also prepared for later assembly � I attached handles to them cut from pieces of railing.
Re: WEM H.M.S. Barham 25.11.1941.
Posted: Sun May 21, 2017 5:44 am
by zs180
Of course not every deck detail is available from aftermarket manufacturers � there is still room for scratchbuilding. A good example for this is the variety of tall vents surrounding barbette B and X. The moulded-on vents were cut off the barbettes, then new ones have been fabricated from Evergreen strips, laminated, sanded to shape and provided with bracing cut from 1:700 and 1:600 railing.
The tiny vents were somewhat difficult to handle.
I similarly scratchbuilt 12 short vents which will be located on the after part of the forecastle deck.