The Ship Model Forum

The Ship Modelers Source
It is currently Fri Jun 20, 2025 11:40 am

All times are UTC - 6 hours [ DST ]


Post new topic Reply to topic  [ 166 posts ]  Go to page Previous  1 ... 5, 6, 7, 8, 9  Next
Author Message
PostPosted: Sat Mar 05, 2022 4:40 am 
Offline
User avatar

Joined: Mon Jan 10, 2005 5:30 pm
Posts: 5568
Location: Nr Southampton England
Good morning!
it is a very sharp looking model !

crisp and 'edgy' as a real ship would be.

I have been watching and will continue to do do!

Best wishes
JB

_________________
....I buy them at three times the speed I build 'em.... will I live long enough to empty my stash...?
http://www.modelshipgallery.com/gallery ... index.html

IPMS UK SIG (special interest group) www.finewaterline.com


Report this post
Top
 Profile  
Reply with quote  
PostPosted: Tue Mar 08, 2022 4:07 pm 
Offline

Joined: Sun Feb 13, 2011 3:11 pm
Posts: 273
I really like what I see here so far. I'm contemplating a 1:200 USS Hornet kit right now, but I'm not sure I have the heart to add all of the P.E. handrails and such.

_________________
Kevin

30 years ago I started off with nothing, and I've still got most of it!


Report this post
Top
 Profile  
Reply with quote  
PostPosted: Wed Mar 09, 2022 4:33 am 
Offline
User avatar

Joined: Thu Dec 28, 2017 10:48 am
Posts: 224
Hi Jim and Kevin, thank you for the words of encouragement, I hope to do another update soon, currently busy in the workshop machining just now. Kevin a 1/200 Hornet sounds impressive and yes I'm sure it will involve an awful lot of P/E detail, well worth the effort though.
The 3D-printed ship's boats are now in transit from NZ, once here I'll post some pictures.

Kind regards

Pete


Report this post
Top
 Profile  
Reply with quote  
PostPosted: Tue Mar 15, 2022 2:48 pm 
Offline
User avatar

Joined: Thu Dec 28, 2017 10:48 am
Posts: 224
Hi guys

I received my parcel from NZ this morning, I haven't cleaned them up yet but here's a few pictures to give some idea of the quality/detail. So I now have all of Hood's boats with the exception of the Admirals barge which I'm thinking of converting the extra 35ft FMB I bought to represent it. I'm not ready for fitting the boats yet and currently very busy on my other project but I may take a look at painting the 16ft dingy's and mounting them at some point soon...:)

Image

Image

Image

Pete


Report this post
Top
 Profile  
Reply with quote  
PostPosted: Tue Mar 15, 2022 2:55 pm 
Offline

Joined: Thu Jan 05, 2017 8:39 pm
Posts: 156
Good grief! Those are gorgeous! :thumbs_up_1:


Report this post
Top
 Profile  
Reply with quote  
PostPosted: Sat Apr 02, 2022 4:54 pm 
Offline
User avatar

Joined: Thu Dec 28, 2017 10:48 am
Posts: 224
Not much done in recent weeks, the dreaded bug got me and I found myself in hospital for a couple of days but feeling a bit better now. I have one very poor picture to share, poor as it was dark and the flash doesn't focus well, usually better to take the image without flash but I was too lazy to set it up....lol

Ok, so work done includes all of the winches, BTW, Pontos shows 15 winches, the kit shows 14, I can only find 14 positions on both the kit and Ponto's instructions, if anyone knows where the 15th goes (if indeed it goes anywhere) please let me know.

As well as the winches I have also fitted the first of the 3D printed boats, in this case, the two 16ft dingy's which hang either side of the radio HF shack(or whatever it's called?) For these prints, the rudders are stowed across the stern-sheets.

The picture shows the port side, alas Pontos only allows for a single 16ft dingy and so I only have two oars for the one side. I'll find something else to hide this, some rope, Denton rafts or even a canvas cover, we shall see. Also, this is the side that's supposed to have the 16ft FMB and thus has different cradles but you can't really notice this with the boat fitted and the boat still sits level.

Image

I'm not happy with the painting yet and have ordered some better brushes to touch in where needed, I also need to paint the oar hooks. I'll try to take the photo for the next update in daylight.

Pete


Report this post
Top
 Profile  
Reply with quote  
PostPosted: Sun Apr 03, 2022 6:52 am 
Offline
User avatar

Joined: Thu Dec 28, 2017 10:48 am
Posts: 224
Photo taken in daylight, there's a bit of glare as the model is now back in its case for protection. At least this photo is a little clearer.

Image

Pete


Report this post
Top
 Profile  
Reply with quote  
PostPosted: Tue Dec 13, 2022 8:09 am 
Offline
User avatar

Joined: Thu Dec 28, 2017 10:48 am
Posts: 224
Hello all

as some will remember I've been busy building live steam loco, this has come to a temporary halt as we have moved house and need to build a new workshop before I can continue with the build. The good news is that I plan to do some more work on Hood while the tools are down. i can't all my tools are in storage but I can get on with the large amount of 3D printed items from Micromaster.
To add to this stack today I have just received the latest parts from NZ.

This time around we have Hood's main guns and a steam pinnace.

A couple of photo's to get things started.

Overall view of the parts as packed, I was happy to see that the steam pinnace funnel is separate, which will make life easier to have the boat stored properly.

Image

And this picture shows a close up of B turret with its UP mount platform.

Image

i have bought myself a small modeling tool kit and glue so that I can assemble the parts, I'll report back when the guns are assembled and sitting on the model, they, of course, won't be painted until later once I can get the gear needed from storage.

Pete


Report this post
Top
 Profile  
Reply with quote  
PostPosted: Tue Dec 13, 2022 8:10 pm 
Offline
User avatar

Joined: Tue Jan 11, 2005 1:40 pm
Posts: 8339
Location: New Jersey
MicroMaster produces very impressive stuff

_________________
Martin

"Tomorrow is the most important thing in life. Comes into us at midnight very clean. It's perfect when it arrives and it puts itself in our hands. It hopes we've learned something from yesterday." John Wayne

Ship Model Gallery


Report this post
Top
 Profile  
Reply with quote  
PostPosted: Wed Dec 14, 2022 3:40 am 
Offline

Joined: Wed Jan 21, 2009 1:51 pm
Posts: 2874
Nice to see the steam launch making an appearance! Hood initially carried two with only minor differences; this printed one resembles the launch not kept, but differences are small so good enough. I would recommend scraping off the coaling chutes from the deck as Hood's launches were oil-fired... (discs on either side of the funnel position).


Report this post
Top
 Profile  
Reply with quote  
PostPosted: Wed Dec 14, 2022 4:37 am 
Offline
User avatar

Joined: Mon Jan 10, 2005 5:30 pm
Posts: 5568
Location: Nr Southampton England
Ha!

Now THAT is the kind of detail that is sooooo easily overlooked
Bravo EJ !!

>>>... scraping off the coaling chutes from the deck as Hood's launches were oil-fired... <<<

Jim B :thumbs_up_1:

_________________
....I buy them at three times the speed I build 'em.... will I live long enough to empty my stash...?
http://www.modelshipgallery.com/gallery ... index.html

IPMS UK SIG (special interest group) www.finewaterline.com


Report this post
Top
 Profile  
Reply with quote  
PostPosted: Wed Dec 14, 2022 4:58 am 
Offline

Joined: Wed Jan 21, 2009 1:51 pm
Posts: 2874
Have to admit that I'd never would have noticed a month ago, but I started on making my own steam launch so... :smallsmile: 
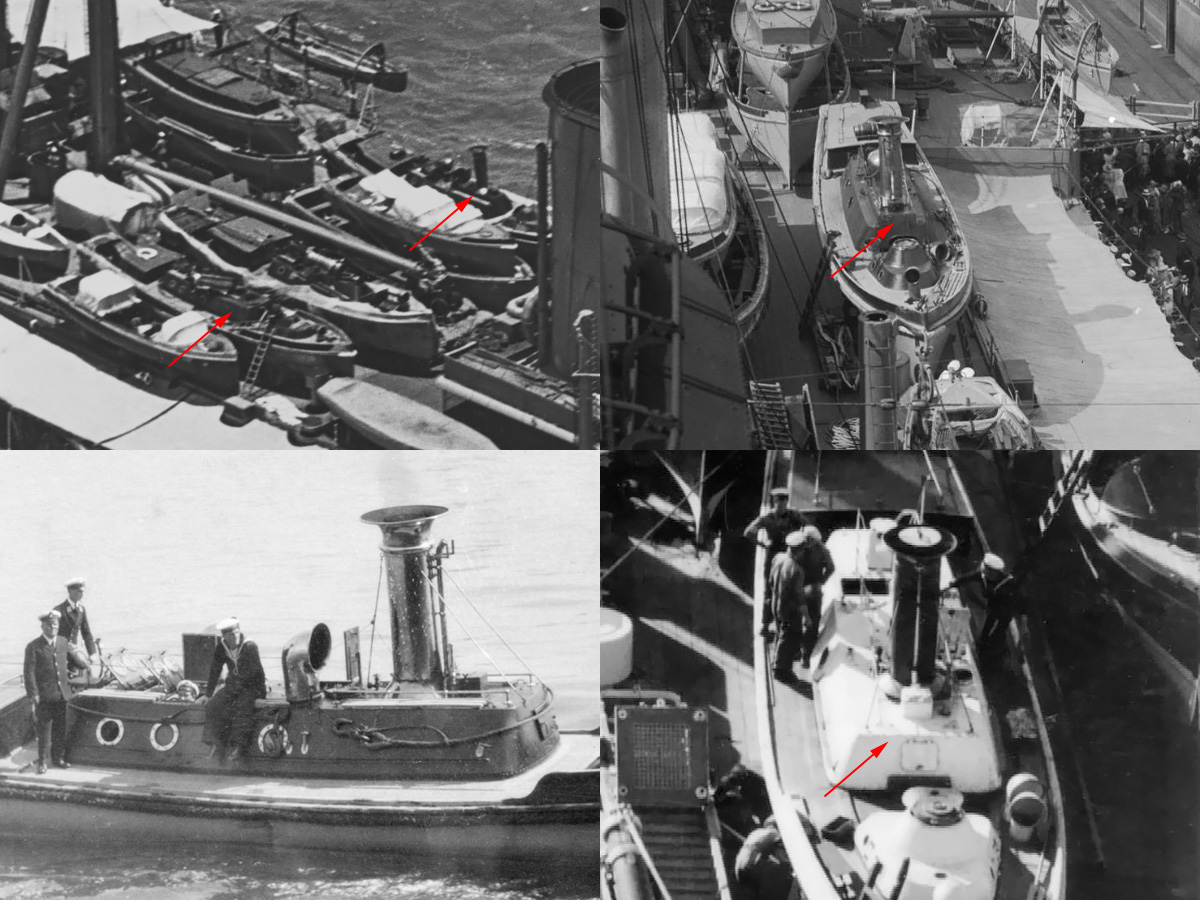
The drawing by Ough is a good starting point but you immediately notice small differences and down the rabbit hole once more... Found this nice link:

https://navyhistory.org.au/steam-picket-boats-some-reminiscences/
abovelink wrote:
From November 1923 to October 1924 I was fortunate enough to be midshipman of HMS Hood’s first picket boat. This period included ‘The World Cruise,’ sometimes called ‘The Empire Cruise’. Both Hood’s picket boats were oil-fired 50 footers. Each had a double crew of one midshipman, one petty officer coxswain, two able seamen bowmen, one able seaman sternsheetsman, one stoker petty officer for the engineroom, and one stoker for the boiler room.


You can notice other difference between the two boats here:

Image

Minor differences in the center "superstructure" and hatch layout can be observed with the Ough drawing; AOTS Hood has the right one drawn (of course?). The port side picket was landed, the starboard picket was still aboard when Hood was sunk (despite 100% of all references claiming both were landed). Note that neither picket has coal chutes on deck.


Report this post
Top
 Profile  
Reply with quote  
PostPosted: Wed Dec 14, 2022 5:15 am 
Offline
User avatar

Joined: Thu Dec 28, 2017 10:48 am
Posts: 224
Thanks guys and a big thank you to EJ...I did see your excellent post on Brit forum but couldn't post as forgotten my PW. After a number of attempts to get in with numerous 29 minute lock outs I gave up for the time, I will try again though.. IIRC I have already fitted the coal shutes but will take a look to see what can be done.

Thanks again EJ for your excellent research that we all benefit from.

Kind regards

Pete


Report this post
Top
 Profile  
Reply with quote  
PostPosted: Wed Dec 14, 2022 5:18 am 
Offline

Joined: Wed Jan 21, 2009 1:51 pm
Posts: 2874
You're welcome, and, did you press the "forgot password" button? :wave_1:


Report this post
Top
 Profile  
Reply with quote  
PostPosted: Wed Dec 14, 2022 6:51 am 
Offline
User avatar

Joined: Thu Dec 28, 2017 10:48 am
Posts: 224
EJFoeth wrote:
You're welcome, and, did you press the "forgot password" button? :wave_1:


I did...but couldn't get past the picture 'not a robot' id page...?


Report this post
Top
 Profile  
Reply with quote  
PostPosted: Thu Dec 15, 2022 10:52 am 
Offline
User avatar

Joined: Thu Dec 28, 2017 10:48 am
Posts: 224
Well, I have done some work on X and Y turrets today, first checking that Micromaster had got the details right for each turret for as you know there are subtle differences. from what I can tell they have done an excellent job, only to be expected from Simon who strives for accuracy.

First up is 'Y' turret which has a ladder up the rear face and also no ribs on the same face, sorry not sure what these are called. I haven't cleaned the small pieces of sprue from the ladder yet and will fill any joints before painting, the other thing that is on these prints but not on the trumpeter parts are the small slices cut off the bottom corners. Each turret is made in 5 parts except B turret which has the UP platform as a separate item.

Image

Next up is 'X' turret with the remains of the aircraft platform, note also the small ladder on the port side. The ladder and platform are all printed as part of the main turret piece. A point to note here, when fitting the sights which are separate I found it best to remove a little material from the mounting tab on the platform side, it's a close fit.

Image

The last picture for tonight shows the rear of both turrets, note that the ribs mentioned are missing on 'Y' but present on 'X'. The rear of the sights are slightly different too, only just noticed this, I will check the accuracy of this but doubt if it's wrong.

Image

Next time I'll cover A and B turrets with their differences.

Pete


Report this post
Top
 Profile  
Reply with quote  
PostPosted: Thu Dec 15, 2022 11:09 am 
Offline
User avatar

Joined: Thu Dec 28, 2017 10:48 am
Posts: 224
Correction to what I wrote above, I have now checked and what I thought to be Y turret is in fact A turret. I had assumed the other way around due to their positions in the box, good job I checked before mounting, mind you that's a way off yet.

Pete


Report this post
Top
 Profile  
Reply with quote  
PostPosted: Fri Dec 16, 2022 9:56 am 
Offline
User avatar

Joined: Thu Dec 28, 2017 10:48 am
Posts: 224
On to the remaining two turrets, in this case 'B' and 'y' turrets now that I've got them sorted properly.

Now these main guns aren't cheap but boy are they worth every penny, or at least they are in my eye's, the next few photo's will show why I feel this way.

First a close-up of the underside of the B turret UP mount, the size of the photo does not give justice to how small these detailed parts are.

Image

A view of the mount sitting on top of the range finder, if I had paid a little more attention I should have removed some small sprue tabs which would have made these parts closer, it's just so difficult to see these tiny parts. Not to worry though as once painted the tiny gaps will disappear. Note that the rear face of the turret has the cutaway angles, only B turret had these.

Image

A close-up showing the top of the UP mount, nice and crisp details. You may just spot a small hole in the flak sheild, that's me dropping the point of the tweezers onto the part, call it flak damage..:) For now i have left off the ammo lockers until after painting.

Image

A view looking down onto the two turrets worked on for today, note the ladders, front middle for B turret and rear for Y turret.

Image

This I particularly liked, at first I thought the sight holes had a piece of sprue in them, I nearly cut them out until I looked closer. What I thought was sprue is in fact the telescopic gun sights themselves, is that cool or what...:)

Pete

Image


Report this post
Top
 Profile  
Reply with quote  
PostPosted: Sun Dec 18, 2022 7:09 pm 
Hiya Pete, Pete here. Yep, those turrets are AWESOME! Way better than the kit parts. I have a set also. When you place them on the bases, you will notice there is a ledge around them, don't worry, it should be like that, the kit turrets are too big!. Look at the photo's over at "On the Slipway".


Report this post
Top
  
Reply with quote  
PostPosted: Mon Dec 19, 2022 10:43 am 
Offline
User avatar

Joined: Thu Dec 28, 2017 10:48 am
Posts: 224
Cheers Pete...not looked closely at the fit yet but thanks for the heads up, I'd be more inclined to trust Simon's work than Trumpeter anyway..

I'm toying with the idea of removing the location lugs from the kit turrets and fit them to the Micromaster turrets so that they can be left unglued and thus able to rotate. If I do this I'll, of course, give full details here..

Kind regards

Pete


Report this post
Top
 Profile  
Reply with quote  
Display posts from previous:  Sort by  
Post new topic Reply to topic  [ 166 posts ]  Go to page Previous  1 ... 5, 6, 7, 8, 9  Next

All times are UTC - 6 hours [ DST ]


Who is online

Users browsing this forum: roym, wefalck and 15 guests


You can post new topics in this forum
You can reply to topics in this forum
You cannot edit your posts in this forum
You cannot delete your posts in this forum
You cannot post attachments in this forum

Jump to:  
Powered by phpBB® Forum Software © phpBB Group