1:160 S.M.S. WESPE Armoured Gunboat (1876)
Moderators: MartinJQuinn, JIM BAUMANN, HMAS, Tiny69, Dave Wooley
-
Iceman 29

- Posts: 1945
- Joined: Tue Sep 29, 2020 4:35 pm
- Location: Bretagne, France
Re: 1:160 S.M.S. WESPE Armoured Gunboat (1876)
10 years of work on this model, what perseverance, which I will never have, it is as remarkable as the quality of the model.
Pascal
�Battleship Bretagne 3D: https://vu.fr/FvCY
�SS Delphine 3D: https://vu.fr/NeuO
�SS Nomadic 3D: https://vu.fr/tAyL
�USS Nokomis 3D: https://vu.fr/kntC
�USS Pamanset 3D: https://vu.fr/jXGQ
�Battleship Bretagne 3D: https://vu.fr/FvCY
�SS Delphine 3D: https://vu.fr/NeuO
�SS Nomadic 3D: https://vu.fr/tAyL
�USS Nokomis 3D: https://vu.fr/kntC
�USS Pamanset 3D: https://vu.fr/jXGQ
-
JIM BAUMANN

- Posts: 5678
- Joined: Mon Jan 10, 2005 5:30 pm
- Location: Nr Southampton England
Re: 1:160 S.M.S. WESPE Armoured Gunboat (1876)
It is a very fine and sharp model ship--
Your sheer perseverance and tenacity to keep up the momentum at consistent quality is very impressive.
I think it is fair to say--the light at the of the tunnel is NOT the locomotive coming towards you

In the grand scheme of things--you are nearly there.
Jim Baumann
Your sheer perseverance and tenacity to keep up the momentum at consistent quality is very impressive.
I think it is fair to say--the light at the of the tunnel is NOT the locomotive coming towards you
In the grand scheme of things--you are nearly there.
Jim Baumann
....I buy them at three times the speed I build 'em.... will I live long enough to empty my stash...?
http://www.modelshipgallery.com/gallery ... index.html
IPMS UK SIG (special interest group) www.finewaterline.com
http://www.modelshipgallery.com/gallery ... index.html
IPMS UK SIG (special interest group) www.finewaterline.com
-
DrPR

- Posts: 1689
- Joined: Sun Mar 07, 2010 12:01 am
- Location: Corvallis, Oregon, USA
- Contact:
Re: 1:160 S.M.S. WESPE Armoured Gunboat (1876)
Eberhard,
I remember when you started on this model - and your amazing work on the gun. Can it possibly be 16 years?
Phil
I remember when you started on this model - and your amazing work on the gun. Can it possibly be 16 years?
Phil
A collision at sea will ruin your entire day. Aristotle
-
wefalck

- Posts: 2079
- Joined: Wed Sep 28, 2011 12:04 pm
- Location: Paris
- Contact:
Re: 1:160 S.M.S. WESPE Armoured Gunboat (1876)
Well, I became aware of this class of ships in the early 1990s and started collecting material. That was in those dark pre-Internet ages with resources more difficult to access and fewer contacts. Once �on-line� in the later 1990s with my own Web-site I started to collate all the information there, hoping to build contacts with other interested people. I was pondering the scale, 1/350 came into fashion just about that time, but I was more thinking of a railway scale due to the availability of material for the �crew� and eventually settled on N-scale, i.e. 1/160.
However, from the mid 1990s on I started in earnest to collect antique watchmaking machinery and spent much time restoring it and making attachments for it, thus greatly enhancing my machining capabilities (I did have a watchmaking lathe since 1988).
Another delaying factor were three job-related international house moves. In addition, I procrastinated starting physically the project because I had no good solution for the numerous and prominent chain-rails.
Then, in autumn 2006 I discovered on a German forum a thread on the WESPE-class that made reference to my own Web-site as source of information and where several models in 1/100 and 1/50 scale were built. This gave me the kick to really start the project. I also taught myself making photoetched parts, which solved many problems with flimsy and parts with surface details, such as rivets. However, it had been hit and miss, as making the masks was not always successful, and cuvette-etching often did not yield the desired quality.
A move from the Netherlands to France and a grave change in my personal circumstances (marriage) stalled the project for some time, plus making more machinery and one or two smaller interim projects.
The purchase of the small laser-cutter to replace photoetching was a good move, although the latter probably would have resulted in crisper parts. I like its ad-hoc availability, while photoetching requires a lot more preparation and effort. It really facilitated the production of many intricate parts that otherwise would have caused me a lot of head-scratching. I am a bit worried now, that all these CNC-techniques, such as in particular 3D-printing, make my treasured watchmaking machinery more or less obsolete.
So, we are looking at something like 18 years between making the first dust to completion � Thanks to all, who had the patience to follow
Eberhard
Former chairman Arbeitskreis historischer Schiffbau e.V. (German Association for Shipbuilding History)
--------------------------------------------------------------------------------------------------------------------------------------------------------------------------------------------


Former chairman Arbeitskreis historischer Schiffbau e.V. (German Association for Shipbuilding History)
--------------------------------------------------------------------------------------------------------------------------------------------------------------------------------------------
-
wefalck
- Posts: 2079
- Joined: Wed Sep 28, 2011 12:04 pm
- Location: Paris
- Contact:
Re: 1:160 S.M.S. WESPE Armoured Gunboat (1876)
Again, real life including (business) travels got in the way of progress on this project. In addition, while I was having dinner in a restaurant together with colleagues, suddenly some �floaters� appeared in one eye. I went immediately to the eye-doctor, who checked my eyes thoroughly. Luckily the floaters are harmless, but annoying signs of age. No retina-detachment or something else serious. Apparently, they can spontaneously disappear or the brain sort of ignores them after a while � keep fingers crossed. For the moment they are quite bothering, when working on really small things � so on to the ensign.
****************************************
The Imperial German Navy Ensign
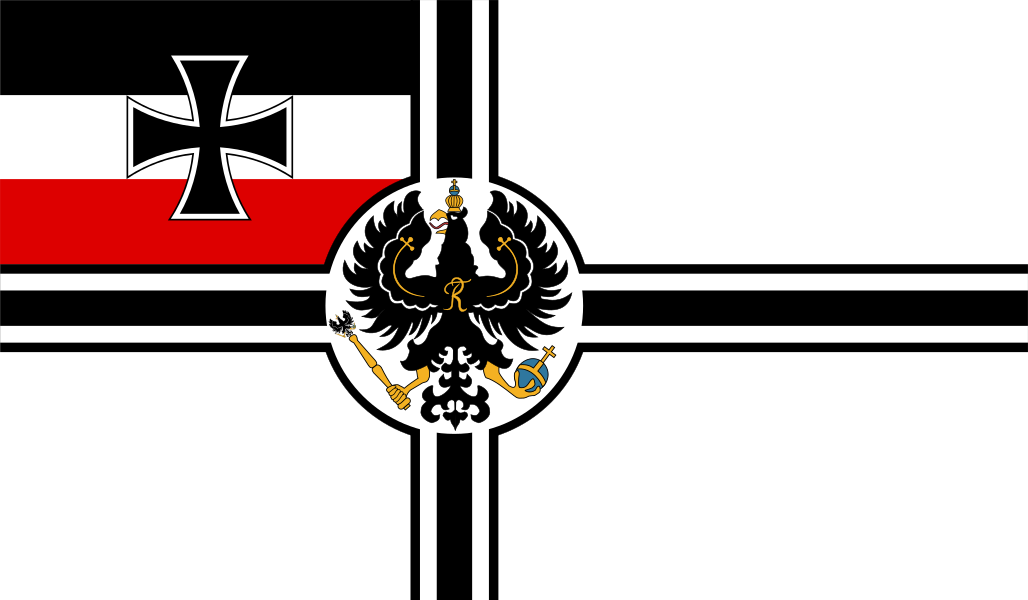
This ensign was first conceived for the navy of the North-German Alliance (Norddeutscher Bund) in 1867, bringing together the colours of the dominant powers, namely Prussia (black-white) and the Hanseatic City States, Hamburg, Bremen und L�beck (red-white). The design obviously was inspired by the British White Ensign and makes reference to various medieval symbols, such as the cross of the Teutonic Order, and the more recent Iron Cross from the Napoleonic War. After the proclamation of the 2nd Empire on 18 January 1871, this ensign became also the ensign of the Imperial German Navy and remained it until the end of the Empire in 1919. There have been, however, some smaller modifications over the years, thus the eagle was somewhat modified and in 1902 the arms of the cross were made heavier in order to avoid confusion at distance with the White Ensign of the Royal Navy.
Overall, it is rather complex design to reproduce purely manually. First, I had to find a correct image for the ensign, as it looked in about 1878 and was lucky, as the Internet furnished a digital image of sufficient size and resolution. The idea was to print it on both sides of very thin paper (the kind that was used in the old days for carbon copies on type-writer, of which I kept a small supply). Such paper, however, does not feed well through the laser-printer and aligning for double-sided printing is practically impossible. Therefore, I resorted to so-called transfer-sheets. These are a kind of waxed paper that is used to transfer laser-printouts to T-shirts, mugs and such things. Laser-printer toner is basically carbon-black mixed with some plastics powder. It can be remelted with a heat-source, such as an ironing-iron and thus transferred to another substrate. I also experimented with overhead-sheets, but the results were not as good.
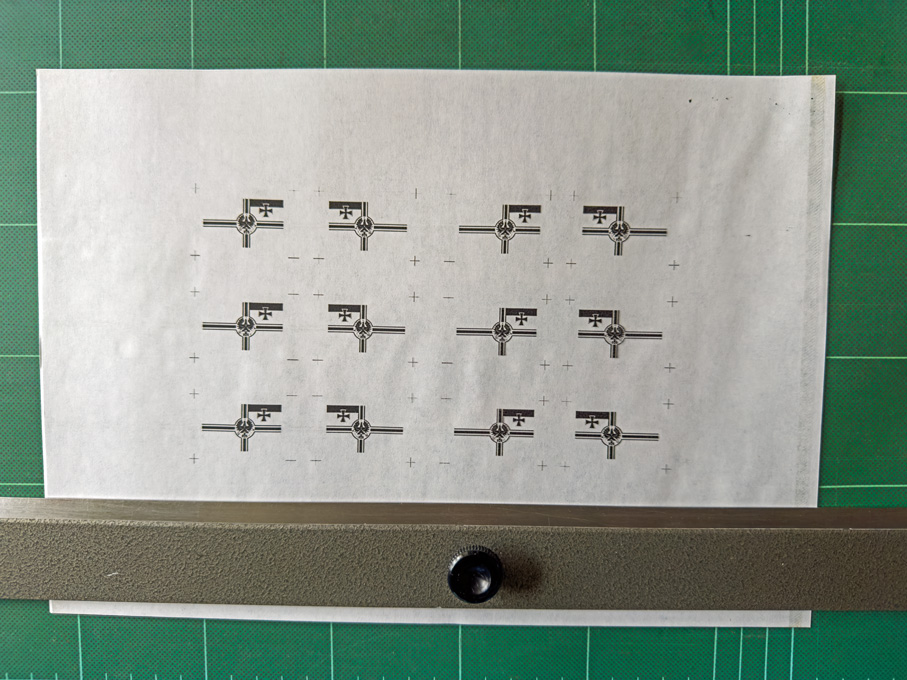
Printing layout for the ensign (as it would appear on the transfer sheet)
In a first step, the red stripe in the flag was eliminated from the image in Photoshop, as it would print grey otherwise. The ensign was then scaled to the right size on the basis of some trial-and-error, as the laser-printer prints a few percent undersize. I then added reference marks some distance from the image and duplicated this for mirroring. Several of these left-right-pairs were arranged on an A4-sheet and then printed onto the transfer-sheet using the highest quality print setting.
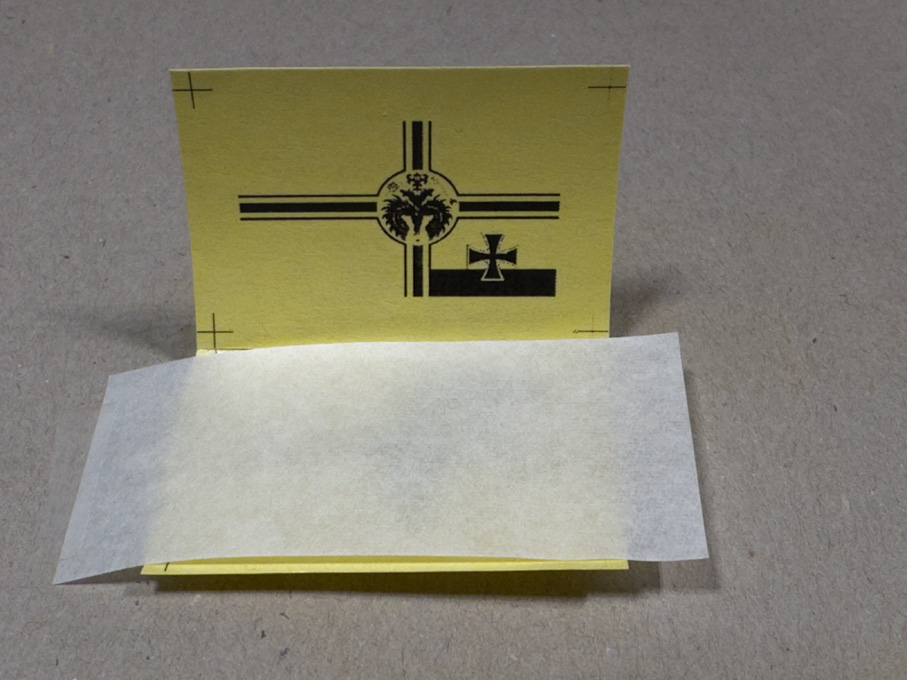
Preparing the pouch for double-sided toner-transfer to the ensign-blank
Using the best matching pair, I made a small pouch (as you would do for the masks, when producing photo-etched parts), aligning the images against each other for a perfect match on an illuminated board (they can be bought for a few �/�/US$ on ebay et al. and are powered through a USB-charger). An oversized strip of the thin paper was slipped in between and everything taped down onto a piece of thick cardboard.
I pressed down an ironing-iron set to the lowest temperature onto the package, which made the toner firmly stick to the paper and no residues left on the transfer-paper. And voil�, a double-sided printed flag with a very detailed eagle etc.
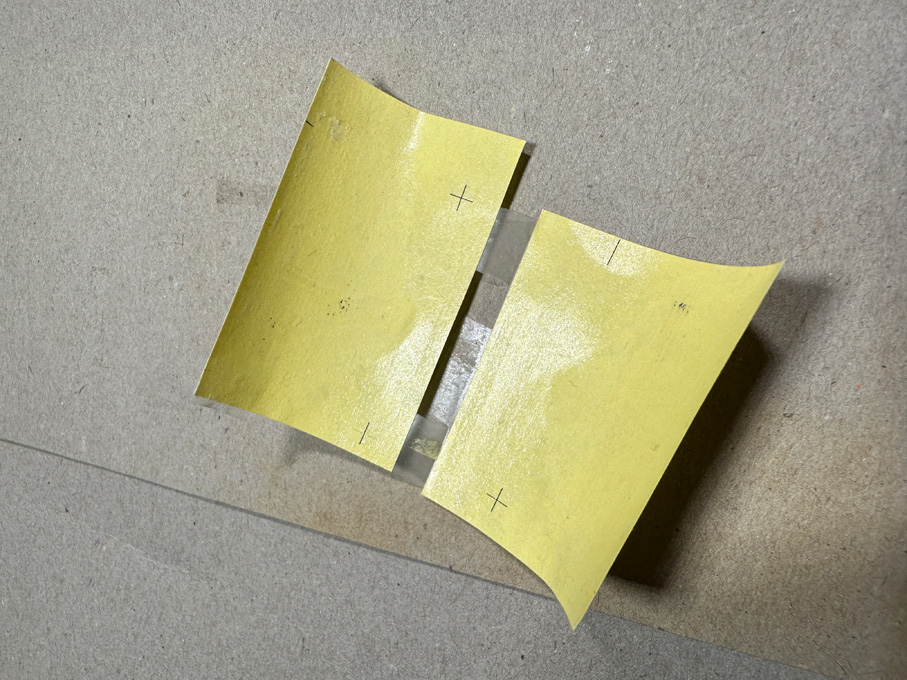
The toner is (almost) completely transferred to the ensign-blank
In the next step the missing red stripe was added using red acrylic paint. I also added colour to the legs and beak of the Imperial Eagle, to the Imperial Insignia and the crown using yellow-ochre acrylic paint. If one has a colour laser-printer this step would not be necessary.
The flag was cut out exactly to size, except for the rear, where it was left a tad longer to provide for a hollow �seam� into which a thread with two loops at the end was laid The seam was glued down with some diluted white glue. This area also needed a bit of touch-up afterwards with black acrylic paint.
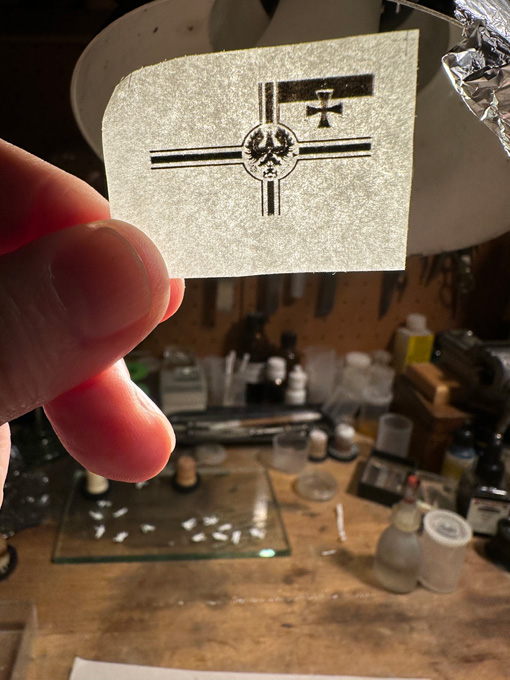
The ensign before adding the colours
Draping the flag is best done or least pre-arranged on the flag-staff. The paper was slightly wetted and the flag laid into diagonal folds in alternate directions. Toothpicks ensured that they became folds and not creases, which would be unnatural. Such a large ensign (2.9 m x 4.96 m) would fully unfold only in a moderate breeze and not in the light wind assumed in the scenic setting. So it flaps lazily in the wind, which I tried to reproduce.

The completed ensign
To the thus prepared ensign the halliard was attached as a loop. This loop was taken over the top of the flag-staff and a tiny laser-cut paper disc glued on as truck. There was no way to cross-drill the staff for the halliard. The halliard was belayed on the clamp. With this the assembly is ready for installation on the boat. But I will not hoist the ensign before the crew is on board. The recruitment process is still on-going �
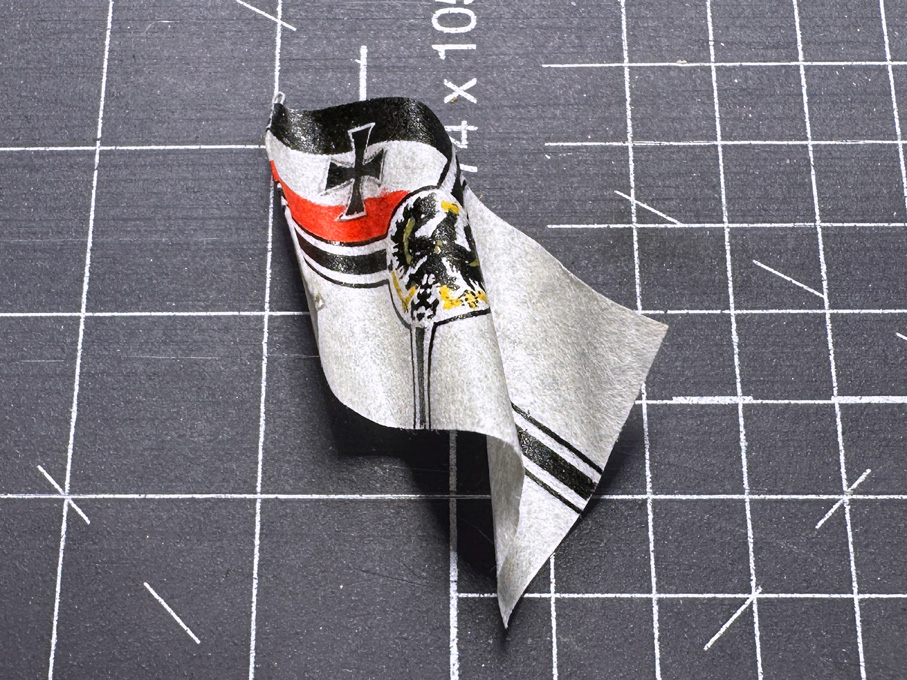
Ensign wetted and shaped
Sorry, this was a rather lengthy essay on just and ensign, but the idea was to describe in detail, how to arrive on a reasonably realistic looking flag at such as small scale.
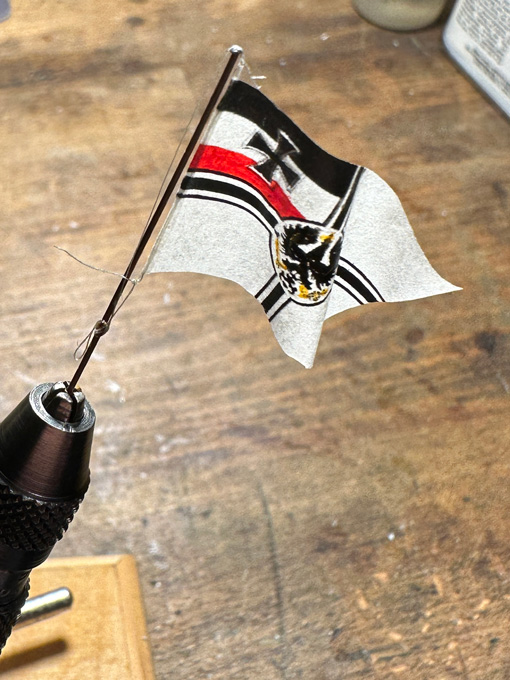
The ensign attached the flagstaff
To be continued ....
****************************************
The Imperial German Navy Ensign
This ensign was first conceived for the navy of the North-German Alliance (Norddeutscher Bund) in 1867, bringing together the colours of the dominant powers, namely Prussia (black-white) and the Hanseatic City States, Hamburg, Bremen und L�beck (red-white). The design obviously was inspired by the British White Ensign and makes reference to various medieval symbols, such as the cross of the Teutonic Order, and the more recent Iron Cross from the Napoleonic War. After the proclamation of the 2nd Empire on 18 January 1871, this ensign became also the ensign of the Imperial German Navy and remained it until the end of the Empire in 1919. There have been, however, some smaller modifications over the years, thus the eagle was somewhat modified and in 1902 the arms of the cross were made heavier in order to avoid confusion at distance with the White Ensign of the Royal Navy.
Overall, it is rather complex design to reproduce purely manually. First, I had to find a correct image for the ensign, as it looked in about 1878 and was lucky, as the Internet furnished a digital image of sufficient size and resolution. The idea was to print it on both sides of very thin paper (the kind that was used in the old days for carbon copies on type-writer, of which I kept a small supply). Such paper, however, does not feed well through the laser-printer and aligning for double-sided printing is practically impossible. Therefore, I resorted to so-called transfer-sheets. These are a kind of waxed paper that is used to transfer laser-printouts to T-shirts, mugs and such things. Laser-printer toner is basically carbon-black mixed with some plastics powder. It can be remelted with a heat-source, such as an ironing-iron and thus transferred to another substrate. I also experimented with overhead-sheets, but the results were not as good.
Printing layout for the ensign (as it would appear on the transfer sheet)
In a first step, the red stripe in the flag was eliminated from the image in Photoshop, as it would print grey otherwise. The ensign was then scaled to the right size on the basis of some trial-and-error, as the laser-printer prints a few percent undersize. I then added reference marks some distance from the image and duplicated this for mirroring. Several of these left-right-pairs were arranged on an A4-sheet and then printed onto the transfer-sheet using the highest quality print setting.
Preparing the pouch for double-sided toner-transfer to the ensign-blank
Using the best matching pair, I made a small pouch (as you would do for the masks, when producing photo-etched parts), aligning the images against each other for a perfect match on an illuminated board (they can be bought for a few �/�/US$ on ebay et al. and are powered through a USB-charger). An oversized strip of the thin paper was slipped in between and everything taped down onto a piece of thick cardboard.
I pressed down an ironing-iron set to the lowest temperature onto the package, which made the toner firmly stick to the paper and no residues left on the transfer-paper. And voil�, a double-sided printed flag with a very detailed eagle etc.
The toner is (almost) completely transferred to the ensign-blank
In the next step the missing red stripe was added using red acrylic paint. I also added colour to the legs and beak of the Imperial Eagle, to the Imperial Insignia and the crown using yellow-ochre acrylic paint. If one has a colour laser-printer this step would not be necessary.
The flag was cut out exactly to size, except for the rear, where it was left a tad longer to provide for a hollow �seam� into which a thread with two loops at the end was laid The seam was glued down with some diluted white glue. This area also needed a bit of touch-up afterwards with black acrylic paint.
The ensign before adding the colours
Draping the flag is best done or least pre-arranged on the flag-staff. The paper was slightly wetted and the flag laid into diagonal folds in alternate directions. Toothpicks ensured that they became folds and not creases, which would be unnatural. Such a large ensign (2.9 m x 4.96 m) would fully unfold only in a moderate breeze and not in the light wind assumed in the scenic setting. So it flaps lazily in the wind, which I tried to reproduce.
The completed ensign
To the thus prepared ensign the halliard was attached as a loop. This loop was taken over the top of the flag-staff and a tiny laser-cut paper disc glued on as truck. There was no way to cross-drill the staff for the halliard. The halliard was belayed on the clamp. With this the assembly is ready for installation on the boat. But I will not hoist the ensign before the crew is on board. The recruitment process is still on-going �
Ensign wetted and shaped
Sorry, this was a rather lengthy essay on just and ensign, but the idea was to describe in detail, how to arrive on a reasonably realistic looking flag at such as small scale.
The ensign attached the flagstaff
To be continued ....
Eberhard
Former chairman Arbeitskreis historischer Schiffbau e.V. (German Association for Shipbuilding History)
--------------------------------------------------------------------------------------------------------------------------------------------------------------------------------------------
Former chairman Arbeitskreis historischer Schiffbau e.V. (German Association for Shipbuilding History)
--------------------------------------------------------------------------------------------------------------------------------------------------------------------------------------------
-
wefalck
- Posts: 2079
- Joined: Wed Sep 28, 2011 12:04 pm
- Location: Paris
- Contact:
Re: 1:160 S.M.S. WESPE Armoured Gunboat (1876)
Last weekend I did some field studies on Lake Geneva on flags moving in the wind: https://maritima-et-mechanika.org/marit ... ssFlag.mp4
Eberhard
Former chairman Arbeitskreis historischer Schiffbau e.V. (German Association for Shipbuilding History)
--------------------------------------------------------------------------------------------------------------------------------------------------------------------------------------------
Former chairman Arbeitskreis historischer Schiffbau e.V. (German Association for Shipbuilding History)
--------------------------------------------------------------------------------------------------------------------------------------------------------------------------------------------
-
wefalck
- Posts: 2079
- Joined: Wed Sep 28, 2011 12:04 pm
- Location: Paris
- Contact:
Re: 1:160 S.M.S. WESPE Armoured Gunboat (1876)
The Crew
The WESPE-Class had a complement of around 80 crew, of which 3 where officers. This seems to be quite a number for a ship of only 46 m length. Unfortunately, there is no information on the different duties and the distribution of ratings. There are some crew photographs from the 1900 to 1910 era, but they manly show officers and petty-officers and in addition, they come from the short periods during which the boats were commissioned for exercises in groups and may show crew from a whole flotilla.
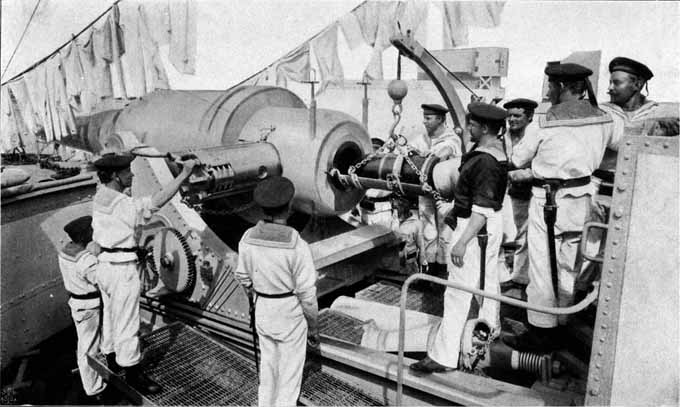
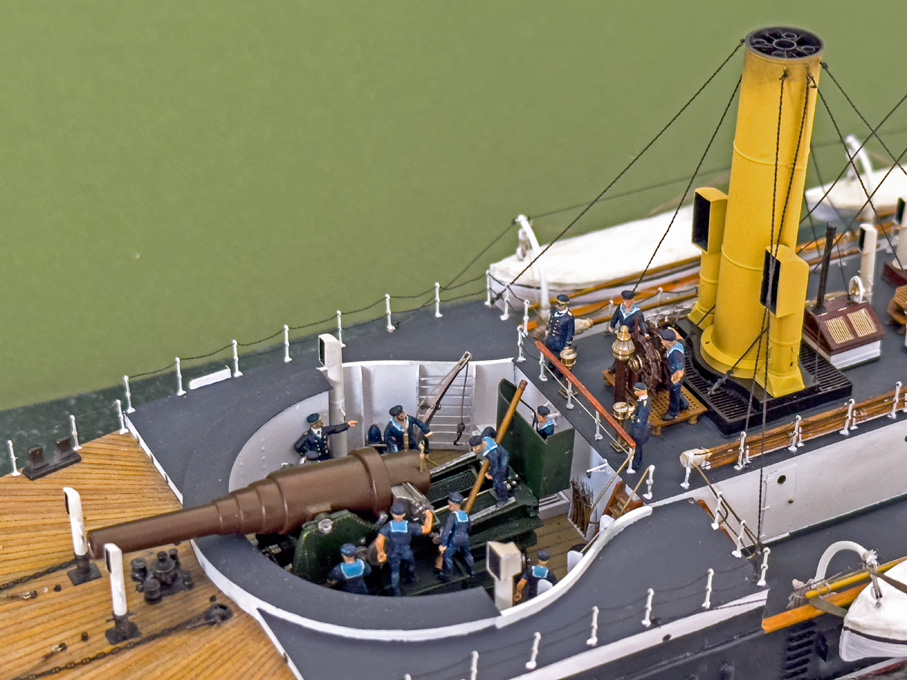
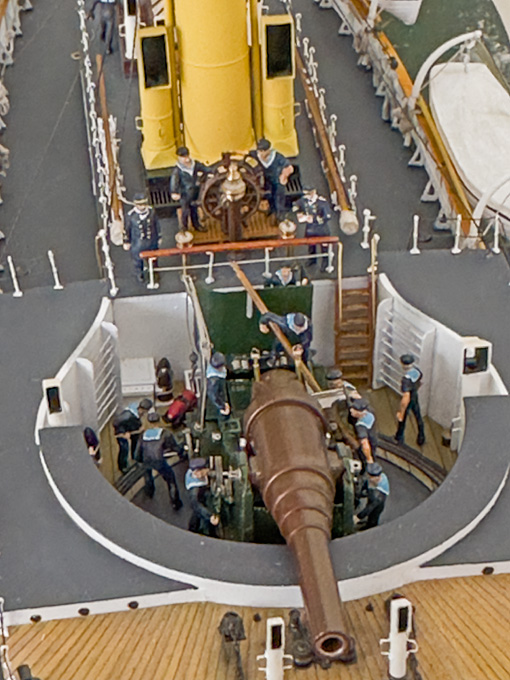
Gun drill on the WESPE-class around 1900
The intention was to show some gun-drill on the boat, as in the historical photograph above. There are about ten ratings visible and a couple more or so may be hidden behind the gun. There would be probably also a petty-officer in charge. On the bridge there would be two men at the helm and a couple of officers. In total, I estimated that about 15 figures would be needed to present a reasonable picture of activity.
Below the gun there would some ten men or more manning the cranks with which the gun is trained. In the boiler-room, some further ten crew would be working hard on stoking the fires, trimming coal etc. The same number of crew, would be on the off-watch. The machine would be tended by perhaps three to four engineers and petty officers. I am sure there are other duties, such as maintenance, signalling, plus a certain number on off-watches, but there is no information available on how these ships were �run�.
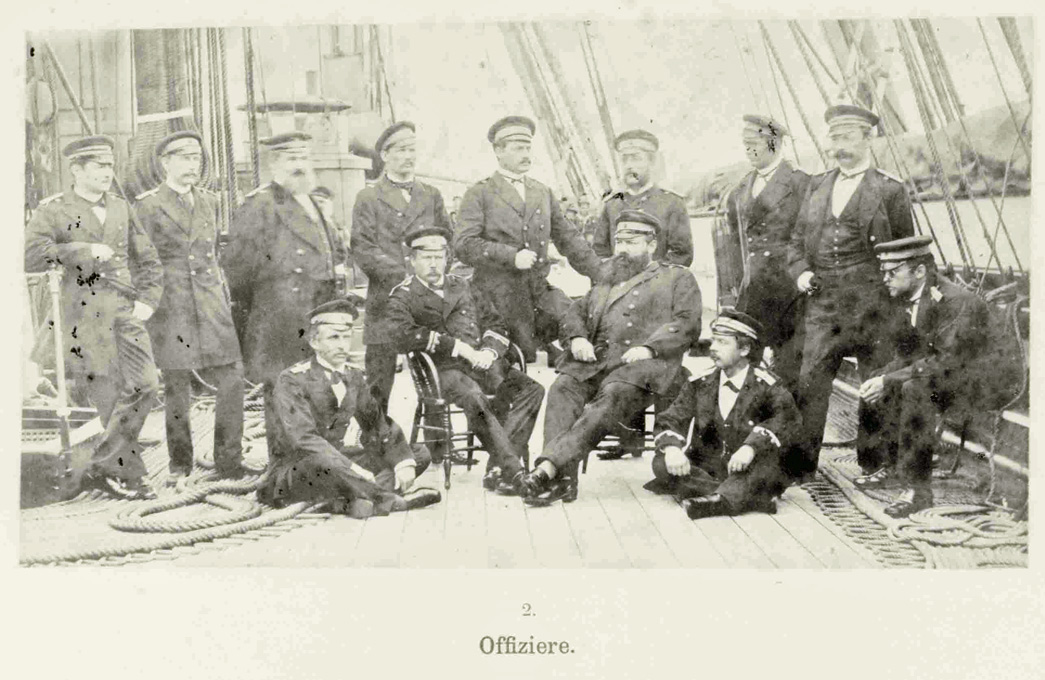
Officers of SMS HERTHA 1874-1877. Source: https://senckenbergarchiv.de/kolonialesbildarchiv/.
Uniforms
The 1870s were a time of transition as far as the naval uniforms are concerned. In the early years of the Empire much of the features of the uniforms of the Prussian navy were retained. To a certain degree the uniforms also followed the general fashion in terms of the height of the waste-line, the width of trousers and blouses, the shape of the caps etc. By the early 1880s the uniforms of all ranks were quite consolidated and were changed only in details until the early years of WW1. There is abundant information on these later years and on officers� and petty-officers� uniforms, but information on ratings in the early years is quite scarce in the primary and secondary literature. In particular, information on working kits is not very detailed. Normally, a certain �kit� would be ordered for certain duties, but photographs show a certain variety of items worn and how they were worn, for instance some men would have the sleeves rolled up, while others would not.
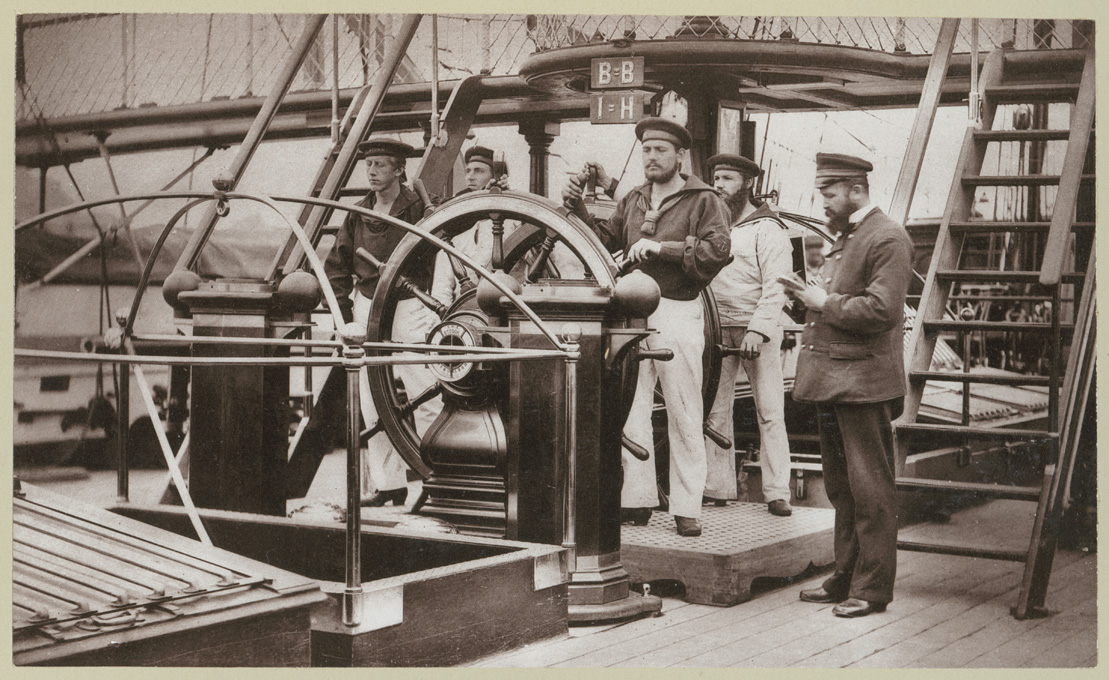
Helmsmen on SMS HERTHA 1874-1877. Source: https://senckenbergarchiv.de/kolonialesbildarchiv/.
Photography was still rather new then and it was difficult to take �action�-pictures with the cumbersome equipment of the day. When a sailor had his likeness taken in a professional photographic studio, then it was in his Sunday-best parade-uniform and not in workaday fatigues. The same applies actually to all ranks. There are fortunately a couple of photo-albums from training-cruises in the mid-1870s (e.g. of the cruise of SMS HERTHA to the Far East in 1874-1877) which on purpose show the real-life of the crew, as much as was possible with the equipment of the day, thinking of heavy tripods and large-format cameras with wet glass-plates. These photographs are an important source of information on how the uniforms really looked like and how they were worn for different duties, although virtually all situations were �posed�.

Gun drill on SMS HERTHA 1874-1877. Source: https://senckenbergarchiv.de/kolonialesbildarchiv/.
Apart from photographs, there are a number of printed works can be considered as primary sources, as they were published at the time, and just two or three secondary publications, which mostly reproduce the plates from earlier publications:
ANONYM (1872): Uniformierungs-Liste der K�niglich Preu�ischen Armee und der Kaiserlich Deutschen Marine. Zweite bis zu Gegenwart fortgef�hrte Auflage.- 114 p., Berlin (E.S. Mittler & Sohn).
ANONYM (1887): Die Uniformen der Deutschen Marine in detaillierten Beschreibungen und Farbendarstellungen (Reprint 2007, Melchior Verlag, Wolfenb�ttel).- 61 p., 18 Taf., Leipzig (Verlag von Moritz Ruhl).
BURGER, L. (1864): Uniformierung der preu�ischen Marine, Originalzeichnungen.- �ber Land und Meer, Bd. 12, Jg. 6, Nr. 31: 487 u. 489.
HENCKEL, C. (1901): Atlas des Deutschen Reichsheeres und der Kaiserlichen Marine einschlie�lich kaiserlicher Schutztruppen in Afrika in ihrer Uniformierung und Einteilung.- 32 pl., Dresden (Milit�r-Kunst-Verlag MARS).
LINTZ, G., RAECKE, K.-H. (1978): Die k�niglich preu�ische Marine.- Z. f�r Heereskunde, 275: 20-21.
MARINEAMT [Ed.] (1984?): Die Geschichte der Matrosenuniform.- 79 p., Wilhelmshaven (Marineunterst�tzungskommando).
NOESKE, R., STEFANSKI, C.P. (2011): Die deutschen Marinen 1818�1918. Organisation, Uniformierung, Bewaffung und Ausr�stung.- 2 vols.: 1336 p., 304 pl., Wien (Verlag Militaria).
RUHL, M. [Ed.] (1887): Uniformen der deutschen Marine in detaillirten Beschreibungen und Farbendarstellungen, nebst Mittheilungen �ber Organisation, St�rke etc., sowie einer Liste s�mtlicher Kriegsfahrzeuge und den genauen Abbildungen aller Standarten und Flaggen.- 98 p., 26 pl., Wolfenb�ttel (Reprint 2007 by Melchior Historischer Verlag).
RUHL, M. (18936): Die Deutsche Marine und die Deutschen Schutztruppen f�r Ostafrika in ihrer neuesten Uniformierung.- 78 p., 20 pl., (Faksimile Fines Mundi).
RUHL, M. (1892): Uniformen der deutschen Marine.- Starnberg (reprint 1989).
SCHLAWE, K. (1900): Die deutsche Marine in ihrer gegenw�rtigen Uniformierung.- 98 p., (M. Ruhl).
WALDORF-ASTORIA [Hrsg.] (193?): Uniformen der Marine und Schutztruppen.- 14 p., 8 pl., M�nchen (Waldorf-Astoria Zigarettenfabrik).
ZIENERT, J. (1970): Unsere Marine-Uniform � Ihre geschichtliche Entstehung seit den ersten Anf�ngen und ihre zeitgem��e Weiterentwicklung von 1816 bis 1970.- 451 p., Hamburg (Helmut Gerhard Schulz Verlag).
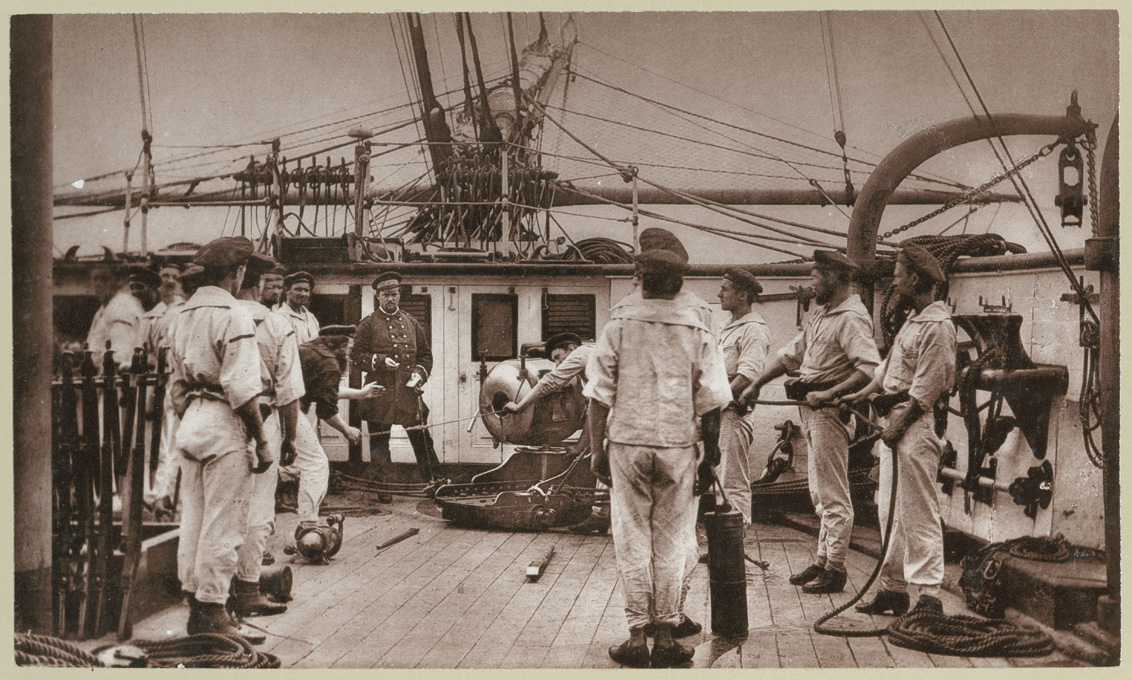
Gun drill on SMS HERTHA 1874-1877 � note the high heels of the shoes at this time. Source: https://senckenbergarchiv.de/kolonialesbildarchiv/.
Preparing the Figures
Starting point is a set of unpainted figures by Preiser in 1/160 (N-scale). Compared to HO-scale the selection is much smaller and the sets of unpainted figures are not so easy to find. Individual figures were selected on the basis of their poses, but very few had vaguely useful dresses. Some of the railway officials formed a suitable a basis for the officers and petty-officers.
Fortunately, the figures are small, some 10 to 11 mm in height, so only a rather summary representation of their attire needs to/can be achieved.
All figures required quite a bit of carving and sculpting with �Green Stuff�. The single-breasted jackets of the railway staff had to be converted into the double-breasted, longer frock-coats of the time. The peak-caps of 1960s officials (many of the figures were originally modelled by Preiser in the early 1960s) looked quite different from those worn by naval officers in the 1870s � German (naval) peak-caps underwent a significant change in appearance between the 1870s and the early post-WWII years.
Naval ratings required more substantial carving: jackets had to be cut away and blouses tucked into high-waist trousers had to be carved. Safety helmets were cut away and the characteristic sailor�s cap sculpted with �Green Stuff�. Shovels etc. were cut away and hands drilled for more appropriate implements. The sailors also got their traditional large collar.
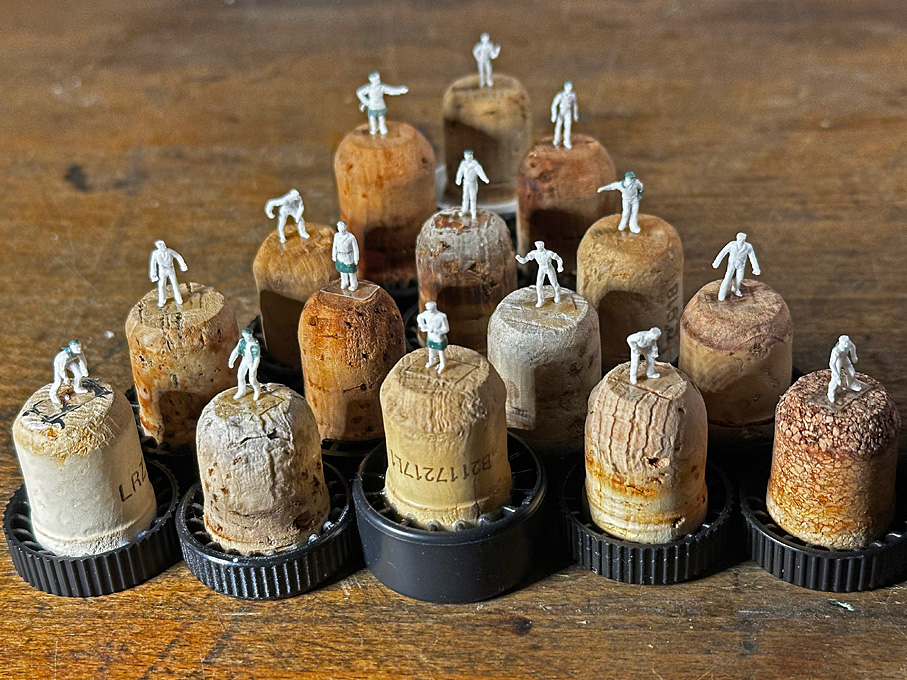
The crew-member at various stages of modelling
Unfortunately, I forgot to take a �before� picture, but the one above shows the 15 figures at various stages of the carving and sculpting exercise. Amputations and reassembly � la Dr. Frankenstein are difficult at this small scale and were not attempted with few minor exceptions.
Again, a text-heavy post, but it serves myself as a memo of my deliberations and what I did.
To be continued ....
The WESPE-Class had a complement of around 80 crew, of which 3 where officers. This seems to be quite a number for a ship of only 46 m length. Unfortunately, there is no information on the different duties and the distribution of ratings. There are some crew photographs from the 1900 to 1910 era, but they manly show officers and petty-officers and in addition, they come from the short periods during which the boats were commissioned for exercises in groups and may show crew from a whole flotilla.
Gun drill on the WESPE-class around 1900
The intention was to show some gun-drill on the boat, as in the historical photograph above. There are about ten ratings visible and a couple more or so may be hidden behind the gun. There would be probably also a petty-officer in charge. On the bridge there would be two men at the helm and a couple of officers. In total, I estimated that about 15 figures would be needed to present a reasonable picture of activity.
Below the gun there would some ten men or more manning the cranks with which the gun is trained. In the boiler-room, some further ten crew would be working hard on stoking the fires, trimming coal etc. The same number of crew, would be on the off-watch. The machine would be tended by perhaps three to four engineers and petty officers. I am sure there are other duties, such as maintenance, signalling, plus a certain number on off-watches, but there is no information available on how these ships were �run�.
Officers of SMS HERTHA 1874-1877. Source: https://senckenbergarchiv.de/kolonialesbildarchiv/.
Uniforms
The 1870s were a time of transition as far as the naval uniforms are concerned. In the early years of the Empire much of the features of the uniforms of the Prussian navy were retained. To a certain degree the uniforms also followed the general fashion in terms of the height of the waste-line, the width of trousers and blouses, the shape of the caps etc. By the early 1880s the uniforms of all ranks were quite consolidated and were changed only in details until the early years of WW1. There is abundant information on these later years and on officers� and petty-officers� uniforms, but information on ratings in the early years is quite scarce in the primary and secondary literature. In particular, information on working kits is not very detailed. Normally, a certain �kit� would be ordered for certain duties, but photographs show a certain variety of items worn and how they were worn, for instance some men would have the sleeves rolled up, while others would not.
Helmsmen on SMS HERTHA 1874-1877. Source: https://senckenbergarchiv.de/kolonialesbildarchiv/.
Photography was still rather new then and it was difficult to take �action�-pictures with the cumbersome equipment of the day. When a sailor had his likeness taken in a professional photographic studio, then it was in his Sunday-best parade-uniform and not in workaday fatigues. The same applies actually to all ranks. There are fortunately a couple of photo-albums from training-cruises in the mid-1870s (e.g. of the cruise of SMS HERTHA to the Far East in 1874-1877) which on purpose show the real-life of the crew, as much as was possible with the equipment of the day, thinking of heavy tripods and large-format cameras with wet glass-plates. These photographs are an important source of information on how the uniforms really looked like and how they were worn for different duties, although virtually all situations were �posed�.
Gun drill on SMS HERTHA 1874-1877. Source: https://senckenbergarchiv.de/kolonialesbildarchiv/.
Apart from photographs, there are a number of printed works can be considered as primary sources, as they were published at the time, and just two or three secondary publications, which mostly reproduce the plates from earlier publications:
ANONYM (1872): Uniformierungs-Liste der K�niglich Preu�ischen Armee und der Kaiserlich Deutschen Marine. Zweite bis zu Gegenwart fortgef�hrte Auflage.- 114 p., Berlin (E.S. Mittler & Sohn).
ANONYM (1887): Die Uniformen der Deutschen Marine in detaillierten Beschreibungen und Farbendarstellungen (Reprint 2007, Melchior Verlag, Wolfenb�ttel).- 61 p., 18 Taf., Leipzig (Verlag von Moritz Ruhl).
BURGER, L. (1864): Uniformierung der preu�ischen Marine, Originalzeichnungen.- �ber Land und Meer, Bd. 12, Jg. 6, Nr. 31: 487 u. 489.
HENCKEL, C. (1901): Atlas des Deutschen Reichsheeres und der Kaiserlichen Marine einschlie�lich kaiserlicher Schutztruppen in Afrika in ihrer Uniformierung und Einteilung.- 32 pl., Dresden (Milit�r-Kunst-Verlag MARS).
LINTZ, G., RAECKE, K.-H. (1978): Die k�niglich preu�ische Marine.- Z. f�r Heereskunde, 275: 20-21.
MARINEAMT [Ed.] (1984?): Die Geschichte der Matrosenuniform.- 79 p., Wilhelmshaven (Marineunterst�tzungskommando).
NOESKE, R., STEFANSKI, C.P. (2011): Die deutschen Marinen 1818�1918. Organisation, Uniformierung, Bewaffung und Ausr�stung.- 2 vols.: 1336 p., 304 pl., Wien (Verlag Militaria).
RUHL, M. [Ed.] (1887): Uniformen der deutschen Marine in detaillirten Beschreibungen und Farbendarstellungen, nebst Mittheilungen �ber Organisation, St�rke etc., sowie einer Liste s�mtlicher Kriegsfahrzeuge und den genauen Abbildungen aller Standarten und Flaggen.- 98 p., 26 pl., Wolfenb�ttel (Reprint 2007 by Melchior Historischer Verlag).
RUHL, M. (18936): Die Deutsche Marine und die Deutschen Schutztruppen f�r Ostafrika in ihrer neuesten Uniformierung.- 78 p., 20 pl., (Faksimile Fines Mundi).
RUHL, M. (1892): Uniformen der deutschen Marine.- Starnberg (reprint 1989).
SCHLAWE, K. (1900): Die deutsche Marine in ihrer gegenw�rtigen Uniformierung.- 98 p., (M. Ruhl).
WALDORF-ASTORIA [Hrsg.] (193?): Uniformen der Marine und Schutztruppen.- 14 p., 8 pl., M�nchen (Waldorf-Astoria Zigarettenfabrik).
ZIENERT, J. (1970): Unsere Marine-Uniform � Ihre geschichtliche Entstehung seit den ersten Anf�ngen und ihre zeitgem��e Weiterentwicklung von 1816 bis 1970.- 451 p., Hamburg (Helmut Gerhard Schulz Verlag).
Gun drill on SMS HERTHA 1874-1877 � note the high heels of the shoes at this time. Source: https://senckenbergarchiv.de/kolonialesbildarchiv/.
Preparing the Figures
Starting point is a set of unpainted figures by Preiser in 1/160 (N-scale). Compared to HO-scale the selection is much smaller and the sets of unpainted figures are not so easy to find. Individual figures were selected on the basis of their poses, but very few had vaguely useful dresses. Some of the railway officials formed a suitable a basis for the officers and petty-officers.
Fortunately, the figures are small, some 10 to 11 mm in height, so only a rather summary representation of their attire needs to/can be achieved.
All figures required quite a bit of carving and sculpting with �Green Stuff�. The single-breasted jackets of the railway staff had to be converted into the double-breasted, longer frock-coats of the time. The peak-caps of 1960s officials (many of the figures were originally modelled by Preiser in the early 1960s) looked quite different from those worn by naval officers in the 1870s � German (naval) peak-caps underwent a significant change in appearance between the 1870s and the early post-WWII years.
Naval ratings required more substantial carving: jackets had to be cut away and blouses tucked into high-waist trousers had to be carved. Safety helmets were cut away and the characteristic sailor�s cap sculpted with �Green Stuff�. Shovels etc. were cut away and hands drilled for more appropriate implements. The sailors also got their traditional large collar.
The crew-member at various stages of modelling
Unfortunately, I forgot to take a �before� picture, but the one above shows the 15 figures at various stages of the carving and sculpting exercise. Amputations and reassembly � la Dr. Frankenstein are difficult at this small scale and were not attempted with few minor exceptions.
Again, a text-heavy post, but it serves myself as a memo of my deliberations and what I did.
To be continued ....
Eberhard
Former chairman Arbeitskreis historischer Schiffbau e.V. (German Association for Shipbuilding History)
--------------------------------------------------------------------------------------------------------------------------------------------------------------------------------------------
Former chairman Arbeitskreis historischer Schiffbau e.V. (German Association for Shipbuilding History)
--------------------------------------------------------------------------------------------------------------------------------------------------------------------------------------------
-
wefalck
- Posts: 2079
- Joined: Wed Sep 28, 2011 12:04 pm
- Location: Paris
- Contact:
Re: 1:160 S.M.S. WESPE Armoured Gunboat (1876)
Painting the figures
In order to better see how the sculpting turned out and any imperfections, the figures were given a spray-coat of matt white paint (Vallejo Model Air). This also served as a primer that made hand-painting easier. I like the consistency of Vallejo Model Air paints also for application by brush, but several coats may be needed for certain colours.
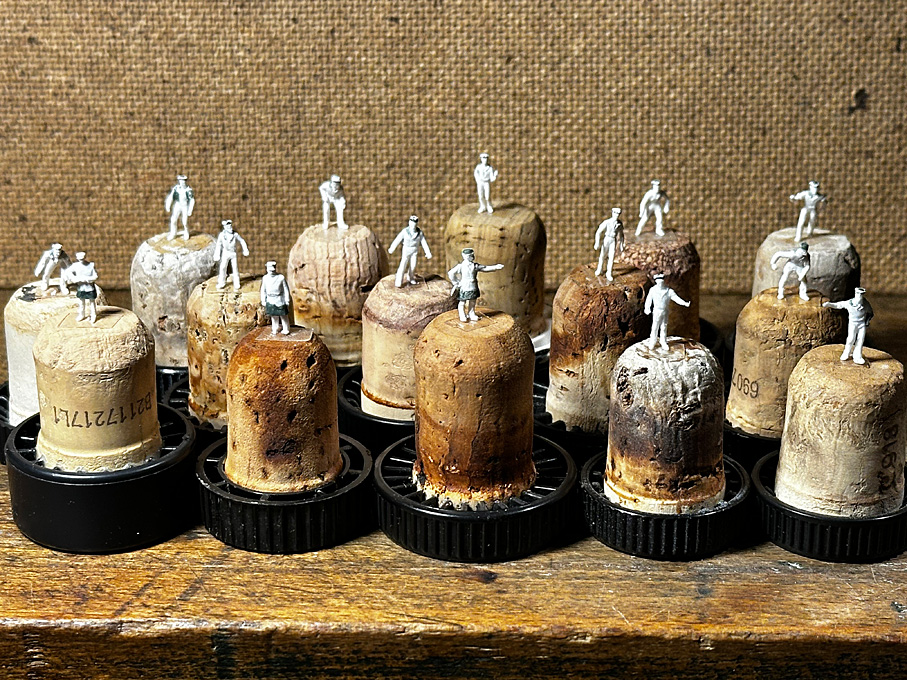
The crew figures with a white base-coat
Unfortunately, only at a relatively late painting stage some molding flash was noticed that could not be removed anymore. Also, it turned out, that some faces were actually not molded very well, which made it difficult to paint them.
Painting such small figures requires a bit of a strategy. However, regardless of scale, I usually begin with the face and any other exposed skin. The reason is that, apart from white, most other clothing colours tend to be darker and have a better coverage and perhaps more importantly, clothing covers the skin, so in order to get precise edges between the clothing and the skin, it is more natural to paint towards the skin, rather than trying to approach the clothing with the skin colour.
At this scale no attempt is made to paint eyes and such details, but rather to paint the shadows under the eyebrows and in other parts of the face. I find the way of how Canaletto treats the staffage in his paintings a useful reference. It is fascinating, how he can bring the �people� to life with just a few brushstrokes and blobs of paint.
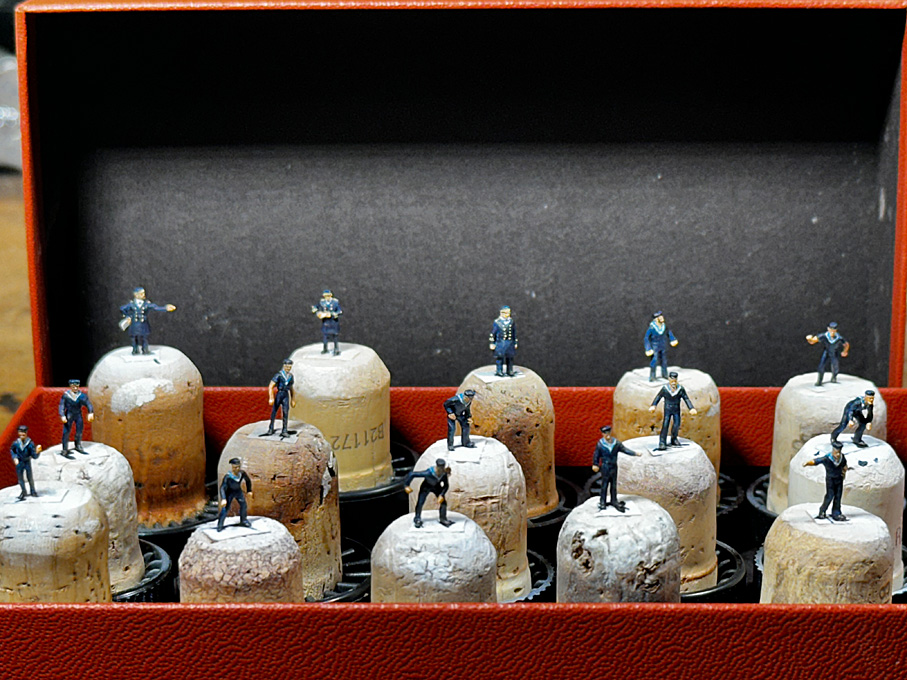
Almost completed paint job on the crew figures
It may be counterintuitive, but it is sometimes better to begin with painting details and then work with the main colour towards them. Or to use an iterative procedure: painting say the main colour of the clothing, then adding detail, followed by touching up with the main colour, where the brush had gone astray. Narrow lines, such as embroidery, are difficult to achieve, but too wide lines can be reduced in width by painting the main colour against them.
The painting proceeded in several iterations and I have not taken pictures of the various steps.
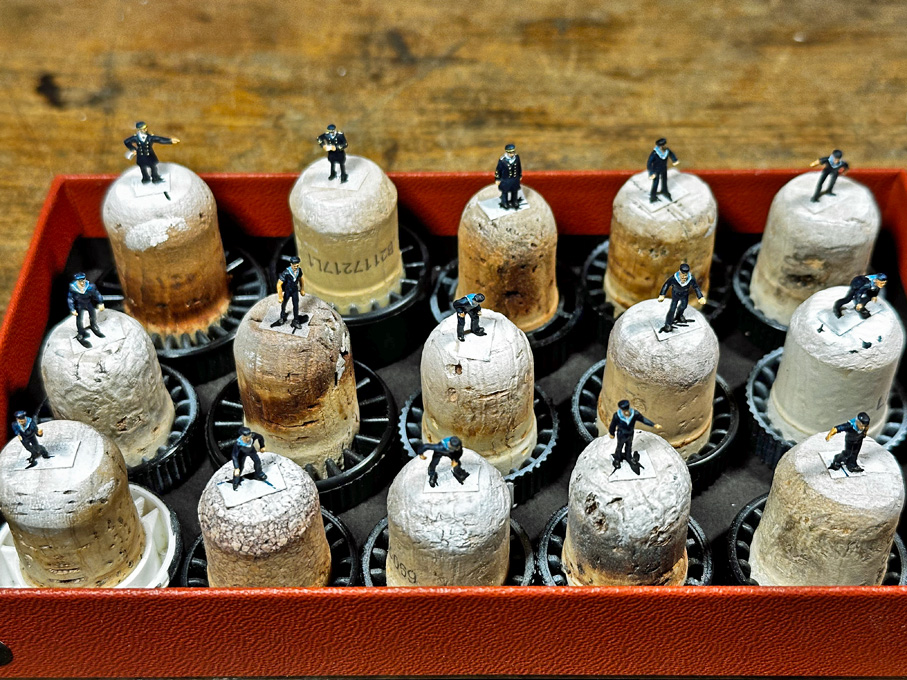
The crew ready to go on board
The Vallejo Model Air paints have a slight satin sheen, which is good for many applications, but in order represent cloth better, the figure were given at the end a light spray coat with matt varnish.
To be continued ....
In order to better see how the sculpting turned out and any imperfections, the figures were given a spray-coat of matt white paint (Vallejo Model Air). This also served as a primer that made hand-painting easier. I like the consistency of Vallejo Model Air paints also for application by brush, but several coats may be needed for certain colours.
The crew figures with a white base-coat
Unfortunately, only at a relatively late painting stage some molding flash was noticed that could not be removed anymore. Also, it turned out, that some faces were actually not molded very well, which made it difficult to paint them.
Painting such small figures requires a bit of a strategy. However, regardless of scale, I usually begin with the face and any other exposed skin. The reason is that, apart from white, most other clothing colours tend to be darker and have a better coverage and perhaps more importantly, clothing covers the skin, so in order to get precise edges between the clothing and the skin, it is more natural to paint towards the skin, rather than trying to approach the clothing with the skin colour.
At this scale no attempt is made to paint eyes and such details, but rather to paint the shadows under the eyebrows and in other parts of the face. I find the way of how Canaletto treats the staffage in his paintings a useful reference. It is fascinating, how he can bring the �people� to life with just a few brushstrokes and blobs of paint.
Almost completed paint job on the crew figures
It may be counterintuitive, but it is sometimes better to begin with painting details and then work with the main colour towards them. Or to use an iterative procedure: painting say the main colour of the clothing, then adding detail, followed by touching up with the main colour, where the brush had gone astray. Narrow lines, such as embroidery, are difficult to achieve, but too wide lines can be reduced in width by painting the main colour against them.
The painting proceeded in several iterations and I have not taken pictures of the various steps.
The crew ready to go on board
The Vallejo Model Air paints have a slight satin sheen, which is good for many applications, but in order represent cloth better, the figure were given at the end a light spray coat with matt varnish.
To be continued ....
Eberhard
Former chairman Arbeitskreis historischer Schiffbau e.V. (German Association for Shipbuilding History)
--------------------------------------------------------------------------------------------------------------------------------------------------------------------------------------------
Former chairman Arbeitskreis historischer Schiffbau e.V. (German Association for Shipbuilding History)
--------------------------------------------------------------------------------------------------------------------------------------------------------------------------------------------
-
wefalck
- Posts: 2079
- Joined: Wed Sep 28, 2011 12:04 pm
- Location: Paris
- Contact:
Re: 1:160 S.M.S. WESPE Armoured Gunboat (1876)
More Crew
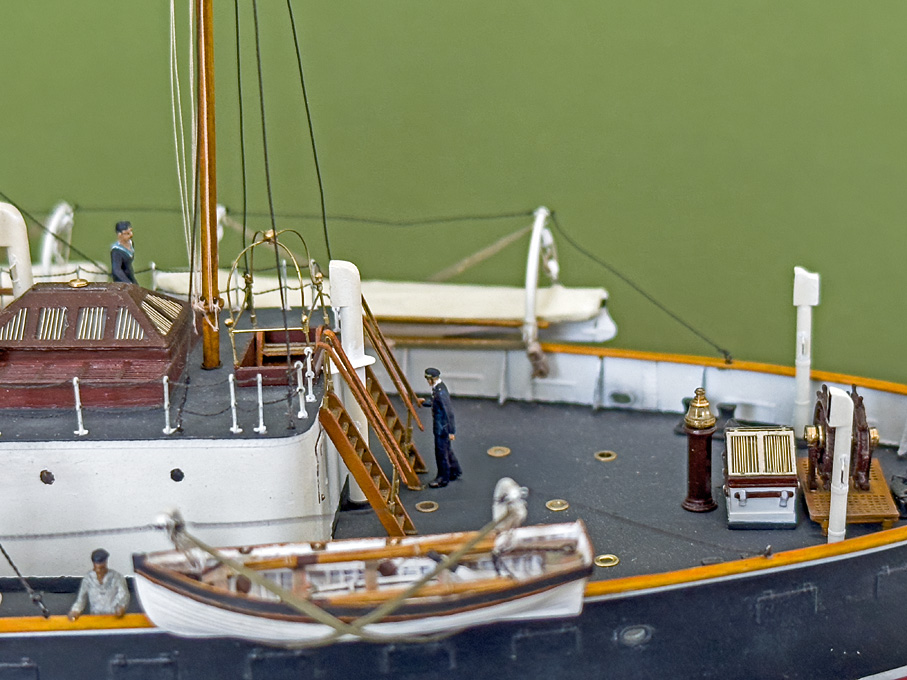
While dispositioning the crew according to the envisages story-board - the crew undergoes some gun drill under the supervision of a petty officer, with the captain (Kapit�nleutnant, but I didn�t manage to paint the two embroidered stripes on the sleeves) looks on, the first officer (Leutnant zur See, one stripe on the sleeves) takes notes, and two men man the helm - I noticed a certain emptiness and lack of activity in the other parts of the boat. So, I sifted through the Preiser-sprues in search for some additional suitable figures. Thus, more mid 20th century German railway staff joined the 19th century Imperial Navy. There will be two stokers taking a break from their arduous work, a rating on signalling duty walking back towards the mast, and a petty officer on the after deck going about his duty.
As before, jackets had to be trimmed down and breast pockets scraped off in order to represent blouses and high-waist trousers. The single-breasted railway-jacket was converted into the double-breasted one of the navy, caps or hats altered.

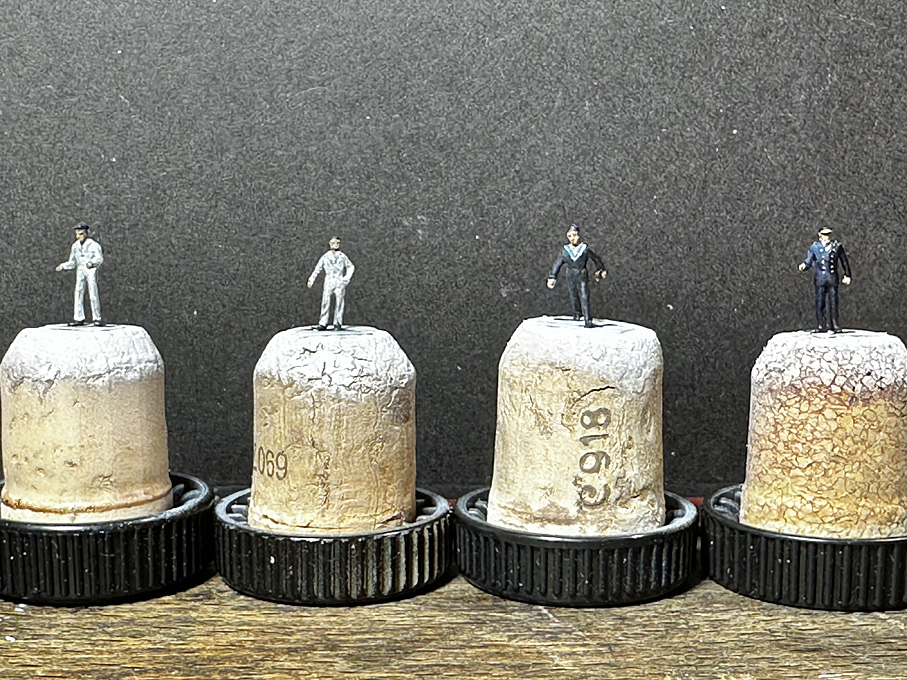
The painting proceeded as before, but I noted that the practices from the other figures paid off. The stokers wear the white working blouse and trousers, which seems a bit strange in a boiler-room environment full of coal-dust, soot, and sweat, but I suppose the undyed cotton stands up better to serious washing than any coloured cloth. After painting, these figures were dusted with grey pastel.
To be continued ....
While dispositioning the crew according to the envisages story-board - the crew undergoes some gun drill under the supervision of a petty officer, with the captain (Kapit�nleutnant, but I didn�t manage to paint the two embroidered stripes on the sleeves) looks on, the first officer (Leutnant zur See, one stripe on the sleeves) takes notes, and two men man the helm - I noticed a certain emptiness and lack of activity in the other parts of the boat. So, I sifted through the Preiser-sprues in search for some additional suitable figures. Thus, more mid 20th century German railway staff joined the 19th century Imperial Navy. There will be two stokers taking a break from their arduous work, a rating on signalling duty walking back towards the mast, and a petty officer on the after deck going about his duty.
As before, jackets had to be trimmed down and breast pockets scraped off in order to represent blouses and high-waist trousers. The single-breasted railway-jacket was converted into the double-breasted one of the navy, caps or hats altered.
The painting proceeded as before, but I noted that the practices from the other figures paid off. The stokers wear the white working blouse and trousers, which seems a bit strange in a boiler-room environment full of coal-dust, soot, and sweat, but I suppose the undyed cotton stands up better to serious washing than any coloured cloth. After painting, these figures were dusted with grey pastel.
To be continued ....
Eberhard
Former chairman Arbeitskreis historischer Schiffbau e.V. (German Association for Shipbuilding History)
--------------------------------------------------------------------------------------------------------------------------------------------------------------------------------------------
Former chairman Arbeitskreis historischer Schiffbau e.V. (German Association for Shipbuilding History)
--------------------------------------------------------------------------------------------------------------------------------------------------------------------------------------------
-
JIM BAUMANN
- Posts: 5678
- Joined: Mon Jan 10, 2005 5:30 pm
- Location: Nr Southampton England
Re: 1:160 S.M.S. WESPE Armoured Gunboat (1876)
Wow!
You have been busy!-
-as I understand( from the curators and re-actors at Fort Nelson
https://en.wikipedia.org/wiki/Fort_Nelson,_Hampshire
you are correct--the ' whites ' were boiled--often for considerable time....
next time you are in the UK
visit it...
cheers
JB
You have been busy!-
-as I understand( from the curators and re-actors at Fort Nelson
https://en.wikipedia.org/wiki/Fort_Nelson,_Hampshire
you are correct--the ' whites ' were boiled--often for considerable time....
next time you are in the UK
visit it...
cheers
JB
- Attachments
-
....I buy them at three times the speed I build 'em.... will I live long enough to empty my stash...?
http://www.modelshipgallery.com/gallery ... index.html
IPMS UK SIG (special interest group) www.finewaterline.com
http://www.modelshipgallery.com/gallery ... index.html
IPMS UK SIG (special interest group) www.finewaterline.com
-
wefalck
- Posts: 2079
- Joined: Wed Sep 28, 2011 12:04 pm
- Location: Paris
- Contact:
Re: 1:160 S.M.S. WESPE Armoured Gunboat (1876)
Thanks, Jim. I wasn't aware of this fort. Unfortunately, my only planned trip to England this year is for a long weekend to London just before Christmas ...
Eberhard
Former chairman Arbeitskreis historischer Schiffbau e.V. (German Association for Shipbuilding History)
--------------------------------------------------------------------------------------------------------------------------------------------------------------------------------------------
Former chairman Arbeitskreis historischer Schiffbau e.V. (German Association for Shipbuilding History)
--------------------------------------------------------------------------------------------------------------------------------------------------------------------------------------------
-
wefalck
- Posts: 2079
- Joined: Wed Sep 28, 2011 12:04 pm
- Location: Paris
- Contact:
Re: 1:160 S.M.S. WESPE Armoured Gunboat (1876)
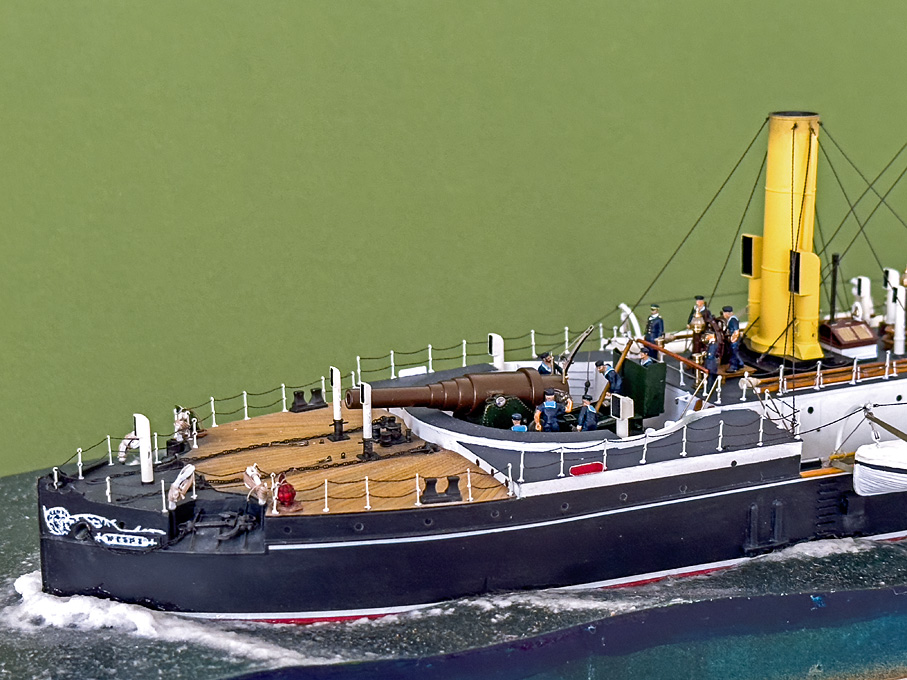
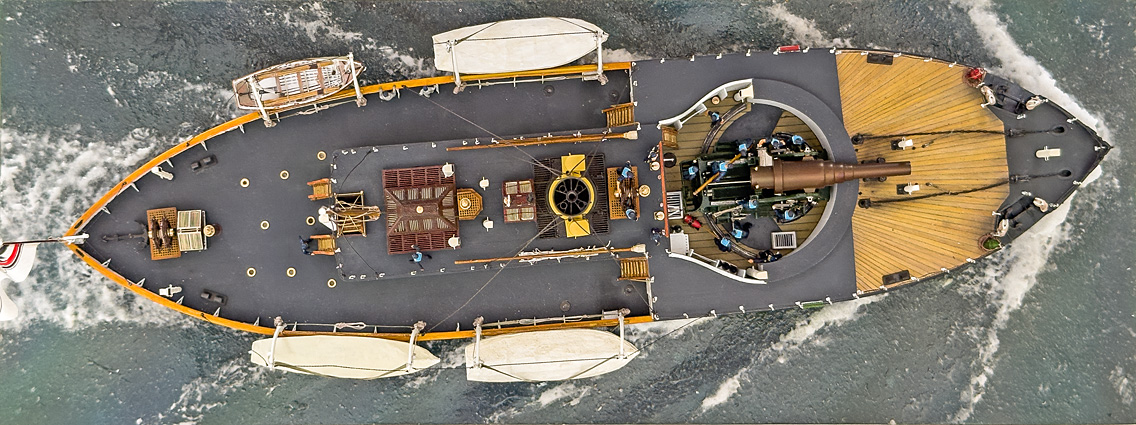
The Crew boards S.M.S. WESPE
With all the crew members being painted, they were place at their foreseen duty stations. They were attached with tiny drops of Vallejo acrylic matt varnish. The pictures below show their disposition.
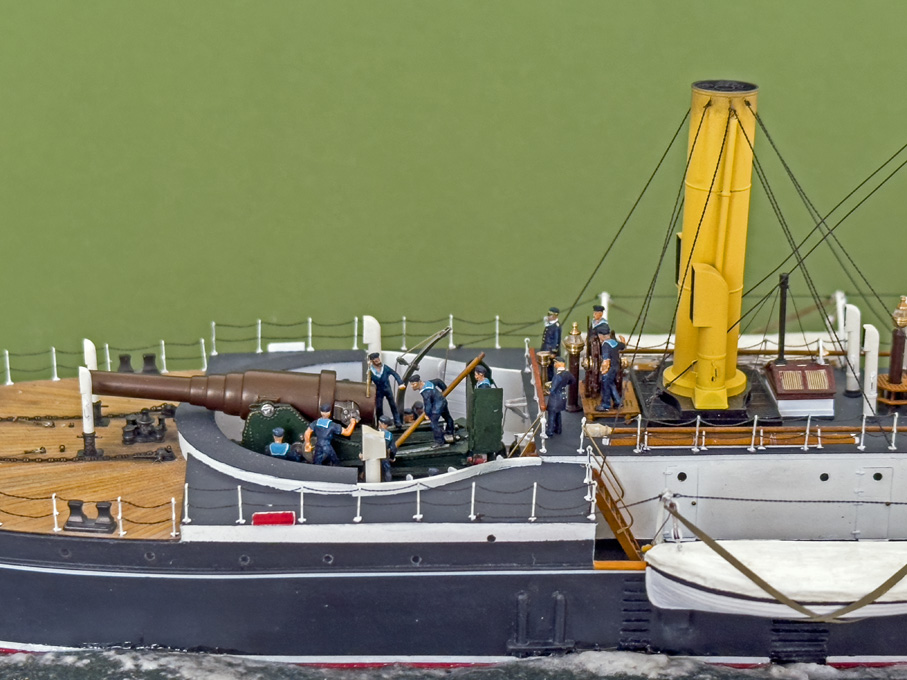
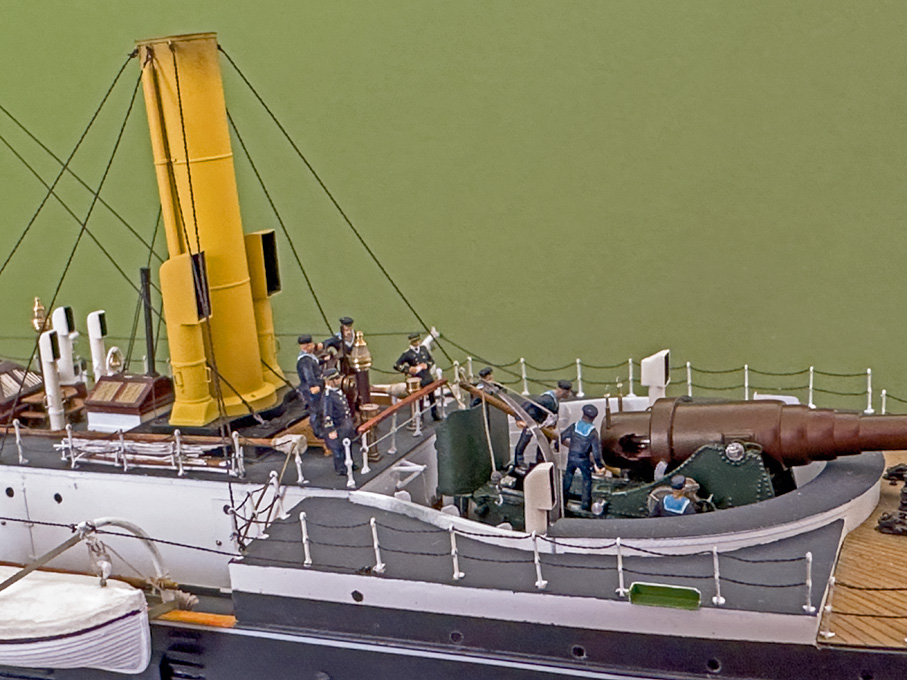
Final touch-ups
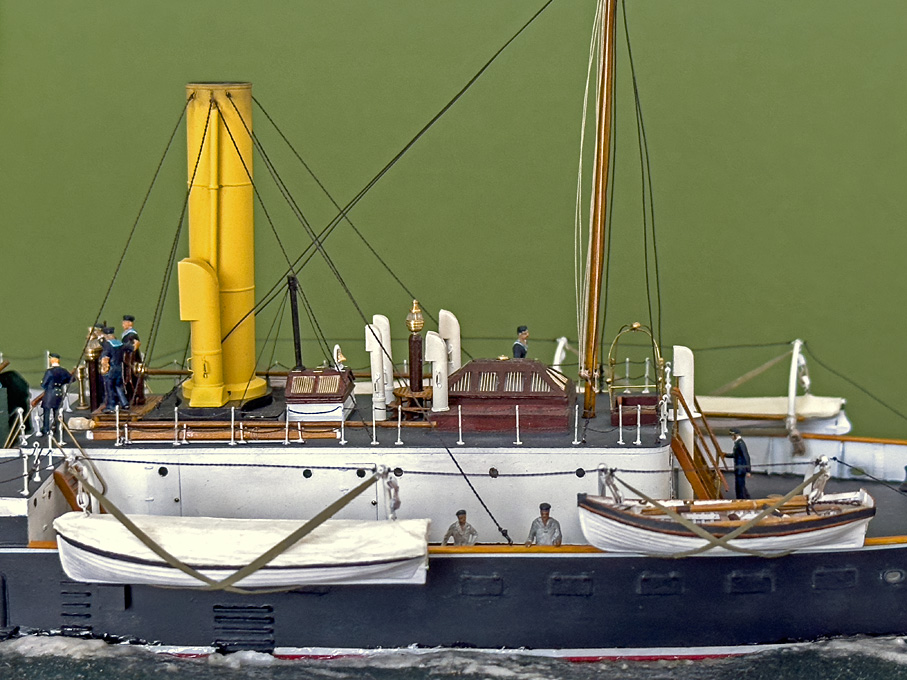
In case I had to remove the model from its base for whatever reason, it had only be screwed down, but the slight gap between the hull and modelled sea had not been filled with acrylic gel yet. Now with the model almost completed, this was done.

I also gave it a very light weathering at certain places. For instance, the top of the smoke stack was lightly dusted with black pastel. White and grey pastel indicated the areas where the ash would have dropped out of the ash-chutes into the sea. Some grey pastel was also applied to certain parts of the hull to break somewhat the uniform black and enhance the visibility of surface structures.
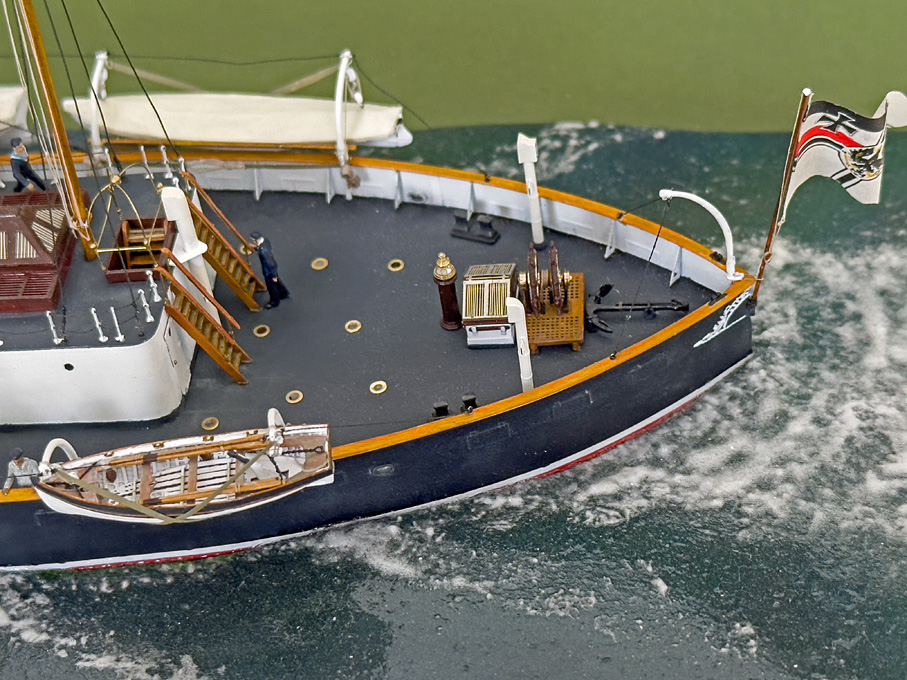
Raising the Ensign
Now, being ready to go to sea, the ensign was raised, meaning the flagstaff was installed. This being extremely delicate, it was left as very last step.
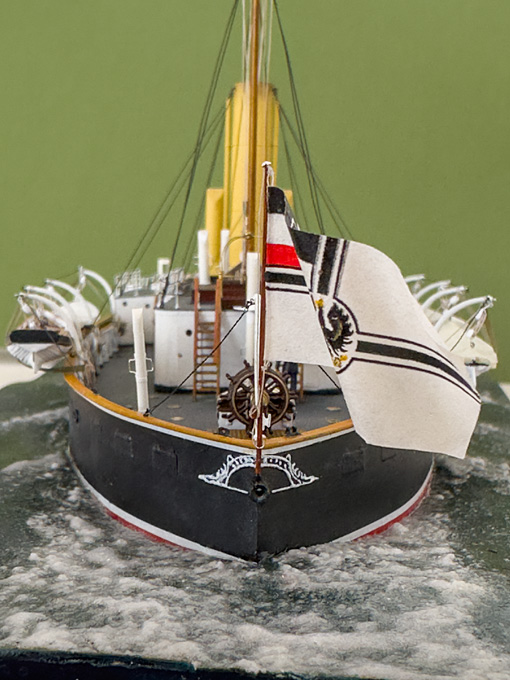
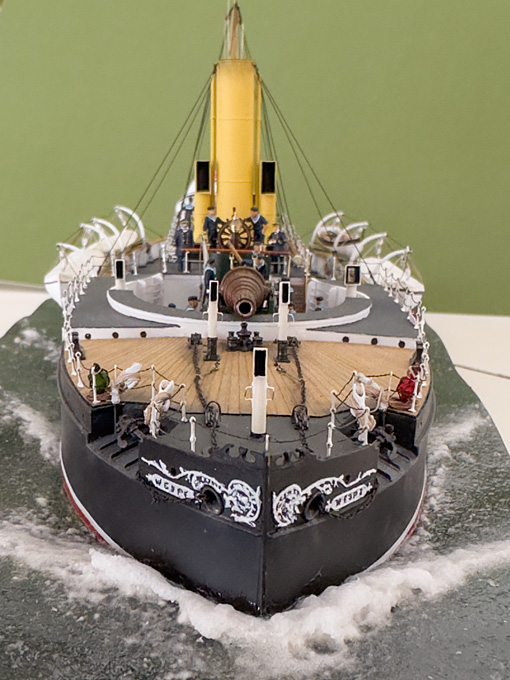
With this the model is in principle finished after a journey of nearly 18 years. I just checked: the first photographs were taken on 1 October 2006. There have been considerable interruptions, such as the move from the Netherlands to Paris. I also built the model of the Zuiderzee-botter in between and spent considerable time on constructing workshop tools and machinery.

However, before screwing down the glass-case the above photographs also serve to check the model for any imperfections that can still be addressed at this point. Paint may have to be touched up etc. This is more visible on 2D images, than on the real thing. Once this is done, some �glamour shots� will be taken before the glass-case makes this more difficult.
There are certainly things that I wish had turned out better. This includes the rigging, which is taught or following catena-curves as I had planned. Making things to scale-size also makes them at the chosen scale rather flimsy with limitations to adjustment possibilities. This is even more the case with �modern� ships in metal and with metal parts, where parts have to be thin and small, compared to those on wooden ships of old. Sometimes, these problems also arose due to a lack of foresight on my side.
What next?
Well, the follow-on project is mentally already almost completed (one of several), but the workshop needs first a good tidying up, cleaning, and re-organisation. Something that had been neglected actually for several years during the drive to complete SMS WESPE. Some machinery also needs a bit TLC to be ready for the next project. There are also a couple of small tool projects that I want to undertake, but I may start those only, once I have started the new ship project.
With all the crew members being painted, they were place at their foreseen duty stations. They were attached with tiny drops of Vallejo acrylic matt varnish. The pictures below show their disposition.
Final touch-ups
In case I had to remove the model from its base for whatever reason, it had only be screwed down, but the slight gap between the hull and modelled sea had not been filled with acrylic gel yet. Now with the model almost completed, this was done.
I also gave it a very light weathering at certain places. For instance, the top of the smoke stack was lightly dusted with black pastel. White and grey pastel indicated the areas where the ash would have dropped out of the ash-chutes into the sea. Some grey pastel was also applied to certain parts of the hull to break somewhat the uniform black and enhance the visibility of surface structures.
Raising the Ensign
Now, being ready to go to sea, the ensign was raised, meaning the flagstaff was installed. This being extremely delicate, it was left as very last step.
With this the model is in principle finished after a journey of nearly 18 years. I just checked: the first photographs were taken on 1 October 2006. There have been considerable interruptions, such as the move from the Netherlands to Paris. I also built the model of the Zuiderzee-botter in between and spent considerable time on constructing workshop tools and machinery.
However, before screwing down the glass-case the above photographs also serve to check the model for any imperfections that can still be addressed at this point. Paint may have to be touched up etc. This is more visible on 2D images, than on the real thing. Once this is done, some �glamour shots� will be taken before the glass-case makes this more difficult.
There are certainly things that I wish had turned out better. This includes the rigging, which is taught or following catena-curves as I had planned. Making things to scale-size also makes them at the chosen scale rather flimsy with limitations to adjustment possibilities. This is even more the case with �modern� ships in metal and with metal parts, where parts have to be thin and small, compared to those on wooden ships of old. Sometimes, these problems also arose due to a lack of foresight on my side.
What next?
Well, the follow-on project is mentally already almost completed (one of several), but the workshop needs first a good tidying up, cleaning, and re-organisation. Something that had been neglected actually for several years during the drive to complete SMS WESPE. Some machinery also needs a bit TLC to be ready for the next project. There are also a couple of small tool projects that I want to undertake, but I may start those only, once I have started the new ship project.
Eberhard
Former chairman Arbeitskreis historischer Schiffbau e.V. (German Association for Shipbuilding History)
--------------------------------------------------------------------------------------------------------------------------------------------------------------------------------------------
Former chairman Arbeitskreis historischer Schiffbau e.V. (German Association for Shipbuilding History)
--------------------------------------------------------------------------------------------------------------------------------------------------------------------------------------------
-
JIM BAUMANN
- Posts: 5678
- Joined: Mon Jan 10, 2005 5:30 pm
- Location: Nr Southampton England
Re: 1:160 S.M.S. WESPE Armoured Gunboat (1876)
Really...
most superb--the crew figures give the ship a purpose and a sense of life and movement
It looks absolutely fabulous!
Its been a long road.... (!! ) but its results that count
Bravo
Jim B
most superb--the crew figures give the ship a purpose and a sense of life and movement
It looks absolutely fabulous!
Its been a long road.... (!! ) but its results that count
Bravo
Jim B
....I buy them at three times the speed I build 'em.... will I live long enough to empty my stash...?
http://www.modelshipgallery.com/gallery ... index.html
IPMS UK SIG (special interest group) www.finewaterline.com
http://www.modelshipgallery.com/gallery ... index.html
IPMS UK SIG (special interest group) www.finewaterline.com
-
EJFoeth
- Posts: 2907
- Joined: Wed Jan 21, 2009 1:51 pm
Re: 1:160 S.M.S. WESPE Armoured Gunboat (1876)
Congrats on finishing the model; it was a delight to follow the progress and the result is great
Last edited by EJFoeth on Sat Jul 13, 2024 11:18 pm, edited 1 time in total.
-
DrPR
- Posts: 1689
- Joined: Sun Mar 07, 2010 12:01 am
- Location: Corvallis, Oregon, USA
- Contact:
Re: 1:160 S.M.S. WESPE Armoured Gunboat (1876)
Beautiful model. Well done!
Phil
Phil
A collision at sea will ruin your entire day. Aristotle
-
109

- Posts: 627
- Joined: Sun Nov 16, 2008 7:56 am
- Contact:
Re: 1:160 S.M.S. WESPE Armoured Gunboat (1876)
Klasse Arbeit!
Thanks & Sources: Nilsson (research) and J.Arntz (research, drawings).
-
Iceman 29
- Posts: 1945
- Joined: Tue Sep 29, 2020 4:35 pm
- Location: Bretagne, France
Re: 1:160 S.M.S. WESPE Armoured Gunboat (1876)
It's truly magnificent, and the sailors add the indispensable finishing touch, because a ship without a crew isn't really a real ship.
It was a real pleasure to follow this construction, even if I picked it up along the way.
It was a real pleasure to follow this construction, even if I picked it up along the way.
Pascal
�Battleship Bretagne 3D: https://vu.fr/FvCY
�SS Delphine 3D: https://vu.fr/NeuO
�SS Nomadic 3D: https://vu.fr/tAyL
�USS Nokomis 3D: https://vu.fr/kntC
�USS Pamanset 3D: https://vu.fr/jXGQ
�Battleship Bretagne 3D: https://vu.fr/FvCY
�SS Delphine 3D: https://vu.fr/NeuO
�SS Nomadic 3D: https://vu.fr/tAyL
�USS Nokomis 3D: https://vu.fr/kntC
�USS Pamanset 3D: https://vu.fr/jXGQ
-
wefalck
- Posts: 2079
- Joined: Wed Sep 28, 2011 12:04 pm
- Location: Paris
- Contact:
Re: 1:160 S.M.S. WESPE Armoured Gunboat (1876)
Thanks again, gentlemen, for your kind comments
While I am trying to source a suitable background paper for the �glamour-shots� of the completed S.M.S. WESPE, I started a new project, a model of single-masted Baltic trader from northern Germany: viewtopic.php?f=13&t=386617.
While I am trying to source a suitable background paper for the �glamour-shots� of the completed S.M.S. WESPE, I started a new project, a model of single-masted Baltic trader from northern Germany: viewtopic.php?f=13&t=386617.
Eberhard
Former chairman Arbeitskreis historischer Schiffbau e.V. (German Association for Shipbuilding History)
--------------------------------------------------------------------------------------------------------------------------------------------------------------------------------------------
Former chairman Arbeitskreis historischer Schiffbau e.V. (German Association for Shipbuilding History)
--------------------------------------------------------------------------------------------------------------------------------------------------------------------------------------------
-
wefalck
- Posts: 2079
- Joined: Wed Sep 28, 2011 12:04 pm
- Location: Paris
- Contact:
Re: 1:160 S.M.S. WESPE Armoured Gunboat (1876)
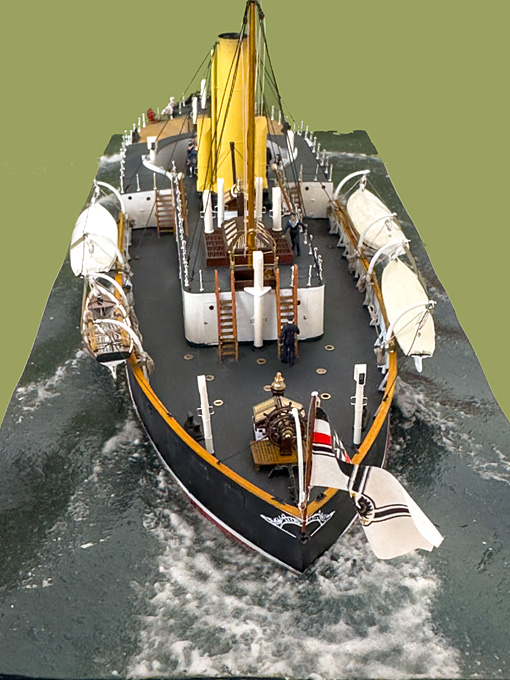
A few glamour-shots of S.M.S. WESPE
Finally, I managed to go into town to buy a suitable paper as backdrop for the glamour-shots of the whole model. Here they are without further comments:


And also two shots in black & white:


Finally, I managed to go into town to buy a suitable paper as backdrop for the glamour-shots of the whole model. Here they are without further comments:
And also two shots in black & white:
Eberhard
Former chairman Arbeitskreis historischer Schiffbau e.V. (German Association for Shipbuilding History)
--------------------------------------------------------------------------------------------------------------------------------------------------------------------------------------------
Former chairman Arbeitskreis historischer Schiffbau e.V. (German Association for Shipbuilding History)
--------------------------------------------------------------------------------------------------------------------------------------------------------------------------------------------
-
Iceman 29
- Posts: 1945
- Joined: Tue Sep 29, 2020 4:35 pm
- Location: Bretagne, France
Re: 1:160 S.M.S. WESPE Armoured Gunboat (1876)
First class!
Pascal
�Battleship Bretagne 3D: https://vu.fr/FvCY
�SS Delphine 3D: https://vu.fr/NeuO
�SS Nomadic 3D: https://vu.fr/tAyL
�USS Nokomis 3D: https://vu.fr/kntC
�USS Pamanset 3D: https://vu.fr/jXGQ
�Battleship Bretagne 3D: https://vu.fr/FvCY
�SS Delphine 3D: https://vu.fr/NeuO
�SS Nomadic 3D: https://vu.fr/tAyL
�USS Nokomis 3D: https://vu.fr/kntC
�USS Pamanset 3D: https://vu.fr/jXGQ