The Ship Model Forum

The Ship Modelers Source
It is currently Thu May 01, 2025 6:36 pm

All times are UTC - 6 hours [ DST ]


Post new topic Reply to topic  [ 1062 posts ]  Go to page Previous  1 ... 50, 51, 52, 53, 54  Next
Author Message
PostPosted: Mon Oct 14, 2024 8:06 am 
Offline
User avatar

Joined: Mon Mar 12, 2012 11:13 am
Posts: 951
Location: Ludwigsburg/Germany
Next, I took care of the cleats for the hangers of the jeer blocks. In Portsmouth they are in the form of a bracket. All other literature that does not base on the restored ship show a shoulder piece.
So the brackets from my printed parts go into the bin. Its up to the shoulder

Image

I took the opportunity to determine the length of the hangers, as I don't know how they will be accessible later.

Image

But more on the jeers later.

And then it's finally its turn, the top mast.

Image

Placed in front of the mast, it is threaded through the trestle trees of the fighting top and pulled upwards using 2 pulleys in the foot.

Image

Here are some older pictures. The top gallant mast was also raised in this way, it is basically a very simple telescopic lift.

Image

Image

Image

XXXDAn

_________________
To Victory and beyond ...
viewtopic.php?f=59&t=99050&start=60

See also our german forum for the age of Sail and History:
http://www.segelschiffsmodellbau.com


Report this post
Top
 Profile  
Reply with quote  
PostPosted: Tue Oct 15, 2024 5:27 am 
Offline
User avatar

Joined: Mon Mar 12, 2012 11:13 am
Posts: 951
Location: Ludwigsburg/Germany
After the fighting top had found its place, it was finally time to fit the futtock shrouds.

The work preparation was the blackening of the etched parts and the painting of the dead eyes. Then the irons of the dead eyes were bent open, the dead eyes inserted and everything squeezed shut and secured with some glue.

Image

The upper hooks were then tied into the shrouds. This shroud was fully dressed, again using my technique with white glue as for my scale.

Image

First test of the dead eyes in the holes of the fighting top and the shrouds hooked in.

Image

Image

Now you can see where the holes in the fighting top need to be reworked so that the irons don't sit at an angle. The lower shrouds have also been marked with a thread to hold the futtock shrouds.

Image

Next, the dressing of the lower shrouds was completed and brought to the same height.

Image

Finally the futtock shrouds could be hooked in, wrapped once around the futtock stave and tied to the shroud.

After trimming, this is what came out :-)

Image

Image

Image

XXXDAn

_________________
To Victory and beyond ...
viewtopic.php?f=59&t=99050&start=60

See also our german forum for the age of Sail and History:
http://www.segelschiffsmodellbau.com


Report this post
Top
 Profile  
Reply with quote  
PostPosted: Wed Oct 16, 2024 8:28 am 
Offline
User avatar

Joined: Mon Mar 12, 2012 11:13 am
Posts: 951
Location: Ludwigsburg/Germany
For the next level, I prepared the top mast shrouds. Even if Steel doesn't mention it explicitly, in most modern sources the foremost shroud is also dressed here, so that's what I decided to do. The sisterblock is also integrated between the two forward shrouds.

But first come the hangers / burton tackles ...

Image

... then the sister blocks ...

Image

... and everything in place.

Image

Image

Here you can see again the difference between the dressed and undressed shrouds. Unfortunately, in contrast to my self-made ropes, the purchased ropes do fluff a little, but this is not visible to the naked eye.

Image

To continue working, I tensioned the shrouds down with clamps and gravity.

Image

And dark ropes in front of a dark background are somewhat annoying even with good lighting, so I made a white cardboard template for this spot.

Image

Image

Here you can see again the difference between the dressed and undressed shrouds. Unfortunately, in contrast to my self-made ropes, the purchased ropes do fluff a little, but this is not visible to the naked eye.

Image

To continue working, I tensioned the shrouds down again with clamps and gravity.

Image

And dark ropes in front of a dark background are a bit annoying even with good lighting, so I made a white cardboard template for this spot.

Image

Then the dead eyes were bound in as the lower ones. To compensate for the lack of a third hand, I then tied the shroud to be worked on with a thread to the yardarm, see green arrows, helps immensely.

Image

XXXDAn

_________________
To Victory and beyond ...
viewtopic.php?f=59&t=99050&start=60

See also our german forum for the age of Sail and History:
http://www.segelschiffsmodellbau.com


Report this post
Top
 Profile  
Reply with quote  
PostPosted: Thu Oct 17, 2024 7:04 am 
Offline

Joined: Tue Jan 11, 2005 10:56 am
Posts: 8795
Location: New York City
Utterly superb work and details. Amazing.


Report this post
Top
 Profile  
Reply with quote  
PostPosted: Fri Oct 25, 2024 4:20 am 
Offline
User avatar

Joined: Mon Mar 12, 2012 11:13 am
Posts: 951
Location: Ludwigsburg/Germany
It was that time again. My little one had wanderlust again and wanted to get out.

Evian on Lake Geneva was the destination this time, a big meeting of the French. And as Madame doesn't like travelling, I was allowed to come along too. And a few other bits and pieces.

Image

The SMS Trinkstein was a big hit! The number of times Joachim had to tell the story is mind boggling, as the dafi was never there, he was at all times everywhere and gossiping with everyone. Thanks Joachim for the help!

Image

Captain Hornblower's starting scene was also well received, Capitaine sans peur as he is called in French, the captain without fear

Image

Image

Various printed parts ...

Image

... working stuff ...

Image

... books ...

Image

... and of course savoury slices - after all, the French are gourmets :-)

Image

And the little one was also very excited ...

Image

...we had a photo session with her straight away.

Image

Image

Image

Image

Image

Best regards, DAniel

_________________
To Victory and beyond ...
viewtopic.php?f=59&t=99050&start=60

See also our german forum for the age of Sail and History:
http://www.segelschiffsmodellbau.com


Report this post
Top
 Profile  
Reply with quote  
PostPosted: Fri Oct 25, 2024 6:53 am 
Offline
User avatar

Joined: Sun Nov 16, 2008 7:56 am
Posts: 611
Thanks for the report :thumbs_up_1:

_________________
Thanks & Sources: Nilsson (research), M.Otten (modelling, research), J.Kaiser (research), B.Jenzsch (3D Services) and J.Arntz (research, drawings). HASSLER Profile, ZERO PAINTS, IWATA airbrush, EXCEL blades, Byrnes Model Machines and more


Report this post
Top
 Profile  
Reply with quote  
PostPosted: Tue Oct 29, 2024 10:01 am 
Offline

Joined: Tue Feb 06, 2007 10:24 am
Posts: 2567
Location: Belgium
That looks like a fun trip Daniel! :thumbs_up_1: :thumbs_up_1: :thumbs_up_1:


Report this post
Top
 Profile  
Reply with quote  
PostPosted: Sat Dec 28, 2024 3:49 pm 
Offline
User avatar

Joined: Mon Mar 12, 2012 11:13 am
Posts: 951
Location: Ludwigsburg/Germany
Merry Christmas everyone. It's been a while since Evian, but my little fat girl with the stripes is still slumbering in her transport box in the camper van. Too much to do in the time before the contemplative time.

Nevertheless, there was some news. Late additions and news. First the late addition :-)

Some time ago I needed some more guns. The proportions of the kit barrels are actually quite good, and with the etched parts you can also get the coat of arms on quite well. However, the most difficult part was always the part that you see the most - the muzzle. In the past, I had always closed it with some sprue and drilled a new hole, which was acceptable for individual pieces but annoying for mass production. Since I already had the basic programming for the guns of the USS Constitution, I took the Blomefield lines from the contemporary plans and updated them in the file and also added the coat of arms in the correct thickness for the scale. So I was able to reconstruct the whole set of guns quite quickly, I still use the gun mounts from the box.

Here's the old and the new together.

Image

Here is the difference between the untreated kit carronade and the new one, once pure and once with paint.

Image

Image

Image

The long tubes also benefit. The basic proportions are correct, but now the reinforcement rings are more clearly defined and the crest fits the scale.

Image

Image

Image

Here is a comparison of the lengths of the 12-pounders: short, medium, long, medium, short. I also took the opportunity to attach the flint lock. Because you never actually saw the empty pan shown otherwise. Either there was a cover over it or the flint lock was fitted.

Image

Image

Image

I think it was worth it :-)

XXXDAn

_________________
To Victory and beyond ...
viewtopic.php?f=59&t=99050&start=60

See also our german forum for the age of Sail and History:
http://www.segelschiffsmodellbau.com


Report this post
Top
 Profile  
Reply with quote  
PostPosted: Thu Jan 09, 2025 6:31 am 
Offline
User avatar

Joined: Mon Mar 12, 2012 11:13 am
Posts: 951
Location: Ludwigsburg/Germany
Well, and the little fat one with the stripes is still stuck in the camper van since Evian. Nevertheless, there is always enough Victory for me to do.

I really missed the 1910 model at the last two exhibitions, as I like to show the developments on the ship. Time to take another look at my victorian black and white beauty. The first construction phase was January to March 2022, so that's already 2 years ago.

A brief look back: After sanding down and fattening up the entire side of the ship to get a level surface, she looked all tattered at first.

Image

But the grace of the paint brought back some decency and dignity.

Image

But in this state I realized one thing: A lot of glue and car filler had caused the hull halves to warp outwards quite a bit, 2 mm on the port side and 6 mm on the starboard side :-0

Then I was initially frustrated, but also realized that I should let the material work out in peace and see if it would still turn out any good.

And I think it's going to become something in the end. The good girl was released from her slumber and thoroughly checked. Deformation no had longer increased. However, it will take a lot of bending force, but I think the decks can manage this, with a little internal help if necessary. But that will only come when the time comes. Why?

I can only insert the decks once the window panes have been inserted. I can only insert the window panes once the outside has been painted. And I can't paint the outside until the planks are in place. So I had to take care of the planks.

In the past, I liked to use 0.2 mm ABS sheet, but the plastic glue tended to leave fingerprints. Wood was too thick for me and too time-consuming to procure. That's why I went exploring in my model maker friends' circles and found what I was looking for: 250 gram paper/cardboard.

Initial tests were quite inspiring.

Image

In the original, there were wooden battens nailed on in two thicknesses to separate the colors. I made these from Evergreen, although I made them slightly thicker for handling reasons.

Image

So planks cut on the guillotine shears ...

Image

... and opened the glue pot.

Image

First planks are slapped on ...

Image

Image

... and even that didn't put me off any further ;-)

And at some point the port half was planked, deliberately disregarding all planking schemes.

Image

Image

Image

Image

And in case anyone thinks that the entrance gate visible today is original, no, the gate that can be seen today is from this state of construction and was installed in the ship between 1820 and 1828. One gate further back than as build. And these port parts were simply reinstalled one port further forward in 1920 and declared as Trafalgar state. Honi soit qui mal y pense.

Image

Image

Fortunately, I've had the parts in my supply kit for a long time, so I just had to grab them.

For me as a plastic person, the tight planking around the stern was of course something new. I'll have to clean it up a bit, then it'll fit.

Image

And I don't know why I remembered some well-known lines in the next picture ...

Image

"Beneath it, visible to all, lay a huge spaceship, one hundred and fifty meters long, shaped like a smooth sneaker, snow-white and maddeningly beautiful. At its heart was a small golden box containing the most sophisticated invention ever made, an invention that made this spaceship something unique in the history of the galaxy, an invention that gave the spaceship its name - 'Heart of Gold'."
- The Hitchhiker's Guide to the Galaxy, Chapter 4

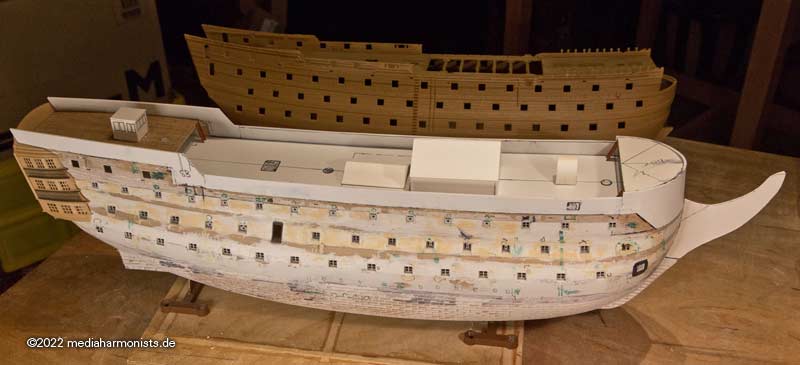
But what still looks like this ...

Image

... should develop into this :-)

Image

Cheers, DAniel

_________________
To Victory and beyond ...
viewtopic.php?f=59&t=99050&start=60

See also our german forum for the age of Sail and History:
http://www.segelschiffsmodellbau.com


Report this post
Top
 Profile  
Reply with quote  
PostPosted: Fri Jan 10, 2025 3:46 am 
Offline
User avatar

Joined: Mon Mar 12, 2012 11:13 am
Posts: 951
Location: Ludwigsburg/Germany
When it rolls, it rolls, or the victory of impatience over model-building caution.

Once I was this far along, I naturally wanted to see the whole thing in paint. This was a risk because the paper planking is quite sensitive and I still had to do the whole other side. But, but, but: it just had to be done.

I had slightly oversized the separating battens, so I sanded the thicker one even thinner and broke the edges. It did the whole thing good.
I used the masking tape to protect the paper planks. This worked really well.

Image

After the first round of white spray over everything, a beveled skewer was ideal for removing grains and impurities.

Image

Then I generously covered the white strip with masking tape and used the profile battens to cut it into shape with a scalpel, which went really quickly. Then black spray and removed the masking and simply: JOY! It worked.

Image

The first size sample of the rigols hung up.

Image

Very striking on the contemporary hull are the many additions, here the downpipes, probably plumbing.

Image

Image

But with a little paint, they blend into the overall work of art in such a way that one thinks they have always been there ;-)

Image

Image

Enjoy, DAniel

_________________
To Victory and beyond ...
viewtopic.php?f=59&t=99050&start=60

See also our german forum for the age of Sail and History:
http://www.segelschiffsmodellbau.com


Report this post
Top
 Profile  
Reply with quote  
PostPosted: Fri Jan 10, 2025 4:15 am 
Offline
User avatar

Joined: Mon Jan 10, 2005 5:30 pm
Posts: 5555
Location: Nr Southampton England
as a fellow black and white sailing ship builder....( Bretagne)

( but mine is 7 x smaller ) :big_grin:

I understand the joy of all
the ' stuff ' being uncompromisingly painted ;black and white--including the anchors

_________________
....I buy them at three times the speed I build 'em.... will I live long enough to empty my stash...?
http://www.modelshipgallery.com/gallery ... index.html

IPMS UK SIG (special interest group) www.finewaterline.com


Report this post
Top
 Profile  
Reply with quote  
PostPosted: Fri Jan 10, 2025 5:03 am 
Offline
User avatar

Joined: Mon Mar 12, 2012 11:13 am
Posts: 951
Location: Ludwigsburg/Germany
... and even the anchor chains :lol_3: :lol_3: :lol_3: :lol_3:

_________________
To Victory and beyond ...
viewtopic.php?f=59&t=99050&start=60

See also our german forum for the age of Sail and History:
http://www.segelschiffsmodellbau.com


Report this post
Top
 Profile  
Reply with quote  
PostPosted: Fri Jan 10, 2025 6:22 am 
Online
User avatar

Joined: Tue Jan 26, 2016 7:59 am
Posts: 239
Fantastic! I have an appreciation for the clean, uncompromising lines and paint schemes of this period. It will be interesting to see how the warping correction turns out.

_________________
King George V class Battleships in 3D


Report this post
Top
 Profile  
Reply with quote  
PostPosted: Mon Jan 13, 2025 4:32 am 
Offline
User avatar

Joined: Mon Mar 12, 2012 11:13 am
Posts: 951
Location: Ludwigsburg/Germany
And because it was so beautiful, we went straight on.

Some of the ports have been planked up over the years. So that it still looks very well-fortified ...

Image

... the missing windows were simply painted on. Honi soit qui mal y pense.

Image

Image

The artillery has also found its way to the dressed rehearsal. In front are the three signal cannons for the salute, above them short 12-pounders from dubious historical stocks ...

Image

... and amidships the historic Trafalgar guns - or what they were considered to be at the time ;-)

Image

And before the questions come, yes, the barrels did indeed sit on the lower portframe back then. Improperly executed changes to the port dimensions and incorrect carriages ...

XXXDAn

_________________
To Victory and beyond ...
viewtopic.php?f=59&t=99050&start=60

See also our german forum for the age of Sail and History:
http://www.segelschiffsmodellbau.com


Report this post
Top
 Profile  
Reply with quote  
PostPosted: Tue Jan 14, 2025 3:02 am 
Offline
User avatar

Joined: Mon Mar 12, 2012 11:13 am
Posts: 951
Location: Ludwigsburg/Germany
The rigols have also found their way onto the model. Here still in the stack ...

Image

... and here already at the scene of the crime.

Image

Image

Image

Image

Image

Image

My favorite detail :-) But I saw afterwards that the wooden panel only covers the top panel, so I'll probably have to touch that up again.

Image

The area of the hase bolsters has already been marked on the bow and the prison cell has also been given its bars ...

Image

... and the windows under the poop also got their window frames.

Image

XXXDAn

_________________
To Victory and beyond ...
viewtopic.php?f=59&t=99050&start=60

See also our german forum for the age of Sail and History:
http://www.segelschiffsmodellbau.com


Report this post
Top
 Profile  
Reply with quote  
PostPosted: Tue Feb 04, 2025 7:23 am 
Offline
User avatar

Joined: Mon Mar 12, 2012 11:13 am
Posts: 951
Location: Ludwigsburg/Germany
Made a little progress over the last few days.

First planked the poop railing, then built the curved end to the aft deck railing, pressed on the end strip using cable ties.

Image

Then sanded down the balusters on the side pocket, which has become quite fast.

Image

First built the dominant vertical rear end profile.
Then came the other window frames.

Image

The whole thing sprayed and the white balusters glued on ...

Image

... and then - oh horror - ...

...

...

...

XXXDAn

_________________
To Victory and beyond ...
viewtopic.php?f=59&t=99050&start=60

See also our german forum for the age of Sail and History:
http://www.segelschiffsmodellbau.com


Report this post
Top
 Profile  
Reply with quote  
PostPosted: Tue Feb 04, 2025 11:16 am 
Offline

Joined: Mon Apr 17, 2017 2:43 am
Posts: 294
Beautiful dafi-esque work. Amazing as always :cool_2:

_________________
http://www.3xblackcats.wordpress.com


Report this post
Top
 Profile  
Reply with quote  
PostPosted: Wed Feb 05, 2025 3:26 am 
Offline
User avatar

Joined: Mon Mar 12, 2012 11:13 am
Posts: 951
Location: Ludwigsburg/Germany
Thank you SG!

When the side gallery was in place, it didn't seem gloomy enough. An anxious look, and sure enough, the white balusters that I had been looking forward to so much just weren't there. Crap. And painting over it looked like crap. I'm sorry, but it did.

Like dafi does what dafi does best: Destruction!

Image

So I broke out the white balusters and put in new black ones. Now the eyeliner is still missing in the broad white profiles and then it could work. It's only an approximation anyway, as otherwise the side galleries would have to be completely rebuilt. At that time, the curves were less pronounced and the whole structure was more angular. But I can't reconstruct it much better with the documents I have so far. Maybe later on, new sources might turn up.

Image

And since I was just tinkering around, I added the chutes for the signal cannons. Probably so that powder and cartridge residues don't stick to the ship's side.

Image

XXXDAn

_________________
To Victory and beyond ...
viewtopic.php?f=59&t=99050&start=60

See also our german forum for the age of Sail and History:
http://www.segelschiffsmodellbau.com


Report this post
Top
 Profile  
Reply with quote  
PostPosted: Wed Feb 05, 2025 10:35 am 
Offline
User avatar

Joined: Mon Mar 12, 2012 11:13 am
Posts: 951
Location: Ludwigsburg/Germany
Just realized that I missed one entry. here it is :-)

So I went over the stovepipe outlet cover plate underneath the fore chains. First it was reduced in size according to the source. On closer inspection of the photpgraph, I noticed that the support block could also be a brick. Since the entire shipyard is made of red brick, I took the opportunity to color it.

Image

Here is my comparison picture again. The shoe for the anchor is still far too small, but the rest is slowly coming along :-)

Image

Even more distinct without color.

Image

As the picture is from 1920 and the state I am showing is 10 years earlier I do not know yet how much of the rot I will show.

XXXDAn

_________________
To Victory and beyond ...
viewtopic.php?f=59&t=99050&start=60

See also our german forum for the age of Sail and History:
http://www.segelschiffsmodellbau.com


Report this post
Top
 Profile  
Reply with quote  
PostPosted: Wed Feb 05, 2025 12:22 pm 
Offline

Joined: Tue Feb 06, 2007 10:24 am
Posts: 2567
Location: Belgium
Wonderful work Daniel! :thumbs_up_1: :thumbs_up_1: :thumbs_up_1:

This may not have been her most beautiful 'version', but it certainly is an interesting one. And it makes for a very unique model too!


Report this post
Top
 Profile  
Reply with quote  
Display posts from previous:  Sort by  
Post new topic Reply to topic  [ 1062 posts ]  Go to page Previous  1 ... 50, 51, 52, 53, 54  Next

All times are UTC - 6 hours [ DST ]


Who is online

Users browsing this forum: No registered users and 12 guests


You can post new topics in this forum
You can reply to topics in this forum
You cannot edit your posts in this forum
You cannot delete your posts in this forum
You cannot post attachments in this forum

Jump to:  
Powered by phpBB® Forum Software © phpBB Group