The Ship Model Forum

The Ship Modelers Source
It is currently Tue Jun 17, 2025 3:07 pm

All times are UTC - 6 hours [ DST ]


Post new topic Reply to topic  [ 892 posts ]  Go to page Previous  1 ... 7, 8, 9, 10, 11, 12, 13 ... 45  Next
Author Message
PostPosted: Thu May 06, 2010 8:10 am 
Offline

Joined: Wed Jan 06, 2010 10:03 am
Posts: 19
Hi All.

Presenting my new book series SuperDrawings in 3D - Takao. There are about 90 views of the entire ship and details. There are also plans in 1:350 scale drawings and a few details.

Greeting,

Viktor


Attachments:
Takao.jpg
Takao.jpg [ 118.93 KiB | Viewed 2391 times ]
Top
 Profile  
Reply with quote  
PostPosted: Sat May 08, 2010 8:24 am 
Offline

Joined: Tue Jan 11, 2005 10:56 am
Posts: 8813
Location: New York City
Chuck, did you receive my PM response?


Top
 Profile  
Reply with quote  
PostPosted: Mon May 10, 2010 1:05 pm 
Offline

Joined: Tue Jan 11, 2005 10:56 am
Posts: 8813
Location: New York City
Some views of Atago's main mast, scanned from the Classic Warships Pictorial on the Takaos.


Attachments:
Atago views aft, 1942 CW.jpg
Atago views aft, 1942 CW.jpg [ 139.63 KiB | Viewed 2310 times ]
Atago,uppermainmastcloseup CW.jpg
Atago,uppermainmastcloseup CW.jpg [ 138.78 KiB | Viewed 2310 times ]
Top
 Profile  
Reply with quote  
PostPosted: Mon May 10, 2010 1:40 pm 
Offline

Joined: Tue Jan 11, 2005 10:56 am
Posts: 8813
Location: New York City
Regarding the 25mm AA director; virtually all the Japanese publications indicate that the top surface rises backwards in a straight, not curved, plane. Below is a cropped view from Atago 1941, though not definitive (credit: Fukui)


Attachments:
Atago , 1941, midsection crop.jpg
Atago , 1941, midsection crop.jpg [ 114.51 KiB | Viewed 2302 times ]
Top
 Profile  
Reply with quote  
PostPosted: Mon May 17, 2010 12:30 pm 
Hello, fellow fanatics! I'm needing some Flyhawk FLH 350009 PE; brass strips set for the securing of the linoleum seams on 1/350 IJN cruisers (late Chokai in this case). I've tried all the suppliers I know of and none can deliver. Whaaaa! For those here who have used this setup - looks like the best (? - http://steelnavy.com/FlyhawkIJNDeckStrips350.htm ) - how many kits are needed per ship, and what have been your methods used to attach those pieces without making too much of a mess about it?
My plan...right now I'm thinking the cleanest way would be to spray adhesive onto the back side of whatever stripping I end up using (Flyhawk, or cut jackstay or railing, GMM Takao set dedicated pieces, etc.) set them in place over the primed surface, set the deadends with a microdab of CA, spray the linoleum paint (and maybe Future, too) over all to seal, and then scrape the paint off the raised brass. Does this make sense, or, better, does it work? I do want to keep the stripping is scale as much as possible, i.e.: not too high in relief, so ....
Trying to think this through before I make too much of a mess with it.... Stephen


Top
  
Reply with quote  
PostPosted: Tue May 18, 2010 1:10 pm 
Offline

Joined: Tue Jan 11, 2005 10:56 am
Posts: 8813
Location: New York City
Dirk is building a 1/350 Mogami and using the GMM version of the tiedown strips. See: viewtopic.php?f=59&t=48997

I think I recall another build with the Flyhawk version but cannot find it. I do have the Flyhawk set but am not building anything in 1/350 at the moment.


Top
 Profile  
Reply with quote  
PostPosted: Wed May 19, 2010 11:06 am 
Thanks for this, Dan; Dirk's build log is an excellent one - there's always a lot to learn on the steep (slippery?) slope of the learning curve! I've got the same GMM PE set that he notes, but something does not quite look right in what he posts, at least I have a different looking result in mind for my job:

On his "Mogami pic #36":

download/file.php?id=19621&mode=view

it does not look like he used the GMM pieces, and the way he lays his transverse strips go over the longitudinal ones does not seem like the best, or even easiest way to go. But there's always at least more than nine ways to skin these cats....

Since you have the Flyhawk strip set, maybe you can tell me: how many are necessary to do a cruiser? From what I can tell from the FH pics, there are perhaps enough straight strips, but way too few intersection pieces. And the detail as well as the size on the Flyhawk strips is way different. ? Am I right? And where did you get yours from? None of the suppliers I contacted had any or knew when they would. Dirk mentions hobbyeasy. Can you advise?

Also, I must mention how inspiring your builds have been for me. The only chance I have of getting to anything similar is to work in 1/350 (I tried a couple of 1/700 kits and the gossamer PE bits totally flummoxed me, I don't mind saying) and really take my time, with learning and enjoying the process, not the end point, being the main thing.

OK, best regards, Stephen


Top
  
Reply with quote  
PostPosted: Wed May 19, 2010 12:49 pm 
Offline

Joined: Tue Jan 11, 2005 10:56 am
Posts: 8813
Location: New York City
Thx for the kind words, Stephen. I'm a sucker for flattery.

Got my set thru Hobbylink Japan. I'll take a closer look at the set and get back to you. I'm sure Dirk would be open to questions & comments, perhaps in a PM.


Top
 Profile  
Reply with quote  
PostPosted: Wed May 19, 2010 1:06 pm 
Offline
User avatar

Joined: Mon Jan 10, 2005 1:21 pm
Posts: 3383
Location: equidistant to everywhere
I personally think after market brass strips in 1/350 scale are much more obvious than can be born out by photographs of the real ship. So while they might add to appearence of realism, they detract from a more rigourous realism.

_________________
Assessing the impact of new area rug under modeling table.


Top
 Profile  
Reply with quote  
PostPosted: Wed May 19, 2010 3:44 pm 
Offline
User avatar

Joined: Fri May 11, 2007 9:13 am
Posts: 291
Location: Düsseldorf, Germany
Stephen,

sorry I just found this discussion here. I really used the GMM pieces. At high magnification the crossings of the transverse and longitudinal strips might look a little bit odd. But when using my naked eyed I like the results. Of course, Chuck is right and these strips are too obvious.
I bought also the Flyhawk strips but never used them. If you want to paint everything (deck and strips) with linoleum color and later scratch the paint from the strips, you might have a problem with the structure on the strips (GMM and Flyhawk).
I used tiny amounts of CA to glue the strips to the already airbrushed deck. This is dangerous because CA at the wrong place will change the color to white.
Better is maybe the suggestion of Jim to use clear matte varnish to glue the strips on the deck.
Later maybe an airbrush with clear matte varnish might give a more even effect of the linoleum, but maybe is removing the gloss of the brass (might make it less obvious). I never tried this.
Dirk

_________________
Dirk
http://www.modelshipgallery.com/gallery/users/Dirk-Ponge/user-index.html


Top
 Profile  
Reply with quote  
PostPosted: Wed May 19, 2010 4:49 pm 
Hi Chuck: I think you are quite right to warn about the excessive feature that any add-on stripping/capping might cause. That is what I saw in Dirk's photo, and what I wished to avoid. Yet to get the right EFFECT in scale does not mean to have an exact and equal reduction in size across the board - note the scale effect on paint shade/hue/saturation. This works for solid features, also, to some vague extent that I have never seen specified. The feature looks weird in Dirk's pic, but in real 1/350 life, it might look just fine - and they do to him, and it might to me, too. I think i will continue to think about how to get this to my satisfaction. The GMM bits look great, but the prospect of getting them down without making a big glue mess is daunting.

It was recently mentioned that in the IJN, they would probably not have paid any attention to keeping the cap strips polished (!/?). They either let them go or treated them with paint or other sealant (?). Any whichaway they wouldn't have been maintained as brightwork unless someone was on the sh*tlist detail. My guess. Any good info. on this???

If that is the case, what I think I will do is lay down the cap strips in whatever way I finally choose, paint linoleum (and Future to secure and seal) over all and then scuff, chip, scrape, or best maybe - sand off - to reveal brass in what I will gauge to be the traffic wear pattern on the deck.

Dirk: as above. Plus: using CA on such nano pieces scares me. I'm just not that good at it. Gator Glue is too globby for this application and dries out too fast here where I am in the small amounts needed. I'm going to go with spray adhesive and use paint and Future/varnish to seal and adhere the PE once its laid down where it wants to go. Glad you didn't take offense over my comments, which I took some care over. I love in-process reports and pics, and your pics are very well done. It is fascinating to see how other people work, adn I picked up more than a few good insights from reading your log.

Dan: Always glad to acknowledge my betters. The Flyhawk PE looks entirely different from the GMM merch. More obvious, maybe. But the intersection pieces would solve quite a lot of the cut-to-fit chore.

Cheers,

Stephen


Top
  
Reply with quote  
PostPosted: Thu May 20, 2010 11:54 am 
Offline

Joined: Tue Jan 11, 2005 10:56 am
Posts: 8813
Location: New York City
Well, I also agree with Chuck in that, truthfully, the effects are overscale in 1/350. The actual brass strips were 30mm in width and only a couple of mm high. 30mm = 1.18". In 1/350, that's .0033".

The GMM 1/350 fret versions seems to be the proper width, though the only thing that I'm familar with in that actual size is the GMM ultrafine railings in 1/700, which is composed of .003" brass. (Obviously, application of brass strips in 1/700 to realistic effect is unrealistic :smallsmile: )

That said, it's more about your personal choice in the aesthetics of modeling, accuracy vs. effect, than anything else.

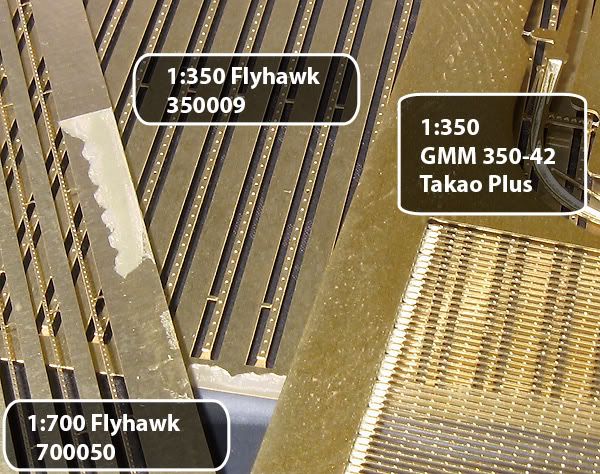
I agree with Dirk that the Flyhawk set strips are considerably wider than the GMM version. And, there aren't enough of them. A quick glance at the AOTS Takao main deck plans indicates that there something on the order of 70-80 intersections of the linoleum strips - a lot of work. (which makes Dirk's efforts on Mogami truly impressive, or insane).

IF I were to replicate the brass strips in 1/350, I think I would take a different approach. Some folks have suggested using a gold pen to ink on the strip. I would take it one step farther and obtain some Micron tape, which can be had in a variety of small widths. I think there is a width as small as .4mm, could be wrong about that. Ink the lines, tape over, spray with linoleum paint, peel off the strips. Probably just as effective and 10% of the work. Just my two cents worths.

I don't know if the actual strips were left to tarnish during wartime; probably. That is a very astute point.


Top
 Profile  
Reply with quote  
PostPosted: Thu May 20, 2010 3:04 pm 
Criminy, why not just lay down gold/brass tape in a filament width over the painted linoleum? 30mm actual (3 cm: seems awfully thin to cover gaps in large butted panels...) = .085mm which is close enough to 0.1mm as to make no difference. 0.1mm metallic or gloss brass-color (dull yellow?) tape should not impossible to find or to strip out oneself from wider stock. Worth considering.... Hmmm....Stephen


Top
  
Reply with quote  
PostPosted: Fri May 21, 2010 11:47 am 
Offline

Joined: Tue Jan 11, 2005 10:56 am
Posts: 8813
Location: New York City
Perhaps, but I think the tape would deteriorate more quickly than paint over time, even with a flat coat over it.


Top
 Profile  
Reply with quote  
PostPosted: Fri May 21, 2010 3:30 pm 
Hmmm...could be. An objection worth considering, especially coming from someone with your experience; I have none in this area. But: even with a Future sealant topcoat? If workable, it would give cap relief in the right direction, i.e.; positive instead of negative. I'll send pix when I get mine done, but only if they're not superbutt-ugly. Ha. Stephen


Top
  
Reply with quote  
 Post subject: GMM PE problems ?
PostPosted: Thu May 27, 2010 11:34 am 
Update on GMM linoleum cap strips (now that I have fresh batteries for my micrometer): .15mm x .20mm, with the detail on them indicating that they should be placed "tall" rather than "flat." This is awkward. Actually the cap strip detail as molded by Aoshima is excellent. Too bad much of it gets ruined by removing their gross molded-on vent and other detail. I still have not decided how to go on this.

Now the other GMM PE situation: I am having trouble in the forward superstructure area - again for the Aoshima Chokai. The GMM bridge windows PE appear to be undersize: not as tall as the clear plastic window pieces which fit fine: when attached to the deck, they do not fill the gap between the deck and its roof. I have tried whittling away on the roof area to bring it down a little, and this helps some, which also cleans up detail that has come out too thick in the moulding process, but there will still be serious gaps when the assembly is put together. My question: is the solution to fill the gap with a solid (painted) or clear treatment? Never seen this addressed, and the pix I have do not indicate how this has been handled by prior kit-builders. Okey dokey, Stephen


Top
  
Reply with quote  
PostPosted: Thu May 27, 2010 1:23 pm 
Offline

Joined: Tue Jan 11, 2005 10:56 am
Posts: 8813
Location: New York City
I have a suggestion for removing the molded on vents; it worked well on the 1/700 version of Chokai. Drill them out with a micro drill. I used a drill bit just a little narrower than the overall diameter to hollow them out , then inserted a very sharp exacto knife blade into the bottom to trim the shell away. Comes right off, very clean.

Not sure how to advise you about #2. FWIW.


Top
 Profile  
Reply with quote  
PostPosted: Thu May 27, 2010 1:35 pm 
That's real sharp. Neat trick: leaves a hole as big - but clean - as the outside diameter of the vent, though, right? Harder to finsih off in 1/350... But easier in the long run than cutting off with a wire snip and then nibbling away on the stub - which is what I did. Small or no hole left to deal with.... I do not like working with putty or filler. Stephen


Top
  
Reply with quote  
PostPosted: Fri Aug 20, 2010 7:00 pm 
Offline
User avatar

Joined: Mon Jan 10, 2005 1:21 pm
Posts: 3383
Location: equidistant to everywhere
After Takao was upgraded with 5"/40 AA guns, did the new 5" mounts have steel beam frames around the mounts to keep them shooting into each other and into superstructure? It seems like they should, but AOTS does not show these in the drawings, and the photos were not clear enough to give definitive evidence. If they did, what is a good source to show the configuration of the frames around each mount?

_________________
Assessing the impact of new area rug under modeling table.


Top
 Profile  
Reply with quote  
PostPosted: Tue Aug 24, 2010 7:55 am 
Offline
User avatar

Joined: Fri Aug 03, 2007 2:55 am
Posts: 98
Location: Wroclaw, Poland
My 3 cents about the brass stripes:
Image
This is my photo of all three sets, there was no manipulation in photoshop involved (no copy-paste procedure from different pics).

According to AotS Takao by J.Skulski the brass stripes were 30 mm wide. In 1:350 scale this is ca. 0.1 mm. GMM stripes have 0.15 mm. Stripes from Flyhawk 1:700 set seem to be only slighly wider than GMM's but the nuts imitations are too dense for 1:350 scale.

Small hint to GMM - maybe selling separate brass stripes would be a good idea? I would definitely buy a couple of such frets.

_________________
Best regards,
Marek

http://www.modelshipgallery.com/gallery/users/Marek-Targowicz/user-index.html


Top
 Profile  
Reply with quote  
Display posts from previous:  Sort by  
Post new topic Reply to topic  [ 892 posts ]  Go to page Previous  1 ... 7, 8, 9, 10, 11, 12, 13 ... 45  Next

All times are UTC - 6 hours [ DST ]


Who is online

Users browsing this forum: No registered users and 2 guests


You can post new topics in this forum
You can reply to topics in this forum
You cannot edit your posts in this forum
You cannot delete your posts in this forum
You cannot post attachments in this forum

Jump to:  
Powered by phpBB® Forum Software © phpBB Group