The Ship Model Forum

The Ship Modelers Source
It is currently Sun Jun 29, 2025 4:23 pm

All times are UTC - 6 hours [ DST ]


Post new topic Reply to topic  [ 107 posts ]  Go to page Previous  1, 2, 3, 4, 5, 6  Next
Author Message
PostPosted: Fri Dec 03, 2010 6:41 pm 
Offline

Joined: Mon Oct 04, 2010 2:29 pm
Posts: 20
Looking good john . keep us updated. :thumbs_up_1:


Report this post
Top
 Profile  
Reply with quote  
PostPosted: Sat Dec 04, 2010 6:57 pm 
Offline
Scale Decks
Scale Decks

Joined: Sun Nov 28, 2010 1:33 am
Posts: 163
Location: Southern California
I have a few updates for you today... First, I have listed the blank sheets in 5x14 size on eBay in case you want to pick those up; I'll see what the market will do with those...

Also, I updated the planking pattern a bit to enhance the end plank lines. This may still be a little dark, but it is a manifestation of the printing. In a subsequent post I will show this problem across various manufactured decks. But, in very fine close-up (Remember, these plank widths are .03 inches wide!) here are two images of the wood sheets... I think we will start using this pattern for our ship decks from now on too, and people are saying they prefer the heavier end lines.
Attachment:
File comment: Here is the new planking pattern with heavier cut lines in MAPLE.
New Planking Maple.jpg
New Planking Maple.jpg [ 86.21 KiB | Viewed 5050 times ]
Attachment:
File comment: Here is the new planking pattern with heavier cut lines in TEAK.
New Planking Teak.jpg
New Planking Teak.jpg [ 91.53 KiB | Viewed 5050 times ]

_________________
scaledecks.com - Proud Sponsor of the ModelWarships.com community!


Report this post
Top
 Profile  
Reply with quote  
PostPosted: Sat Dec 04, 2010 7:17 pm 
Offline
Scale Decks
Scale Decks

Joined: Sun Nov 28, 2010 1:33 am
Posts: 163
Location: Southern California
I decided to break out three of the decks that I have for kits that are waiting on the shelf and do another analysis and comparison based upon our production decks. I have the following five to compare, all in 1/350 scale, with associated material thicknesses:

My Borodino/Maple - .0100 thick, thermal fleece backed
My Konig/Teak - .0090 thick, thermal fleece backed
Hasegawa Nagato - .0120 thick, adhesive backed
Academy Graf Spee - .0150 thick, adhesive backed
KA MK1 Bismarck - .0120 thick, adhesive backed

I prefer to NOT have adhesive backing, allowing for a thinner product and also allowing the modeler to use whatever types of adhesives they prefer, from CA to Liquid Styrene Cement or even White Glue. (I ordered some Gorilla Glue and I want to experiment with that; when I do will post results.)

For the self-adhesive decks above the backing layer is actually very thin, and doesn't add appreciably to the deck thickness. The Hasegawa, for example, barely measures .0005 on my digital caliper; it's VERY thin! (My caliper is only accurate to 1/2000 of an inch, and the backing film kept flipping between .0000 and .0005) The thicknesses above are thus very close to the actual thickness for the wood product alone without the backing.

Appearing below are shots of all five decks, in the same resolution, and taken from the same distance. You will notice the differences in the planking patterns between the different manufacturers, and the differences in rendered plank widths. I think we offer the narrowest plank widths available. Also note the "burned brown" end cuts on the laser cut decks, versus our printed black lines.

The Nagato deck is the best detail, made by Hasegawa directly, with superb deck features (like wood rings around the barbette) rendered in the deck. We're still working on perfecting the alignment between printing and cutting before we get to that level. With that said, here are the five decks:
Attachment:
File comment: scaledecks.com - Borodino / Maple
ScaleDecks_Borodino_Maple.jpg
ScaleDecks_Borodino_Maple.jpg [ 70.49 KiB | Viewed 5048 times ]
Attachment:
File comment: scaledecks.com - Konig / Teak
ScaleDecks_Konig_Teak.jpg
ScaleDecks_Konig_Teak.jpg [ 78.85 KiB | Viewed 5048 times ]
Attachment:
File comment: KA MK1 - Bismarck
MK1_Bismarck.jpg
MK1_Bismarck.jpg [ 63.46 KiB | Viewed 5048 times ]
Attachment:
File comment: Academy - Graf Spee Premium Edition
Academy_GrafSpee.jpg
Academy_GrafSpee.jpg [ 77.54 KiB | Viewed 5048 times ]
Attachment:
File comment: Hasegawa - Nagato Leyte Gulf Edition
Hasegawa_Nagato.jpg
Hasegawa_Nagato.jpg [ 72.58 KiB | Viewed 5048 times ]

So, how thin are our decks? Well, the MAPLE in particular is so thin that it is translucent! For this reason we recommend that you paint the deck under the wood to keep an even background color. Paint the deck white for a lighter color, pait it blue to appear less yellow, pait it red to appear warmer, paint it black to appear darker, etc.

To show you this effect, here is the maple Borodino deck placed on top of the teak Konig deck!
Attachment:
File comment: Notice how thin and translucent the scaledecks.com decks are.
Translucence.jpg
Translucence.jpg [ 142.48 KiB | Viewed 5048 times ]

_________________
scaledecks.com - Proud Sponsor of the ModelWarships.com community!


Last edited by johnd13 on Sun Dec 05, 2010 3:38 am, edited 2 times in total.

Report this post
Top
 Profile  
Reply with quote  
 Post subject: Sneak Peek: I-400
PostPosted: Sat Dec 04, 2010 7:22 pm 
Offline
Scale Decks
Scale Decks

Joined: Sun Nov 28, 2010 1:33 am
Posts: 163
Location: Southern California
At the office today re-engineering plank lines and photographing deck materials... And in the next room we had a test fit going on for the Tamiya I-400, so I snuck in and took a shot of that. We still need to make some adjustments, and the laser was running a bit hot and it singed the wood a little bit - but we didn't care about that since this was just a test cut for alignment purposes. Here's what that process looks like:
Attachment:
File comment: Test fit underway for I-400. It's getting close!
I-400 Sneak Peek.JPG
I-400 Sneak Peek.JPG [ 39.15 KiB | Viewed 5049 times ]
Jayson wants to start his own thread on "Building the I-400" in a "like father, like son" sort of deal, so look forward to that starting soon.

_________________
scaledecks.com - Proud Sponsor of the ModelWarships.com community!


Report this post
Top
 Profile  
Reply with quote  
PostPosted: Sun Dec 05, 2010 9:03 am 
Offline

Joined: Mon Oct 04, 2010 2:29 pm
Posts: 20
Hi John .Your planking looks about the best Id say . About the end cuts , in this scale would they really be that visible?The linear cuts would because they catch the eye more but im not sure its the same effect with the end cuts . I like your porthole attatchment device .Cheers Martin :thumbs_up_1:


Report this post
Top
 Profile  
Reply with quote  
PostPosted: Sun Dec 05, 2010 9:52 am 
Offline
User avatar

Joined: Mon Jan 10, 2005 5:30 pm
Posts: 5568
Location: Nr Southampton England
Well... speaking as a dyed- in-the-wool deck painter.... :big_grin:

Disclaimer:--personal opinion only! :heh:

I think the maple deck looks the best so far--teak is a nice tone--but to rich for a scrubbed/ holystoned deck and in relative scale tone.

good colour for 1:1 or on a larger scale yacht or powerboat model- maintained/scrubbed or oiled teak

I thin in 1/35o the butt ends should not be visible- painters of deck try and vary the tone of individual planks to show this off --often excessively in my view- but it suffices to indicate --without overdoing it by an actual marking

On the whole,- a deck is usually a fairly homogeneous colour...

I prefer the printed almost invisible butt ends to the burnt version-- if they have to be there at all!

They always catch the eye to much, lateral marking show more as models are usually viewed side-on....

here are some views of North Carolina-( from MW.com) -which shows colour differential in plank tones--but the bitt ends are al but invisible..

in 1/350 scale I think the tone should be a bit greyer still ...

http://www.modelwarships.com/features/a ... nc/004.jpg

http://www.modelwarships.com/features/a ... nc/016.jpg

http://www.modelwarships.com/features/a ... nc/021.jpg


http://www.modelwarships.com/features/a ... nc/019.jpg

here is a model deck of mine( 1/350 Roma )that looks believable...

and even so I wished the deck did not have the cast butt ends-( I filled them with paint!! )

Image

Image


and from way back wehn....

I tried indicating the butt ends with pencil ( excessivly!)

Image

Better here...

Image

subtler still

Image

and on my latest 350 model almost I left them off completely...( apart from the odd gentle pencil stroke...)


Image


Please do not get me wrong--I think your decks are a definite improvement on the trenched plastic/resin caulking seams in decks--a flush finish is of course preferable...-


- but for me I would prefer the barest minimum of but ends visible...

so far this lighter deck--without butt ends is your most convincing effect

Image

cheerio

JB in a damp UK

_________________
....I buy them at three times the speed I build 'em.... will I live long enough to empty my stash...?
http://www.modelshipgallery.com/gallery ... index.html

IPMS UK SIG (special interest group) www.finewaterline.com


Report this post
Top
 Profile  
Reply with quote  
PostPosted: Sun Dec 05, 2010 7:03 pm 
Offline
User avatar

Joined: Wed Apr 02, 2008 6:23 am
Posts: 1216
Location: South Carolina USA
John
I used Gator glue on my last wood deck, it holds better than white glue but gives you plenty of work time. Hate to make a mistake with CA no going back after that's dry.

_________________
"Only two sailors, in my experience, never ran aground. One never left
port and the other was an atrocious liar."
-Don Bamford


Report this post
Top
 Profile  
Reply with quote  
PostPosted: Sun Dec 05, 2010 8:00 pm 
Offline

Joined: Tue Nov 03, 2009 9:28 pm
Posts: 2126
Location: Egg Harbor Twp, NJ
I don't know if this helps any but

*Edited by Tracy*


Report this post
Top
 Profile  
Reply with quote  
PostPosted: Sun Dec 05, 2010 9:09 pm 
Offline

Joined: Mon Jan 10, 2005 11:02 am
Posts: 10569
Location: EG48
Please stop posting LIFE images minus the watermark... I really don't fancy a cease & desist from copyright lawyers!

_________________
Tracy White -Researcher@Large

"Let the evidence guide the research. Do not have a preconceived agenda which will only distort the result."
-Barbara Tuchman


Report this post
Top
 Profile  
Reply with quote  
PostPosted: Mon Dec 06, 2010 5:32 pm 
Offline
User avatar

Joined: Wed Apr 02, 2008 6:23 am
Posts: 1216
Location: South Carolina USA
My Borodino decks came today :woo_hoo: I have two versions of teak, one with heavy cut lines the other with light, which are both superb. The wife likes the darker Teak, said it looked more like a real deck, I like both but will more than likely do the darker Teak to make her happy and help me order another kit later :heh:

Here are a few pictures I took for you to look at. These decks are sliced so thin that if I were to put a couple of coats of paint down on the deck rather than John's wood, the paint would be thicker. This is by far the thinnest and finest cut wood I have seen. Kudos John for a fine job.

By the way the fit was right on, I laid the deck over the kit deck for a test and it fit like a glove! No need to cut or trim anything for this to work.

I had to cut the file size so I could post them here, but I think you get a good idea of the quality.

I plan to follow up with more on these as I progress in the build. Shipping was under a week after I bought on ebay.

Hey John looking forward to the Bismarck now... :jump_1:


Attachments:
File comment: First look with flash
1.jpg
1.jpg [ 58.62 KiB | Viewed 4965 times ]
File comment: taken through a magnifier
2.jpg
2.jpg [ 51.59 KiB | Viewed 4965 times ]
File comment: through magnifier with heavy Teak on left light Teak on right
3.jpg
3.jpg [ 50.7 KiB | Viewed 4965 times ]

_________________
"Only two sailors, in my experience, never ran aground. One never left
port and the other was an atrocious liar."
-Don Bamford


Last edited by Charlestonguy on Mon Dec 13, 2010 2:37 pm, edited 2 times in total.
Report this post
Top
 Profile  
Reply with quote  
PostPosted: Mon Dec 06, 2010 11:48 pm 
Offline
Scale Decks
Scale Decks

Joined: Sun Nov 28, 2010 1:33 am
Posts: 163
Location: Southern California
Charlestonguy wrote:
Hey John looking forward to the Bismarck now...

You and me both, buddy. You and me both. :big_grin:

Glad you like the decks - nothing like satisfied customers.

And, all, here's a "heads up"... I have the Eastern Express Borodino and Knyaz Suvarov. Once the Borodino project was well underway, I ordered the Oriel last and it was a Zvezda. I compared all three kits and the molds for the deck pieces are exactly the same. Last night I decided to look at the instructions that came with the Oriel (Zvezda), because the Borodino (EE) instructions were less than clear. The Zevezda instructions are way better, and much more clear.

BUT...

They are so clear, they even indicated to paint the walkabout at the stern in tan wood color. As in, the color of the deck. As in, a part of the ship that I did not cut a deck piece for. The reason that we missed it is that we make a piece for every part that has wood deck lines in the injection mold. And that area, being the "top" of a mold with the detail concentrated on the sides, had no plank lines on it. That gave the impression that it was steel and did not require planking.
:Oops_1:
I would not have caught it at all if it wasn't for the fact that the better Zvezda instructions said to paint it as a deck.

But FEAR NOT! It's a teeny-tiny little piece, and so I can cut a whole bunch of them from single sheets of Maple and Teak Stock, and distribute them as supplements for every deck that I have shipped so far, and send them out to all the customers who already received walkabout-less decks. One cut job, standard first class postage, standard envelope all help me to keep the costs at a minimum. I will chalk it up as a "Lesson Learned."

And I will alter the plan to make sure that all future Borodino decks either include the add-on supplement, or else use a new cut pattern that includes the walkabout from the get-go. So everybody will have all the wood pieces they need to do it right. (Including ME - I want MINE to be right, too!) And that really represents my philosophy here. If you as builders discover any sort of a problem, just let me know and I will make it right, because I WANT to make it right. I know what it is like to be on the receiving end of this hobby! So mark that as a future point of reference.

Also, I am really starting to think about a "custom cut service" to allow the super-detail guys to get the exact cuts that they want. I figure it would work something like this... If you want a custom cut deck, you first have to purchase a regular deck - stock. Then you can modify the stock deck as you would wish, and then send the original back or photocopy it or scan it, and mark up exactly what you would want changed. I am thinking that I could eliminate cutouts, or extend certain areas to suit modifications that you would want to do. I could probably also add or move cuts, but I'd be concerned about the exact fit - so I think for "additional cuts" I would recommend that you do those yourself with an X-Acto. Then I would cut a second deck to your specification, and sell that to you at the price of a regular deck. So you get an custom-cut deck at the effective cost of 2x a normal stock deck. What do you all think of that offer? Something attractive that you'd be interested in? Or do you have some other idea? I'm open to all suggestions, so let me know what you have in mind, and I'll let you know if it's workable on my end or not.

Thanks!

_________________
scaledecks.com - Proud Sponsor of the ModelWarships.com community!


Report this post
Top
 Profile  
Reply with quote  
PostPosted: Fri Dec 10, 2010 4:45 am 
Offline
Scale Decks
Scale Decks

Joined: Sun Nov 28, 2010 1:33 am
Posts: 163
Location: Southern California
Hey, gang... I took a day off from work today (and will tomorrow, too!) to relax and spend a bunch of time on the Borodino. I am racing on this build because I want to get this sucker done and move on to something else. So this is not up to my usual build quality standards, and I can feel myself rushing through this. But all that I really want to do is to make sure that the deck works okay, and that I can a completed model to show with a deck in place. (And if I think THIS is rushing, coming soon will be a build of the Borodino out-of-the-box, only following kit directions and using kit parts. The purpose of THAT is to show what a basic model looks like compared to a model with metal barrels, etched brass, and a wood deck - a great exhibit at a trade show.)

Now that I have made that disclaimer, and admit that the Borodino is going together slapdash, here is what we were able to get done today...

    We windowed the bridge and cabins (see below)
    We started to assemble 18 deck guns (more on that tomorrow)
    I painted a lot of linoleum (nasty job; I may start making linoleum decks!)
    I touched up some roofs and walls
    I drilled out some glued portholes
    I test fit the walkabout deck, and had to trim it a bit
    I glued down the walkabout and aft deck (see below)
    I snapped of the four stern guns when I tried to rotate them
    And I took a bunch of pictures

All in all, a pretty good day.

_________________
scaledecks.com - Proud Sponsor of the ModelWarships.com community!


Report this post
Top
 Profile  
Reply with quote  
 Post subject: Making Windows...
PostPosted: Fri Dec 10, 2010 4:57 am 
Offline
Scale Decks
Scale Decks

Joined: Sun Nov 28, 2010 1:33 am
Posts: 163
Location: Southern California
I thought about painting all the square windows on the Borodino silver to simulate glass, but decided instead to open them up.

I first tried to drill them out and file them square, but that was a disaster. The windows are large, and separated only by thin, externally-mounted strips. Filing down the windows filed through the strips and left jagged, uneven squares.

Jayson recommended doing a complete rebuild of the structures using strip stock. So that's what he did - and it turned out pretty good. When complete and painted, we filled the windows with a mix of white glue and water, which dried clear to simulate glass. Here's the process...
Attachment:
File comment: After slots are cut in each wall where the windows will go, and the external braces molded into the kit are shaved off with a knife, the external braces are replaced with strip stock.
External_Bracing.jpg
External_Bracing.jpg [ 76.68 KiB | Viewed 4891 times ]
Attachment:
File comment: After the glue sets, the excess strip stock can be trimmed away. The unit is then painted, inside and out. Notice the painted unit at right. The glued windows at right have already mostly dried and are clear, whereas the windows on the underside are still wet and opaque white.
Trimmed_Bracing.jpg
Trimmed_Bracing.jpg [ 147.71 KiB | Viewed 4891 times ]
Attachment:
File comment: The glue is easily applied with a paintbrush. You can see the "clearing effect" clearly happening here. If the bubble pops, just re-paint it. If they keep popping, add more glue to stiffen the mix.
Making_Windows.jpg
Making_Windows.jpg [ 116.76 KiB | Viewed 4891 times ]

_________________
scaledecks.com - Proud Sponsor of the ModelWarships.com community!


Report this post
Top
 Profile  
Reply with quote  
 Post subject: Gluing Down the Deck
PostPosted: Fri Dec 10, 2010 5:02 am 
Offline
Scale Decks
Scale Decks

Joined: Sun Nov 28, 2010 1:33 am
Posts: 163
Location: Southern California
For those of you who will be working with wood decks, I recommend you do the following test FIRST: Stick a scrap of the deck (if you have one) to a spare piece of plastic with whatever method you plan to use to understand how the adhesive plays out. For me, I did not know if I wanted to use Testor's Liquid Plastic Cement, or if I wanted to experiment with some Gator Grip that was recommended here. So I tried both on the underside of the upper deck, as so:
Attachment:
File comment: Testing glues on the underside of the deck.
Underside_Test.jpg
Underside_Test.jpg [ 76.24 KiB | Viewed 4891 times ]

I liked the Gator Grip - it was very easy to work with, so I decided to try it out... I heard that it could work almost like a contact cement if you applied it to both surfaces, so I decided to do that with a wet layer in-between.

First, I coated the underside of the wood - figuring some of it would be soaked up in the thermal fleece backing. So the first coat here acted more like a sealer coat...
Attachment:
File comment: Gluing the underside of the wood...
Glue_on_Wood.jpg
Glue_on_Wood.jpg [ 145.43 KiB | Viewed 4890 times ]

Next, I applied the glue to the plastic deck. The underside test revealed that the Gator Grip was really clear when it dried, so I didn't worry too much about slobbering it on the fittings - preferring instead to get a good grip all the way to the edges.
Attachment:
File comment: Brushing the glue on the deck... Shortly after starting to spread the glue, I realized that I had to paint the two bumps brass - so I took a brief time-out to do that. You will see the results later.
Glue_on_Plastkc.jpg
Glue_on_Plastkc.jpg [ 100.04 KiB | Viewed 4890 times ]

I then applied another coat to the wood (I did not take a picture of that; if you want to see what that looked like, go back two pictures and check it out - it looked exactly like that! :smallsmile:) The second coat, stayed wet a bit longer thanks to the sealer coat preventing the wood from soaking up so much of the glue.

Next up was just a matter of plopping the deck into place, and giving it a good rubdown to make sure that the glue made good contact.
Attachment:
File comment: When you're not using the sharpened end of a dental instrument to carve your initials in the side of a moose (sorry, I could not resist) - they can serve as the perfect tool for pressing down a wood deck to apply a lot of pressure in very tight spaces.
Sharpened_End_of_a_Dental_Instrument.jpg
Sharpened_End_of_a_Dental_Instrument.jpg [ 139.52 KiB | Viewed 4890 times ]

When you're done, You have an effect like this... Notice how crisp and clean the lines are between the wood and the fittings in black or brass. (I spent hours today painting the boundaries between the black fittings and the painted-on linoleum on other decks. The wood deck makes that maddeningly frustrating task totally unnecessary.
Attachment:
File comment: Here is a close-up of the two decks. The deck I am using was a test cut that had one small flaw at a rear cleat - I figured I could live with that on my rush-built model. Also, note that the planking pattern on the two decks doesn't quite match; the walkabout deck uses a bit of a heavier line. (It's pretty pronounced here in the enlargement, but it looks okay in real life. Once I add the walkabout railings and canopy frame, and replace the broken-off stern guns, it will be buried under a bunch of other detail and not so pronounced.
Two_Decks_Closeup.jpg
Two_Decks_Closeup.jpg [ 86.05 KiB | Viewed 4890 times ]

I glued the hull sides to the foredeck, then added in the rounded aft bulkhead at the rear of the foredeck and did some touch-up painting of the seams. Finally, before wrapping up for the night I decied to put some of the pieces into place just to see how it was all looking. I think it's starting to look like a Borodino!
Attachment:
File comment: Everything above the aft deck is held in place only by gravity. Lots is missing, and a bunch of what is placed here is misaligned in this photo.
Gravity_Model.jpg
Gravity_Model.jpg [ 86.35 KiB | Viewed 4890 times ]

Tomorrow we shoud be able to start putting the superstructure together, and mounting some of the detail fittings.

Closing question: Have you ever built a deck gun and stand that looks like a squashed mosquito - only smaller?
:doh_1:

_________________
scaledecks.com - Proud Sponsor of the ModelWarships.com community!


Report this post
Top
 Profile  
Reply with quote  
PostPosted: Fri Dec 10, 2010 5:52 am 
Offline

Joined: Mon Mar 30, 2009 9:54 am
Posts: 107
John, what are you doing for the pattern of edge planking that border around the barbettes and/or any hatches that pierce the deck and around the deck edge itself?

I suppose it is enough that the waste 'surround' of timber that comes with? each 'inner' deck can be cut for strips by the modeller himself and that those can be used for these edging planks... and with each new edging plank being custom cut-to-fit, they will be a closer fit than the lazer cut hole. [no gaps! Hope that's not a back-handed compilment? ;-)]

A lot of people get a lot of satisfaction working with wood... it's like brass in this regard... it's pleasing to the eye! And although it is personal preference, a I think the wood decks looks great... far better than paint... even if the grain is out of scale. :-)

cheers


Report this post
Top
 Profile  
Reply with quote  
PostPosted: Fri Dec 10, 2010 9:49 am 
Offline

Joined: Mon Oct 04, 2010 2:29 pm
Posts: 20
:wave_1: Hi John . I recieved my Varyag decks today . Wow . Its thin .Actually i wasnt prepared for it to be so thin . This is my first wooden deck so Ill take your advice about doing some test pieces with different glues . Are you happy with the gator glue? Is it an instant grab or can it be moved about ,because i was thinking that plastic cement wouldn't allow any degree of error in the positioning.?
I like the idea you could do the linoleum flooring as well .What material could be utilised for that ?. There are some extremly fine emery type papers available. We have one at work that is so fine and paper thin its hard to belive its abrasive . And its self adhesive.
Any plans to do the Hasegawa Mikasa in the future ?
Thanks again John . Mucho satisfacto. Cheers Martin :thumbs_up_1:


Report this post
Top
 Profile  
Reply with quote  
PostPosted: Fri Dec 10, 2010 10:09 am 
Offline
User avatar

Joined: Thu Mar 05, 2009 10:38 pm
Posts: 3127
I cannot wait to see your Modern New Jersey cut. I am really anticipating this. Thank you so much for getting into the market. This should be a blast!

_________________
Proper Preparation Prevents Poor Performance


Report this post
Top
 Profile  
Reply with quote  
PostPosted: Fri Dec 10, 2010 2:35 pm 
Offline
Scale Decks
Scale Decks

Joined: Sun Nov 28, 2010 1:33 am
Posts: 163
Location: Southern California
TCC wrote:
John, what are you doing for the pattern of edge planking that border around the barbettes and/or any hatches that pierce the deck and around the deck edge itself?

I suppose it is enough that the waste 'surround' of timber that comes with? each 'inner' deck can be cut for strips by the modeller himself and that those can be used for these edging planks... and with each new edging plank being custom cut-to-fit, they will be a closer fit than the lazer cut hole. [no gaps! Hope that's not a back-handed compilment? ;-)]

A lot of people get a lot of satisfaction working with wood... it's like brass in this regard... it's pleasing to the eye! And although it is personal preference, a I think the wood decks looks great... far better than paint... even if the grain is out of scale. :-)

Right now we're not doing anything with edge planking. Per my prior posts, the resolution of our planks are overscale anyway, and I'm concerned about putting all that detail in - it might just look too clunky. I want the decks to be a harmonious part of an overall great model - not draw too much attention to themselves and steal the show! Hasagewa does edge details on their Nagato, which you can view in photos in a prior post. If you as a hobbyist want to make them - wow! That's a lot of work - but certainly a very impressive commitment to detail.

Now on the 1/200 Arizona, that's a whole different matter. We are now approaching a size where we can start to think about putting in true deck detail - and indeed we are. I am looking at lateral expansion lines, and there is a peculiar shaped area back around the 3rd main battery turret that sits under the boat stowage that we are looking real carefully at. If we can do what I want to do there, I think you'll all be stunned.

Right now we're trying to overcome issues of aliignment between the laser printing and laser cutting. Just to keep you all fully in the loop (and maybe get some free advice!) I have no problem sharing where we are at. The printing on the wood is fine, but the laser printer wasn't meant to print wood. So sometimes the sheets go in a little crooked - like a fraction of a degree, but just not perfectly parallel to the edges. And, in fact, the wood that I work with is machine cut but not exactly a consistent size - and sometimes the edges are a little jagged. (It's not like a perfect 11x17 sheet of paper by any means.) And, sometimes the wood binds up a little bit, making a "bend" appear in some of the planking when it is fusing. I know this all sounds bad - but don't worry - if it's not printed right, I don't sell it.

But assuming I get a workable pattern on the wood, I now have to cut it. And here it gets tricky again. First, we have to carefully align the material with the pattern in the laser cutter. And again, we can't just "square it up" on the edges, since the edges are inconsistent. We have to set registration targets on the printed wood, and then make sure that the laser lines up with those targets when it cuts. (We have different layers in our plans - print layer, cut layer, alignment layer, border and labeling layer, template layer, etc.) And then we have to lock down a very thin piece of wood to the cutting bed with a system that doesn't get in the way of the cutting. It's a tough project to get clean alignment to start the cut, trust me on that. Then, when we cut, there is a lot of air movement over the cut surface (fans and blowers and such) to clear out the smoke. (The decks actually smell "like Christmas!" somebody once said... They have a nice, wood fire smoky smell to them when first unpacked...) But all of those blowers can make the super-thin wood "flutter" and can also cause some alignment problems.

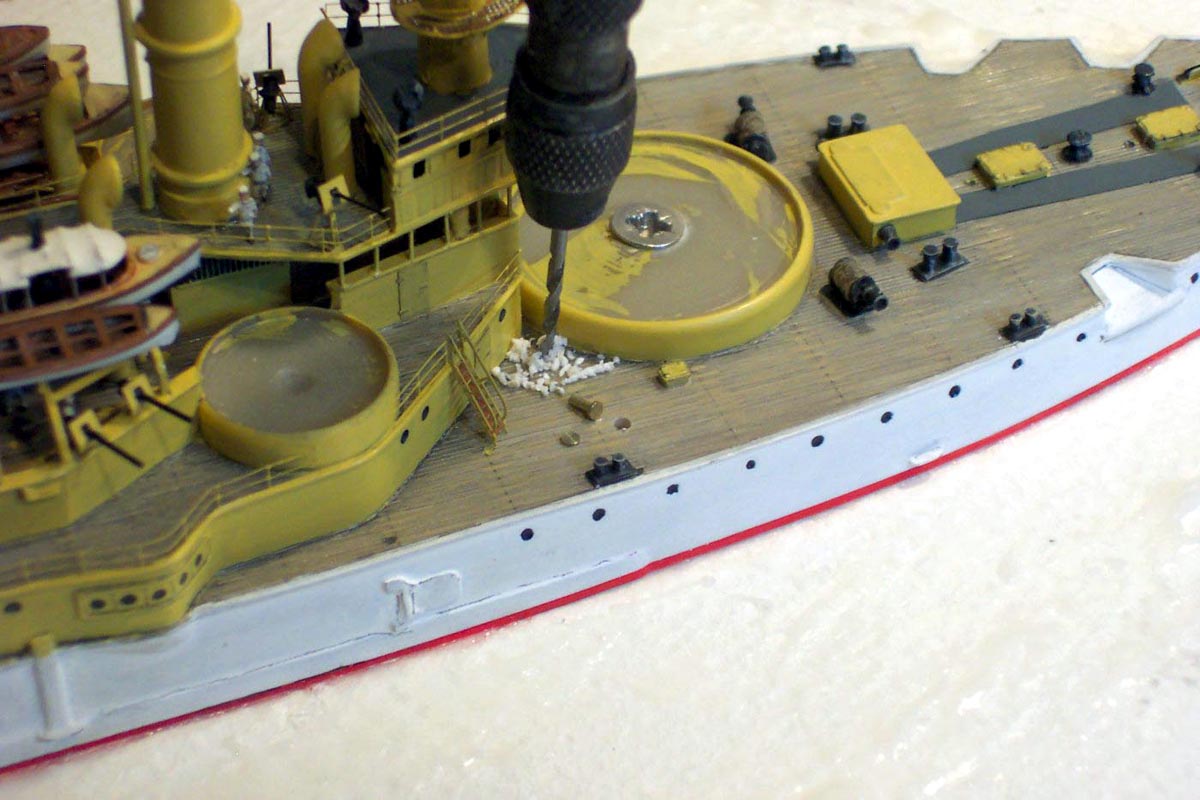
What all that means is that right now, our placement of the cut layer onto the print layer is "close" but not "perfect." So I have to give us some margin for error in the printed planking because I don't know exactly where the cuts are going to come down in that area. As a result, tricky patterns like radial spokes around gun mounts (like on the I-400) or doing edge planks and barbette surrounds becomes a real challenge, and is just not within grasp of our technology at this point - at least not with the equipment and registration system we are using. HOWEVER, this is a HUGE issue for us, and we're spending a whole lot of time working to lock it down. We're experimenting with new techniques and equipment continuously, with the goal of being able to drop cuts EXACTLY where we want them in relation to the printed layer. And I am confident that we will get there. Absolutely. So then we will be able to even cut barbette rings perfectly centered in our barbette surround plank pattern. We're just not quite there today, so we're sticking with a straight plank pattern (for the most part) that doesn't have to be precisely aligned.

Let me point out in closing that if we just burned in the plank pattern with the laser then we'd have no problems... A blank sheet of wood would go into the machine, and the machine would do it all in one step so there would be no alignment problem between competing technologies. But THEN we'd have issues of brown plank lines that were too thick and inconsistent widths for linear and butt cuts... I don't want to go down that path, I want to strive for something better. We'll get there. It's just a matter of time until we perfect a system and lock down the solution.

_________________
scaledecks.com - Proud Sponsor of the ModelWarships.com community!


Last edited by johnd13 on Sat Dec 11, 2010 3:29 am, edited 1 time in total.

Report this post
Top
 Profile  
Reply with quote  
PostPosted: Fri Dec 10, 2010 2:57 pm 
Offline
Scale Decks
Scale Decks

Joined: Sun Nov 28, 2010 1:33 am
Posts: 163
Location: Southern California
redsoldiergreen wrote:
:wave_1: Hi John . I recieved my Varyag decks today . Wow . Its thin .Actually i wasnt prepared for it to be so thin . This is my first wooden deck so Ill take your advice about doing some test pieces with different glues . Are you happy with the gator glue? Is it an instant grab or can it be moved about ,because i was thinking that plastic cement wouldn't allow any degree of error in the positioning.?
I like the idea you could do the linoleum flooring as well .What material could be utilised for that ?. There are some extremly fine emery type papers available. We have one at work that is so fine and paper thin its hard to belive its abrasive . And its self adhesive.
Any plans to do the Hasegawa Mikasa in the future ?
Thanks again John . Mucho satisfacto. Cheers Martin :thumbs_up_1:

Martin -

I'm glad you are pleased!

I am very impressed with the Gator Glue. My observations are that indeed it does allow a lot of movement, and it sticks down pretty well. I think the plastic bond is pretty solid, but not absolutely locked in, as I was able to slide in a razor blade on the test patches and separate them from the plastic undamaged. Actually, I think that's a really good thing in case you encounter some disaster and need to back up a step. With CA, that ain't gonna happen. Once it's down, it's attached, and any attempt to peel it off and try again would just shred the deck. The liquid cement is thicker and I think it bonds better than the Gator Glue - a nice happy medium between the two, but it has super-grabby tackiness - so it is not going to allow for much repositioning at all...

The thing to consider, though, is that with all the cutouts for the fittings the decks aren't going to slide around much anyway. They just drop into place and you use all the cutouts molded in the kit as a guide to position the main decks right where they need to be. So for the main decks, I think I would use the liquid cement. But for things like round gun tubs, there are no real landmarks. If you want to make sure that your planks are running fore and aft then the slippery Gator Glue has a ton of appeal. Also for positioning the walkabout deck it was great. And, we're looking at doing wood cuts someday for utility boats and rowboats and such (I think our material is thin enough to get away with that.) So some slipperyness there would be a great benefit. If we start doing curved pieces - say for the outside of rowboats - then I would probably not trust the Gator Glue or even Testors Liquid Cement, and I would probably jump right to the CA in those circumstances. I want the curved wood to stay put and not try to straighten out... I would say that there is no "one best glue." Each has strengths and weaknesses, so get familiar with them all, then choose what you are most comfortable working with in each unique application.

I haven't thought about the linoleum material - I'll talk to my laser cutter guy to see if he has any suggestions. Whatever I do, I would think that I would want it to be in the right color for any given kit. Not sure how to do that yet. But even without that, then the hobbyist could paint it any color that they like, and then still end up with perfectly crisp and clean edges around fittings and bulkheads and such. After painting all those stupid edges on the Borodino, I gotta admit that if I had linoleum cutouts I would have had a much better evening.

As for the Mikasa, I have the deluxe kit which came with a wood deck, brass barrels, photo etch, etc. The deck looks pretty good (Hasegawa quality, all burned, adhesive backed.) And you can buy the deck separately, too. I love the Mikasa as a kit, and want to build it myself. And when I do, I think I'd want to "upgrade" to one of MY decks on it. But I don't know how many other people would toss a reasonable Hasegawa deck to buy one from me at additional expense. I don't know if there is a big enough market there in that slice. What I DO know is that there are a lot of other kits with no decks available, and that people are clamoring for those... Like the 1/200 Arizona, and the Modern New Jersey (and all the Iowas) and the 1/400 Heller kits, etc. My thinking is to address those kits first where no product currently exists. I think that better serves the community.

One thing I do plan on doing is to list ALL the scale decks that I know of at scaledecks.com - those that we manufacture and those of other vendors for other kits. In that way, the website can be a one-stop reference to all known scale deck solutions. Hey, if somebody makes a deck for an Essex and I do not, what is the harm of letting a hobbyist know where to go to find the deck they need for their kit even if I don't manufacture that specific application? And on the plus side, if they always come to me first as the definitive source of info on ALL scale decks, then maybe I can sell them something that I DO offer along the way. I think that's not only a very helpful thing for me to do as one hobbyist to another, I think it's also good business.

_________________
scaledecks.com - Proud Sponsor of the ModelWarships.com community!


Last edited by johnd13 on Sat Dec 11, 2010 3:34 am, edited 2 times in total.

Report this post
Top
 Profile  
Reply with quote  
PostPosted: Fri Dec 10, 2010 5:11 pm 
Offline

Joined: Mon Oct 04, 2010 2:29 pm
Posts: 20
Hi John . I wasnt aware that hasegawa did a deluxe Mikasa . Thats next on my radar. Ive been doing a bit of research myself for wood decks . There are a few manufacturers about ,all have website but i cant find anything on Blue Star or A1. Do you know of these ? There is also a chap who does one for the Revell Emden and the Varyag . Hes called Vectorcut .com . That also has some very good insperational modelling on in various scales . Check him out . Martin :thumbs_up_1:


Report this post
Top
 Profile  
Reply with quote  
Display posts from previous:  Sort by  
Post new topic Reply to topic  [ 107 posts ]  Go to page Previous  1, 2, 3, 4, 5, 6  Next

All times are UTC - 6 hours [ DST ]


Who is online

Users browsing this forum: No registered users and 10 guests


You can post new topics in this forum
You can reply to topics in this forum
You cannot edit your posts in this forum
You cannot delete your posts in this forum
You cannot post attachments in this forum

Jump to:  
Powered by phpBB® Forum Software © phpBB Group