The Ship Model Forum

The Ship Modelers Source
It is currently Thu Apr 18, 2024 4:01 pm

All times are UTC - 6 hours [ DST ]


Post new topic Reply to topic  [ 61 posts ]  Go to page 1, 2, 3, 4  Next
Author Message
PostPosted: Sat Sep 24, 2011 10:39 am 
Offline
User avatar

Joined: Mon Jan 10, 2005 5:30 pm
Posts: 5386
Location: Nr Southampton England
After the protracted gestation of my Vladimir Monomakh model...

http://www.modelwarships.com/reviews/sh ... /index.htm

I fancied a a model based on a recent kit as a starting point--with less removal of incorrect or crude features and thereby a more pleasant ( speedy?) build,,,....??-

-we shall see!!

Riurik II is a not unfamiliar name for those who have been buying Combrig kits for the last 15 years....

The ship has been kitted by Combrig previously-- an 'older' kit that was based on some dimensionally flawed plans and depicted the vessel in her immediate post-as built status--with all lino decks and only a small amount of planking near the anchor handling gear- as per builders model.

I have yet to see one of these kits built ( well) and must confess to having never quite started mine...

A bit of history... ( condensed..)

Rurik was unusual in that she was built by Vickers in Barrow in Furness, England.
Laid down August 1905, launched 4 November 1906, completed July 1909. The Russian Navy was not usually a customer of British shipyards.

The main armament consisted of 4 x 10-inch guns in two turrets, the secondary armament consisted of 8 x 8-inch guns in four twin turrets located at the corners of the superstructure.

The anti-torpedo boat armament comprised 20 x 120 mm guns in casemates. There were also four 1.85-inch (47 mm) guns and two 18-inch (460 mm) torpedo tubes.

Rurik was commissioned in 1908. She carried out a deployment to the Mediterranean in company with the battleships Tsesarevich and Slava, where she represented Russia at the coronation of King Nicholas of Montenegro

She was the flagship of the Baltic Fleet during World War I and saw much action, being damaged by mines on several occasions. T

By 1918 the ship was worm out and at the end of her useful service life . Hulked in 1922 she was sold for scrapping in 1930.


I have always been fond of Rurik, with her long elegant hull and minimalistic low superstructure and the three funnels hinting at power and speed....

The NEW Combrig kit is a solid and far more accurate starting point,with much fine detailing incorporated in the castings.

However--with the finely detailed planking it is now not possible to depict the ship at the start of her career due to the absence of the lino decking without a huge amount of filling and paring work!

After study of photos and plans... I decided on a course of action.

1) depict the vessel as in 1913--supported by some good quality and high res photos

2) Add as much detail as feasible without the project stalling

3) open as many hatches and casemates as the photos show...


After an exploratory coat of paint on the decks I decided to open the aft officers accommodation hatches as seen in almost every on-deck photo of Rurik.

I removed the nicely rendered tops of the skylight castings and depicted the grilles over the windows below--often seen half open - with some fine relief etched doors cut into squares, the open lids being strips of PE and doors as appropriate to the size of the skylight.

Attachment:
Riurik10.jpg
Riurik10.jpg [ 61.27 KiB | Viewed 4547 times ]
Attachment:
Riurik11.jpg
Riurik11.jpg [ 69.49 KiB | Viewed 4547 times ]
Attachment:
Riurik12.jpg
Riurik12.jpg [ 135.47 KiB | Viewed 4547 times ]
Attachment:
Riurik14.jpg
Riurik14.jpg [ 149.51 KiB | Viewed 4547 times ]
Attachment:
Riurik15.jpg
Riurik15.jpg [ 143.85 KiB | Viewed 4547 times ]
Attachment:
Riurik16.jpg
Riurik16.jpg [ 140.6 KiB | Viewed 4547 times ]


The over side discharge pipes and chutes were removed as I reckoned I could make the a bit finer, but primarily because I want to hint at some plating detail - its not always very visible in most photos but its total absence would leave the hull looking featureless--more of that later..

Attachment:
Riurik17.jpg
Riurik17.jpg [ 63.84 KiB | Viewed 4547 times ]
Attachment:
Riurik18.jpg
Riurik18.jpg [ 66.21 KiB | Viewed 4547 times ]


The casemates in most photos appear to be open , being high up - even when the ship is under way at some speed .

Attachment:
02031038.jpg
02031038.jpg [ 153.94 KiB | Viewed 4547 times ]


I removed all the cast on hatches--these are quite over scale -- as in photos the casemates appear flush when they are closed,

Attachment:
Riurik19.jpg
Riurik19.jpg [ 101.73 KiB | Viewed 4547 times ]


Attachment:
Riurik21.jpg
Riurik21.jpg [ 86.07 KiB | Viewed 4547 times ]


Attachment:
Riurik20.jpg
Riurik20.jpg [ 97.06 KiB | Viewed 4547 times ]


I then used a blade to 'imply' the shape of the casemate - this area will be more interesting visually once the drop down hatches are in place-and will hide a multitude of my sins as well!


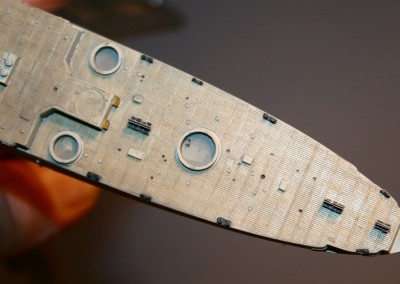
Study of photos shows there to be a prominent strake flush with the deck edge around the entire ship.

This was made of copper wire and added using CA glue applied with a piece of stretched sprue.

The copper wire being circular in profile--as opposed to half-round- has the added benefit of being able to later disguise the bottom waterway of the GMM Goldplus rails I intend using on the weather decks, by dropping into the small recess formed.

Attachment:
1913 strake.jpg
1913 strake.jpg [ 188.28 KiB | Viewed 4547 times ]


Attachment:
Riurik25.jpg
Riurik25.jpg [ 87.89 KiB | Viewed 4547 times ]


Study of photos showed that in 1913 most of the deck structures were dark grey( black?) on the vertical surfaces with light grey lids or tops.

The inside of the deck edges to waterways and all bollards, fairleads etc were also dark coloured- the waterway of the railing giving a sharp colour separation demarcation once rails are added.- this also makes for a visually more interesting model

The turrets have been prepared and the funnels have had a number of thin coats; so I am hoping that further progress will be fairly speedy... ( denial!! )

The sighting slits in the conning towers are simply excellent--and surprisingly tricky to render nicely--I used the sharpened edge of a propelling pencil to colour these.

I added the (just about visible!) rim strake around the aft conning tower made of stretched sprue


Attachments:
Riurik26.jpg
Riurik26.jpg [ 111.37 KiB | Viewed 4547 times ]

_________________
....I buy them at three times the speed I build 'em.... will I live long enough to empty my stash...?
http://www.modelshipgallery.com/gallery ... index.html

IPMS UK SIG (special interest group) www.finewaterline.com
Report this post
Top
 Profile  
Reply with quote  
PostPosted: Sat Sep 24, 2011 11:15 am 
Offline
User avatar

Joined: Tue Jan 11, 2005 12:17 am
Posts: 723
Location: Dinslaken, Germany
For some people there is no such thing as a "simple build"... :heh:
Looking forward to see this one evolve.
Cheers,
Guido

_________________
AKA "Tailor"
VMF'06 - German Gamblers
Veritable Modelling Friends 2006, Germany

Never wear your best trousers when you go out to fight for freedom and truth. - H. IBSEN

http://www.youtube.com/channel/UCk8zhb1sc4Pe3BRLqq3d-SQ


Report this post
Top
 Profile  
Reply with quote  
PostPosted: Mon Sep 26, 2011 4:06 am 
Offline
User avatar

Joined: Sun Mar 13, 2005 11:51 am
Posts: 2407
Location: Belgium
Quote:
with less removal of incorrect or crude features


Well, that failed miserably after two seconds I suppose... Reading the rest of that same post where you mention removing over side discharge pipes, adding the prominent strake and casemates! :woo_hoo:
Anyway, off to a very detailed build again, no use in trying to make it look simple :heh:

_________________
The merchant shipyard


Report this post
Top
 Profile  
Reply with quote  
PostPosted: Mon Sep 26, 2011 12:33 pm 
Offline
User avatar

Joined: Wed Apr 23, 2008 7:40 pm
Posts: 1147
Location: New Jersey
Looks great as always Jim.

Question:

I'm building the same model (as you know!), what paints are you using for the grey? I'm having a tough time deciding on an equivalent.

_________________
Image


Report this post
Top
 Profile  
Reply with quote  
PostPosted: Mon Sep 26, 2011 1:35 pm 
Offline
User avatar

Joined: Mon Jan 10, 2005 5:30 pm
Posts: 5386
Location: Nr Southampton England
I am now using Humbrol 28 for all vertical surfaces

and 27 for the turret tops and small decks ahead of fwd casemates

Lino on bridge deck

I used a similar colour on my Andrei Parvozvanny--similar era

http://www.modelwarships.com/reviews/sh ... ildup.html

and it looks 'bout right for that era - compared to photos anyway...

JB :wave_1:

_________________
....I buy them at three times the speed I build 'em.... will I live long enough to empty my stash...?
http://www.modelshipgallery.com/gallery ... index.html

IPMS UK SIG (special interest group) www.finewaterline.com


Report this post
Top
 Profile  
Reply with quote  
PostPosted: Tue Sep 27, 2011 6:11 pm 
Offline
User avatar

Joined: Mon Jan 10, 2005 5:30 pm
Posts: 5386
Location: Nr Southampton England
Progress is being made...

but it will make a quantum leap once the hull is secured to its baseplate--for which I am still waiting!!!!

The hull and its cut in casemates are looking more convincing now...

Once the open lids go on it should create some nice shadows..

Attachment:
Riurik27.jpg
Riurik27.jpg [ 78.14 KiB | Viewed 4378 times ]


The fwd superstructure and conning tower had a beading strake on the ral ship--I have added this using copper wire
The deck will be pared with a blade down nearer to the level of the strake
Attachment:
rurik04.jpg DP pic.jpg
rurik04.jpg DP pic.jpg [ 98.01 KiB | Viewed 4378 times ]
Attachment:
Riurik28.jpg
Riurik28.jpg [ 91.61 KiB | Viewed 4378 times ]


The turret tops are quite tricky--as the vertical colour does roll round over the top onto the turret top.

They all will need further fine tuning-- big digital photos are so brutal!!

Attachment:
ruril turret top.jpg
ruril turret top.jpg [ 102.39 KiB | Viewed 4378 times ]


Attachment:
Riurik29.jpg
Riurik29.jpg [ 108.51 KiB | Viewed 4378 times ]

_________________
....I buy them at three times the speed I build 'em.... will I live long enough to empty my stash...?
http://www.modelshipgallery.com/gallery ... index.html

IPMS UK SIG (special interest group) www.finewaterline.com


Report this post
Top
 Profile  
Reply with quote  
PostPosted: Tue Sep 27, 2011 6:31 pm 
Offline
User avatar

Joined: Sun Mar 13, 2011 12:19 am
Posts: 313
Location: Fredericton NB, Canada
subscribed and will follow this build closely. especially when so well illustrated! thanks Jim and looking forward to seeing the progress of another Baumann gem!


Report this post
Top
 Profile  
Reply with quote  
PostPosted: Tue Sep 27, 2011 11:11 pm 
Offline
User avatar

Joined: Wed Apr 23, 2008 7:40 pm
Posts: 1147
Location: New Jersey
Following the build closely Jim. What diameter copper wire is that? I've seen you utilize it very well on many of your turn of the century Russian warships.

_________________
Image


Report this post
Top
 Profile  
Reply with quote  
PostPosted: Thu Oct 06, 2011 7:07 pm 
Offline
User avatar

Joined: Mon Jan 10, 2005 5:30 pm
Posts: 5386
Location: Nr Southampton England
Apologies for my negligence!

I use all sources of old cables--particularly fond of hearing aid wire,,, very fine indeed-- along with some hi-end automotive car stereo wire...

Progress is steady--if rather slow....

The funnels were hollowed out using a drum shaped burr cutting tool in the motor tool mini drill.
Attachment:
Riurik30.jpg
Riurik30.jpg [ 135.69 KiB | Viewed 4219 times ]


The numerous mushroom vents of all sizes all around the deck were supplied as small castings.

The smaller ones were fine--but I preferred the large and medium size to have a thinner top flange- the slight doming and rounding was done later with a drop of thinned white glue- not perfect-- but give the impression of the edges being rounder...

I substituted the resin items with my favourite items--model railway tubular rivets

Attachment:
Riurik31.jpg
Riurik31.jpg [ 123.98 KiB | Viewed 4219 times ]


I have a decent selection of railway items that give a multitude of nautical uses...

Attachment:
Riurik32.jpg
Riurik32.jpg [ 179.64 KiB | Viewed 4219 times ]


With the( decal strip) boot-topping done( needs a bit more toning), funnels installed and many deck details added the ship is almost ready for mounting to her metal plate. I also added the previously removed over-side discharge pipes -as well as the square section midships gash chute. Noteworthy is that the disposition and size of the over-side pipes are different port to stb

Attachment:
Riurik33.jpg
Riurik33.jpg [ 86.58 KiB | Viewed 4219 times ]


With ships anchor chains--few things look as chainy as chain.

Most small chain is overscale- I use a subterfuge that in my view works well...

The eye can accept -when viewing from above that the chain looks chainy--and perhaps somewhat large...

Its in the side elevation that over scale chain looks silly...

--I get around this by cutting a deep steep-sided V-shaped groove in the foredeck/chainway using a Mission models Micro-chisel( via BFM) and dropping the chain into this chasm--soi that the horizontal plane links are flush with the deck... and I think I get away with it!

Attachment:
Riurik34.jpg
Riurik34.jpg [ 96.47 KiB | Viewed 4219 times ]


The PE supplied boat racks midships are rather good-I toyed with adding more depth--but photos suggest them to be about right dimensionally- the small triangular reinforcing gussets also being on the PE fret.

Note that the aft funnel only did carry twin steam pipes-whilst the remainder carry single pipes only
Attachment:
Riurik35.jpg
Riurik35.jpg [ 107.63 KiB | Viewed 4219 times ]


More progress soon

Cheers

JB

_________________
....I buy them at three times the speed I build 'em.... will I live long enough to empty my stash...?
http://www.modelshipgallery.com/gallery ... index.html

IPMS UK SIG (special interest group) www.finewaterline.com


Report this post
Top
 Profile  
Reply with quote  
PostPosted: Fri Oct 07, 2011 2:29 am 
Offline
User avatar

Joined: Fri Jan 14, 2005 10:08 am
Posts: 1059
Location: Cornwall
I built the original kit of this ship with linoleum decks which I found utterly dull. You are tempting me to replace it with the new kit.

Nice work BTW.

Cheers,

Rob

_________________
IPMS Fine Waterline Special Interest Group


Report this post
Top
 Profile  
Reply with quote  
PostPosted: Fri Oct 07, 2011 2:57 am 
Offline
User avatar

Joined: Fri Jul 04, 2008 9:03 am
Posts: 1846
Location: 3rd rock from the Sun
I have come learn that great attention to detail is probably your middle name. Looking at the bridge section (grab rail ?) how do you actually stick these down ? also I've noticed the smaller boat housing has been lifted clear off the decking, this must add a nightmare to the delicate handling, especially when adding the boats themselves. Apart from being very careful, how do you handle these pieces without crushing them into a million fragments ?
:big_grin:


Report this post
Top
 Profile  
Reply with quote  
PostPosted: Sat Oct 08, 2011 4:05 pm 
Offline
User avatar

Joined: Fri Aug 26, 2005 6:53 am
Posts: 542
Location: France
Always fantastic work Jim


Jef :thumbs_up_1:

_________________
Current 1/700 WL
HMS Repulse


Report this post
Top
 Profile  
Reply with quote  
PostPosted: Mon Oct 10, 2011 10:19 am 
Offline
User avatar

Joined: Tue Jan 11, 2005 1:40 pm
Posts: 8174
Location: New Jersey
As always, great stuff. She really was a handsome ship, wasn't she? Definitely a kit I want to pick up.

_________________
Martin

"Tomorrow is the most important thing in life. Comes into us at midnight very clean. It's perfect when it arrives and it puts itself in our hands. It hopes we've learned something from yesterday." John Wayne

Ship Model Gallery


Report this post
Top
 Profile  
Reply with quote  
PostPosted: Mon Oct 10, 2011 3:03 pm 
Offline
User avatar

Joined: Sun Mar 13, 2005 11:51 am
Posts: 2407
Location: Belgium
Great job, going rather fast (although you disagree). One question though: did you drill those funnels free hand? With the machine drill or on a sort of workbench to hold the drill or funnel? Looks quite tricky to me!

_________________
The merchant shipyard


Report this post
Top
 Profile  
Reply with quote  
PostPosted: Tue Oct 11, 2011 1:47 pm 
Offline
User avatar

Joined: Mon Jan 10, 2005 5:30 pm
Posts: 5386
Location: Nr Southampton England
Thansk you all for kind words!

@ Neptune...

I made a small hole in the centre of the funnel with a pushpin--then used a small drill bit as a pilot--then followed witha 2.5 mm drill-- all hand held using a slow speed cordless drill

Finished off using the drum shaped cuiribg tool--frequently gholding the funnel up agaist a strong light source so as to ensure it was not getting tooooo thin in the funnel walls!

meanwhile...


The ship is now mounted on her sea-base-...phew-- much safer and easier to handle-- no more involuntary removal of details...

( My open hatches on the aft deck are all.. err .... currently in' storage' -- ( big clumsy thumb removed them all !! )

The model is screwed to the usual stainless steel plate with countersunk holes using No6 self-tapping screws into 3mm drilled holes...

Attachment:
Riurik36.jpg
Riurik36.jpg [ 64.67 KiB | Viewed 3982 times ]


virtually all the photos I have show Rurik cruising at slow speed in calm waters.

most handsome indeed...

I however wanted the ship to show here dashing lines to best effect- as she was capable of 21 knots she should be seen powering along with a bone in her teeth.... :thumbs_up_1:

My usual method of water construction--watercolour paper over cocktail sticks, paper sealed with CA

fully described here:

viewtopic.php?f=4&t=37223

Studiers of the build will notice that the stylish three funnelled cruiser is currently only wearing two funnels...

( dislodged the aft stack with the drill after mounting...( doh! )

glue will sort....

Attachment:
Riurik37.jpg
Riurik37.jpg [ 78.75 KiB | Viewed 3982 times ]


Attachment:
Riurik38.jpg
Riurik38.jpg [ 74.77 KiB | Viewed 3982 times ]


Attachment:
Riurik39.jpg
Riurik39.jpg [ 100.54 KiB | Viewed 3982 times ]

_________________
....I buy them at three times the speed I build 'em.... will I live long enough to empty my stash...?
http://www.modelshipgallery.com/gallery ... index.html

IPMS UK SIG (special interest group) www.finewaterline.com


Report this post
Top
 Profile  
Reply with quote  
PostPosted: Tue Oct 11, 2011 6:09 pm 
Offline
User avatar

Joined: Mon Jan 10, 2005 5:30 pm
Posts: 5386
Location: Nr Southampton England
The fwd bridge deck-- in outline plan view spot on--however it has the canvas covered railings cast-on as solid bulwarks

( intriguingly--the 1/350 version of this kit -(reviewed here at MW.com) has the same failing ...

http://www.modelwarships.com/reviews/sh ... eview.html

I endeavoured to remove these resin bulwarks and then tried to thin the deck to near scale--

and I failed dismally!!! .

A new bridge deck was made- of paper. I used the resin version as a template- with no alteration other than

merely cutting the stairway apertures a bit narrower.

I made the deck using the template as a half pattern-

ie - the paper was folded in half, cutting through two layers of paper simultaneously guaranteed symmetry.
The centre crease was flattened with smooth faced jewellers pliers.

I made a small ball of double-sided tape and tacked the underside of the deck on; thereby not having to touch the surface of the deck for the purpose of glue application.
The paper was stabilised using CA runny glue spread on rapidly using a cocktail stick--and allowed to set.

Then I removed the deck and stuck it on the ball of sticky tape the other way up and repeated the application of CA.

Thereafter I fine-tuned the 'flatness' using my fingers.

Once mounted and with rails attached to the edges it will be perfectly strong and stable

The contrast in near-scale deck thickness can be seen here:

Attachment:
Riurik40.jpg
Riurik40.jpg [ 143.98 KiB | Viewed 3959 times ]


More progress soon!

JIM B :wave_1:

_________________
....I buy them at three times the speed I build 'em.... will I live long enough to empty my stash...?
http://www.modelshipgallery.com/gallery ... index.html

IPMS UK SIG (special interest group) www.finewaterline.com


Report this post
Top
 Profile  
Reply with quote  
PostPosted: Sat Oct 15, 2011 10:50 am 
Offline
User avatar

Joined: Fri Jan 05, 2007 8:31 pm
Posts: 892
Location: Flensburg, Germany
Nice and sharp bridge deck. One day you'll build a model completely out of paper. What is *RESIIN*? :heh:

Happy modelling ~ Olaf!


Report this post
Top
 Profile  
Reply with quote  
PostPosted: Sun Oct 16, 2011 7:04 pm 
Offline
User avatar

Joined: Mon Jan 10, 2005 5:30 pm
Posts: 5386
Location: Nr Southampton England
The build continues now into the minutia...

The Bridge structure is a fiddly affair--lots of small struts ...

The bridge decks railings had to be 'cut-and-shut' of many small pieces to get the stanchions in the correct places.

using WEM superfine rails here( it really is!)

Attachment:
Riurik42.jpg
Riurik42.jpg [ 156.66 KiB | Viewed 3820 times ]


Attachment:
Riurik43.jpg
Riurik43.jpg [ 74.55 KiB | Viewed 3820 times ]


The fwd funnel platform was supplied as a PE piece--neatly done actually!

I added some single bar rail around the outside perimeter so as to keep it thin.

Attachment:
Riurik44.jpg
Riurik44.jpg [ 173.21 KiB | Viewed 3820 times ]

Attachment:
Riurik45.jpg
Riurik45.jpg [ 115.69 KiB | Viewed 3820 times ]


The upper pilot house was supplied as a resin casting.
I had completed it ready to install complete with the canvas railings, merely the 'canvas ' paint was drying...
when it inexplicably 'pinged' out of my tweezers into a hidden dusty recess of the modelroom... :mad_1: :mad_2: :Mad_5: :Mad_5:

After about an hour of searching in the vicinity of where I thought I heard it land...--and having discovered all sorts of long forgotten treasure ...

I resigned myself to scratching a new one-- and I may as well make the windows see thru...-- not because I had any thoughts per se -- I was quite happy with the cast item to which I had laboriously fitted window frames...

This was a bit tedious--as the windows have thick divisions between them.
using some 1/350 ladder ( WEM Koenig ) I added the windows individually to the T-shaped styrene box bottom; and cut a matching roof of paper.

Once the paper deck was fitted I then in-filled the window dividers with white glue.


The upper deck had a small extension deck added -this is supported by two slim pillars ahead of the pilot house.

After painting and adding all the upper rails - again cutting and shutting in very small pieces...

and adding the canvas of white glue -0 canvas it all looked pretty ok

Alas I have shot these photos in poor light and with a flash-too close...

I shall endeavour to take some better photos in daylight with the macro lens shortly.

In real life it looks crisper with less flash reflections!

Attachment:
Riurik46.jpg
Riurik46.jpg [ 145.02 KiB | Viewed 3820 times ]


Attachment:
Riurik47.jpg
Riurik47.jpg [ 210.25 KiB | Viewed 3820 times ]


Attachment:
Riurik48.jpg
Riurik48.jpg [ 120.75 KiB | Viewed 3820 times ]


The mast holes have been drilled through to the base and the lower masts have been cut of thin steel tube;
this will be the next area of construction...- a small break from the tedium of cutting railings

The masts will be constructed off the ship , mounted in heavy pin-vices so that they can be free-standing until ready to mount to the vessel

:wave_1:
JB

_________________
....I buy them at three times the speed I build 'em.... will I live long enough to empty my stash...?
http://www.modelshipgallery.com/gallery ... index.html

IPMS UK SIG (special interest group) www.finewaterline.com


Report this post
Top
 Profile  
Reply with quote  
PostPosted: Wed Oct 19, 2011 12:29 pm 
Offline
User avatar

Joined: Sun Mar 13, 2005 11:51 am
Posts: 2407
Location: Belgium
Looks awesome! Perhaps you can actually paint the balls on both sides of the compass red and green :heh: , or are warships not doing that?

Can you actually sand the paper deck you used? Or is it impossible to sand due to the paper structure?

_________________
The merchant shipyard


Report this post
Top
 Profile  
Reply with quote  
PostPosted: Wed Oct 19, 2011 1:48 pm 
Offline
User avatar

Joined: Sun Apr 11, 2010 1:22 pm
Posts: 157
As beautifully delicate as ever Jim.
Of course you do realise that now you have built a new pilot house the original one will turn up, released by the carpet monster now it has no hostage value.
Rob.


Report this post
Top
 Profile  
Reply with quote  
Display posts from previous:  Sort by  
Post new topic Reply to topic  [ 61 posts ]  Go to page 1, 2, 3, 4  Next

All times are UTC - 6 hours [ DST ]


Who is online

Users browsing this forum: No registered users and 15 guests


You can post new topics in this forum
You can reply to topics in this forum
You cannot edit your posts in this forum
You cannot delete your posts in this forum
You cannot post attachments in this forum

Jump to:  
cron
Powered by phpBB® Forum Software © phpBB Group