Late summer 1805, the sun is burning inexorably from above, the wind is completely asleep, the sea is smooth as glass.
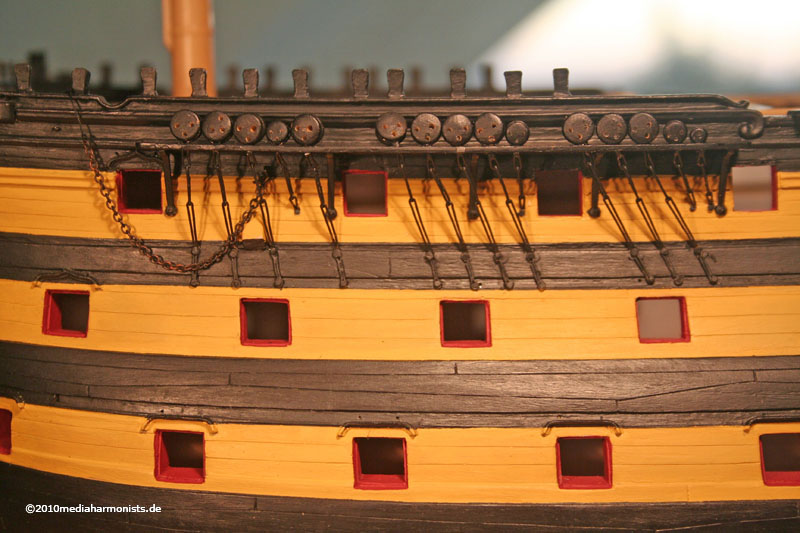
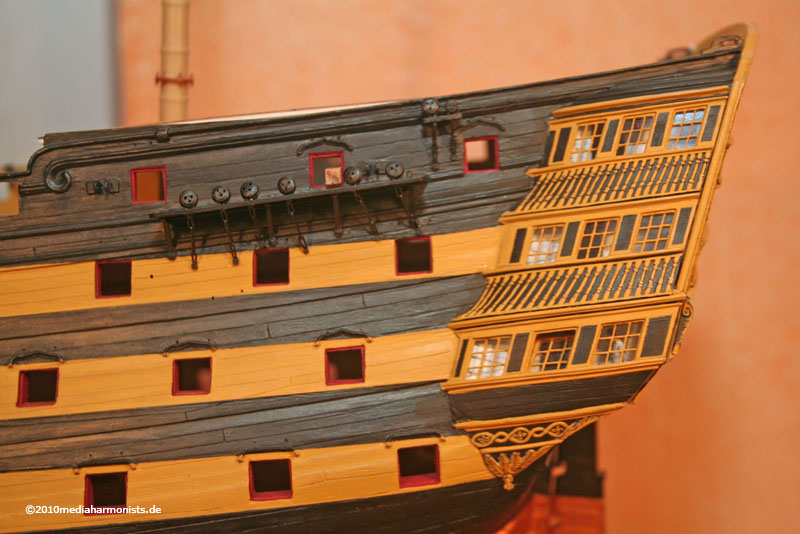
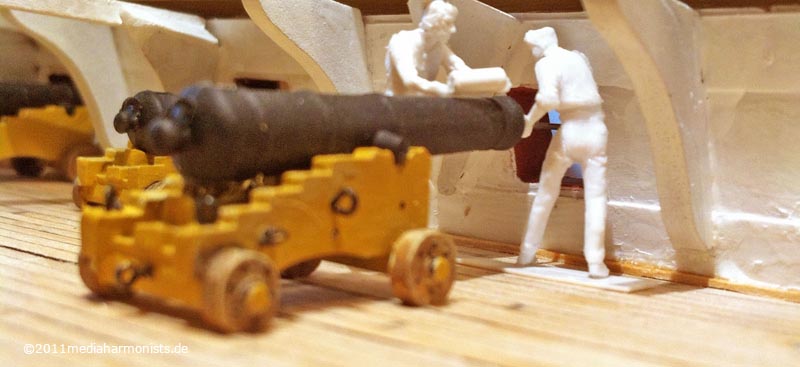
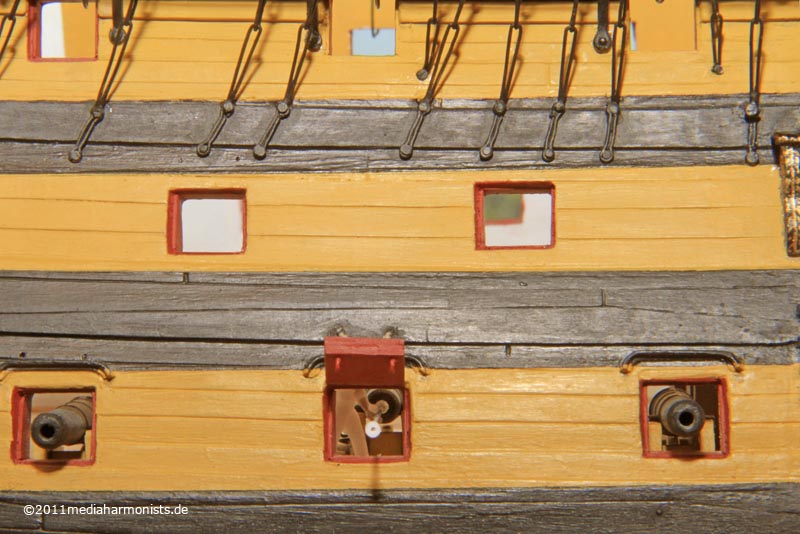
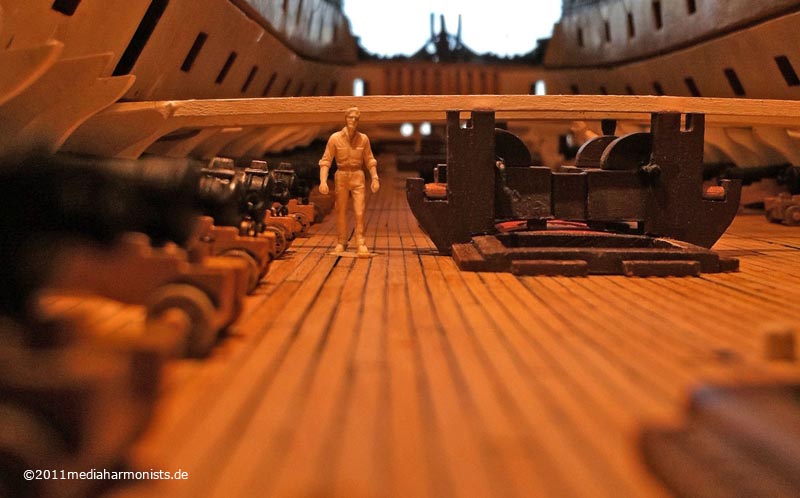
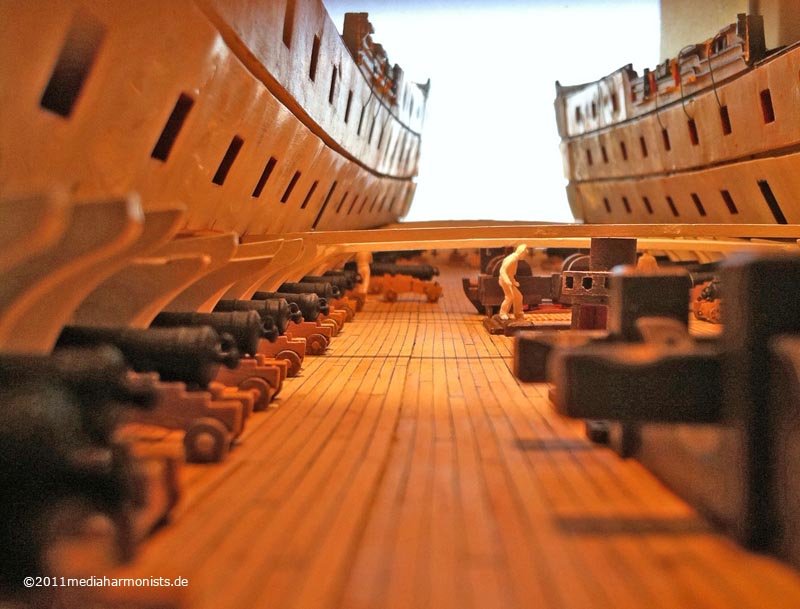
The dispatches have already been exchanged. The master of the small cutter has just returned to his small vessel. Behind it there is towering the enormously massiv silhouette of the huge black and ocher-striped three-decker. Through the open gunports the lashed up guns can be seen. Also the officers' cabins ports are wide opened by the order of the Captain's to ensure an optimal ventilation of the hot and steamy lower decks.
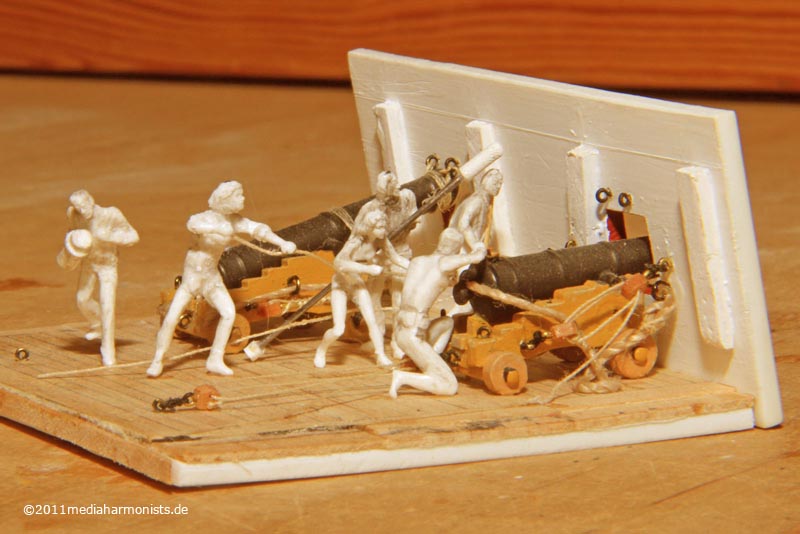
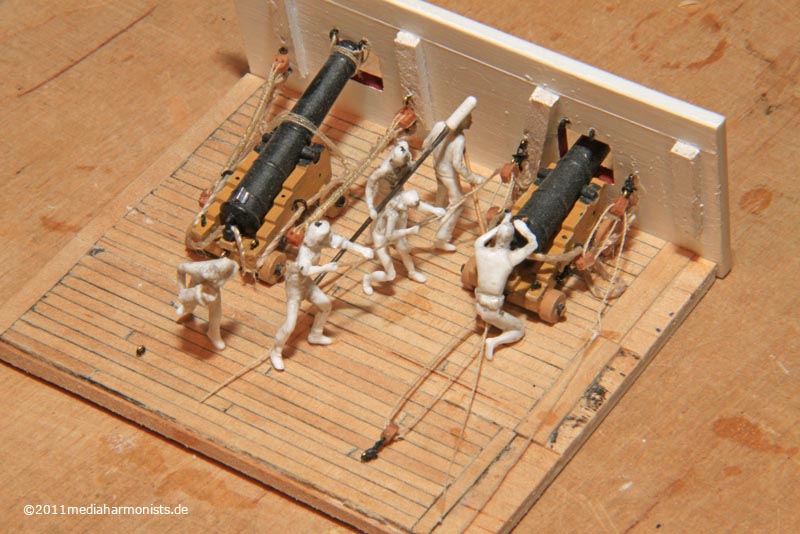
Clatter of activity on some guns being ran out cuts through the silence. The rumble of the heavy guns rolling over the decks and the trampling of countless bare feet and the short shouted commands supported by a multitude of hand signs originate from the ordered gundrill for new gun crews and their officers. In competition between the three decks they are fighting for the fastest rate of firing. The rest of the ships crew is occupied with cleaning and mending duties. The holystone are scratching on the decks.
Above all the sails hang slack in their yards. No breath of wind moves them. They are nestled heavily over stays and fighting tops. The captain took advantage of the hot calm to put up all the canvas possible for airing. One of the studdingsails is taken in, the spar tied up with its inner end against the shrouds, in order to mend something on its fittings. Sitting on a swing seat pendent from the fore top, a crew member just is finishing painting over with ocher the originally black coloured mast loops.
On the poop Captain Hardy monitors the young cadets� training in navigation, supported by Lord Nelson, who uses the opportunity to entertain the cadets with stories of his actions and the ideas of his tactical concepts.
But in the back of everybodys mind there is just one question - When will there be wind again ...
To HMS Victory and beyond
Moderators: BB62vet, MartinJQuinn, JIM BAUMANN, Jon, Dan K
-
dafi

- Posts: 998
- Joined: Mon Mar 12, 2012 11:13 am
- Location: Ludwigsburg/Germany
- Contact:
To HMS Victory and beyond
Last edited by dafi on Mon Dec 03, 2012 9:59 am, edited 1 time in total.
To Victory and beyond ...
viewtopic.php?f=59&t=99050&start=60
See also our german forum for the age of Sail and History:
http://www.segelschiffsmodellbau.com
viewtopic.php?f=59&t=99050&start=60
See also our german forum for the age of Sail and History:
http://www.segelschiffsmodellbau.com
-
dafi
- Posts: 998
- Joined: Mon Mar 12, 2012 11:13 am
- Location: Ludwigsburg/Germany
- Contact:
Re: To HMS Victory and beyond
Some twelve years ago, I retook modeling after a break of some twenty years. I started the Soleil Royal oob but soon realised that there should be more to be achieved. To late to be incorporated in that build, I started Hellers HMS Victory some ten years ago. First oob with some essential "supering" I decided after a longer break to redo the model from bottom on all over again.
The principal difference was, that it was not supposed to be just "supered", but to first understand and then to build accordingly, using what can be used and scratching what needed to be scratched. This odyssey can be found in its epic length at Pete Coleman http://pete-coleman.com/forum/viewtopic.php?f=15&t=1035 or in a shorter version at MSW http://modelshipworld.com/phpBB2/viewto ... &start=150.
Thank you Jim for giving me the opportunity to present a excerpt of this build here, as I want to try out lot of different things, that is usually not in the range of the "classical" sailing ship modeling. Many fine waterline models present a lot of possibilities and opportunities that still could be transferred over into this age and especially into the tricky scale of 1 Very small and therefor difficult to articulate details nicely but already big enough that they visible enough and need to be pronounced properly, especially as soon as it comes to the rigging, weathering and the presentation. And this is my motivation to show some of my work here to get new and different ideas.
I will show some pictures her just to give you an idea of how the build has already gone,
all the best, Daniel
The principal difference was, that it was not supposed to be just "supered", but to first understand and then to build accordingly, using what can be used and scratching what needed to be scratched. This odyssey can be found in its epic length at Pete Coleman http://pete-coleman.com/forum/viewtopic.php?f=15&t=1035 or in a shorter version at MSW http://modelshipworld.com/phpBB2/viewto ... &start=150.
Thank you Jim for giving me the opportunity to present a excerpt of this build here, as I want to try out lot of different things, that is usually not in the range of the "classical" sailing ship modeling. Many fine waterline models present a lot of possibilities and opportunities that still could be transferred over into this age and especially into the tricky scale of 1
 Very small and therefor difficult to articulate details nicely but already big enough that they visible enough and need to be pronounced properly, especially as soon as it comes to the rigging, weathering and the presentation. And this is my motivation to show some of my work here to get new and different ideas.
I will show some pictures her just to give you an idea of how the build has already gone,
all the best, Daniel
To Victory and beyond ...
viewtopic.php?f=59&t=99050&start=60
See also our german forum for the age of Sail and History:
http://www.segelschiffsmodellbau.com
viewtopic.php?f=59&t=99050&start=60
See also our german forum for the age of Sail and History:
http://www.segelschiffsmodellbau.com
-
dafi
- Posts: 998
- Joined: Mon Mar 12, 2012 11:13 am
- Location: Ludwigsburg/Germany
- Contact:
Re: To HMS Victory and beyond
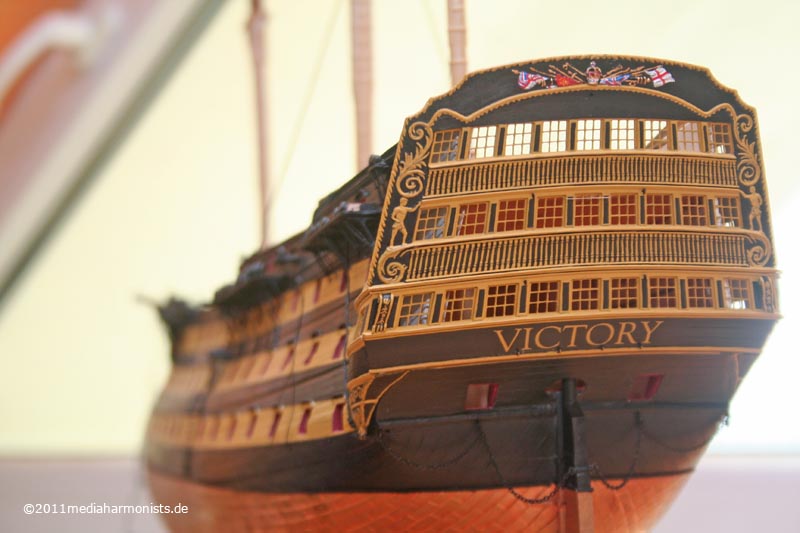
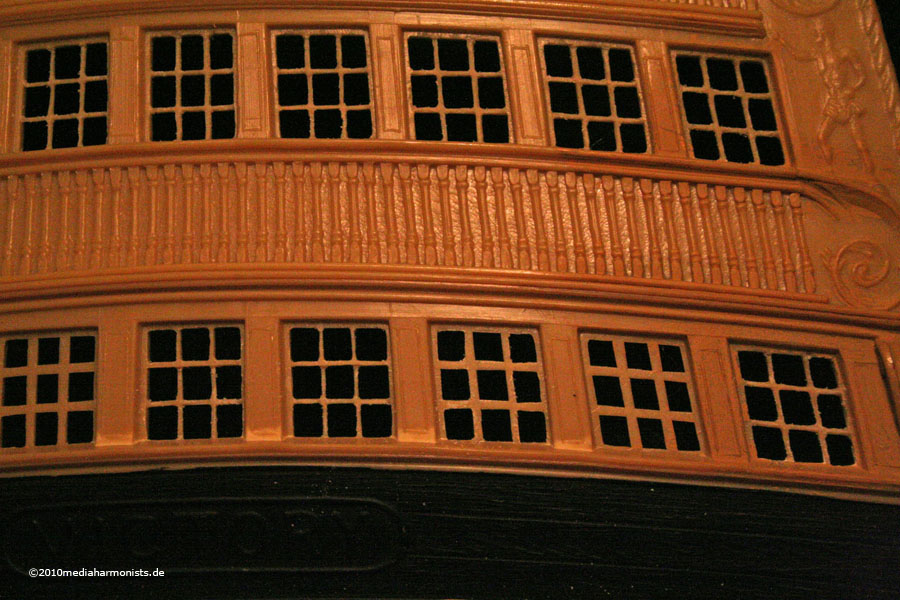
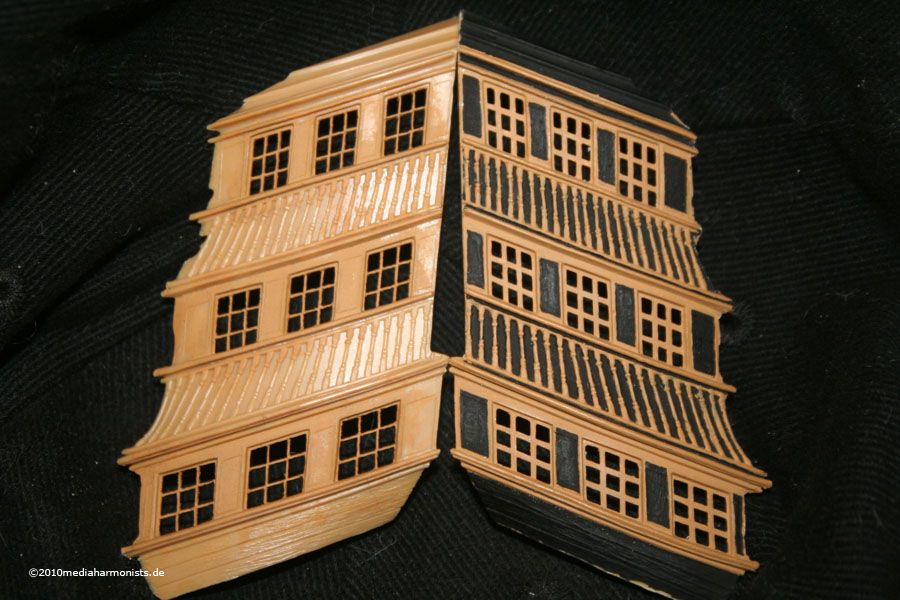
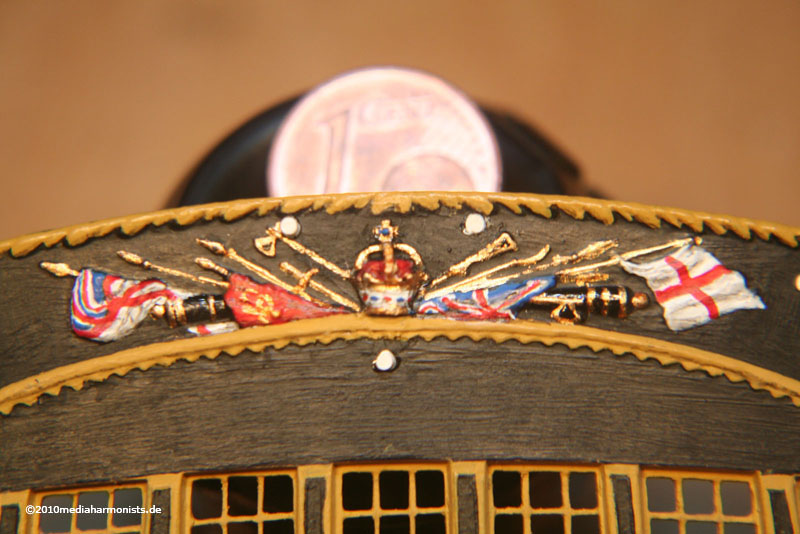
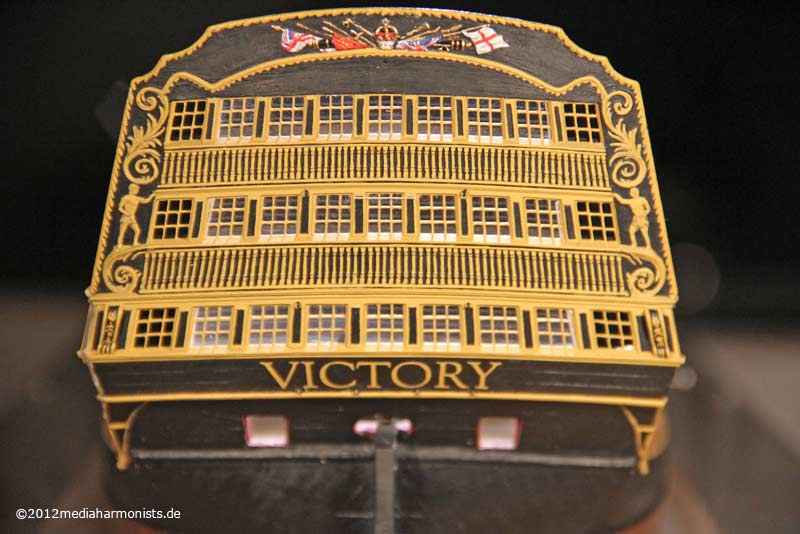
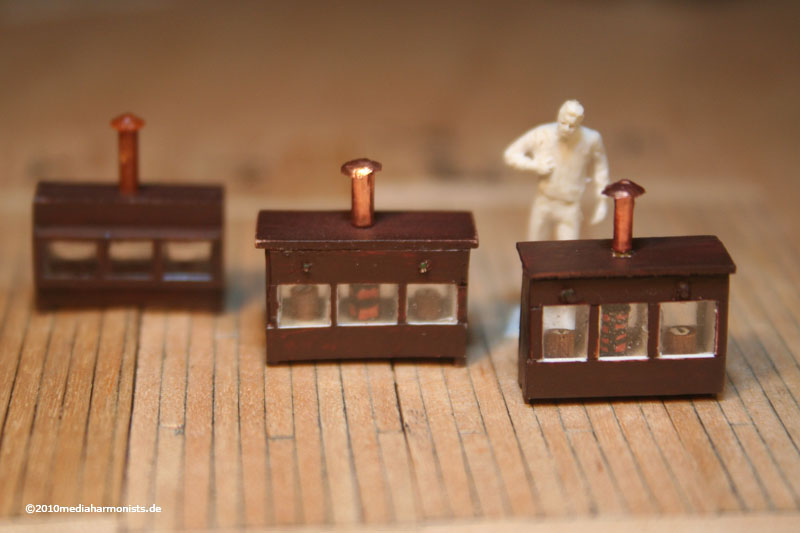
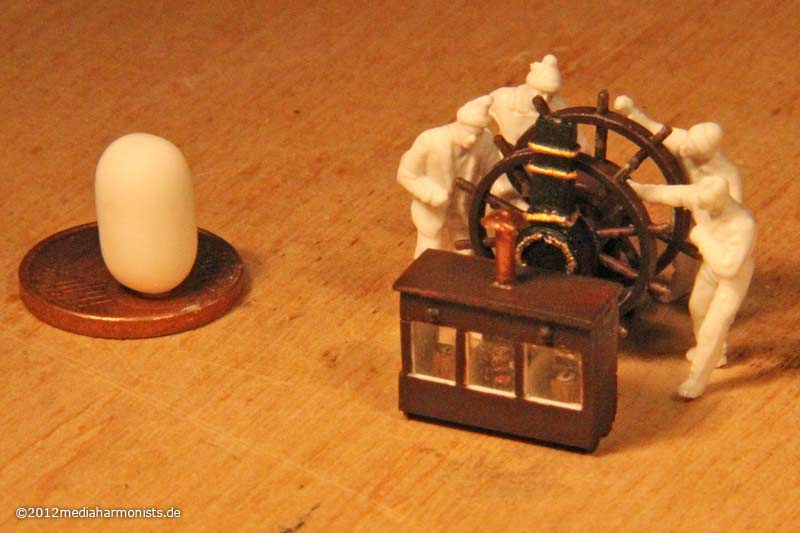
It was a funny the first months working and it was surprising. Here are the results of all the work: So close to each other the normal peoples eyes and yet far beyond!
To see and feel the differences between OOB and a little bit more effort, I prepared some small montages. Just try to find out by yourselves, what is the old and what is the new:
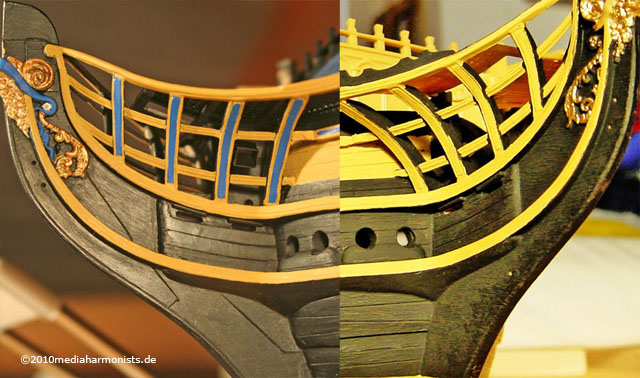
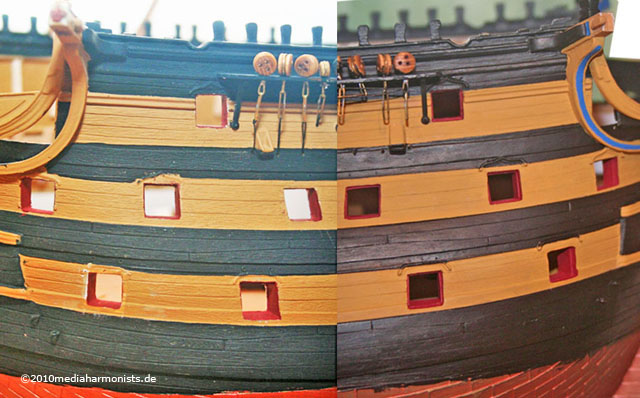
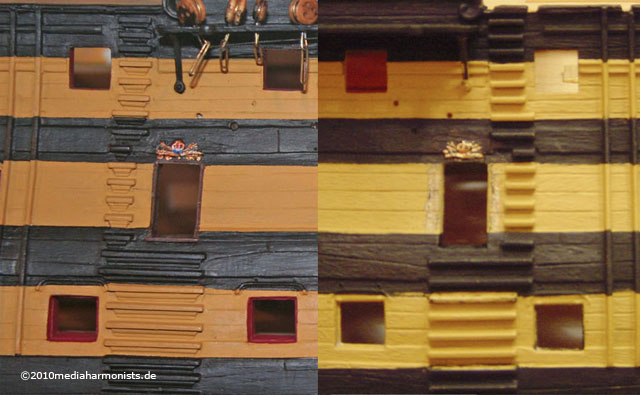
And to speak in the words of Buzz Lightyear: To HMS Victory and beyond!
Greetings Daniel
To see and feel the differences between OOB and a little bit more effort, I prepared some small montages. Just try to find out by yourselves, what is the old and what is the new:
And to speak in the words of Buzz Lightyear: To HMS Victory and beyond!
Greetings Daniel
To Victory and beyond ...
viewtopic.php?f=59&t=99050&start=60
See also our german forum for the age of Sail and History:
http://www.segelschiffsmodellbau.com
viewtopic.php?f=59&t=99050&start=60
See also our german forum for the age of Sail and History:
http://www.segelschiffsmodellbau.com
-
dafi
- Posts: 998
- Joined: Mon Mar 12, 2012 11:13 am
- Location: Ludwigsburg/Germany
- Contact:
Re: To HMS Victory and beyond
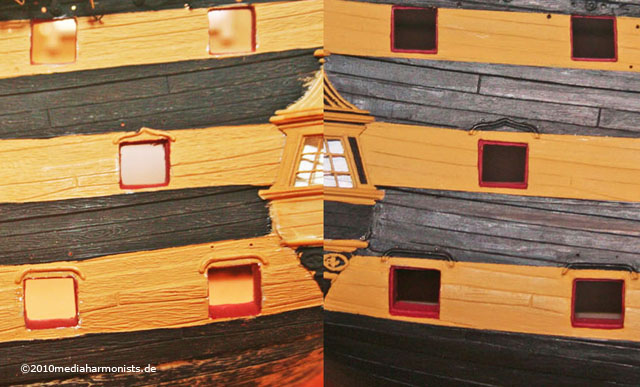
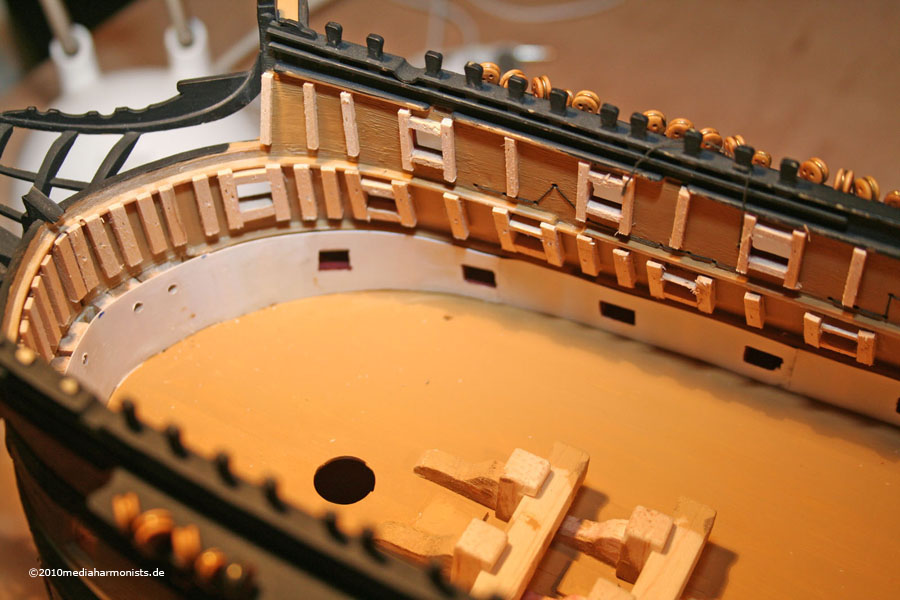
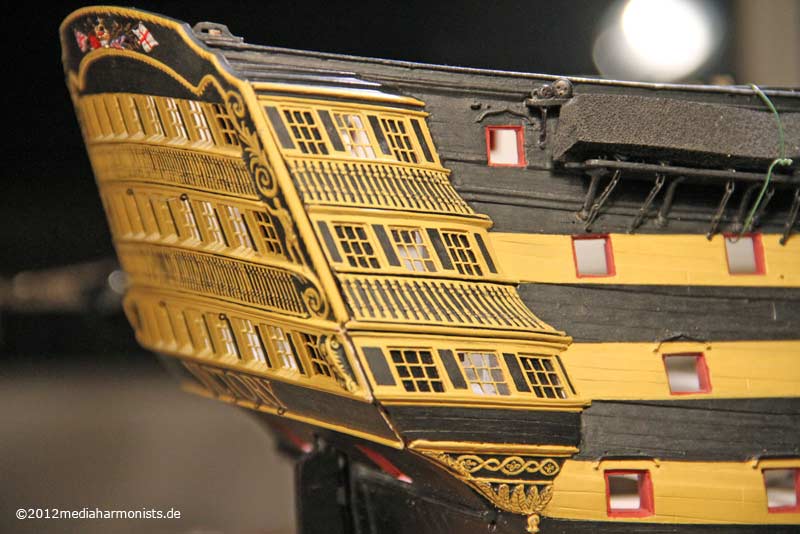
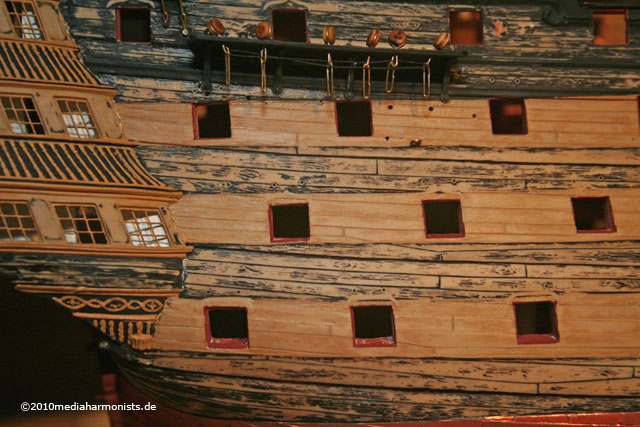
Here are some more impressions, without to many explanations:

All too prominent wood imitations sanded down, rigols, gunports and deadeyes reworked
All too prominent wood imitations sanded down, rigols, gunports and deadeyes reworked
Last edited by dafi on Thu Mar 15, 2012 10:40 am, edited 9 times in total.
To Victory and beyond ...
viewtopic.php?f=59&t=99050&start=60
See also our german forum for the age of Sail and History:
http://www.segelschiffsmodellbau.com
viewtopic.php?f=59&t=99050&start=60
See also our german forum for the age of Sail and History:
http://www.segelschiffsmodellbau.com
-
dafi
- Posts: 998
- Joined: Mon Mar 12, 2012 11:13 am
- Location: Ludwigsburg/Germany
- Contact:
Re: To HMS Victory and beyond

Last edited by dafi on Thu Mar 15, 2012 10:58 am, edited 11 times in total.
To Victory and beyond ...
viewtopic.php?f=59&t=99050&start=60
See also our german forum for the age of Sail and History:
http://www.segelschiffsmodellbau.com
viewtopic.php?f=59&t=99050&start=60
See also our german forum for the age of Sail and History:
http://www.segelschiffsmodellbau.com
-
dafi
- Posts: 998
- Joined: Mon Mar 12, 2012 11:13 am
- Location: Ludwigsburg/Germany
- Contact:
Re: To HMS Victory and beyond
Last edited by dafi on Thu Mar 15, 2012 11:00 am, edited 5 times in total.
To Victory and beyond ...
viewtopic.php?f=59&t=99050&start=60
See also our german forum for the age of Sail and History:
http://www.segelschiffsmodellbau.com
viewtopic.php?f=59&t=99050&start=60
See also our german forum for the age of Sail and History:
http://www.segelschiffsmodellbau.com
-
dafi
- Posts: 998
- Joined: Mon Mar 12, 2012 11:13 am
- Location: Ludwigsburg/Germany
- Contact:
Re: To HMS Victory and beyond
So that is it for now, all questions welcome, all the best, Daniel
Last edited by dafi on Thu Mar 15, 2012 10:56 am, edited 7 times in total.
To Victory and beyond ...
viewtopic.php?f=59&t=99050&start=60
See also our german forum for the age of Sail and History:
http://www.segelschiffsmodellbau.com
viewtopic.php?f=59&t=99050&start=60
See also our german forum for the age of Sail and History:
http://www.segelschiffsmodellbau.com
-
Dirk

- Posts: 291
- Joined: Fri May 11, 2007 9:13 am
- Location: D�sseldorf, Germany
Re: To HMS Victory and beyond
Wow, that's some pretty hot stuff!  Nelson would be proud.
Looking forward to see more!
Looking forward to see more!
-
jlogicalor
- Posts: 80
- Joined: Wed Feb 29, 2012 6:30 pm
Re: To HMS Victory and beyond
looking good!
-
dafi
- Posts: 998
- Joined: Mon Mar 12, 2012 11:13 am
- Location: Ludwigsburg/Germany
- Contact:
Re: To HMS Victory and beyond
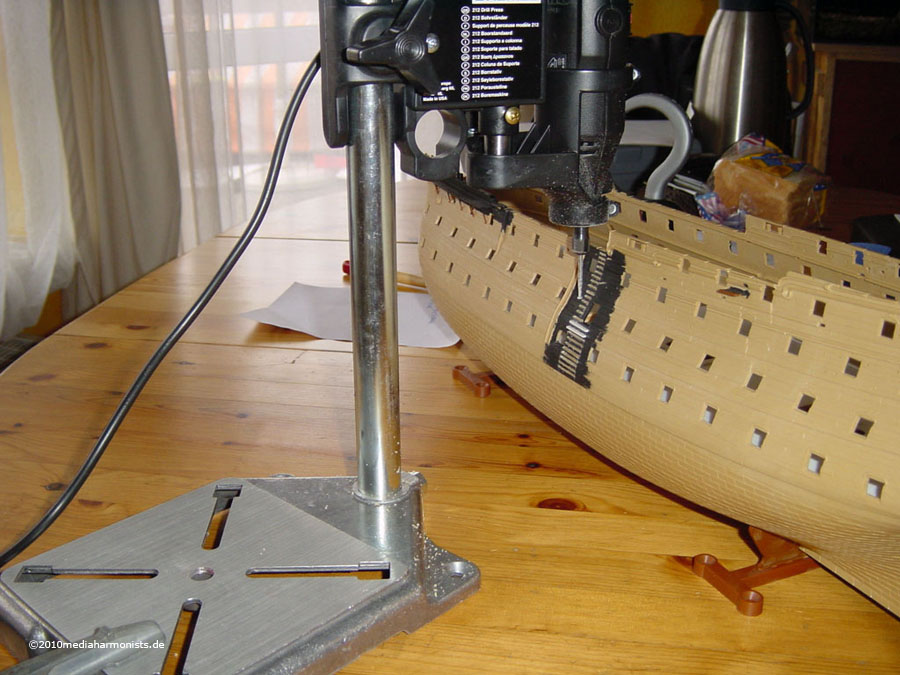
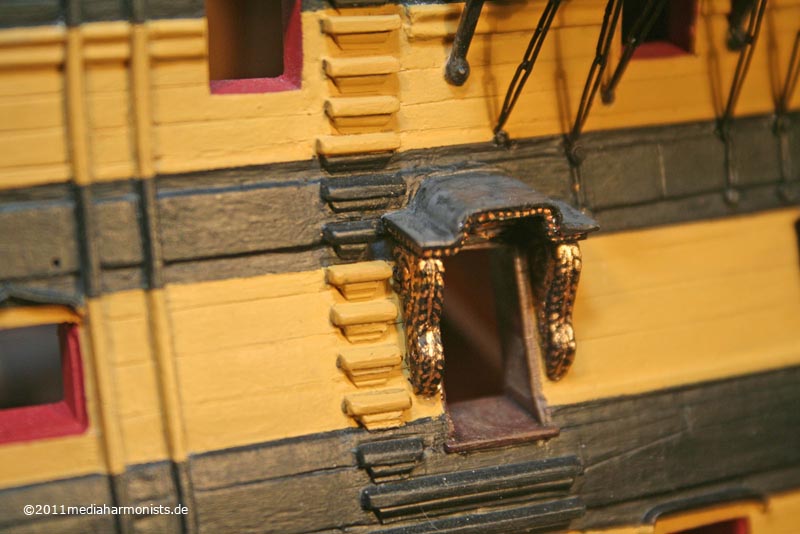
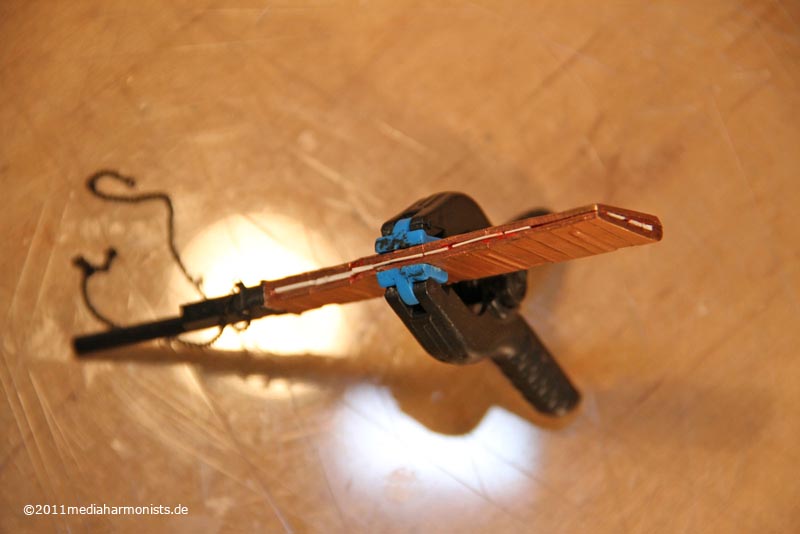
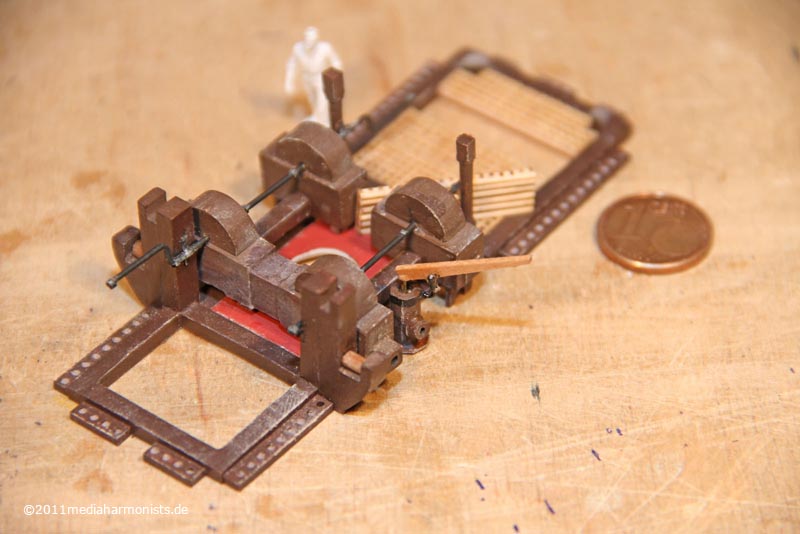
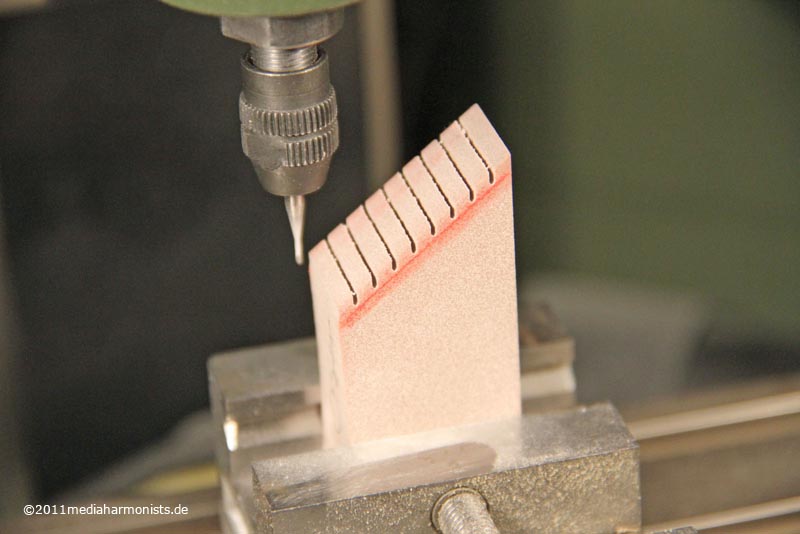
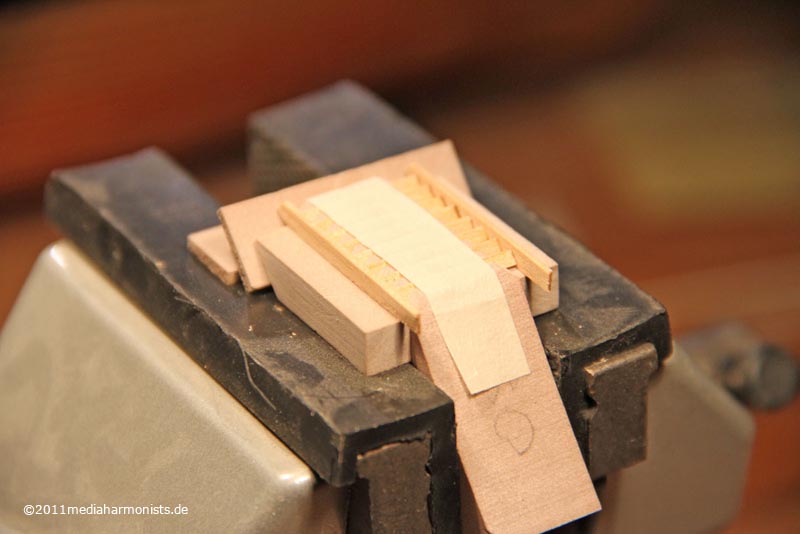
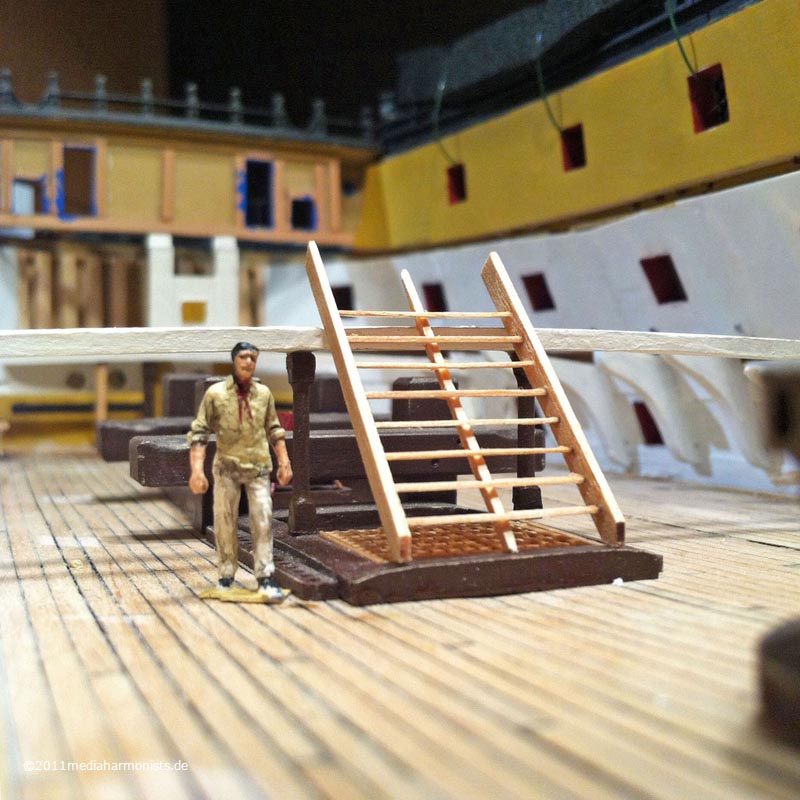
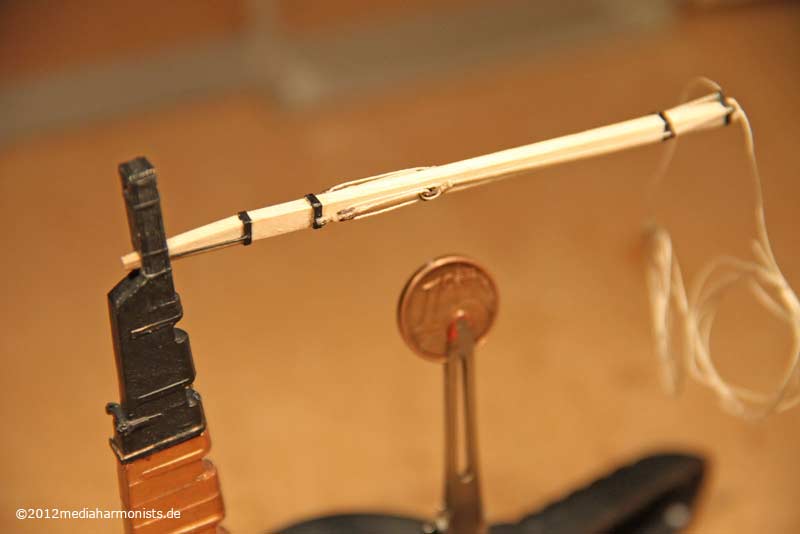
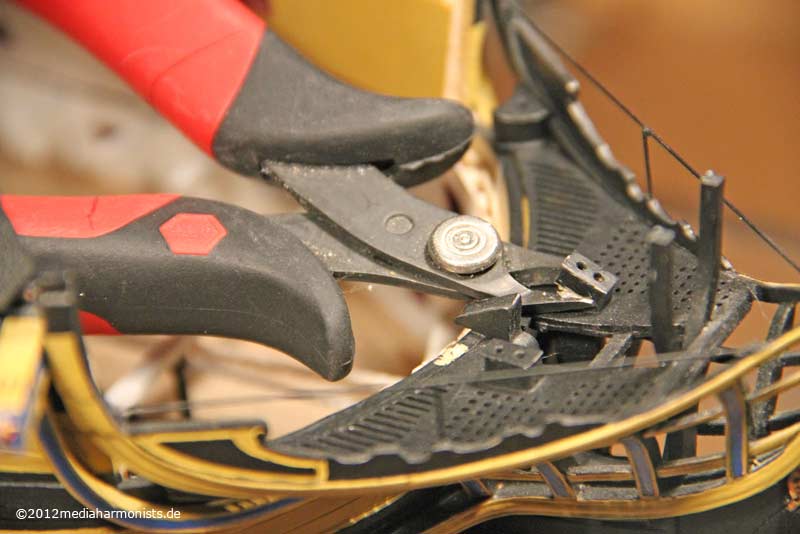
Jim asked me about the way of milling the steps for the side entry port.
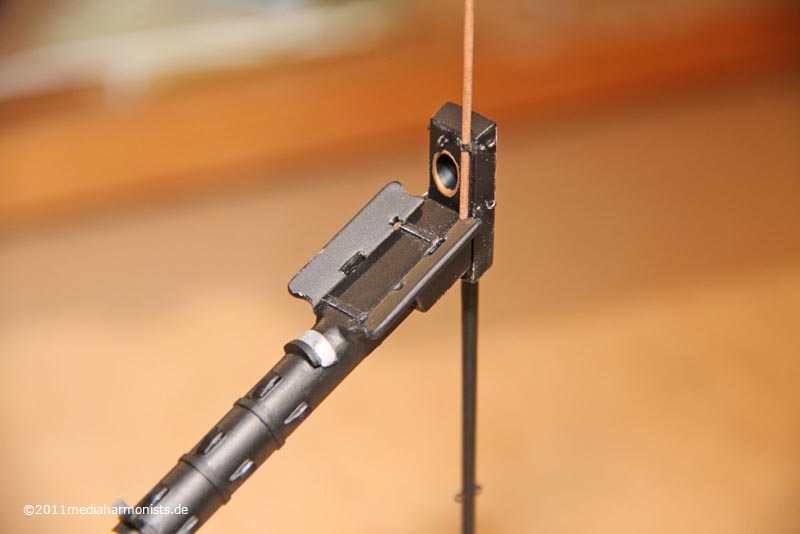
I clamped the stand of my dremel onto the table, see bottom left, sweept the tool to the backside ...
... used a 1 mm milling cutter, always adjusted the height with the sliding calliper ...
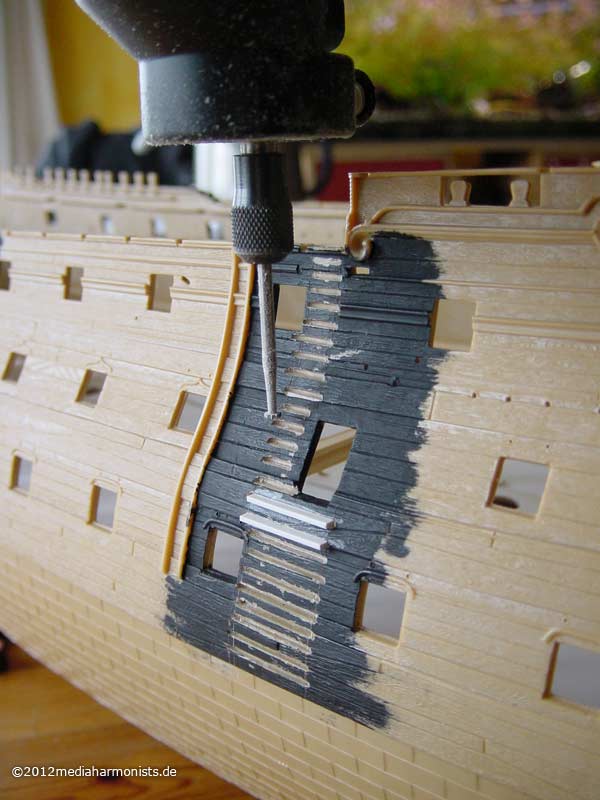
and moved the ship along the way.
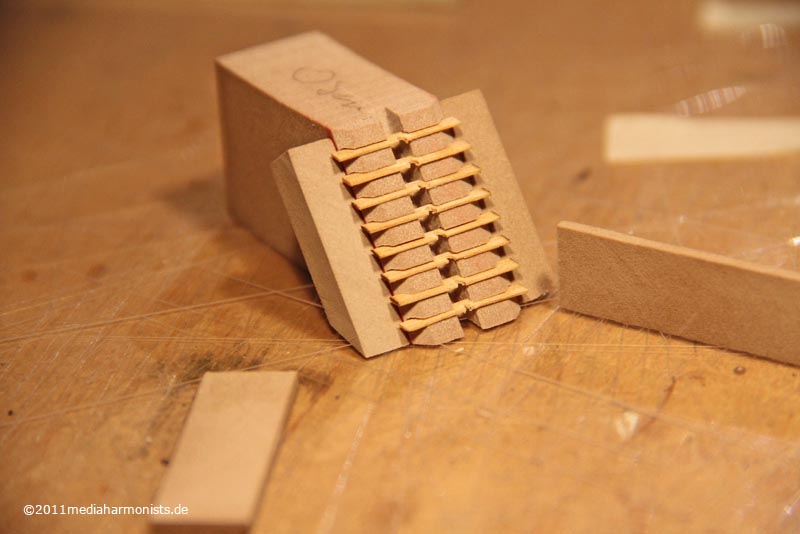
Afterwards filled with Evergreen, later on still rounded off the edges and glued the supports underneath.
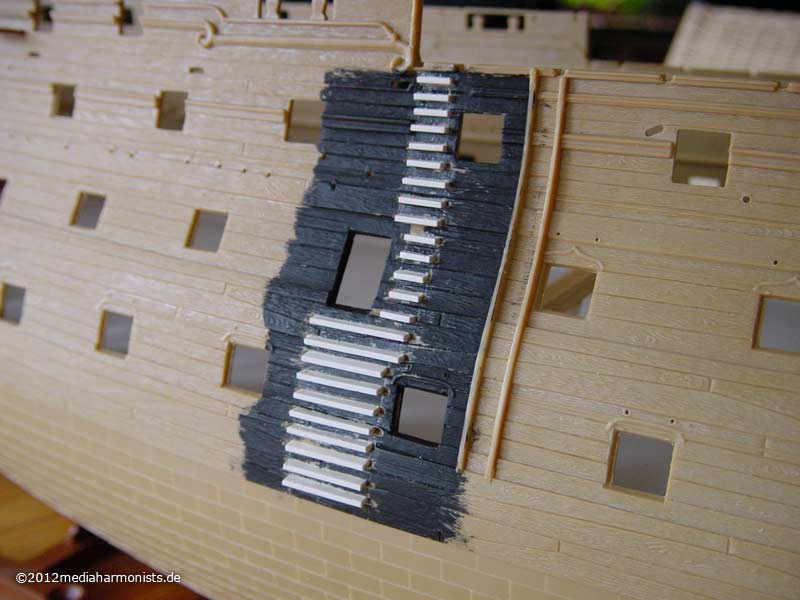
Like this the steps came horizontal and not like often seen perpendicular to the hull.
The final painting was done with Citadel Paint from Games Workshop.
All the best, Daniel
I clamped the stand of my dremel onto the table, see bottom left, sweept the tool to the backside ...
... used a 1 mm milling cutter, always adjusted the height with the sliding calliper ...
and moved the ship along the way.
Afterwards filled with Evergreen, later on still rounded off the edges and glued the supports underneath.
Like this the steps came horizontal and not like often seen perpendicular to the hull.
The final painting was done with Citadel Paint from Games Workshop.
All the best, Daniel
To Victory and beyond ...
viewtopic.php?f=59&t=99050&start=60
See also our german forum for the age of Sail and History:
http://www.segelschiffsmodellbau.com
viewtopic.php?f=59&t=99050&start=60
See also our german forum for the age of Sail and History:
http://www.segelschiffsmodellbau.com
-
Dan K
- Posts: 9047
- Joined: Tue Jan 11, 2005 10:56 am
- Location: New York City
Re: To HMS Victory and beyond
OMG. NICE!
-
sgtryan13

- Posts: 2650
- Joined: Thu Apr 03, 2008 10:48 pm
- Location: Connecticut, USA
Re: To HMS Victory and beyond
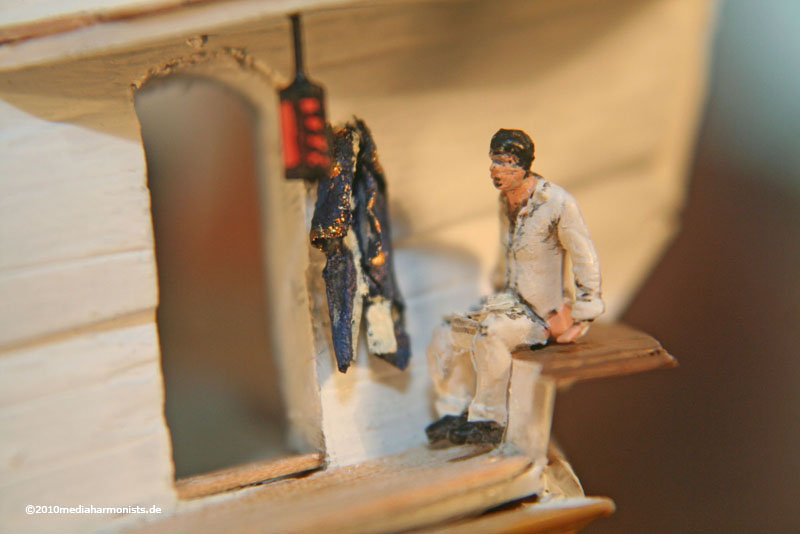
Really great detailing all around. the sailor using the "poop-deck" is a really cool little touch!
Enlisted men are stupid, but very cunning and deceitful and bear considerable watching." - Marine Corps Officers Manual, 1894
http://www.modelshipgallery.com/gallery ... index.html
http://www.modelshipgallery.com/gallery ... index.html
-
dafi
- Posts: 998
- Joined: Mon Mar 12, 2012 11:13 am
- Location: Ludwigsburg/Germany
- Contact:
Re: To HMS Victory and beyond
Thank you very much Sirs, very appreciated 
It was a funny and rough ride, with several make overs that still make me run shivers down the spine ...
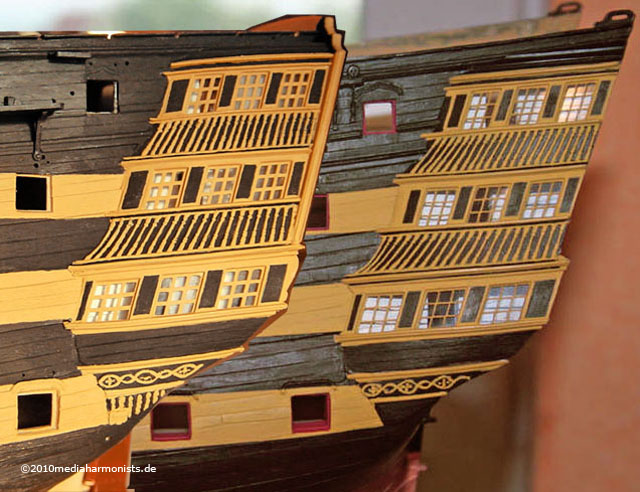
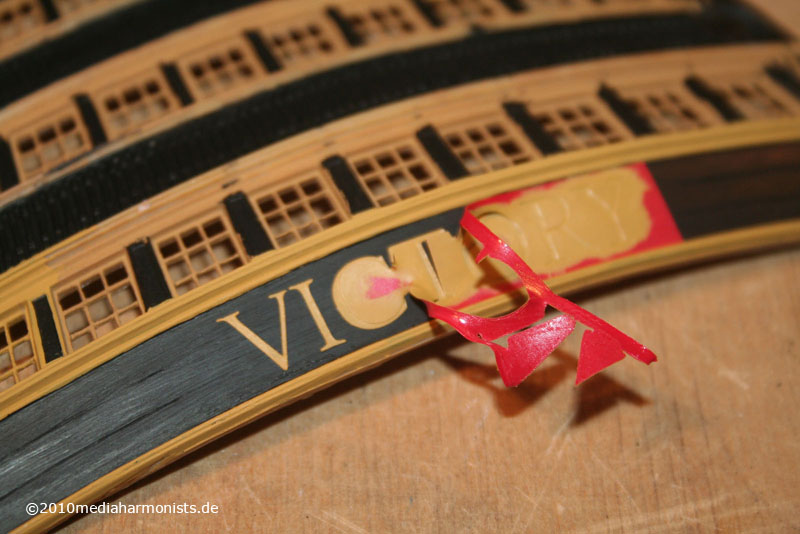
Taking off the already glued side galleries for sanding down the wood imitation and old paint ...
... adjusting the already finished batten of the coppering (Tiffany foil) ...
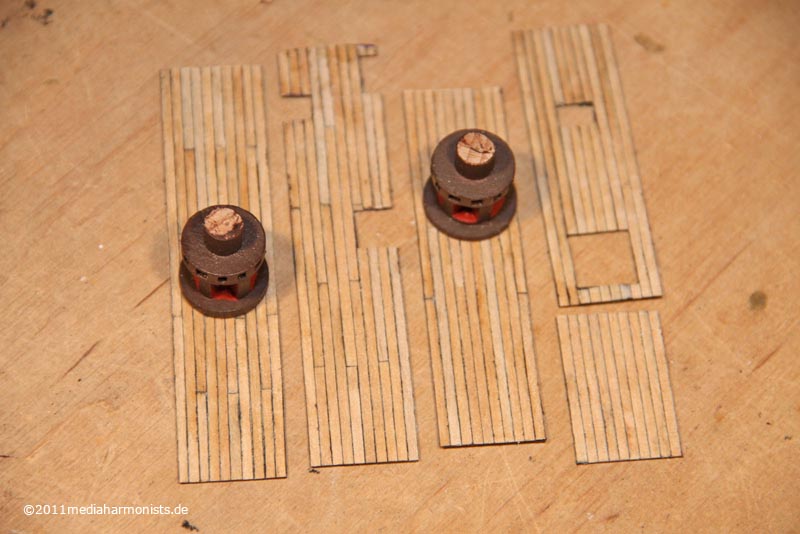
... extracting riding bits and gratings Mark 1 ...
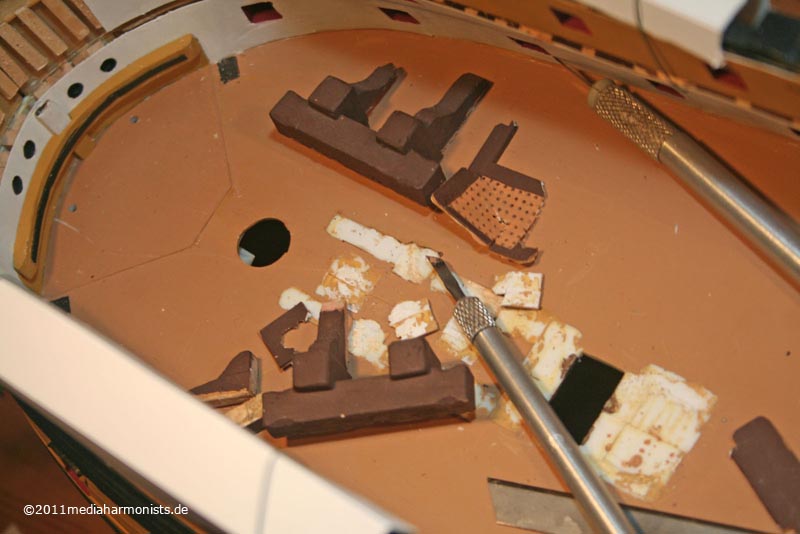
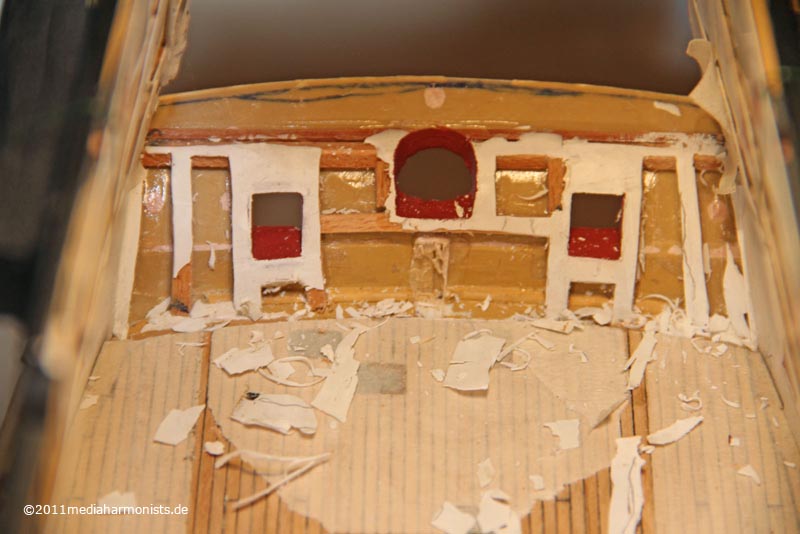
... reworking the aft part of the lower gun deck ...
... enhancing the seats of ease on the already finished area ...
... among other adventures. But here she lies in her working slipway aka Snow-White glas coffin and it was all worth it
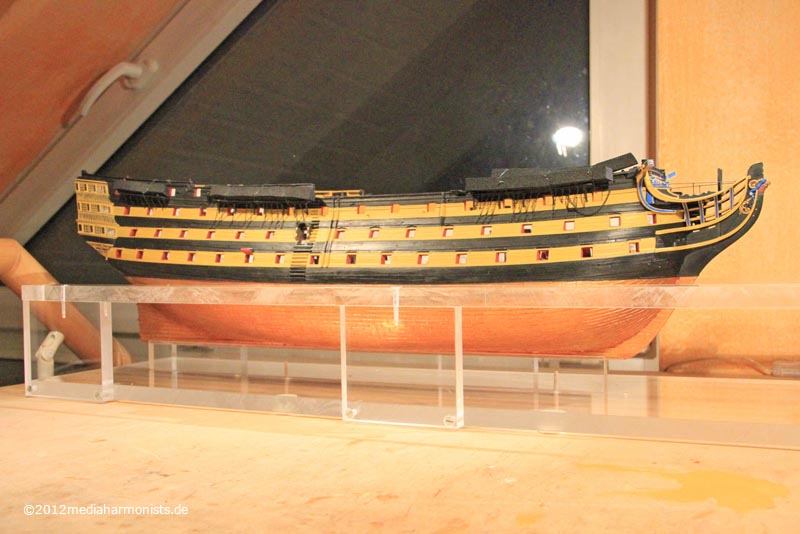
All the best, Daniel
It was a funny and rough ride, with several make overs that still make me run shivers down the spine ...
Taking off the already glued side galleries for sanding down the wood imitation and old paint ...
... adjusting the already finished batten of the coppering (Tiffany foil) ...
... extracting riding bits and gratings Mark 1 ...
... reworking the aft part of the lower gun deck ...
... enhancing the seats of ease on the already finished area ...
... among other adventures. But here she lies in her working slipway aka Snow-White glas coffin and it was all worth it
All the best, Daniel
To Victory and beyond ...
viewtopic.php?f=59&t=99050&start=60
See also our german forum for the age of Sail and History:
http://www.segelschiffsmodellbau.com
viewtopic.php?f=59&t=99050&start=60
See also our german forum for the age of Sail and History:
http://www.segelschiffsmodellbau.com
-
Rob 2

- Posts: 157
- Joined: Sun Apr 11, 2010 1:22 pm
Re: To HMS Victory and beyond
Hello Daniel,
Even though I know your build well I still have to comment on its quality
Rob.
P.S. Does Pete know you are moonlighting?
Even though I know your build well I still have to comment on its quality
Rob.
P.S. Does Pete know you are moonlighting?
-
dafi
- Posts: 998
- Joined: Mon Mar 12, 2012 11:13 am
- Location: Ludwigsburg/Germany
- Contact:
Re: To HMS Victory and beyond
Pssssst! Do not tell Pete 
Rob, the man with the 1.001 nicknames
Nice to know you here (as expected), all the best, Daniel
Rob, the man with the 1.001 nicknames
Nice to know you here (as expected), all the best, Daniel
To Victory and beyond ...
viewtopic.php?f=59&t=99050&start=60
See also our german forum for the age of Sail and History:
http://www.segelschiffsmodellbau.com
viewtopic.php?f=59&t=99050&start=60
See also our german forum for the age of Sail and History:
http://www.segelschiffsmodellbau.com
-
DanCinSD

- Posts: 578
- Joined: Sat Nov 25, 2006 11:14 pm
- Location: San Diego, California
- Contact:
Re: To HMS Victory and beyond
Wow
Dan
Field Artillery, King of Battle
Please check out the Secret Society of Model Builders on facebook.
Field Artillery, King of Battle
Please check out the Secret Society of Model Builders on facebook.
-
JIM BAUMANN

- Posts: 5681
- Joined: Mon Jan 10, 2005 5:30 pm
- Location: Nr Southampton England
Re: To HMS Victory and beyond
very very impressive work!
I thought you may be interested in seeing this--also a nice way of presentation
( I always feel that old sailing ships really come to life when waterlined...
viewtopic.php?f=4&t=38284
Will you be presenting the model as a full hull?-- or in drydock-as she is now...?
The copper bottom I alwasy feel should be toned down a bit--unless the model is being presented as a
'builders' model...
here is a photo showing the colouring of the copper after being immersed for a summer season
from this thread
http://forum.model-space.co.uk/default. ... sts&t=1912
discussing verdigris paint amongst other interesting issues
....I buy them at three times the speed I build 'em.... will I live long enough to empty my stash...?
http://www.modelshipgallery.com/gallery ... index.html
IPMS UK SIG (special interest group) www.finewaterline.com
http://www.modelshipgallery.com/gallery ... index.html
IPMS UK SIG (special interest group) www.finewaterline.com
-
dafi
- Posts: 998
- Joined: Mon Mar 12, 2012 11:13 am
- Location: Ludwigsburg/Germany
- Contact:
Re: To HMS Victory and beyond
Thank you very much Sirs
Thank you too for the links, always very welcome, impressive build!
The copper is a large field of discussion: pattern, color, nails ...
In the old closed Arsenal forum of Gerard there are some pictures of a historic coppering, as access is restricted here is the straight link to the pictures. As far as I know they were taken nearby a spanish Navy school
http://img168.imageshack.us/f/1002477.jpg/
http://img502.imageshack.us/i/1002474.jpg/
http://img222.imageshack.us/i/1002473.jpg/
http://img705.imageshack.us/i/1002482.jpg/
http://img685.imageshack.us/i/1002483.jpg/
Here ia a link from the actual forum with other pictures of a ship in use
http://5500.forumactif.org/t285p880-ima ... ines#33275
Nice to see, that the nails are barely visible, so I took the chance and omitted them on my 1:100 scale model
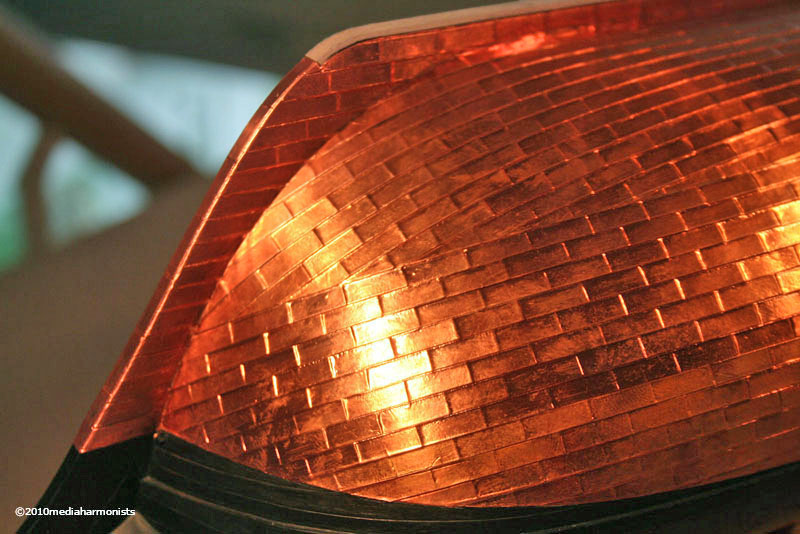
Another thing to be seen on the last pictures is the color. The verdigris just occures when copper is exposed to air! Underneath the water it stays brownish, or pinkish due to the chemical reactions. It changes color on the waterline to pink or green, apparently the green just with ships that just lay in harbour.
Here is a small film about the surprise being taken out for repair ...
http://www.youtube.com/watch?v=j5DuRSVJaOs
Nicely brown, even after all the growth taken out. Just as a sidekick: Can you imagine all the sailing-ship-builders arrrghs seeing the props ??
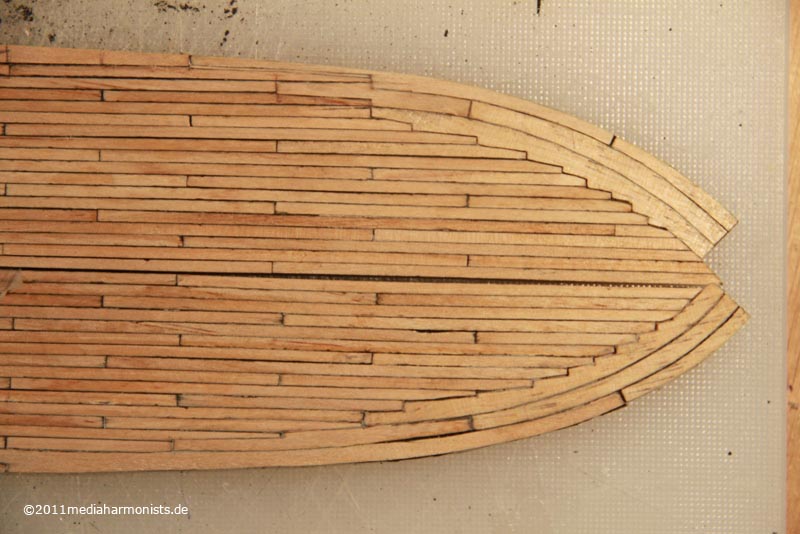
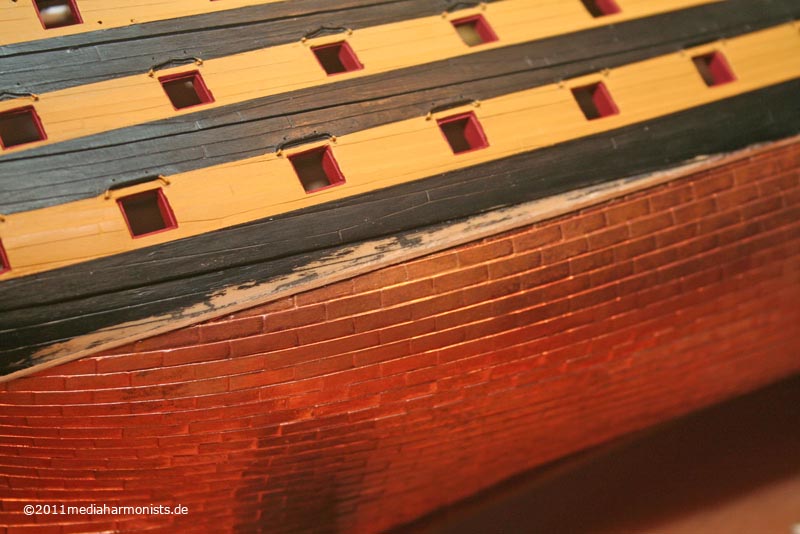
The layout pattern of the tiles is surprisingly accurate on the Heller kit, showing the lines running up and being cut at sometimes sharp angle and not taking the continental way with two lines on the top running parallel to the waterline.
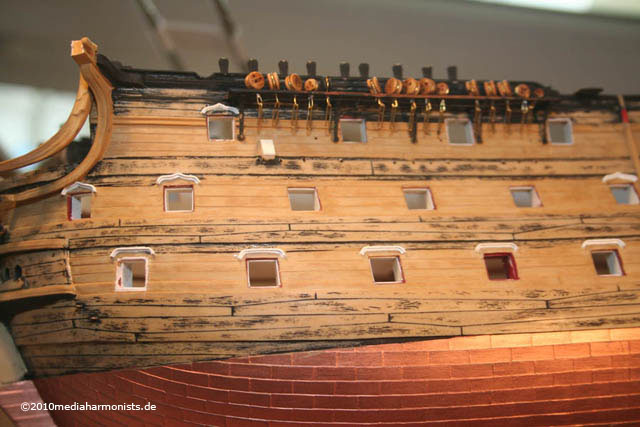
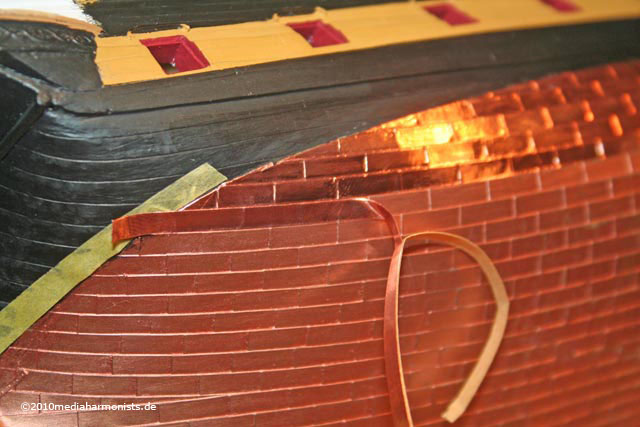
For my model I used Tiffany self adhesive foil, which was available at the right measures and which I was able to apply as long stripes. Just a priming with copper paint underneath in case of small gaps and afterwords pressing the foil onto the tiles with a toothpick to mark the structure better. Even though the stucture of the tiles is far to strong, I just left it as it was. The decision in which way the copper will be aged I am still making up my mind also still checking out the way of presentation, so I have another two or three years before I start with the rigging.
Here are the results of my humble efforts on the coppering on my model so far:
with false keel added
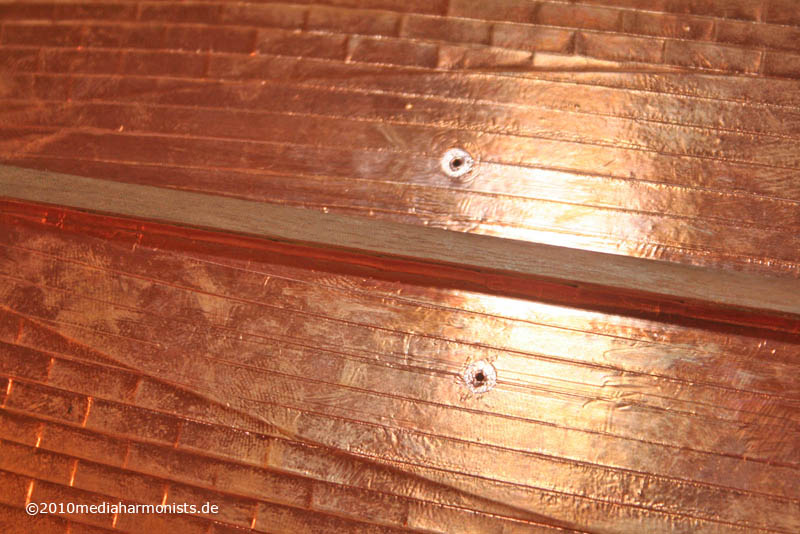
The inlets for the elm tree pump, aka Nelsons bathtub plugs
Those holes stirred a lot of conversation but got confirmed in the end.
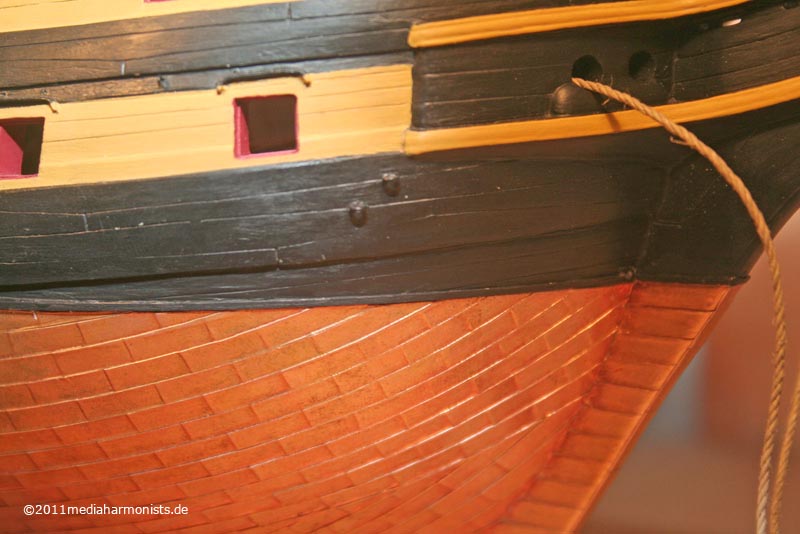
Still added the batten to the top of the coppering, an english speciality due to the cut copper plates.
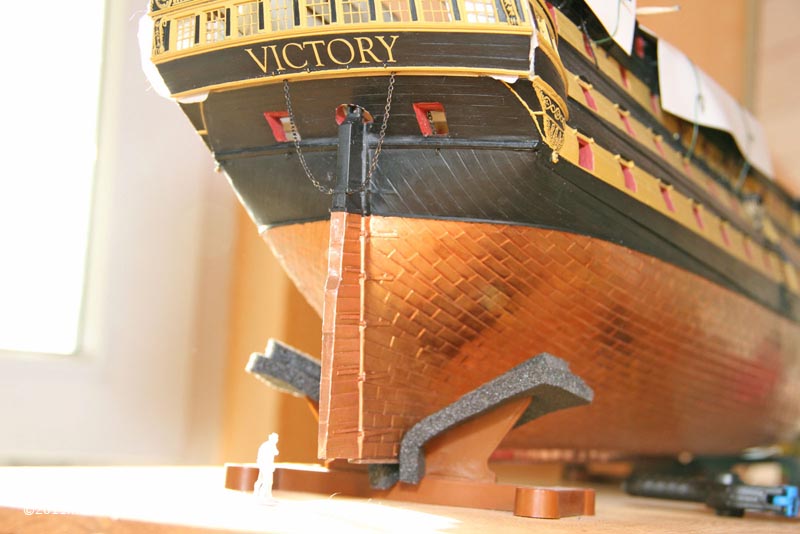
And I love those gracious lines of the ship, ending in the thinned down rudder.
For those who like the verdigris version, Rolans/LTGarp of Wettringer shows a nice way of aging with saturated saltwater and vinegar applied to the copper
http://www.wettringer-modellbauforum.de ... post234114
and painted nails
http://www.wettringer-modellbauforum.de ... post267776
Liebe Gr��e, Daniel
Thank you too for the links, always very welcome, impressive build!
The copper is a large field of discussion: pattern, color, nails ...
In the old closed Arsenal forum of Gerard there are some pictures of a historic coppering, as access is restricted here is the straight link to the pictures. As far as I know they were taken nearby a spanish Navy school
http://img168.imageshack.us/f/1002477.jpg/
http://img502.imageshack.us/i/1002474.jpg/
http://img222.imageshack.us/i/1002473.jpg/
http://img705.imageshack.us/i/1002482.jpg/
http://img685.imageshack.us/i/1002483.jpg/
Here ia a link from the actual forum with other pictures of a ship in use
http://5500.forumactif.org/t285p880-ima ... ines#33275
Nice to see, that the nails are barely visible, so I took the chance and omitted them on my 1:100 scale model
Another thing to be seen on the last pictures is the color. The verdigris just occures when copper is exposed to air! Underneath the water it stays brownish, or pinkish due to the chemical reactions. It changes color on the waterline to pink or green, apparently the green just with ships that just lay in harbour.
Here is a small film about the surprise being taken out for repair ...
http://www.youtube.com/watch?v=j5DuRSVJaOs
Nicely brown, even after all the growth taken out. Just as a sidekick: Can you imagine all the sailing-ship-builders arrrghs seeing the props ??
The layout pattern of the tiles is surprisingly accurate on the Heller kit, showing the lines running up and being cut at sometimes sharp angle and not taking the continental way with two lines on the top running parallel to the waterline.
For my model I used Tiffany self adhesive foil, which was available at the right measures and which I was able to apply as long stripes. Just a priming with copper paint underneath in case of small gaps and afterwords pressing the foil onto the tiles with a toothpick to mark the structure better. Even though the stucture of the tiles is far to strong, I just left it as it was. The decision in which way the copper will be aged I am still making up my mind also still checking out the way of presentation, so I have another two or three years before I start with the rigging.
Here are the results of my humble efforts on the coppering on my model so far:
with false keel added
The inlets for the elm tree pump, aka Nelsons bathtub plugs
Those holes stirred a lot of conversation but got confirmed in the end.
Still added the batten to the top of the coppering, an english speciality due to the cut copper plates.
And I love those gracious lines of the ship, ending in the thinned down rudder.
For those who like the verdigris version, Rolans/LTGarp of Wettringer shows a nice way of aging with saturated saltwater and vinegar applied to the copper
http://www.wettringer-modellbauforum.de ... post234114
and painted nails
http://www.wettringer-modellbauforum.de ... post267776
Liebe Gr��e, Daniel
To Victory and beyond ...
viewtopic.php?f=59&t=99050&start=60
See also our german forum for the age of Sail and History:
http://www.segelschiffsmodellbau.com
viewtopic.php?f=59&t=99050&start=60
See also our german forum for the age of Sail and History:
http://www.segelschiffsmodellbau.com
-
dafi
- Posts: 998
- Joined: Mon Mar 12, 2012 11:13 am
- Location: Ludwigsburg/Germany
- Contact:
Re: To HMS Victory and beyond
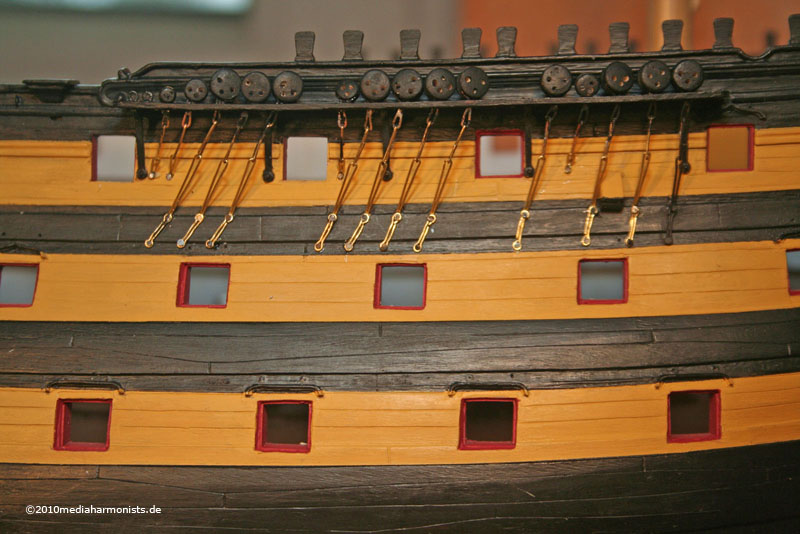
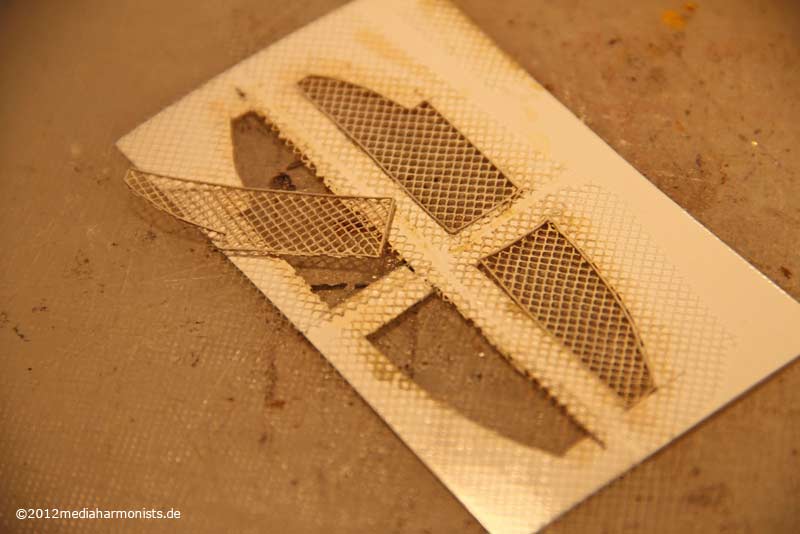
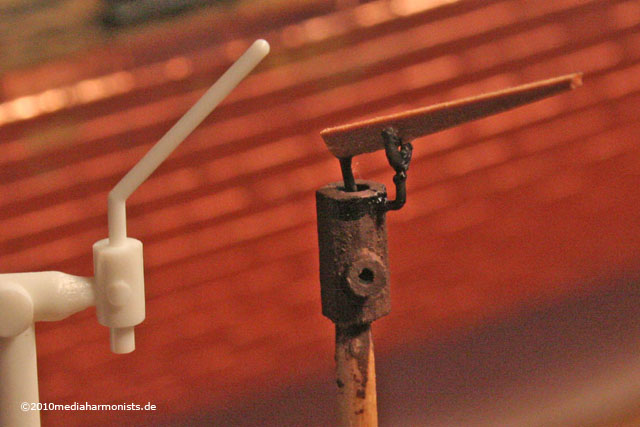
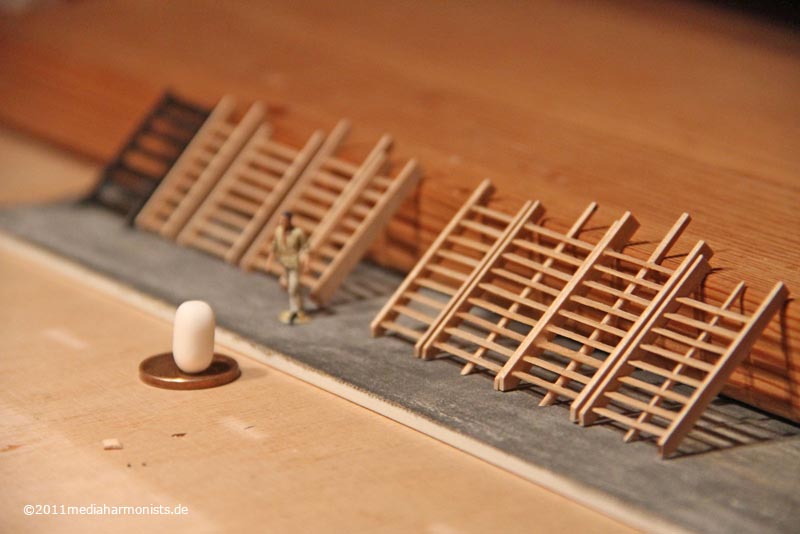
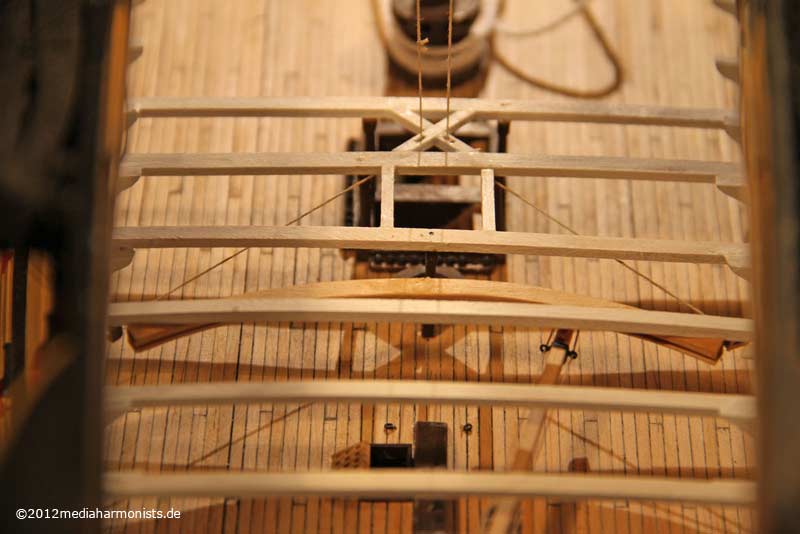
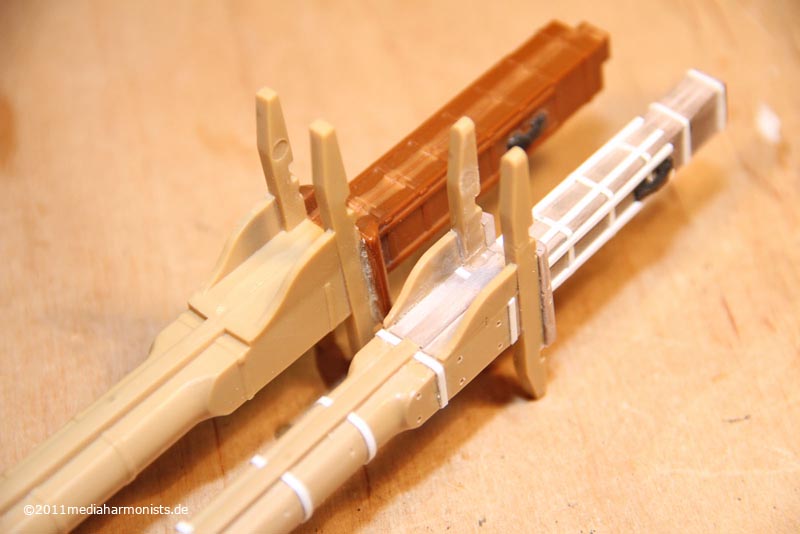
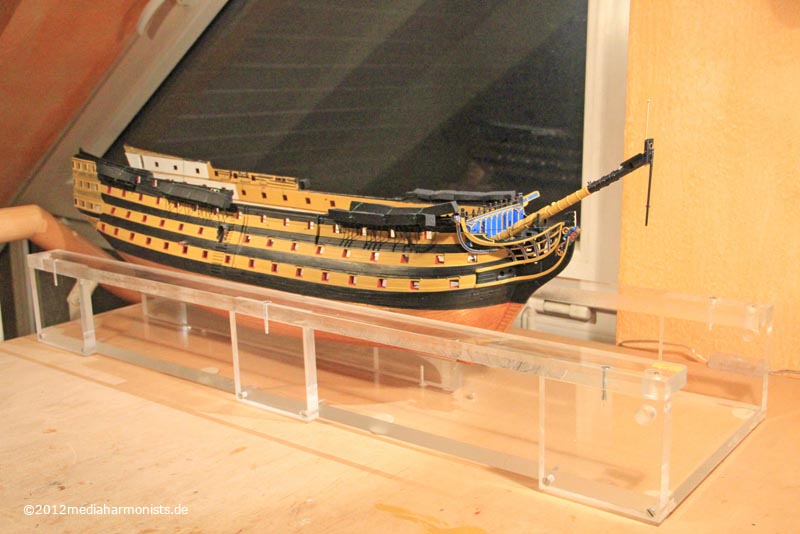
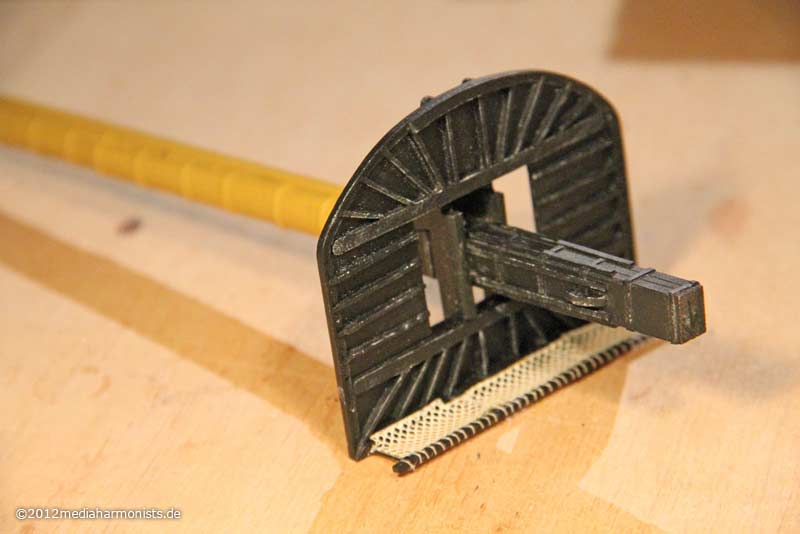
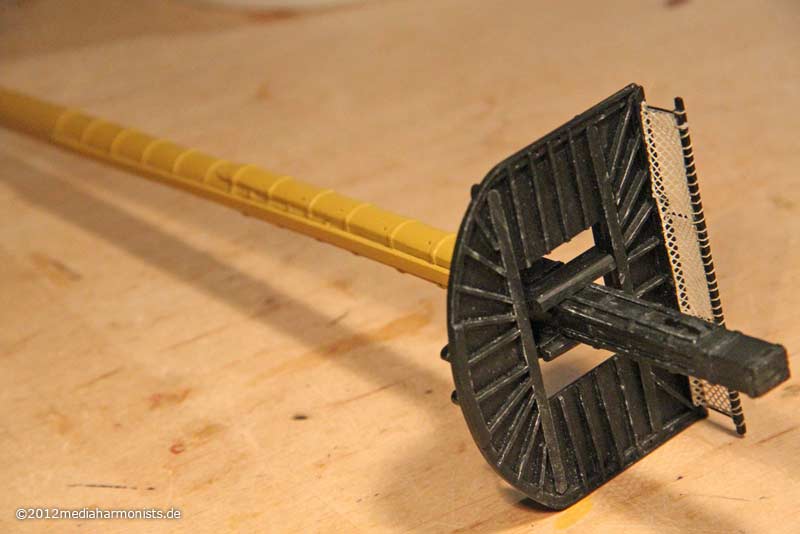
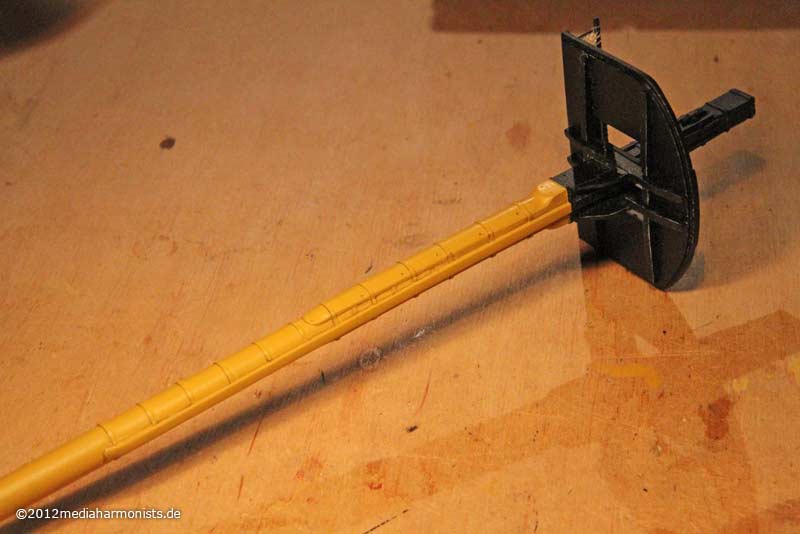
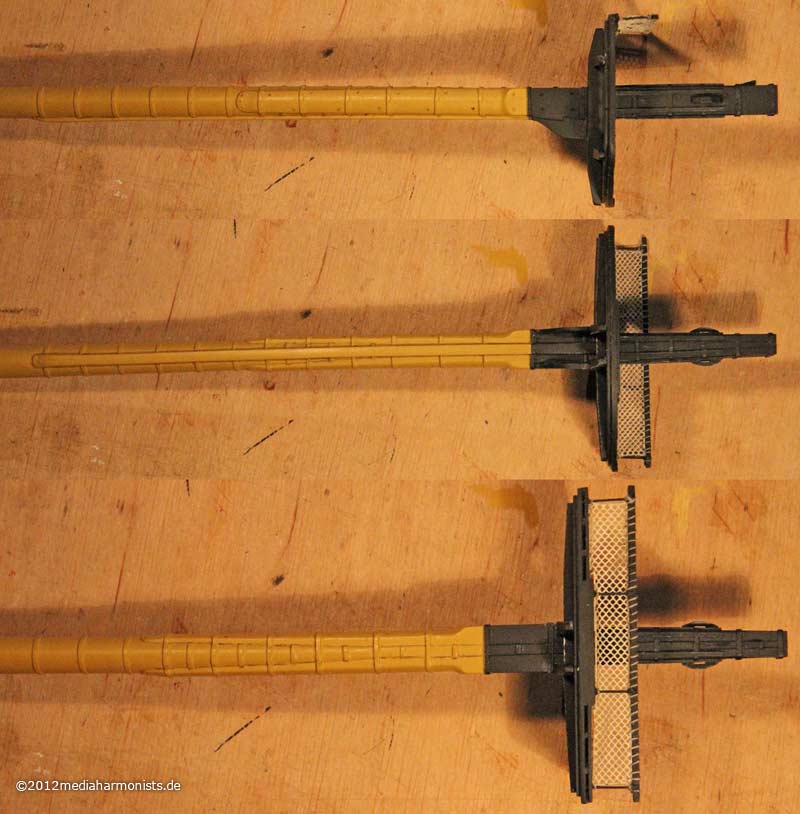
Going a little bit more aloft, the upper parts finally got their paint ...
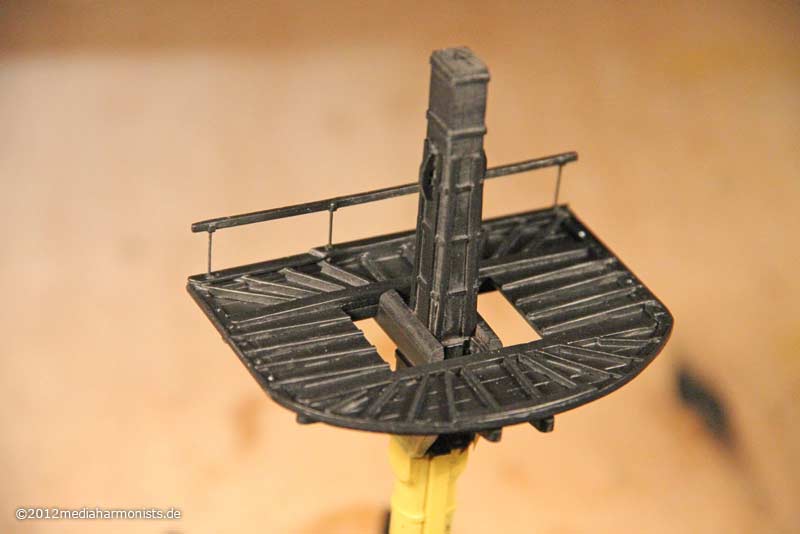
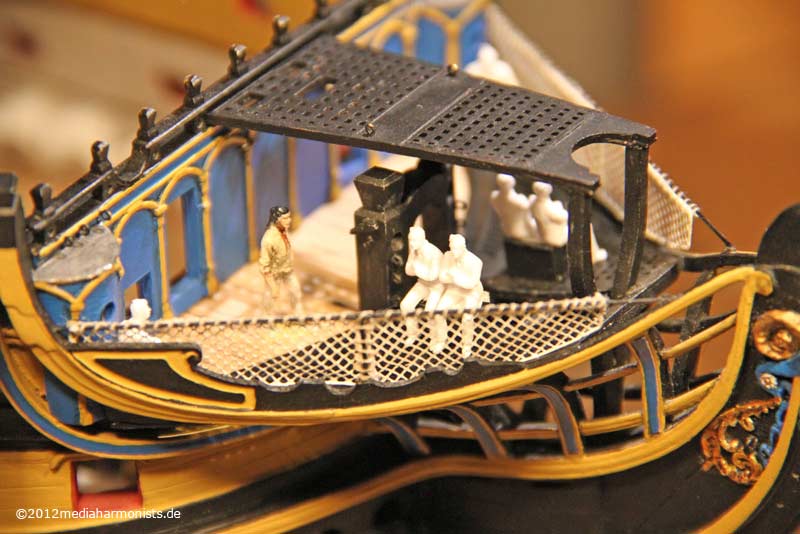
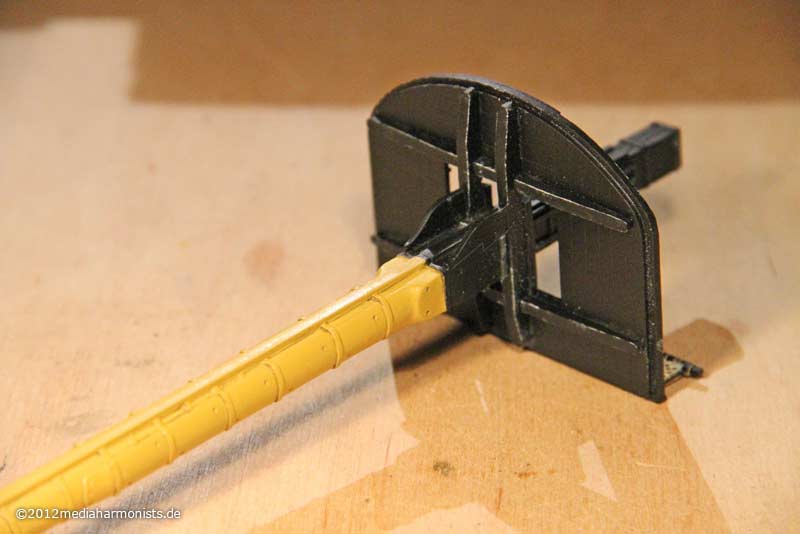
... you can see nicely the slots underneath the gunwhale of the newly shaped foretop, which represents the version used in between 1803 and 1815 on big ships.

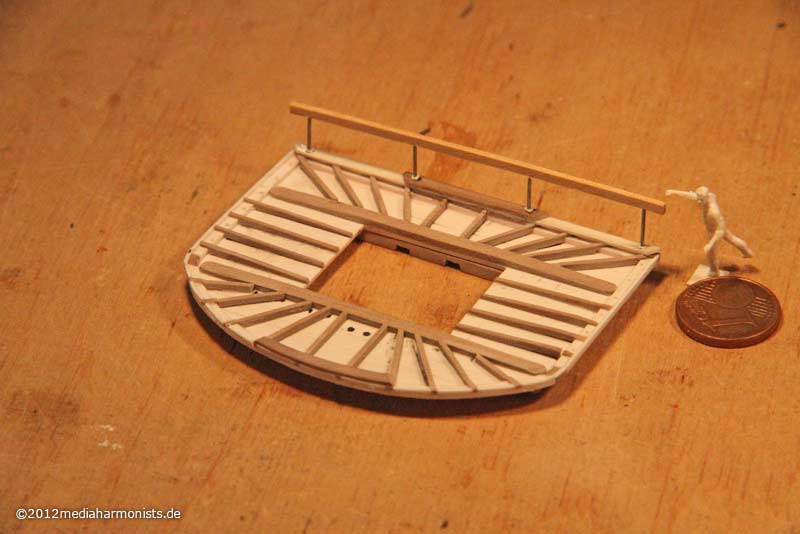
As a result of a freshly introduced quality management our little able-bodied seaman checks the fitting of the rail ...
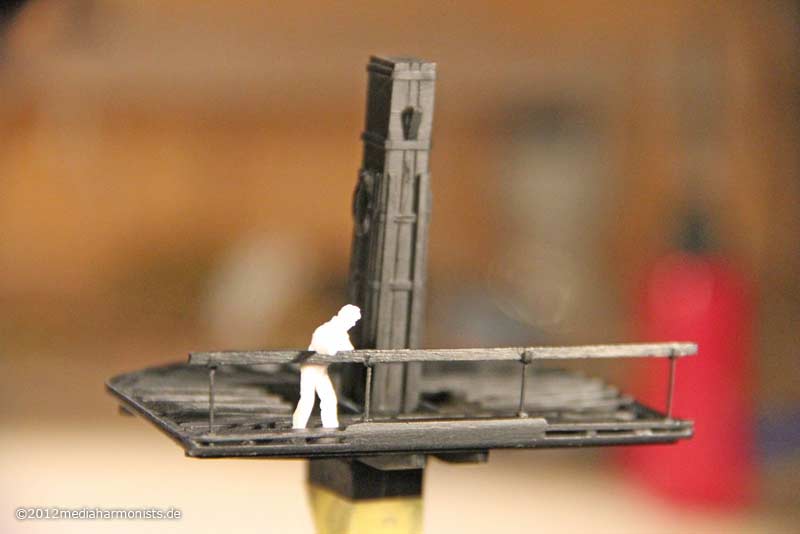
... fixes the netting as demanded by the trade unions and insures himself about the stability of the planks of the platform..
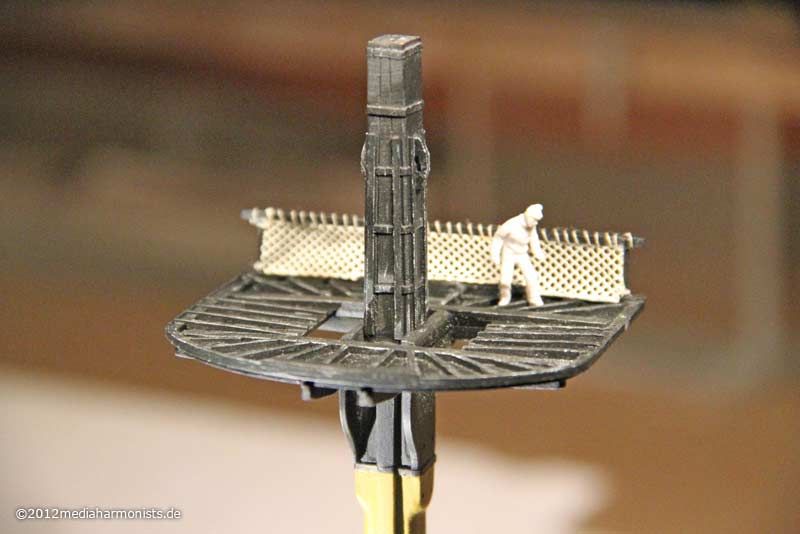
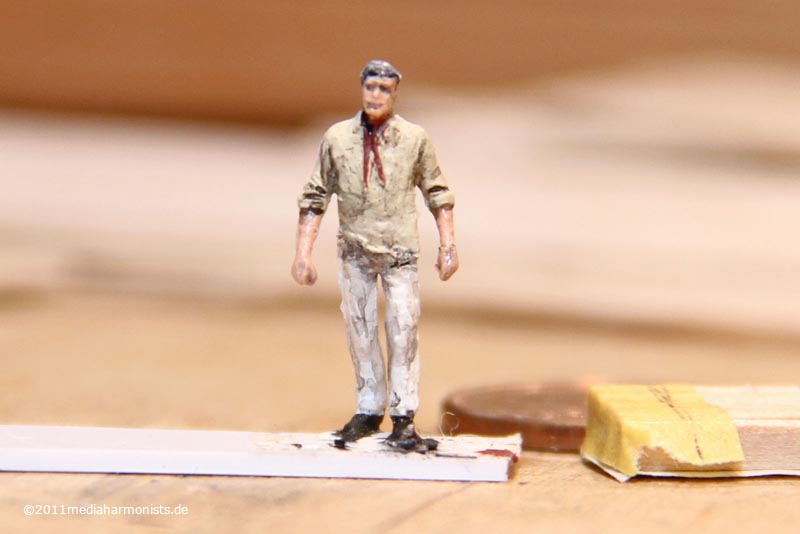
Then came my usual drybrush and incing session, looks rather strong in the macro, but with the final viewing distance of min 40 cm it looks fine, especially to articulate the details with all the rigging still to come.
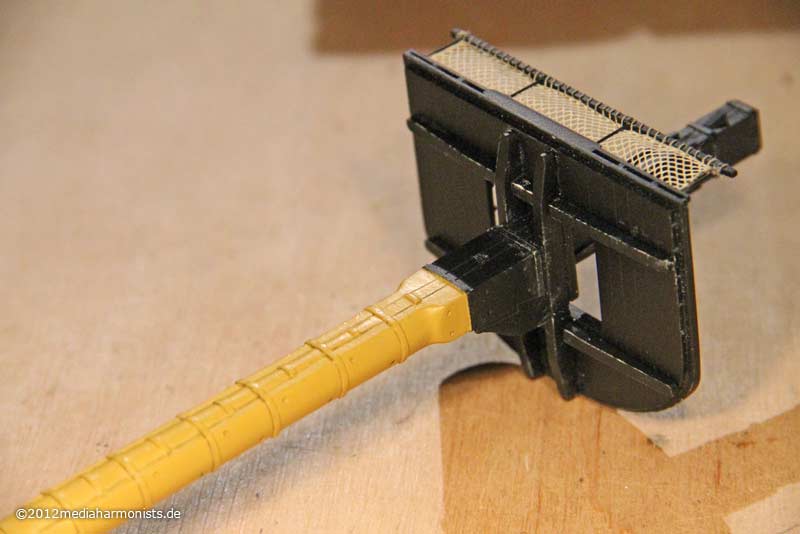
Soo I am looking rather happy now with the results
Cordialement, Daniel
... you can see nicely the slots underneath the gunwhale of the newly shaped foretop, which represents the version used in between 1803 and 1815 on big ships.
As a result of a freshly introduced quality management our little able-bodied seaman checks the fitting of the rail ...
... fixes the netting as demanded by the trade unions and insures himself about the stability of the planks of the platform..
Then came my usual drybrush and incing session, looks rather strong in the macro, but with the final viewing distance of min 40 cm it looks fine, especially to articulate the details with all the rigging still to come.
Soo I am looking rather happy now with the results
Cordialement, Daniel
To Victory and beyond ...
viewtopic.php?f=59&t=99050&start=60
See also our german forum for the age of Sail and History:
http://www.segelschiffsmodellbau.com
viewtopic.php?f=59&t=99050&start=60
See also our german forum for the age of Sail and History:
http://www.segelschiffsmodellbau.com
-
Tom L.

- Posts: 173
- Joined: Mon Jan 10, 2005 7:59 pm
- Location: Hamilton, Ohio
Re: To HMS Victory and beyond
Beautiful, beautiful work!