Dreadnought with Pontos detail set.
Moderators: BB62vet, MartinJQuinn, JIM BAUMANN, Jon, Dan K
-
ArizonaBB39

- Posts: 1321
- Joined: Sat Jan 08, 2005 7:29 pm
- Location: Tempe, Arizona
- Contact:
Re: Dreadnought with Pontos detail set.
Excellent work! Hopefully you can find new employment soon
-
FlowerPower

- Posts: 235
- Joined: Wed Apr 03, 2013 7:05 pm
- Location: Netherlands
Re: Dreadnought with Pontos detail set.
outstanding!
sorry to hear about your job, best of luck.
Cheers!
Rob
sorry to hear about your job, best of luck.
Cheers!
Rob

WIP:
-1/72 Revell flower class corvette,with GLS PE and lots of Evergreen.
-1/350 Dragon Scharnhorst, Artwox wooden decks, CyberHobby PE, Master brass barrels.
-
Rob 2

- Posts: 157
- Joined: Sun Apr 11, 2010 1:22 pm
Re: Dreadnought with Pontos detail set.
Thanks guys for the comments.
Something I forgot to mention was that I used the backing material from the wooden deck as a template to cut masks. It proved very useful and saved some time.
Rob.
Something I forgot to mention was that I used the backing material from the wooden deck as a template to cut masks. It proved very useful and saved some time.
Rob.
-
sotter

- Posts: 23
- Joined: Fri Mar 01, 2013 5:48 am
- Location: Poland
Re: Dreadnought with Pontos detail set.
Beautiful work! I admire fine hull plating. A lot of work will require proper rigging of Dreadnought, especially antitorpedo net rigging.
-
MartinJQuinn

- Posts: 8593
- Joined: Tue Jan 11, 2005 1:40 pm
- Location: New Jersey
Re: Dreadnought with Pontos detail set.
Holy sh*t - outstanding work. Love the hull plating!
Good luck on your job search.
Good luck on your job search.
Martin
"Tomorrow is the most important thing in life. Comes into us at midnight very clean. It's perfect when it arrives and it puts itself in our hands. It hopes we've learned something from yesterday." John Wayne
Ship Model Gallery
"Tomorrow is the most important thing in life. Comes into us at midnight very clean. It's perfect when it arrives and it puts itself in our hands. It hopes we've learned something from yesterday." John Wayne
Ship Model Gallery
-
Rob 2
- Posts: 157
- Joined: Sun Apr 11, 2010 1:22 pm
Re: Dreadnought with Pontos detail set.
Thanks Guys for the positive comments.
With more time than usual on my hands I have been busy with Dreadnought. Works alright but it does get in the way of my modelling time.
The breakwaters have now been added.


Some of the many PE components that require folding, the detail is amazing.

Bridge fittings including a PE ships wheel.

The bridge itself.


Painted 12pound quick firing guns.


To fit the boat deck over the search lights I had to trim the bases of the lights quite a lot, yet more clearance was required. I didn�t want to trim the lights any further so I hollowed out the bottom area of the boat deck for additional clearance. The lights were angled fore and aft to help fit into the cut away areas of the boat deck.
I fitted some spare PE railing around the stairwells for health & safety reasons.

I read that the admirals walk was floored with gratings and decided to try and replicate this. The idea was to use a piece of WEM etch as a pattern. I rubbed some foil over the etch which after removal had the back reinforced with some PVA. It was only after painting that I decided I didn�t like the effect so removed it with a Swann Morton chisel blade. The resulting mess was covered with spare deck veneer from the kit, and we shall never talk of it again.


I finally fitted the boat deck after fitting the 12pounders below it. I had to move one of the supports at mid ships inboard slightly for clearance. An annoying aspect of this piece is that the rear portion fits on top rather than into the superstructure. This leaves an unsightly slightly mismatched joint. I decided I had to do something with it so removed the last pair of boat hangers and fitted the railing above; I could conceal its joint at the same time. A lot of tricky sanding later and a bit of keyhole surgery to refit one of the 12 pounders I managed to knock out I was pleased with the result. The last pair of boat hangers was replaced with slightly larger Evergreen, the joint reinforced with brass wire.


I still need to matt down a lot of this work to conceal some shiny glue deposits and Future stains, I use this to check my sanding as it quick dries and leaves a glossy finish I can play light over to look for imperfections. I have also added a two pairs of ladders and two pairs of steps up to the boat deck which have been missed by Pontos, hardly surprising with their work load and us impatient modelers nagging them with our wish lists.
I have started to fit many of the sub assemblies.


Next up will be the funnels only because she looks rather strange at the moment.
Thanks for looking.
With more time than usual on my hands I have been busy with Dreadnought. Works alright but it does get in the way of my modelling time.
The breakwaters have now been added.
Some of the many PE components that require folding, the detail is amazing.
Bridge fittings including a PE ships wheel.
The bridge itself.
Painted 12pound quick firing guns.
To fit the boat deck over the search lights I had to trim the bases of the lights quite a lot, yet more clearance was required. I didn�t want to trim the lights any further so I hollowed out the bottom area of the boat deck for additional clearance. The lights were angled fore and aft to help fit into the cut away areas of the boat deck.
I fitted some spare PE railing around the stairwells for health & safety reasons.
I read that the admirals walk was floored with gratings and decided to try and replicate this. The idea was to use a piece of WEM etch as a pattern. I rubbed some foil over the etch which after removal had the back reinforced with some PVA. It was only after painting that I decided I didn�t like the effect so removed it with a Swann Morton chisel blade. The resulting mess was covered with spare deck veneer from the kit, and we shall never talk of it again.
I finally fitted the boat deck after fitting the 12pounders below it. I had to move one of the supports at mid ships inboard slightly for clearance. An annoying aspect of this piece is that the rear portion fits on top rather than into the superstructure. This leaves an unsightly slightly mismatched joint. I decided I had to do something with it so removed the last pair of boat hangers and fitted the railing above; I could conceal its joint at the same time. A lot of tricky sanding later and a bit of keyhole surgery to refit one of the 12 pounders I managed to knock out I was pleased with the result. The last pair of boat hangers was replaced with slightly larger Evergreen, the joint reinforced with brass wire.
I still need to matt down a lot of this work to conceal some shiny glue deposits and Future stains, I use this to check my sanding as it quick dries and leaves a glossy finish I can play light over to look for imperfections. I have also added a two pairs of ladders and two pairs of steps up to the boat deck which have been missed by Pontos, hardly surprising with their work load and us impatient modelers nagging them with our wish lists.
I have started to fit many of the sub assemblies.
Next up will be the funnels only because she looks rather strange at the moment.
Thanks for looking.
-
litvin70
- Posts: 298
- Joined: Sun Mar 06, 2011 6:19 am
Re: Dreadnought with Pontos detail set.
Very helpful and interesting for me. Thank you. 
-
Captain pugwash

- Posts: 422
- Joined: Sun Jan 08, 2012 5:36 am
- Location: LA/Cornwall-UK
Re: Dreadnought with Pontos detail set.
Great job Rob mate.
She is looking very good.
Sorry to hear on your curcumstances, hope they Improove.
She is looking very good.
Sorry to hear on your curcumstances, hope they Improove.
Cornwall UK
-
Rob 2
- Posts: 157
- Joined: Sun Apr 11, 2010 1:22 pm
Re: Dreadnought with Pontos detail set.
Thanks everyone for your support.
Initially I was hoping to assemble the main components of the foremast before fitting to the kit but this proved to be impossible so the mast was disassembled. The machining of the main derrick is a work of art, the heel pivot actually works! I initially assembled the derrick using the etched rigging lines but felt these were over scale. They were removed and the masthead modified to represent what should be there, the rigging was replaced with fly fishing silk.


I painted the mast and fitted it to the kit using epoxy, plenty of fiddle time required. I had considered various Heath Robinson inspired contraptions to hold everything square while the resin set but resorted to a blob of blutac in the end. The lower platform was folded up and the starfish platform test fitted. The stiffening pieces were added from .5mm Evergreen, further study of the A.O.T.S showed they should be finer.


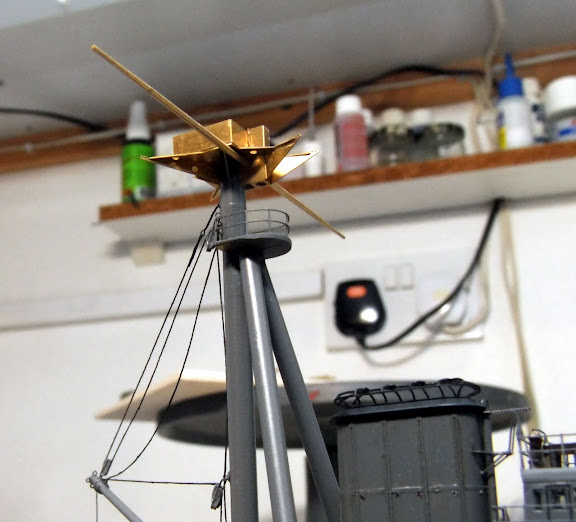
You will have noticed the funnels have been added; I made funnel stay bands from Bare Metal Foil and made impressions in the funnels where the stays would go with a needle. Various ladders have also been added to this area. The rear funnel stays have been added from stretched sprue.


The main mast has been fitted after adding the fittings for the 40ft coaling derricks and adding two supports per side to the searchlight platform.

The 32ft cutters had an extra thwart added as well as stern benches.


The various skylights have had their covers added.

The six 40ft coaling derricks have also been assembled and the fit of the components was incredibly precise.


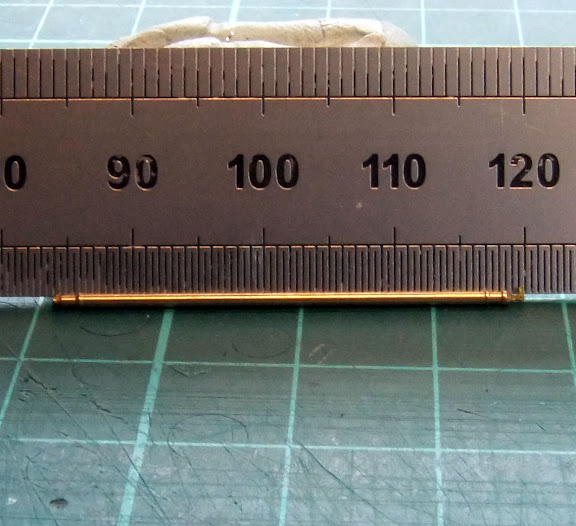
Thanks for looking.
Rob.
Initially I was hoping to assemble the main components of the foremast before fitting to the kit but this proved to be impossible so the mast was disassembled. The machining of the main derrick is a work of art, the heel pivot actually works! I initially assembled the derrick using the etched rigging lines but felt these were over scale. They were removed and the masthead modified to represent what should be there, the rigging was replaced with fly fishing silk.
I painted the mast and fitted it to the kit using epoxy, plenty of fiddle time required. I had considered various Heath Robinson inspired contraptions to hold everything square while the resin set but resorted to a blob of blutac in the end. The lower platform was folded up and the starfish platform test fitted. The stiffening pieces were added from .5mm Evergreen, further study of the A.O.T.S showed they should be finer.
You will have noticed the funnels have been added; I made funnel stay bands from Bare Metal Foil and made impressions in the funnels where the stays would go with a needle. Various ladders have also been added to this area. The rear funnel stays have been added from stretched sprue.
The main mast has been fitted after adding the fittings for the 40ft coaling derricks and adding two supports per side to the searchlight platform.
The 32ft cutters had an extra thwart added as well as stern benches.
The various skylights have had their covers added.
The six 40ft coaling derricks have also been assembled and the fit of the components was incredibly precise.
Thanks for looking.
Rob.
-
Christian M.
- Posts: 967
- Joined: Sat Oct 06, 2012 4:34 pm
- Location: Cologne / Germany, sometimes Poznan/ Poland and Chessington/ UK
Re: Dreadnought with Pontos detail set.
Because I build this mother of capital ships too in moment and also with Pontos Set, an always interesting wip thread for me as inspiration. Your kit looks really good until now and the extra work you did was it really worth! 
The only real difference between us is the shade of the grey, because I choose after study of original photos a some what lighter grey as you ... but this not mean that my is right and you wrong or something like this, because I found also pictures showing her somewhat darker matching to your colour choose.
One question I have here: You made this reddish brown linoleum colour on the floor of your bridgework, where did you read / see it that Dreadnought had? I will do too, because from the beginning on I thought she has too, but found no sources about....
Cheers,
Christian
The only real difference between us is the shade of the grey, because I choose after study of original photos a some what lighter grey as you ... but this not mean that my is right and you wrong or something like this, because I found also pictures showing her somewhat darker matching to your colour choose.
One question I have here: You made this reddish brown linoleum colour on the floor of your bridgework, where did you read / see it that Dreadnought had? I will do too, because from the beginning on I thought she has too, but found no sources about....
Cheers,
Christian
The advantage of wisdom is that you can play dumb; conversely, it is more difficult.
-
dafi
- Posts: 1005
- Joined: Mon Mar 12, 2012 11:13 am
- Location: Ludwigsburg/Germany
- Contact:
Re: Dreadnought with Pontos detail set.
The usual great Rob-treat for us. Feeling well pampered 
XXXDAn
XXXDAn
To Victory and beyond ...
viewtopic.php?f=59&t=99050&start=60
See also our german forum for the age of Sail and History:
http://www.segelschiffsmodellbau.com
viewtopic.php?f=59&t=99050&start=60
See also our german forum for the age of Sail and History:
http://www.segelschiffsmodellbau.com
-
Rob 2
- Posts: 157
- Joined: Sun Apr 11, 2010 1:22 pm
Re: Dreadnought with Pontos detail set.
Thanks for the comments Christian and Daniel.
As for the linoleum decks Christian I followed the painting instructions provided by Zvezda and Trumpeter.
Page 127 of the AOTS states,
"All mess decks, accommodation areas etc were covered with thick linoleum, known as corticene, where elsewhere the decks and platforms were plain steel".
In the end I went with linoleum because I liked the colour contrast.
I hope this helps,
Rob.
As for the linoleum decks Christian I followed the painting instructions provided by Zvezda and Trumpeter.
Page 127 of the AOTS states,
"All mess decks, accommodation areas etc were covered with thick linoleum, known as corticene, where elsewhere the decks and platforms were plain steel".
In the end I went with linoleum because I liked the colour contrast.
I hope this helps,
Rob.
-
JIM BAUMANN

- Posts: 5699
- Joined: Mon Jan 10, 2005 5:30 pm
- Location: Nr Southampton England
Re: Dreadnought with Pontos detail set.
This is looking pretty sharp!
Fine modelmaking!
envious of your progress--I am over-run with work and have done nothing for 2 =weeks.......
Jb
Fine modelmaking!
envious of your progress--I am over-run with work and have done nothing for 2 =weeks.......
Jb
....I buy them at three times the speed I build 'em.... will I live long enough to empty my stash...?
http://www.modelshipgallery.com/gallery ... index.html
IPMS UK SIG (special interest group) www.finewaterline.com
http://www.modelshipgallery.com/gallery ... index.html
IPMS UK SIG (special interest group) www.finewaterline.com
-
mark_sch

- Posts: 178
- Joined: Mon Apr 13, 2009 8:42 pm
- Location: Fort Myers, Florida
-
Rob 2
- Posts: 157
- Joined: Sun Apr 11, 2010 1:22 pm
Re: Dreadnought with Pontos detail set.
Thanks for your encouragement. Progress is in fits and starts between �should be job hunting guilt� and �make the most of the fine weather to work on the house guilt�
Mind you I do enjoy a guilty pleasure now and then .
.
Rob.
Mind you I do enjoy a guilty pleasure now and then
.Rob.