The Ship Model Forum

The Ship Modelers Source
It is currently Sun May 04, 2025 5:37 pm

All times are UTC - 6 hours [ DST ]


Post new topic Reply to topic  [ 24 posts ]  Go to page 1, 2  Next
Author Message
 Post subject: 1/700 USS Morris DD417
PostPosted: Sun Jan 12, 2014 8:36 am 
Offline

Joined: Tue Feb 06, 2007 10:24 am
Posts: 2567
Location: Belgium
Hello,

After many years of modelling AFV-diorama's and figure-modelling, I tried to get back to a childhood passion of mine more than 5 years ago: ships. I got me a 1/700 Lexington, signed up to this forum and got hold of a Niko Models Hughes kit thanks to Timothy (many thanks timothy!). I constructed both, but never got round to finishing them as I first got involved in a couple of shadowbox diorama's and then a 2,5 year break of modelling (small kids, you know how that goes).
But I recently got back to modelling, took up that little destroyer, and now I hope to get on this forum more frequently too.

I converted the Hughes to Morris (very simple: mainly the searchlight at the rear). It will be picking up survivors from Lexington while it's crew abandones ship, hence all the crew on the rear deck. The ones on the lines climing up the ship will only be added when the ship will be in it's seascape, and probably some more crew will be added to the deck at that time. Similarly, the starbord whaleboat is still missing too, as I plan to have it launched on the diorama.

I can see some construction errors (and lack of corrections) and historical mistakes, so no need to be gentle with me. Critique is a very useful learning tool, so all comments are welcome.

Marijn

(note: the colors look a bit washed out on the foto's)
Image

Image

Image

Image

Image

Image

The diorama is inspired by this. Still a bit of work to do... :)
Image


Report this post
Top
 Profile  
Reply with quote  
PostPosted: Sun Jan 12, 2014 8:48 am 
Offline
User avatar

Joined: Thu May 03, 2007 10:39 pm
Posts: 773
Location: Westminster, Colorado
Can you share with us your technique to give 3D appearance to your photo etch crew figures? They look great.
Dave


Report this post
Top
 Profile  
Reply with quote  
PostPosted: Sun Jan 12, 2014 10:35 am 
Offline
User avatar

Joined: Mon Nov 11, 2013 11:01 pm
Posts: 1257
Location: Detroit area
Veeeeeeery ambitious. I shall be watching this thread. It's always awesome to see old photographs brought to life, particularly of momentous events...and yikes, that's a LOT of detail on a tiny destroyer model!

_________________
Sean Nash, ACG (aircraft camo gestapo)

On the ways:
1/200 Trumpeter HMS Nelson
1/700 Tamiya USS Yorktown CV-5

In the stash:
1/35 Italiari PT-109
1/35 Tamiya "Pibber" Patrol Boat
1/350 Trumpeter USS Yorktown CV-10


Report this post
Top
 Profile  
Reply with quote  
PostPosted: Sun Jan 12, 2014 1:53 pm 
Offline
User avatar

Joined: Fri Jun 22, 2012 12:59 am
Posts: 405
Location: Shreveport, LA USA
Incredible amount of detail in that thing! :woo_hoo: I can't do half of what you did in three fiftieth - which is twice as big; half the detail skills; so I'm a tiny fraction of your amazing talent! :heh:

Indeed though, how DID you do those figures? We wants to know... very cool.

Kyle

_________________
Shipmodels Gallery \/

http://www.modelshipgallery.com/gallery ... index.html


Report this post
Top
 Profile  
Reply with quote  
PostPosted: Sun Jan 12, 2014 3:11 pm 
Offline
User avatar

Joined: Fri Apr 08, 2005 9:41 am
Posts: 2214
Location: Monson, MA.
What a superb representation of the Morris!! :thumbs_up_1: :thumbs_up_1: :thumbs_up_1: :thumbs_up_1:


Bob Pink. :wave_1:


Report this post
Top
 Profile  
Reply with quote  
PostPosted: Sun Jan 12, 2014 3:41 pm 
Offline
User avatar

Joined: Fri Aug 29, 2008 6:17 am
Posts: 409
Location: Lerici
Marijn, welcome back to modeling!

I'm a big fan of your works, often seen on model time!

your skill are amazing even on ships, not only dioramas or AFV......those 1/700 crews are mindblowing...how did you managed the 3d aspect?

_________________
On the bench: evolution of Royal Italian Navy Ironclads-1/700

-Regia Nave Roma...no, not that one!


Report this post
Top
 Profile  
Reply with quote  
PostPosted: Sun Jan 12, 2014 9:55 pm 
Offline
User avatar

Joined: Mon May 21, 2007 5:49 pm
Posts: 1608
Location: The beautiful PNW
:twitch: How the @&$%#@&$& did you achieve that weathering in 1/700? This has got to be one of the finest 1/700 builds of a USN subject I have seen in sometime. My only critique from a historical standpoint is the air search radar doesn't look right for a 42' SA array, but I wouldn't worry about as I was so engrossed with the rest of the build I almost didn't notice. If you build the Lex and continue this level of quality and execution, this will be a sight to behold. Please keep us posted on any updates.

Matt

_________________
In the yards right now:
USS Utah AG-16
On Hold
1/350 USS Portland CA-33 1942
1/350 Trumpeter Texas with a twist


Report this post
Top
 Profile  
Reply with quote  
PostPosted: Mon Jan 13, 2014 5:29 am 
Offline

Joined: Tue Feb 06, 2007 10:24 am
Posts: 2567
Location: Belgium
Thanks for the nice comments everybody!
I always enjoyed modelling in tiny detail, and I have been doing it for quite a while, just not ships.

Thanks Stefano! I always have a soft spot for Italy modelling wise, having many good memories of trips to Italian modelling shows, and many good friends in your beautiful country. Model Time is a great magazine too, and I am always very happy to get published in Model Time or Soldatini.

Matt, many thanks for your comments, especially also the critique. My nautical knowledge is unfortunately very limited, so I have to admit just using the radar supplied in the kit. My mistake of course...
But since I hope to learn a lot on this forum about naval history and ships' details: do you have any pics of how the radar should look like? I probably won't change it anymore now out of fear to damage the rigging, but this will help me to get it right the next time. Many thanks!

Yes, the diorama is very ambitious indeed! But I'm not new to ambitious projects, in fact I love them. It will take me at least the better part of a year to finish though, and the big challenge will be the sheer amount of figures to get a sufficiently crowded feeling on that deck.
I will start a post on the Lexington when I get round to taking some pics. This can help me to get feedback on some details too.

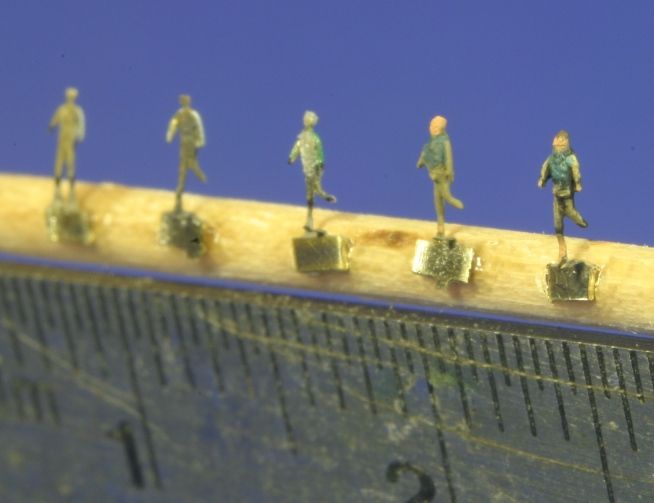
And about the figures:
As a base, I use PE like (almost) everybody. While most brands are fine, I do like the Eduard sets. They are very fine, come in usefull poses, there are a lot in one set, and the stainless steel makes it quite strong (especially the attachment to the fret, which I don't want to break untill I put a knife to it). It is prepainted, but sanding of the paint is the first thing I do. This is easy and quick by sanding the entire fret as one piece.

Next, I cut each figure from the fret, but leaving a part of fret to the feet which I use to hold the figure.
Then I pose the figure with fine tweezers.
Then I glue the piece of fret on the feet to a toothpick, so I can hold it easilly and place it in a piece of styrofoam for drying etc. (see photo's below)

Then I ticken the figures. For this, I use a trick often used by armour modellers to fill big gaps: superglue and baking powder. Bringing baking powder in contact with (liquid) superglue hardens the superglue instantly and acts as a filler. It becomes very hard and adheres strongly.
This is the proces for 1/700th figures:

The materials needed: regular kitchen baking powder, fine wire (I got me a spool of 0.1mm at an electronics supply store) and liquid superglue.
Image

I use the wire to apply a small drop of glue to one part of the figure (here the front of the torso):
Image

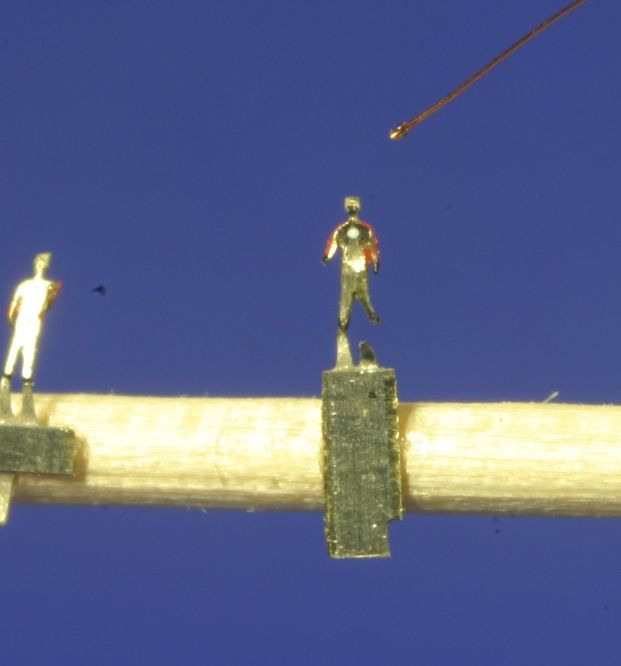
Then, I immediately dipping the figure in a pile of baking powder: Image

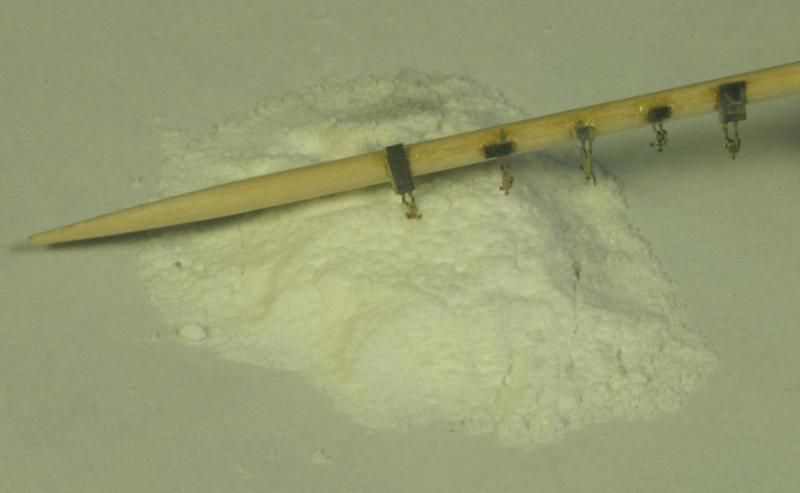
The baking powder instantly bonds with the superglue, thickening the part to which the glue was applied.
Next, I can immediately continue with the other parts of the figure. With standing or walking figures I usually do this:
- one or two layers to the front of the upper body
- one layer to the front of the head
- one layer to the back of the head
- one layer to the shoulders
- one layer to the bottocks
Note that I don't apply a coat to the entire back of the torso, only to the top (shoulder area) and bottom (ass). This creates the curve in the back that we all have, and which is essential for a natural and dynamic look of any figure. A trick I picked up when sculpting 1/35 scale figures...
I don't ticken any limbs, as I don't think they need it in this scale.

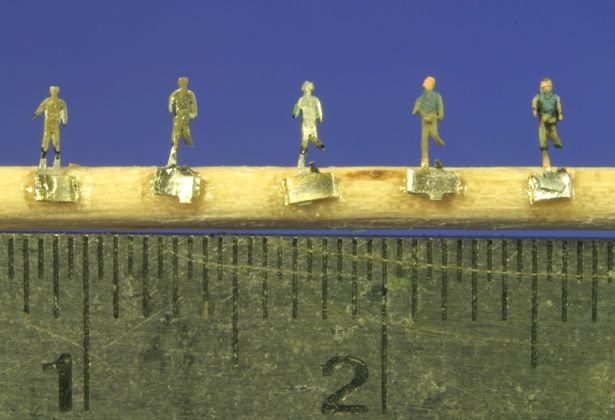
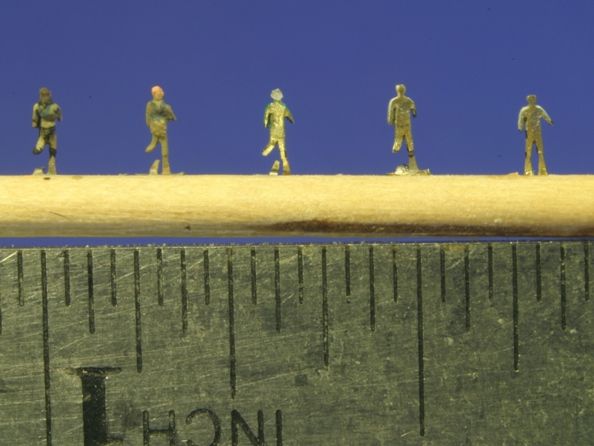
In these 3 photo's, you can see the process from left to right:
- basic PE figure
- posed (I normally do this before attaching to the toothpick)
- tickened (hard to see because the glue/backing powder is translucent)
- basecoats applied
- highlighted, shaded and detailed
The figure on the right is supposed to be an officer wearing a lifevest.
Image

Image

Image

Painting is essential for the 3D look. I highlight and shade them like I would with any figure at any scale, according to the light coming from above. This emphasises the 3D-look very much, and makes the figures appear more detailed and refined.

Only drawback to these techniques: it is time-consuming. When working in series, I spend 1,5 to 2 minutes on the tickening of each figure, while painting takes about 5 minutes per figure. Together with preparation and installing, this makes about 10 minutes per figure. Not too bad, but it adds up quickly. Morris has 59 on her now, and I estimate the diorama will take about 1000 more...
But hey, good results do take some effort, don't they? :)

Cheers,

Marijn


Report this post
Top
 Profile  
Reply with quote  
PostPosted: Mon Jan 13, 2014 6:08 am 
Offline
User avatar

Joined: Tue Jan 11, 2005 10:26 am
Posts: 1689
Location: The Netherlands
Wow...

_________________
If all else fails, a complete pig-headed refusal to see facts in the face will see us through. - General Melchett


Report this post
Top
 Profile  
Reply with quote  
PostPosted: Mon Jan 13, 2014 9:12 am 
Offline
User avatar

Joined: Thu May 03, 2007 10:39 pm
Posts: 773
Location: Westminster, Colorado
Thanks for the tutorial on the figures. The results are excellent.
Dave


Report this post
Top
 Profile  
Reply with quote  
PostPosted: Mon Jan 13, 2014 12:11 pm 
Online
User avatar

Joined: Mon Jan 10, 2005 6:00 pm
Posts: 12309
Location: Ottawa, Canada
Gorgeous work, and thank you for the figures tutorial! Might be worth posting on its own to the Tricks and Tips section of the forum =)

On the radar, I believe this photo shows you the type that should be on her: http://www.flickr.com/photos/phnsy/8159270837/

_________________
De quoi s'agit-il?


Report this post
Top
 Profile  
Reply with quote  
PostPosted: Mon Jan 13, 2014 12:43 pm 
Offline
User avatar

Joined: Sun Jul 11, 2010 6:52 am
Posts: 356
Location: Galicia (Spain)
Perfect, amazing work with figures. Really very good job.
:thumbs_up_1:

_________________
On workbench:
Uss Missouri 1/350 Tamiya
Russian SSBN Borei Class - K-550 Alexander Nevskiy


My Galery:
http://www.modelshipgallery.com/gallery ... index.html
Instagram: Tamboshipsmodels


Report this post
Top
 Profile  
Reply with quote  
PostPosted: Mon Jan 13, 2014 12:49 pm 
Offline
User avatar

Joined: Fri Jun 22, 2012 12:02 pm
Posts: 2350
Location: Herndon, VA
I'll echo what others have said about the figures. That's insanely cool detail work.

_________________
- Chris

1/700 Saratoga w/Pontos (Needs paint)
1/700 Potato w/Kurama (On hold)
1/700 Murdertorpedoboat Ooi


Report this post
Top
 Profile  
Reply with quote  
PostPosted: Tue Jan 14, 2014 5:41 pm 
Offline

Joined: Tue Feb 06, 2007 10:24 am
Posts: 2567
Location: Belgium
Thanks everybody!

And thanks for the photo Timmy C!
I had that one indeed, and it is a great one because taken during repairs after Coral Sea (shows some nice weathering!), but I failed to notice that the radar was a lot squarer than the kit item indeed... But it is always good to get ones' sensitivity for observation challenged and expanded! :)

Marijn


Report this post
Top
 Profile  
Reply with quote  
PostPosted: Tue Jan 14, 2014 6:14 pm 
Offline
User avatar

Joined: Sun Feb 01, 2009 3:55 pm
Posts: 3125
Location: Hawaii
Can one of the mods copy out the figure tutorial and make it a sticky in the "Tips and Tricks" section please!!! :worship_1: :worship_1: :worship_1:

Can't wait to see Lex along side this work of art :cool_1:

_________________
Drawing Board:
1/700 Whiff USS Leyte and escorts 1984
1/700 Whiff USN Modernized CAs 1984
1/700 Whiff ASW Showdown - FFs vs SSGN 1984

Slipway:
1/700 Whiff USN ASW Hunter Killer Group Dio 1984


Report this post
Top
 Profile  
Reply with quote  
PostPosted: Tue Jan 14, 2014 6:18 pm 
Online
User avatar

Joined: Mon Jan 10, 2005 6:00 pm
Posts: 12309
Location: Ottawa, Canada
Cliffy B wrote:
Can one of the mods copy out the figure tutorial and make it a sticky in the "Tips and Tricks" section please!!!

Done!

_________________
De quoi s'agit-il?


Report this post
Top
 Profile  
Reply with quote  
PostPosted: Wed Jan 15, 2014 6:34 am 
Offline
User avatar

Joined: Sat Oct 06, 2012 4:34 pm
Posts: 967
Location: Cologne / Germany, sometimes Poznan/ Poland and Chessington/ UK
Awesome and this is 1/700 ... unbelievable!!!

Thank you for the guide about the figures ... must wok in 1/350 same way I guess. :thumbs_up_1:

_________________
The advantage of wisdom is that you can play dumb; conversely, it is more difficult.


Report this post
Top
 Profile  
Reply with quote  
PostPosted: Wed Jan 15, 2014 10:09 am 
Offline
User avatar

Joined: Thu Sep 23, 2010 3:08 am
Posts: 245
Location: The Netherlands
Jaw dropping model… and thanks for sharing that great figgy-technique.

Cheers
Jeroen


Report this post
Top
 Profile  
Reply with quote  
PostPosted: Wed Jan 15, 2014 5:07 pm 
Offline
User avatar

Joined: Tue Jan 11, 2005 1:40 pm
Posts: 8326
Location: New Jersey
Very nice. Love the paint work on the model. It's very impressive.

_________________
Martin

"Tomorrow is the most important thing in life. Comes into us at midnight very clean. It's perfect when it arrives and it puts itself in our hands. It hopes we've learned something from yesterday." John Wayne

Ship Model Gallery


Report this post
Top
 Profile  
Reply with quote  
PostPosted: Thu Jan 16, 2014 9:48 am 
Offline

Joined: Tue Feb 06, 2007 10:24 am
Posts: 2567
Location: Belgium
Cliffy B wrote:
Can't wait to see Lex along side this work of art :cool_1:


Neither can I! :)

Many thanks everyone for the positive comments! They are certainly appreciated.

@Christian M: It can work also for 1/350.
The technique has one drawback however: the surface is slightly rough (bacause the baking powder grains gets enclosed by the glue) and it sets immediately, which limits the amount of control you have over the exact outcome of each application.

For 1/700 I think it is a good technique with good results, but still I am looking for something more controllable that works equally fast and adheres sufficiently the the PE.
In 1/350 however, I would prefer myself to look into the commercially available 3D figures and modify or detail them as necessary, which I think would give better results.

Marijn


Report this post
Top
 Profile  
Reply with quote  
Display posts from previous:  Sort by  
Post new topic Reply to topic  [ 24 posts ]  Go to page 1, 2  Next

All times are UTC - 6 hours [ DST ]


Who is online

Users browsing this forum: No registered users and 30 guests


You can post new topics in this forum
You can reply to topics in this forum
You cannot edit your posts in this forum
You cannot delete your posts in this forum
You cannot post attachments in this forum

Jump to:  
Powered by phpBB® Forum Software © phpBB Group