super job
I'm building the exact same ship right now. I've been wanting to add a Lexington to my fleet for 35 years! Now I'm finally doing it.
I love doing the extra detailing like you but at my age I don't have the patience I used to.
What paint will you use for the vertical surfaces? I'm having a hard time finding a brand and color to match MS 11 camouflage.
I can't wait to see it painted.
Lexingtons last battle, 1//700
Moderators: BB62vet, MartinJQuinn, JIM BAUMANN, Jon, Dan K
-
Geno the Viking

- Posts: 79
- Joined: Sat Dec 10, 2011 6:36 pm
- Location: Everett, Washington
-
marijn van gils
- Posts: 2689
- Joined: Tue Feb 06, 2007 10:24 am
- Location: Belgium
Re: Lexingtons last hours
Thanks a lot guys!
Geno the Viking, I am also not sure yet what I will use. I love working with Humbroll enamels, so most likely I will choose whatever they have that is closest to the hue, but lighter. I am a firm believer of keeping the colours on small scale models light enough for scale effect, and also for the more artistic but not unimportant purpose of keeping the model attractive to the eye. That will be the main challenge here for me: keeping it as light as possible, but still making it look like MS11.
If I can't find a good base-colour out of the tin, I will mix the colour I want myself. But the final look will be influenced very much by multiple other coats of paint: filters, shading, highlighting, weathering effects, ...
Anyway, I'll post what I come up with!
It will take a bit of time though before I start painting, because I want to do another batch of figures first so I don't have to do too many of them at the end of the project. But I'm getting anxious to see it painted too!
Enjoy your build! Don't worry about the extra detailing. The kit is very nice from the box, and I think the only correct way of modelling is the way we enjoy best...
-
silvershadow

- Posts: 283
- Joined: Mon Nov 04, 2013 2:17 am
- Location: _/\/�����\/\_ Cape Town
Re: Lexingtons last hours
very nice, really like it. You should do a display smoke effect on your model
#idea#
http://driftmission.com/burn-effect-v2- ... generator/
#idea#
http://driftmission.com/burn-effect-v2- ... generator/
-
marijn van gils
- Posts: 2689
- Joined: Tue Feb 06, 2007 10:24 am
- Location: Belgium
Re: Lexingtons last hours
Thanks silvershadow!
Great idea, but I prefer to keep my static models static. Special effects can look great on photo, but I feel they rarely do when seeing the model in the flesh. Just personal preference... But you're right, it would add so much to a dio like this if there would be a convincing way to model smoke! But I will keep this in mind for possible future boxed diorama projects...
Meanwhile, I finished construction completely with the last bits.
For the 1.1 inch quadruple guns, I used Flyhawks WWII USN AA guns n�1 (FH 700032).
The kit item on the left is really quite good for this scale, but of course the PE item looks much more in scale and is more finely detailed. The trade-of is the flatness of the barrels, but this is really not too apparent when not magnified like this, and I do prefer the finesse of the PE.


The 20mm Oerlikons were made from Five Star Models WWII USN 20mm Oerlikon single & twin set (FS700004). These are of the tripod type, so I had to replace this with a solid conic support. I could have used the Trumpeter kit parts but wanted them to be a bit thinner. So I put bits of plastic rod in my Dremel and turned them shaping them with sandpaper. Simple enough!
The other ones were my alternatives: on the left the kit item (also really quite good for plastic in this scale), with a shield from the Lexington GMM PE set, in the middle one from the Eduard Lexington PE set. I think I chose correctly...


For the .50 guns, I couldn't find too much, so I used the items from the Eduard Lexington set, to which I added magazines from the Five Star Model 20mm set. Kit part again on the left, which again is not too bad.


But of course, for a ship like this I needed some larger quantities:


For the 20mm and .50 guns, I added punched styrene discs to their future location. After assembling, their edge will be visible as the mounting ring of their pedestal.

I also prepared the directors, rangefinders and searchlights for painting. The 24" searchlights are nicely detailed, but unfortunately the kit provides only these, while in reality only the ones on the island are 24", while the ones on the funnel platform should be 36". Does anybody know a good source for well detailed 36" searchlights? Paper lab did some great ones, but they seem out of stock everywhere...

And to finish some extra pics of the superstructure:


Cheers!
Marijn
-
hypno7
- Posts: 380
- Joined: Tue Sep 17, 2013 12:16 pm
Re: Lexingtons last hours
Wow... No words... Those guns are the nicest I have seen I think. Makes me want to rethink some things about my build.
Very very clean and consistent work! The concistency part is the most difficult in my opinion!
Very very clean and consistent work! The concistency part is the most difficult in my opinion!
CV-8: viewtopic.php?f=59&t=153851
DD-436: viewtopic.php?f=59&t=157123
CVL-24 viewtopic.php?f=59&t=158455
DD-436: viewtopic.php?f=59&t=157123
CVL-24 viewtopic.php?f=59&t=158455
-
davetwin

- Posts: 240
- Joined: Tue Jan 21, 2014 2:16 am
- Location: Trowbridge, Wiltshire
Re: Lexingtons last hours
Wow thats some impressive PE work
-
LE BOSCO

- Posts: 2261
- Joined: Thu Aug 27, 2009 11:05 am
- Location: Paris France
Re: Lexingtons last hours
Simply perfect Marijn  well done
Cheers
Nicolas
Cheers
Nicolas
-
Devin

- Posts: 2503
- Joined: Mon Jan 10, 2005 10:46 am
- Location: Hoboken, NJ
- Contact:
Re: Lexingtons last hours
Great work. How you guys do all the building and attaching of the PE and THEN paint, I'll never know, but I love the look of all the bare styrene and PE together.
If you want some roundness to those 1.1 barrels, you can take an extremely fine paintbrush and run a bead of paint across the top of them. It won't be totally round, but it'll be more so than flat brass.
If you want some roundness to those 1.1 barrels, you can take an extremely fine paintbrush and run a bead of paint across the top of them. It won't be totally round, but it'll be more so than flat brass.
We like our history sanitized and theme-parked and self-congratulatory, not bloody and angry and unflattering. - Jonathan Yardley
-
marijn van gils
- Posts: 2689
- Joined: Tue Feb 06, 2007 10:24 am
- Location: Belgium
Re: Lexingtons last hours
Thanks guys!
Hypno7 is right, the hardest part is consistency. The Five Star Models and Flyhawk PE is very well designed and easy to work with, considering the parts are so tiny.
Devin, to me it is so much easier to attach PE before painting. That way I cannot mess up paint when taking it from the fret or bending, I don't have to worry too much about glue spots as I can scrape those away without messing up any paint, and it is easy to paint PE that is attached to a large object (the model). The other way round would be much harder to do to me...
I come from armour and figure modelling and I find it often funny to see that ship modellers tend paint a lot before attachment, while armour and figure modellers avoid that as much as possible.
Of course it is often easier to keep things separate for painting (that's why I keep all the guns, safety nets, island, funnel, crane etc. also separate with this build), but I really wouldn't like attaching stuff like railings after painting.
Cheers,
Marijn
-
chewitt13

- Posts: 242
- Joined: Thu Aug 05, 2010 5:40 pm
- Location: Dalgety Bay,Scotland
Re: Lexingtons last hours
Just found this, amazing work  and in 1/700 that's all I work in and this is fantastic
  .
.

Model Gallery
http://www.modelshipgallery.com/gallery ... index.html
Latest build https://www.britmodeller.com/forums/ind ... 1937-1350/
http://www.modelshipgallery.com/gallery ... index.html
Latest build https://www.britmodeller.com/forums/ind ... 1937-1350/
-
bgire

- Posts: 569
- Joined: Wed Jan 19, 2005 11:48 am
- Location: La Rochelle, France
Re: Lexingtons last hours
I've been following your thread for a while before I realized this wasn't 1:350 but 1:700: this is an awesome very clean and very inspiring realization. I'm speechless....
_Bruno
A day spent without laughing is a wasted day!
-
Devin
- Posts: 2503
- Joined: Mon Jan 10, 2005 10:46 am
- Location: Hoboken, NJ
- Contact:
Re: Lexingtons last hours
I agree that it's better for assembly and less touch-up after the build, I just can't figure out HOW you do it! I've had Dan Kaplan, who builds this way, explain how he masks with PE on the model and then removes it afterwards without breaking anything, and I still can't see how to do it. My compliments!marijn van gils wrote:that's why I keep all the guns, safety nets, island, funnel, crane etc. also separate with this build), but I really wouldn't like attaching stuff like railings after painting.
We like our history sanitized and theme-parked and self-congratulatory, not bloody and angry and unflattering. - Jonathan Yardley
-
Dan K
- Posts: 9067
- Joined: Tue Jan 11, 2005 10:56 am
- Location: New York City
Re: Lexingtons last hours
Great details.
Devin, the key is patience. And tranquilizers.
Devin, the key is patience. And tranquilizers.
-
marijn van gils
- Posts: 2689
- Joined: Tue Feb 06, 2007 10:24 am
- Location: Belgium
Re: Lexingtons last hours
Thanks guys!
Dan is right Devin, it basically takes patience: taking your time to do it (and redo when it doesn't sit staith), and expecting a build to take a lot more time. Of course experience is also important: the first PE seems very daunting and can be a bit difficult, but after many years it does get a lot easier.
But of course PE (or any way of fine detailing) isn't for everyone. I happen to love working in fine detail, but if you don't, or simply want your models to finish in less time, it can be the better personal choice to stick to out of the box building. The point is always to enjoy modelling. That's of course obvious to most, but some let themselves be pushed into doing more than they enjoy which boggs them down. In the end, the best model is a finished model...
But then again, there is detailing and there is detailing. A couple of pieces of PE is not the same as covering an entire model in brass. So if you feel like having a go, start with something simple (but something that really adds to a model), and build up from there. No need to be affraid, just try it and with some practice you can go a long way. But Dan is right: extra work means extra time means extra patience...
Also, I feel it is often a misconception that the smaller PE parts are, the more difficult it gets. On the contrary, I find large PE parts often harder to work with.
As for the gluing itself: I use superglue.
First I add some tiny dots of gell type superglue to the part with the tip of a sewing needle and tack the part in place. The gell type CA gives a couple of seconds working time so you can move the part around just a bit. I use very little gel glue, so it is easy enough to remove the part again if it doesn't go on the way I want.
But if tacked in the correct place, I next firmly glue it down by adding thin CA with a thin copper wire (usually 0,1mm) to the join. I apply it the the area that is out of view, usually the underside. If there are any glue spots visible, I scrape them of with a sharp scalpel.
Hope this helps!
Marijn
-
silvershadow
- Posts: 283
- Joined: Mon Nov 04, 2013 2:17 am
- Location: _/\/�����\/\_ Cape Town
Re: Lexingtons last hours
I find that most of the time when applying multiple parts of tiny PE together, sometimes very hard to just have to hold it with something while glueing the other part to it without damaging the part your holding. Love this build, really looks awesome
-
Devin
- Posts: 2503
- Joined: Mon Jan 10, 2005 10:46 am
- Location: Hoboken, NJ
- Contact:
Re: Lexingtons last hours
Oh, I've worked with PE extensively. I prefer 1/350th scale, but I did do a 1/700 Luzon a year or so ago. It isn't the thought of doing the PE, it's the thought of removing masking tape after all that PE is on, especially in 1/700!marijn van gils wrote:So if you feel like having a go, start with something simple (but something that really adds to a model), and build up from there. No need to be affraid, just try it and with some practice you can go a long way. But Dan is right: extra work means extra time means extra patience...
Last edited by Devin on Mon Sep 08, 2014 12:59 pm, edited 1 time in total.
We like our history sanitized and theme-parked and self-congratulatory, not bloody and angry and unflattering. - Jonathan Yardley
-
wing_nut
- Posts: 107
- Joined: Tue Nov 22, 2011 4:04 pm
- Location: New Jersey
Re: Lexingtons last hours
WOW That is truly remarkable. I can't decide if that makes me want to built another ship... or why bother and never again. 
There is one thing I need to ask... Do the look at you funny when you walk up to the cashier with a couple of hundred boxes of toothpicks?
There is one thing I need to ask... Do the look at you funny when you walk up to the cashier with a couple of hundred boxes of toothpicks?
-
marijn van gils
- Posts: 2689
- Joined: Tue Feb 06, 2007 10:24 am
- Location: Belgium
Re: Lexingtons last hours
Sorry for the late reply guys!
I agree, it is very difficult to impossible to glue tiny parts to tiny parts. That's why I always plan things so I can glue small parts to big parts that I can hold easily. In the case of the AA guns, this was hard to do because all parts are small and I want to keep the guns separate for ease of painting. But also during painting, I will need something to hold them, so I started construction from the same support: the toothpick!
For example for the 20mm's, I first glued the conical base to the tip of the toothpick. Then I glued the PE shield on top of that (it has a lip on the bottom that folds backwards and can sit on top of the conical support). Then I glued the gun itself on top of that, and finally I glued the magazine to the side of that. All the time, I could simply hold the toothpick while working, and prick it in a piece of styrofoam to safely set it aside while taking glue or the next piece.
So, the trick is to make difficult things as easy as possible by logical planning.
For me, the solution is planning again, and also a bit more handpainting.
For example, I plan to paint the hull from bottom to top instead of the other way: first the hull red, then mask that, then the black waterline stripe, then mask that, and then the rest of the hull. That way, I don't need to put any tape on these fragile details just above the waterline:

I also do a lot of handpainting. I prefer to handpaint most decks for example, as by retouching the edges with a fine brush moistened with white spirit (I use Humbroll enamels, which can be "worked" for some minutes after drying to the touch), I can get a much more precise transition than I would ever be able to by masking.
I also find it also much easier to get nice flowing lines for camo-patterns by handpainting, and by applying several very thin coats of paint, I don't get the "step"-effect one often gets by masking and airbrushing.
Example for both decks and camo: 1/700 Morris (I only painted the 5" guns, director, torpedo tubes and of course figures separately):
Cheers!
Marijn
Thanks silvershadow!silvershadow wrote:I find that most of the time when applying multiple parts of tiny PE together, sometimes very hard to just have to hold it with something while glueing the other part to it without damaging the part your holding.
I agree, it is very difficult to impossible to glue tiny parts to tiny parts. That's why I always plan things so I can glue small parts to big parts that I can hold easily. In the case of the AA guns, this was hard to do because all parts are small and I want to keep the guns separate for ease of painting. But also during painting, I will need something to hold them, so I started construction from the same support: the toothpick!
For example for the 20mm's, I first glued the conical base to the tip of the toothpick. Then I glued the PE shield on top of that (it has a lip on the bottom that folds backwards and can sit on top of the conical support). Then I glued the gun itself on top of that, and finally I glued the magazine to the side of that. All the time, I could simply hold the toothpick while working, and prick it in a piece of styrofoam to safely set it aside while taking glue or the next piece.
So, the trick is to make difficult things as easy as possible by logical planning.
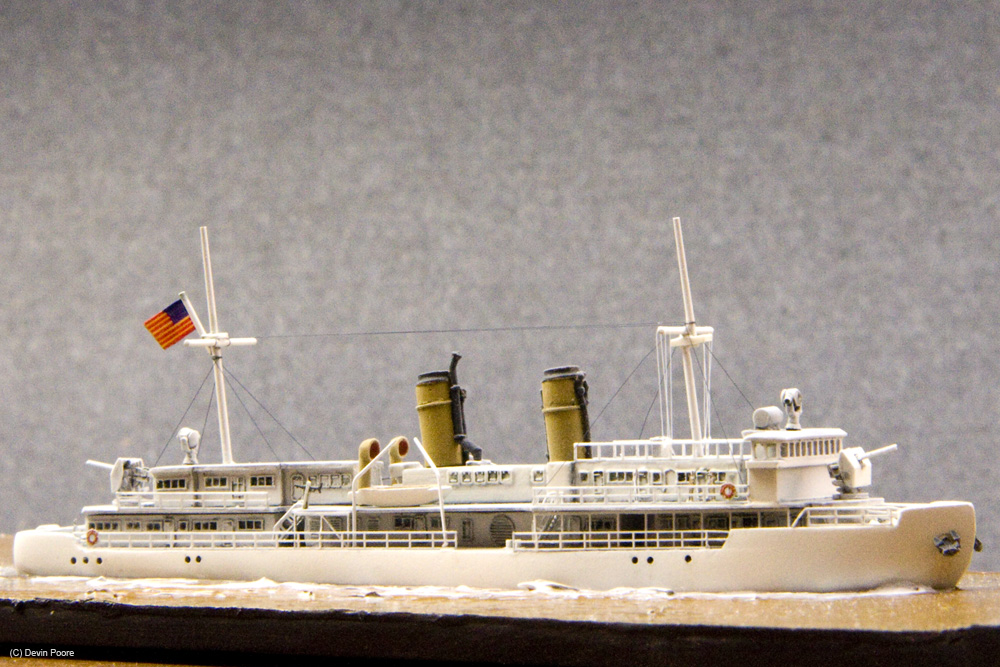
Sorry Devin, I misunderstood! Also, I'm still quite new at this forum and unfortunately don't know everyone and their work yet. Thanks for pointing me to yours, that's a beautiful model!Devin wrote:Oh, I've worked with PE extensively. I prefer 1/350th scale, but I did do a 1/700 Luzon a year or so ago. It isn't the thought of doing the PE, it's the thought of removing masking tape after all that PE is on, especially in 1/700!
For me, the solution is planning again, and also a bit more handpainting.
For example, I plan to paint the hull from bottom to top instead of the other way: first the hull red, then mask that, then the black waterline stripe, then mask that, and then the rest of the hull. That way, I don't need to put any tape on these fragile details just above the waterline:

I also do a lot of handpainting. I prefer to handpaint most decks for example, as by retouching the edges with a fine brush moistened with white spirit (I use Humbroll enamels, which can be "worked" for some minutes after drying to the touch), I can get a much more precise transition than I would ever be able to by masking.
I also find it also much easier to get nice flowing lines for camo-patterns by handpainting, and by applying several very thin coats of paint, I don't get the "step"-effect one often gets by masking and airbrushing.
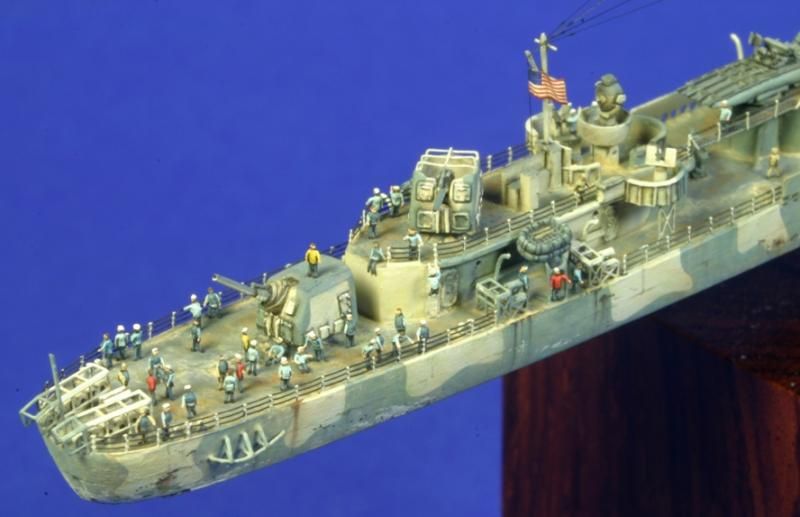
Example for both decks and camo: 1/700 Morris (I only painted the 5" guns, director, torpedo tubes and of course figures separately):

Cheers!
Marijn
-
marijn van gils
- Posts: 2689
- Joined: Tue Feb 06, 2007 10:24 am
- Location: Belgium
Re: Lexingtons last hours
Hello everyone,
Finally an update!
I have been busy though since I last posted: I built and painted 400 more figures (I have 600 ready now, but still a lot more to do), and I did several tests with seascapes (it's my first time, and I want to get it right on the dio). But these are not very interesting to photograph and post...
But now I finally applied a basecoat of paint to Lex. Now the main fun can start: weathering!


Some stuff to be finished separately:

5" guns:

1.1" guns:

20mm guns and rangefinders:

.50 guns:

5" directors and signal lights:

Now, how do I clean my teeth?
Cheers,
Marijn
-
Devin
- Posts: 2503
- Joined: Mon Jan 10, 2005 10:46 am
- Location: Hoboken, NJ
- Contact:
Re: Lexingtons last hours
Very nice work! Really looking forward to seeing what you do with this now that the paint is a sprayin'.
Question if you don't mind: What's your mix for the hull red?
Question if you don't mind: What's your mix for the hull red?
We like our history sanitized and theme-parked and self-congratulatory, not bloody and angry and unflattering. - Jonathan Yardley