Tracy White wrote:
Don't sell yourself short. There's a lot of builders who are so afraid of "ruining" a kit that they would never even start such a project such as this. A lot of "pros" are simply people who said, "I bet I can do this...."
+1 !
Absolutely a great start and a good job. Jumping off the cliff can be hard sometimes. Good for you!
For those not wishing do go to this amount of effort, your kit will still build into a fine model. Do what pleases you. You probably could skip the remainder of my post below as well.
Sorry not to post sooner, I've been out of town for over a week and was not able to post pictures, just text.
For anyone who's going to the effort to do this, here are a couple more things to at least consider. When you get the hull smooth by removing the oversized plating, you have done a lot of work. There are a couple more things to consider - at least, I think are worth considering - once you have gotten this far. There are some distinctive features of the YORKTOWN hull you can add which will enhance the look and bring it even closer to the real ship. There are a couple of knuckles in the hull which are prominent and add to the character of the hull. One occurs where the shell plating under the aft 5" platforms meets the hull at the main deck / hangar deck level. Full disclosure - the first two pictures are taken of my HORNET hull in-progress. I have gotten close on my Merit YORKTOWN, but not to this point quite yet because of my travel.
Attachment:
 pre-paint 004.JPG [ 17.87 KiB | Viewed 5006 times ]
The knuckle is visible in this picture. Look at navsource's photo gallery for all the YORKTOWNs for additional pix.
Attachment:
 Pre-paint hi res 2.JPG [ 41.6 KiB | Viewed 5006 times ]
There is also a knuckle halfway down the forward 5" platform shell plating at the focs'l deck level, half the length of the platform. It can be seen in this model photo, and in some ship photos when the sun angle is right. Trust me (or don't), it is there on the real ship and in the plans (MD Silver).
Attachment:
 HORNET stern comp.jpg [ 44.92 KiB | Viewed 5006 times ]
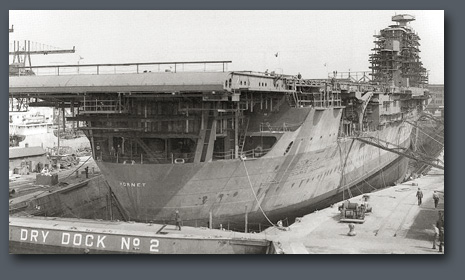
One final thing. As this picture shows (HORNET in drydock), the hull is actually concave under the aft 5" gun platforms. The red line in the picture shows, somewhat exaggerated, the concave curve, the knuckle, and the shell plating angle just below the platform.
How do you get these features in a smooth hull? Use sanding forms for the sandpaper that have fairly large radii and carefully sand the features into the plastic hull. I have used a piece of 4" PVC pipe, maybe 20 degrees of the full circle (as viewed from the end) and two inches long along the length of the pipe to get a wide radius convex sanding surface. The plastic model hull is thick enough to do this and provide a very good representation. Proceed carefully. Hold the hull up to a bright light frequently and look inside it so you can see if the hull is getting too thin before it's too late. Depending on how thin you sand it, you can laminate a piece or two of Evergreen 0.020 plastic inside to reinforce the area without distorting your work.
As far as the sink area in the bow, I am planning to push in a tapered plastic wedge into the void on the inside to push the hull outward at that point. This will also make it easier to thin the stem really thin. This is a theory right now until I actually do it. I'll report back when I do. Paul B used a good analogy in the 'April Fool's' CV-5 thread - the hull should resemble a hollow-ground knife blade at the bow. In other words, with the hull laying on the table and bottom side up toward you, the actual waterline as seen from that perspective (looking directly down on the bottom) is a very long and thin wedge which is slightly concave inward as you move from bow toward midships. I emphasize the 'slightly'. The Merit hull is really good as is, but I plan to make the cutwater thinner and sharper than it is. I theorize the wedge inside will make the stem area more rigid and give me more thickness to sand into.


 ) to work on this and my port side is 95% done. Just using coarse sanding sticks for now - the trick, as was mentioned earlier, is to use shapes and to think about how you are "carving" as you sand. Don't just lay it down and move it back and forth. Keep a mental image of what you want that surface to do and what you need to focus on to get it to that point.