The Ship Model Forum

The Ship Modelers Source
It is currently Mon May 05, 2025 6:20 pm

All times are UTC - 6 hours [ DST ]


Post new topic Reply to topic  [ 380 posts ]  Go to page Previous  1 ... 9, 10, 11, 12, 13, 14, 15 ... 19  Next
Author Message
PostPosted: Mon Feb 02, 2015 5:03 am 
Offline

Joined: Tue Feb 06, 2007 10:24 am
Posts: 2567
Location: Belgium
Many thanks guys!

JIM BAUMANN wrote:
for guaranteed ( non-experimental ) longevity... steel! :big_grin: :thumbs_up_1:

weight--does it matter?-- heavier bases are more stable and secure on the tables at exhibitions...! :thumbs_up_1:


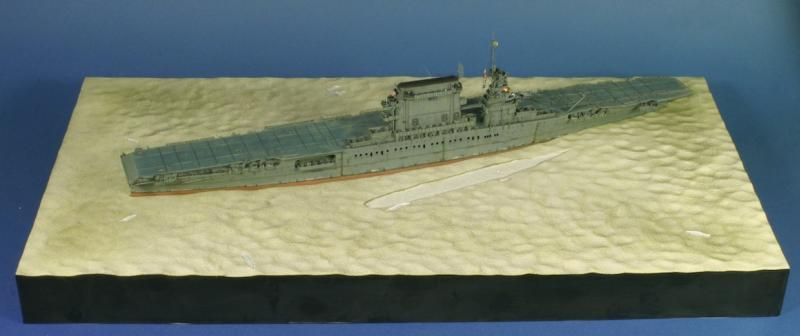
I assume you will have a glass case lid for your base as well?-- so that your rigging and fine details are not ruined by dust...?
and spiders and atmospheric pollution, cat secure , child secure etc etc!!! :big_grin:

best wishes

JB


Thanks for the ideas Jim!
While I never liked the idea of glass cases in the past, I am actually considering one at the moment. I always felt they inhibit good viewing of a model, but recently I have seen some (yours for example) which convinced me it doesn't have to detract from viewing the model at all when done right.

And indeed, ship models are harder to dust than most armour or figure models. I have a good showcase at home out of reach of the children, but safety of the rigging is a concern at shows indeed...

I'm not looking forward to actually building it though, so I better start doing my research on materials and techniques so my mind can get used to the idea... :)

MartinJQuinn wrote:
blacman wrote:
I thought I'm crazy. But you are the worse case....


LOL. The pot calling the kettle black. I think is the best comment yet. :heh:


Exactly my idea! :big_grin:

Mgunns wrote:
You are doing outstanding work on this model. I look at your work and I feel like giving up. Your work has certainly raised the bar to new heights.
This will certainly be an interesting diorama. My grade school friends dad was a member of the Marine Detachment on board the Lexington when it went down, so it has a special interest to me.


Many thanks!
I know you're not serious, but don't give up modelling! It took me many many, years of intensive modelling to reach this level. Besides, everyone enjoys modelling in a different way, and I'm simply lucky to enjoy building in tiny detail and spending lots of time on it. Having a different style or level of finesse or technique doesn't make anyone a lesser modeller.

Obviously this subject is less personal for me than for you, but I find it a really very compelling story indeed. It is at the same time sad and positive, a loss and a victory: loosing Lex and many lives, but through good leadership and calm evacuation saving many more. I hope I will manage to somehow portray this duality in this diorama.

Best wishes,

Marijn


Report this post
Top
 Profile  
Reply with quote  
PostPosted: Tue Feb 03, 2015 3:26 am 
Offline

Joined: Tue Feb 06, 2007 10:24 am
Posts: 2567
Location: Belgium
I still had to paint the deck equipment, but that's finished now too.
In case the matchhead doesn't give enough feeling of scale in the very much enlarged photo's: both the tractors and forklift are only about 3,5mm long.

Image

Image

Image

Image

Image

Image

Image

Image

Image

Image

Image

Image

Cheers,

Marijn


Report this post
Top
 Profile  
Reply with quote  
PostPosted: Tue Feb 03, 2015 5:10 am 
Offline

Joined: Tue Sep 17, 2013 12:16 pm
Posts: 356
Your progress never ceases to amaze me! I recently got that deck equipment PE (from Flyhawk right?) They are really small! This motivates me to work on them as I initially thought they where too small :big_grin:

Are you going to put some figures in the equipment? or were they already abandoned by the time your diorama will represent?

_________________
CV-8: http://www.shipmodels.info/mws_forum/viewtopic.php?f=59&t=153851
DD-436: http://www.shipmodels.info/mws_forum/viewtopic.php?f=59&t=157123
CVL-24 http://www.shipmodels.info/mws_forum/viewtopic.php?f=59&t=158455


Report this post
Top
 Profile  
Reply with quote  
PostPosted: Tue Feb 03, 2015 8:12 am 
Offline
User avatar

Joined: Mon Jan 10, 2005 10:46 am
Posts: 2463
Location: Hoboken, NJ
Beautiful work, as always. I'm having issues with small assemblies in a 1/350th scale build, it's hard to fathom how you do these in 1/700.

One historical note, if you're concerned: the Lexington and other carriers in 1942 did not have aircraft mules/tractors. Those are a 1943 and later development. They had bomb and torpedo carts and everything else you have there, but when it was time to move an unpowered aircraft around, it was done with a half-dozen or so crewmen pushing on the wings. It's not a huge thing and most people put them on their builds anyway, but if you're going for total accuracy, you could just leave those off.

This is all correct, of course, until someone finds a photo with a tractor from that time frame. I'm still waiting for that to happen!

_________________
We like our history sanitized and theme-parked and self-congratulatory, not bloody and angry and unflattering. - Jonathan Yardley


Report this post
Top
 Profile  
Reply with quote  
PostPosted: Tue Feb 03, 2015 8:49 am 
Offline

Joined: Sun Jun 02, 2013 6:54 am
Posts: 285
Your build is awesome.


Report this post
Top
 Profile  
Reply with quote  
PostPosted: Wed Feb 04, 2015 3:33 am 
Offline

Joined: Tue Feb 06, 2007 10:24 am
Posts: 2567
Location: Belgium
Many thanks guys!

They are PE from Flyhawk indeed. This set is excellent: amazing detail, and the items are surprizingly easy to assemble as the PE is very well designed. The tractors are only four pieces (chasis with wheels, nose with shield, rear fenders with drivers seat, and steering wheel), and everything folds very easily. The carts are only 2 pieces each. Highly recommended!

hypno7 wrote:
Are you going to put some figures in the equipment? or were they already abandoned by the time your diorama will represent?


Mostly abandoned, as the crew is gathering on the aft flight deck and abandoning ship. I only plan to have one tractor driving towards the rear, pulling a small cart with crewmen in it.

Devin wrote:
One historical note, if you're concerned: the Lexington and other carriers in 1942 did not have aircraft mules/tractors. Those are a 1943 and later development. They had bomb and torpedo carts and everything else you have there, but when it was time to move an unpowered aircraft around, it was done with a half-dozen or so crewmen pushing on the wings. It's not a huge thing and most people put them on their builds anyway, but if you're going for total accuracy, you could just leave those off.


Many thanks Devin!
Of course, this kind of info always comes AFTER I build and paint something... :)
I suspected this already, but couldn't find any info on it. I just couldn't see any in any '42 carrier photo's.
Usually I go for accuracy, but these are just too much fun to leave of. :) And many people do put them on indeed, and often even paint them yellow too! :) Anyway, I'll be having more bomb carts etc. on the deck than would be totally accurate for that moment in time too, but the artistic aspect of having a crowded and lively flightdeck is important to me too.

Cheers,

Marijn


Report this post
Top
 Profile  
Reply with quote  
PostPosted: Mon Feb 09, 2015 2:41 am 
Offline

Joined: Wed Jan 21, 2009 1:51 pm
Posts: 2874
I managed to not notice this thread until now, while even being quite familar with Marijn's work. It looks absolutely great so far :thumbs_up_1: It convinced me to start lining in my own model (so I should be just in time for Telford 2025). Marijn, what Humbrol color do you use for the dirt streaks along the hull? Is this also a very dark brown?


Report this post
Top
 Profile  
Reply with quote  
PostPosted: Mon Feb 09, 2015 4:39 am 
Offline

Joined: Tue Feb 06, 2007 10:24 am
Posts: 2567
Location: Belgium
Many thanks EJFoeth! (maybe I know your real name from meeting you at a show around here? :) )

The colour I use is matt black 33, with a nice dab of Raw Umber oil paint in it. It is a very dark brown, almost black. The oil paint makes the paint "workable" for a longer time, but the Humbroll still makes it dry fast enough, and always flat. I use White Spirit to thin it, and to blend the edges.

I can would certainly encourage you to try this technique. It takes a bit more time than a pinwash, but you don't seem to have a shortage of patience, and all that magnificent detail on your Hood deserves it! It will come out much more clearly, and you will be able to enjoy all those details again while painting. :)

The technique which really complements it is highlighting all top edges with a lighter version of the base colours. The highlights are actually painted on with wet paint on a fine brush, not drybrushed. This works as fast a good drybrush, but gives a more controlled and less stone-like result.

Cheers,

Marijn


Report this post
Top
 Profile  
Reply with quote  
PostPosted: Mon Feb 09, 2015 6:57 am 
Offline

Joined: Wed Jan 21, 2009 1:51 pm
Posts: 2874
I've experimented a bit with wet drybrushing, that is, drybrushing with oils (white) in a downward motion. It blends much better than ordinary drybrush and isn't very harsh but it also tends to muddle up the entire area a bit and then the local highlighting is gone. Pinwashing and drybrushing (oils) also doesn't really give me a good effect for PE surface detail so lining in both light and dark tones is the next step; I'll give it a try the coming days (and ruin my funnels?): I tried some smudging with black humbrol and umber oils separately but I notice I have to repeat the streaks several times; one attempt gives a very faint line that is just so subtle!

I don't think we've actually met (First name Evert-Jan btw) but I think the first work I've seen from you was the GVD diorama at the Lancers contest (only two were held IIRC). Seeing such models is the reason I postponed painting for so long I suppose :big_grin:


Report this post
Top
 Profile  
Reply with quote  
PostPosted: Mon Feb 09, 2015 10:29 am 
Offline

Joined: Tue Feb 06, 2007 10:24 am
Posts: 2567
Location: Belgium
Nice to meet you here Evert-Jan! :)

Ah, that diorama takes me back a while! I built the thing in 2001… :)

The trick with lining is to really paint the shadow(line)s onto the surface, and take your time to blend the edges. Probably 1/3th of the time is painting the shadows, and 2/3th blending the edges, constantly switching between them. And it is important to use a fine high quality brush (I prefer 000 size from Winsor & Newton series 7), and take your time for it. Mario Eens uses it extensively on his well-known armor models too.

Another update:
I added rubble to the deck. It consists of assorted pieces of PE, cut up plastic sheet, fine copper wire, and mostly crumbled thin chocolate wrapper foil. I "glued" it with flat varnish and integrated some of the deck equipment.

Image

Image

Image

The inspiration. The only two photo's known of the deck after the 14h45 explosion (as far as I know) show ruble and equipment "swept" against the island, as well as some rubble spread around the flight deck:
Image

And painted:
Image

Image

Image

The area around the bomb hole was actually already cleared at that moment, but I want to make it absolutely clear that this is bomb damage, also to people who are not familiar with the subject. So here the storytelling needs compel me to combine different moments in time in one image. And I just love cheating! :)

Cheers!

Marijn


Report this post
Top
 Profile  
Reply with quote  
PostPosted: Mon Feb 09, 2015 10:51 am 
Offline
User avatar

Joined: Mon Jan 10, 2005 10:46 am
Posts: 2463
Location: Hoboken, NJ
Fantastic. I love the negative image of the missing life rafts on the island.

_________________
We like our history sanitized and theme-parked and self-congratulatory, not bloody and angry and unflattering. - Jonathan Yardley


Report this post
Top
 Profile  
Reply with quote  
PostPosted: Mon Feb 09, 2015 11:32 am 
Offline
User avatar

Joined: Mon Nov 11, 2013 11:01 pm
Posts: 1257
Location: Detroit area
That is just abso-effing-lutely impressive work, Marjin m8! :thumbs_up_1: :cool_1:

_________________
Sean Nash, ACG (aircraft camo gestapo)

On the ways:
1/200 Trumpeter HMS Nelson
1/700 Tamiya USS Yorktown CV-5

In the stash:
1/35 Italiari PT-109
1/35 Tamiya "Pibber" Patrol Boat
1/350 Trumpeter USS Yorktown CV-10


Report this post
Top
 Profile  
Reply with quote  
PostPosted: Wed Feb 11, 2015 2:39 am 
Offline

Joined: Tue Feb 06, 2007 10:24 am
Posts: 2567
Location: Belgium
Many thanks guys!

It's a really fun project, so it's not too hard to give it my best.

Cheers,

Marijn


Report this post
Top
 Profile  
Reply with quote  
PostPosted: Wed Feb 11, 2015 7:35 am 
Offline
User avatar

Joined: Wed Mar 30, 2011 9:38 am
Posts: 1381
I am really closely looking at the way you are handled the battle damage. It simply amazes me.

Some of my more ambitious projects will involve some effects similar to this. With your permission I would like to save a few of these pictures to my hard drive for personal use only, as the WIP will eventually disappear before I get to those (especially with my build pace).

_________________
Gabriel


Report this post
Top
 Profile  
Reply with quote  
PostPosted: Thu Feb 12, 2015 6:04 am 
Offline

Joined: Tue Feb 06, 2007 10:24 am
Posts: 2567
Location: Belgium
Many thanks Gabriel! It is my pleasure and a big compliment if my work can somehow inspire anyone.

So hereby, you have my permission! :D
Anyway, I probably shouldn't put it on the interweb if I didn't want anyone to save and use them... :)

Cheers,

Marijn


Report this post
Top
 Profile  
Reply with quote  
PostPosted: Thu Feb 12, 2015 10:47 am 
Offline

Joined: Tue Sep 17, 2013 12:16 pm
Posts: 356
yes, I will also save those pictures, of course, pictures do not do justice as we talked before, the real model looks a lot better.

After looking again at your pictures (the latest ones), now I understand what you meant about washing with light and dusty colors, very nice!

Looking forward to see more updates!

_________________
CV-8: http://www.shipmodels.info/mws_forum/viewtopic.php?f=59&t=153851
DD-436: http://www.shipmodels.info/mws_forum/viewtopic.php?f=59&t=157123
CVL-24 http://www.shipmodels.info/mws_forum/viewtopic.php?f=59&t=158455


Report this post
Top
 Profile  
Reply with quote  
PostPosted: Thu Feb 12, 2015 12:56 pm 
Offline
User avatar

Joined: Thu Aug 27, 2009 11:05 am
Posts: 2261
Location: Paris France
HI Marijn

no words can qualify what I see it just .......... :woo_hoo: :woo_hoo: I have rarely seen such a beautiful painting on this scale , without speaking the rendered of damages :thumbs_up_1:
God to put his hand on you !!
cheers
nicolas

_________________
https://ladiagonaledubosco.blogspot.fr/


Report this post
Top
 Profile  
Reply with quote  
PostPosted: Fri Feb 13, 2015 3:53 pm 
Offline
User avatar

Joined: Mon Oct 13, 2014 5:39 pm
Posts: 674
Location: San Tan Valley Arizona
Hello Marijn:

Your battle damage is very convincing. It's hard for me to get my arms wrapped around that this is 1/700! I too like your shadow effect of the missing life rafts on the stack, all your work is truly outstanding.

_________________
Mark
Master Gunnery Sergeant USMC (Ret.)
http://www.modelshipgallery.com/gallery ... index.html

On the bench:

1/200 USS Enterprise, CV-6


Report this post
Top
 Profile  
Reply with quote  
PostPosted: Sun Feb 15, 2015 4:50 pm 
Offline
User avatar

Joined: Tue Jan 11, 2005 1:40 pm
Posts: 8327
Location: New Jersey
Devin wrote:
Fantastic. I love the negative image of the missing life rafts on the island.

Yes - bravo! Very nice touch!

_________________
Martin

"Tomorrow is the most important thing in life. Comes into us at midnight very clean. It's perfect when it arrives and it puts itself in our hands. It hopes we've learned something from yesterday." John Wayne

Ship Model Gallery


Report this post
Top
 Profile  
Reply with quote  
PostPosted: Mon Feb 16, 2015 11:21 am 
Offline

Joined: Tue Feb 06, 2007 10:24 am
Posts: 2567
Location: Belgium
Many thanks guys!

Meanwhile, Lexington is fixed in her seascape. Still have to fill the gaps (and of course paint it).

Image

Of course I couldn't resist taking a shot with Morris by her side:

Image

I also sorted all 1400 figures by pose and color, to make it easier to keep an overview on them while gluing them to the ship. Of course I could have made many more subdivisions, but I couldn't find a box with more spaces… :)

Image

Now the real fun can start!

Cheers,

Marijn


Report this post
Top
 Profile  
Reply with quote  
Display posts from previous:  Sort by  
Post new topic Reply to topic  [ 380 posts ]  Go to page Previous  1 ... 9, 10, 11, 12, 13, 14, 15 ... 19  Next

All times are UTC - 6 hours [ DST ]


Who is online

Users browsing this forum: Majestic-12 [Bot], taskforce48 and 49 guests


You can post new topics in this forum
You can reply to topics in this forum
You cannot edit your posts in this forum
You cannot delete your posts in this forum
You cannot post attachments in this forum

Jump to:  
Powered by phpBB® Forum Software © phpBB Group