1/200 Arizona to Pennsylvania Conversion
Moderators: MartinJQuinn, JIM BAUMANN, Jon, Dan K
-
ArizonaBB39

- Posts: 1321
- Joined: Sat Jan 08, 2005 7:29 pm
- Location: Tempe, Arizona
- Contact:
Re: 1/200 Arizona to Pennsylvania Conversion
I'd definitely be interested in such drawings. I'll have to check out that CD Mark mentioned.
-
gott_cha
- Posts: 382
- Joined: Wed Nov 17, 2010 10:51 am
- Location: S.C.
Re: 1/200 Arizona to Pennsylvania Conversion
Abram, it's a good CD,..just got my copy on Monday and it will be a good reference tool
What I'm having problems obtaining are photos and drawings of the Mare Island early 42 refit . Most major structures are the same as what she had on 7 Dec 41,...but there are/ were various changes made such as Gun shields,...boat arrangement, Radar,..gun tubs added around the main mast and a large square/rectangle platform/tower with Air Defense 20 mm's built up around the STACK.
NavSource and the CD have a few pics of these changes , but nothing in great detail.
Hopefully I can find drawings of these changes but so far I have turned up nothing ...could be they no longer exist or that they are looked away some place in an obscure vault forgotten about after all these years.....
If anyone has suggestions on that I'm open for it.
Hank@ Yes that would be great if you could do that!
Mark@ If Stephen could get the drawings and dimensions of the "clover leaf" for a printed subject, I'm sure would be a great benefit...the rest as far as height and spread could then logically be worked out from that. That is if You and He are open to it.
Mark
-
ModelMonkey
- Model Monkey

- Posts: 4111
- Joined: Sat Aug 20, 2005 9:27 pm
- Location: USA
- Contact:
Re: 1/200 Arizona to Pennsylvania Conversion
I'm game. I can design a 3D printed cloverleaf from Chesley's drawings and Mark's experience with the kit.
Normally, 2D drawings of a quality that at least matches Booklet of General Plans drawings are needed to make a quality 3D design. But we just don't have anything more authoritative at present.
Surely, the Pennsy experts here can come to a "best consensus" on a cloverleaf design for the 1/200 kit. I'll produce that.
Rescaling to 1/350 and 1/700 from that design can be problematic for some modelers. A part that fits one kit in one scale then rescaled for other kits is likely to have to be adapted by the 1/350 and 1/700 modeler to fit well.
Have fun, Monkey around. TM
-Steve L.
Complete catalog: - https://www.model-monkey.com/
Follow Model Monkey™ on Facebook: - https://www.facebook.com/modelmonkeybookandhobby
-Steve L.
Complete catalog: - https://www.model-monkey.com/
Follow Model Monkey™ on Facebook: - https://www.facebook.com/modelmonkeybookandhobby
-
Mgunns

- Posts: 674
- Joined: Mon Oct 13, 2014 5:39 pm
- Location: San Tan Valley Arizona
Re: 1/200 Arizona to Pennsylvania Conversion
Okay folks:
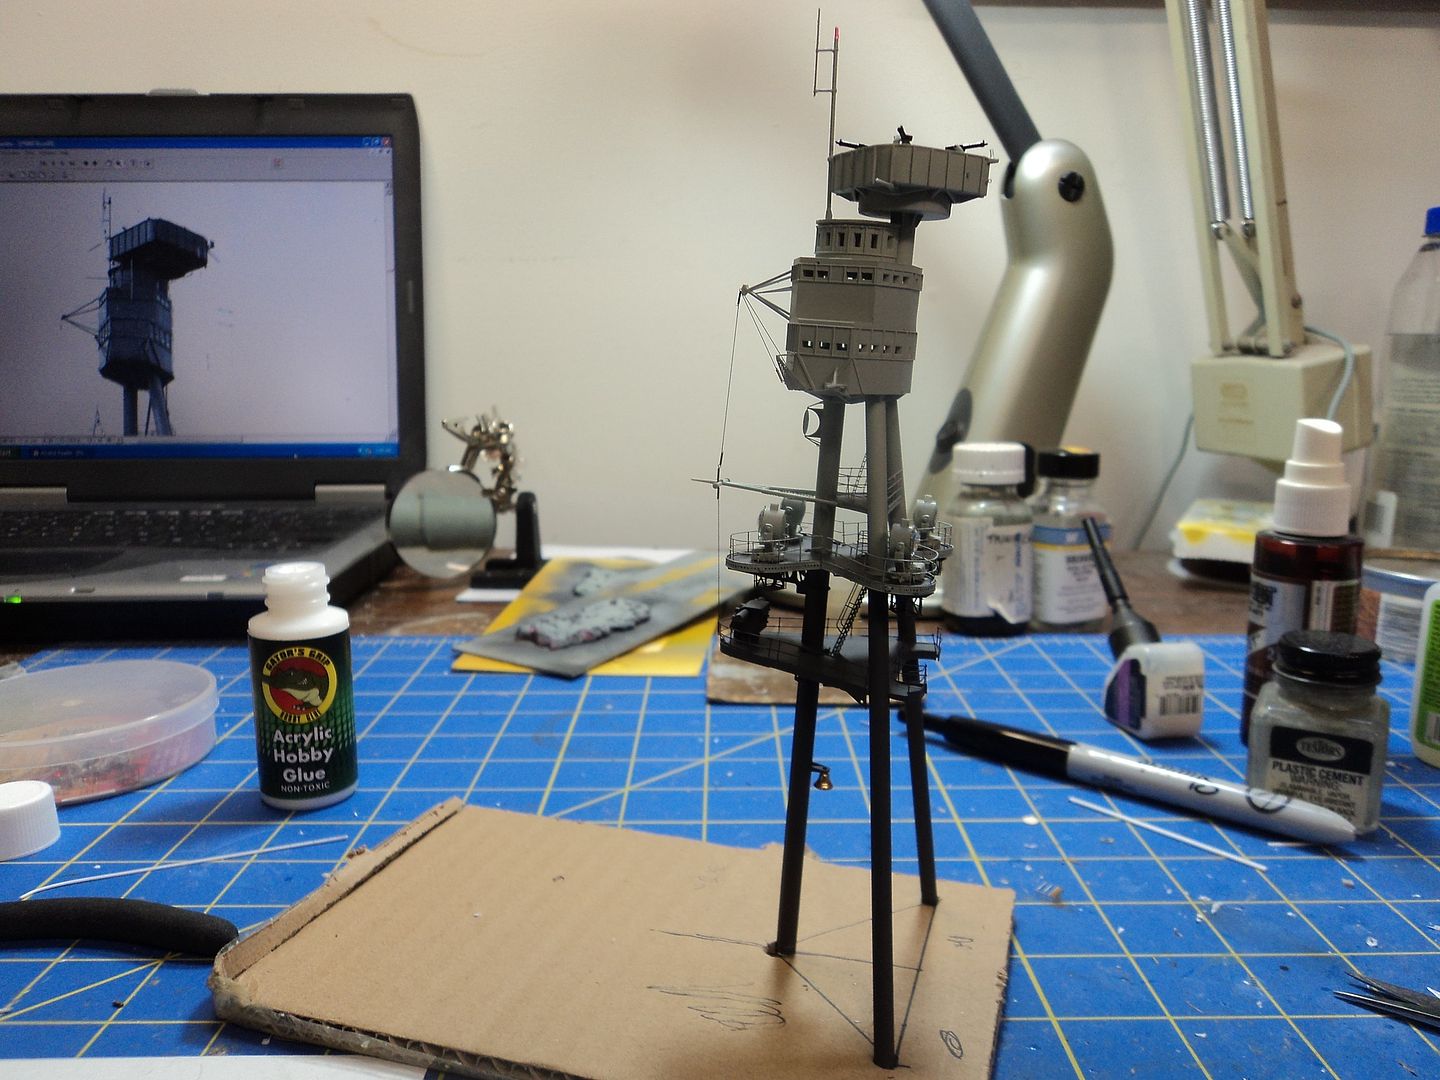
A few more updates. In order for the cranes and the legs to fit on the main deck, the raised locator tabs for the cranes need to be filed off and locator holes drilled for the legs next to the kingposts as on the actual ship.
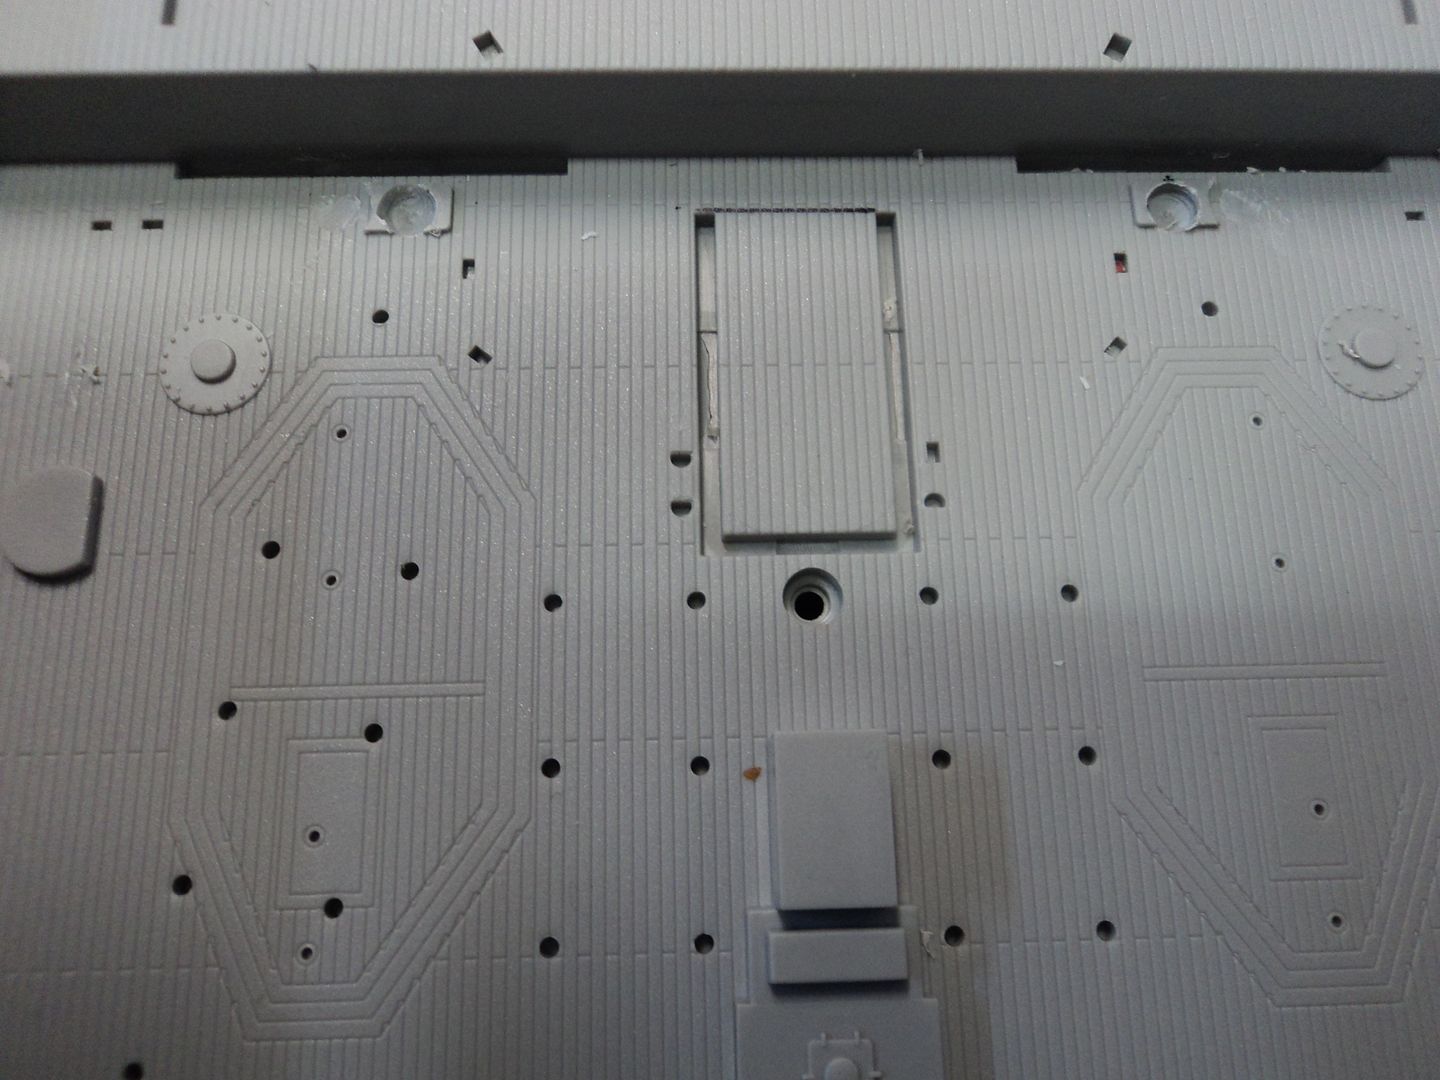
Here you can see the kingpost on the right and the leg of the mainmast: Not the locator holes for the kingposts have to made larger to accept the larger Pennsylvania Kingposts. I added Plastruct around the parts and filled in the holes where the Arizona mast legs would go.
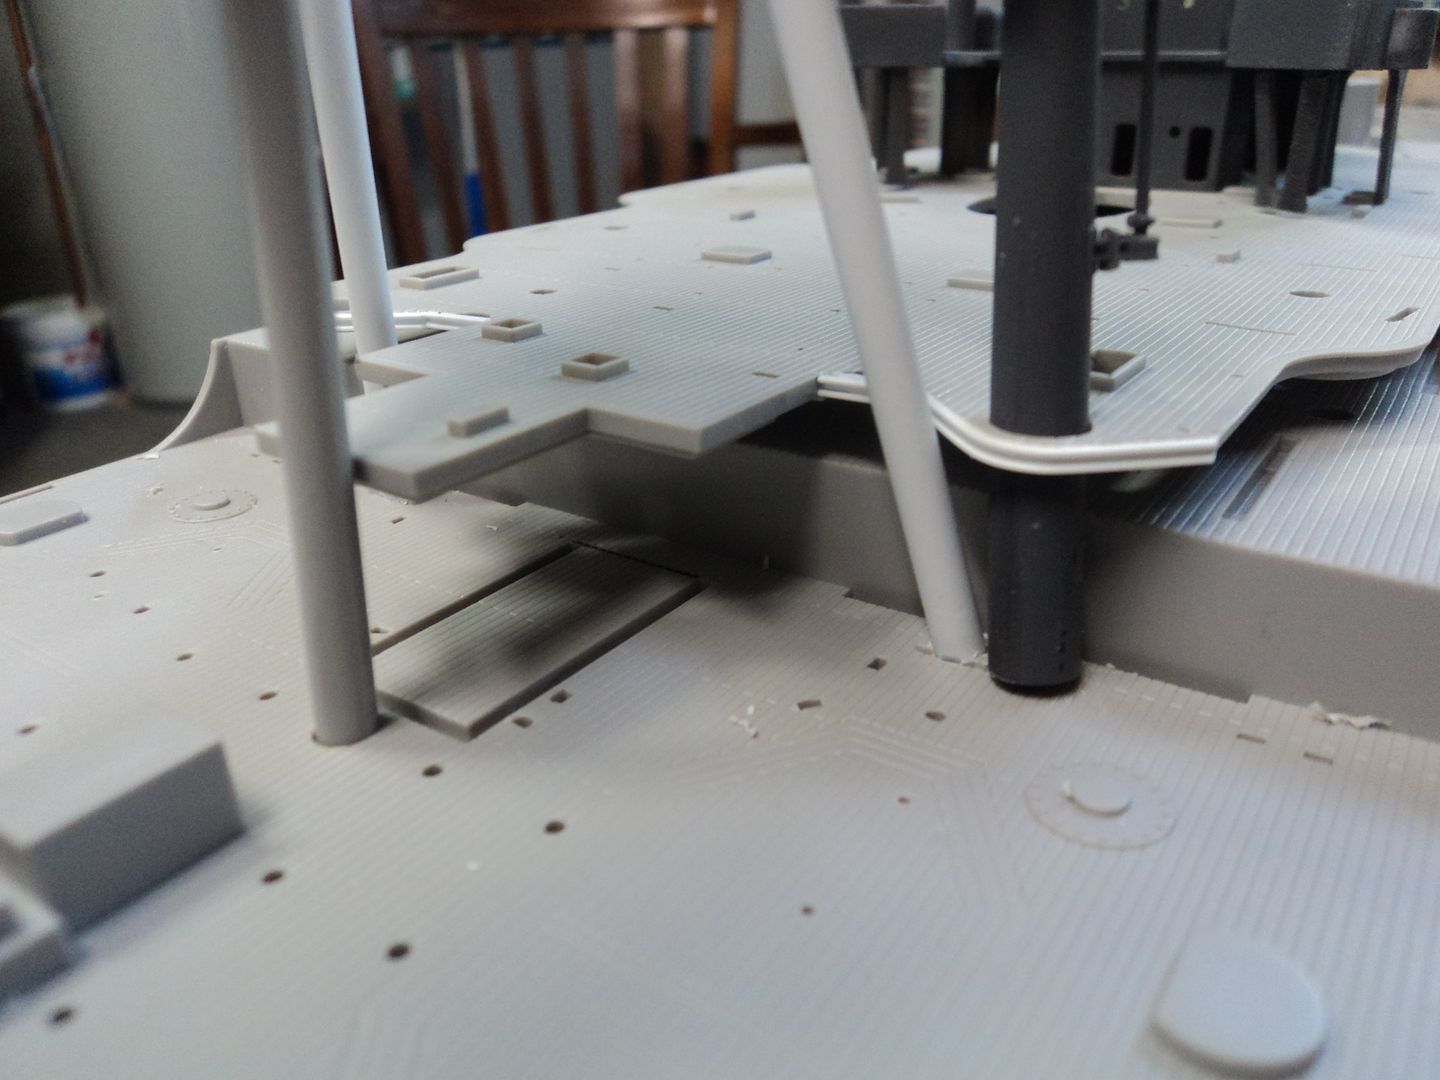
Here you get an idea of how it will look and fit on the actual model.
Some adjustment will be made but for now, I am happy with how it is and I can proceed with PE, locator tabs, paint and then put aside to dry.
A few more updates. In order for the cranes and the legs to fit on the main deck, the raised locator tabs for the cranes need to be filed off and locator holes drilled for the legs next to the kingposts as on the actual ship.

Here you can see the kingpost on the right and the leg of the mainmast: Not the locator holes for the kingposts have to made larger to accept the larger Pennsylvania Kingposts. I added Plastruct around the parts and filled in the holes where the Arizona mast legs would go.

Here you get an idea of how it will look and fit on the actual model.


Some adjustment will be made but for now, I am happy with how it is and I can proceed with PE, locator tabs, paint and then put aside to dry.
Mark
Master Gunnery Sergeant USMC (Ret.)
http://www.modelshipgallery.com/gallery ... index.html
On the bench:
1/200 USS Enterprise, CV-6
Master Gunnery Sergeant USMC (Ret.)
http://www.modelshipgallery.com/gallery ... index.html
On the bench:
1/200 USS Enterprise, CV-6
-
BB62vet

- Posts: 3151
- Joined: Mon Nov 18, 2013 3:41 pm
- Location: Mocksville, NC
Re: 1/200 Arizona to Pennsylvania Conversion
Mark,
Really looking good! I think your approach to this conversion is working well.
I'll email both you and Steve re. the Main Mast stuff.
Hank
Really looking good! I think your approach to this conversion is working well.
I'll email both you and Steve re. the Main Mast stuff.
Hank
HMS III
Mocksville, NC
BB62 vet 68-69
Builder's yard:
USS STODDARD (DD-566) 66-68 1:144, Various Lg Scale FC Directors
Finished:
USS NEW JERSEY (BB-62) 67-69 1:200
USN Sloop/Ship PEACOCK (1813) 1:48
ROYAL CAROLINE (1748) 1:47
AVS (1768) 1:48
Mocksville, NC
BB62 vet 68-69
Builder's yard:
USS STODDARD (DD-566) 66-68 1:144, Various Lg Scale FC Directors
Finished:
USS NEW JERSEY (BB-62) 67-69 1:200
USN Sloop/Ship PEACOCK (1813) 1:48
ROYAL CAROLINE (1748) 1:47
AVS (1768) 1:48
-
Channell

- Posts: 2068
- Joined: Mon May 14, 2012 12:18 pm
- Location: Salt Lake City, USA
Re: 1/200 Arizona to Pennsylvania Conversion
Oh yeah, looking very good so far Mark!
I know I shouldn't be one to talk when it comes to spending too much on builds but damn, that Pennsy looks expensive already!
I know I shouldn't be one to talk when it comes to spending too much on builds but damn, that Pennsy looks expensive already!
-Jason Channell
Current Project: 1/200 Bismarck
Current Project: 1/200 Bismarck
-
BB62vet
- Posts: 3151
- Joined: Mon Nov 18, 2013 3:41 pm
- Location: Mocksville, NC
Re: 1/200 Arizona to Pennsylvania Conversion
Channell wrote:
 ....but all things are relative.
I have a list, but never bothered adding it up
Hank
Looks ARE deceiving, it's way past "expensive"I know I shouldn't be one to talk when it comes to spending too much on builds but damn, that Pennsy looks expensive already!
I have a list, but never bothered adding it up
Hank
HMS III
Mocksville, NC
BB62 vet 68-69
Builder's yard:
USS STODDARD (DD-566) 66-68 1:144, Various Lg Scale FC Directors
Finished:
USS NEW JERSEY (BB-62) 67-69 1:200
USN Sloop/Ship PEACOCK (1813) 1:48
ROYAL CAROLINE (1748) 1:47
AVS (1768) 1:48
Mocksville, NC
BB62 vet 68-69
Builder's yard:
USS STODDARD (DD-566) 66-68 1:144, Various Lg Scale FC Directors
Finished:
USS NEW JERSEY (BB-62) 67-69 1:200
USN Sloop/Ship PEACOCK (1813) 1:48
ROYAL CAROLINE (1748) 1:47
AVS (1768) 1:48
-
Mgunns
- Posts: 674
- Joined: Mon Oct 13, 2014 5:39 pm
- Location: San Tan Valley Arizona
Re: 1/200 Arizona to Pennsylvania Conversion
It hasn't quite reached the "Tehnoart" Indianapolis.........................Yet!Channell wrote:Oh yeah, looking very good so far Mark!
I know I shouldn't be one to talk when it comes to spending too much on builds but damn, that Pennsy looks expensive already!
Mark
Master Gunnery Sergeant USMC (Ret.)
http://www.modelshipgallery.com/gallery ... index.html
On the bench:
1/200 USS Enterprise, CV-6
Master Gunnery Sergeant USMC (Ret.)
http://www.modelshipgallery.com/gallery ... index.html
On the bench:
1/200 USS Enterprise, CV-6
-
Mgunns
- Posts: 674
- Joined: Mon Oct 13, 2014 5:39 pm
- Location: San Tan Valley Arizona
Re: 1/200 Arizona to Pennsylvania Conversion
Thanks Hank:BB62vet wrote:Mark,
Really looking good! I think your approach to this conversion is working well.
I'll email both you and Steve re. the Main Mast stuff.
Hank
It's coming along at a nice pace. A little tweaking and I will be ready for paint and to move on.
Mark
Master Gunnery Sergeant USMC (Ret.)
http://www.modelshipgallery.com/gallery ... index.html
On the bench:
1/200 USS Enterprise, CV-6
Master Gunnery Sergeant USMC (Ret.)
http://www.modelshipgallery.com/gallery ... index.html
On the bench:
1/200 USS Enterprise, CV-6
-
Channell
- Posts: 2068
- Joined: Mon May 14, 2012 12:18 pm
- Location: Salt Lake City, USA
Re: 1/200 Arizona to Pennsylvania Conversion
...and I'm not done collecting for it either. Race ya to bankruptcy? It worked for countries in the 30's-40's... well, a couple of 'em, anyway.Mgunns wrote:Channell wrote: It hasn't quite reached the "Tehnoart" Indianapolis.........................Yet!
-Jason Channell
Current Project: 1/200 Bismarck
Current Project: 1/200 Bismarck
-
Channell
- Posts: 2068
- Joined: Mon May 14, 2012 12:18 pm
- Location: Salt Lake City, USA
Re: 1/200 Arizona to Pennsylvania Conversion
Yeah... the way I figure it, big builds should be counted not by the total $$$ spent on a single ship but by the "smiles per hour" ( or is it hours of smiles?) you get from it. Looks like you guys will not be short-changed in the end!BB62vet wrote:Channell wrote:Looks ARE deceiving, it's way past "expensive"I know I shouldn't be one to talk when it comes to spending too much on builds but damn, that Pennsy looks expensive already!
I have a list, but never bothered adding it up
Hank
-Jason Channell
Current Project: 1/200 Bismarck
Current Project: 1/200 Bismarck
-
BB62vet
- Posts: 3151
- Joined: Mon Nov 18, 2013 3:41 pm
- Location: Mocksville, NC
Re: 1/200 Arizona to Pennsylvania Conversion
Channell wrote:
Hank
Well, Jason - count yourself amongst us - your various 1/200 builds will someday (as will ours) come full circle.Yeah... the way I figure it, big builds should be counted not by the total $$$ spent on a single ship but by the "smiles per hour" ( or is it hours of smiles?) you get from it. Looks like you guys will not be short-changed in the end!
Hank
HMS III
Mocksville, NC
BB62 vet 68-69
Builder's yard:
USS STODDARD (DD-566) 66-68 1:144, Various Lg Scale FC Directors
Finished:
USS NEW JERSEY (BB-62) 67-69 1:200
USN Sloop/Ship PEACOCK (1813) 1:48
ROYAL CAROLINE (1748) 1:47
AVS (1768) 1:48
Mocksville, NC
BB62 vet 68-69
Builder's yard:
USS STODDARD (DD-566) 66-68 1:144, Various Lg Scale FC Directors
Finished:
USS NEW JERSEY (BB-62) 67-69 1:200
USN Sloop/Ship PEACOCK (1813) 1:48
ROYAL CAROLINE (1748) 1:47
AVS (1768) 1:48
-
Dan K
- Posts: 9064
- Joined: Tue Jan 11, 2005 10:56 am
- Location: New York City
Re: 1/200 Arizona to Pennsylvania Conversion
Great work on that mainmast.
-
Mgunns
- Posts: 674
- Joined: Mon Oct 13, 2014 5:39 pm
- Location: San Tan Valley Arizona
Re: 1/200 Arizona to Pennsylvania Conversion
Thanks Dan for stopping by, checking it out and your comments, duly appreciated.
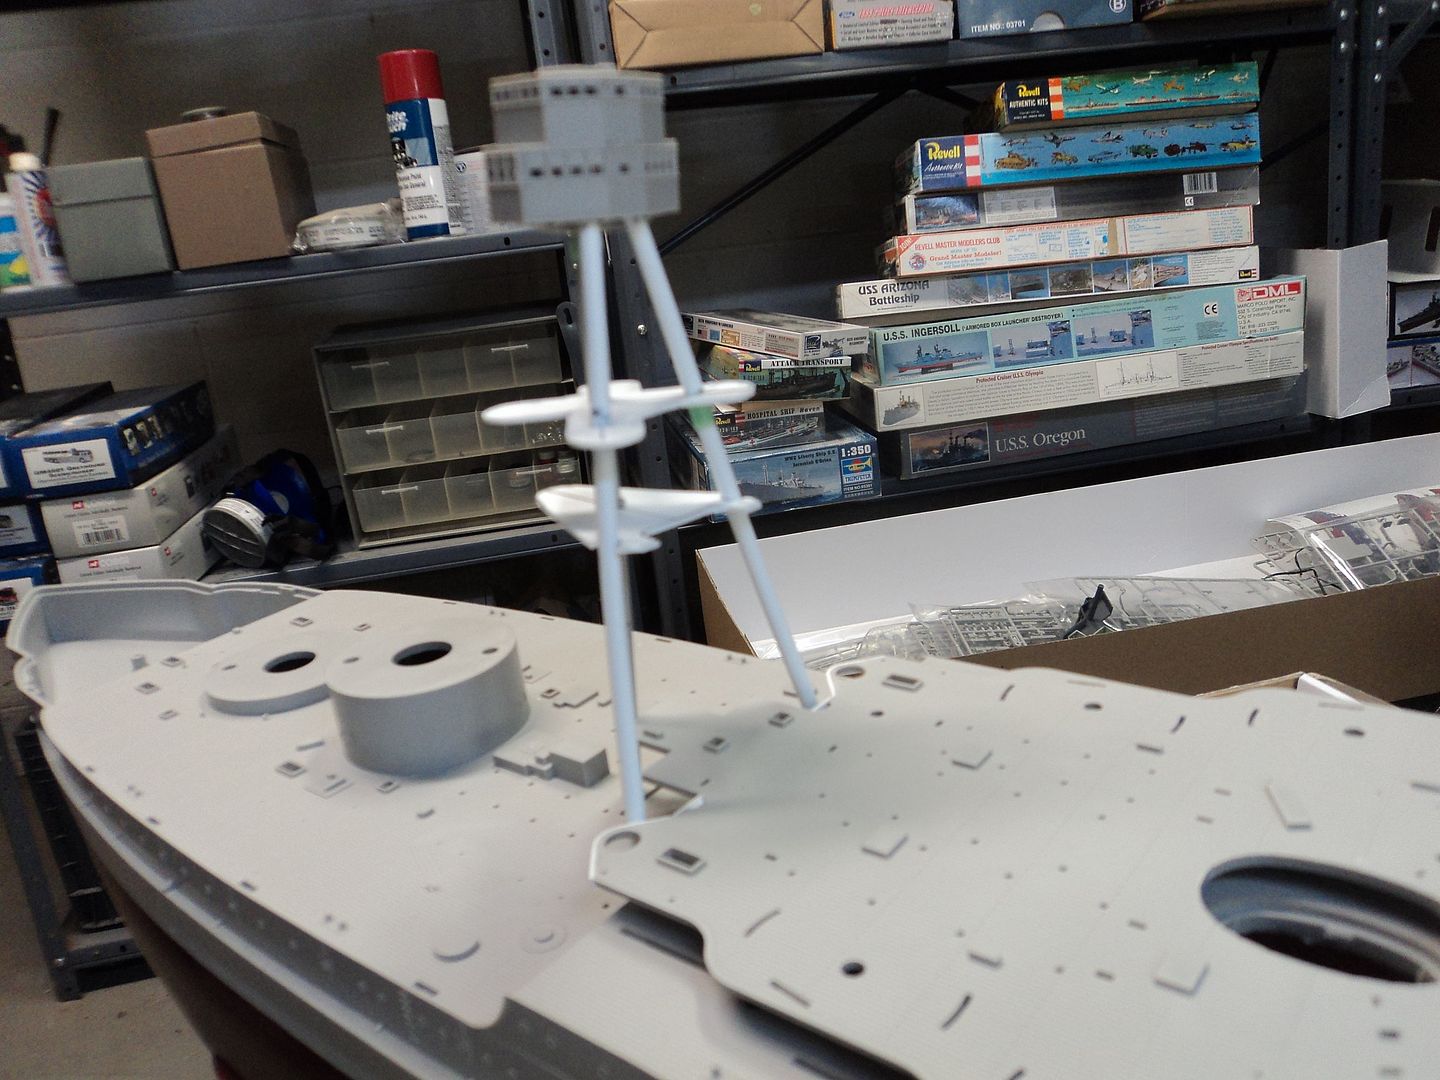
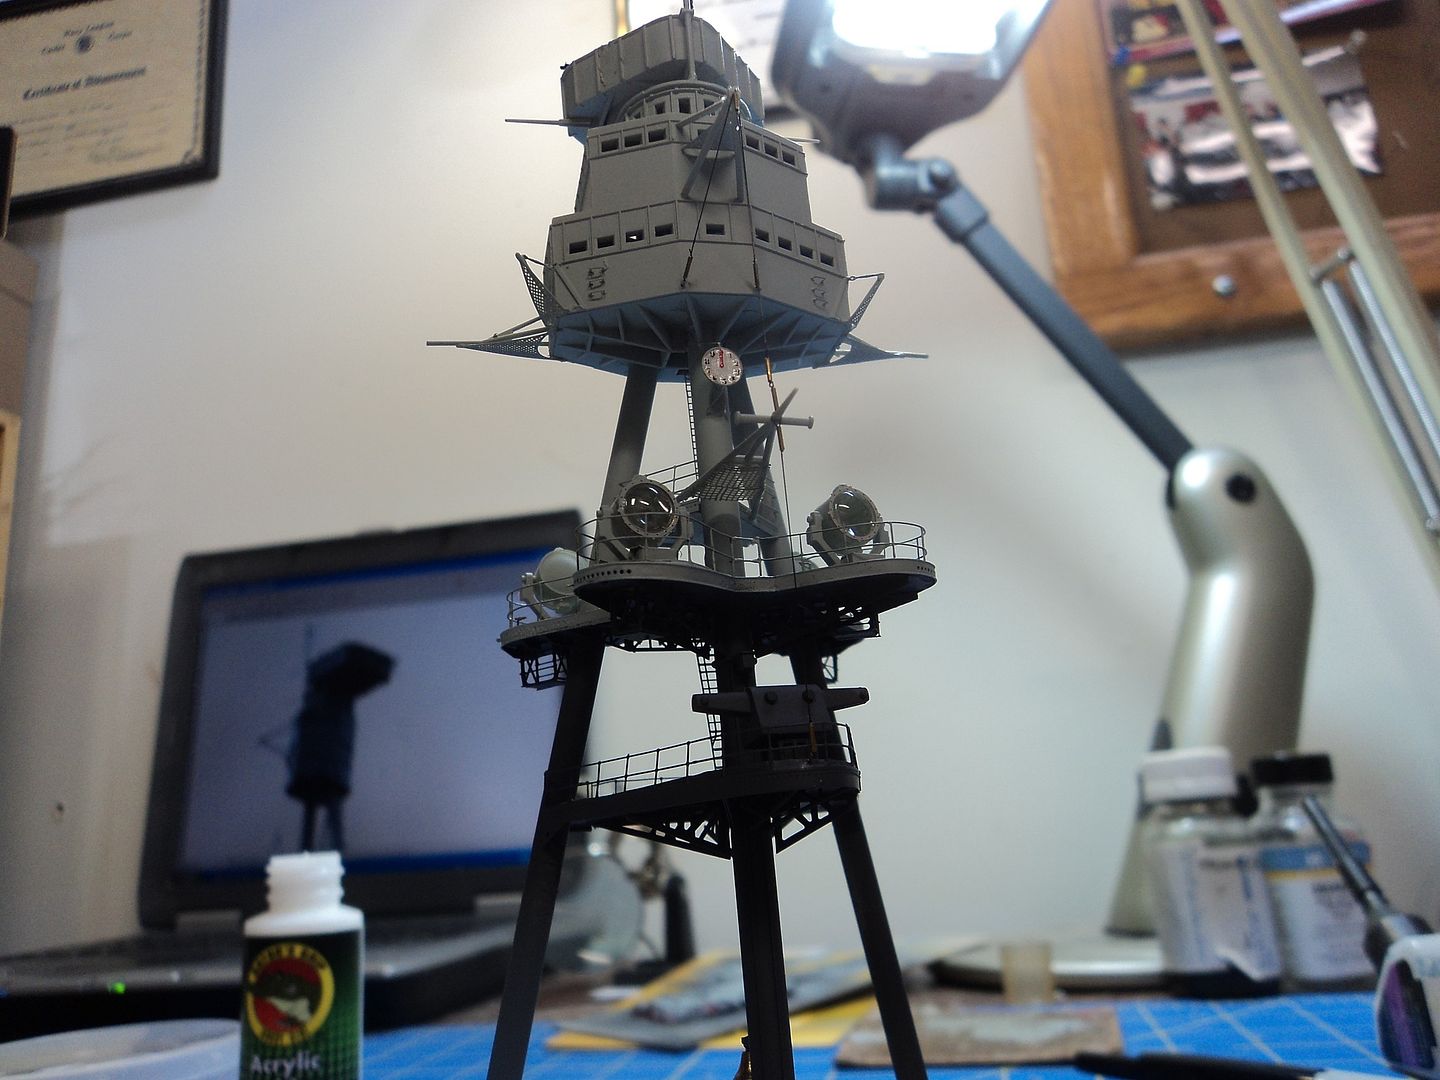
Okay, not a lot of "excitement" but a lot of progress. I am in the final throes of getting this "cursed" main mast together. It has been a struggle, I am not very accomplished at scratchbuiding and this main mast has been a challenge. If the alignment is off a hair, it throes everything off, so a lot of re-doing the platforms not to mention the photo etch railings. I am pretty happy with it now. I have added the platform supports to both platforms using the Eduard PE for the 1/200 Arizona and matching as close as possible to the supports in the drawing. For the edging and railings on the triangular platform I used the Eduard Railings as it has that triangular gusset on the end. I had to do some splicing as the platform is smaller than AZ. For the cloverleaf platform, I used the Kit provided PE for the edge and the railings. I like it better than the Eduard as it is more pliable and I can drill holes through the holes for the eyelets to run the rigging through.
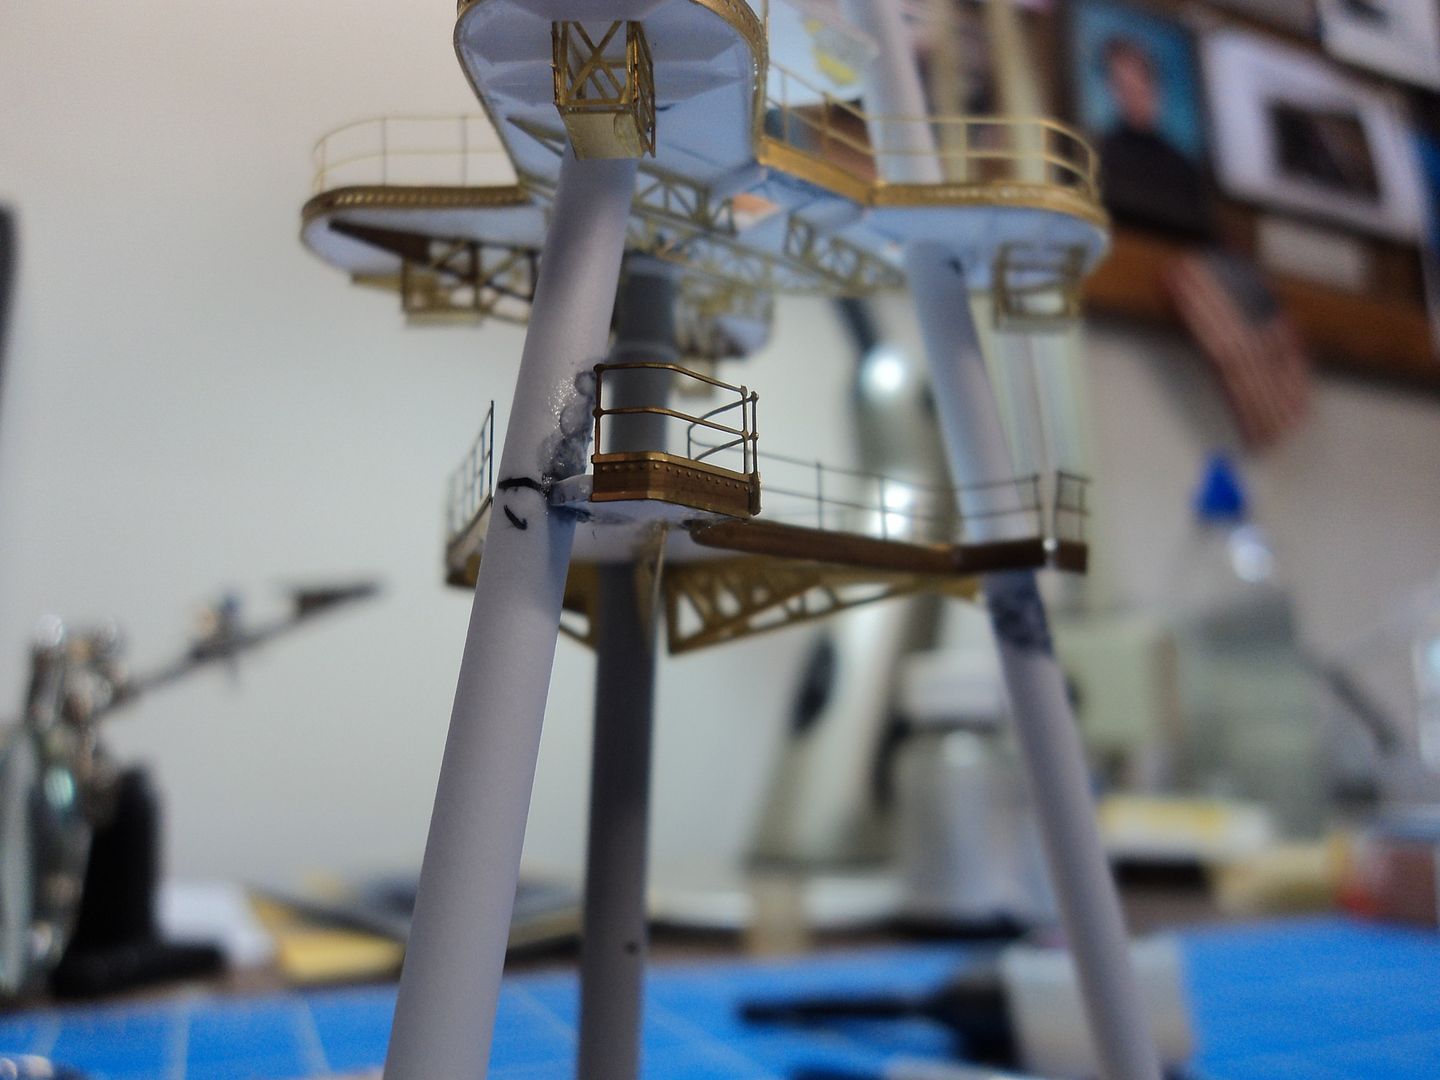
I used the kit provided searchight motor access platforms and added railings on the open sides.
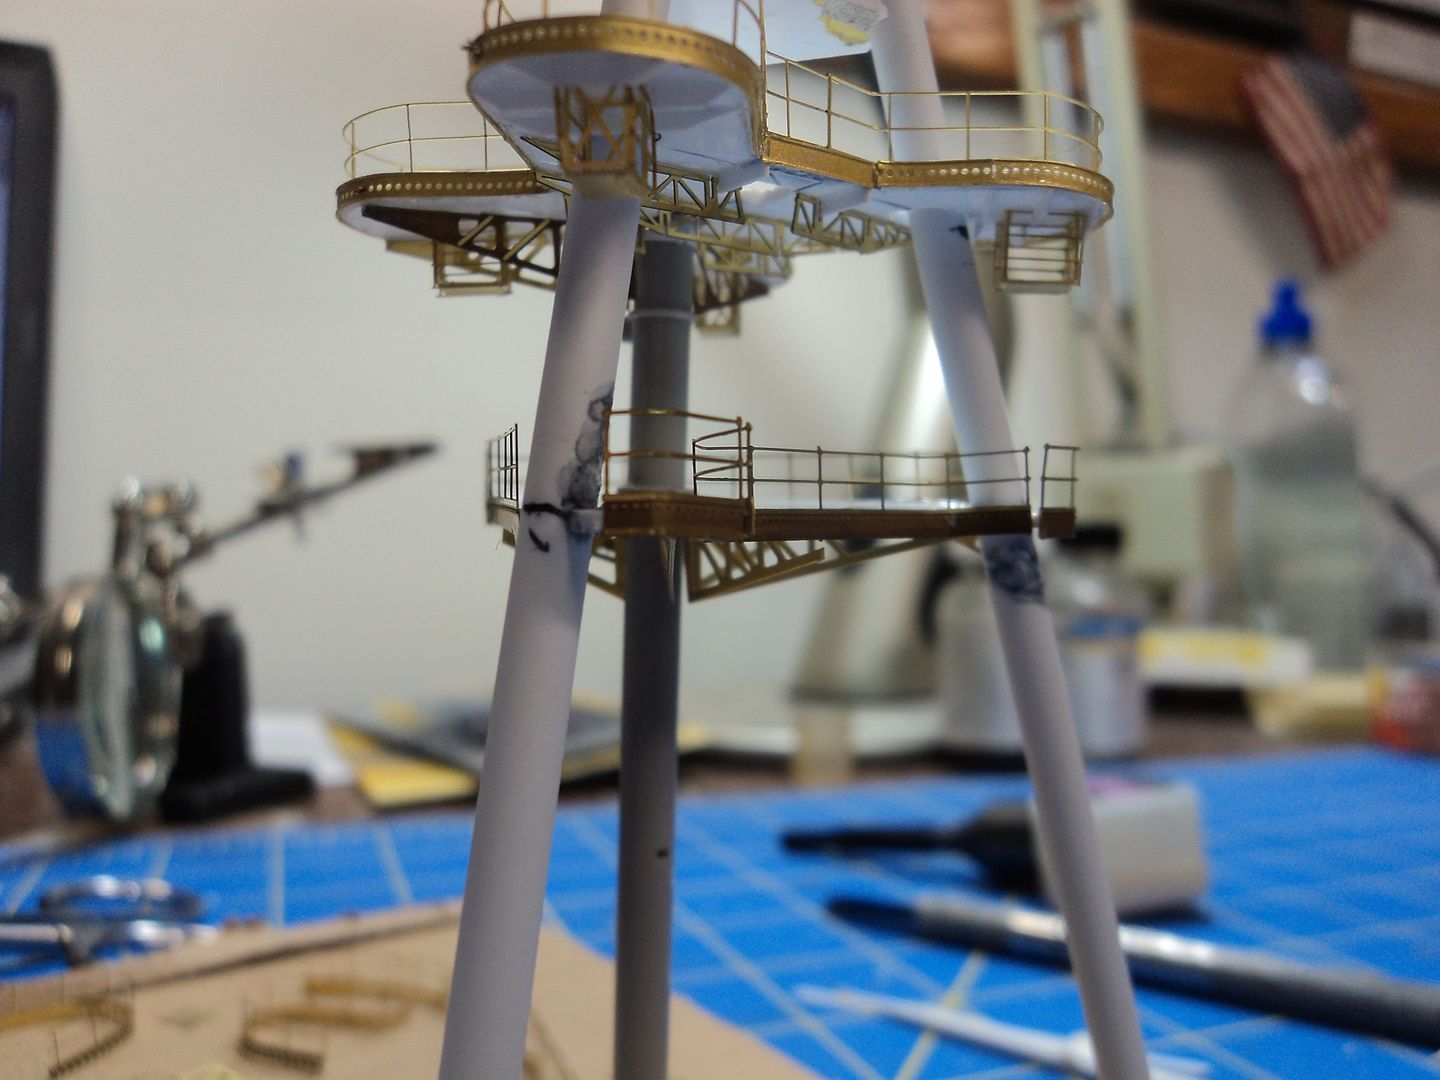
All I have left to for the platforms is add an access hole for the ladder from the cloverleaf platform to the next level up platform and the platforms will be done. It all aligns pretty darned good when placed on the model. I have to work on the top, paint and move on to the more pedestrian side of the build which should move along quite good.
A little tweaking here and there and it's ready.
Thanks for looking.
Okay, not a lot of "excitement" but a lot of progress. I am in the final throes of getting this "cursed" main mast together. It has been a struggle, I am not very accomplished at scratchbuiding and this main mast has been a challenge. If the alignment is off a hair, it throes everything off, so a lot of re-doing the platforms not to mention the photo etch railings. I am pretty happy with it now. I have added the platform supports to both platforms using the Eduard PE for the 1/200 Arizona and matching as close as possible to the supports in the drawing. For the edging and railings on the triangular platform I used the Eduard Railings as it has that triangular gusset on the end. I had to do some splicing as the platform is smaller than AZ. For the cloverleaf platform, I used the Kit provided PE for the edge and the railings. I like it better than the Eduard as it is more pliable and I can drill holes through the holes for the eyelets to run the rigging through.

I used the kit provided searchight motor access platforms and added railings on the open sides.

All I have left to for the platforms is add an access hole for the ladder from the cloverleaf platform to the next level up platform and the platforms will be done. It all aligns pretty darned good when placed on the model. I have to work on the top, paint and move on to the more pedestrian side of the build which should move along quite good.

A little tweaking here and there and it's ready.
Thanks for looking.
Mark
Master Gunnery Sergeant USMC (Ret.)
http://www.modelshipgallery.com/gallery ... index.html
On the bench:
1/200 USS Enterprise, CV-6
Master Gunnery Sergeant USMC (Ret.)
http://www.modelshipgallery.com/gallery ... index.html
On the bench:
1/200 USS Enterprise, CV-6
-
ArizonaBB39
- Posts: 1321
- Joined: Sat Jan 08, 2005 7:29 pm
- Location: Tempe, Arizona
- Contact:
Re: 1/200 Arizona to Pennsylvania Conversion
Excellent work Mark, I always enjoy your updates.
-
BB62vet
- Posts: 3151
- Joined: Mon Nov 18, 2013 3:41 pm
- Location: Mocksville, NC
Re: 1/200 Arizona to Pennsylvania Conversion
Mark,
OUTSTANDING, my friend!!! Thanks also for pointing out which of the PE sheets work best for this modification.
As I've got the CAD drawing pretty well underway, it is amazing to see how close we are on the layout of the platforms without knowing it. I'm glad you are leading the way on this as it will help me later when I get to this part of my build. Even using the 1935 PENNSY Chesley plans to go by, they are still somewhat vague in details of the lower platforms hidden by those above. Before I closed out the CAD file Friday, I had just laid out the Searchlight Platform on the Elevation drawing and while mine will reflect a somewhat earlier period, the basic shape is the same. I hope to have something to print (and post) perhaps next weekend when I'm able to access the forum again. Of course, this drawing will have to be rectified with your templates as I'm quite sure the model is not 100% interchangeable with the plans (if it IS, I will be very surprised!).
I also discovered I had already on hand the Eduard PE sets #4 & #6 (Main Top & Superstructure) when this order came in this week, but that's ok - I'm sure the parts will come in handy.
It will really be interesting to see the entire mast all together as one unit.
Hank
HMS III
Mocksville, NC
BB62 vet 68-69
Builder's yard:
USS STODDARD (DD-566) 66-68 1:144, Various Lg Scale FC Directors
Finished:
USS NEW JERSEY (BB-62) 67-69 1:200
USN Sloop/Ship PEACOCK (1813) 1:48
ROYAL CAROLINE (1748) 1:47
AVS (1768) 1:48
Mocksville, NC
BB62 vet 68-69
Builder's yard:
USS STODDARD (DD-566) 66-68 1:144, Various Lg Scale FC Directors
Finished:
USS NEW JERSEY (BB-62) 67-69 1:200
USN Sloop/Ship PEACOCK (1813) 1:48
ROYAL CAROLINE (1748) 1:47
AVS (1768) 1:48
-
gott_cha
- Posts: 382
- Joined: Wed Nov 17, 2010 10:51 am
- Location: S.C.
Re: 1/200 Arizona to Pennsylvania Conversion
Coming along nicely Mark. And I agree with Hank, can't wait to see the mast completed.
PS has Bob's Buckles moved his web site?.....when I open his link it claims the domain is closed, site no longer available
PS has Bob's Buckles moved his web site?.....when I open his link it claims the domain is closed, site no longer available
-
Mgunns
- Posts: 674
- Joined: Mon Oct 13, 2014 5:39 pm
- Location: San Tan Valley Arizona
Re: 1/200 Arizona to Pennsylvania Conversion
Thanks Hank and Mark for checking it out. It is almost completed and I will post some pictures when it is all painted and finished.
I just checked the Bob's Buckles site and it worked for me: http://www.bobsbuckles.co.uk/
Let me know
I just checked the Bob's Buckles site and it worked for me: http://www.bobsbuckles.co.uk/
Let me know
Mark
Master Gunnery Sergeant USMC (Ret.)
http://www.modelshipgallery.com/gallery ... index.html
On the bench:
1/200 USS Enterprise, CV-6
Master Gunnery Sergeant USMC (Ret.)
http://www.modelshipgallery.com/gallery ... index.html
On the bench:
1/200 USS Enterprise, CV-6
-
Mgunns
- Posts: 674
- Joined: Mon Oct 13, 2014 5:39 pm
- Location: San Tan Valley Arizona
Re: 1/200 Arizona to Pennsylvania Conversion
Okay Folks:
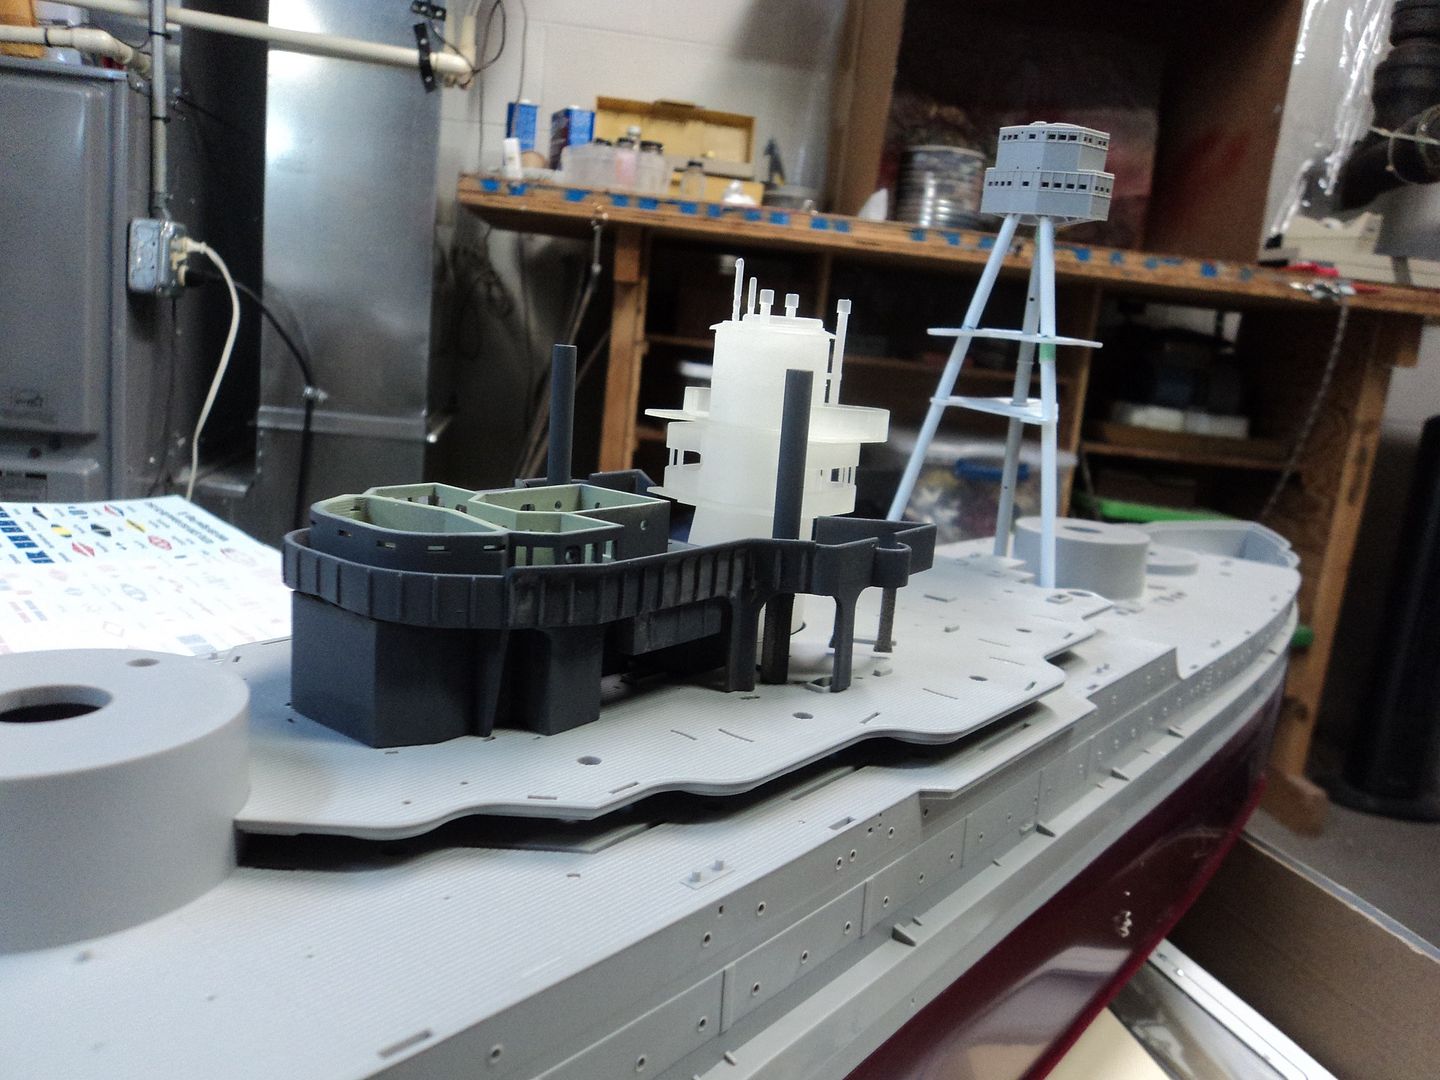
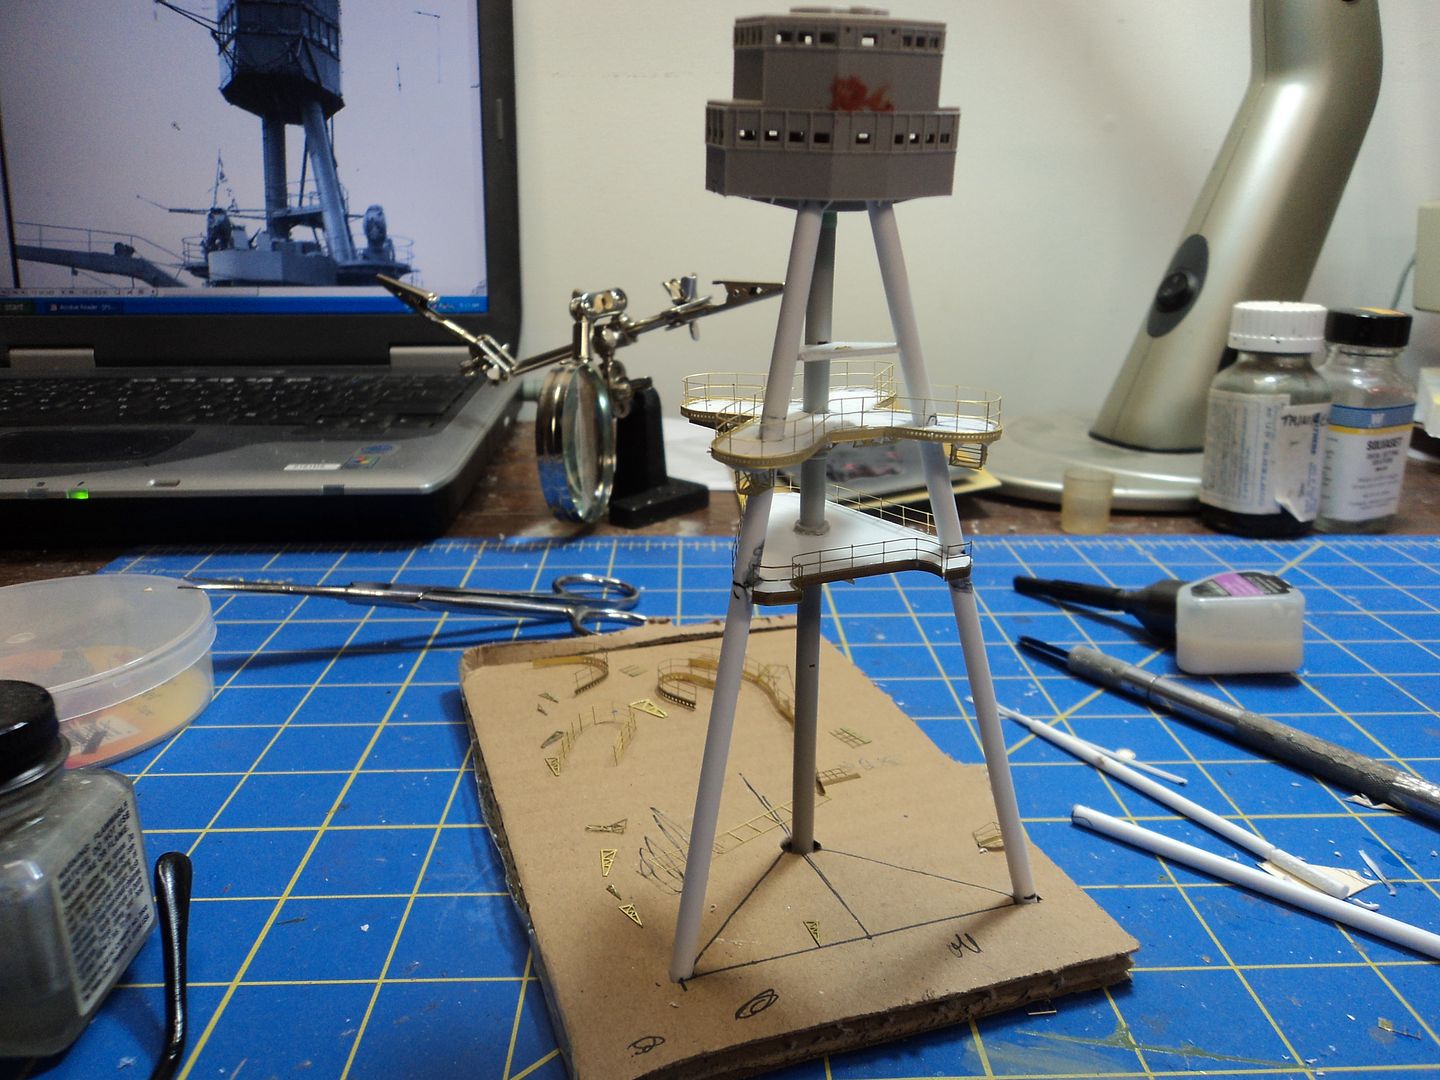
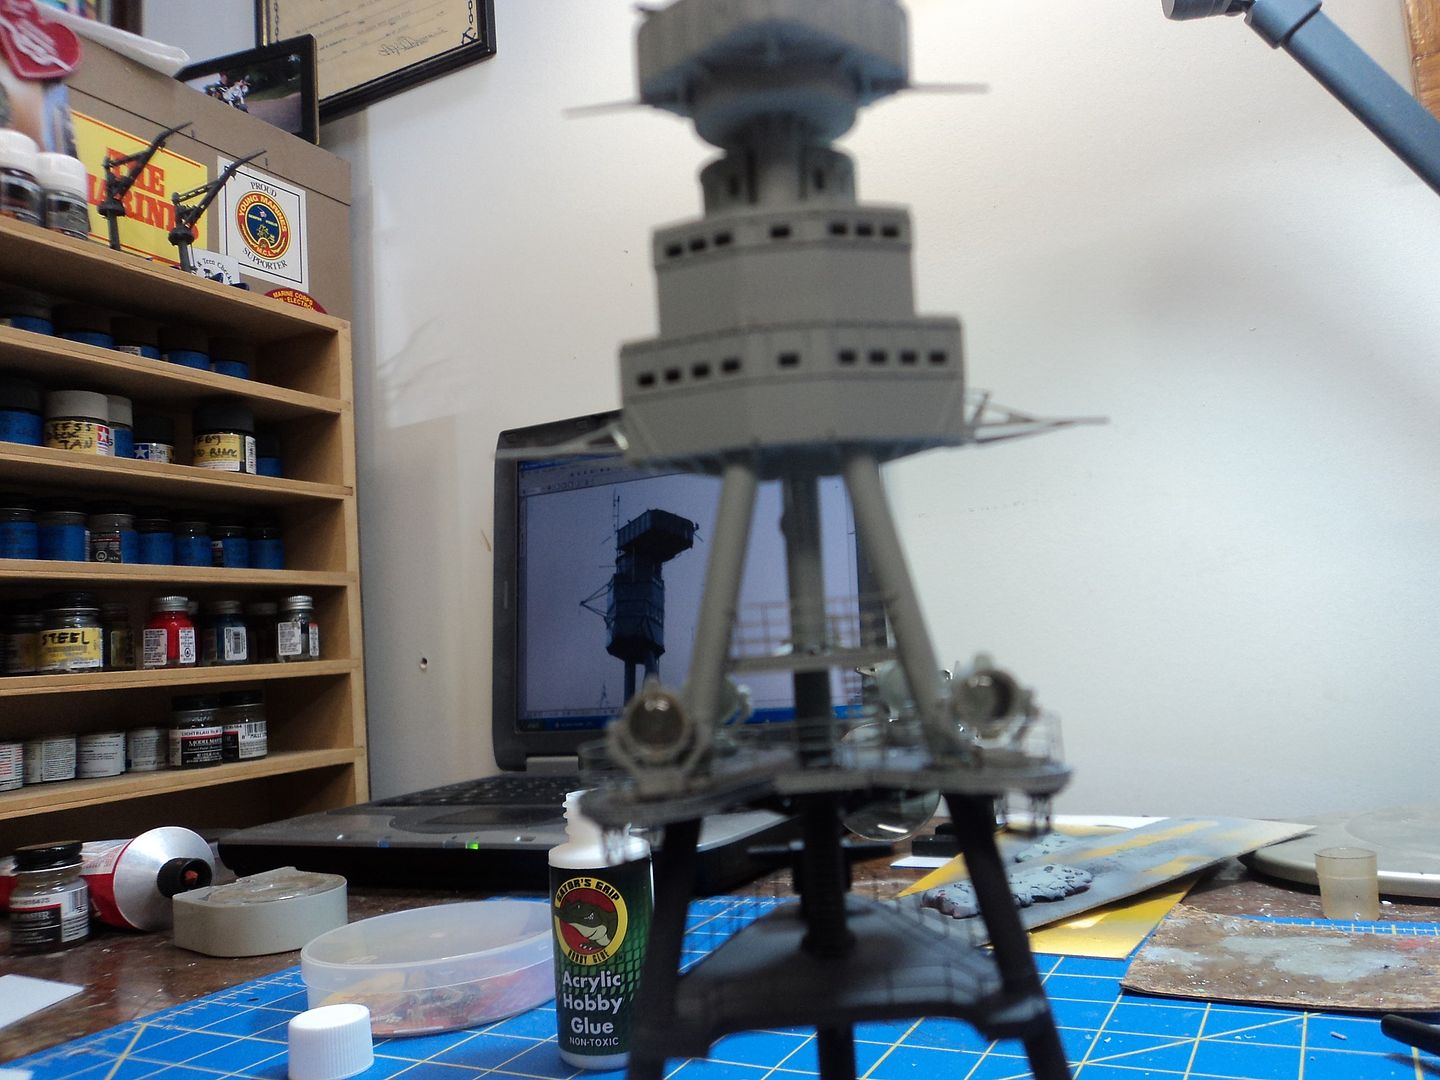
Another update before I head into the usual stuff like boats, airplanes etc. I am calling the main mast finished except for more rigging and the ladders on each of the forelegs of the tripod as I don't want to deal with those when I am handling the mast to fix to the model.
I put the railings off the Eduard set for the mainmast on the upper triangular platform, the ladder and the opening safety railings. Due to the Pennsylvania structure being different I had to trim a little on each side of the triangular platform railings as the mating surface was narrower. The Arizona has a smaller platform above this one, haply, Pennsylvania doesn't. I made a mast/antenna out of a piece of brass rod and stiff wire, Bob's Buckles eyelets and tubes for the support structure and a piece of red streched sprue for the top aircraft warning light. The kit provided one was close and I was going to use it, but; I was challenged (read shamed) by Chuck Bauer to attempt to duplicate the real one, so I did, I am pleased with the results.
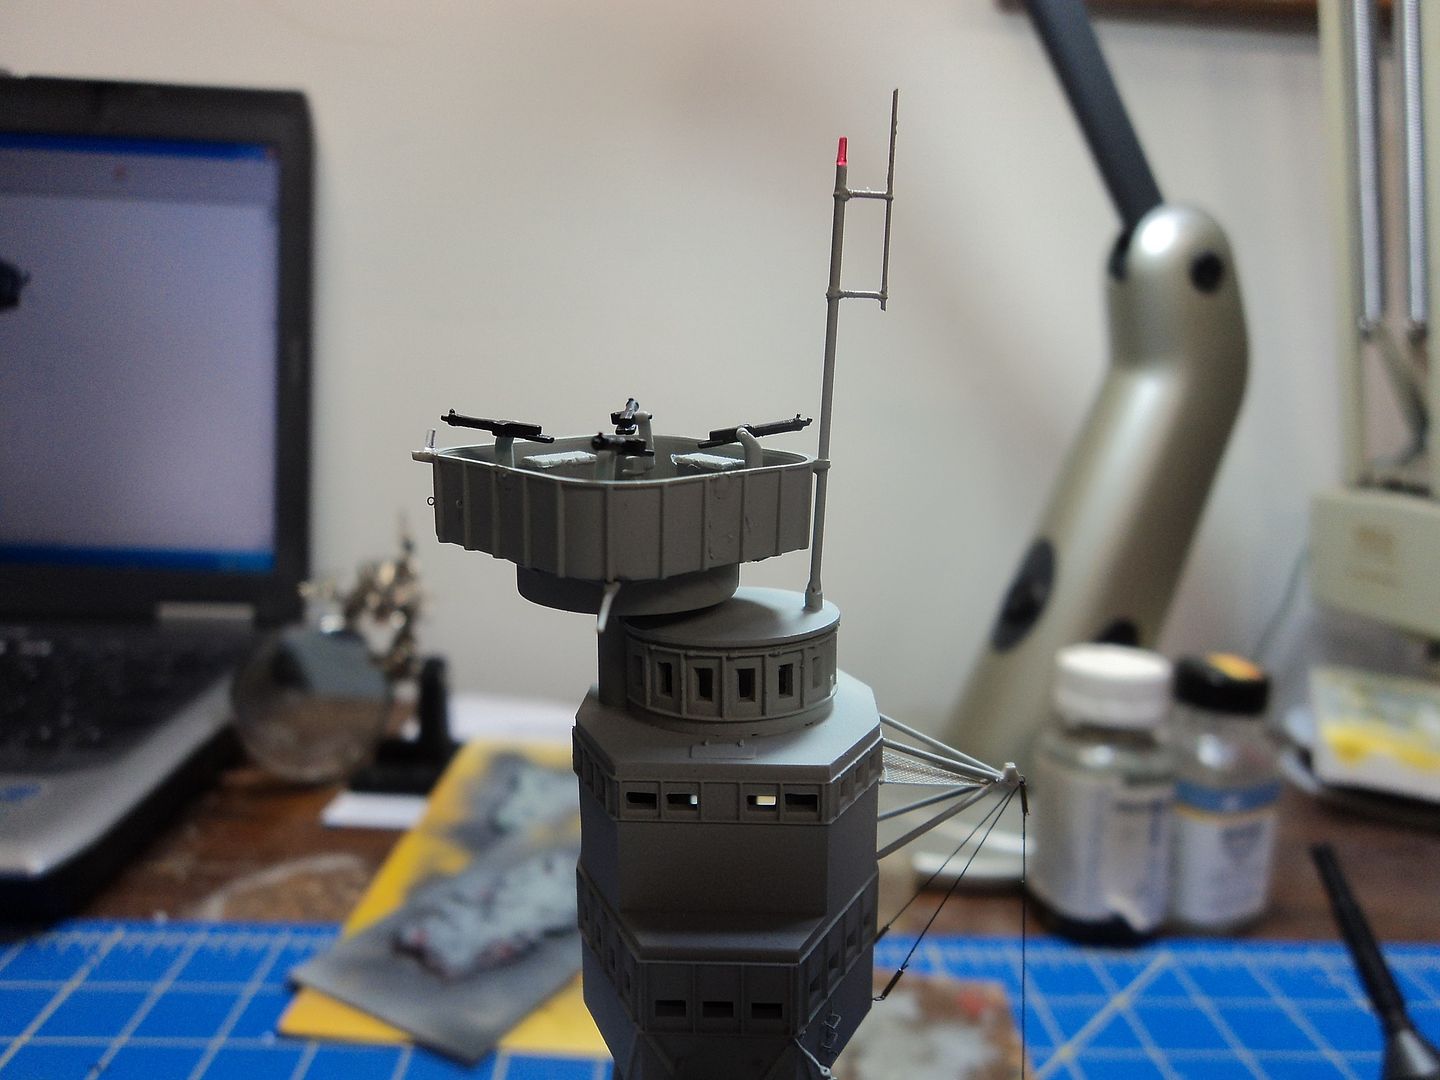
I am not sure if the Pennsylvania had 4 or 3 .50's in the bird bath, so I went with the kit provided 4, I like the semitry of the four guns and the four lockers. I had a hatch off a spare GMM PE fret and used it for the entrance hatch to the Bird Bath.
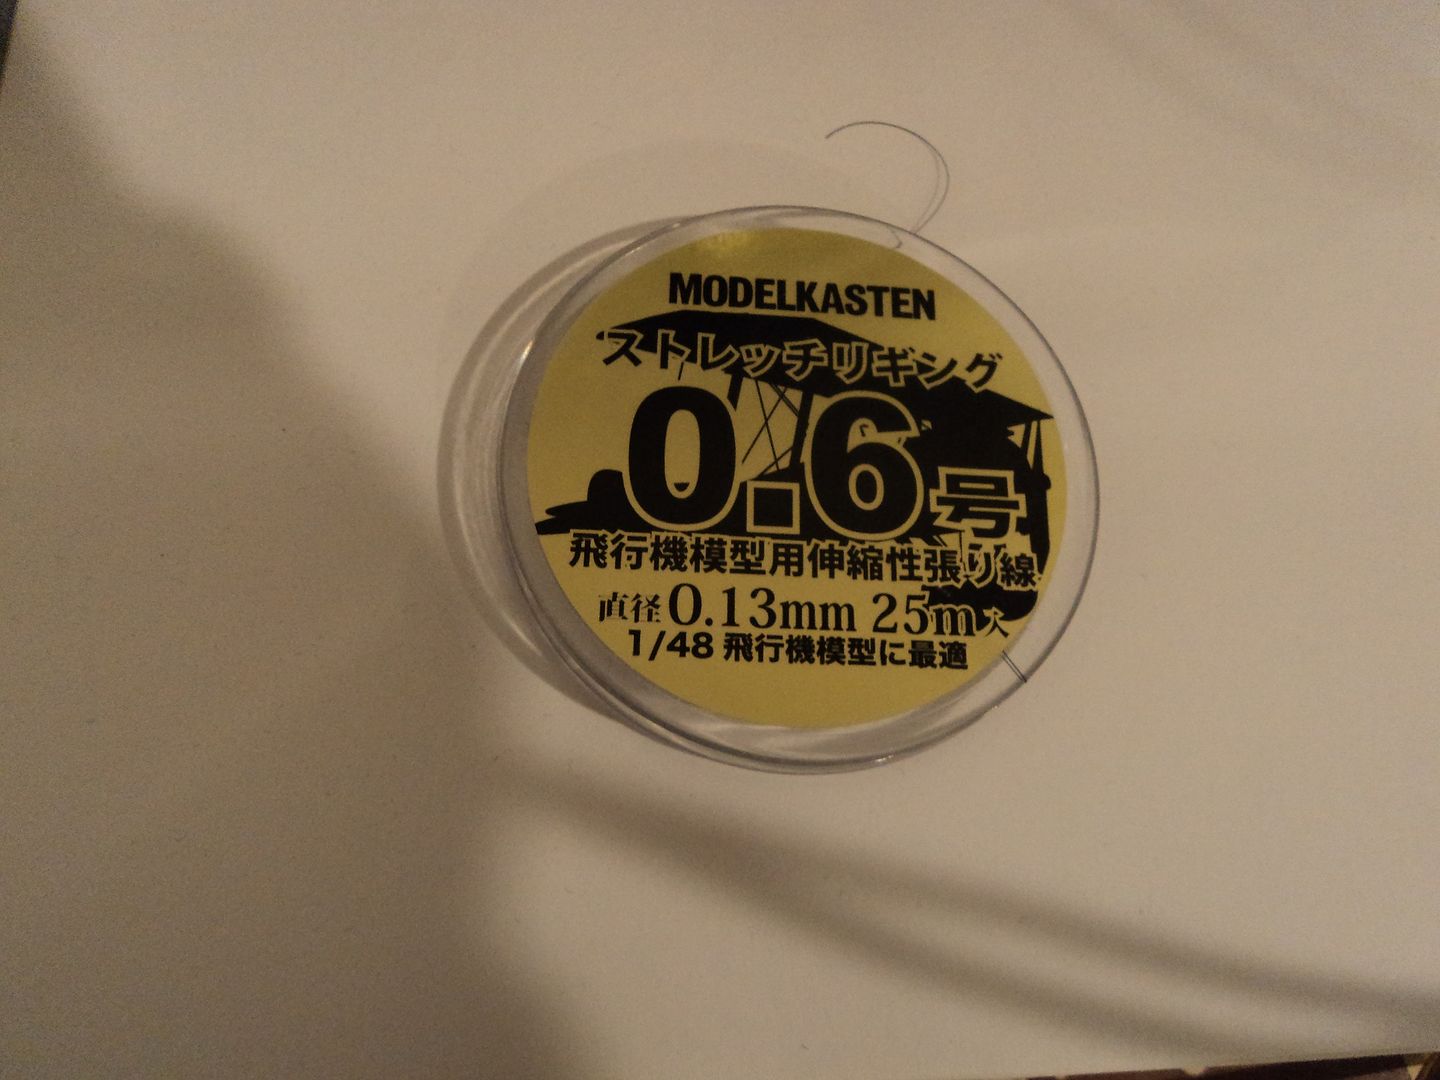
Hank Strub, BB62VET, sent me some ladder rungs with a drilling template so I used those for the rungs on the main top. I also used some Plastruct for the corner supports of the top. For the Netting I used the appropriate pieces off the MKI set I got for the Arizona, they look pretty decent. The yards at the aft corners of the top that the kit provides are wrong, so I used stiff wire bent to the approximate angel and Gaspatch 1/48 Turnbuckles for the support turnbuckles. I think it looks rather convincing. Pennsylvania did retain the aft range clock during the time frame I am depicting which is about August 1941. For the aft antenna spreader supports I used the appropriate kit parts, when set, I drilled a hole, inserted an eyelet and rigged the supports using the MODELKASTEN .03MM Flexible line available from "Sprue Brothers."
The ladders I used were from the Eduard set for the mainmast and spares. I used Gator Grip Thick glue for attaching all the PE. I really like the stuff, it is strong but flexible and forgiving. If you bump a piece of PE, and who hasn't? The PE doesn't fly off, it stays put. I use CA glue for attaching the eyelets and the rigging once it run through the tube.
This was one tough structure to "scratch build." I am neither a draftsman nor an engineer and it took me quite a lot of trial and error to get it to this point. There is still some error, but; I am happy with it and I want to move on. I think once it is fixed to the model and the model is done it will look just fine.
One last note. The paint I am using for the 5-L Light Grey is a mixture I made using Tamiya Acrylics as recommended for the 3D superstructure. I sprayed some of it and some of the Colour Coats 5-L and it is a perfect match. I was quite pleased with that result as well.
Thanks for looking and checking out the build.
Another update before I head into the usual stuff like boats, airplanes etc. I am calling the main mast finished except for more rigging and the ladders on each of the forelegs of the tripod as I don't want to deal with those when I am handling the mast to fix to the model.
I put the railings off the Eduard set for the mainmast on the upper triangular platform, the ladder and the opening safety railings. Due to the Pennsylvania structure being different I had to trim a little on each side of the triangular platform railings as the mating surface was narrower. The Arizona has a smaller platform above this one, haply, Pennsylvania doesn't. I made a mast/antenna out of a piece of brass rod and stiff wire, Bob's Buckles eyelets and tubes for the support structure and a piece of red streched sprue for the top aircraft warning light. The kit provided one was close and I was going to use it, but; I was challenged (read shamed)


I am not sure if the Pennsylvania had 4 or 3 .50's in the bird bath, so I went with the kit provided 4, I like the semitry of the four guns and the four lockers. I had a hatch off a spare GMM PE fret and used it for the entrance hatch to the Bird Bath.
Hank Strub, BB62VET, sent me some ladder rungs with a drilling template so I used those for the rungs on the main top. I also used some Plastruct for the corner supports of the top. For the Netting I used the appropriate pieces off the MKI set I got for the Arizona, they look pretty decent. The yards at the aft corners of the top that the kit provides are wrong, so I used stiff wire bent to the approximate angel and Gaspatch 1/48 Turnbuckles for the support turnbuckles. I think it looks rather convincing. Pennsylvania did retain the aft range clock during the time frame I am depicting which is about August 1941. For the aft antenna spreader supports I used the appropriate kit parts, when set, I drilled a hole, inserted an eyelet and rigged the supports using the MODELKASTEN .03MM Flexible line available from "Sprue Brothers."


The ladders I used were from the Eduard set for the mainmast and spares. I used Gator Grip Thick glue for attaching all the PE. I really like the stuff, it is strong but flexible and forgiving. If you bump a piece of PE, and who hasn't? The PE doesn't fly off, it stays put. I use CA glue for attaching the eyelets and the rigging once it run through the tube.

This was one tough structure to "scratch build." I am neither a draftsman nor an engineer and it took me quite a lot of trial and error to get it to this point. There is still some error, but; I am happy with it and I want to move on. I think once it is fixed to the model and the model is done it will look just fine.
One last note. The paint I am using for the 5-L Light Grey is a mixture I made using Tamiya Acrylics as recommended for the 3D superstructure. I sprayed some of it and some of the Colour Coats 5-L and it is a perfect match. I was quite pleased with that result as well.
Thanks for looking and checking out the build.
Mark
Master Gunnery Sergeant USMC (Ret.)
http://www.modelshipgallery.com/gallery ... index.html
On the bench:
1/200 USS Enterprise, CV-6
Master Gunnery Sergeant USMC (Ret.)
http://www.modelshipgallery.com/gallery ... index.html
On the bench:
1/200 USS Enterprise, CV-6
-
ArizonaBB39
- Posts: 1321
- Joined: Sat Jan 08, 2005 7:29 pm
- Location: Tempe, Arizona
- Contact:
Re: 1/200 Arizona to Pennsylvania Conversion
Excellent work! I never noticed how different the main mast was from the Arizona's. I always assumed they were the same. Your build is inspiring and a great help for me on mine. Hopefully after this pay day I'll have a little money in my model fund to buy some odds and ends I need to continue on my build. Keep up the great work, your build is one of my main references 