1/700 Amagi diorama
Moderators: MartinJQuinn, JIM BAUMANN, Jon, Dan K
-
MartinJQuinn

- Posts: 8544
- Joined: Tue Jan 11, 2005 1:40 pm
- Location: New Jersey
Re: 1/700 Amagi diorama
You are a magician! Excellent, excellent work.
Martin
"Tomorrow is the most important thing in life. Comes into us at midnight very clean. It's perfect when it arrives and it puts itself in our hands. It hopes we've learned something from yesterday." John Wayne
Ship Model Gallery
"Tomorrow is the most important thing in life. Comes into us at midnight very clean. It's perfect when it arrives and it puts itself in our hands. It hopes we've learned something from yesterday." John Wayne
Ship Model Gallery
-
Dan K
- Posts: 9053
- Joined: Tue Jan 11, 2005 10:56 am
- Location: New York City
Re: 1/700 Amagi diorama
Yes, let's go with A.W.E.S.O.M.E.
-
Joe Simon
- Posts: 825
- Joined: Sat Jan 24, 2009 5:16 pm
- Location: Wisconsin
Re: 1/700 Amagi diorama
He is the master!!! 
-
J. Soca

- Posts: 2161
- Joined: Sun Dec 03, 2006 5:36 pm
- Location: About 50 miles away from the Gulf of Mexico ( traveling W is you do so :)
Re: 1/700 Amagi diorama
It just keeps getting better and better! 
Jose
Jose
-
marijn van gils
- Posts: 2686
- Joined: Tue Feb 06, 2007 10:24 am
- Location: Belgium
Re: 1/700 Amagi diorama
Many thanks everyone!
Your nice words are certainly motivating me to get on with it and finally finish construction on this project.
Cheers,
Marijn
Your nice words are certainly motivating me to get on with it and finally finish construction on this project.
Cheers,
Marijn
-
zs180

- Posts: 670
- Joined: Sun Oct 12, 2008 3:55 am
- Location: Budapest, Hungary
Re: 1/700 Amagi diorama
Marijn you have managed to raise the bar in this segment. I cannot recall having seen such extensive battle damage so faithfully reproduced before. I am looking forward to the painting phase of the build with great anticipation as we all know that you are a great master of painting and weathering. Ever since I first read about this dio I have been wondering how you are going to paint the vertical lines of deposits caused by high and low tides. It is extremely difficult to mask. Maybe I'd pour some stained water around her repeatedly and wait till it evaporates...
George P�k
George P�k
-
marijn van gils
- Posts: 2686
- Joined: Tue Feb 06, 2007 10:24 am
- Location: Belgium
Re: 1/700 Amagi diorama
Many thanks Georgy!
Those lines are certainly a very eye-catching weathering technique, and one of the most interesting painting challenges for this project indeed! I'm not completely sure yet how I will do them.
I was playing with the idea of setting the model in stained water to let this evaporate, like you suggest. This might give a very realistic result, but might be hard to control. I will have to do some tests. But in any case, I would have to repeat it several times to get the multi-layered effect of the real thing.
Most likely, I will just hand-paint the effect. This will also be a slow process however: paint small sections at a time, carefully blending the edges while proceeding. And repeating this for each individual line� I will have to be careful to keep it sufficiently strait for a realistic effect, but it should give me total control on the opacity, color, and width of each line.
So I'm still in doubt!
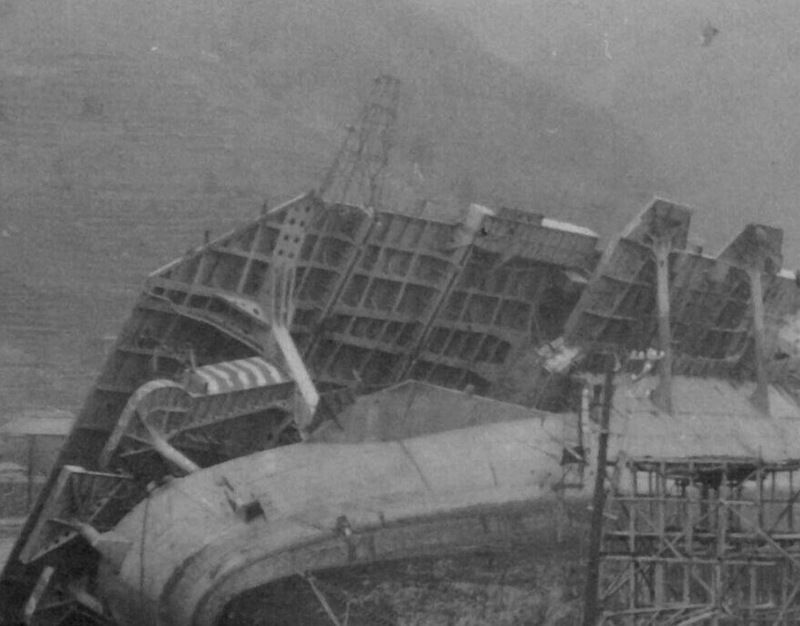
Interestingly, there not only are these lines which formed after the ship capsized, but there is also a line that formed when the ship was still upright in the water (in the red circle in the picture below). Note also how the hull red above that line has faded a lot, while the color below is much more saturated.
So many interesting weathering effects on this ship! I'm looking forward to getting some paint on her�
Cheers,
Marijn

Those lines are certainly a very eye-catching weathering technique, and one of the most interesting painting challenges for this project indeed! I'm not completely sure yet how I will do them.
I was playing with the idea of setting the model in stained water to let this evaporate, like you suggest. This might give a very realistic result, but might be hard to control. I will have to do some tests. But in any case, I would have to repeat it several times to get the multi-layered effect of the real thing.
Most likely, I will just hand-paint the effect. This will also be a slow process however: paint small sections at a time, carefully blending the edges while proceeding. And repeating this for each individual line� I will have to be careful to keep it sufficiently strait for a realistic effect, but it should give me total control on the opacity, color, and width of each line.
So I'm still in doubt!
Interestingly, there not only are these lines which formed after the ship capsized, but there is also a line that formed when the ship was still upright in the water (in the red circle in the picture below). Note also how the hull red above that line has faded a lot, while the color below is much more saturated.
So many interesting weathering effects on this ship! I'm looking forward to getting some paint on her�
Cheers,
Marijn

-
EJFoeth
- Posts: 2917
- Joined: Wed Jan 21, 2009 1:51 pm
Re: 1/700 Amagi diorama
You can always apply a few optical techniques to aid with the painting... horizontal laser-line approaches... flick it on every so now and then and the rest should be fairly easy. Make sure it's not above class II (preferably below) because you do not want it to be very bright. They can be very cheap and you can attach them to some pedestal to move them around on a flat surface... laser-upgraded camera obscura... 

Enough colors:
http://laserpointerforums.com/f44/pleas ... 86299.html
Enough colors:
http://laserpointerforums.com/f44/pleas ... 86299.html
-
Aop Aur

- Posts: 972
- Joined: Thu Jul 02, 2015 1:06 am
- Location: Bangkok, Thailand
Re: 1/700 Amagi diorama
Water deposit marks? This sounds absolutely interesting! If the techniques you are going to experiment work, we have to see some tutorials!!
Aop
Aop
On the way:
--1/350 Tamiya DKM Tirpitz Nov 1944
--1/350 scratch-build HMS Lion never built battleship (1938)
And our artworks!
--1/350 Tamiya DKM Tirpitz Nov 1944
--1/350 scratch-build HMS Lion never built battleship (1938)
And our artworks!
-
marijn van gils
- Posts: 2686
- Joined: Tue Feb 06, 2007 10:24 am
- Location: Belgium
Re: 1/700 Amagi diorama
Thanks Evert-Jan! That might come in handy indeed!
Thanks Aop! Of course I'll post my progress here, and the technique(s) used!
Cheers,
Marijn
Thanks Aop! Of course I'll post my progress here, and the technique(s) used!
Cheers,
Marijn
-
MartinJQuinn
- Posts: 8544
- Joined: Tue Jan 11, 2005 1:40 pm
- Location: New Jersey
Re: 1/700 Amagi diorama
And that is why this is the best ship modeling site on the internet. The willingness of supremely talented modelers to share not only what they do, but HOW they do it, with the rest of us hacks.marijn van gils wrote:Of course I'll post my progress here, and the technique(s) used!
Martin
"Tomorrow is the most important thing in life. Comes into us at midnight very clean. It's perfect when it arrives and it puts itself in our hands. It hopes we've learned something from yesterday." John Wayne
Ship Model Gallery
"Tomorrow is the most important thing in life. Comes into us at midnight very clean. It's perfect when it arrives and it puts itself in our hands. It hopes we've learned something from yesterday." John Wayne
Ship Model Gallery
-
robn1

- Posts: 48
- Joined: Tue Aug 30, 2016 8:11 pm
- Location: Waikato, New Zealand
Re: 1/700 Amagi diorama
100%MartinJQuinn wrote:And that is why this is the best ship modeling site on the internet. The willingness of supremely talented modelers to share not only what they do, but HOW they do it, with the rest of us hacks.marijn van gils wrote:Of course I'll post my progress here, and the technique(s) used!
Cheers
Rob
-
marijn van gils
- Posts: 2686
- Joined: Tue Feb 06, 2007 10:24 am
- Location: Belgium
Re: 1/700 Amagi diorama
Thanks Martin and Rob!
But don't give me too much credit; I'm just doing what everyone is doing here.
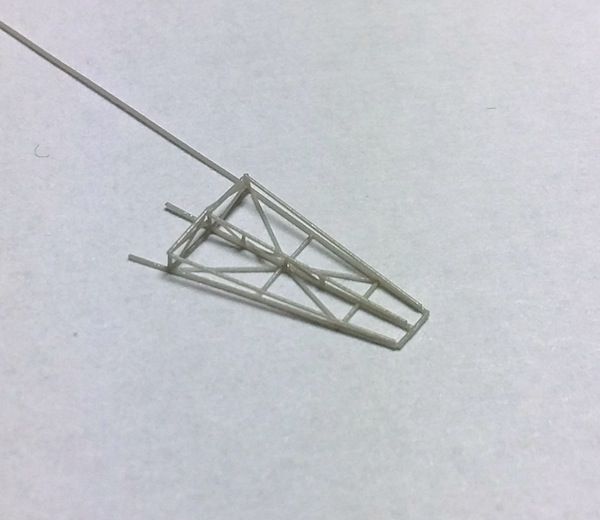
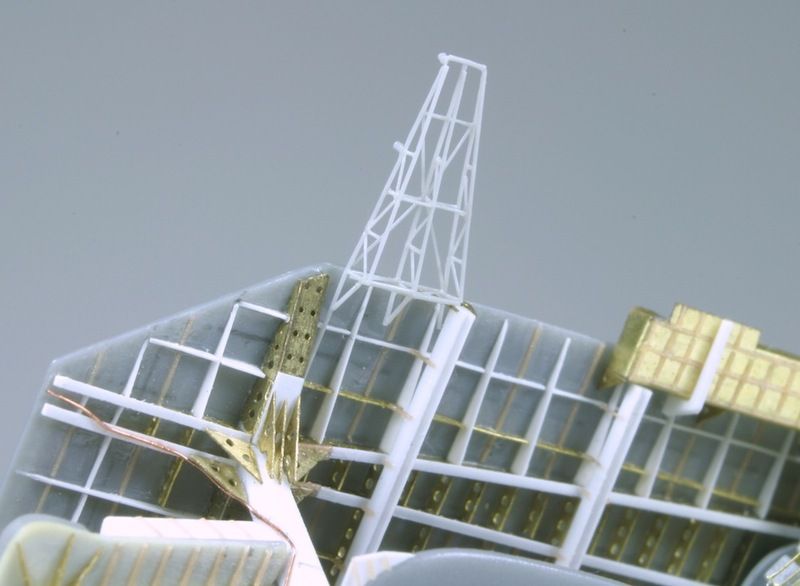
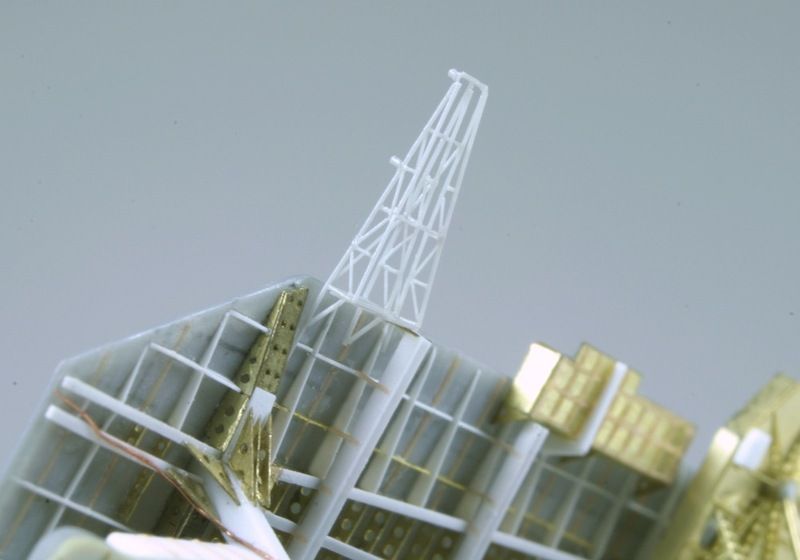
Meanwhile, I finally got a bit of workbench-time.
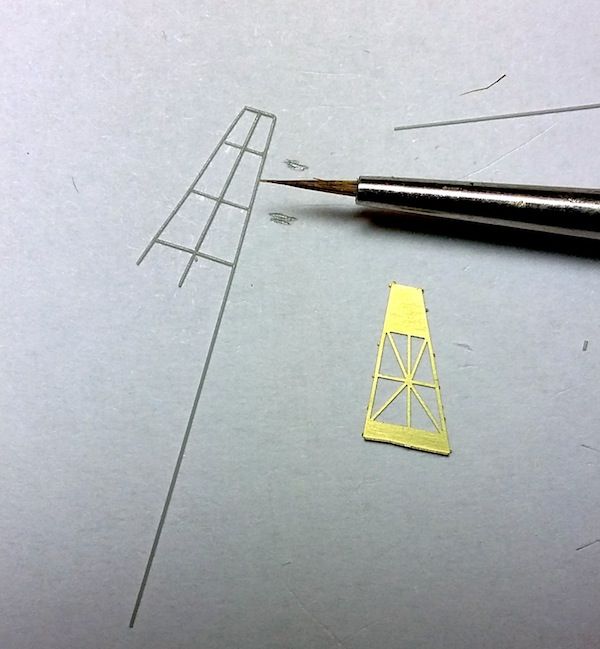
First, I tackled this 'wingy' platform at the rear corner of the flight deck:
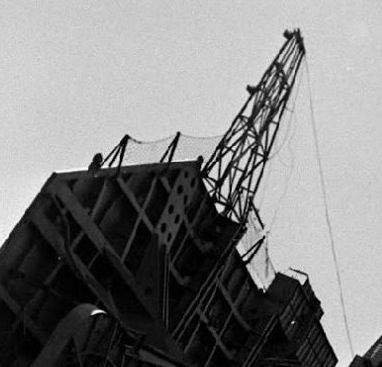
The PE item included in the Lionroar set for Unryu does look like what is visible on photo's of Katsuragi, and on plans of Unryu, but unfortunately doesn't resemble the structure visible in the photo's of Amagi:
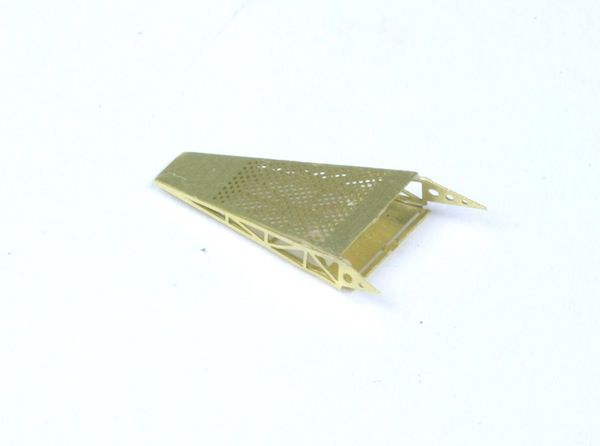
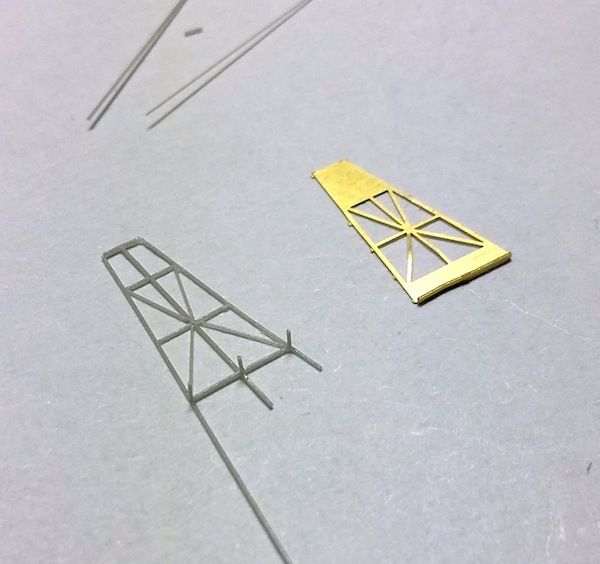
My first plan was to cobble it together with different bits of PE, starting with some parts of the above piece. But I couldn't get this to work� Guess I have to buy me some more PE!
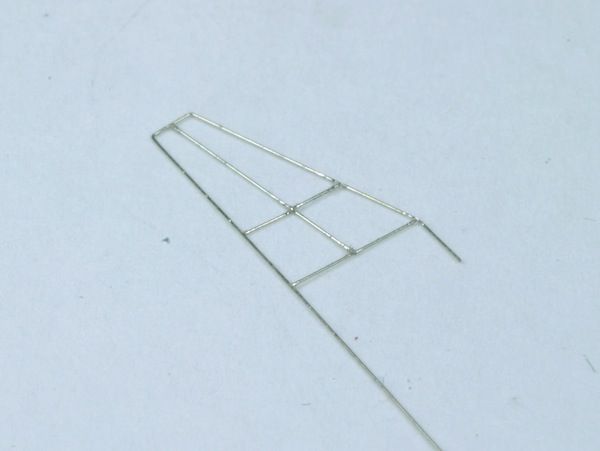
Next plan was to scratch build it with 0,1mm nickel silver wire. It started out ok, but I quickly found that on something this fine, even the slightest build-up of CA glue on the joints shows too much. Gluing with CA lacked adjustability too. I abandoned it at this stage:
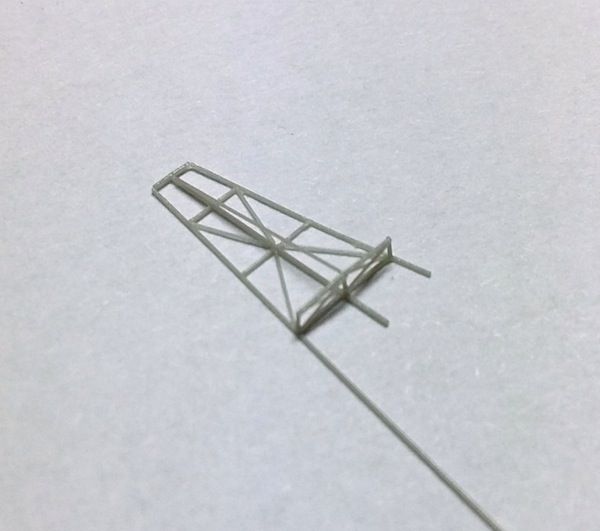
Then I resorted to stretched sprue, glued with Tamiya extra thin (green cap). This took some time and care, but worked very well!
The trick is to start simple, and keep one piece too long so I could use it as a handle:
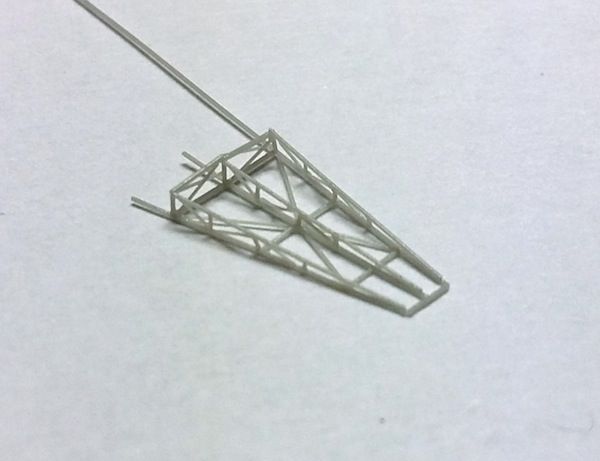
I worked on top of piece of paper. This soaked up excess glue, so the stretched sprue wouldn't stick to the work surface too much. It stuck a bit to the paper anyway, but not so much that it was easy to pry loose with a scalpel.
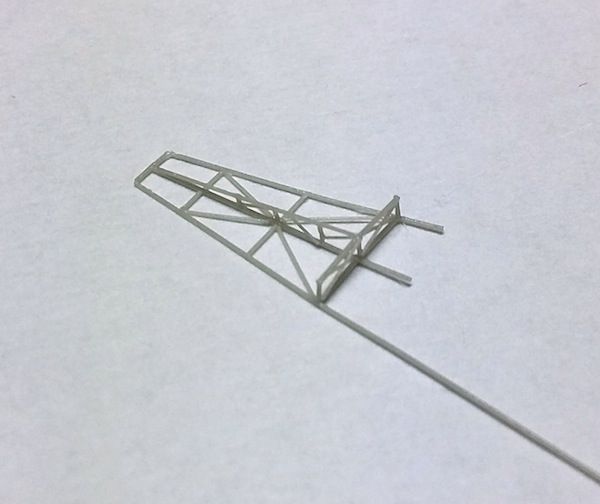
Next, I started adding piece by piece, letting assemblies dry in between:
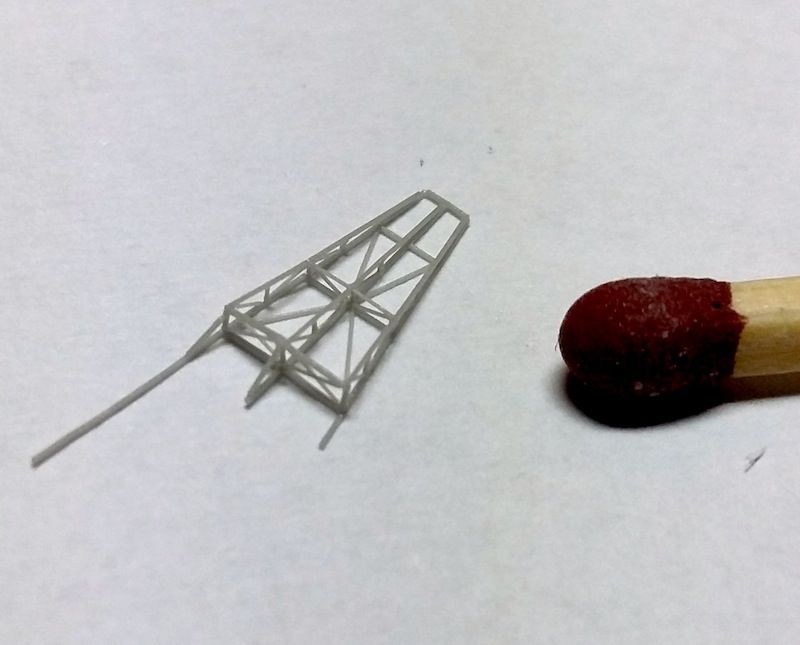
I have been told that a match doesn't really show how small these kind of details really are. So now I'll try with my index finger:
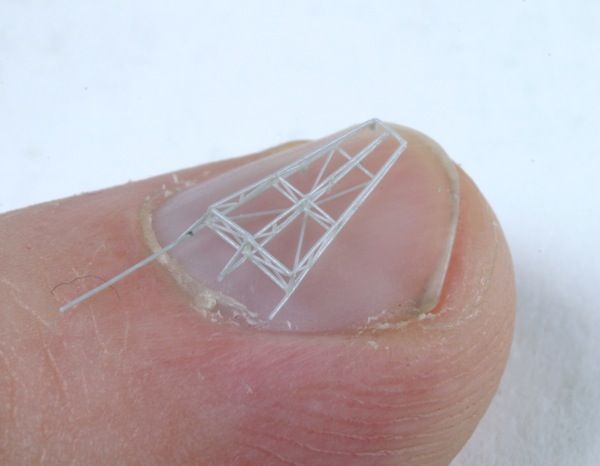
And before someone comments on my finger: it is actually very fine and elegant, thank you very much!
And the piece in it's place. Well, more or less, as I left it loose with the 'handle' still in place for painting.
Cheers,
Marijn
But don't give me too much credit; I'm just doing what everyone is doing here.
Meanwhile, I finally got a bit of workbench-time.
First, I tackled this 'wingy' platform at the rear corner of the flight deck:


The PE item included in the Lionroar set for Unryu does look like what is visible on photo's of Katsuragi, and on plans of Unryu, but unfortunately doesn't resemble the structure visible in the photo's of Amagi:

My first plan was to cobble it together with different bits of PE, starting with some parts of the above piece. But I couldn't get this to work� Guess I have to buy me some more PE!
Next plan was to scratch build it with 0,1mm nickel silver wire. It started out ok, but I quickly found that on something this fine, even the slightest build-up of CA glue on the joints shows too much. Gluing with CA lacked adjustability too. I abandoned it at this stage:

Then I resorted to stretched sprue, glued with Tamiya extra thin (green cap). This took some time and care, but worked very well!
The trick is to start simple, and keep one piece too long so I could use it as a handle:

I worked on top of piece of paper. This soaked up excess glue, so the stretched sprue wouldn't stick to the work surface too much. It stuck a bit to the paper anyway, but not so much that it was easy to pry loose with a scalpel.
Next, I started adding piece by piece, letting assemblies dry in between:


I have been told that a match doesn't really show how small these kind of details really are. So now I'll try with my index finger:

And before someone comments on my finger: it is actually very fine and elegant, thank you very much!
And the piece in it's place. Well, more or less, as I left it loose with the 'handle' still in place for painting.


Cheers,
Marijn
-
Goodwood

- Posts: 1257
- Joined: Mon Nov 11, 2013 11:01 pm
- Location: Detroit area
Re: 1/700 Amagi diorama
Are you sure you're not some kind of brain surgeon, m8? 
Sean Nash, ACG (aircraft camo gestapo)
On the ways:
1/200 Trumpeter HMS Nelson
1/700 Tamiya USS Yorktown CV-5
In the stash:
1/35 Italiari PT-109
1/35 Tamiya "Pibber" Patrol Boat
1/350 Trumpeter USS Yorktown CV-10
On the ways:
1/200 Trumpeter HMS Nelson
1/700 Tamiya USS Yorktown CV-5
In the stash:
1/35 Italiari PT-109
1/35 Tamiya "Pibber" Patrol Boat
1/350 Trumpeter USS Yorktown CV-10
-
Milan Kuliffay

- Posts: 65
- Joined: Sat Apr 26, 2014 10:15 am
- Location: Stupava, Slovakia
Re: 1/700 Amagi diorama
Marijn
-
Stefano Salesi

- Posts: 410
- Joined: Fri Aug 29, 2008 6:17 am
- Location: Lerici
Re: 1/700 Amagi diorama
what the...
that is amazing. your precision in working on small details is stunning.
"we are not worthy, we are not worthy" (cit.)
that is amazing. your precision in working on small details is stunning.
"we are not worthy, we are not worthy" (cit.)
On the bench: evolution of Royal Italian Navy Ironclads-1/700
-Regia Nave Roma...no, not that one!
-Regia Nave Roma...no, not that one!
-
Dan K
- Posts: 9053
- Joined: Tue Jan 11, 2005 10:56 am
- Location: New York City
Re: 1/700 Amagi diorama
Beautiful. The difference between the PE and the photo of the real thing is that the netting that layers over the top of the framework has disappeared, or been removed.
-
Joe Simon
- Posts: 825
- Joined: Sat Jan 24, 2009 5:16 pm
- Location: Wisconsin
Re: 1/700 Amagi diorama
This is amazing!!!!!!!!!!!!
-
johndon

- Posts: 1033
- Joined: Mon Jan 10, 2005 3:39 pm
- Location: Newcastle Upon Tyne, England
Re: 1/700 Amagi diorama
Superb work.
John
John