I'll try to mix facts (F) with opinion (O)

1) Portholes - drill out, or fill with dark grey-black wash? This is 1/700 scale remember.
(O) I would never drill out portholes (only to fill them with some stock styrene, slightly recessed)
2) Little cranes next to various hatches - remove them for battle? Makes a bit of an easier build.
(F) The two torpedo davits near the breakwater were nearly always stored, so yes. The other smaller davits near hatches (tiny actually in 1/700) were folded down. Note that the ladders from the fwd superstructure to the fwd deck, and the 4 ladders from from the superstructure towards the quarterdeck were also stored inside when at sea. The largest derricks were nearly always stored (bulkhead of the bridge, for example).
3) Other hatches in hull - model all closed as prepped for battle?
(F) Closed.
4) Hatches in the deck - all closed for battle?
(F) Closed. That is, perhaps some hatchways in the mid superstructure were open, but I doubt that for battle.
5) Lifeboats - present on the deck or some taken below deck?
(F) The only lifeboats are Carley and Denton floats; the rest of the boats were not technically lifeboats. But in any case: all on deck.
6) Lifeboats - covered with light gray or white color tarps or uncovered?
(F) All covered. This is one area where I will have some "artistic license" introduce an error and NOT add these covers (same for hawser reals).
7) amount of weathering on the anti-fouling paint - discolored already or still bright red? Survivors said it was black when it upturned, but it could have been oil I guess...?
(?) Don't know
8 ) hull anchor howse pipes, areas on the bow - rusty still? Overall how weathered would the hull be? I know they kept ships clean but generally speaking RN warships were often in much less kept shape than Kreigsmarine (I guess because they were actually used...)
(F) HMS Hood was frequently (!) repainted in 1941 and should be very well kept. However, some sediment and such is always present near the hawse pipes, even though the entire area was usually hosed. So some room for fouling there, but keep it subtle.
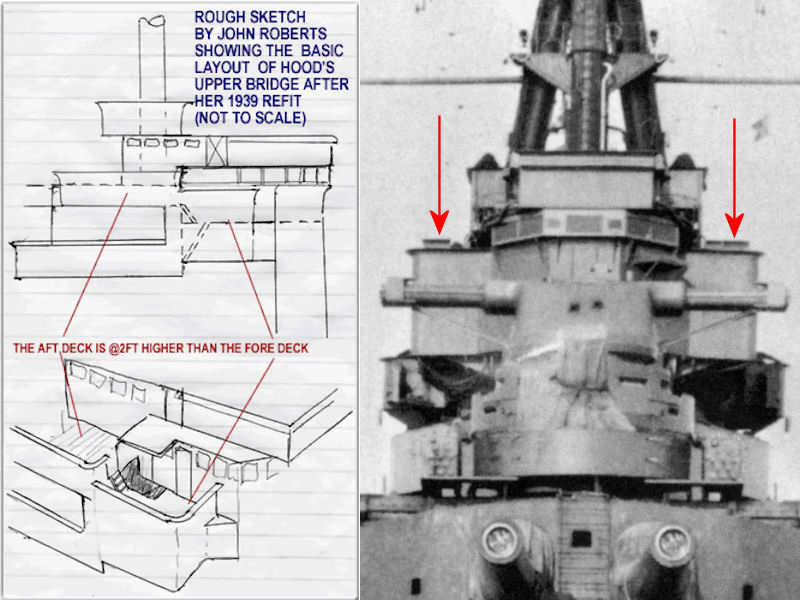
9) PE - Flyhawk - do you glue on superstructure brass panels on TOP of the plastic pieces or use them as replacement of plastic parts? Talking about conning tower for example I have the whole thing supposedly folding into a superstructure and I wonder if this is legit or it will be so brittle I will regret it...
(?) Don't know about kits and/or PE sets
10) who has rigging instructions for Hood? a good source i welcome. I dont wanna fully rig it in this scale... but basics are a must.
(?) How to do the rigging itself, or, how to do the rig? If the latter, I guess the Anatomy of the Ship is a good starting point? (Haven't studied the rig very well so far)


 if you have a painting technique that works for you to simulate wood decks I would agree the stick-on ones aren't essential, but they are handy.
