The Ship Model Forum

The Ship Modelers Source
It is currently Wed Apr 24, 2024 5:54 pm

All times are UTC - 6 hours [ DST ]


Post new topic Reply to topic  [ 1221 posts ]  Go to page Previous  1 ... 32, 33, 34, 35, 36, 37, 38 ... 62  Next
Author Message
PostPosted: Wed Nov 24, 2021 3:10 am 
Offline

Joined: Tue Feb 06, 2007 10:24 am
Posts: 2498
Location: Belgium
Many thanks Eberhard!

I didn't know of that 'nanomill'. It looks very nice indeed! But it seems limited to very small parts only (tiny bed). I will probably like to make some larger pieces too somewhere in the future (who knows when I want to return to 1/35 scale subjects?).

I was eyeing the Proxxon MF70 too. It gets good reviews regarding precision, has a larger bed but is still small and relatively light. I don't have a big workshop as I prefer to model in the living room (I have my own little corner there), so I need to be able to store it away easily. It is also relatively inexpensive. The bigger Proxxon models may be more versatile (for even much bigger parts), but they are a lot more costly, and much bigger and heavier.
The only disadvantage I see is indeed that downfeed hand-wheel. Also, it doesn't have a downfeed lever (drill-press style), which would be handy for drilling slightly larger holes. But of course that's not very common for milling machines...

If you think of any other options, they're still welcome! This would be a good birthday present to myself... :big_grin:


Report this post
Top
 Profile  
Reply with quote  
PostPosted: Wed Nov 24, 2021 3:29 am 
Offline

Joined: Wed Jan 21, 2009 1:51 pm
Posts: 2858
Yes, please be my guinea pig for testing that Proxxon and report back :big_grin: A small milling machine has been on my wanted list for a while, but Proxxon tools can be a bit hit & miss. This one does have 20,000 rpm, so drilling in small holes may work (the lathe and drill press are too slow to drill brass <0.5mm). What I read on drilling holes is that having a feel for the force you exert is important, and with the Proxxon with that wheel that is pretty much out of the question? The drill press isn't fast enough, plus, it flexes a bit when you pull the lever and that may kill your fine drills.
A small antique as Eberhard indicated is probably much much better....


Report this post
Top
 Profile  
Reply with quote  
PostPosted: Wed Nov 24, 2021 4:29 am 
Offline
User avatar

Joined: Wed Sep 28, 2011 12:04 pm
Posts: 1820
Location: Paris
The problem is that with size one typically looses sensitivity because of the larger masses that need to be moved and because the quality of the finish on feed-screws and slide-fitting is not that good on consumer-market machines. The Swiss (used to) make very heavy toolroom-machines to drill holes down to 0.1 mm or even less, but apart from the price, you are looking at chunks of a quarter ton of weight or more :big_grin:

There is on the German ebay a guy who sells from time to time conversion sets for watchmakers lathes similar to the Nanomill or what I did. Don't have his user name to hand unfortunately. I think there was also a sort of Web-site, but I don't seem to have bookmarked it.

There was also a guy in the UK who sort of copied (and modernised) the Wolf, Jahn & Co. milling machine, like the one I have, but I don't know, whether he still produces them: http://www.lathes.co.uk/stevens/. It may be worthwhile giving him a ring. He also advertised the machine here: https://www.worthpoint.com/worthopedia/watchmakers-micro-milling-machine-425613167.

A problem with nearly all small milling machines is that the down-feed handle is on top the machine, which makes its use very tiring and somewhat acrobatic, when you have to watch also close-up of what the drill does.

All these options obviously come at a higher price-tag than the PROXXON ...

_________________
Eberhard

Former chairman Arbeitskreis historischer Schiffbau e.V. (German Association for Shipbuilding History)

--------------------------------------------------------------------------------------------------------------------------------------------------------------------------------------------

Image Image Image Image


Last edited by wefalck on Wed Dec 08, 2021 4:36 am, edited 1 time in total.

Report this post
Top
 Profile  
Reply with quote  
PostPosted: Thu Nov 25, 2021 4:34 am 
Offline

Joined: Tue Feb 06, 2007 10:24 am
Posts: 2498
Location: Belgium
Many thanks Eberhard! :thumbs_up_1:

Of course cost does matter, and for me especially also size and versatility. I can see myself building some larger scale subjects in the (far?) future (1/35 scale dioramas and box dioramas), so I would like to be able to also mill for example 1/35 scale furniture or architectural elements. I'm afraid the type of machine you have will be too small for that. But I'm sure its quality is better than the Proxxon!

The Proxxon seems to be a good balance between large enough for my needs, yet small and portable. I ordered it, so I'll report back!
But in the near future, I will only use it as a drill press...

EJFoeth wrote:
What I read on drilling holes is that having a feel for the force you exert is important, and with the Proxxon with that wheel that is pretty much out of the question?

With the lathe, I do find you do feel the resistance a little with the hand wheels too, and of course you do see and hear what is happening. It is probably not the same as with a lever, but I found the lathe also requires a fair amount of 'feel' to operate. So I'm guessing the mill with hand wheels will work fine too, after getting a little experience with it. In any case, the wheel enables one to drill slowly and carefully. But we'll see... ;)


Report this post
Top
 Profile  
Reply with quote  
PostPosted: Thu Nov 25, 2021 6:08 am 
Offline
User avatar

Joined: Wed Sep 28, 2011 12:04 pm
Posts: 1820
Location: Paris
There are also so-called 'sensitive drilling attachments' for use on a drill-press or a milling-machine that are essentially sleeve-mounted drill-chucks that freely slide up and down:

Image
The above is from Sherline.

I never used one, but think it will have the same issue as lever-operated drill-presses in that the down-feed is not really sensitive enough for drills below 0.3 mm diameter. It can easily happend that you feed too much, the drill catches (particularly also in brass) and then breaks. I prefer screw-feed as you can watch the drill progress and when you stop feeding the drill just idles. Also it is difficult with a lever to restart the drilling without feeding in too much at the beginning.

I think the MF70 is a good choice and I would probably go for it, if I didn't have my machines. The x-y-gibs on the table will need careful adjustment to run smoothly (I looked at it in shops). Personally, I would also replace the solid handwheels that have spinning handles with ball-cranks or at least to replace the spinning plastic handles with fixed steel ones. The spinning handle add another sort of degree of freedom that does not let you feel very well what is happening.

I am running all my machines off a momentary foot-switch. This keeps your hands free and you can stop the machine in case something goes wrong by just lifting off your foot - no need to look for the switch.

I don't know, how the vertical column is arranged internally on the MF70, but it may be possible to add an angle-drive to the z-screw and lead it out at the bottom to the side - it reduces a bit the feel compared to a direct screw-drive, but keeps your hand near the work, when you are working with your nose on it.

_________________
Eberhard

Former chairman Arbeitskreis historischer Schiffbau e.V. (German Association for Shipbuilding History)

--------------------------------------------------------------------------------------------------------------------------------------------------------------------------------------------

Image Image Image Image


Report this post
Top
 Profile  
Reply with quote  
PostPosted: Fri Nov 26, 2021 5:16 am 
Offline

Joined: Tue Feb 06, 2007 10:24 am
Posts: 2498
Location: Belgium
Many thanks for all your ideas Eberhard. Most useful! :thumbs_up_1: :thumbs_up_1: :thumbs_up_1:

I find that with the Proxxon lathe, I only spin the hand-wheels by their spinning handles when travelling fast over longer distances. But for fine adjustments, I tend to hold the entire wheel with my hand and twist it like a big knob. It just allows me too feel much better what is happening.
So I do agree the wheels with spinning handles are not the best. Replacing them with ball-crancks sound like an interesting idea! Especially for the down-feed on the MF70 because of its awkward position...

I am mostly worried about how smoothly the X-Y table, and even more the down-feed, will run. On some youtube videos it looked quite stiff, with some people putting in some ball-bearings to have it run smoother. Maybe I'll go that route too, but first I'll see how far I can get with normal adjustments.
I don't have a technical education, so customizing machines is not exactly in my comfort zone. But those simple things shouldn't be a problem... ;)


Report this post
Top
 Profile  
Reply with quote  
PostPosted: Fri Nov 26, 2021 5:53 am 
Offline

Joined: Wed Jan 21, 2009 1:51 pm
Posts: 2858
I think the main problem with the Proxxon crosstable is that it has a lot of slack; going in 1 direction is fine, but without adjustments... don't go the other direction?


Report this post
Top
 Profile  
Reply with quote  
PostPosted: Fri Nov 26, 2021 6:52 am 
Offline
User avatar

Joined: Thu Dec 28, 2017 10:48 am
Posts: 220
Good day all, just picking up on slack in milling tables or lathes, a couple of digital linear scales will remove any accuracy/slack in the gib concerns. I'm not sure of the Proxon table size but you can get 0-150mm scales starting for under £35 each, naturally, you'll need two of these for X and Y or 3 if you want to cover Z too. Spending a little bit more you can pick up a 2 axis DRO system for close to £200, perhaps less. Using a DRO opens up a whole new world of possibilities on top of accurate machining including drilling complicated hole patterns. Makes life much simpler for multiples of parts when also using a machine vice and setting up a register to accurately hold each piece.

Kind regards

Pete


Report this post
Top
 Profile  
Reply with quote  
PostPosted: Sat Nov 27, 2021 4:59 am 
Offline

Joined: Tue Feb 06, 2007 10:24 am
Posts: 2498
Location: Belgium
Thanks for all the ideas Pete and Evert-Jan! :thumbs_up_1:

For now I will keep things simple though. Construction on my current project is almost finished, and I will only be using the machine on it as a drill press (and probably not even under 0,3mm). So I will just use this time to get used to the machine and its quirks a bit. I only got a machine vise as an additional accessory for now.

However, during construction I have often thought that certain tasks would be much easier and/or more precise if I had a milling machine. So I'm sure this little investment will be put to good use on future projects. So then, some further modifications may be made. Certainly, the first thing I will get when the real milling starts will be a dividing head:
Image


Report this post
Top
 Profile  
Reply with quote  
PostPosted: Sat Nov 27, 2021 5:37 am 
Offline
User avatar

Joined: Wed Sep 28, 2011 12:04 pm
Posts: 1820
Location: Paris
Perhaps we should open a different thread for this kind of discussion ...

There are a couple of issues/features around any tool slide, being it Proxxon or something else:

- the parallelism of the guiding surfaces on slides

- the backlash in the thread/nut-system of the screw-feed

- the friction in the thrust-bearings of the screw-feed

In high-quality machines the guiding surfaces of the dove-tails were 'scraped in' to mate exactly. Their distance and the friction is adjusted with gib-strips. The PROXXON KT also has gib-strips and a good number of adjusting screws. Upon receipt of the mill, I would take it apart, clean it carefully and inspect the gib-strip and other parts for any burrs. They should be removed with a fine file. One can also check the gib-strip whether it has an uniform thickness over its whole length using vernier calipers - if not one can cautiosly rub the high areas with wet-n-dry paper (clean very carefully afterwards). The next step is to adjust the gib-strip screws so that the slided move freely without sticking along the whole length. Also check that the slides are not rocking - if so, the gib-strip needs to be tightened. It may take several rounds of trial and they may need to be adjusted again once in a while.

I am not entirely sure, how the PROXXON KT is constructed internally, but I think there is a solid feed-nut with no backlash adjustment. On more expensive machines the nuts are split and can be tightened with little set-screws. On my machines I can reduce the backlash, i.e. the jump in the dial between turning the feed-screw in different directions, to 0.1 mm. The standard strategy to avoid backlash issues when machining is to approach a target point always from the same direction, meaning that if you have to come from the opposite direction, first run the slide beyond the point then came back.

Depening on the construction, but I don't know how this is done on the PROXXON KT, one may be able to tighten the feed-screw bearing in some way. Friction or sticking over some part of a 360° turn of the feed-screw is cause, when the bearing surfaces are not 100% parallel or flat. The friction as such can be reduced by using two small thrust-bearings, but the uneven resistance will remain, if the surfaces against which the thrust-bearings rest are not parallel or flat.

If you show me how the PROXXON KT looks when disassemble, I probably can give you further advice on how to improve its performance.

_________________
Eberhard

Former chairman Arbeitskreis historischer Schiffbau e.V. (German Association for Shipbuilding History)

--------------------------------------------------------------------------------------------------------------------------------------------------------------------------------------------

Image Image Image Image


Report this post
Top
 Profile  
Reply with quote  
PostPosted: Mon Dec 06, 2021 8:45 am 
Offline

Joined: Tue Feb 06, 2007 10:24 am
Posts: 2498
Location: Belgium
Many thanks for all the ideas Eberhard! :thumbs_up_1: :thumbs_up_1: :thumbs_up_1:

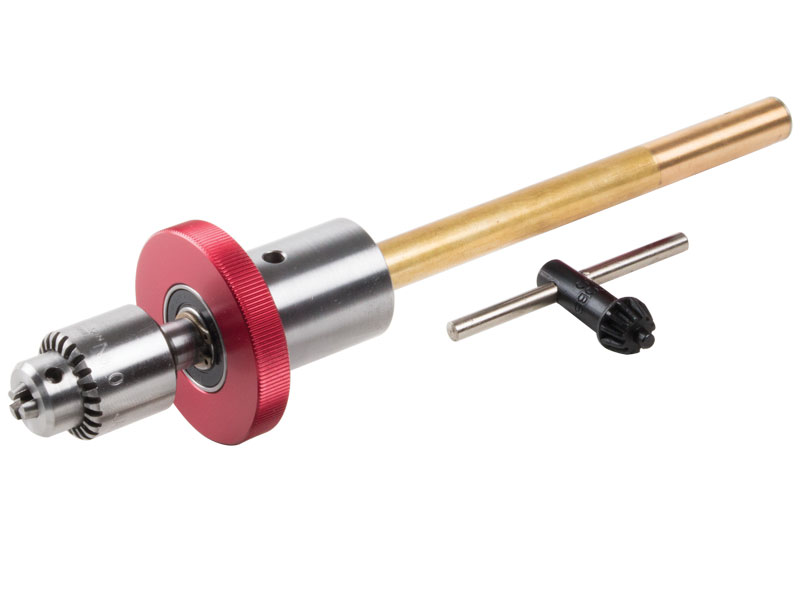
My new toy arrived last week! :smallsmile: :cool_2: :smallsmile:
I got the steel vice PM 40 too, which is most useful.

Image

It works pretty well straight from the box. I’m pleasantly surprized that the amount of slack on the down feed and X-Y table is really very small. I’m also happy that the down feed handle turns nice and smooth. On the table, the Y is ok, and the X could be a bit smoother. Not really a problem for (slow) precision work though.

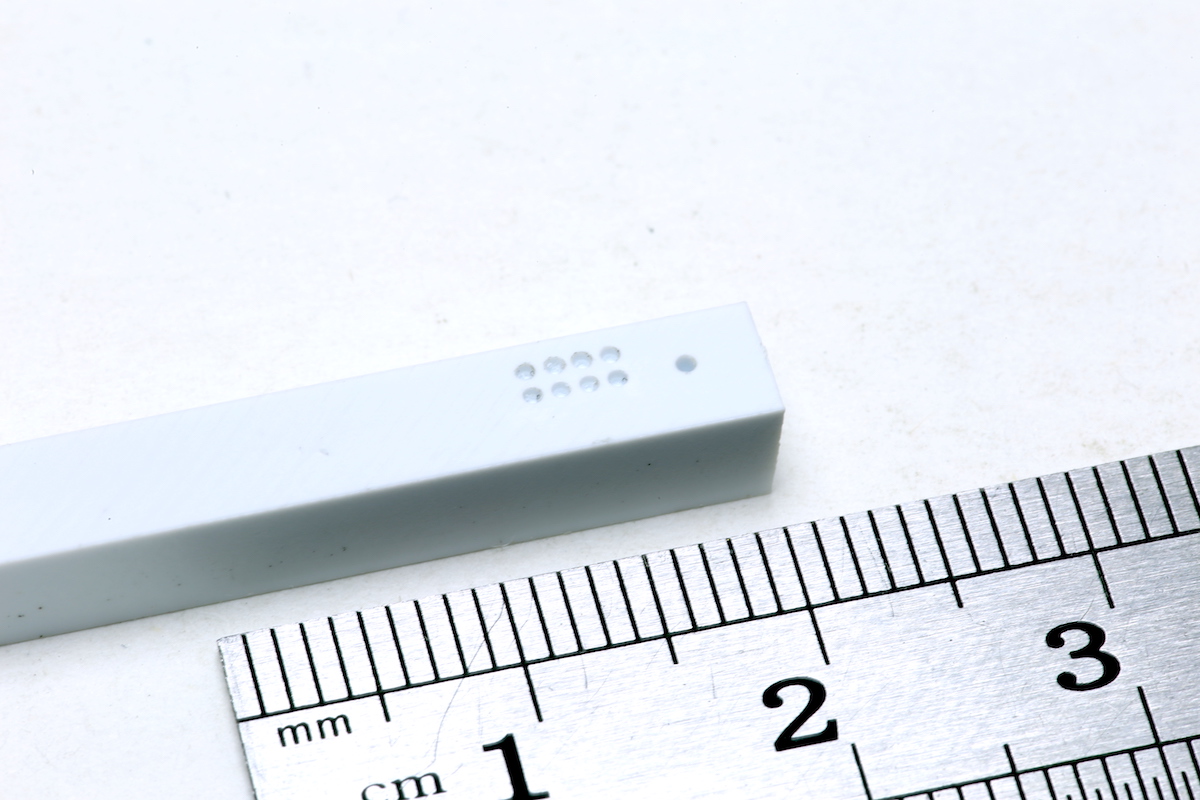
Initial drilling tests went well.
From right to left:
- 0,5mm drill
- 0,4mm
- 0,2mm
- 0,1mm
Image

All went well, only the 0,1mm drill broke when retracting it from the hole. But honestly, I’m not sure I will ever need 0,1mm. I have had these 0,1mm drills for some time but never actually felt the need to use them yet, while I do like some pretty small detail work… ;)

Precise placement drilling in a grid was easy too. This test with the 0,5mm drill was done very quickly; I’m sure I could do it even more precise.
Image

I also did some quick milling tests. Some 1x1mm and 0,5x0,5mm steps, milled in 5x5mm styrene square rod:
Image

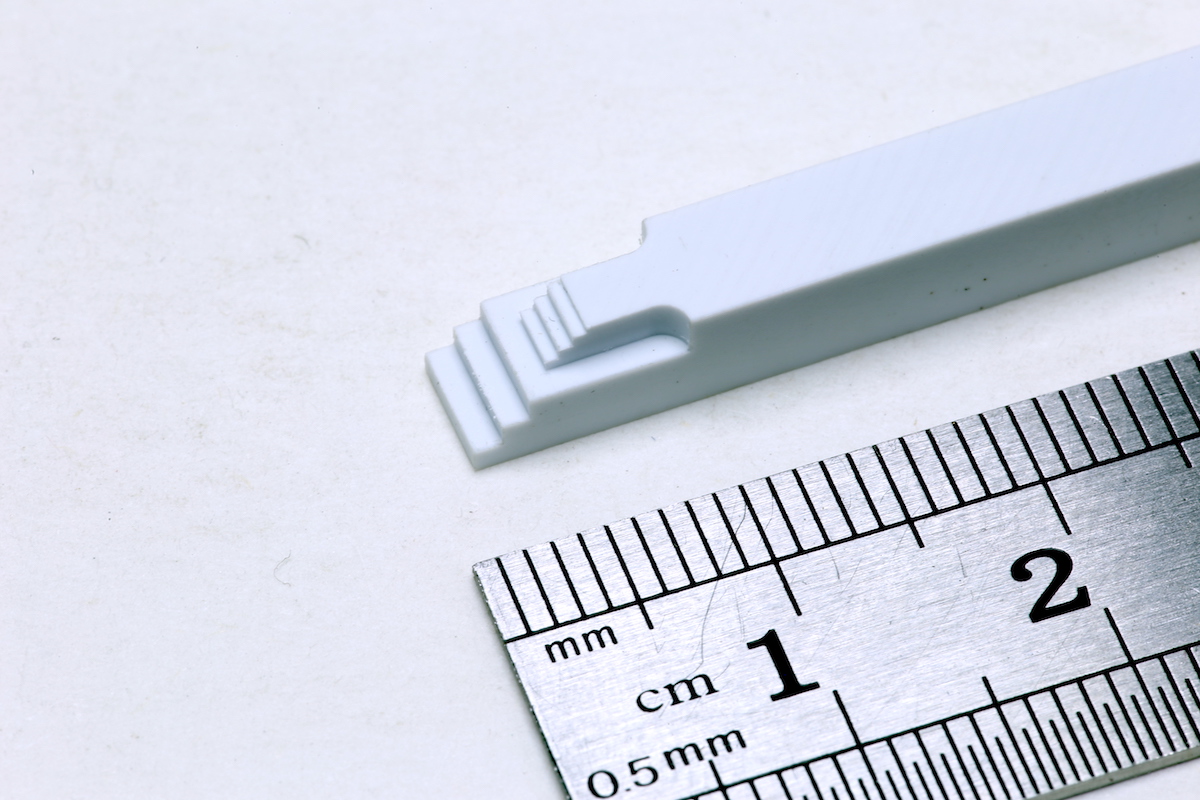
It is very very useful that the machine does not only go up to 20 000 rpm for working brass, but also down to 5000 rpm, which makes working in styrene possible.

For now, I’m really happy with the machine, especially for the very reasonable price (I payed 269 euro. The vice is not included, but a set of step clamps is, and so is a set of collets).


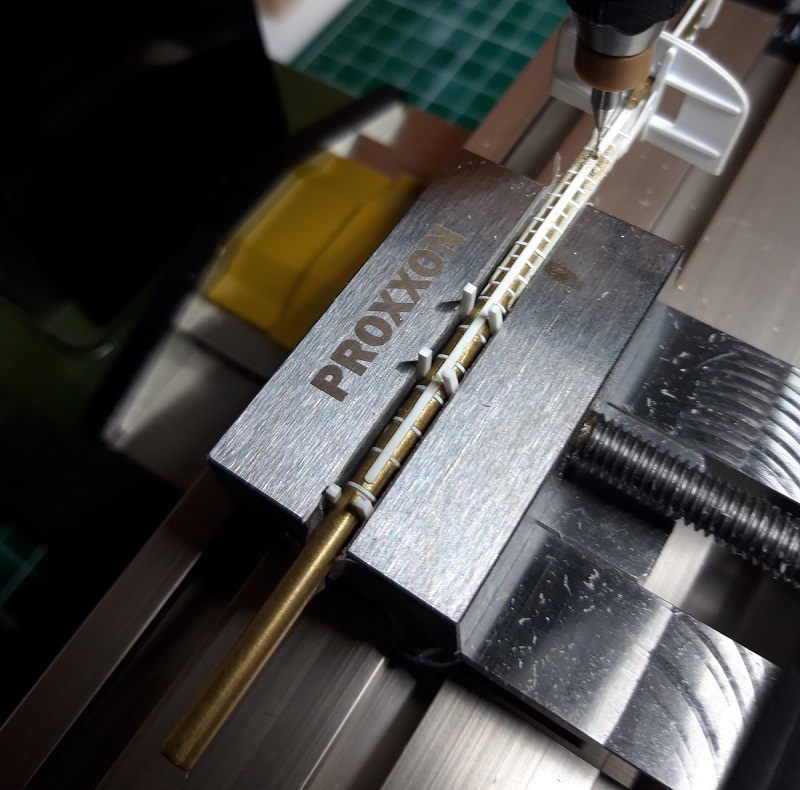
The immediate use I have for it is however not milling, but only drilling the masts and spars (so I join them firmly with brass pins).

Of course, one would normally do this before adding any detail to the masts. But since I was a bit late, I had to find a way to clamp masts and spars carefully, without damaging the fragile plastic details.
I used stock styrene square rod as a ‘buffer’ to clamp them in the vice. I put double-sided tape on the inside of the jaws of the vice to keep them in place:
Image

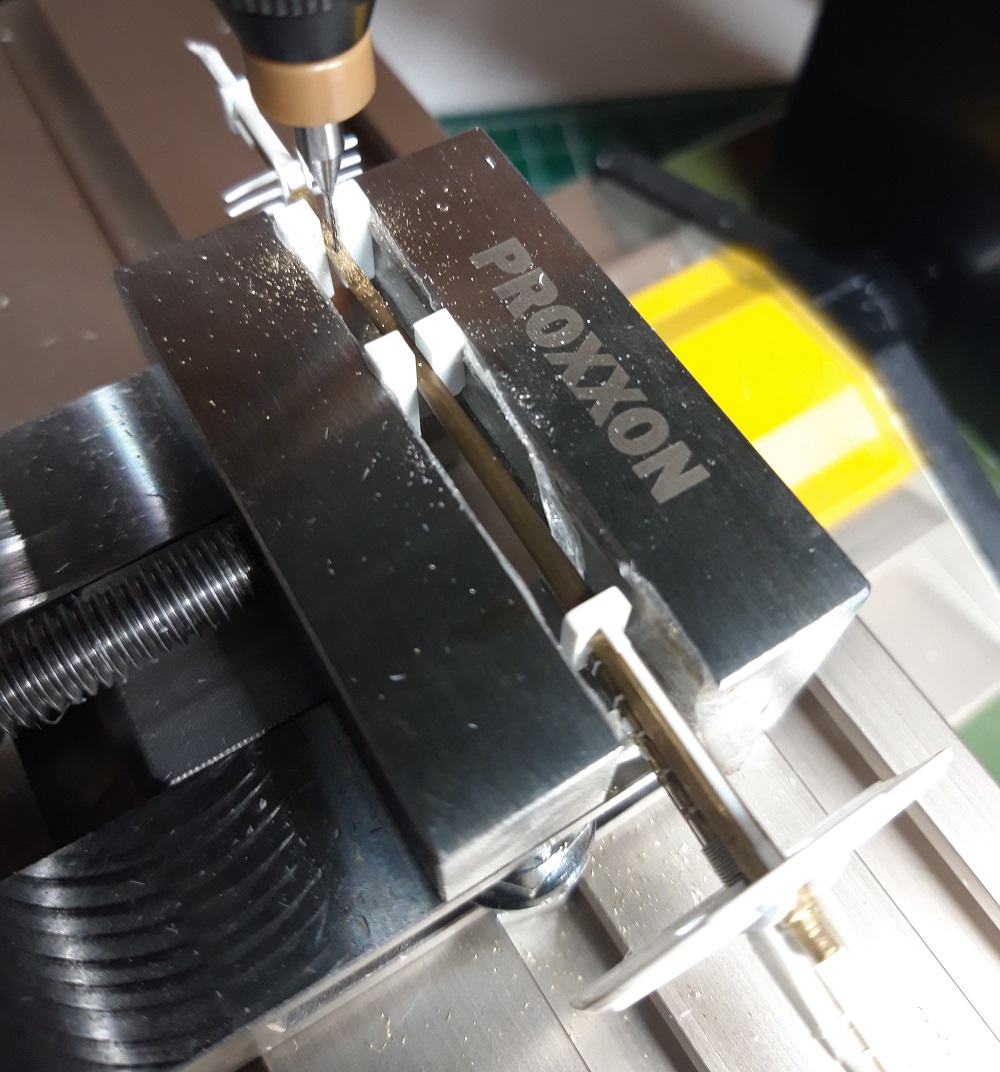
Victory’s lower masts were the hardest, because I couldn’t clamp them at the location of the hole to be drilled:
Image

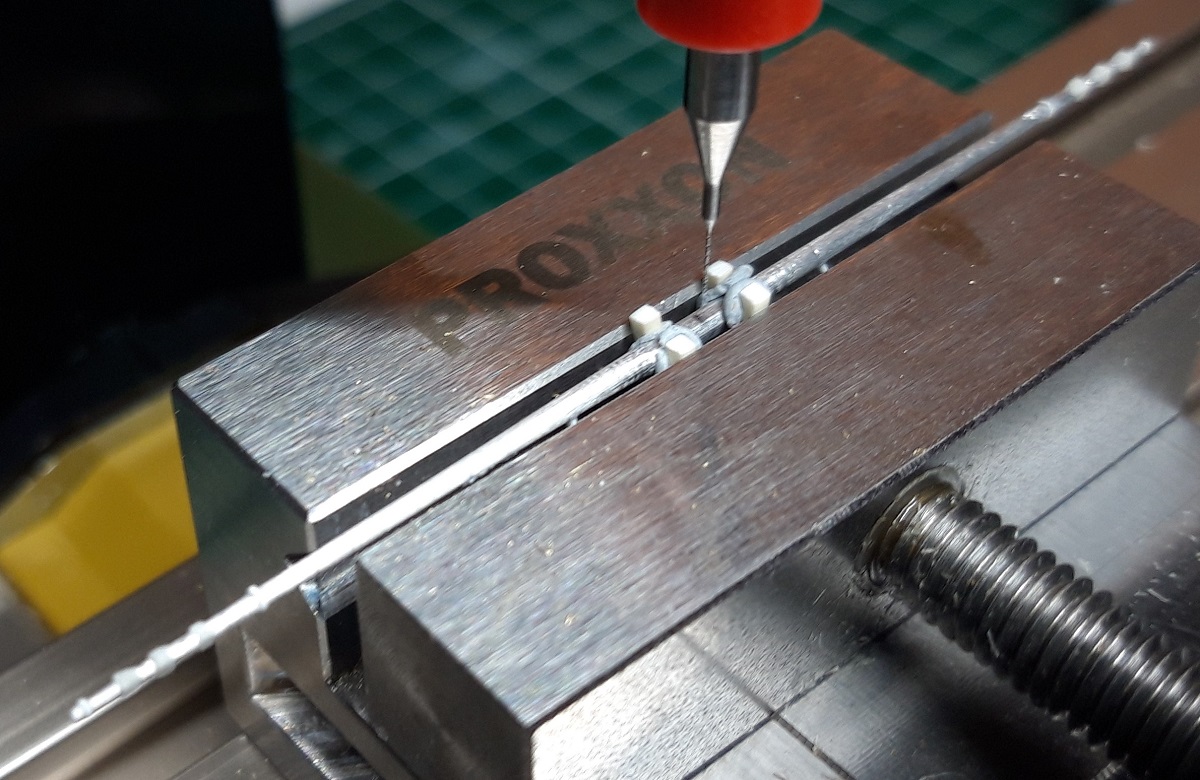
This worked very well. Only, the double sided tape proved tedious to remove from the vice after clamping.
So I used Blue Tack instead, sticking the styrene rod directly to the piece. Much easier!
Image

Image

And the results:
0,4mm holes in lower mast and spar, for a 4mm brass pin (forgot to clean up the hole in the mast):
Image

And in the topmast:
Image

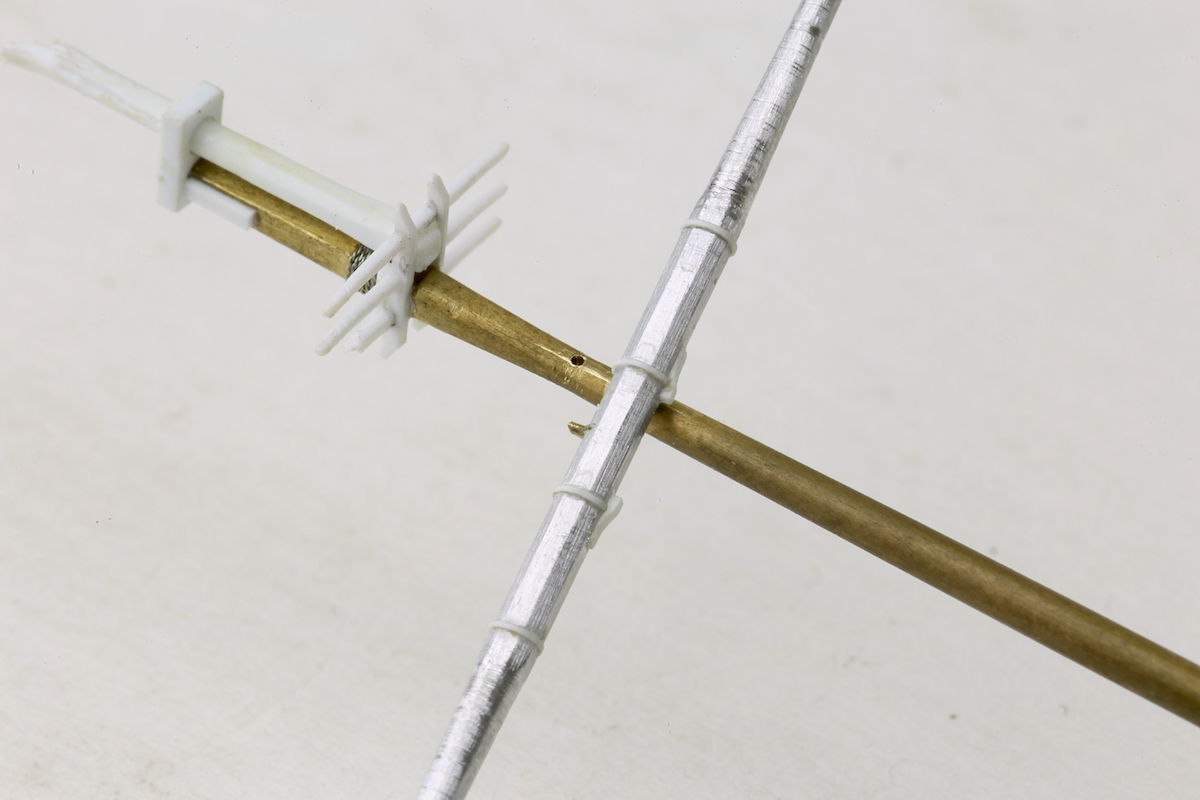
I have drilled other masts and spars with 0,3 and 0,2mm too, and that worked perfectly too. :)


Report this post
Top
 Profile  
Reply with quote  
PostPosted: Mon Dec 06, 2021 9:04 am 
Offline

Joined: Wed Jan 21, 2009 1:51 pm
Posts: 2858
Excellent! I have to have one too... Going below 0.4mm with my lathe and drill press is not possible and with 20,000 rpm this device is much better for comparatively little money. Did you use any cutting oils? Makes life a bit easier and reduce drill breakage?

Also entertaining that you need to use it for the yardarms and nothing will be visible of that work in the end :big_grin: Fortunately there will be plenty left to see... I used some hard solder for my Hood mast many moons ago that that connection method is awful; this is much better and may even be soldered a bit. That is, not with all the styrene in this phase... :wave_1:


Report this post
Top
 Profile  
Reply with quote  
PostPosted: Mon Dec 06, 2021 9:07 am 
Offline
User avatar

Joined: Wed Sep 28, 2011 12:04 pm
Posts: 1820
Location: Paris
Looks like a worthwhile acquisition !

Drilling brass can be tricky, depending on the type of brass. Some brasses have the tendency to grab and break normal twist drills. There are special brass drills, but they are difficult to find and expensive. Watchmakers use spade drills or drills with straight flutes - this requires frequent clearing of the holes.

Your milling of styrene looks very clean - or did you do some post-processing ? I think it is good to have high RPMs for that (my machines are a bit too slow) and use slow feed - most plastics are poor heat-conductors and, therefore, have the tendency to melt, when one takes too heavy cuts.

There is double-sided tape that is meant for fixing items during machining etc. I got some from ebay a while ago. It is very thin, but quite tacky, but peels off quite well from vices etc. it comes in different widths. Can't really give you a reference ...

_________________
Eberhard

Former chairman Arbeitskreis historischer Schiffbau e.V. (German Association for Shipbuilding History)

--------------------------------------------------------------------------------------------------------------------------------------------------------------------------------------------

Image Image Image Image


Report this post
Top
 Profile  
Reply with quote  
PostPosted: Mon Dec 06, 2021 9:53 am 
Offline
User avatar

Joined: Tue Sep 29, 2020 4:35 pm
Posts: 1722
Location: Bretagne, France
Nice device!

What are the best drill and milling cutter brands?

_________________
Pascal

•Battleship Bretagne 3D: https://vu.fr/FvCY
•SS Delphine 3D: https://vu.fr/NeuO
•SS Nomadic 3D: https://vu.fr/tAyL
•USS Nokomis 3D: https://vu.fr/kntC
•USS Pamanset 3D: https://vu.fr/jXGQ


Report this post
Top
 Profile  
Reply with quote  
PostPosted: Mon Dec 06, 2021 12:40 pm 
Offline
User avatar

Joined: Wed Sep 28, 2011 12:04 pm
Posts: 1820
Location: Paris
Brands and best ones? I could give you some Swiss brand names - but than you have to trade in your car :big_grin:

I would go in any case for HSS-drills rather than carbide ones. The carbide ones are very sharp, but break very easily (just broke one yesterday and it was not even a very small one in a very inconvenient location on my model - but I am not telling you were ...). Also, the carbide drills for circuit-boards one usually gets, have too long flutes, which makes them even more prone to breaking.

For mills the situation is different. There I am also using various types of carbide end-mills, ranging from 1-flute to 4-flute ones, depending on the application. I get them through ebay.

The various types of jewellers burrs with 2.34 mm shank make good end-mills, because of their fine teeth. Here Busch is a good brand that is available in many countries. I get them from a jewellers supply-house, rather than from ebay et al. They are chrome-vanadium steel, rather than HSS, so don't use them on steel. Cheaper ones may not run very concentric, which doesn matter too much, when you use them in your hand-held drill, but is frustrating, when you use them on your milling machine.

_________________
Eberhard

Former chairman Arbeitskreis historischer Schiffbau e.V. (German Association for Shipbuilding History)

--------------------------------------------------------------------------------------------------------------------------------------------------------------------------------------------

Image Image Image Image


Report this post
Top
 Profile  
Reply with quote  
PostPosted: Tue Dec 07, 2021 10:16 am 
Offline

Joined: Tue Feb 06, 2007 10:24 am
Posts: 2498
Location: Belgium
EJFoeth wrote:
Did you use any cutting oils? Makes life a bit easier and reduce drill breakage?

No, and I don't have any currently. Probably it would be a good idea, but for now I didn't have any drill breakage. But I work very slowly and carefully, only putting the slightest pressure on the downfeed.

EJFoeth wrote:
Also entertaining that you need to use it for the yardarms and nothing will be visible of that work in the end :big_grin: Fortunately there will be plenty left to see... I used some hard solder for my Hood mast many moons ago that that connection method is awful; this is much better and may even be soldered a bit. That is, not with all the styrene in this phase... :wave_1:

Well, I plan on attaching the spars only after painting and partly rigging and adding sails to them. This makes rigging them easier, as well as part of the rigging on the masts (especially stays and shrouds, and falls of running rigging). So those holes and pins will make it much easier and stronger to attach the spars at that stage. Otherwise, I would only have glue and the rigging at my disposal for the connection, soldering being out of the question... ;)
No such problems though with the 'simple' rigging of WWII ships! :big_grin:


wefalck wrote:
Your milling of styrene looks very clean - or did you do some post-processing ? I think it is good to have high RPMs for that (my machines are a bit too slow) and use slow feed - most plastics are poor heat-conductors and, therefore, have the tendency to melt, when one takes too heavy cuts.

Thanks! No, I didn't do any sanding or anything afterwards. I milled at 5000 rpm, which allowed quite fast cuts. I did use a very new cutter, that hadn't been used on metal yet. That may make a difference?
A friend in my modelling club has a lot of experience with milling styrene (he used to make masters for Verlinden back in the day, and for his own brand Pro-art Models since then). He uses low rpm to avoid melting.

wefalck wrote:
There is double-sided tape that is meant for fixing items during machining etc. I got some from ebay a while ago. It is very thin, but quite tacky, but peels off quite well from vices etc. it comes in different widths. Can't really give you a reference ...

Many thanks! I'll have to look out for that, as the double sided tape was pretty handy for repeated use of plastic 'spacers' in the vice.

Good question Iceman 29!
And thanks for answering Eberhard! Because I'm really not a specialist in this, and was wondering this too. :big_grin:
I still have to look around for some sub-1mm cutters, so I'll take your advice and look around for Busch!


Report this post
Top
 Profile  
Reply with quote  
PostPosted: Tue Dec 07, 2021 5:37 pm 
Offline
User avatar

Joined: Sat Apr 29, 2006 7:36 am
Posts: 658
Location: Vigo, Spain
Hi there Marijn and all,

Again a superb update. It is amazing the level of precision that these toys allow to have.
Really a candy for a modeler´s eye. Always interested in seeing what comes next.

Nice going and best regards,

Willie.

_________________
Amen dico tibi, hodie mecum eris in paradiso (Lk 23,43).


Report this post
Top
 Profile  
Reply with quote  
PostPosted: Tue Dec 07, 2021 5:59 pm 
Offline

Joined: Tue Jan 11, 2005 10:56 am
Posts: 8577
Location: New York City
Precise, and astounding, are the perfect descriptors here.


Report this post
Top
 Profile  
Reply with quote  
PostPosted: Wed Dec 08, 2021 3:56 am 
Offline

Joined: Tue Feb 06, 2007 10:24 am
Posts: 2498
Location: Belgium
Thanks Willie and Dan!

Yes, just like the Proxxon lathe, the MF70 milling machine allows for a precision of 0,05mm. Good enough for me! :big_grin:

If I had realized that a small milling machine of this quality level was available for a modest price (a couple of 1/350 kits will quickly add up to the same amount), I would have probably bought it years ago! It is not necessary by any means for most scratchbuilding work, but it does make things easier and more precise for quite a number of tasks.
I would advise it to anyone regularly doing some scratchbuilding, but not having a lot of workshop space available. This one is small and light enough to easily be stored away, even in between modelling sessions.


Report this post
Top
 Profile  
Reply with quote  
PostPosted: Wed Dec 08, 2021 4:39 am 
Offline
User avatar

Joined: Wed Sep 28, 2011 12:04 pm
Posts: 1820
Location: Paris
A milling machine is not only useful for making parts, but also for making more tools and fixtures, that then allow you to do more precise work. I have even made certain hand-tools with the machine.

And yes, I would rather spend 100€ on a tool, than on a kit. Once the kit is built, you sank the 100€, but a tool will give you service for years :big_grin:

_________________
Eberhard

Former chairman Arbeitskreis historischer Schiffbau e.V. (German Association for Shipbuilding History)

--------------------------------------------------------------------------------------------------------------------------------------------------------------------------------------------

Image Image Image Image


Report this post
Top
 Profile  
Reply with quote  
Display posts from previous:  Sort by  
Post new topic Reply to topic  [ 1221 posts ]  Go to page Previous  1 ... 32, 33, 34, 35, 36, 37, 38 ... 62  Next

All times are UTC - 6 hours [ DST ]


Who is online

Users browsing this forum: Bing [Bot] and 117 guests


You can post new topics in this forum
You can reply to topics in this forum
You cannot edit your posts in this forum
You cannot delete your posts in this forum
You cannot post attachments in this forum

Jump to:  
Powered by phpBB® Forum Software © phpBB Group