HMS Victory and Le Redoutable at Trafalgar (1/300)
Moderators: BB62vet, MartinJQuinn, JIM BAUMANN, Jon, Dan K
-
Neptune

- Posts: 2463
- Joined: Sun Mar 13, 2005 11:51 am
- Location: Belgium
Re: HMS Victory and Le Redoutable at Trafalgar (1/300)
Wow, those guns bring a lot of clutter and life in this project. Even without paint it already looks very impressive and alive!
The merchant shipyard
-
StevenVD
- Posts: 626
- Joined: Fri Dec 27, 2013 6:32 pm
Re: HMS Victory and Le Redoutable at Trafalgar (1/300)
Hey Marijn, your demo and a nice Ebay offer got me over the finish, I also got me one of those.

But did you also get a useless M2 hex key for the table fixing bolts? I had to get to my toolbox for an M4 one, my brother took all the IKEA ones... And I also saw an unidentified metal part on the right side of the box photo that I did not see in the box or the manual. Maybe it's inside the tool.
But did you also get a useless M2 hex key for the table fixing bolts? I had to get to my toolbox for an M4 one, my brother took all the IKEA ones... And I also saw an unidentified metal part on the right side of the box photo that I did not see in the box or the manual. Maybe it's inside the tool.
-
wefalck

- Posts: 2109
- Joined: Wed Sep 28, 2011 12:04 pm
- Location: Paris
- Contact:
Re: HMS Victory and Le Redoutable at Trafalgar (1/300)
I keep a set of ball-head hex-keys in a rack behind my machines - they are needed all the time. All screws that need to be moved on my equipment are internal-hex (Imbus), much better than slotted screws. Also all the tools and fixtures I built (and that's the advantage of a mill that you can do that now) use internal-hex screws.
Eberhard
Former chairman Arbeitskreis historischer Schiffbau e.V. (German Association for Shipbuilding History)
--------------------------------------------------------------------------------------------------------------------------------------------------------------------------------------------


Former chairman Arbeitskreis historischer Schiffbau e.V. (German Association for Shipbuilding History)
--------------------------------------------------------------------------------------------------------------------------------------------------------------------------------------------
-
marijn van gils
- Posts: 2691
- Joined: Tue Feb 06, 2007 10:24 am
- Location: Belgium
Re: HMS Victory and Le Redoutable at Trafalgar (1/300)
Yes, I was also very pleasantly surprised by their effect! Thank you!Neptune wrote:Wow, those guns bring a lot of clutter and life in this project. Even without paint it already looks very impressive and alive!
Haha, glad I inspire you to spend your money!StevenVD wrote:Hey Marijn, your demo and a nice Ebay offer got me over the finish, I also got me one of those.
But did you also get a useless M2 hex key for the table fixing bolts? I had to get to my toolbox for an M4 one, my brother took all the IKEA ones... And I also saw an unidentified metal part on the right side of the box photo that I did not see in the box or the manual. Maybe it's inside the tool.
But really, if I had known this machine and the fact that it is not much more expensive, I would have bought one at the very beginning f this project. It would have made many things much easier!
The contents are the same with mine: hex key that I didn't use (I also have a set of hex keys handy, so I'm not bothered by it), and mystery metal part of the box image is missing. But I have no idea what purpose it would serve, so I don't mind either.
A set of basic milling cutters would have been nice, but these were easily bought separately.
Meanwhile, contrary to 2020, there was a lot of family time again this year, so not much modelling time. No problem of course!
But I did manage to built the same items for Redoutable. But there are no canon ball racks, as those are the �triangles� on the deck.
Just for sake of variation, I made the belaying pins from 0,2mm brass rod this time. Cutting and gluing is a little less precise than stretched sprue, but they will be stronger during painting and rigging. Their racks were made with the milling machine again, but the staghorns were done the �traditional� way.
Some pieces are built �damaged�.

And in place (temporarily, with Blu Tack):


And with a 1/350 figure for scale:

-
wefalck
- Posts: 2109
- Joined: Wed Sep 28, 2011 12:04 pm
- Location: Paris
- Contact:
Re: HMS Victory and Le Redoutable at Trafalgar (1/300)
I continue to admire your styrene-carving ability ... 
If you point out, which mystery part on the the box you are referring to, I can possibly give you some indications.
If you point out, which mystery part on the the box you are referring to, I can possibly give you some indications.
Eberhard
Former chairman Arbeitskreis historischer Schiffbau e.V. (German Association for Shipbuilding History)
--------------------------------------------------------------------------------------------------------------------------------------------------------------------------------------------
Former chairman Arbeitskreis historischer Schiffbau e.V. (German Association for Shipbuilding History)
--------------------------------------------------------------------------------------------------------------------------------------------------------------------------------------------
-
marijn van gils
- Posts: 2691
- Joined: Tue Feb 06, 2007 10:24 am
- Location: Belgium
Re: HMS Victory and Le Redoutable at Trafalgar (1/300)
Thank you!
Here, the challenge was the tiny size, and to make them look identical.
I encircled that is the part in red:
Here, the challenge was the tiny size, and to make them look identical.
I encircled that is the part in red:
- Attachments
-
-
wefalck
- Posts: 2109
- Joined: Wed Sep 28, 2011 12:04 pm
- Location: Paris
- Contact:
Re: HMS Victory and Le Redoutable at Trafalgar (1/300)
Ah yes, I suspected it might be this part. It is actually a sample workpiece. I think it appears on catalogue pictures with the subtitle 'Workpiece not included' ...
Eberhard
Former chairman Arbeitskreis historischer Schiffbau e.V. (German Association for Shipbuilding History)
--------------------------------------------------------------------------------------------------------------------------------------------------------------------------------------------
Former chairman Arbeitskreis historischer Schiffbau e.V. (German Association for Shipbuilding History)
--------------------------------------------------------------------------------------------------------------------------------------------------------------------------------------------
-
marijn van gils
- Posts: 2691
- Joined: Tue Feb 06, 2007 10:24 am
- Location: Belgium
Re: HMS Victory and Le Redoutable at Trafalgar (1/300)
Ok, that solves the mystery. Now Steven and me can get our FOMO under control... 
Thanks!
Thanks!
-
marijn van gils
- Posts: 2691
- Joined: Tue Feb 06, 2007 10:24 am
- Location: Belgium
Re: HMS Victory and Le Redoutable at Trafalgar (1/300)
And now a little backtracking�
On Victory, early on in the build, I decided not to include the belaying pins on the bitts:

Later, I figured I would add them when rigging, just butt-gluing short pieces of stretched sprue on top. But that would be a pain, and it would be near impossible to also add the lower ends of the pins.
So, with my new toy in the house, I decided now was the time to replace the longitudinal beams all together:

I�m starting to feel like Dafi more and more! I guess Victory does this to a modeller�
Luckily, removing the beams without damaging the uprights was easier than I thought it would be.
New beams were drilled and milled on the Proxxon mill, and 0,2mm brass pins inserted:

The spacing of the pins is a lot closer than on the other pin rails I did before (and varied too), and the beams are a lot thicker (the same as their width: 0,75 mm for fore and main, and 0,5mm for mizzen). The milling machine really proved its value here!
And in their final location:

The main bitts were damaged by round shot:

Remember, that mast behind it is only 3mm wide!
The mizzen has one pin missing, not so much considering the entire mast fell down:

On Victory, early on in the build, I decided not to include the belaying pins on the bitts:
Later, I figured I would add them when rigging, just butt-gluing short pieces of stretched sprue on top. But that would be a pain, and it would be near impossible to also add the lower ends of the pins.
So, with my new toy in the house, I decided now was the time to replace the longitudinal beams all together:
I�m starting to feel like Dafi more and more! I guess Victory does this to a modeller�
Luckily, removing the beams without damaging the uprights was easier than I thought it would be.
New beams were drilled and milled on the Proxxon mill, and 0,2mm brass pins inserted:
The spacing of the pins is a lot closer than on the other pin rails I did before (and varied too), and the beams are a lot thicker (the same as their width: 0,75 mm for fore and main, and 0,5mm for mizzen). The milling machine really proved its value here!
And in their final location:
The main bitts were damaged by round shot:
Remember, that mast behind it is only 3mm wide!
The mizzen has one pin missing, not so much considering the entire mast fell down:
-
wefalck
- Posts: 2109
- Joined: Wed Sep 28, 2011 12:04 pm
- Location: Paris
- Contact:
Re: HMS Victory and Le Redoutable at Trafalgar (1/300)
Console yourself, that on the real ship they constantly took bits and pieces apart and fitted new ones ...
How do you cut the pins ? I am using a square scalpel on a thick glass-plate, which seems to give quite clean cuts.
Other people also use a relatively heavy cutter blade, while rolling the wire on a cutting-mat. This seems to form some sort of head. While this method originally was intented to produce small pins, the head formed could also be a good start for forming the handle of the belaying pins with white glue or acrylic gel.
I am glad that you find more and more uses for the milling machine. I wouldn't want to be without one anymore, it makes life easier and adds more precision to ones work.
Eberhard
Former chairman Arbeitskreis historischer Schiffbau e.V. (German Association for Shipbuilding History)
--------------------------------------------------------------------------------------------------------------------------------------------------------------------------------------------
Former chairman Arbeitskreis historischer Schiffbau e.V. (German Association for Shipbuilding History)
--------------------------------------------------------------------------------------------------------------------------------------------------------------------------------------------
-
marijn van gils
- Posts: 2691
- Joined: Tue Feb 06, 2007 10:24 am
- Location: Belgium
Re: HMS Victory and Le Redoutable at Trafalgar (1/300)
Thanks Eberhard!
I'm also cutting straight down with a scalpel on a piece of glass, but just a regular n�11. For 0,2mm brass it works fine. For anything thicker, I would use a Stanley knife and/or a rolling motion indeed while cutting. For 0,2mm, a rolling motion gives a big chance of moving the knife's location, which was pretty critical here.
Also, when cutting straight down, I can place the index finger of my left hand on the pice to be cut (after placing the knife in the correct position on the wire of course) to prevent it from jumping away. 1,8mm long pieces of 0,2 wire are hard to find again after they get launched across the workbench...
But most of the time, for anything thicker I usually use side-cutters and clean up the edge with a file.
I don't think I will attempt to form the handles. The space between the pins on the bitts varies only between 0,2 and 0,3 mm. Not a lot of space to get a brush point with glue or gel in...
Anyway, in this scale their shape would get partly lost when I will hang 'rope' loops around them.
I wouldn't want to be without a milling machine anymore too! Most of what it does can be done by hand too, but indeed not nearly so easily and precisely. And it is a lot of fun to work with!
But I won't be using it for some time now, as construction on this project is almost coming to an end... But I'm sure I'll find a lot of use for it on the next project again!
-
Iceman 29

- Posts: 1945
- Joined: Tue Sep 29, 2020 4:35 pm
- Location: Bretagne, France
Re: HMS Victory and Le Redoutable at Trafalgar (1/300)
I like the detail about the damage to the skylight, I don't think it's EP?
Enjoy your work!
Enjoy your work!
Pascal
�Battleship Bretagne 3D: https://vu.fr/FvCY
�SS Delphine 3D: https://vu.fr/NeuO
�SS Nomadic 3D: https://vu.fr/tAyL
�USS Nokomis 3D: https://vu.fr/kntC
�USS Pamanset 3D: https://vu.fr/jXGQ
�Battleship Bretagne 3D: https://vu.fr/FvCY
�SS Delphine 3D: https://vu.fr/NeuO
�SS Nomadic 3D: https://vu.fr/tAyL
�USS Nokomis 3D: https://vu.fr/kntC
�USS Pamanset 3D: https://vu.fr/jXGQ
-
JIM BAUMANN

- Posts: 5687
- Joined: Mon Jan 10, 2005 5:30 pm
- Location: Nr Southampton England
Re: HMS Victory and Le Redoutable at Trafalgar (1/300)
Hello gentlemen
@ Marijn GREAT works -- sharp and edgy!
and for you ... good tenacity and pereverance in the face of a gargantuan project!!
ref cutting brass... I use in my 1/1 job--every day Fiskar scissors
we buy them from Amazon ( where it said ... welcome back-you have purchased this item 107 times...(!!)
( we supply the scissors to all our staff-- new ones 3 x a year , our work amnd cloths are a challenege to any cutting edge
in my view the best and hardest blades .. also for cutting wires in brass, copper, Fuse , silver (!) and Nickel silver up to 1mm(
( for 1 mmand up..(!) I use the older ' spent ' 25 cm scioors right uin against the hige point. )
Point being...== > it is VERY quick and repeatable , the cut is nigh on perfect every time with no clean up
encs imgs
@ Marijn GREAT works -- sharp and edgy!
and for you ...
ref cutting brass... I use in my 1/1 job--every day Fiskar scissors
we buy them from Amazon ( where it said ... welcome back-you have purchased this item 107 times...(!!)
( we supply the scissors to all our staff-- new ones 3 x a year , our work amnd cloths are a challenege to any cutting edge
in my view the best and hardest blades .. also for cutting wires in brass, copper, Fuse , silver (!) and Nickel silver up to 1mm(
( for 1 mmand up..(!) I use the older ' spent ' 25 cm scioors right uin against the hige point. )
Point being...== > it is VERY quick and repeatable , the cut is nigh on perfect every time with no clean up
encs imgs
- Attachments
-
-
....I buy them at three times the speed I build 'em.... will I live long enough to empty my stash...?
http://www.modelshipgallery.com/gallery ... index.html
IPMS UK SIG (special interest group) www.finewaterline.com
http://www.modelshipgallery.com/gallery ... index.html
IPMS UK SIG (special interest group) www.finewaterline.com
-
EJFoeth
- Posts: 2919
- Joined: Wed Jan 21, 2009 1:51 pm
Re: HMS Victory and Le Redoutable at Trafalgar (1/300)
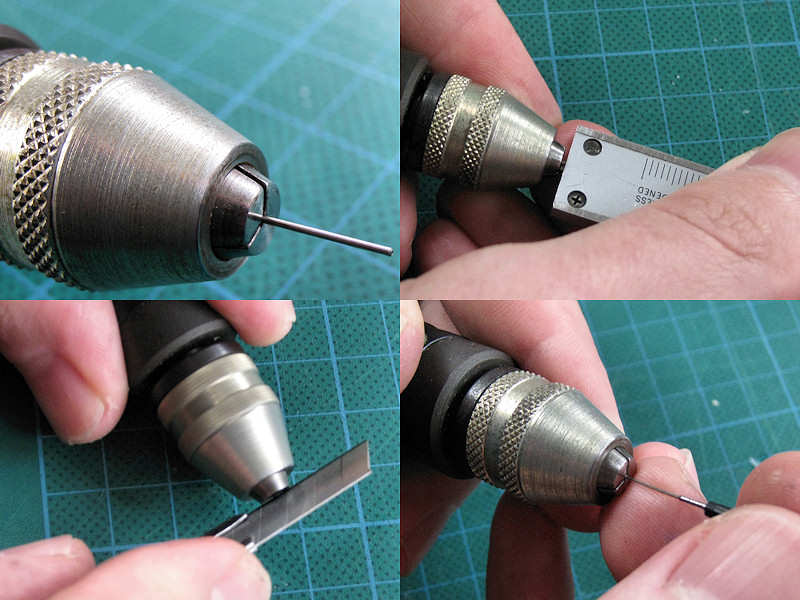
You can cut tubes and wires using your drill as well. If the end is nicely sanded down: set, clamp, cut. If the wire/tube isn't too short, clamp it back in, sand the end. (1.8mm might just work...).
-
marijn van gils
- Posts: 2691
- Joined: Tue Feb 06, 2007 10:24 am
- Location: Belgium
Re: HMS Victory and Le Redoutable at Trafalgar (1/300)
Many thanks for the tips Jim and Evert-Jan!
Those scissors look very nice indeed Jim! I'll have to look into those, as they also seem very interesting for cutting thin brass sheet.
Evert-Jan, I find it difficult to clamp 0,2mm thick wire nicely concentric in a chuck (but probably my chuck is not as nice as yours!), but for thicker wire and especially tube that is a very interesting 'trick' indeed!
Because sailing ships are a new subject to me (at least since my childhood), there are plenty of new things to learn and keep me interested. And still plenty ahead to look forward to...
And as Donald McNarry wrote more than 65 years ago: 'patience is very much at the bottom of the list of qualities a good modeller needs. If one wants to do something, patience is not needed.'
Those scissors look very nice indeed Jim! I'll have to look into those, as they also seem very interesting for cutting thin brass sheet.
Evert-Jan, I find it difficult to clamp 0,2mm thick wire nicely concentric in a chuck (but probably my chuck is not as nice as yours!), but for thicker wire and especially tube that is a very interesting 'trick' indeed!
Thanks Jim! Luckily, there is a lot of variation in this project, so I didn't get even the least bit bored with it yet.JIM BAUMANN wrote:good tenacity and pereverance in the face of a gargantuan project!!
Because sailing ships are a new subject to me (at least since my childhood), there are plenty of new things to learn and keep me interested. And still plenty ahead to look forward to...
And as Donald McNarry wrote more than 65 years ago: 'patience is very much at the bottom of the list of qualities a good modeller needs. If one wants to do something, patience is not needed.'
-
marijn van gils
- Posts: 2691
- Joined: Tue Feb 06, 2007 10:24 am
- Location: Belgium
Re: HMS Victory and Le Redoutable at Trafalgar (1/300)
Thanks Pascal!Iceman 29 wrote:I like the detail about the damage to the skylight, I don't think it's EP?
Enjoy your work!
Yes, it is PE. It is one of the few parts from the Rod Langton kit I did use. But of course slightly adapted (rounded top, and set deeper in the deck), and 'damaged' with a knife.
-
EJFoeth
- Posts: 2919
- Joined: Wed Jan 21, 2009 1:51 pm
Re: HMS Victory and Le Redoutable at Trafalgar (1/300)
Ah yes! I forgot about the 0,2mm thickness. Even this Proxxon chuck I used cannot really hold such small wires...So "interesting" that you continuously run into the limits of your precision tools....marijn van gils wrote:Evert-Jan, I find it difficult to clamp 0,2mm thick wire nicely concentric in a chuck (but probably my chuck is not as nice as yours!), but for thicker wire and especially tube that is a very interesting 'trick' indeed!
-
wefalck
- Posts: 2109
- Joined: Wed Sep 28, 2011 12:04 pm
- Location: Paris
- Contact:
Re: HMS Victory and Le Redoutable at Trafalgar (1/300)
Unfortunately, there is little in machining one can do with 0.2 mm diameter brass wire. I have a 0.2 mm collet for my watchmakers lathe and my hand-held archimedes drill would also clamp it, but if it sticks out more than half a millimeter or so it would just bend ...

Steel wire would be stiffer, but is difficult to cut, while molybdenum wire would be even stiffer, but is near impossible to cut ...
Steel wire would be stiffer, but is difficult to cut, while molybdenum wire would be even stiffer, but is near impossible to cut ...
Eberhard
Former chairman Arbeitskreis historischer Schiffbau e.V. (German Association for Shipbuilding History)
--------------------------------------------------------------------------------------------------------------------------------------------------------------------------------------------
Former chairman Arbeitskreis historischer Schiffbau e.V. (German Association for Shipbuilding History)
--------------------------------------------------------------------------------------------------------------------------------------------------------------------------------------------
-
SG1
- Posts: 413
- Joined: Mon Apr 17, 2017 2:43 am
- Contact:
Re: HMS Victory and Le Redoutable at Trafalgar (1/300)
Marijn,
an alternative way to EJ's outstanding method is to use a nail cutter, a fine-grain diamond file and a very basic jig made out from a simple piece of styrene:
-Drill a 0.2 hole into a plasticard section which must have the same height of the brass tube/wire section you want to cut.
-Place the jig on your workbench attached on a strip of double-sided adhesive tape.
-Put the wire into the Jig's hole and cut it with the nailcutter. The wire section will be protruding to some extent from the jig's surface. It will be actually protruding minimally. (advice: use the corners of the nailcutter for the cutting job).
-File-to-size the protruding end of the wire section with a diamond file (until the file reaches the jig's surface i mean), then release the newly trimmed-to-size wire section from the jig.
For multiple wire/tubing sections such as the pins you need for your project just prepare a jig with multiple holes. Then cut the sections one by one and file them down all in once.
Pros of the technique: very accurate sections, wire/rod can be trimmed easily. Very thin wires (for example 0.06-0.08 mm) can be trimmed if you use root canal drills/files of the appropriate diameter to drill the jig holes.
Cons: time consuming, patience (the same you advocated quoting Donald McNarry) needed. Only 0.2-0.3 mm tubing suitable for nailcutter trimming, bigger diameters can be deformed.
Limits: the thickness of the plasticard sections used for the jigs.
Finally, let me congratulate with you for your outstanding modelling projects that i've been following through the years (from the "Godverdomme times" on, i mean). You've written some of the finest pages of modern modelling so far.
Cheers,
SG
Last edited by SG1 on Mon Jan 10, 2022 7:28 am, edited 2 times in total.
-
EJFoeth
- Posts: 2919
- Joined: Wed Jan 21, 2009 1:51 pm
Re: HMS Victory and Le Redoutable at Trafalgar (1/300)
I too encountered Marijn's work first with the Godverdomme diorama when I was using duct tape to hold my models together
I use the plastic method SG described often, e.g. when filing a tube to size already fitted to the model. Very accurate and repeats very well too! Nail clippers are indeed very useful but there's a great variance in quality. I stole a clipper from she-who-shall-not-be named, a Zwilling-Henkels. About 30-40 Euro IIRC... and she will never get it back.

Don't buy this one; absolutely terrible to work with.

I use the plastic method SG described often, e.g. when filing a tube to size already fitted to the model. Very accurate and repeats very well too! Nail clippers are indeed very useful but there's a great variance in quality. I stole a clipper from she-who-shall-not-be named, a Zwilling-Henkels. About 30-40 Euro IIRC... and she will never get it back.
Don't buy this one; absolutely terrible to work with.