Page 6 of 18
Re: 3D printing
Posted: Sun Feb 13, 2022 4:55 am
by Iceman 29
Bravo! That's much better.

I never use the automatic function of putting supports on chitubox, it is not precise enough, The Algorithm is not very advanced , the program often forgets to put supports in strategic and essential places.
To hollow out, I also use the grid option, it allows you to hollow out and put supports and support inside the room to avoid collapse, especially for larger spaces.
Re: 3D printing
Posted: Sun Feb 13, 2022 5:49 pm
by NavyShooter
As the 'odd guy out' here who's using a filament printer as opposed to the resin ones, I figured I'd drop in an update that after I had the bed heater wire sever during a print the other day (soldering repair completed) I've decided to upgrade to a new one - still sticking with Filament though. I've got a Prusa Mk3s coming soon! I found a place that had them in stock even!
Re: 3D printing
Posted: Sun Feb 13, 2022 7:11 pm
by Fliger747
As far as Chitubox supports I'll usually have the auto have a thrashing at it and then go in and QC and add more supports as necessary. On a few occasions Auto has run a support through a piece, which can ruin it. Remove some, add some.
Cheers: Tom
Re: 3D printing
Posted: Mon Feb 14, 2022 12:14 am
by Iceman 29
NavyShooter wrote:As the 'odd guy out' here who's using a filament printer as opposed to the resin ones, I figured I'd drop in an update that after I had the bed heater wire sever during a print the other day (soldering repair completed) I've decided to upgrade to a new one - still sticking with Filament though. I've got a Prusa Mk3s coming soon! I found a place that had them in stock even!
Probably the best wire 3D printer on the consumer market. Very good quality/price ratio!
Maybe one day, I'll buy one, to print large hulls at big scales, but deck and hull only.
https://www.3dbeginners.com/prusa-i3-mk2-review/
https://modelshipworld.com/topic/29293- ... rtual-kit/
https://modelshipworld.com/uploads/mont ... 4c41fe.JPG
Re: 3D printing
Posted: Mon Feb 14, 2022 12:19 am
by DrPR
Tom and Pascal,
Chitubox's algorithm does come up short occasionally. I printed two cylindrical pieces 33 mm diameter - hollow cylinders with walls 3 mm thick, oriented with the axis vertical. On one piece it crammed as many supports as possible around the base (30 to 40) and the other had only about a dozen. The first piece printed OK but the second failed with the part stuck to the plastic film. I added more supports manually and it printed OK.
I usually let Chitubox add supports and the edit them to move them around and add more manually as needed. I have seen some of the automatic supports run through places that would ruin the piece, and sometimes they are added asymmetrically putting many supports on one side and leaving few on the other.
I am learning!
Phil
Re: 3D printing
Posted: Thu Feb 17, 2022 9:32 pm
by NavyShooter
Here's 2 hours of work on my Saluting Gun.
I get frustrated with DSM at times - trying to replicate things, and chasing my tail trying to figure out how to select a different viewing plane and such.
On the other hand, it's a heck of a tool, and free too!
I'm going to print 3 of these and see how they look in the morning.
Oh...and my new Prusa printer showed up tonight. I'll be playing about with that over the weekend!
Re: 3D printing
Posted: Thu Feb 17, 2022 11:26 pm
by DrPR
What type saluting gun it that? It is quite different from the 40 mm saluting guns we had on the cruiser.
Phil
Re: 3D printing
Posted: Fri Feb 18, 2022 12:24 am
by Fliger747
It's RCN so probably something Royal Navy from circa 1903?
Re: 3D printing
Posted: Fri Feb 18, 2022 2:51 am
by DrPR
I decided to try to print the anchor chain for the OK City (1:96 scale). I haven't been able to find stud link chain that is the right size. I didn't know if it would work because the links are pretty small - 3.95 mm x 2.4 mm (0.155 x 0.094 inches) with a "wire" diameter of 0.66 mm (0.026 inches). In Navy terms the round bar that the links are made of is called "wire." The wire for the 1:1 links was 2.5 inch diameter.
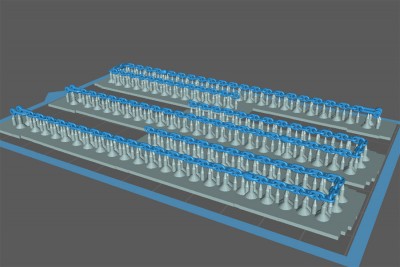
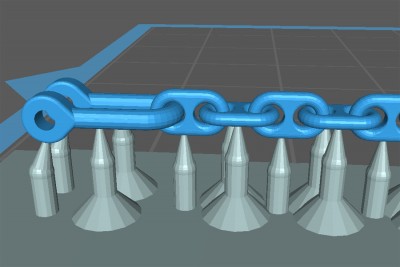
First I printed at 0.01 mm vertical step size and 3 seconds exposure. The resulting chain links were fused together. But you can see in the pictures above that there is clearance between the links. I figured the parts were coming out thicker than designed for two reasons. The 3 second exposure was curing excess resin in the gaps between the links, and printing with so many steps was just increasing the cure time for resin around the parts. Also, I had the anti-aliasing functions enabled in Chitubox (Settings/Advanced) and that could be blurring the image on the LCD and adding to exposure between the links.
The second print was made with 0.02 mm step size to cut the number of exposures in half, and with 2 second exposures (the minimum recommended by Anycubic for the Basic Grey resin and the Photon Mono. And the anti-aliasing function was disabled.
Success!
The top "chain" is the first print with fused links. The bottom chain is the second print. All the links are separate!
Here is a closeup of the two chains. You can see the excess resin that is fusing the links in the top chain, and the clear openings between links in the lower chain. The top links are definitely smoother because of the 0.01 mm step size and probably the anti-aliasing feature. But the bottom links are certainly good enough! Now I just have to figure out how to paint them without gluing the links together.
A really nice thing about being able to print the chains is that I can include the anchor shackle, a swivel link, and the correct number of links for the configuration on the ship. All in one print job!
These aren't the greatest pictures. It is late and I was in a hurry so I used my cell phone 's macro lens. It works OK but not nearly as good as my camera with a macro lens!
Phil
Re: 3D printing
Posted: Fri Feb 18, 2022 3:21 am
by wefalck
I recently bought some 3D-printed studded chain from a Japanese manufacturer with 1 mm link length and this is much metter than I could ever fabricate manually - one has to know one's limits and make the right choices

Re: 3D printing
Posted: Fri Feb 18, 2022 7:06 am
by Iceman 29
Very successful this anchor chain.
I think Tom had done some testing to get the minimum size possible.
viewtopic.php?f=13&t=332683&start=120
After that the links can be glued if you draw the chain in the shape where it should be placed on the model, this is another solution for very small chains.
Re: 3D printing
Posted: Fri Feb 18, 2022 10:04 am
by BB62vet
Dr PR wrote:
Now I just have to figure out how to paint them without gluing the links together.
Phil,
Tom & I have both been successful in printing "free-floating" anchor chain in 1:120, 1:133, and 1:144 (mine) scales. I have printed enough for my USS STODDARD model as well as the possible T-3 tanker. As for painting, I don't. I believe I've already discussed in my other build threads that I use black dye - and once you've soaked the part in the dye, it is permanent. I can't recall the drying time, but usually I leave it for several hours or overnight to make sure it's dry. I actually figured this out using the 3D printed 1:200 scale anchor chains that used to be sold by Floating Drydock that were Matthew's Marine parts (no longer in production). They were the old white resin and the dye worked perfectly on them. Same true for the SLA resin that I'm using now.
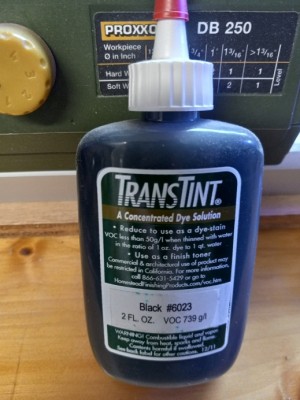
I use a small 1 oz jigger of this about 1/8 full with equal amount of water. You don't need a lot. Enough to cover the parts. Then let dry off on paper towel stretched out - DON'T TOUCH THE DYE or you will be stained for life!!!! I periodically shake or wiggle it to make sure it's still flexible using tweezers to hold the chain.
Hope this helps,
Hank
Re: 3D printing
Posted: Fri Feb 18, 2022 10:09 am
by NavyShooter
The saluting guns in RCN service are currently (well, they're all dated from 1966...so...they've been this way for a while) anyhow, they're 6 Pdr AT Guns from a ground mount that have been fabbed onto a 1901 VS&M mount for a 3Pdr.
I have some very detailed photos of them as they cycled through the warehouse here that I work at in Dockyard.
Re: 3D printing
Posted: Sat Feb 19, 2022 1:59 am
by DrPR
Hank,
Thanks for the tip about the dye.
I have some of the old Floating Drydock 3D printed chain. Even the smallest they offered was too large for the light cruiser project.
I do recall seeing Tom's posts about printing chain. In fact, the chain has been bothering me since I started this project in 2005, and has been a reason I have wanted to get into 3D printing myself. And it actually worked.
It also gave me a chance to test some of my hypotheses about exposure time and layer (step) thickness on the final dimensions of printed parts. I'm learning!
Phil
Re: 3D printing
Posted: Sat Feb 19, 2022 8:42 am
by BB62vet
Phil,
Glad that info is helpful! I have to confess that you're delving into the 3D aspect W-A-Y more than I've done at this point. Once I got started, Tom has assisted in any changes needing to be made to the Chitubox settings as I took the position that "I don't know anything, it's supposed to work when I press the ON button" - I've made a few adjustments over the course of 2 years on his lead when something failed to print or needed some adjustments.
The anchor chains present a different set of challenges (I'd rather use the word
problems as this is what it actually is, but younger people haven't got a clue due to their PC indoctrination) as far as printing goes. Therefore, your R&D into how to achieve the best result will certainly benefit all of us. At some point in time, I may go back and actually do some settings adjustments to see if the Phrozen printer I'm using will improve with adjustments to the exposure time & layer thickness.
I guess you might say that I'm one of those "set it and forget it" users and only tinker with things when they somehow go south and you're scratching your head.

As for dying vs painting, I think this would be viable if the price were reasonable and they made the dyes in a large number of solid shades - not the case from what I can see!
Hank
Re: 3D printing
Posted: Sat Feb 19, 2022 1:06 pm
by Fliger747
It's been a while since I did the work with the chain as I have a supply enough for any needs for a while. What I found out was the resin choice was quite important. The only resin that would not merge was the black, somewhat translucent "Phtozen Rapid Black". This avoided the gooey merging which was a problem with the Gray ABS resins. I made the curves to lay the chain back and forth more gentle. It was satisfying with the small supports to be able to zip the chain off by starting at one end and gently pulling. Thorough rinsing is essential and as one cures, I would run the chain through my hands to keep it flexible and avoid any link fusing as if they remain in contact without disturbing they tend to stick. The "wires" are maybe a little undersize as a good clearance is necessary to ensure remaining flexibility. The overall width of good chain I could make was about 2mm or so. I discussed all this somewhere in one of my threads, probably the APA but possibly Poseidon as I didn't replace the chain on the APA as it's hidden under the forward 40 quad mount.
The dye idea is excellent (the black resin helps) as paint can make the links stick together.
The chain I was able to achieve was slightly smaller (not a lot) than the smallest FDD of years past. Amore capable (resolution) printer than mine may be able to do a little better.
Good luck!!!!
Re: 3D printing
Posted: Sat Feb 19, 2022 1:45 pm
by wefalck
I am wondering, what the 'dye' mentioned above really is and how it works. The resin (in theory) is impermeable and non-porous, so a dye should not penetrate. I am wondering, whether it not just acts as a permanent ink.
Ink by definition does not contain pigments, but coloured molecules and a binder (e.g. gum arabic). Hence, it only builds up minimal layer thickness.
Re: 3D printing
Posted: Sat Feb 19, 2022 2:19 pm
by Fliger747
Some 2mm chain I pulled out of the box. At this size it's flexible to the extent that you can easily form it to whatever shape you need, but does not fall in a pile such as the larger printed scales will. The water based resins are hygroscopic so I expect that they might have some dye penetration?
Tom
Re: 3D printing
Posted: Sat Feb 19, 2022 3:57 pm
by wefalck
Are they hygroscopic in the cured state? I wonder what resin it is then.
Re: 3D printing
Posted: Sat Feb 19, 2022 7:05 pm
by Fliger747
Not being a resin chemist I can't but guess. However I did at one time, for an advanced degree, do research in Clay Mineralogy and Geochemistry, so am at least a little but familiar with various molecular and crystal properties. My GUESS is that when the resins are surface cured that they are not completely desiccated and probably retain some water content and porosity. As such they might be able to take up some dye. Not having any dye myself, but I have seen Hank get good results with it. For various reasons even if it's mostly a surface coating it would likely be better than paint for modeling purposes.
At our hobbyist level we unfortunately are usually left with empirical experimentation.
Cheers: Tom