Neptune,
This is looking really good. I don't know how you are doing the lettering but here is a trick I have used:
First I paint the surface the color of the letters and allow the paint to dry.
Then I apply dry transfer letters - the rub-on type.
After that I paint the surface, dry transfers and all, and allow it to dry thoroughly.
Then I use masking tape to lift off the dry transfers. Sometimes there is a slight raised edge around the letters if the paint was applied thickly, but this is very easy to remove with a jeweler's file or knife edge.
This leaves very nice painted letters without the tell-tale thickness and clear border of decals. The painted letters don't discolor or flake off with time like decals will do, and they don't eventually peel off like dry transfers will do. And they aren't affected by water.
I tried this in desperation once when I couldn't find decals or dry transfer letters that were the correct color, but I did find the dry transfer letters that were the correct font and size. With this method the colors can be anything you want (if you can find the right paint color).
Phil
1/100 Chaconia LPG carrier
Moderators: MartinJQuinn, JIM BAUMANN, HMAS, Tiny69, Dave Wooley
-
DrPR

- Posts: 1689
- Joined: Sun Mar 07, 2010 12:01 am
- Location: Corvallis, Oregon, USA
- Contact:
Re: 1/100 Chaconia LPG carrier
A collision at sea will ruin your entire day. Aristotle
-
Neptune

- Posts: 2466
- Joined: Sun Mar 13, 2005 11:51 am
- Location: Belgium
Re: 1/100 Chaconia LPG carrier
By now the job is done, but basically I used a small "stencil" cut out from paper, since I needed the correct font and size, drew the letters in pencil on the hull, and then masked piece by piece. There are some edges all over the place, but due to the size of the whole thing, they aren't really visible. I didn't want stick-on letters since they would probably not be resistent to water. The remaining pensil lines can be removed with water without any problem.
Edges weren't really a problem as in general the first name of a ship, in my case that is "Chaconia", is welded seperately on the bow. First I made some litho letters to duplicate this effect, but I didn't use them since the letters weren't consistently cut.
I do have one more problem now... Draft marks. Any merchant ship has three different draft marks, one on the forward perpendicular, one on the aft and one in the middle (where also the plimsol mark is placed). For the plimsol mark I have an idea, but for the draft marks I'm a little in doubt. I thought of just putting small stripes with slightly longer ones for the meter marks, but I'm not sure. Numbers would only be 1mm high and these you can't really find in any shop, painting would be a crazy idea as well (not to mention the amount of them). Any advice regarding this is welcome!
Edges weren't really a problem as in general the first name of a ship, in my case that is "Chaconia", is welded seperately on the bow. First I made some litho letters to duplicate this effect, but I didn't use them since the letters weren't consistently cut.
I do have one more problem now... Draft marks. Any merchant ship has three different draft marks, one on the forward perpendicular, one on the aft and one in the middle (where also the plimsol mark is placed). For the plimsol mark I have an idea, but for the draft marks I'm a little in doubt. I thought of just putting small stripes with slightly longer ones for the meter marks, but I'm not sure. Numbers would only be 1mm high and these you can't really find in any shop, painting would be a crazy idea as well (not to mention the amount of them). Any advice regarding this is welcome!
The merchant shipyard
-
Dave Wooley

- Posts: 4131
- Joined: Sat Jan 22, 2005 10:18 am
- Location: Liverpool
Re: 1/100 Chaconia LPG carrier
Hi Roel Great to pick up on your build. My appologies for not doing so much sooner I see that I have missed so much of this superb build .As for your depth makes these can be baought through BECC in the UK to the size you require .Hope this helps .
http://www.reademodels.com/catalogue09A ... yReade.pdf
Dave Wooley
http://www.reademodels.com/catalogue09A ... yReade.pdf
Dave Wooley
-
Neptune
- Posts: 2466
- Joined: Sun Mar 13, 2005 11:51 am
- Location: Belgium
Re: 1/100 Chaconia LPG carrier
Thanks for jumping in Dave!
I'm still in doubt about those draught marks... I sort of intended to really do everything myself, taken in account my limitations, I did consider making something like simplified draught marks, with just some small stripes instead of the numbers.
The ones in the catalogue would give a really cool finish though. If you use these for an R/C ship, do you apply them before you spray on the lacquer or do stick them on after the finishing layer?
Currently I'm painting everything I have to paint, because the lacquer will protect that paint as well, only some weathering will be applied after the final coat since I'll use oil paint for that...
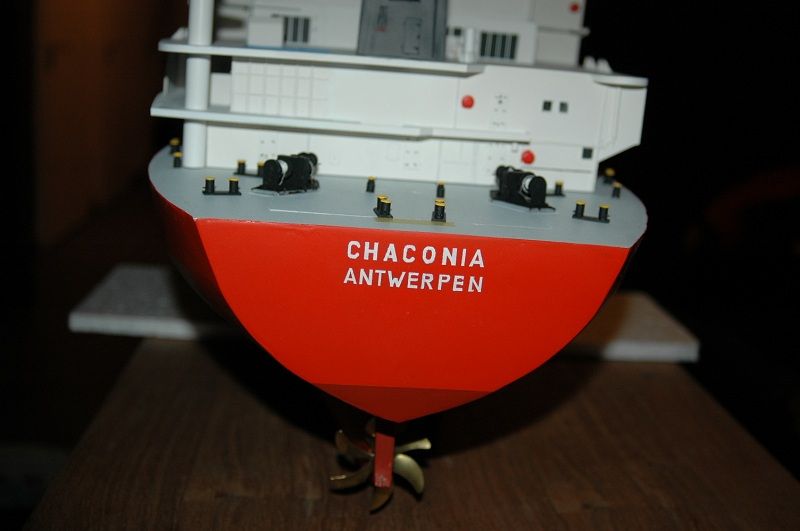
In the mean time, here is a picture of the stern with the port of registry finished as well. Otherwise nothing really new as I was on holidays the past two weeks.
I'm also finally trying to finish a 1/700 build (as a last step I'm trying to make railings without using PE), so this build will be on the backburner until I finish the small one.
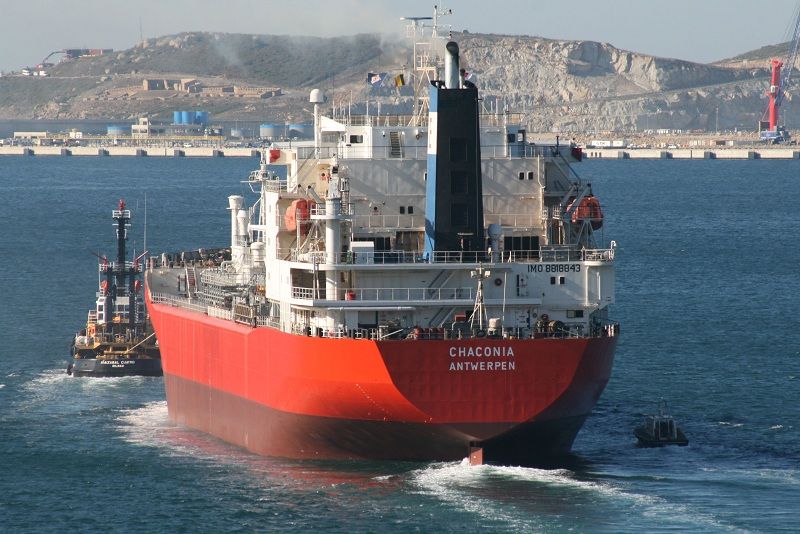
And here is a pic of the real stern. A lot more oil canning than the model, as you can also see, the poop deck is a lot more cluttered than what I have currently dry fitted. The main items remaining after what I have already built are ventilation ducts for below deck spaces and the emergency towing winch and cable. The ventilation ducts I have already built (without detailing), the winch I still have to do (and it's not on the plan as it wasn't a requirement when these ships were built).
I'm still in doubt about those draught marks... I sort of intended to really do everything myself, taken in account my limitations, I did consider making something like simplified draught marks, with just some small stripes instead of the numbers.
The ones in the catalogue would give a really cool finish though. If you use these for an R/C ship, do you apply them before you spray on the lacquer or do stick them on after the finishing layer?
Currently I'm painting everything I have to paint, because the lacquer will protect that paint as well, only some weathering will be applied after the final coat since I'll use oil paint for that...
In the mean time, here is a picture of the stern with the port of registry finished as well. Otherwise nothing really new as I was on holidays the past two weeks.
I'm also finally trying to finish a 1/700 build (as a last step I'm trying to make railings without using PE), so this build will be on the backburner until I finish the small one.
And here is a pic of the real stern. A lot more oil canning than the model, as you can also see, the poop deck is a lot more cluttered than what I have currently dry fitted. The main items remaining after what I have already built are ventilation ducts for below deck spaces and the emergency towing winch and cable. The ventilation ducts I have already built (without detailing), the winch I still have to do (and it's not on the plan as it wasn't a requirement when these ships were built).
The merchant shipyard
-
Dave Wooley
- Posts: 4131
- Joined: Sat Jan 22, 2005 10:18 am
- Location: Liverpool
Re: 1/100 Chaconia LPG carrier
Hi Roel I apply the draught markings or any other markings to the hull before the final layer of lacquer is applied . Superb build
Dave Wooley
Dave Wooley
-
Neptune
- Posts: 2466
- Joined: Sun Mar 13, 2005 11:51 am
- Location: Belgium
Re: 1/100 Chaconia LPG carrier
Hi Dave,
I followed your advice and ordered the draft marks from Reade. I'll see when they arrive. Unfortunately I delayed a little too much and they'll probably arrive when I'm already gone.
Anyway these questions popped up my mind. Can these marks withstand any protective layer or only acrylic spray?
And do you cover the whole model with the final spray coat? Or only the hull and not the main deck etc?
I had to order two sets since they only contain four marks and merchant ships have also draft marks in the middle to check for any sagging or hogging of the ship during loading/discharging.
Apart from that, I haven't done anything, I saved the details to build onboard. Currently I'm finishing the Flanders Harmony which can be seen here:
viewtopic.php?f=59&t=56126
I followed your advice and ordered the draft marks from Reade. I'll see when they arrive. Unfortunately I delayed a little too much and they'll probably arrive when I'm already gone.
Anyway these questions popped up my mind. Can these marks withstand any protective layer or only acrylic spray?
And do you cover the whole model with the final spray coat? Or only the hull and not the main deck etc?
I had to order two sets since they only contain four marks and merchant ships have also draft marks in the middle to check for any sagging or hogging of the ship during loading/discharging.
Apart from that, I haven't done anything, I saved the details to build onboard. Currently I'm finishing the Flanders Harmony which can be seen here:
viewtopic.php?f=59&t=56126
The merchant shipyard
-
ollie27rs
Re: 1/100 Chaconia LPG carrier
Hi good day! how did you come up with a perfectly shaped hull? anyway, i really admire your work. well done!
-
Neptune
- Posts: 2466
- Joined: Sun Mar 13, 2005 11:51 am
- Location: Belgium
Re: 1/100 Chaconia LPG carrier
Not sure of your question. The method I used for constructing it, is shown in this topic. As to how I got it more or less correct? Well I used the original frame plan. Basically, in old days, they built a model from wood, pulled it through a test tank and adjusted their shape to have less resistance. Afterwards it was cut in pieces and those cuts were transferred to paper, creating a frame plan. Those frames were then enlarge to become the real frames of the ship. This plan is the one I used for this model, so I shouldn't be too far off.
She also looks better now that she's painted, I guess that's because the brighter colours show the errors less than the regular warship grey colour. There are quite a few bumps in the hull, most notably is a frame that was slightly shifted from the center near the stern. I sanded and filled most of it away though, and again, with the current colours it's less visible.
When I started painting, I was kind of surprised that I gave up so "fast" on the sanding and filling as I found quite some imperfections. Considering the timing and weather I have the work with, I did decide to paint her and get along.
Since I'm onboard again, I'm building another set of details. I heard from the home front that my draft marks from BECC have arrived at home, so that means that once I get home I'll get them on and spray the whole with a protective, matt, varnish. Then I can finally start placing more details on the hull.
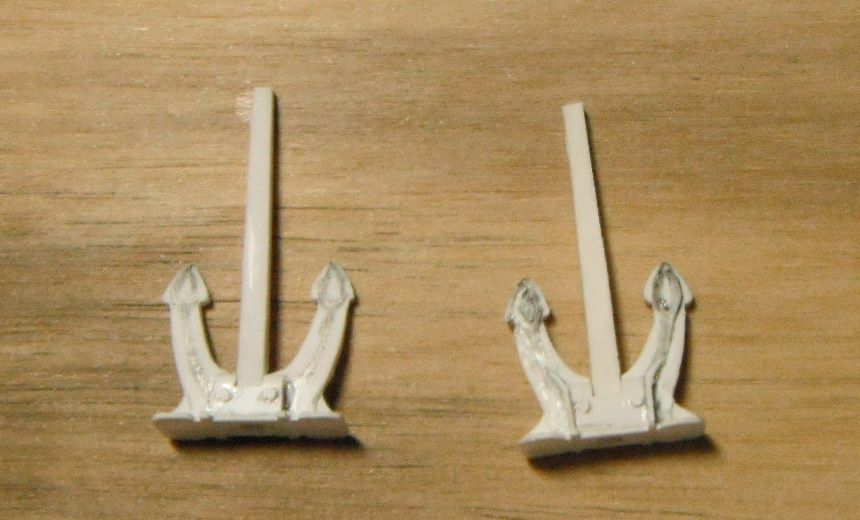
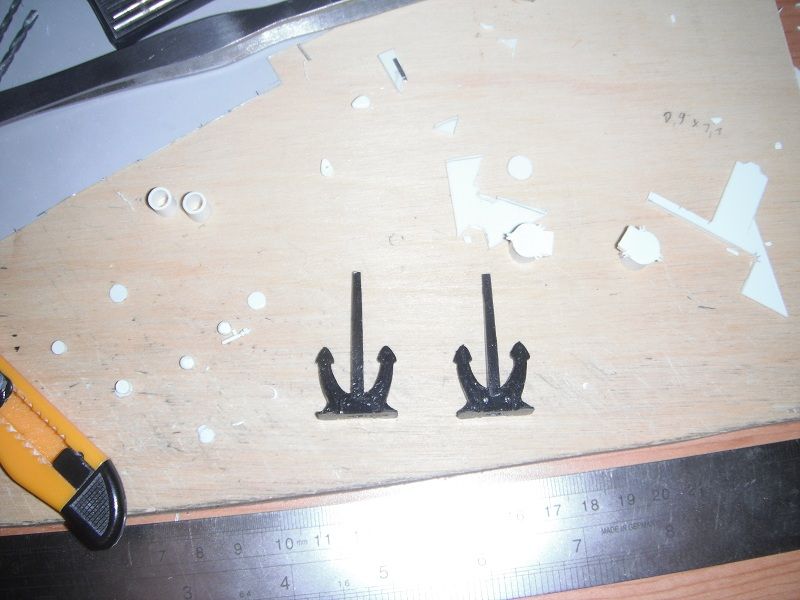
Currently I'm finishing the anchors, admiralty types.
I also finished, or am near to finishing the ballast vents and the ballast manholes. The hatches themselves are placed on an upstanding coaming, which I still have to make. Some hatches I still have to make as well. They are on top of a certain structure to lift the load line of these ships. There is no hatch or hull opening that is on the upper deck, they were all, including the upper deck door edges, heightened to be about 50cm above deck, to be able to have a better load line. It's like building a higher hull, but saving the money of all the steel to make the hull higher all around.
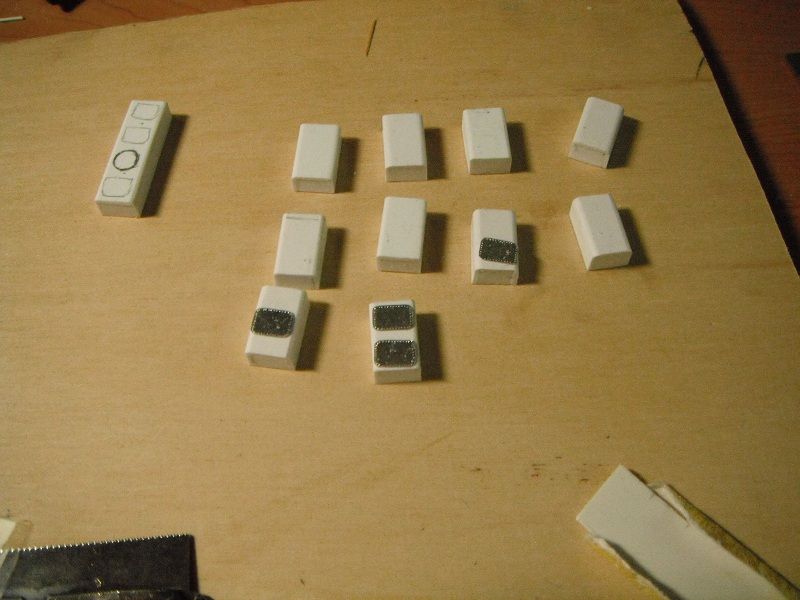
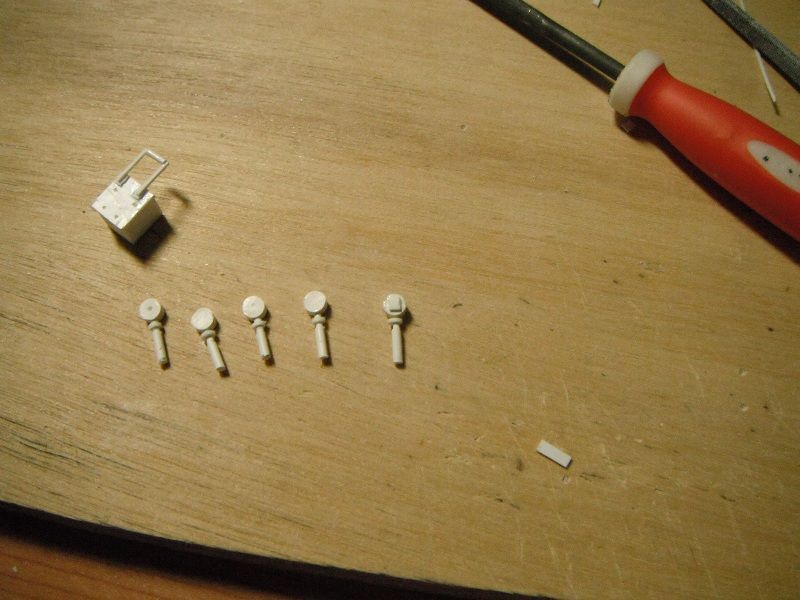
And here are the ballast vent heads, to allow the ballast tanks to release air when they are being filled and to suck in air when they are being emptied as well. Additionally the tank can be overflowed through these vents to make sure its full. It's a non-return device so that you don't get any water from outside going in the ballast tanks.
On the upper left corner is the emergency escape hatch for the steering gear, which is painted entirely red, giving the ship a little more colour as well.
I also finished some really nice bunker tank manholes, but afterwards discovered they were a size too big! I'll redo these slightly smaller soon.
First anchor is also painted now, I have to finish the second one before I go ahead with more details.
She also looks better now that she's painted, I guess that's because the brighter colours show the errors less than the regular warship grey colour. There are quite a few bumps in the hull, most notably is a frame that was slightly shifted from the center near the stern. I sanded and filled most of it away though, and again, with the current colours it's less visible.
When I started painting, I was kind of surprised that I gave up so "fast" on the sanding and filling as I found quite some imperfections. Considering the timing and weather I have the work with, I did decide to paint her and get along.
Since I'm onboard again, I'm building another set of details. I heard from the home front that my draft marks from BECC have arrived at home, so that means that once I get home I'll get them on and spray the whole with a protective, matt, varnish. Then I can finally start placing more details on the hull.
Currently I'm finishing the anchors, admiralty types.
I also finished, or am near to finishing the ballast vents and the ballast manholes. The hatches themselves are placed on an upstanding coaming, which I still have to make. Some hatches I still have to make as well. They are on top of a certain structure to lift the load line of these ships. There is no hatch or hull opening that is on the upper deck, they were all, including the upper deck door edges, heightened to be about 50cm above deck, to be able to have a better load line. It's like building a higher hull, but saving the money of all the steel to make the hull higher all around.
And here are the ballast vent heads, to allow the ballast tanks to release air when they are being filled and to suck in air when they are being emptied as well. Additionally the tank can be overflowed through these vents to make sure its full. It's a non-return device so that you don't get any water from outside going in the ballast tanks.
On the upper left corner is the emergency escape hatch for the steering gear, which is painted entirely red, giving the ship a little more colour as well.
I also finished some really nice bunker tank manholes, but afterwards discovered they were a size too big! I'll redo these slightly smaller soon.
First anchor is also painted now, I have to finish the second one before I go ahead with more details.
The merchant shipyard
-
Neptune
- Posts: 2466
- Joined: Sun Mar 13, 2005 11:51 am
- Location: Belgium
Re: 1/100 Chaconia LPG carrier
Small update.
Took me long to figure out a way to get a consistent bolting pattern (and yes, for the rivet counters, the number of bolts is correct) on my hatches (and to shape them consistently), but it seems to have worked.
Some different styles of hatches were made, round ones for hold spaces, rectangular ones for ballast tanks.
The hatches are not glued in place yet. Once they are in place (glue is at home for this job), I'll have to make small holes and add two handles on each.
Furthermore the anchors are painted, I'll put some rusty weathering on those once they are in place. In this picture you also see the round-ish type of manholes for the bunker tanks. They were ok, but a size too big, as mentioned before. I've now started cutting the first pieces for the smaller version of these. I'm also working on the rope hatches, used to put some mooring ropes in rope lockers below the forecastle and aft peak. They are similar to the bunker manholes in shape, but a lot smaller.
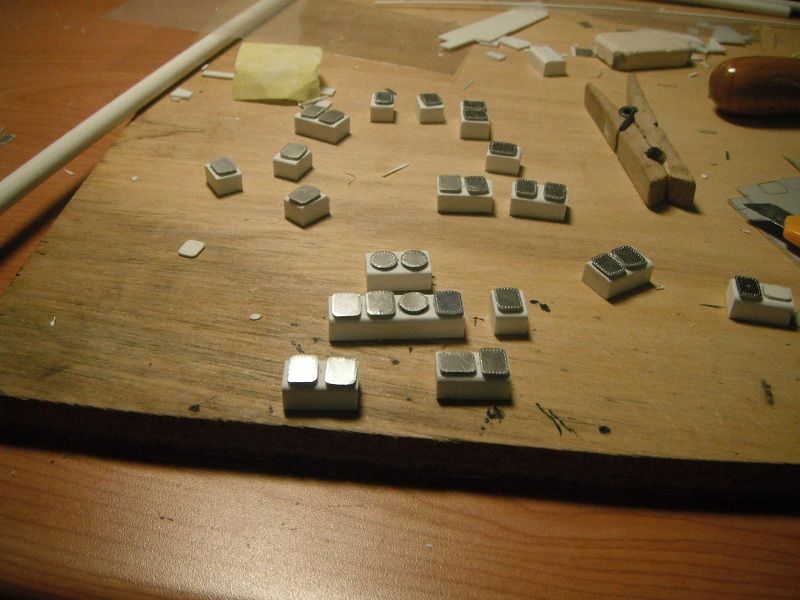
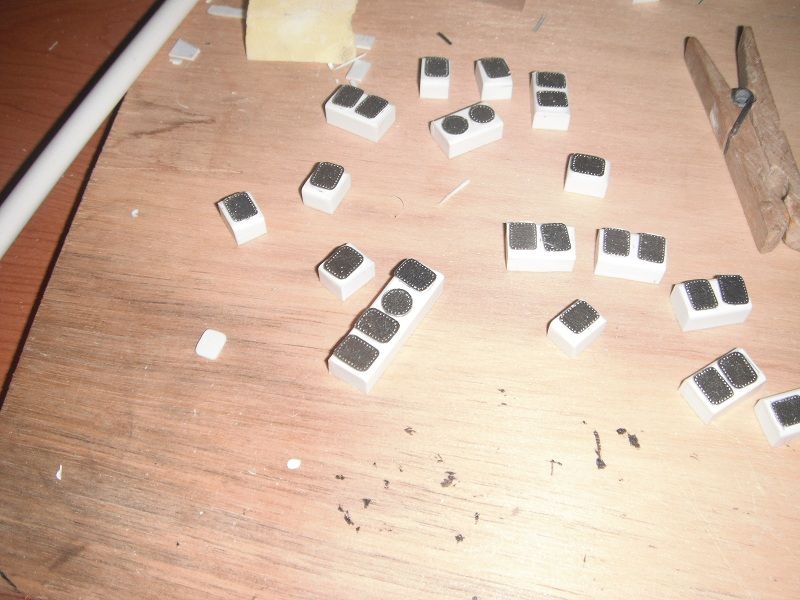
Took me long to figure out a way to get a consistent bolting pattern (and yes, for the rivet counters, the number of bolts is correct) on my hatches (and to shape them consistently), but it seems to have worked.
Some different styles of hatches were made, round ones for hold spaces, rectangular ones for ballast tanks.
The hatches are not glued in place yet. Once they are in place (glue is at home for this job), I'll have to make small holes and add two handles on each.
Furthermore the anchors are painted, I'll put some rusty weathering on those once they are in place. In this picture you also see the round-ish type of manholes for the bunker tanks. They were ok, but a size too big, as mentioned before. I've now started cutting the first pieces for the smaller version of these. I'm also working on the rope hatches, used to put some mooring ropes in rope lockers below the forecastle and aft peak. They are similar to the bunker manholes in shape, but a lot smaller.
The merchant shipyard
-
Richard J OMalley

- Posts: 1012
- Joined: Mon Jun 12, 2006 1:46 pm
Re: 1/100 Chaconia LPG carrier
Nice hatches ! So how did you make the bolt pattern ? 
So how did you make the bolt pattern ? If you are not living on the edge then you are taking up to much space
-
Dave Wooley
- Posts: 4131
- Joined: Sat Jan 22, 2005 10:18 am
- Location: Liverpool
Re: 1/100 Chaconia LPG carrier
Hi Roel My appologies for not posting on your thread sooner . I Like the hatches and I to ask the same question as Richard , "how did you do the rivet pattern"? demo please
Dave Wooley
Dave Wooley
-
Guest
Re: 1/100 Chaconia LPG carrier
NOTE THIS SHIP HAS NOW CHANGED HANDS AND CALLED 'GAS CAT' OWNED BY A TURKISH COMPANY NEGMAR.
-
Neptune
- Posts: 2466
- Joined: Sun Mar 13, 2005 11:51 am
- Location: Belgium
Re: 1/100 Chaconia LPG carrier
She indeed is. She was sold to a Turkish owner, that doesn't mean I'll change mine though 
Finally back home now.
As for how I did that pattern. Didn't have much time to make any tutorial, but it's easy really. I just punch it with a needle. How to get them so equal. Well, I just made a pattern in Paint. Drew a "hatch" with rounded corners, but with 800 x 600 pixels as size. This is also the size of my hatches but in mm then. Afterwards I drew dots where I needed them, of course I did some estimation. Once you have 2 dots, you can copy that part of your drawing and overlay it on one of the existing dots, this way you get an equal distance between your dots.
When I finished it, I just printed it, and then rescaled it to the good size. Afterwards I put this pattern on the litho, first "punched" (not all the way through, more like "pushed") the pattern with a needle. Afterwards I cut the hatch out and rounded the corners with a file.
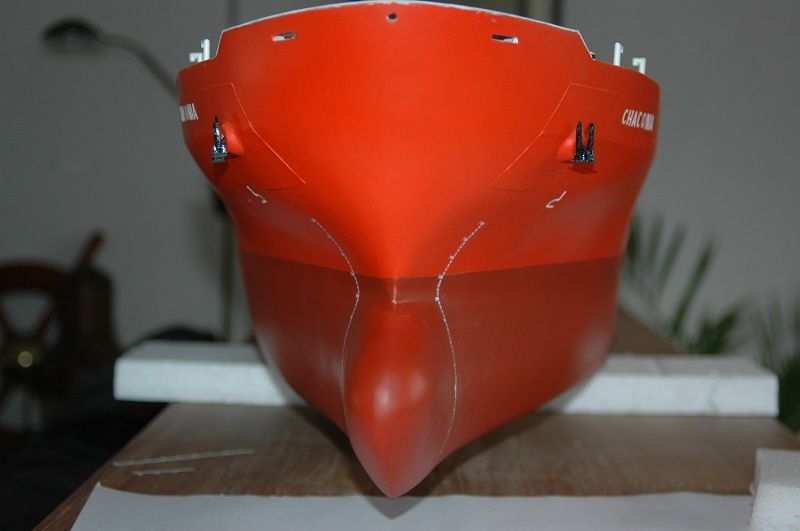
Since I'm home, I finally got a view of the BECC draft marks and they are really worth their price. They even came with plimsol marks for different classification societies, including Lloyds Register under which this ship was classed. Furthermore Germanisher Lloyd, Bureau Veritas and American Bureau of Shipping is present on the sheet. There are 4 draught marks, a bit of a pitty since you need 6 for any decent merchant ship (the middle draught mark is used to see the sagging and hogging of the ship (bending in the middle = when middle draught is not the same as the average between forward and aft).
So I bought two sets. There are also markings for thrusters, Fresh Water/Tropical etc. for next to the plimsol and bulbous bow (the sign I already painted).
I started applying them, the only problem is aft. Due to the extreme curve of the hull there, I'll have to paint them (draughts are read perpendicular, so the sign is stretched along the hull to have a perpendicular height of 10cm). I can use the marks on the rudder stock, but not further up. I'll first have to fix the rudder though. I'm also looking at the propulsion now. Afterwards a layer of varnish or lacquer will go over the marks (satin gloss I think, since glossy makes them look like a factory or toy model). It will also blend in the remaining transparent pieces of the draught marks.

Finally back home now.
As for how I did that pattern. Didn't have much time to make any tutorial, but it's easy really. I just punch it with a needle. How to get them so equal. Well, I just made a pattern in Paint. Drew a "hatch" with rounded corners, but with 800 x 600 pixels as size. This is also the size of my hatches but in mm then. Afterwards I drew dots where I needed them, of course I did some estimation. Once you have 2 dots, you can copy that part of your drawing and overlay it on one of the existing dots, this way you get an equal distance between your dots.
When I finished it, I just printed it, and then rescaled it to the good size. Afterwards I put this pattern on the litho, first "punched" (not all the way through, more like "pushed") the pattern with a needle. Afterwards I cut the hatch out and rounded the corners with a file.
Since I'm home, I finally got a view of the BECC draft marks and they are really worth their price. They even came with plimsol marks for different classification societies, including Lloyds Register under which this ship was classed. Furthermore Germanisher Lloyd, Bureau Veritas and American Bureau of Shipping is present on the sheet. There are 4 draught marks, a bit of a pitty since you need 6 for any decent merchant ship (the middle draught mark is used to see the sagging and hogging of the ship (bending in the middle = when middle draught is not the same as the average between forward and aft).
So I bought two sets. There are also markings for thrusters, Fresh Water/Tropical etc. for next to the plimsol and bulbous bow (the sign I already painted).
I started applying them, the only problem is aft. Due to the extreme curve of the hull there, I'll have to paint them (draughts are read perpendicular, so the sign is stretched along the hull to have a perpendicular height of 10cm). I can use the marks on the rudder stock, but not further up. I'll first have to fix the rudder though. I'm also looking at the propulsion now. Afterwards a layer of varnish or lacquer will go over the marks (satin gloss I think, since glossy makes them look like a factory or toy model). It will also blend in the remaining transparent pieces of the draught marks.
The merchant shipyard
-
Cadman

- Site Admin

- Posts: 3632
- Joined: Sat Jan 08, 2005 4:31 pm
- Location: Plattsburg, Missouri
Re: 1/100 Chaconia LPG carrier
Awesome! I love the way the draft marks highlight the bow shape.
-
JIM BAUMANN

- Posts: 5689
- Joined: Mon Jan 10, 2005 5:30 pm
- Location: Nr Southampton England
Re: 1/100 Chaconia LPG carrier
very good mate!!!
I am impressed!
JB
I am impressed!
JB
....I buy them at three times the speed I build 'em.... will I live long enough to empty my stash...?
http://www.modelshipgallery.com/gallery ... index.html
IPMS UK SIG (special interest group) www.finewaterline.com
http://www.modelshipgallery.com/gallery ... index.html
IPMS UK SIG (special interest group) www.finewaterline.com
-
Neptune
- Posts: 2466
- Joined: Sun Mar 13, 2005 11:51 am
- Location: Belgium
Re: 1/100 Chaconia LPG carrier
Thanks a lot, means a lot coming from you guys!!!
Here is a slow progress. Made a big mess out of the aft drafts. Tried to paint it with a piece of brass wire, didn't really work. Drawing them at the correct position wasn't really easy either. Eventually I used the external frame, drew a perpendicular line next to it, then transferred the drafts to the shape of the frame. Holding the frame along the ship, I marked the position of the different numbers.
Now I'm trying with a sort of small paint marker, doesn't really seem fine enough, but lost the patience to wait any longer.

Here is a slow progress. Made a big mess out of the aft drafts. Tried to paint it with a piece of brass wire, didn't really work. Drawing them at the correct position wasn't really easy either. Eventually I used the external frame, drew a perpendicular line next to it, then transferred the drafts to the shape of the frame. Holding the frame along the ship, I marked the position of the different numbers.
Now I'm trying with a sort of small paint marker, doesn't really seem fine enough, but lost the patience to wait any longer.
The merchant shipyard
-
Capit�o Norbert

- Posts: 1993
- Joined: Tue Apr 17, 2007 9:18 am
- Location: Brasil
Re: 1/100 Chaconia LPG carrier
Hi Neptune your model looks very great .
great model hull too and good painting work 
great model hull too and good painting work
-
Dave Wooley
- Posts: 4131
- Joined: Sat Jan 22, 2005 10:18 am
- Location: Liverpool
Re: 1/100 Chaconia LPG carrier
Hi Roel Ah the draft markings .Always a tricky application even more so if the numbers are raised off the plates but reproducing that at any scale is a nightmare but PE can come to the rescue. Yours does look good .Question did you apply each set of numbers separately?
Dave Wooley
Dave Wooley
-
Neptune
- Posts: 2466
- Joined: Sun Mar 13, 2005 11:51 am
- Location: Belgium
Re: 1/100 Chaconia LPG carrier
thanks for the interest. Not sure what you meant with "seperately".
In the sheet, they go from 0-10m and then a second line from 10-20m. So I had to match those together. I did not cut out the numbers seperately, just in two strips of numbers. In reality I've noticed the numbers are slightly too high and the space between them slightly too small. The space between should be equal to the height of the numbers (10cm each). Bottom of the number marks the draught, top of the number is 10cm more than that number, then a space of again 10cm and then starts the bottom of the next number.
So if the water comes at the bottom of the 2, that means a draught of Xm 20cm. If it is at the top of the 2, it's Xm 30cm, then you have 10cm of free space (31cm-39cm) and then comes the bottom of the 4, which marks the 40cm.
The marker seemed to go well,but is completely not water resistant, one drop of water and the numbers are gone. Not exactly great. For the top marks of the aft draughts, I separated the numbers and varied the space between. It gives a better effect. It's only for the real bottom/curved numbers that I'm still looking for an acceptable solution. After that I'll go for the varnish and perhaps another floatation test to see how she looks on the water .
.
In the sheet, they go from 0-10m and then a second line from 10-20m. So I had to match those together. I did not cut out the numbers seperately, just in two strips of numbers. In reality I've noticed the numbers are slightly too high and the space between them slightly too small. The space between should be equal to the height of the numbers (10cm each). Bottom of the number marks the draught, top of the number is 10cm more than that number, then a space of again 10cm and then starts the bottom of the next number.
So if the water comes at the bottom of the 2, that means a draught of Xm 20cm. If it is at the top of the 2, it's Xm 30cm, then you have 10cm of free space (31cm-39cm) and then comes the bottom of the 4, which marks the 40cm.
The marker seemed to go well,but is completely not water resistant, one drop of water and the numbers are gone. Not exactly great. For the top marks of the aft draughts, I separated the numbers and varied the space between. It gives a better effect. It's only for the real bottom/curved numbers that I'm still looking for an acceptable solution. After that I'll go for the varnish and perhaps another floatation test to see how she looks on the water
.The merchant shipyard
-
Neptune
- Posts: 2466
- Joined: Sun Mar 13, 2005 11:51 am
- Location: Belgium
Re: 1/100 Chaconia LPG carrier
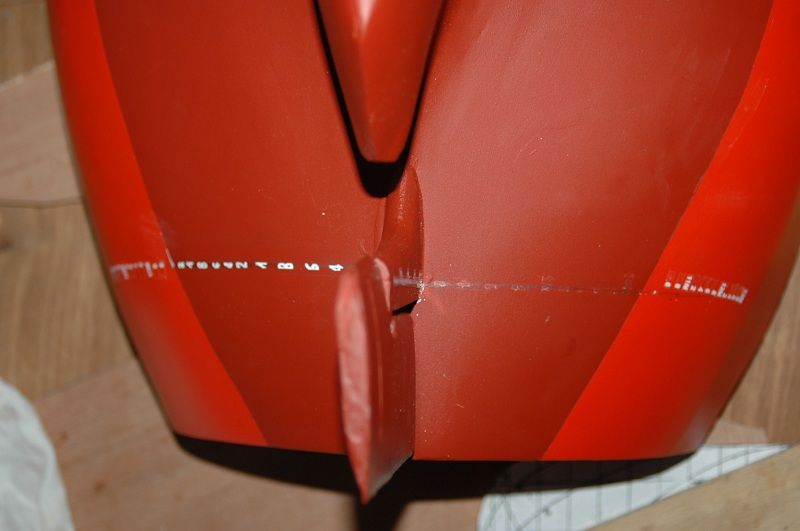
Here are a few pics of the "progress". You can also see the reason why PE wouldn't bring a solution, I need letters of very different sizes, but with same width for the lower side. You can see a pic from the bottom, where you can see the much higher numbers. And one from the side, where you can see the side effect of these "high" figures. You can also see the banana shape which was the result of this try. Not exactly perfect, but I guess it will have to do.
I'm working on the other side for now. I'll see where that ends up. I'll have to re-apply the stickers. I guess for further ideas, using a wooden external frame, instead of paper, to mark a straight, perpendicular line along the height of the hull will be required. Once I have such a line, I suppose I could at least get rid of the banana figure.
.

I'm working on the other side for now. I'll see where that ends up. I'll have to re-apply the stickers. I guess for further ideas, using a wooden external frame, instead of paper, to mark a straight, perpendicular line along the height of the hull will be required. Once I have such a line, I suppose I could at least get rid of the banana figure.
.
The merchant shipyard