Yes, what Joelle said. Agree 100%Joelle wrote: Sat Aug 01, 2026 12:54 pm I’m simply running out of superlatives here.
What more is there to say?
Fantastic.
HMS Victory and Le Redoutable at Trafalgar (1/300)
Moderators: BB62vet, MartinJQuinn, JIM BAUMANN, Jon, Dan K
-
MartinJQuinn

- Posts: 8570
- Joined: Tue Jan 11, 2005 1:40 pm
- Location: New Jersey
Re: HMS Victory and Le Redoutable at Trafalgar (1/300)
Martin
"Tomorrow is the most important thing in life. Comes into us at midnight very clean. It's perfect when it arrives and it puts itself in our hands. It hopes we've learned something from yesterday." John Wayne
Ship Model Gallery
"Tomorrow is the most important thing in life. Comes into us at midnight very clean. It's perfect when it arrives and it puts itself in our hands. It hopes we've learned something from yesterday." John Wayne
Ship Model Gallery
-
marijn van gils
- Posts: 2721
- Joined: Tue Feb 06, 2007 10:24 am
- Location: Belgium
Re: HMS Victory and Le Redoutable at Trafalgar (1/300)
Thank you very much guys! 

Now, the shaping!
This is basically a matter of wetting the sail and prodding it into shape. When dry, the sail holds the shape and the folds created. No need for glue or varnish or…
Of course, the copper wire bolt ropes help to give it some rigidity too.
This was the main reason for me to use silkspan: it doesn’t disintegrate when wet. Of course it does get a little more fragile, so some care is necessary, but it doesn’t just fall apart like about any other type of paper.
And also positive: it can be wetted as often as you like.
That proved to be very important, because complex shapes can take some time to shape, and it is very convenient that it doesn’t need to be finalised in one session. That takes a lot of the stress out of it!
For a simple sail with only a general shape and simple folds like the fore royal, one session will usually do. But for others, I needed multiple modelling sessions.
For example, the fore topsail (that has fallen with its yard on the fore top and lower yard):
- In a first session, I wetted the complete sail, and defined the overall shape.
- In the next session, I wetted only the starboard side, and fitted it better to the yard it would be hanging over.
- Next session: I wetted only the starboard side and shaped that better into the ‘hang’ I wanted
- Last session; I wetted the sail locally to adjust specific places and folds, finetuning everything.
Each session took about 45 minutes to 1,5 hours.
And it doesn’t need to be so systematic. With the sail in this SBS (main course), I went back and forth a couple of times because I was not happy how my pre-conceived sail shape was turning out. So I messed around a bit, tried some things out, corrected, …
Which I didn’t photograph, but should have…
Wetting is done with normal tap water, applied with a brush. I used a larger one for wetting large areas, and a smaller for small ones.
For shaping, I used fingers and tweezers, and sometimes the brushes. But whatever works for you can be used of course!
The sail dries while you are working on it, so I often had to apply more water to keep it workable. I usually did this only locally on the area I was working on.
The silkspan holds the shape very well. But sometimes, it was necessary to hold something in place while drying, for example by weighing it down with one of my hand tools.
The rear of the sail, clewed up:

Note how the reef points get roughed up a bit. Normally, I would attach these only after shaping a sail, but with overlapping parts of sails that can be difficult so I attached them in advance.
And the front is pulled up with the buntlines and one of the leechlines (the starboard one will be damaged):

Note how I didn’t glue any reef points on this side before shaping.
I thought that only clewing the sail from the rear would be enough, but it wasn’t. The sail was still hanging too low, obscuring too much activity on deck. So I also had it bunted up from the front, and now I will have to add the reef points in between the overlapping sail parts…
That shows that not everything goes according to plan, and some flexibility is always necessary…
Now, the battle damage is added.
This is easy enough: just pluck out small pieces of silkspan with small tweezers, letting the edges break naturally.
Parts that need to hang down, are wetted with a small brush and folded down.

One annoying detail: silkspan is made from (or at least contains) small fibres, and these often stick out of the edges as unwanted fluff or ‘hairs’. So, these need to be removed, which I did by pulling them out with fine tweezers. A bit time-consuming, but it makes a big difference to the appearance of the battle damage.
I also straightened the reef points at this time. Some had lost too much paint, so I removed them, to be later replaced with new ones.

Now, some more painting follows: shading the folds.
This helps to empasize the threedimensionality of the folds and sails. And very importantly, it gives some more scale-feeling, and colour-wise integrates them more with the rest of the model.
I only used raw umber oil paint, more or less diluted with white spirit.
For very faint shadows in shallow folds, the paint is very heavily diluted (only a minimum of colour is applied). Often, the colour is built up carefully in several layers.
For very deep shadows in deep creases, the paint is kept ‘dark’ by using much less dilution.


The shadows are painted on carefully with a fine brush (I like a size 00 for this), following the principles of larger scale figure-painting (zenithal lighting: the top halves of the folds are shaded). Care is taken not to haver the brush too ‘wet’, especially when using a lot of dilution. We want to apply the paint only where the brush touches the sail, not have it run around like a wash.
For a good result, this does take some time! A sail as complex as this one, with many intricate folds, takes me about 3 hours to shade. Remember, there are two sides of each sail to paint…
But a simple sail, like the fore royal, only takes about 20 minutes or so.
With the same raw umber oil paint, I also painted on some stains:

With some sails, I followed the location where ropes rub against the sail. But with this one I kept it a bit random, in places with no other detail.
By the way, I also highlighted the lower edges of the shot holes with pure white enamel paint. But this is barely visible on the photo’s (and also not so much on the model).
I didn’t highlight the lower parts of folds, because that would remove too much of the colour variation and seemlines I added earlier.
Now, cringles were superglued to the bolt ropes. These were made like you would make rings (wrapping copper wire around a drill bit or brass wire), but with twisted copper wire. And of course the ‘rings’ were cut in half.
I also glued the bunt- and leechline blocks to the yard now, and added the reef points to the front of the sail.

Close-up:

Finally, the last blocks and lines were added to the sail:


Of course, the bunt-, leech- and cluelines were kept in mind very much when shaping the sail! Now, this comes together and the folds finally make sense…
The sling collar line was left long to serve as a nice handle, but is now cut and bent into its final shape.
But most of the time, I would hold the entire thing by the ends of the yard. You can see in the photo’s how my fingers have rubbed the paint off those. That will be retouched after attaching the sail to the mast. (Stunsail boom irons and Flemish horses will also be added later; because their position would render them too fragile now.)
But that’s for next time! I overloaded you with enough text for now I’m sure…
Now, the shaping!
This is basically a matter of wetting the sail and prodding it into shape. When dry, the sail holds the shape and the folds created. No need for glue or varnish or…
Of course, the copper wire bolt ropes help to give it some rigidity too.
This was the main reason for me to use silkspan: it doesn’t disintegrate when wet. Of course it does get a little more fragile, so some care is necessary, but it doesn’t just fall apart like about any other type of paper.
And also positive: it can be wetted as often as you like.
That proved to be very important, because complex shapes can take some time to shape, and it is very convenient that it doesn’t need to be finalised in one session. That takes a lot of the stress out of it!
For a simple sail with only a general shape and simple folds like the fore royal, one session will usually do. But for others, I needed multiple modelling sessions.
For example, the fore topsail (that has fallen with its yard on the fore top and lower yard):
- In a first session, I wetted the complete sail, and defined the overall shape.
- In the next session, I wetted only the starboard side, and fitted it better to the yard it would be hanging over.
- Next session: I wetted only the starboard side and shaped that better into the ‘hang’ I wanted
- Last session; I wetted the sail locally to adjust specific places and folds, finetuning everything.
Each session took about 45 minutes to 1,5 hours.
And it doesn’t need to be so systematic. With the sail in this SBS (main course), I went back and forth a couple of times because I was not happy how my pre-conceived sail shape was turning out. So I messed around a bit, tried some things out, corrected, …
Which I didn’t photograph, but should have…
Wetting is done with normal tap water, applied with a brush. I used a larger one for wetting large areas, and a smaller for small ones.
For shaping, I used fingers and tweezers, and sometimes the brushes. But whatever works for you can be used of course!
The sail dries while you are working on it, so I often had to apply more water to keep it workable. I usually did this only locally on the area I was working on.
The silkspan holds the shape very well. But sometimes, it was necessary to hold something in place while drying, for example by weighing it down with one of my hand tools.
The rear of the sail, clewed up:
Note how the reef points get roughed up a bit. Normally, I would attach these only after shaping a sail, but with overlapping parts of sails that can be difficult so I attached them in advance.
And the front is pulled up with the buntlines and one of the leechlines (the starboard one will be damaged):
Note how I didn’t glue any reef points on this side before shaping.
I thought that only clewing the sail from the rear would be enough, but it wasn’t. The sail was still hanging too low, obscuring too much activity on deck. So I also had it bunted up from the front, and now I will have to add the reef points in between the overlapping sail parts…
That shows that not everything goes according to plan, and some flexibility is always necessary…
Now, the battle damage is added.
This is easy enough: just pluck out small pieces of silkspan with small tweezers, letting the edges break naturally.
Parts that need to hang down, are wetted with a small brush and folded down.
One annoying detail: silkspan is made from (or at least contains) small fibres, and these often stick out of the edges as unwanted fluff or ‘hairs’. So, these need to be removed, which I did by pulling them out with fine tweezers. A bit time-consuming, but it makes a big difference to the appearance of the battle damage.
I also straightened the reef points at this time. Some had lost too much paint, so I removed them, to be later replaced with new ones.
Now, some more painting follows: shading the folds.
This helps to empasize the threedimensionality of the folds and sails. And very importantly, it gives some more scale-feeling, and colour-wise integrates them more with the rest of the model.
I only used raw umber oil paint, more or less diluted with white spirit.
For very faint shadows in shallow folds, the paint is very heavily diluted (only a minimum of colour is applied). Often, the colour is built up carefully in several layers.
For very deep shadows in deep creases, the paint is kept ‘dark’ by using much less dilution.
The shadows are painted on carefully with a fine brush (I like a size 00 for this), following the principles of larger scale figure-painting (zenithal lighting: the top halves of the folds are shaded). Care is taken not to haver the brush too ‘wet’, especially when using a lot of dilution. We want to apply the paint only where the brush touches the sail, not have it run around like a wash.
For a good result, this does take some time! A sail as complex as this one, with many intricate folds, takes me about 3 hours to shade. Remember, there are two sides of each sail to paint…
But a simple sail, like the fore royal, only takes about 20 minutes or so.
With the same raw umber oil paint, I also painted on some stains:
With some sails, I followed the location where ropes rub against the sail. But with this one I kept it a bit random, in places with no other detail.
By the way, I also highlighted the lower edges of the shot holes with pure white enamel paint. But this is barely visible on the photo’s (and also not so much on the model).
I didn’t highlight the lower parts of folds, because that would remove too much of the colour variation and seemlines I added earlier.
Now, cringles were superglued to the bolt ropes. These were made like you would make rings (wrapping copper wire around a drill bit or brass wire), but with twisted copper wire. And of course the ‘rings’ were cut in half.
I also glued the bunt- and leechline blocks to the yard now, and added the reef points to the front of the sail.
Close-up:
Finally, the last blocks and lines were added to the sail:
Of course, the bunt-, leech- and cluelines were kept in mind very much when shaping the sail! Now, this comes together and the folds finally make sense…
The sling collar line was left long to serve as a nice handle, but is now cut and bent into its final shape.
But most of the time, I would hold the entire thing by the ends of the yard. You can see in the photo’s how my fingers have rubbed the paint off those. That will be retouched after attaching the sail to the mast. (Stunsail boom irons and Flemish horses will also be added later; because their position would render them too fragile now.)
But that’s for next time! I overloaded you with enough text for now I’m sure…
-
wefalck

- Posts: 2119
- Joined: Wed Sep 28, 2011 12:04 pm
- Location: Paris
- Contact:
Re: HMS Victory and Le Redoutable at Trafalgar (1/300)
That looks very realistic, indeed, and I can well imagine that it took several sessions of wetting to coerce the still relatively stiff material into fabric-like folds. Although the fibres in silkspan are oriented randomly, it still tends to make long straight folds unlike what one would see on a limp sail-cloth.
I know that diluting oils with a lot of white spirit makes them more or less matt, but you also used enamels (matt) - how did you tie them all together to have a uniform matt sheen? I would have probably sprayed the sails lightly with matt acrylic varnish as a last step.
I know that diluting oils with a lot of white spirit makes them more or less matt, but you also used enamels (matt) - how did you tie them all together to have a uniform matt sheen? I would have probably sprayed the sails lightly with matt acrylic varnish as a last step.
Eberhard
Former chairman Arbeitskreis historischer Schiffbau e.V. (German Association for Shipbuilding History)
--------------------------------------------------------------------------------------------------------------------------------------------------------------------------------------------




Former chairman Arbeitskreis historischer Schiffbau e.V. (German Association for Shipbuilding History)
--------------------------------------------------------------------------------------------------------------------------------------------------------------------------------------------
-
SG1
- Posts: 420
- Joined: Mon Apr 17, 2017 2:43 am
- Contact:
Re: HMS Victory and Le Redoutable at Trafalgar (1/300)
Incredible achievement Marijn! The damaged/weathered sail and mast are a model in themselves. Super super cool
-
marijn van gils
- Posts: 2721
- Joined: Tue Feb 06, 2007 10:24 am
- Location: Belgium
Re: HMS Victory and Le Redoutable at Trafalgar (1/300)
Thank you very much guys!
Eberhard, I always let the oil paint wait on a piece of corrugated cardboard before using them, for at least 30 minutes but often an entire night, so the cardboard can soak up some of their oil. That, combined with thinning the paints with white spirit (which degreases too), results in a matt surface very reliably.
Only when the paint is used almost undiluted, it can still have some sheen, but that is not the case on these sails.
So, very conveniently, I didn't have any need for a matt varnish over the shadows. No tying together was needed, as everything was matt already.
I did use matt varnish a lot though to cover the shine from gluing with CA glue. But I applied it only locally with a brush.
You are right, the silkspan does take some work to fold in a good way. For me, that is the main drawback for this material: I wish it would give me some more control over the folds. But maybe that's just because I used to do some figure-sculpting, where epoxy putty gives total control over all the folds, small and large...
Stefano, those sails and yards hold a surprising amount of detail. So, they do take some time and work, and I like to treat them like models in their own right indeed, just like the small boats etc.
Eberhard, I always let the oil paint wait on a piece of corrugated cardboard before using them, for at least 30 minutes but often an entire night, so the cardboard can soak up some of their oil. That, combined with thinning the paints with white spirit (which degreases too), results in a matt surface very reliably.
Only when the paint is used almost undiluted, it can still have some sheen, but that is not the case on these sails.
So, very conveniently, I didn't have any need for a matt varnish over the shadows. No tying together was needed, as everything was matt already.
I did use matt varnish a lot though to cover the shine from gluing with CA glue. But I applied it only locally with a brush.
You are right, the silkspan does take some work to fold in a good way. For me, that is the main drawback for this material: I wish it would give me some more control over the folds. But maybe that's just because I used to do some figure-sculpting, where epoxy putty gives total control over all the folds, small and large...
Stefano, those sails and yards hold a surprising amount of detail. So, they do take some time and work, and I like to treat them like models in their own right indeed, just like the small boats etc.
-
marijn van gils
- Posts: 2721
- Joined: Tue Feb 06, 2007 10:24 am
- Location: Belgium
Re: HMS Victory and Le Redoutable at Trafalgar (1/300)
Hello everyone,
In the previous ‘step’, the sail was ready to be attached to the mast. I hope it was obvious that I prefer to attach as many of the blocks and lines to the mast and yard before gluing them to the mast.
So, now the time came to marry them permanently to the mast:

For this, I used 5 minute epoxy glue. It is less brittle than CA (to resist the inevitable accidental knocks while rigging the rest of the mast), and gives more time to position the yard exactly like I want it.
Front view:

Earlier, I had cut the length of the upper jeer strops, so they would fit behind the stay collars, but not extend above. This took some test-fitting of course.

After that, the upper end of the upper jeer strops followed, making it look as if it is one single assembly that attaches the upper jeer block to the lashing around the masthead. I should take a close-up of this, as it is not really visible in the following photo…
Neither is the sling, which followed afterwards.
The falls of various lines were added next:

Close-up of the lower part of the starboard lift fall.
The main line, blocks and lanyard were assembled before gluing them on the model. Except for the last part of the lanyard, which was glued to the top block and kevel afterwards.

And finally, the rest of the rigging was added to the sail and yard (The sling and upper part of the jeer strop are slightly visible here too):

The paint on the ends of the yardarms is retouched too.
But that’s not the end, because some rigging is not in place yet: sheet and tack lines, and the falls of the bunt- and leechlines. These would be in the way when installing rigging for the topsail. So, stay tuned for the next instalment!
In the previous ‘step’, the sail was ready to be attached to the mast. I hope it was obvious that I prefer to attach as many of the blocks and lines to the mast and yard before gluing them to the mast.
So, now the time came to marry them permanently to the mast:
For this, I used 5 minute epoxy glue. It is less brittle than CA (to resist the inevitable accidental knocks while rigging the rest of the mast), and gives more time to position the yard exactly like I want it.
Front view:
Earlier, I had cut the length of the upper jeer strops, so they would fit behind the stay collars, but not extend above. This took some test-fitting of course.
After that, the upper end of the upper jeer strops followed, making it look as if it is one single assembly that attaches the upper jeer block to the lashing around the masthead. I should take a close-up of this, as it is not really visible in the following photo…
Neither is the sling, which followed afterwards.
The falls of various lines were added next:
Close-up of the lower part of the starboard lift fall.
The main line, blocks and lanyard were assembled before gluing them on the model. Except for the last part of the lanyard, which was glued to the top block and kevel afterwards.
And finally, the rest of the rigging was added to the sail and yard (The sling and upper part of the jeer strop are slightly visible here too):
The paint on the ends of the yardarms is retouched too.
But that’s not the end, because some rigging is not in place yet: sheet and tack lines, and the falls of the bunt- and leechlines. These would be in the way when installing rigging for the topsail. So, stay tuned for the next instalment!
-
EJFoeth
- Posts: 2927
- Joined: Wed Jan 21, 2009 1:51 pm
Re: HMS Victory and Le Redoutable at Trafalgar (1/300)
That would be my perpetual source of worry for this modelmarijn van gils wrote: Thu Aug 13, 2026 7:08 am For this, I used 5 minute epoxy glue. It is less brittle than CA (to resist the inevitable accidental knocks while rigging the rest of the mast), and gives more time to position the yard exactly like I want it.
 Are the “floating” blocks done with the same glue, need to add similar blocks to my main mast…
-
marijn van gils
- Posts: 2721
- Joined: Tue Feb 06, 2007 10:24 am
- Location: Belgium
Re: HMS Victory and Le Redoutable at Trafalgar (1/300)
Hello EJ! 
Which blocks do you mean? N°1 (for lifts and topsail sheets) or n°2 (for bunt- and leechlines)?
 [/url]
N°1 is attached by its copperwire 'rope'.
Already for painting the blocks, I drilled holes in them and inserted wire 'rope'. This would serve as a handle during painting, and for many blocks as the part of their strop with which to attach them to a mast, yard or rope.


Blocks n°1 are the 4th from the left in the photos above. You see they were already attached to each other before painting (connected with a little copperwire pin, superglued into small holes in each block).
To attach them to the yard, the long 'rope' was wrapped around the yardarm and superglued to it. I made sure to leave a bit of length to the rope, so the blocks would be able to bend downwards towards the masthead (orientation for the lifts). The connection is certainly strong enough, and remains flexible foir adjustment when installing the lifts.
Blocks n°2 are also superglued, but simply their 'body' directly onto the face of the yard.
The part of their strops around the yard was already fitted at this stage, before attaching the sail:

For installing the blocks, their 'strops' were cut short (about 1 mm I think), and the blocks themselves were superglued directly onto the face of the yard. The little end of strop was then bent onto the strop section that was already around the yard.
Hard to explain in text, but very simple on the workbench...
Which blocks do you mean? N°1 (for lifts and topsail sheets) or n°2 (for bunt- and leechlines)?
[/url]N°1 is attached by its copperwire 'rope'.
Already for painting the blocks, I drilled holes in them and inserted wire 'rope'. This would serve as a handle during painting, and for many blocks as the part of their strop with which to attach them to a mast, yard or rope.
Blocks n°1 are the 4th from the left in the photos above. You see they were already attached to each other before painting (connected with a little copperwire pin, superglued into small holes in each block).
To attach them to the yard, the long 'rope' was wrapped around the yardarm and superglued to it. I made sure to leave a bit of length to the rope, so the blocks would be able to bend downwards towards the masthead (orientation for the lifts). The connection is certainly strong enough, and remains flexible foir adjustment when installing the lifts.
Blocks n°2 are also superglued, but simply their 'body' directly onto the face of the yard.
The part of their strops around the yard was already fitted at this stage, before attaching the sail:
For installing the blocks, their 'strops' were cut short (about 1 mm I think), and the blocks themselves were superglued directly onto the face of the yard. The little end of strop was then bent onto the strop section that was already around the yard.
Hard to explain in text, but very simple on the workbench...
-
EJFoeth
- Posts: 2927
- Joined: Wed Jan 21, 2009 1:51 pm
Re: HMS Victory and Le Redoutable at Trafalgar (1/300)
Ah yes, I meant blocks #1. So they're drilled in and then wrapped around the yard-arm, so that would indeed be more than sturdy enough. I have some block work of my own, a few large pulleys in the main mast for the helm indicator and for the main derrick (cannot post pics now, doing Fortran in my hotel room some distance from my home PC). Need to figure out how to attach... Some minor block work as your #2 is present for the smaller cranes...
The prepainted blocks and wires are also convenient, may help solving my cable reel problem where I omitted adding cables to the drums and the various lines in the main mast too. Still trying to figure out the exact rigging configuration though, there's a bit more up there than I initially thought. Not of sailing ship complexity of course but it is tricky to get a good, clear shot of that location; but I did find a few good ones showing how the main aerials are running over the main mast; for many lines I cannot confirm where they end up on deck or on the starfish so some guesswork will be in order. Also, Johan's live demonstruction of his rigging gave me enough confidence in spanning that large distance between the main yardarms using the steel wires.
The prepainted blocks and wires are also convenient, may help solving my cable reel problem where I omitted adding cables to the drums and the various lines in the main mast too. Still trying to figure out the exact rigging configuration though, there's a bit more up there than I initially thought. Not of sailing ship complexity of course but it is tricky to get a good, clear shot of that location; but I did find a few good ones showing how the main aerials are running over the main mast; for many lines I cannot confirm where they end up on deck or on the starfish so some guesswork will be in order.
Also, Johan's live demonstruction of his rigging gave me enough confidence in spanning that large distance between the main yardarms using the steel wires.-
Dino Carancini
- Posts: 430
- Joined: Wed Oct 11, 2006 5:46 am
Re: HMS Victory and Le Redoutable at Trafalgar (1/300)
I like to come back after a while, because this build is a always a mesmerizing surprise! 
-
marijn van gils
- Posts: 2721
- Joined: Tue Feb 06, 2007 10:24 am
- Location: Belgium
Re: HMS Victory and Le Redoutable at Trafalgar (1/300)
Thank you very Much Dino!
EJ, yes the steel wires are great!
I also used them for a couple of things. The snaking between the fore and main stays and preventer stays comes to mind, and also the fore royal lifts, and some of the thinnest falls that had to run all the way from the royal to the deck or lower top.
How were Hood's real blocks attached to the yard/mast? I can imagine there would be more steel involved... That is probably also important to consider?
EJ, yes the steel wires are great!
I also used them for a couple of things. The snaking between the fore and main stays and preventer stays comes to mind, and also the fore royal lifts, and some of the thinnest falls that had to run all the way from the royal to the deck or lower top.
How were Hood's real blocks attached to the yard/mast? I can imagine there would be more steel involved... That is probably also important to consider?
-
marijn van gils
- Posts: 2721
- Joined: Tue Feb 06, 2007 10:24 am
- Location: Belgium
Re: HMS Victory and Le Redoutable at Trafalgar (1/300)
Now, the main topsail:

This was actually the first sail I made, and actually I made it only as a test to try the techniques.
The topsails are the most complex sails, so I thought it would be good for a test piece. Also, it would allow me to follow Victory’s preserved fore topsail to get a feel for the battle damage.
But it went quite well, and after feedback from multiple modelling friends I decided to just go ahead and use it on the model.
A sketch from the Victory’s actual fore topsail from Trafalgar:
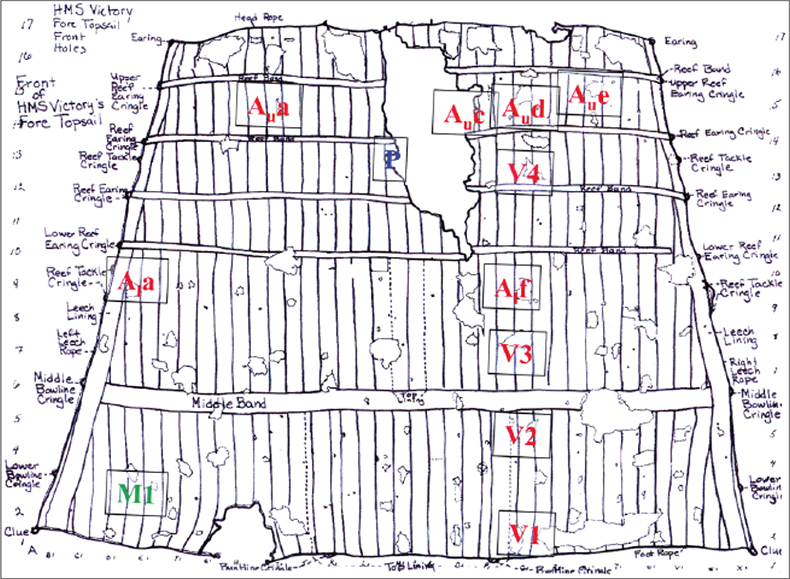
(from this website: https://spectroscopyworld.com/article/r ... algar-sail)
I followed this very much, but I didn’t copy it completely. Anyway, they are not the same sail… (fore versus main)
(Note that my photo shows the rear of the sail, so the damage looks mirrored.)
In the above photo, the sail/yard assembly was not yet complete for attachment to the mast.
I first added the cluelines and a section of a topgallant sheet (hanging loose, because the topgallant mast was shot away, with of course the sail), and then glued the yard to the mast:

But contrary to the course, I didn’t add the buntlines yet:

These are more fragile than the course buntlines (because they are much longer), and easier to install afterwards (because they don’t need to be tight).
But they were the first lines to install after the yard was attached to the mast:

Reef tackle lines and lifts followed also.
These lines (plus a couple more) need their falls to run down to the deck of course:

The falls run through the lubbers hole in the lower top, to be attached the different pinrails:

The reef tackle falls were a bit more complex, so they followed last, together with a number of damaged lines from the topgallant rigging:


After all the falls were fitted through the lubbers hole down to the pin rails, I could ‘instert’ the catharpins laterally through the shrouds and the spiders web of falls, and glue them in place.
The lower bunt- and leechline falls were added last, because they all hang behind the aftermost catharpin.
At the front of the sail, not much of all those lines is visible. Just a damaged topgallant line hanging over the yard:

And I even forgot to add one! I only noticed while annotating these photo’s…
That shows that, even though I’ve been making plans and lists while doing the rigging to keep track of everything, it still is easy to overlook something…
But luckily, this one was easily added afterwards. And if I hadn’t, I doubt anyone would have ever noticed… but I’m still glad I saw it!
This was actually the first sail I made, and actually I made it only as a test to try the techniques.
The topsails are the most complex sails, so I thought it would be good for a test piece. Also, it would allow me to follow Victory’s preserved fore topsail to get a feel for the battle damage.
But it went quite well, and after feedback from multiple modelling friends I decided to just go ahead and use it on the model.
A sketch from the Victory’s actual fore topsail from Trafalgar:
(from this website: https://spectroscopyworld.com/article/r ... algar-sail)
I followed this very much, but I didn’t copy it completely. Anyway, they are not the same sail… (fore versus main)
(Note that my photo shows the rear of the sail, so the damage looks mirrored.)
In the above photo, the sail/yard assembly was not yet complete for attachment to the mast.
I first added the cluelines and a section of a topgallant sheet (hanging loose, because the topgallant mast was shot away, with of course the sail), and then glued the yard to the mast:
But contrary to the course, I didn’t add the buntlines yet:
These are more fragile than the course buntlines (because they are much longer), and easier to install afterwards (because they don’t need to be tight).
But they were the first lines to install after the yard was attached to the mast:
Reef tackle lines and lifts followed also.
These lines (plus a couple more) need their falls to run down to the deck of course:
The falls run through the lubbers hole in the lower top, to be attached the different pinrails:
The reef tackle falls were a bit more complex, so they followed last, together with a number of damaged lines from the topgallant rigging:
After all the falls were fitted through the lubbers hole down to the pin rails, I could ‘instert’ the catharpins laterally through the shrouds and the spiders web of falls, and glue them in place.
The lower bunt- and leechline falls were added last, because they all hang behind the aftermost catharpin.
At the front of the sail, not much of all those lines is visible. Just a damaged topgallant line hanging over the yard:
And I even forgot to add one! I only noticed while annotating these photo’s…
That shows that, even though I’ve been making plans and lists while doing the rigging to keep track of everything, it still is easy to overlook something…
But luckily, this one was easily added afterwards. And if I hadn’t, I doubt anyone would have ever noticed… but I’m still glad I saw it!