Page 10 of 12

Re: WIP HMS Renown (1942) White Ensign Models

Posted: Mon Nov 15, 2010 7:54 pm
by Bill Livingston
I have started painting the oars and they will go on tomorrow... Looking at that selection of pictures of your boats makes me realise just how good you are at small details... The thwarts on your boats look SO much better, you obviously reduce the resin boat to a thin shell and then use PE to make the thwarts... SO much better...

I will try the pencil trick before I fix the oars in place in the morning. The 45ft boats shouldn't have oars though should they? They are open launches and I was going to add a bit of rod to simulate the motor and the prop shaft...

I am going to save those pictures as a reference (and inspiration!) for future builds though. I have learnt an awful lot on this model... And the more I get modelling references like these, the more i can learn and the better and more satisfying modelling ships will become... Thanks... Much appreciated :-)

Bill

Re: WIP HMS Renown (1942) White Ensign Models

Posted: Mon Nov 15, 2010 8:17 pm
by JIM BAUMANN
Thank you for crediting me with the integrity of inserting individual seats....

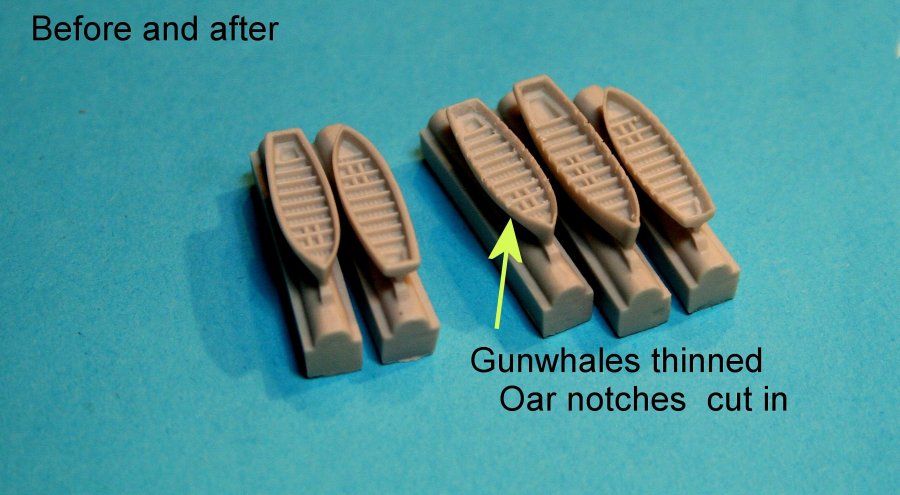
However-- I am merely a bludgeoning bodger... I have in the past inserted thwarts individually--and have also used PE inserts--but have always removed the cast thwarts with a burr tool, and thinned the shells.

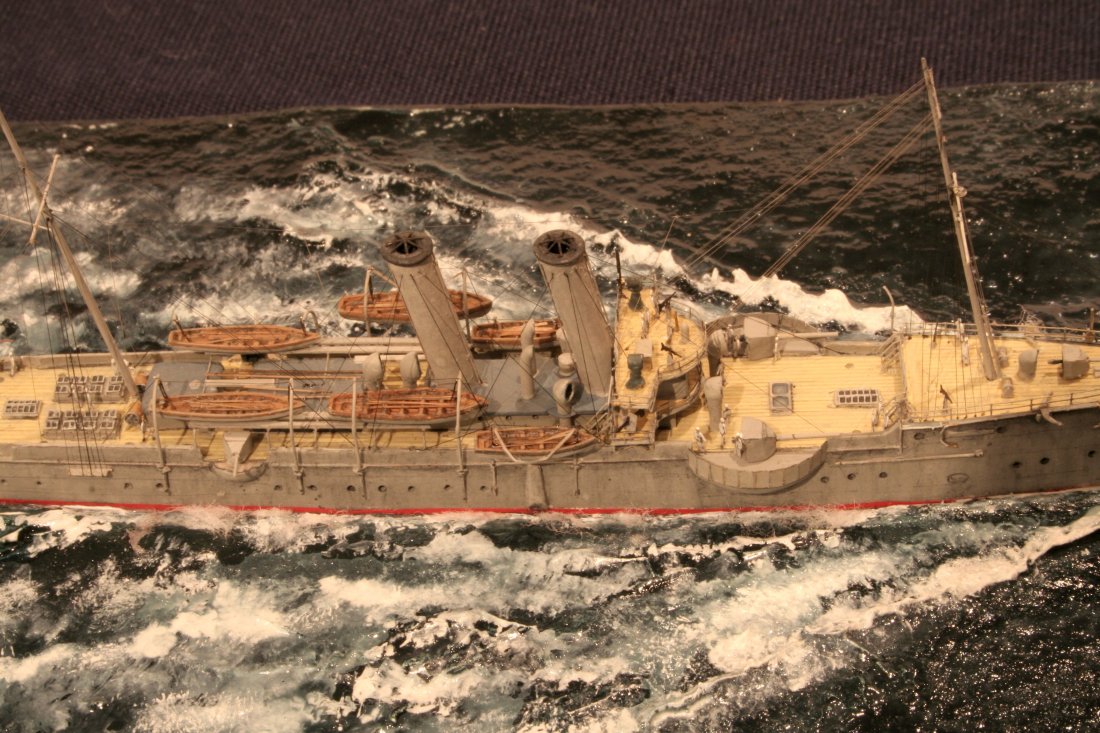
but all the images above and below have resin thwarts-- I merely scraped the coamings rather thinner from outside and done a bit of 'trickery' paint effects using the pencil blade edge to give sharper demarcations ( shadows) and simulate shadows- works well-- and brace of oars hides a multitude of sins!

Good luck

JB

Image


Image

Re: WIP HMS Renown (1942) White Ensign Models

Posted: Wed Nov 17, 2010 7:10 pm
by Bill Livingston
Thanks again for the pictures Jim...


Just managed to fit the canvas covered boats in place permanently. Starting on the cranes and the hangar deck next... Started modifying the aircraft so it will look a little more accurate, the trailing edge profile of the upper wing is much too simplified, just changing that makes a big difference. Have also cut away the engine 'pod' and am making a new one with the right profile and will try to do the struts over the fuselage to mount the upper wing which will be tricky but fun... The original cast is just one solid lump which looks completely wrong. Jim B did a really nice job with his Walrus on Renown... So that will give me some inspiration anyway... :smallsmile:

Re: WIP HMS Renown (1942) White Ensign Models

Posted: Fri Nov 19, 2010 12:06 pm
by Bill Livingston
Was up until 5.00am working on the cranes and fitting parts of the superstructure and railings in place permanently and correcting a few errors in the camouflage pattern. Not much looks different, but I now its better! :-)

Anyway, started on the Walrus and will post my progress as I work through it. Not sure of colours as in 700 scale the true 1:1 colours will look very very dark... I'll have to see how it goes.

Anyway, here are some up to date pictures. The cranes will be rigged with 0,05mm mono rather than use the PE cables as they are much too thick... so in the meantime the booms are just located and not glued... the crane housing as fixed though (that was all a bit fiddly to get them lined up perfectly as the weight of the booms tilted the crane mechanism housing so it was all a bit of a balancing act and lots of BluTak to hold everything square while the glue set.

Image

Image

Image

The Walrus... todays' work! :-)

Image

Re: WIP HMS Renown (1942) White Ensign Models

Posted: Fri Nov 19, 2010 2:35 pm
by Cliffy B
Good Golly Miss Molly!!!!!!!!!! She's a beaut Bill, keep it up :thumbs_up_1:

Re: WIP HMS Renown (1942) White Ensign Models

Posted: Fri Nov 19, 2010 3:13 pm
by Bill Livingston
Thanks CliffyB :wave_1:

OK... Here we go... I am going to try and do this in steps and add to this post as I go. Could mess it up completely but I'm going to give it a go! :big_grin:

OK... This is what I am aiming for!!! This is a 48th scale Walrus. I am using this as a reference as it is pretty accurate (although from Manchester I think, not Renown, so the name will not go on... :smallsmile: )


Image

Step 1

OK... I cut off the crude engine mounting block and thought for ages how to go about the struts. I looked at JB's and decided stretched sprue was too fragile and far beyond me to attempt, so, as I had a spare Renown PE set I 'stole' the outerwing struts from the spare one and folded them into a 'V' and then drilled four tiny holes and superglued them in place. I then brought them together and glued them where they touched. It sort of forms a cradle and engine pod will rest in there. Not perfectly accurate but already looks miles better than it would have done. I also drilled out the two MG positions and tidied up the moulding. The wing trailing edge has been corrected and I have cut the disc that was supposed to represent the cylinders off. Not sure what to use to represent them... maybe I have some 700 scale PE aerial spreaders that Jim B sent me a while back that I could modify...

Image

Step 2

I removed the engine pod after trial fitting and saw that the engine sits to high on the 'rack'. I then drilled pilot holes and fitted the outer wing struts. I placed the upper wing on top to check the look and its really promising and much easier than I thought... anyway, a short break now... will continue shortly :smallsmile:

Image

Step 3

There is a small air intake in the front of the engine pod... so I drilled into it with the smallest drill I had and used the drill to hold the resin pod cut from the underside of the wing during the rest of the pod assembly. I used a couple of star shaped PE cage aerial spacers to represent the cylinders of the engine and they seemed to work well. The PE propellor from the WEM kit looks good and I put a little twist into it to represent the pitch and then a drop of white glue to simulate the propellor boss. I'm very happy with it so far.

Image

You can see the prop and the completed sub assemblies here... I will leave the engine pod separate during the painting phase. Just now going to add the struts to the tailplane... I'm going to use some individual horizontal railings cut down for them... then on to painting!

Image

Next stage is to prime it... I will probably use 507C with a tiny drop of green airbrushed over in a very thin coat, or some lightened Sky type 'S' which will then become the underside colour when I airbrush the upper surfaces... then some 0.05mm mono line for the rigging. That will have to wait until tomorrow... Let me know what you think so far :smallsmile:

Re: WIP HMS Renown (1942) White Ensign Models

Posted: Fri Nov 19, 2010 5:04 pm
by J. Soca
She is a work of art Bill :thumbs_up_1: :thumbs_up_1: cant stop admiring your camo paint job, its very neat!!


Jose :wave_1:

Re: WIP HMS Renown (1942) White Ensign Models

Posted: Fri Nov 19, 2010 7:01 pm
by JIM BAUMANN
EXCELLENT PROGRESS and method. :thumbs_up_1: :thumbs_up_1:

For the engine cylinder heads I used a WEM PE large steering wheel from their ships wheel set.

Has approximately the right number of 'spikes' to look convincing in 1/700 :heh:

The whole model is starting to come to life! :thumbs_up_1: :thumbs_up_1:

JB :wave_1:

Re: WIP HMS Renown (1942) White Ensign Models

Posted: Fri Nov 19, 2010 9:40 pm
by Bill Livingston
Thanks Jim, I ended up using two of the PE aerial spacers you sent me earlier in the year. Proving to be a very useful fret!!! :thumbs_up_1:

I have now finished the Walrus. Just needs painting now. Bit late... so I will do it in the morning!

The tail struts were difficult... I had to get the length right and make sure they were square and angled correctly in two planes... I had eight attempts at the last one and I have several tiny bits of railing sitting in a pool of superglue on my glass cutting/gluing pad! Ah well... the tail struts sort of make the thing work, so it was worth it. Rigging this is going to be fun! :big_grin:

Anyway... here you go... just before I airbrush it...

Image

Test assembly prior to airbrushing to check fit and alignment...

Image

I'm quite pleased with that... the whole aircraft is just a fraction over 1/2" long (15mm). Apologies for the quality of the photos... all these have been taken on my iPhone,,, the last one with the digital zoom.

Re: WIP HMS Renown (1942) White Ensign Models

Posted: Sat Nov 20, 2010 8:07 am
by Guido
... and the fun part: Rigging the plane! :big_grin:

Great work, Bill! :thumbs_up_1: :thumbs_up_1: :thumbs_up_1:

Guido

Re: WIP HMS Renown (1942) White Ensign Models

Posted: Sat Nov 20, 2010 8:16 am
by Bill Livingston
Weird... just sent you a PM as you were posting this! :-)

And yes.... the rigging is going to be fun... almost dreading it... toying with the idea of the WT aerials... they should be on short masts on the upper surface of the upper wing back to the tail... as well as the interstrut rigging... really need to drill fine holes and thread the 0.05mm mono through them to be able to pull them tight and then cut off and touch up afterwards... but at this scale even the smallest drill I have looks enormous... ah well... :big_grin:

Re: WIP HMS Renown (1942) White Ensign Models

Posted: Sat Nov 20, 2010 10:43 am
by MartinJQuinn
Fantastic work. You've really done a great job.

Re: WIP HMS Renown (1942) White Ensign Models

Posted: Sun Nov 21, 2010 9:21 pm
by Bill Livingston
Well, I have finished the Walrus... It looks OK in real life... but at this sort of magnification the flaws in a 700 scale aircraft are pretty apparent. Thankfully Jim B called this afternoon and managed to talk me out of starting again. I know one thing though... I would NEVER drill holes for rigging in this scale again... I REALLY have to learn to use stretched sprue properly... thankfully, JB has kindly offered to give a one day intensive course on all matters rigging so sometime after the NEW Year I shall wend my way south and spend the best part of the day improving my modelling skills. Really, stretched sprue is such an important part of ship modelling, it isnt really an option any more for me... it's a necessity. Obviously I have used stretched sprue in the past and can do it within the normal requirements of basic modelling... but at the level Jim does it... well... I am nowhere near...

Anyway, crude as it is, this is my finished Walrus. I hand painted it at first and at this scale it just looked awful. I stripped it all off and airbrushed it... the finish is SO much better. The only problem is, the fine paint from an airbrush shows up all the casting flaws and surface imperfections unseen under a thick coat of paint... and as I said before, at this magnification the whole thing looks pretty crude. The model was airbrushed in neat 'Johnsons Klear' before adding decals. The Scalemaster 700 scale naval aircraft decal set was used. The fuselage roundels were about the right size although the register wasnt perfect... the upper wing roundels were very nicely registered but are slightly too small... Ah well... It needs a final matt coat, but that should tie everything together nicely and lighten it even more. Overall, I'm reasonably pleased but have learnt enough to know how to make it a lot better next time.

Image

Plastic aircraft with really good precision machined moulds would produce a much better finish... I will have to start looking for some really high quality aircraft for future projects... with an airbrush paint job, stretched sprue for rigging rather than PE and mono and the right sized upper roundels it would look a lot better than this!! :-) Still... it looks good on mounted on the catapult on my Renown in life size... and that's what counts I suppose... :-)

Image

Re: WIP HMS Renown (1942) White Ensign Models

Posted: Mon Nov 22, 2010 6:11 am
by Blackbrazen
You're being too hard on yourself, Bill...
It looks tremendous! :thumbs_up_1:

Re: WIP HMS Renown (1942) White Ensign Models

Posted: Mon Nov 22, 2010 2:43 pm
by Bill Livingston
Thank you Blackbrazen... how are you getting on with your camouflage ...?? Ready to post any updates yet? I am really interested to see how you were getting on... :smallsmile:

OK... managed to finish the Walrus, put on the underside decals and the undercarriage and the catapult cradle, gave everything a wash with raw umber oils very heavily diluted which just took the edge off everything and then coated it with matt varnish.

When it came to mounting the Walrus I really couldnt make up my mind where to put it... I tried all sorts of locations, even one with it at the very end of the catapult with the tail hanging over the edge of the ship... It looked very good... but unlikely at the speed I have depicted her at and I wasnt going to change the seascape to something a little more pedestrian just so I could have my Walrus in a dramatic position! In the end I settled on a boring 'stowed on rails' in the middle of the hangar deck... Anyway, here we go...

Image

Image

Image

By the time I have added crew and a few bits and pieces on the hangar deck it will look OK...

Right, on to the rear mast and superstructure detail next... :wave_1:

Re: WIP HMS Renown (1942) White Ensign Models

Posted: Mon Nov 22, 2010 6:25 pm
by Cliffy B
If you don't win a gold (or several :big_grin:) with this one then there is something wrong with the universe. Superb Walrus sir :thumbs_up_1:

Re: WIP HMS Renown (1942) White Ensign Models

Posted: Tue Nov 23, 2010 3:28 pm
by Bill Livingston
Ok... having painted a few crew members last night, I decided I would get on with the 20mm Oerlikons. There are eight of them on HMS Renown in 1942... all singles. Three on B turret, two either side of the main superstructure and one on the rear superstructure. At first I was going to use the flat PE bases as supplied in the WEM kit and punch out a small circular disc to cement them to prior to fitting, but then Jim Bauman called me about another matter and we got talking about 700 scale Oerlikons and how to improve their look over the basic flat PE...

He told me about using toothpicks... yes... toothpicks. They have a nice pointed end which is about the right size to represent the cone mounting (some have an open mounted tripod frame and some have a solid cone base...), for ease of building, I decided Renown must have had the solid cone shaped mounts... and so decided to follow Jim's advice!!! :thumbs_up_1:

Here is a photo of the actual mount...

Image

Here are the bits I need to try and replicate this...

Image

As you can see... I have punched out several small discs to use as the base, toothpicks, to use as the cone mounting and the WEM PE parts for the shield and gun. I started by rolling the ends of the toothpick in thin CA and they are drying now. I will then cut the cone from the end of the toothpick and try to mount the oerlikon itself directly on top and then the sheild. Jim assures me this works and I have to say, I'm pretty confident that if I can do this neatly I will have some nice Oerlikons to add... The crew figures are there so I can make sure the gun mounts are reasonably in scale and a crewmember could actually fire the things... at 700 scale its quite easy to make fittings like this impossible for the crew to use! :big_grin:

EDIT: I had a trial run following Jim's instructions... It works!

Right.. I had a couple of goes. It's pretty obvious once you have messed up the first one that you dont cut the tip off the toothpick until AFTER you have glued the Oerlikon in place!

1). Cut the PE barrel/mount part just below the support bracket the shield will eventually be mounted to.
2). Cut off the very tip of the toothpick so you have a very tiny flat surface.
3). Dip the tip of the toothpick in a drop of white glue.
4). Using tweezers, place the gun section of the PE in place on the white glue 'bob' and then, using a wet paintbrush, shape the white glue so the excess has been removed and you have a nice domed top.
5). Once dry, coat the join at the tip in superglue to seal everything and make sure it is totally secure.
6). Cut off the top of the toothpick about 2mm below the join.
7). Holding the Oerlikon barrel with tweezers, dip the base of the toothpick in a puddle of superglue and place on a plastic disc... Oddly enough, the surface tension of the glue centres it on the disc.
8). Airbrush the whole thing 507c.
9). Handpaint the gun itself gunmetal/black.
10). Place on a bit of bluetak to hold still and fit the shield in place.

I managed to do all the above (apart from respraying the assembly as this was a trial run) in about twenty minutes and only had one attempt once I had worked out the right way to do it...

Image

Thanks Jim... another major step towards becoming a better modeller... Really appreciate your help and advice on this... :thumbs_up_1: :thumbs_up_1: :thumbs_up_1:


EDIT: Damn... just noticed that by chance I managed to get the HTML code for a smiley in at point '8'... not much I can do about that!!! :-)

Re: WIP HMS Renown (1942) White Ensign Models

Posted: Tue Nov 23, 2010 3:39 pm
by MartinJQuinn
WEM actually makes little resin pedestals in 1/700 scale, which I've used before. In case you run out of toothpicks. :)

Re: WIP HMS Renown (1942) White Ensign Models

Posted: Tue Nov 23, 2010 4:39 pm
by JIM BAUMANN
No sooner do I suggest it....

Bill turns it into a photo/text step-by-step...

Looks excellent Bill !! :thumbs_up_1: :thumbs_up_1: :thumbs_up_1:

JIM B ( fighting with teeny 3" QF on 1890's TBD's...)

Re: WIP HMS Renown (1942) White Ensign Models

Posted: Tue Nov 23, 2010 8:05 pm
by Bill Livingston
LOL! Jim... Well, it means more than just one person can steal your ideas! :big_grin:

Finished the Oerlikons... assembly and painting as described previously. The shields were tacked in place with matt varnish and then moved into position so they were perfectly square and then a drop of very thin superglue applied to the rear with a thin bit of sprue... (yes, Jim's suggestion as well!!!! Lol!)

Step 1

Image

Step 2

Image

Step 3

Image

Right... off to sleep.... let them set hard and fit them on Renown tomorrow :thumbs_up_1: