Hi Roel Now there is dedication, good to see you getting back into the modelling groove. I agree you really can't have enough photos and the right ones can be a fair substitute for even a drawing.
Dave Wooley
1/100 Chaconia LPG carrier
Moderators: MartinJQuinn, JIM BAUMANN, HMAS, Tiny69, Dave Wooley
-
Dave Wooley

- Posts: 4131
- Joined: Sat Jan 22, 2005 10:18 am
- Location: Liverpool
-
Neptune

- Posts: 2456
- Joined: Sun Mar 13, 2005 11:51 am
- Location: Belgium
Re: 1/100 Chaconia LPG carrier
So I worked on the fans (but forgot to take pics)
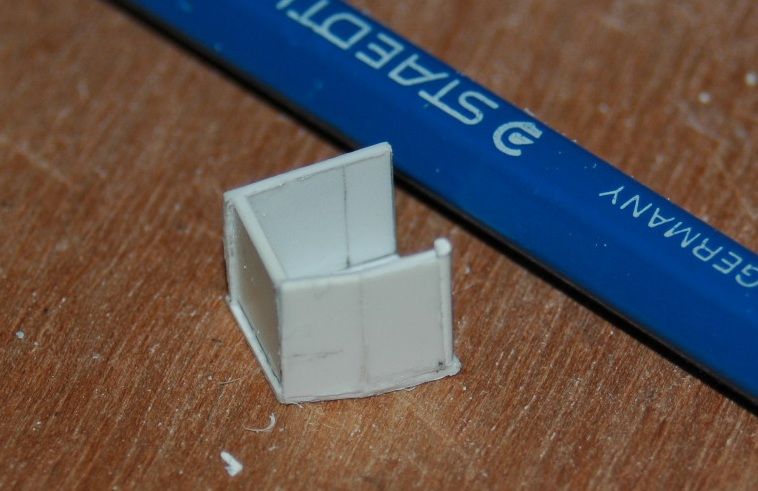
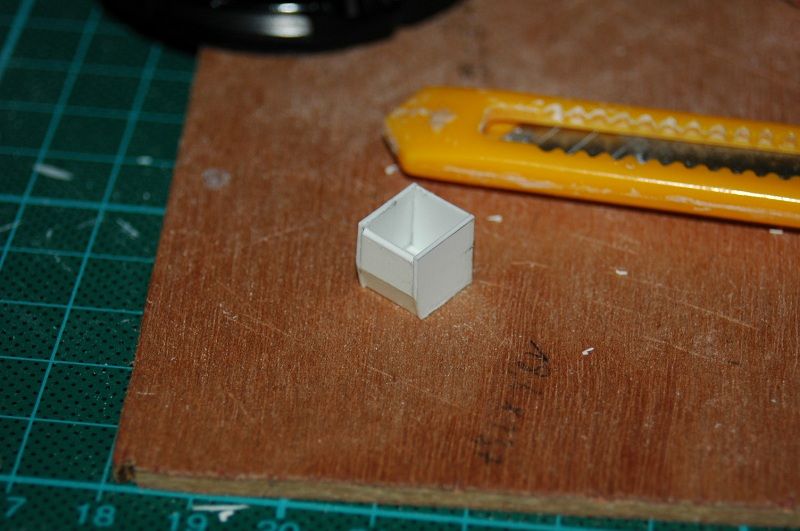
And I made the detail hatches for the cargo tank dome. (did take pics!).
So here is the sequence, in the same way I made the ballast entry hatches, but didn't document it well back then.
Step 1: draw the pattern (by hand or computer) on a piece of paper. Start with a circle with the actual hatch diameter. Count the bolts on the actual hatch (Rivet counting!!! Or do it at random). Calculate the angle you need between the bolts.
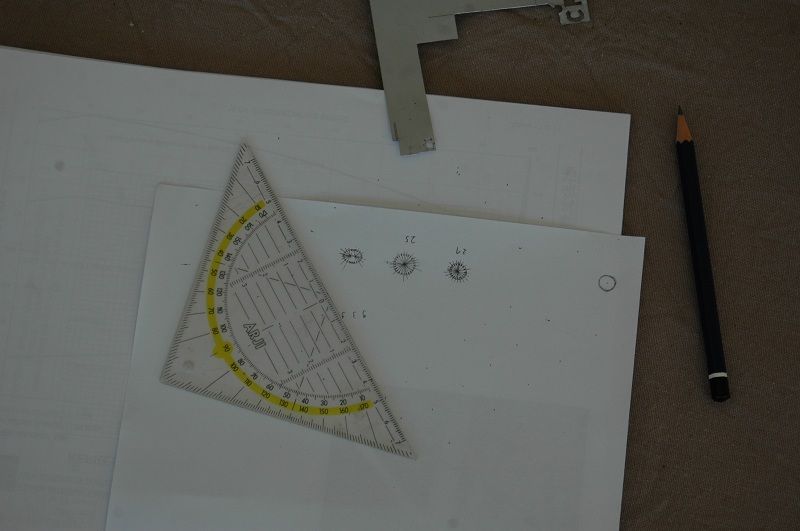
Step 2: Put the piece of paper on top of a piece of litho, stick through the dots which represent the bolts with a divider or needle. Result is a pattern of bolts.
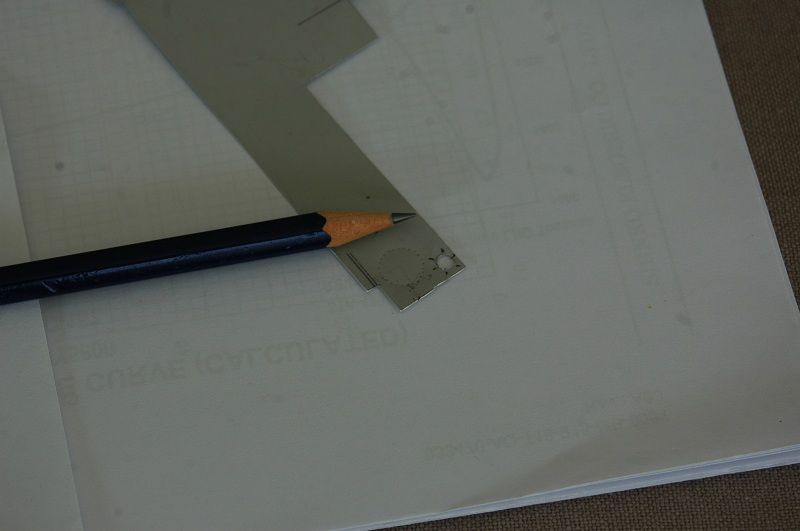
Step 3: if the pattern is round. Draw a circle with the actual diameter of the hatch around the dots. I didn't use a divider as that would give me an annoying bolt/dot in the middle.
I punched a hole with the correct diameter in a piece of styrene and then used that as a template. (had a suitable ruler for it, but lost it during the move). Then cut and file to that circle.
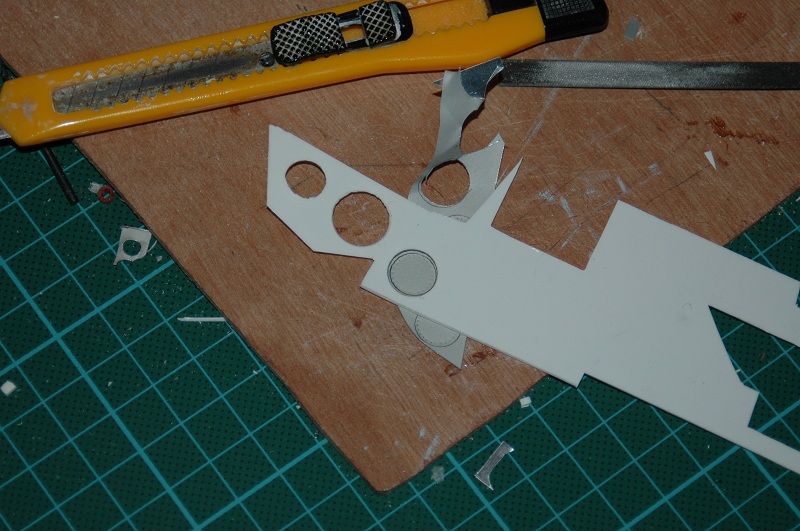
Result is a tank dome full of entry hatches. I've now changed plan and I'll finish all tank domes and install them first.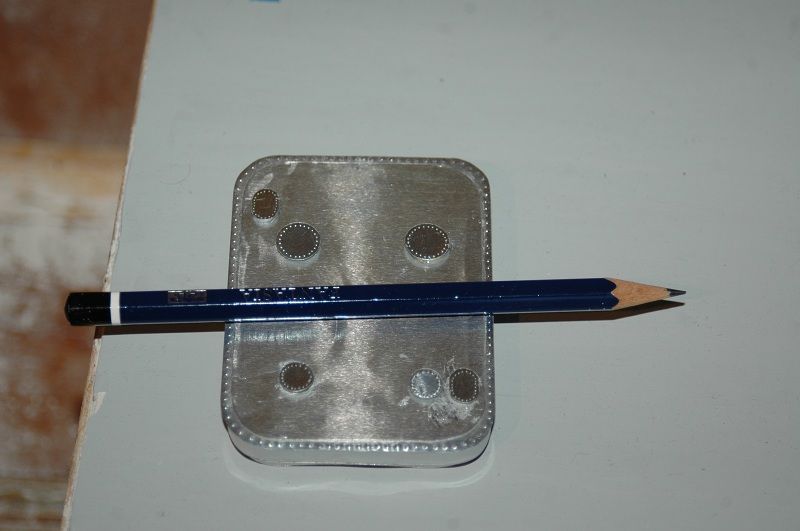
And I made the detail hatches for the cargo tank dome. (did take pics!).
So here is the sequence, in the same way I made the ballast entry hatches, but didn't document it well back then.
Step 1: draw the pattern (by hand or computer) on a piece of paper. Start with a circle with the actual hatch diameter. Count the bolts on the actual hatch (Rivet counting!!! Or do it at random). Calculate the angle you need between the bolts.
Step 2: Put the piece of paper on top of a piece of litho, stick through the dots which represent the bolts with a divider or needle. Result is a pattern of bolts.
Step 3: if the pattern is round. Draw a circle with the actual diameter of the hatch around the dots. I didn't use a divider as that would give me an annoying bolt/dot in the middle.
I punched a hole with the correct diameter in a piece of styrene and then used that as a template. (had a suitable ruler for it, but lost it during the move). Then cut and file to that circle.
Result is a tank dome full of entry hatches. I've now changed plan and I'll finish all tank domes and install them first.
The merchant shipyard
-
Neptune
- Posts: 2456
- Joined: Sun Mar 13, 2005 11:51 am
- Location: Belgium
Re: 1/100 Chaconia LPG carrier
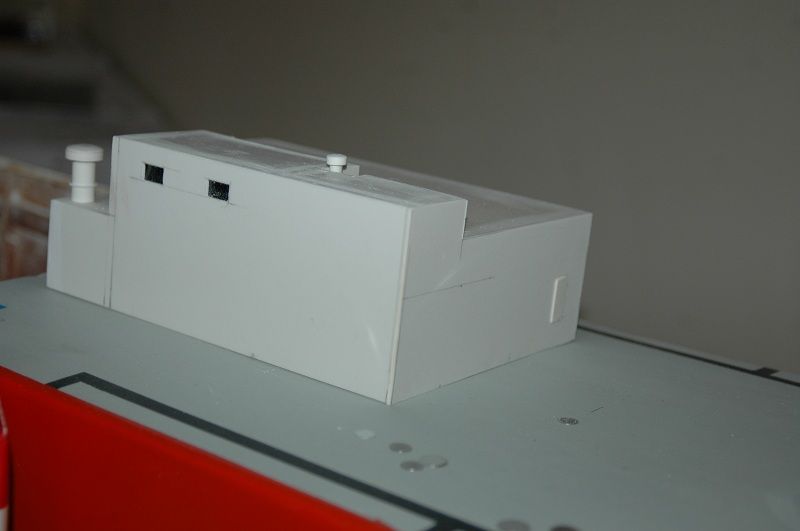
So, since I'm moving aft, I planned on finally completing/advancing on the compressor room, which is located just forward of the manifold/loading arrangement.
I built the original compressor room about 3 years ago, that's the one you see in most overall pics. Perhaps the first thing I built on this model.
Now, while going back to that, it seemed awkwardly bad in construction. Not strong enough and mostly bent in all directions. I first tried to fix it, with fillers etc. But in the end I just decided to start a new one... 1 step back, but 6 ahead in quality and final result.
She's not finished yet, but here are a couple of pics.
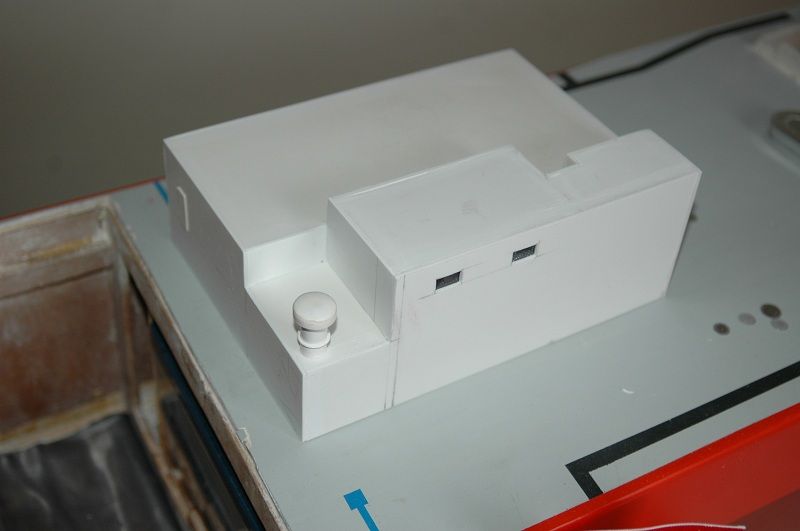
I've used some of the original panels, but made a totally new roof, thicker and much more strengthened. In previous attempt I was also planning to make the top roof of the cargo control room etc. removable, in order to see the inside. That also meant a lot of complication on the construction (more measuring and inaccuracies). Now I did away with that idea and just made a full roof, makes the whole thing a lot stronger of course.

I'm now working on some of the many ventilation fans. After that I have to put some more doors and ventilation grills. But for now I'll have to wait for priming untill I get some better weather and a new airbrush!
I built the original compressor room about 3 years ago, that's the one you see in most overall pics. Perhaps the first thing I built on this model.
Now, while going back to that, it seemed awkwardly bad in construction. Not strong enough and mostly bent in all directions. I first tried to fix it, with fillers etc. But in the end I just decided to start a new one... 1 step back, but 6 ahead in quality and final result.
She's not finished yet, but here are a couple of pics.
I've used some of the original panels, but made a totally new roof, thicker and much more strengthened. In previous attempt I was also planning to make the top roof of the cargo control room etc. removable, in order to see the inside. That also meant a lot of complication on the construction (more measuring and inaccuracies). Now I did away with that idea and just made a full roof, makes the whole thing a lot stronger of course.
I'm now working on some of the many ventilation fans. After that I have to put some more doors and ventilation grills. But for now I'll have to wait for priming untill I get some better weather and a new airbrush!
The merchant shipyard
-
Neptune
- Posts: 2456
- Joined: Sun Mar 13, 2005 11:51 am
- Location: Belgium
Re: 1/100 Chaconia LPG carrier
Ok, another small update. Compressor room/deckhouse filler is drying.
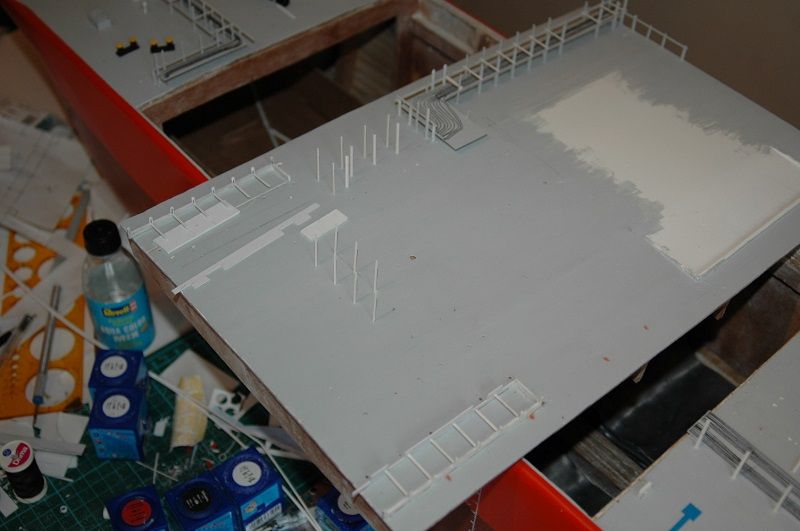
Decided to tackle my "itchy" point, the pipe supports... While I was out of the country, I've drawn a lay-out plan which (I think and hope) is rather accurate. I don't have any real plan of it, so I'm doing it by referencing on different pictures and cross referencing with more pics. The plan only goes till just aft of the compressor room for now. The manifold area is a big spaghetti and I don't think I have sufficient pics to make it really 100% accurate (for now that is).
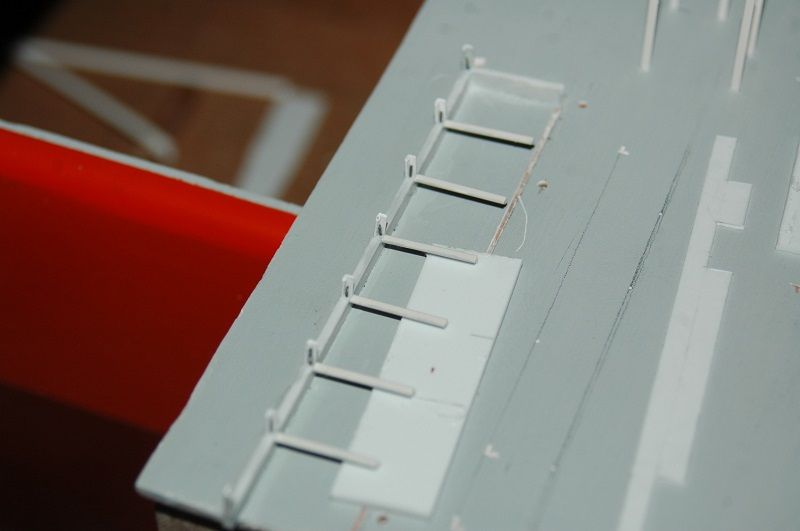
So, here are the pics. I've scanned my "plan" first. Then I cut it to useable pieces. I drew out the outline of the structure on deck by pencil.
Then I put the edge of the plan on the line and punched my L-irons' position through with the tip of my drill. After removing the paper, I drilled a couple of holes with a 0.5mm drill in an L-shape to match the position of the support. This way I can glue the support directly to the wood, to make it stronger and more wave-resistant for RC purpose (I'll see if it works later )
)
You can see the L-shaped cut-outs in the deck. Some of the stanchions are dry-fit, the forward ones are glued. I tried to rip out one which was longer than the others, but that didn't go too well, so I suppose I won't really lose them in the water, the worst that can happen will be deformation.
You can see most of my rudimentary tools for this process around the picture.
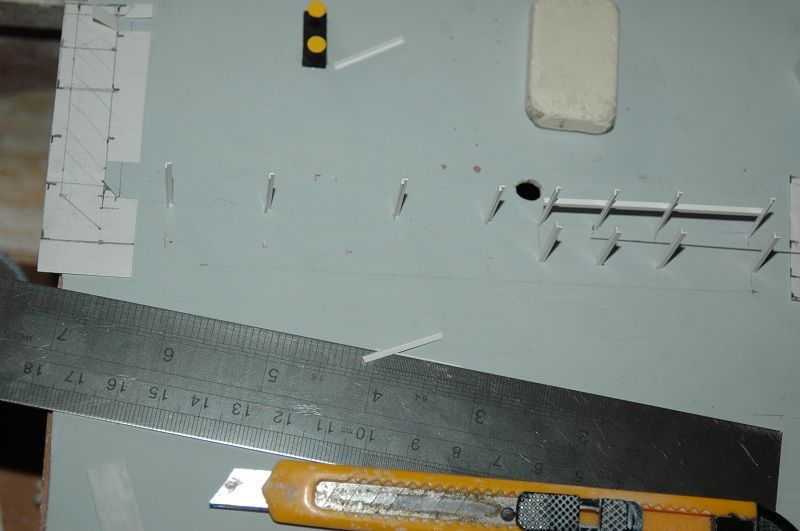
After the cut-out process I first erase the pencil lines with an eraser as pencil lines are notoriously hard to paint over, you can really see them through after a couple of coats! So better erase first.
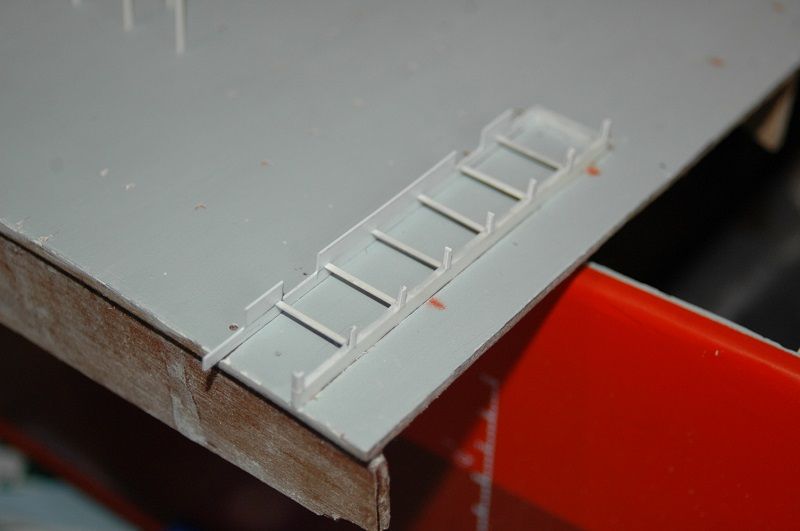
After placing some stanchions I'm putting the horizontal connection beams.

Decided to tackle my "itchy" point, the pipe supports... While I was out of the country, I've drawn a lay-out plan which (I think and hope) is rather accurate. I don't have any real plan of it, so I'm doing it by referencing on different pictures and cross referencing with more pics. The plan only goes till just aft of the compressor room for now. The manifold area is a big spaghetti and I don't think I have sufficient pics to make it really 100% accurate (for now that is).
So, here are the pics. I've scanned my "plan" first. Then I cut it to useable pieces. I drew out the outline of the structure on deck by pencil.
Then I put the edge of the plan on the line and punched my L-irons' position through with the tip of my drill. After removing the paper, I drilled a couple of holes with a 0.5mm drill in an L-shape to match the position of the support. This way I can glue the support directly to the wood, to make it stronger and more wave-resistant for RC purpose (I'll see if it works later
You can see the L-shaped cut-outs in the deck. Some of the stanchions are dry-fit, the forward ones are glued. I tried to rip out one which was longer than the others, but that didn't go too well, so I suppose I won't really lose them in the water, the worst that can happen will be deformation.
You can see most of my rudimentary tools for this process around the picture.
After the cut-out process I first erase the pencil lines with an eraser as pencil lines are notoriously hard to paint over, you can really see them through after a couple of coats! So better erase first.
After placing some stanchions I'm putting the horizontal connection beams.
The merchant shipyard
-
Neptune
- Posts: 2456
- Joined: Sun Mar 13, 2005 11:51 am
- Location: Belgium
Re: 1/100 Chaconia LPG carrier
Another small update. It's becoming increasingly crowdy forward. And the structure of the piping is rather complex, but following the Dave Wooley philosophy of breaking it down to smaller less-complex parts is working.

And a bigger close-up. The cables are not yet fixed in place. The forward part of the "cables" will be connected to the pipe, where they pass underneath the wave breaker.
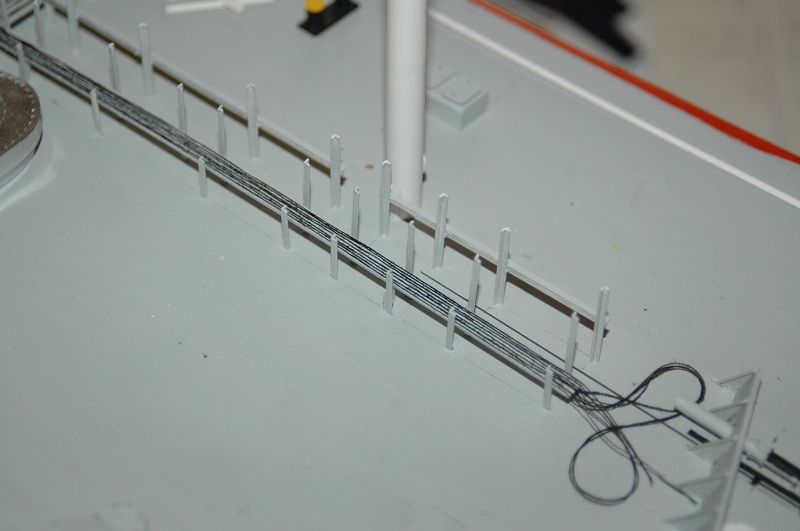
I'm slightly blocked now as the cable tray more aft, towards the manifold, has a very irregular shape and seems to shift position somewhere in that area. Since it's underneath the piping (which increases in amount more towards the aft), it's difficult to view. I have most of it figured out, but I guess I'll take a slight "artist licence" in that area. Can't see it on 100s of pictures of the real ship, I doubt it will be very visible on the model.
I'm also working on some bigger items like the manifold drip tray and the bunker manifold drip trays. These are things that should certainly be in the correct position. Smaller items, like ballast entry hatches and bollards can still be shifted 1mm in relation to these, in order to look correct.
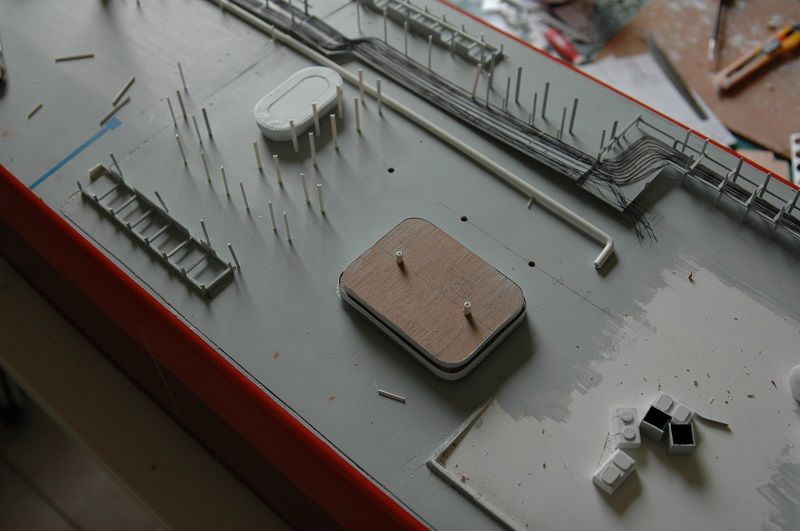
This is how I start:
The bottom section (in first picture) is actually the side of the object. They are angled inside towards the bottom.
Afterwards I put the aft and forward sections inside, the top of the forward edge being rounded to receive the fuel hose without damaging it.
Afterwards I sand everything flat and fix the top (= the other side) in place. The bottom place is only in place to keep the shape and give some strength. The inside is fully painted black, so you won't see the bottom plate.
After that I'll file everything flat and paint it. The bottom will be filed to fit the deck camber.
And a bigger close-up. The cables are not yet fixed in place. The forward part of the "cables" will be connected to the pipe, where they pass underneath the wave breaker.
I'm slightly blocked now as the cable tray more aft, towards the manifold, has a very irregular shape and seems to shift position somewhere in that area. Since it's underneath the piping (which increases in amount more towards the aft), it's difficult to view. I have most of it figured out, but I guess I'll take a slight "artist licence" in that area. Can't see it on 100s of pictures of the real ship, I doubt it will be very visible on the model.
I'm also working on some bigger items like the manifold drip tray and the bunker manifold drip trays. These are things that should certainly be in the correct position. Smaller items, like ballast entry hatches and bollards can still be shifted 1mm in relation to these, in order to look correct.
This is how I start:
The bottom section (in first picture) is actually the side of the object. They are angled inside towards the bottom.
Afterwards I put the aft and forward sections inside, the top of the forward edge being rounded to receive the fuel hose without damaging it.
Afterwards I sand everything flat and fix the top (= the other side) in place. The bottom place is only in place to keep the shape and give some strength. The inside is fully painted black, so you won't see the bottom plate.
After that I'll file everything flat and paint it. The bottom will be filed to fit the deck camber.
The merchant shipyard
-
Neptune
- Posts: 2456
- Joined: Sun Mar 13, 2005 11:51 am
- Location: Belgium
Re: 1/100 Chaconia LPG carrier
So, not much to report this time. Small update on the forward part, after putting the "electrical wires" (= sewing threads) in place I was able to close that part and put the horizontal beams in place. These are also the supports for the piping which will follow later.
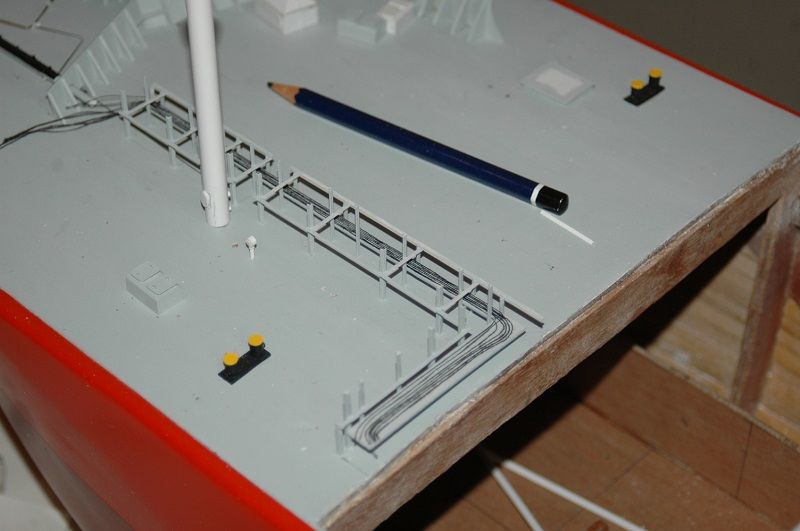
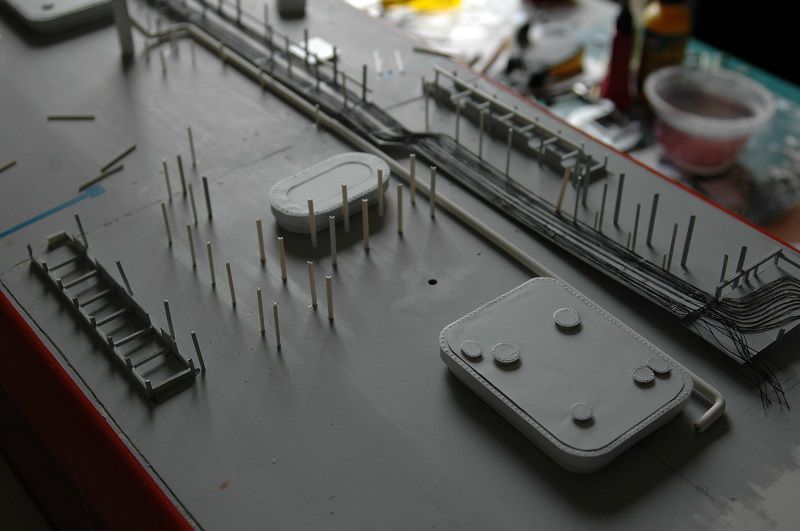
I've been putting supports all around, but got slightly stuck on that manifold area. Needed to place some other things first, so I started the manifold drip trays. These things are present on all tankers, be it oil-, gas- or chemical carriers.
This particular one is a tray with some supports, on top of these is a grating to stand on while handling and connecting the cargo transfer system (hoses or arms)
And here a picture of the whole area, including more supports (around the deckhouse) and indeed finished electrical cabling there as well.
And here the starboard driptray in a further advanced stage. The funny red spots were created while spraying the hull. I taped it off with masking tape connected to newspapers, hadn't noticed the (stupid) small holes in the bottom of these papers. (I believe they are there for the machines that make or transfer the papers in the press) Anyhow through these small holes a bit of spray came on the deck. They have been overpainted along with the drip tray by now.
Next up is some more supports and the electrical cabling layer in the manifold area and aft.
The merchant shipyard
-
Neptune
- Posts: 2456
- Joined: Sun Mar 13, 2005 11:51 am
- Location: Belgium
Re: 1/100 Chaconia LPG carrier
Discovered the drip trays were wrong, so I'll have to chop a piece off. Not too difficult I guess.
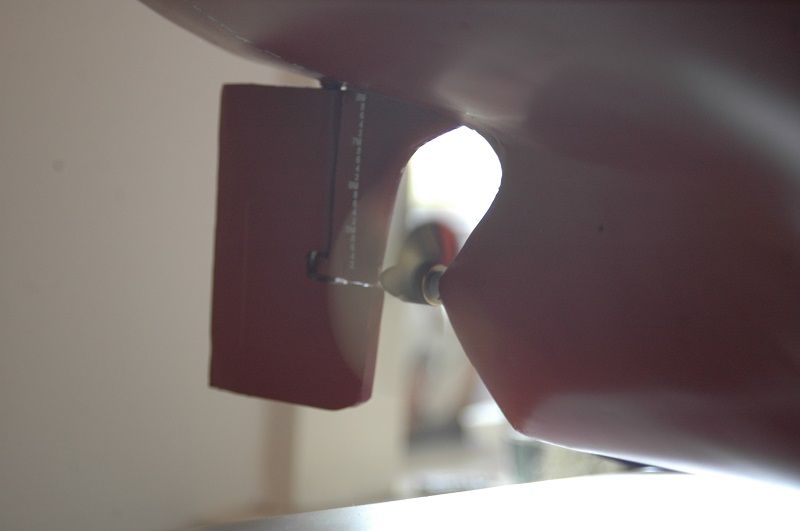
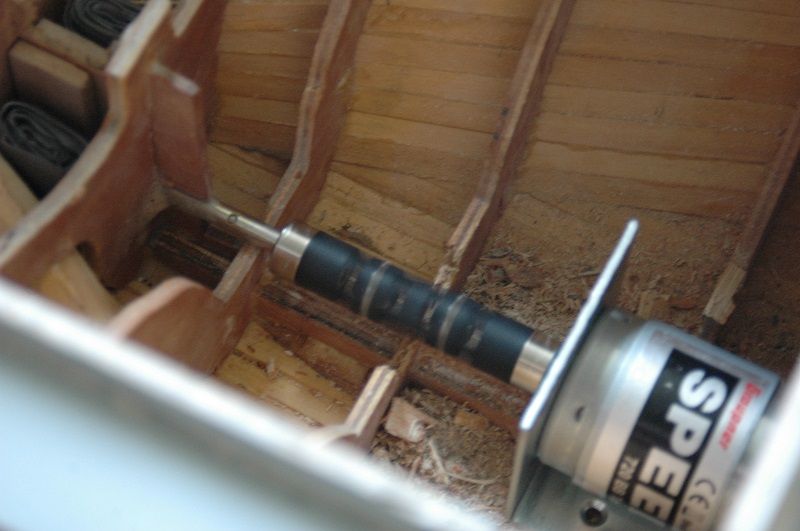
Anyway some progress. Although the physical progress on deck is going pretty good, I'm most happy with the progress on the electronics part. I've finally decided to do the "right" thing, meaning, chop out that keel and get that motor in line with the shaft. The reason why it took me so long is that I don't have the right tool for something like that and that I didn't want to buy it for a single job either.
I decided to fix this by drilling the keel away, piece by piece. With the risk of course of damaging the hull.
It worked out ok. The motor seems to create a certain vibration on the shaft though. A loud screaming noise can be heard. First, with the motor raised it occured nearly immediately. By mounting the motor in a better aligned position, the noise is reduced, yet occasionally, even on constant rpm it comes and stays. If I slowly gear up it seems to go ok and at lower rpm it seems to be absent. I'll see on the water what kind of speeds I can make until this happens.
When I run the motor seperately it seems that it has some occasional reductions in rpm, without changing any settings. Any idea how this happens and what I can do about that????
Anyway, with the motor (and mount) in place, I can continue to get her ready for a self propelled water test.
I want to see how current detail will survive before I continue adding details.
On to the pictures then:
First pipe mounted on deck, vent mast temporarily placed to see the alignment of piping and supports around that area.

The tank domes are now finally finished (1 was remaining and these are things I seem to postpone...)
and sprayed in primer already. Soon I'll try my first attempts with a Badger 150. First some testing, then the tank domes.
All tank domes have 3mm locator pins to help keep them in place and to have them located perfectly when glueing. That will happen once they are painted.
Anyway some progress. Although the physical progress on deck is going pretty good, I'm most happy with the progress on the electronics part. I've finally decided to do the "right" thing, meaning, chop out that keel and get that motor in line with the shaft. The reason why it took me so long is that I don't have the right tool for something like that and that I didn't want to buy it for a single job either.
I decided to fix this by drilling the keel away, piece by piece. With the risk of course of damaging the hull.
It worked out ok. The motor seems to create a certain vibration on the shaft though. A loud screaming noise can be heard. First, with the motor raised it occured nearly immediately. By mounting the motor in a better aligned position, the noise is reduced, yet occasionally, even on constant rpm it comes and stays. If I slowly gear up it seems to go ok and at lower rpm it seems to be absent. I'll see on the water what kind of speeds I can make until this happens.
When I run the motor seperately it seems that it has some occasional reductions in rpm, without changing any settings. Any idea how this happens and what I can do about that????
Anyway, with the motor (and mount) in place, I can continue to get her ready for a self propelled water test.
I want to see how current detail will survive before I continue adding details.
On to the pictures then:
First pipe mounted on deck, vent mast temporarily placed to see the alignment of piping and supports around that area.
The tank domes are now finally finished (1 was remaining and these are things I seem to postpone...)
and sprayed in primer already. Soon I'll try my first attempts with a Badger 150. First some testing, then the tank domes.
All tank domes have 3mm locator pins to help keep them in place and to have them located perfectly when glueing. That will happen once they are painted.
The merchant shipyard
-
Wis

- Posts: 72
- Joined: Fri Nov 23, 2012 4:39 pm
- Contact:

-
DrPR

- Posts: 1689
- Joined: Sun Mar 07, 2010 12:01 am
- Location: Corvallis, Oregon, USA
- Contact:
Re: 1/100 Chaconia LPG carrier
Roel,
It sounds like the motor may be defective. I have seen motors that run fine at some speeds but set up an oscillation at certain speeds that causes a lot of drag and noise, reducing speed. I think this is usually caused by defective (worn) bearings that make a loose fit with the armature shaft or an improperly balanced armature.
Are you running the motor alone or with the drive coupling? An imbalanced coupling could cause this. An improperly balanced propeller could also cause this problem, as could a bent or imbalanced propeller shaft. When the oscillation starts the hull will act as a sound board and amplify the noise.
Phil
A collision at sea will ruin your entire day. Aristotle
-
Sharpie

- Posts: 59
- Joined: Thu Jun 21, 2012 3:05 pm
- Location: San Jose, CA
- Contact:
Re: 1/100 Chaconia LPG carrier
Neptune,
very cool work. can't what to see more. Like that tin work.
very cool work. can't what to see more. Like that tin work.
1/192 uss Iowa, build still in progess.
1/72 USCGC Resolute still in progess.
1/72 USCGC Resolute still in progess.
-
Neptune
- Posts: 2456
- Joined: Sun Mar 13, 2005 11:51 am
- Location: Belgium
Re: 1/100 Chaconia LPG carrier
Hi Phil,
thanks for the suggestions. I got the same answer on a different board as well.
I've run the motor alone as well and from the sound of it, it seems that there is a variation in the motor rpm. I guess that causes a "sudden" shock which destabilises the shaft.
Propellor doesn't seem to be well balanced either, the tip moves up and down a bit, yet when rpm goes up, it seems to stabilise. With the variations in motor rpm perhaps it gets destabilised again and created that noise.
There seems to be a way to clean the brushes of a motor, but I still have to figure it out, it seems to involve running the motor in water We'll see where that gets us.
With sunny weather coming over here I hope to test her soon.
thanks for the suggestions. I got the same answer on a different board as well.
I've run the motor alone as well and from the sound of it, it seems that there is a variation in the motor rpm. I guess that causes a "sudden" shock which destabilises the shaft.
Propellor doesn't seem to be well balanced either, the tip moves up and down a bit, yet when rpm goes up, it seems to stabilise. With the variations in motor rpm perhaps it gets destabilised again and created that noise.
There seems to be a way to clean the brushes of a motor, but I still have to figure it out, it seems to involve running the motor in water
With sunny weather coming over here I hope to test her soon.
The merchant shipyard
-
HvyCgn9
- Posts: 771
- Joined: Mon May 10, 2010 9:09 am
- Location: Adelaide,SouthOZ
Re: 1/100 Chaconia LPG carrier
It could be the uni joint making the noise too.. I have a couple of them in CGN9 and they made alot of noise in her original motor setup (same as yours prop shaft graupner type uni then motor) once I changed to a setup with a short intermediate shaft with two sets of uni's 90% of the driveline noise disappeared . The raboesch unis are lot smoother in running than the graupners (and the Graupners are easy to break when putting together or pulling apart).
Cheers Bruce
Cheers Bruce
building:
1/72 RC USS LONG BEACH CGN9
1/72 RC USS CALIFORNIA CGN36
1/72 RC USS SAIPAN LHA2
1/72 RC USS JOHN PAUL JONES DDG53
1/72 RC USS SHARK SSN591
1/72 RC USS SEAWOLF SSN21
1/72 RC USS ALBANY CG10
1/72 RC USS LONG BEACH CGN9
1/72 RC USS CALIFORNIA CGN36
1/72 RC USS SAIPAN LHA2
1/72 RC USS JOHN PAUL JONES DDG53
1/72 RC USS SHARK SSN591
1/72 RC USS SEAWOLF SSN21
1/72 RC USS ALBANY CG10
-
Dave Wooley
- Posts: 4131
- Joined: Sat Jan 22, 2005 10:18 am
- Location: Liverpool
Re: 1/100 Chaconia LPG carrier
Roel my friend this is superb work . As for your shaft problem , does the problem lay with the shaft, coupling , motor or alignment of all three? I'm still working on the 45 !!
Dave Wooley
Dave Wooley
-
Capit�o Norbert

- Posts: 1993
- Joined: Tue Apr 17, 2007 9:18 am
- Location: Brasil
Re: 1/100 Chaconia LPG carrier
the deck arrangments is incredible.
perfect
perfect
-
Laurent

- Posts: 481
- Joined: Wed Nov 08, 2006 9:13 am
- Location: Li�ge , Belgium
Re: 1/100 Chaconia LPG carrier
Roel,
nice work so far!
About the ballasting of the hull, put all your weights (lead, batteries) on the middle of your hull, not on the ends; your model won't turn properly if you keep it that way...
nice work so far!
About the ballasting of the hull, put all your weights (lead, batteries) on the middle of your hull, not on the ends; your model won't turn properly if you keep it that way...
Scared of Nothing , Always Thirsty
Just call me the "Cereals Box Killer" , I guess
Just call me the "Cereals Box Killer" , I guess
-
Neptune
- Posts: 2456
- Joined: Sun Mar 13, 2005 11:51 am
- Location: Belgium
Re: 1/100 Chaconia LPG carrier
The ballast is quite widely spread. The battery is just aft of tank 2, which is the centre. More weight is distributed in Tank 1 and 3, I still have to do final ballasting once she's in the water.
As for "properly" turning. I guess she won't. It's a tanker, in reality they are made to go straight and not to turn. That results in a serious radius, which could be problematic in some waters. I'll see what it gives. In reality the weight is also distributed along the length of the ship, if not done properly you can break the ship (which is also what I was affraid of in this model). So all in all the weight is definately not concentrated at the ends. The small lead bars on both sides of the prop shaft are also removed as they won't give too much of a change and they'd be difficult to reach afterwards.
Today I've put the first real piping, fire line, bunker line, spray line etc. on the aft part up till the removable midships deck.
I also finally finished the detailing of the deck dry powder boxes (extinguishing powder that is), I have to make two more boxes (rectangular ones) and then they can be painted, since they're red they'll give a nice touch to the ship.
The merchant shipyard
-
Capit�o Norbert
- Posts: 1993
- Joined: Tue Apr 17, 2007 9:18 am
- Location: Brasil
Re: 1/100 Chaconia LPG carrier
we are waiting for more of your work 
-
Luky

- Posts: 221
- Joined: Tue Dec 11, 2012 8:27 pm
- Location: Guerneville,CA
-
Neptune
- Posts: 2456
- Joined: Sun Mar 13, 2005 11:51 am
- Location: Belgium
Re: 1/100 Chaconia LPG carrier
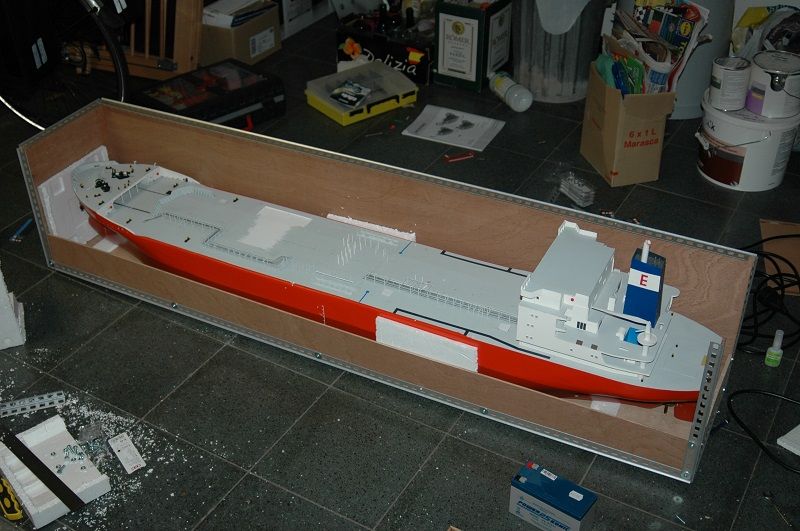
Since it's been a while most readers will think that this post will stop this topic... But it isn't. Quite on the contrary. I've taken the step of building a transport box for this ship, quite a big box. It took me a while to get started on it, since it would slow down the work on the ship itself. In the end I ended up not building either the ship nor the box, because of doubt etc.
So finally here is the box, with the ship. For strength reasons I strengthened the bottom plate with two wooden beams in the length direction, so lifting goes by the bottom. The rest of the structure is mainly 8mm ply and 5mm ply, reinforced by these steel corners. To make it easy to move the ship in and out of the box without too much damage, the upper part of the aft and one side can be removed.
The dimensions are: l x b x h: 170cm x 30cm x 35cm
I didn't put a top on it so I can keep the superstructure on. The initial 35cm in height was chosen so I could leave the foremast, deck house and vent masts in place. I intended to make a top for it as well, but then I thought nothing would really fall on it, nor would/should! the box jump that heigh that it would hit the ceiling of the car during transport.
On to the pictures now:
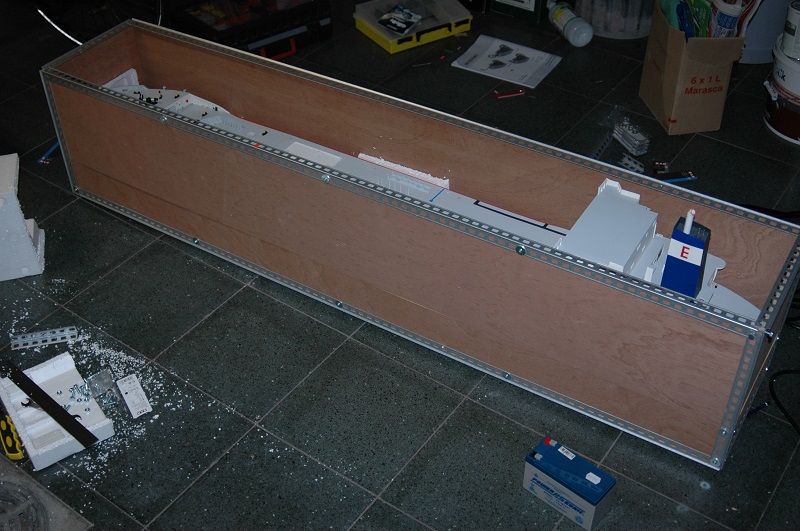
So here it is, with the parts removed, only the corner stanchion remains in place and is kept there by the lower parts of the aft and sideboard.
Tight fit, but good enough to fit some styrofoam in place:

Now what I meant with "quite the contrary": I took her out to test. I was scared by like hell, because it wouldn't want to see 3 years of work sinking. That also contributed to the fun you have when it actually floats! Pictures will follow
So finally here is the box, with the ship. For strength reasons I strengthened the bottom plate with two wooden beams in the length direction, so lifting goes by the bottom. The rest of the structure is mainly 8mm ply and 5mm ply, reinforced by these steel corners. To make it easy to move the ship in and out of the box without too much damage, the upper part of the aft and one side can be removed.
The dimensions are: l x b x h: 170cm x 30cm x 35cm
I didn't put a top on it so I can keep the superstructure on. The initial 35cm in height was chosen so I could leave the foremast, deck house and vent masts in place. I intended to make a top for it as well, but then I thought nothing would really fall on it, nor would/should! the box jump that heigh that it would hit the ceiling of the car during transport.
On to the pictures now:
So here it is, with the parts removed, only the corner stanchion remains in place and is kept there by the lower parts of the aft and sideboard.

Tight fit, but good enough to fit some styrofoam in place:


Now what I meant with "quite the contrary": I took her out to test. I was scared by like hell, because it wouldn't want to see 3 years of work sinking. That also contributed to the fun you have when it actually floats! Pictures will follow
The merchant shipyard
-
Capit�o Norbert
- Posts: 1993
- Joined: Tue Apr 17, 2007 9:18 am
- Location: Brasil
Re: 1/100 Chaconia LPG carrier
Hello Roel your model looks fantastic.
my congratulations - i love the box too
my congratulations - i love the box too