An excessively ambitious 1/72 Revell Gato build...
Moderators: BB62vet, MartinJQuinn, JIM BAUMANN, Jon, Dan K
-
sirpaul

- Posts: 1500
- Joined: Sun Jun 12, 2011 10:37 am
- Location: Massachusetts.
Re: An excessively ambitious 1/72 Revell Gato build...
I did not know Trumpy put the pressure hull in the 144 kit. Probably because i don't build 144 i guess. the bow shot of your Gato looks great. I can see right in and the pe in there adds alot to your build. Great work so far. Whats your hours so far on this build? You know you are a true builder when the model never seems done. 
On the Bench
1/350 Independence
1/350 Dunkerque
1/350 Shimakaze
1/350 Sharnhorst Dragon
1/350 Belfast
1/350 Independence
1/350 Dunkerque
1/350 Shimakaze
1/350 Sharnhorst Dragon
1/350 Belfast
-
Channell

- Posts: 2068
- Joined: Mon May 14, 2012 12:18 pm
- Location: Salt Lake City, USA
Re: An excessively ambitious 1/72 Revell Gato build...
I'm not counting but I'm sure I've put at least 40 hours in so far.sirpaul wrote:I did not know Trumpy put the pressure hull in the 144 kit. Probably because i don't build 144 i guess. the bow shot of your Gato looks great. I can see right in and the pe in there adds alot to your build. Great work so far. Whats your hours so far on this build? You know you are a true builder when the model never seems done.
I think the hardest part is behind me though... the major modifications are done and most of the work ahead is the kind of stuff that shows results.
The next major task ahead of me is to "oil can" the diveplanes/rudder and stern area of the hull and add better weld lines.
I figure I've gone this far and have my whole life to finish it, so I might as well go "all out".
-Jason Channell
Current Project: 1/200 Bismarck
Current Project: 1/200 Bismarck
-
Rotorhead

- Posts: 127
- Joined: Thu Dec 25, 2008 5:36 pm
Yahoo Looks GREAT
Channell............
I really like the "Look" of the Bow. What i like is that it just looks so "delicate" and "alive"......not just a lump of styrene. It will be interesting to see just what shadows you might be able to see through all the small openings. I'm excited for your build here.
The worst part of a "build" for me is the "deconstructing" of the plastic kit. Once i get past that.........it's more fun. It looks like you are basically at that point. IT's ALL FUN FROM HERE OUT!
Regards
Steve
-
NCMac
- Posts: 602
- Joined: Wed Apr 14, 2010 5:41 pm
- Location: North Carolina, USA
Re: An excessively ambitious 1/72 Revell Gato build...
Sir,
Just followed over from the Main Forum, holy , what have you created? This is unbelievable work. Had no idea you were so far along nor so "excessively ambitious". Wow
Mac
Just followed over from the Main Forum, holy
Mac
-
Guest
Re: An excessively ambitious 1/72 Revell Gato build...
WOW! Amazing build!
Too bad I didn't see this before...we make all 3 styles of torpedo shutters in resin:
http://amp.rokket.biz/am_1_72_gato_sets.shtml
as well as new rudder and stern shutters, and a torpedo tube and door.
Would love to link to this thread over on the AMP forum:
http://models.rokket.biz/index.php
Beautiful work!
Rokket
rokket@rokket.biz
AMP - Accurate Model Parts
-
Channell
- Posts: 2068
- Joined: Mon May 14, 2012 12:18 pm
- Location: Salt Lake City, USA
Re: An excessively ambitious 1/72 Revell Gato build...
Thanks for the praise everyone! It gives me motivation to go on!
Rokket, I've been by your site before and it's great! I got an instant inferiority complex when I looked through a couple of the U-boat builds on the AMP forum though... That's the kind of work I'm trying to aspire to and what possessed me to take on this project in the first place! But I don't mind if you want to link to this thread.
Rokket, I've been by your site before and it's great! I got an instant inferiority complex when I looked through a couple of the U-boat builds on the AMP forum though... That's the kind of work I'm trying to aspire to and what possessed me to take on this project in the first place! But I don't mind if you want to link to this thread.
-Jason Channell
Current Project: 1/200 Bismarck
Current Project: 1/200 Bismarck
-
rokket

- Posts: 20
- Joined: Tue Nov 29, 2005 5:18 pm
- Location: Australia
- Contact:
Re: An excessively ambitious 1/72 Revell Gato build...
Thanks mate, will be linking. You reeeally shouldn't have an inferiority complex with such beautiful work!
AMP: Accurate Model Parts: http://amp.rokket.biz
"It's about the model" - Fabric Flags, Uboat and Gato Resin and PE
Talk Like HAL day - http://www.talklikehal.com/
"It's about the model" - Fabric Flags, Uboat and Gato Resin and PE
Talk Like HAL day - http://www.talklikehal.com/
-
K494

- Posts: 409
- Joined: Sun May 20, 2012 6:01 am
- Location: Ontario Canada
Re: An excessively ambitious 1/72 Revell Gato build...
Great work.
K494 HMCS Arnprior
Royal Canadian Navy
Royal Canadian Navy
-
Channell
- Posts: 2068
- Joined: Mon May 14, 2012 12:18 pm
- Location: Salt Lake City, USA
Re: An excessively ambitious 1/72 Revell Gato build...
Update for this week!
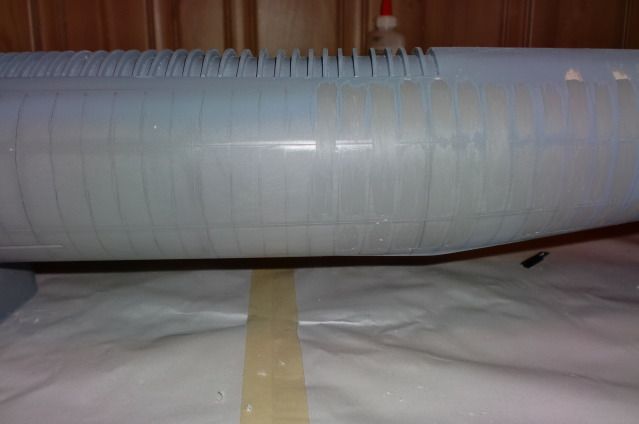
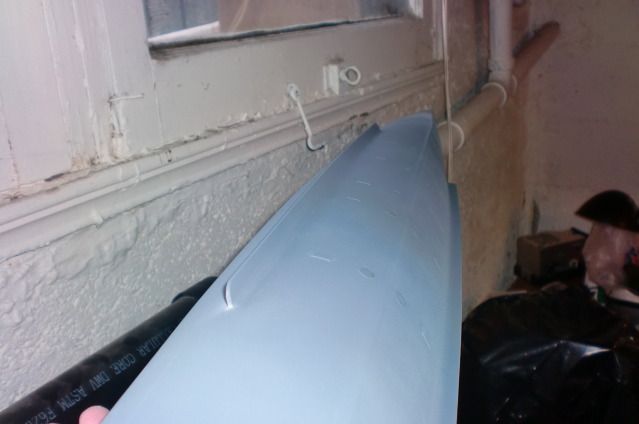
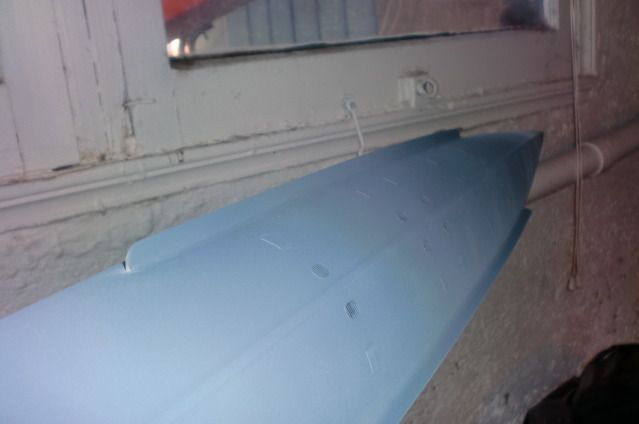
I've taken most of the week off on the Cobia, but I have started "oil canning" the hull... not a simple proposition for a 4 foot long boat. My intent is to get a very subtle effect that isn't really noticeable when looking broadside but is readily apparent if looking down the hull from the bow or stern... like the real thing.
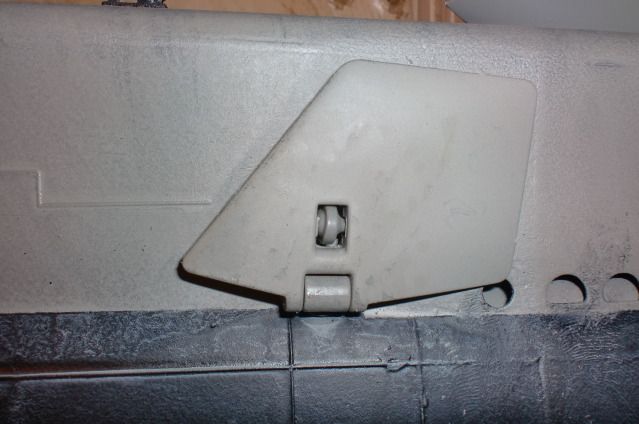
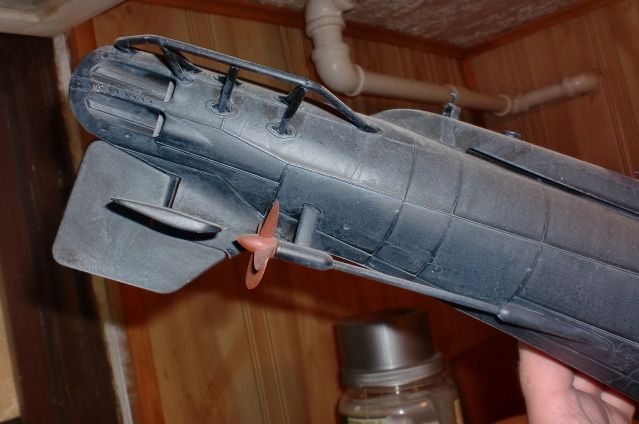
I've also done some work on the dive planes. Yet another problem with the Revell kit is they give you this (This is the old gato, BTW):
When they should look like this:
http://www.williammaloney.com/Aviation/ ... gPlane.htm
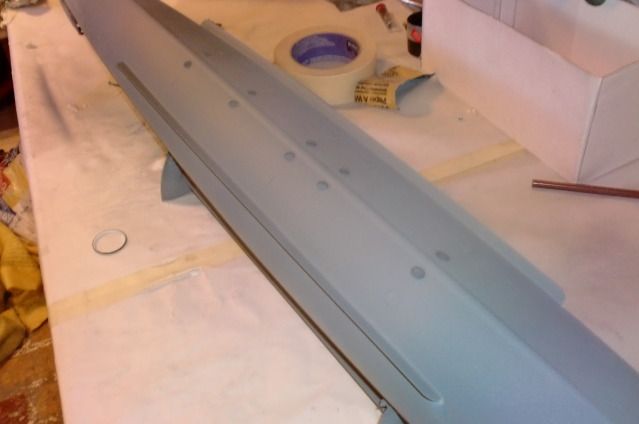
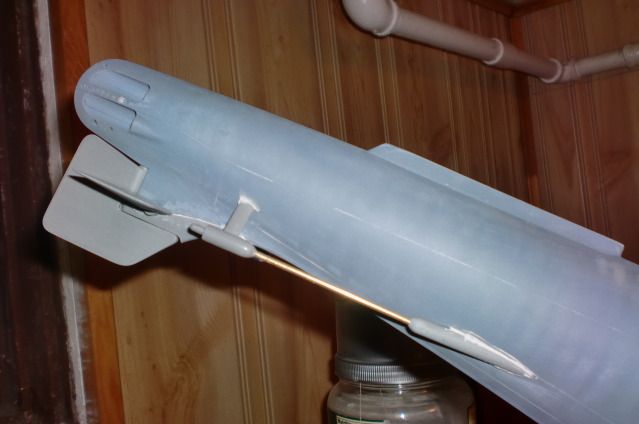
So I went to work, first thinning out the planes and carving them to make them look like there is a rigid frame under the "skin":
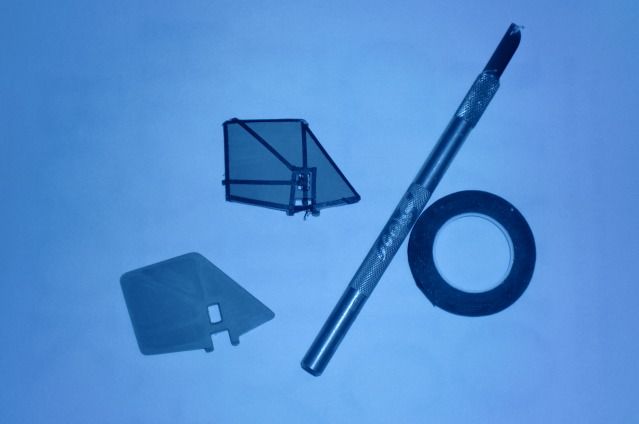
And then adding "weld lines" with white glue carefully squirted out of a syringe and spraying them with a quick coat of primer.
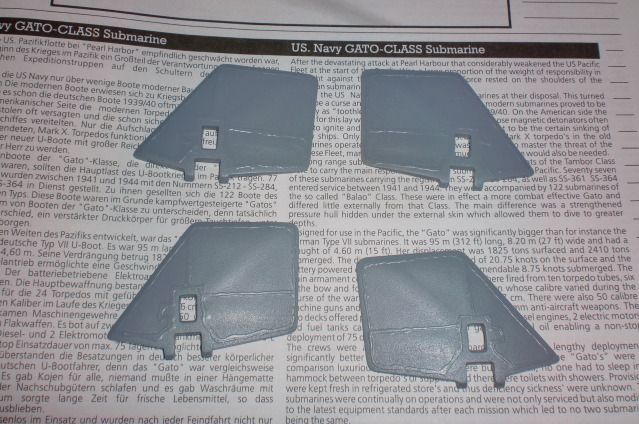
I've now got this:
I'm not quite happy with the thickness and irregularity of my "welds" so I may try again with the white glue, but otherwise it didn't turn out too shabby. The rudder and stern dive planes are getting a similar treatment too.
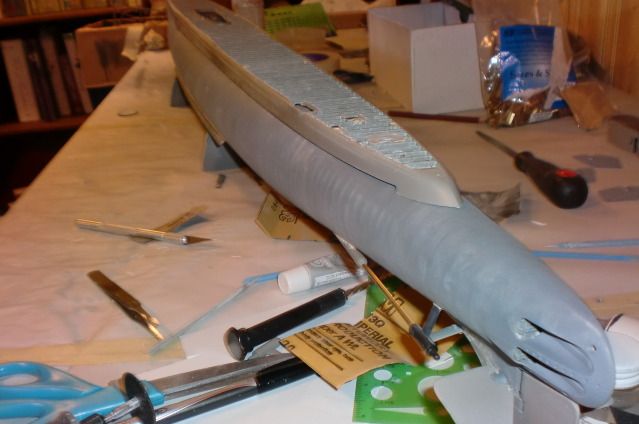
Finally, I glued the skeletonized deck pieces together in preparation for scratchbuilding the area underneath the deck. This is REALLY where my madness paid off; I couldn't imagine how nightmarish it would have been to try to measure, cut and glue all the deck supports out of styrene strips and and still manage to get it all to fit together straight. Now I have a complete unit that fits perfectly on top the hull with very little distortion and is quite sturdy. This means the basic structure of the sub is FINALLY complete and is undoubtedly going to work!
I can't loose now...solid "plastic toy" decked 1/72 Gatos are now officially a thing of the past!
...until next week!
I've taken most of the week off on the Cobia, but I have started "oil canning" the hull... not a simple proposition for a 4 foot long boat. My intent is to get a very subtle effect that isn't really noticeable when looking broadside but is readily apparent if looking down the hull from the bow or stern... like the real thing.
I've also done some work on the dive planes. Yet another problem with the Revell kit is they give you this (This is the old gato, BTW):
When they should look like this:
http://www.williammaloney.com/Aviation/ ... gPlane.htm
So I went to work, first thinning out the planes and carving them to make them look like there is a rigid frame under the "skin":
And then adding "weld lines" with white glue carefully squirted out of a syringe and spraying them with a quick coat of primer.
I've now got this:
I'm not quite happy with the thickness and irregularity of my "welds" so I may try again with the white glue, but otherwise it didn't turn out too shabby. The rudder and stern dive planes are getting a similar treatment too.
Finally, I glued the skeletonized deck pieces together in preparation for scratchbuilding the area underneath the deck. This is REALLY where my madness paid off; I couldn't imagine how nightmarish it would have been to try to measure, cut and glue all the deck supports out of styrene strips and and still manage to get it all to fit together straight. Now I have a complete unit that fits perfectly on top the hull with very little distortion and is quite sturdy. This means the basic structure of the sub is FINALLY complete and is undoubtedly going to work!
I can't loose now...solid "plastic toy" decked 1/72 Gatos are now officially a thing of the past!
...until next week!
-Jason Channell
Current Project: 1/200 Bismarck
Current Project: 1/200 Bismarck
-
Rob 2
- Posts: 157
- Joined: Sun Apr 11, 2010 1:22 pm
Re: An excessively ambitious 1/72 Revell Gato build...
I�m really enjoying following your build.
Very impressed.
Rob.
Very impressed.
Rob.
-
LE BOSCO

- Posts: 2261
- Joined: Thu Aug 27, 2009 11:05 am
- Location: Paris France
Re: An excessively ambitious 1/72 Revell Gato build...
HI Channell
a big great build I like the "oil can" effect on the bow
regards
Nicolas
a big great build
regards
Nicolas
-
Channell
- Posts: 2068
- Joined: Mon May 14, 2012 12:18 pm
- Location: Salt Lake City, USA
Re: An excessively ambitious 1/72 Revell Gato build...
Sorry, not much in the way of pics this time as they really just look like more of the same at the moment.
Anyway, I'm moving along on the Cobia; I finished the "oil canning" and it ended up so light under the primer that I can't even get it to show up in a picture! (though you can tell just barely when looking at it in person).
While it looks visually interesting, I think often times modelers take oil canning too far (I see it especially often on superdetailed Revell 1/72 U Boats I otherwise admire so much). But when you're working in 1/72 scale, it's too easy to end up with the equivalent of this, because that's what it takes to make the canning visible:
http://www.ibiblio.org/hyperwar/USN/rep ... 58-6-1.jpg
A boat could only end up that squashed after a serious depth charge attack coupled with an extended trip WAY too deep and would not be safe to take out to sea...especially if the entire hull looked like that. It's proving quite difficult to get that realistic "plate on frame" look without getting a "gato accordion" in the process, so I'm just gonna have to make up the difference with the weathering later on.
In other words, that was hours of work mostly for nothing... but then again, that's what this project is all about! After all, it's about the journey and all that B.S. right?
I'll soon be wrapping up the remainder of the details on the hull, adding and replacing weld lines and will hopefully get the boring stuff below the waterline out of the way this weekend.
From there I might take a break for a while as I've gone hot-guns on this project for a month and I need to mentally prepare myself for what comes next:
The "less crazy" part of me says I should skip all that luscious, juicy and complicated detail that will be only barely seen under the deck but I don't know if I can resist...
-Jason Channell
Current Project: 1/200 Bismarck
Current Project: 1/200 Bismarck
-
Channell
- Posts: 2068
- Joined: Mon May 14, 2012 12:18 pm
- Location: Salt Lake City, USA
Re: An excessively ambitious 1/72 Revell Gato build...
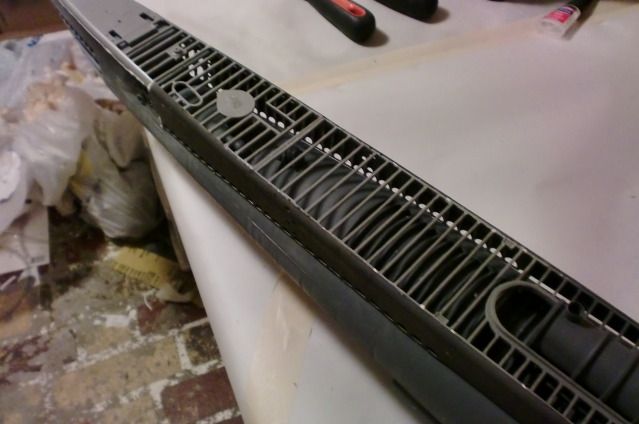
Some more "bottom of the boat" stuff:
I habitually get lazy on the bottom of my model ships... someday I'll probably only do waterline models because of it. Usually I can get away with it, but with the Gato kit there is LOT to see below the waterline, so I can't just ignore it. %&#*ing submarines!!
My humble internet research on what lies beneath suggests the bottom of a gato class sub looks something like a cheese grater with naked ladies climbing out of the holes ... but that's where all agreement on the subject ends. Anyway, I decided to just stick with K.I.S.S. (keep it simple stupid!) and did what the Eduard PE instructions claimed was there.
Earlier in the build I drilled and carved out the holes:
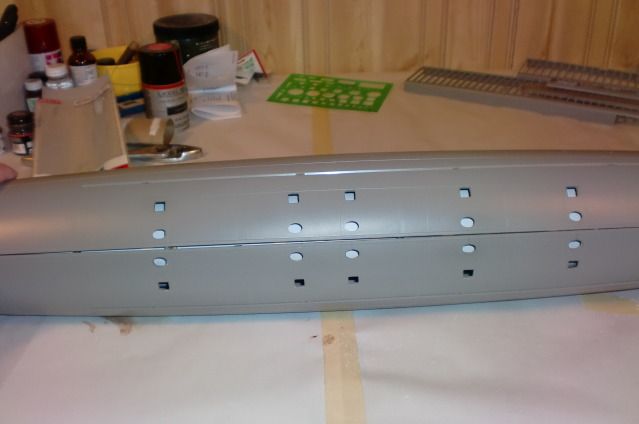
And here is the mostly finished result:
It would appear wartime boats dispensed with the grating for faster dive times, but I put them on anyway because they look good and am assuming they went back on after the war (the timeframe I'm aiming for). I was also told the square holes (which Eduard provides screens for) weren't actually holes, but were places where square plates were welded to the hull. So I did likewise, even though I had already cut them out.
Anyway, it ain't perfectly accurate, but it will have to do.
I have also noticed that I have completely forgotten to do the sonar heads... I'm still debating on whether to add them.
Back on the stern, I traded the plastic propshafts for slightly smaller (and rounder ) brass ones, reworked the surface of the rudder to make it look like it's actually a skin-on-frame piece instead of a slab of plastic and reshaped the stern dive planes.
Revell gives stern planes that are the wrong shape; the real thing looks more like an airplane wing:
http://www.navsource.org/archives/08/0822309.jpg
The unmodified kit looks like this:
... and here's where I am now:
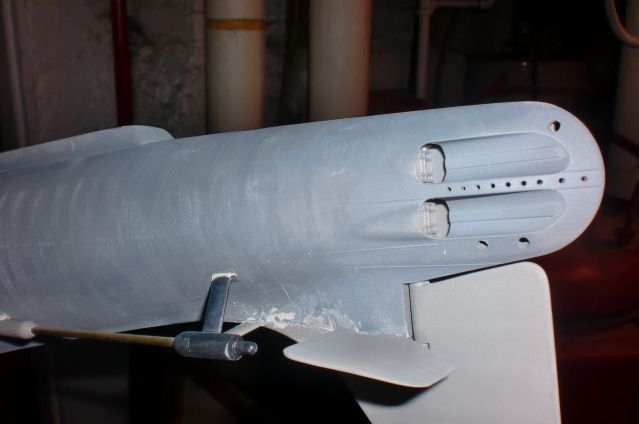
With the standard kit engineering, the dive planes and rudder aren't moveable but I did some quick mods to change that on my boat, mostly so I could paint them easier down the road.
If anyone is wondering, the black propshaft strut was lifted from the old gato because I accidentally drilled the hole for the brass shaft crooked on the new one. This was easier than refilling and redrilling... It's now my "parts boat" anyway.
I habitually get lazy on the bottom of my model ships... someday I'll probably only do waterline models because of it. Usually I can get away with it, but with the Gato kit there is LOT to see below the waterline, so I can't just ignore it. %&#*ing submarines!!
My humble internet research on what lies beneath suggests the bottom of a gato class sub looks something like a cheese grater with naked ladies climbing out of the holes
Earlier in the build I drilled and carved out the holes:
And here is the mostly finished result:
It would appear wartime boats dispensed with the grating for faster dive times, but I put them on anyway because they look good and am assuming they went back on after the war (the timeframe I'm aiming for). I was also told the square holes (which Eduard provides screens for) weren't actually holes, but were places where square plates were welded to the hull. So I did likewise, even though I had already cut them out.
Anyway, it ain't perfectly accurate, but it will have to do.
I have also noticed that I have completely forgotten to do the sonar heads... I'm still debating on whether to add them.
Back on the stern, I traded the plastic propshafts for slightly smaller (and rounder
Revell gives stern planes that are the wrong shape; the real thing looks more like an airplane wing:
http://www.navsource.org/archives/08/0822309.jpg
The unmodified kit looks like this:
... and here's where I am now:
With the standard kit engineering, the dive planes and rudder aren't moveable but I did some quick mods to change that on my boat, mostly so I could paint them easier down the road.
If anyone is wondering, the black propshaft strut was lifted from the old gato because I accidentally drilled the hole for the brass shaft crooked on the new one. This was easier than refilling and redrilling... It's now my "parts boat" anyway.
-Jason Channell
Current Project: 1/200 Bismarck
Current Project: 1/200 Bismarck
-
herrmill

- Posts: 271
- Joined: Sat Aug 05, 2006 8:01 pm
- Location: Xiaoshan, China, home of the "oldest" boat
- Contact:
Re: An excessively ambitious 1/72 Revell Gato build...
That is some AMAZING work!
"China is a sleeping giant. Let her sleep, for when she wakes she will shake the world." ~ Napoleon Bonaparte
-
Guest
Re: An excessively ambitious 1/72 Revell Gato build...
Bown away at what you are doing! Gave you a little advertisement over at Subcommittee.
http://s181686668.onlinehome.us/phpBB3/ ... 540#p66540
Scott T
http://s181686668.onlinehome.us/phpBB3/ ... 540#p66540
Scott T
-
Channell
- Posts: 2068
- Joined: Mon May 14, 2012 12:18 pm
- Location: Salt Lake City, USA
Re: An excessively ambitious 1/72 Revell Gato build...
Thanks everyone for the compliments!!!
Time for yet another progress check...
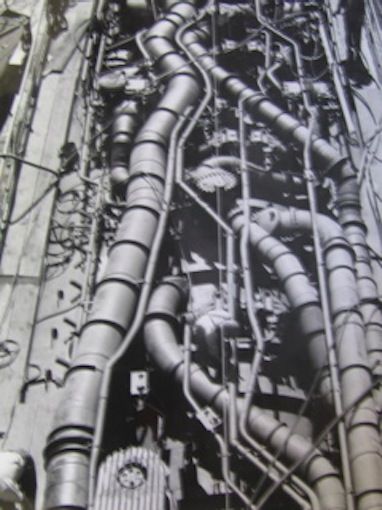
This week I finally got into some of the "meat" of the build. After lots of thought and almost deciding to forgo all the piping altogether I decided to meet myself in the middle and go for some quick piping that would look cool and give some interesting shape/shadows to the area below the deck but wasn't too complicated or time-consuming to put in.
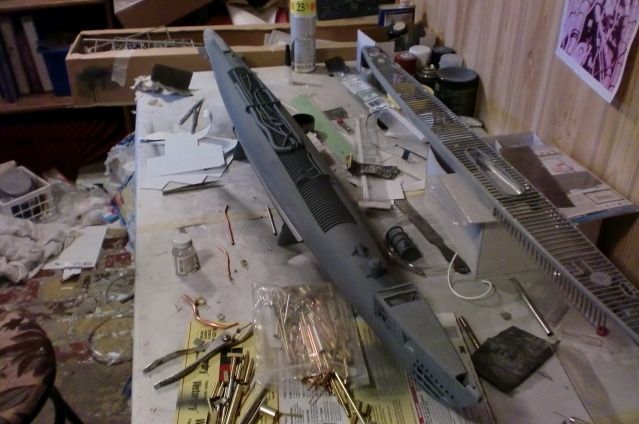
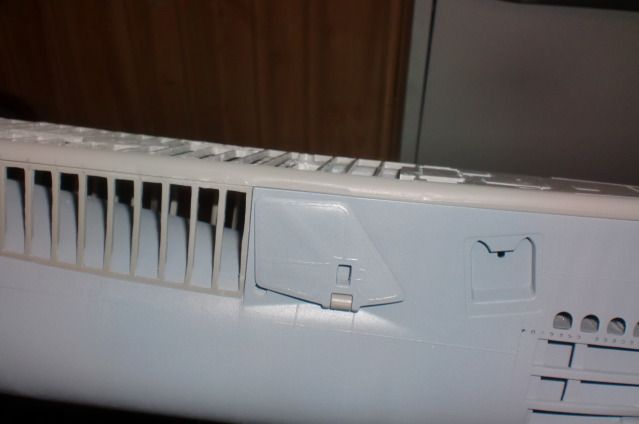
First I built the conning tower pressure chamber out of a piece of dowel with Evergreen strips and a brass tube for the conning tower hatch. It has one "dished side" and one "bulging" side as per the real thing. You can hardly see it at all with the fairwater over it, but it does serve a purpose as structural support, anchoring the deck sub-assembly in the center of the boat.
Next I went to work on the piping. I made the large induction pipe out of a piece of clear plastic piping I found that looked like the right size with 1/16" tape glued to it to provide the "ribs". The next size down came from a piece of copper water line that I had laying around. The three smaller sizes were from various pieces that I found at Hobby Lobby.
Towards the bow, I built the escape trunk with a piece of brass pipe, evergreen strips and piece of model scrap for the door; the top was sawed off the kit trunk. The forward torpedo loading hatch is brass pipe, scratch plastic and a hatch off the old Gato.
I also added a couple of structural "bulkheads" to give some strength/ stop sideways movement on the deck before gluing the deck structure sub-assembly onto the hull.

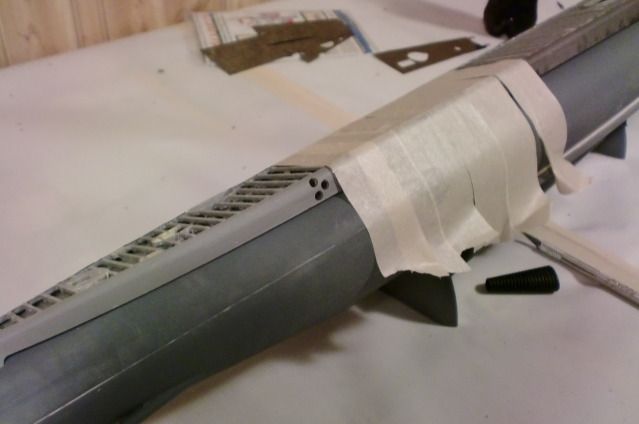
Finally, I attached the Eduard PE to the side of the deck.
Other internet builds complained the PE was difficult to attach as it is made out of "springy" instead of "bendy" metal (please forgive me for being so technical ) but it didn't end up being as hard as I expected. I just superglued them on and held the bend down with tape while it dried.
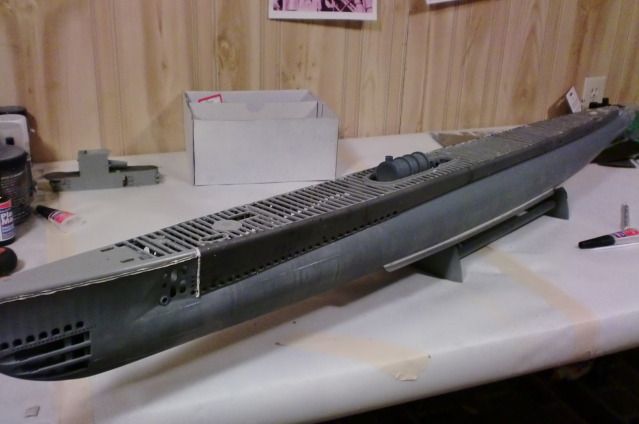
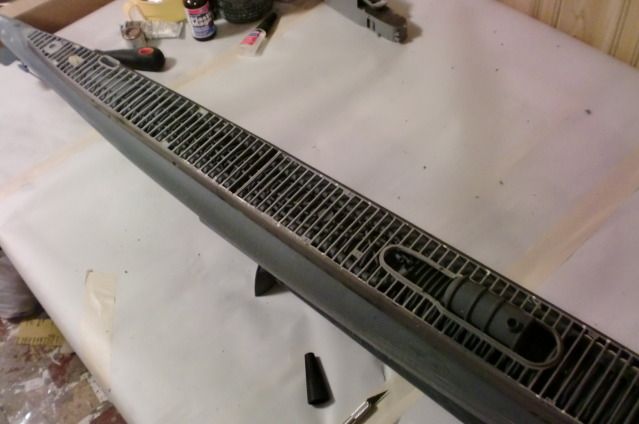
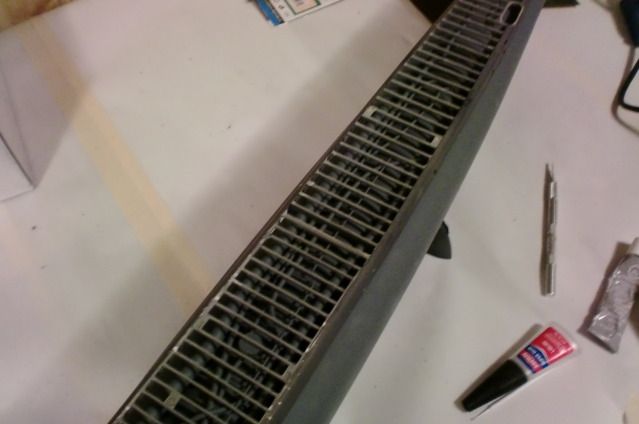
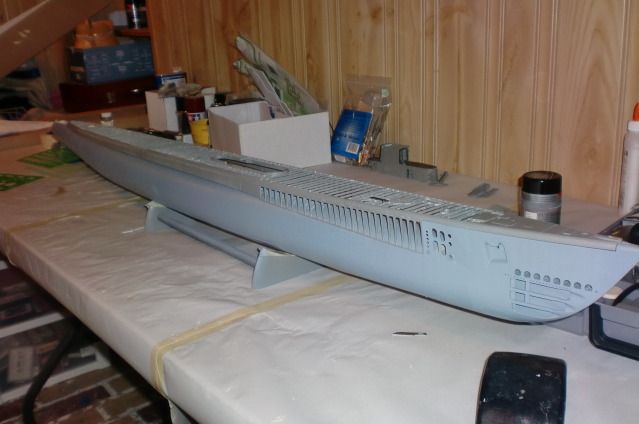
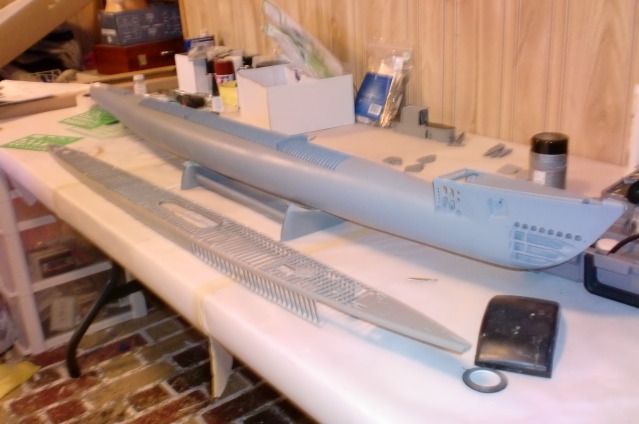
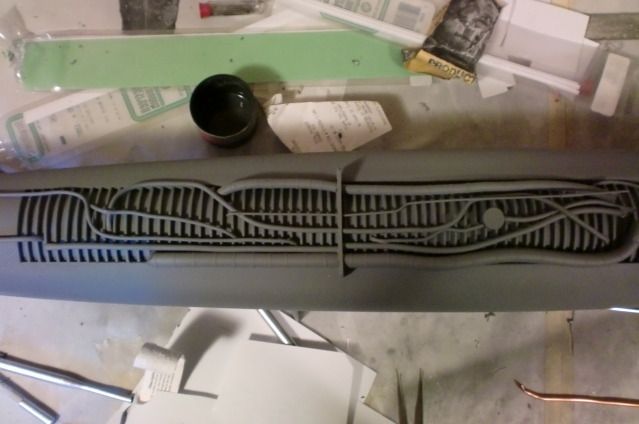
Here's a couple more shots with the deck PE laid on top:
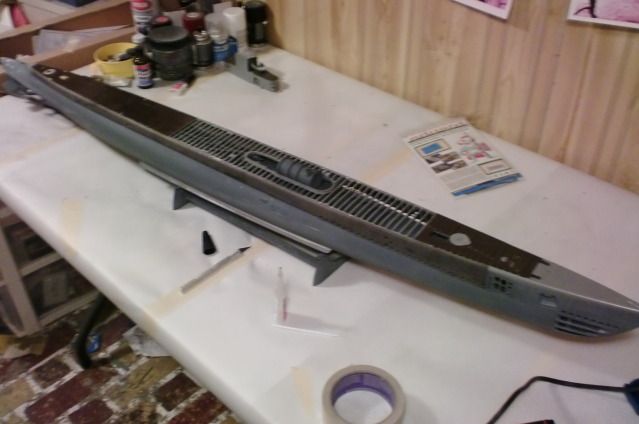
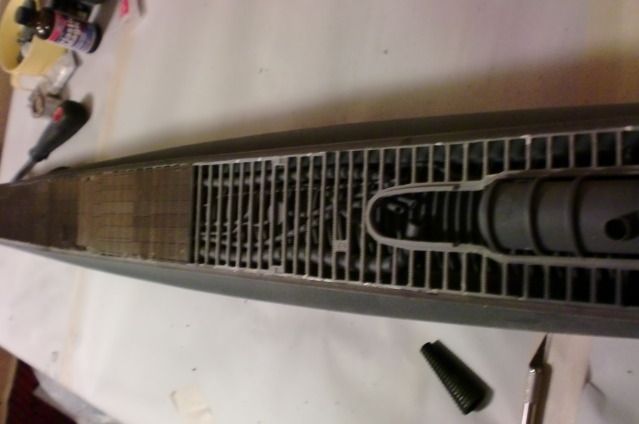
It will be hard to see much detail but the shapes will be there should anyone try to look closely at the finished product. I also intend to add some more bracing under the deck and add couple more bulkheads in the bow area that I figured would be easier to do with the deck attached. I also need to add the 6 compressed air tanks in the bow that were used to launch the torpedoes and give some kind of vague indication of the bow plane mechanism.
The fun never ends!
Time for yet another progress check...
This week I finally got into some of the "meat" of the build. After lots of thought and almost deciding to forgo all the piping altogether I decided to meet myself in the middle and go for some quick piping that would look cool and give some interesting shape/shadows to the area below the deck but wasn't too complicated or time-consuming to put in.
First I built the conning tower pressure chamber out of a piece of dowel with Evergreen strips and a brass tube for the conning tower hatch. It has one "dished side" and one "bulging" side as per the real thing. You can hardly see it at all with the fairwater over it, but it does serve a purpose as structural support, anchoring the deck sub-assembly in the center of the boat.
Next I went to work on the piping. I made the large induction pipe out of a piece of clear plastic piping I found that looked like the right size with 1/16" tape glued to it to provide the "ribs". The next size down came from a piece of copper water line that I had laying around. The three smaller sizes were from various pieces that I found at Hobby Lobby.
Towards the bow, I built the escape trunk with a piece of brass pipe, evergreen strips and piece of model scrap for the door; the top was sawed off the kit trunk. The forward torpedo loading hatch is brass pipe, scratch plastic and a hatch off the old Gato.
I also added a couple of structural "bulkheads" to give some strength/ stop sideways movement on the deck before gluing the deck structure sub-assembly onto the hull.
Finally, I attached the Eduard PE to the side of the deck.
Other internet builds complained the PE was difficult to attach as it is made out of "springy" instead of "bendy" metal (please forgive me for being so technical
Here's a couple more shots with the deck PE laid on top:
It will be hard to see much detail but the shapes will be there should anyone try to look closely at the finished product. I also intend to add some more bracing under the deck and add couple more bulkheads in the bow area that I figured would be easier to do with the deck attached. I also need to add the 6 compressed air tanks in the bow that were used to launch the torpedoes and give some kind of vague indication of the bow plane mechanism.
The fun never ends!
-Jason Channell
Current Project: 1/200 Bismarck
Current Project: 1/200 Bismarck
-
whaynes

- Posts: 294
- Joined: Mon Feb 27, 2006 10:32 pm
- Location: South Carolina
Re: An excessively ambitious 1/72 Revell Gato build...
This is a really impressive build!! I hope to do a similar effort on a Portsmouth Balao, but the difference in limber holes has intimidated me so far. I have enjoyed and admired your techniques. Keep it up.
Walt Haynes
Walt Haynes
-
LE BOSCO
- Posts: 2261
- Joined: Thu Aug 27, 2009 11:05 am
- Location: Paris France
Re: An excessively ambitious 1/72 Revell Gato build...
HI Channell
This is a really a great build
It brings me back memories

a VIIC/41
regards
Nicolas
This is a really a great build
It brings me back memories
a VIIC/41
regards
Nicolas
-
Channell
- Posts: 2068
- Joined: Mon May 14, 2012 12:18 pm
- Location: Salt Lake City, USA
Re: An excessively ambitious 1/72 Revell Gato build...
Do it... you know you want to!whaynes wrote:This is a really impressive build!! I hope to do a similar effort on a Portsmouth Balao, but the difference in limber holes has intimidated me so far. I have enjoyed and admired your techniques. Keep it up.
Walt Haynes
Somebody needs to sell photoetch Balao sideplates to make it easy...
-Jason Channell
Current Project: 1/200 Bismarck
Current Project: 1/200 Bismarck
-
Channell
- Posts: 2068
- Joined: Mon May 14, 2012 12:18 pm
- Location: Salt Lake City, USA
Re: An excessively ambitious 1/72 Revell Gato build...
Le Bosco, did you do an online build log of that one? It sure looks familiar...LE BOSCO wrote:HI Channell
This is a really a great build
It brings me back memories
a VIIC/41
regards
Nicolas
I originally got this idea while oogling truly awesome superdetailed 1/72 U-Boat builds online. I also noticed a sad lack of superdetailed 1/72 Gatos... I was going to wait to do the 1/200 Bismarck next but the void had to be filled, despite my lack of mad modeling skills. At least I have lots of patience to make up the difference.
I can't hold a candle to to you guys, you're so good... but damn if I'm not trying!

-Jason Channell
Current Project: 1/200 Bismarck
Current Project: 1/200 Bismarck