Calm water photo-tutorial with plaster
Moderator: JIM BAUMANN
-
Eric Bergerud
- Posts: 359
- Joined: Thu Apr 01, 2010 10:24 pm
Re: Calm water photo-tutorial with plaster
I do have a 8 oz jar of Blick artist grade gloss medium - stuff is very like molding paste in texture (thick) but clear. Or so it says. I have a surplus of blue things around to try thing out on. Normally I'd use Golden, but Blick's artist grade stuff has been decent in my opinion - most of my oils are Blicks'. See what it looks tomorrow. I'll also get some styrene - wonder if Baumann's incense stick might do the trick for heating it up? But I'm loathe to junk all the plaster at this stage - I've bought materials and spent several hours on this and it's getting personal.
A model boat is much cheaper than a real one and will not sink with you in it.
-
Eric Bergerud
- Posts: 359
- Joined: Thu Apr 01, 2010 10:24 pm
Re: Calm water photo-tutorial with plaster
Just checked your gallery. Lovely PW (among others). And very nice water.
I've been toying with the idea of doing a "project" WWII battleship in 1/350 - a summer's worth. I'd really like a Washington or maybe one of Oldendorff's old BBs at Surigao. (Think DML is coming out with a Pennsylvania which was the one ship that, as I recall, didn't fire at Surigao.) I won't do a Bismarck. Have thought of rolling the dice and trying the Pontos PW to 1941 KGV conversion. KGV put Bismarck where it belonged and would be worth a build. Not sure I have the horses for it though.
Eric
I've been toying with the idea of doing a "project" WWII battleship in 1/350 - a summer's worth. I'd really like a Washington or maybe one of Oldendorff's old BBs at Surigao. (Think DML is coming out with a Pennsylvania which was the one ship that, as I recall, didn't fire at Surigao.) I won't do a Bismarck. Have thought of rolling the dice and trying the Pontos PW to 1941 KGV conversion. KGV put Bismarck where it belonged and would be worth a build. Not sure I have the horses for it though.
Eric
A model boat is much cheaper than a real one and will not sink with you in it.
-
EJFoeth
- Posts: 2924
- Joined: Wed Jan 21, 2009 1:51 pm
Re: Calm water photo-tutorial with plaster
I work as a naval hydrodynamicists; not on waves but I've seen enough to watch model wave patterns like soSargentX wrote:This whole water thing is a real science hey?
 I have still to exercise my own model wave patterns so I keep my criticisms to myself until I manage to get anything half-decent
The V-type pattern usually originates at the bow and sometimes clearly visible from the stern, depending on hull type and ship speed of course. The larger transverse waves:Eric Bergerud wrote:Lovely photo EJ. Wish the waves were generated from the bow - be hard to use for a single ship base.

originate near the bulbous bow and forward/aft shoulder of the vessel (in general). Very blunt vessels show this transverse waves very clearly and that wave creates far more drag than the finer diverging wave you see for more slender vessels. The transverse wave moves along the hull at a near-constant period that is a direct function of ship speed (length = 0.64 V^2); however, the height can be different. What you do not see is that waves suddenly originate at the midship of a vessel; there is no change in hull form so there is no reason for a wave to appear.
Anyway, it will be vacation soon, perhaps I should write this down... There are nice guides around already, like http://www.steelnavy.com/WavePatterns.htm. I've been collecting a few photographs showing various types of wave patterns... At work we do a lot of wave pattern calculations for all kinds of ship types... if I had a nice smooth HMS Hood CAD file I'd calculate it asap...
-
Eric Bergerud
- Posts: 359
- Joined: Thu Apr 01, 2010 10:24 pm
Re: Calm water photo-tutorial with plaster
Chris,
Sorry to pester you again, but the more time I sink into this the more I want to avoid utter debacle.
I've been exploring several techniques. I found the one with foam and a cigarette lighter very interesting and did a couple of small pieces with about 2"x3"x1/4" thick styrofoam. Melting the stuff has great promise - I've also been messing around with a soldering iron. From a distance I think the bit pictured would have a nice swell effect. (The color is considerably darker than the flash makes it appear. I'm going back and forth between Liquitex gloss medium/varnish and Woodland Scenics Realistic Water. The later is very clear, does not shrink and has zero bubbles. It's thinner, however, so it collects a bit in the lower parts of the swells. The Liqutex is thicker and goes on more uniformly. But I can see why railroaders wanting to make ponds or streams like the Woodland stuff - it's the brighter of the two.)
In the tutorial page where you introduce the lighter/foam technique you recommend paper towels instead of normal paper, so I followed along. Must say that both samples I did showed the paper towel texture. It's just normal stuff, no patterns. Why do you think that paper towel is better for this than normal paper?
Eric
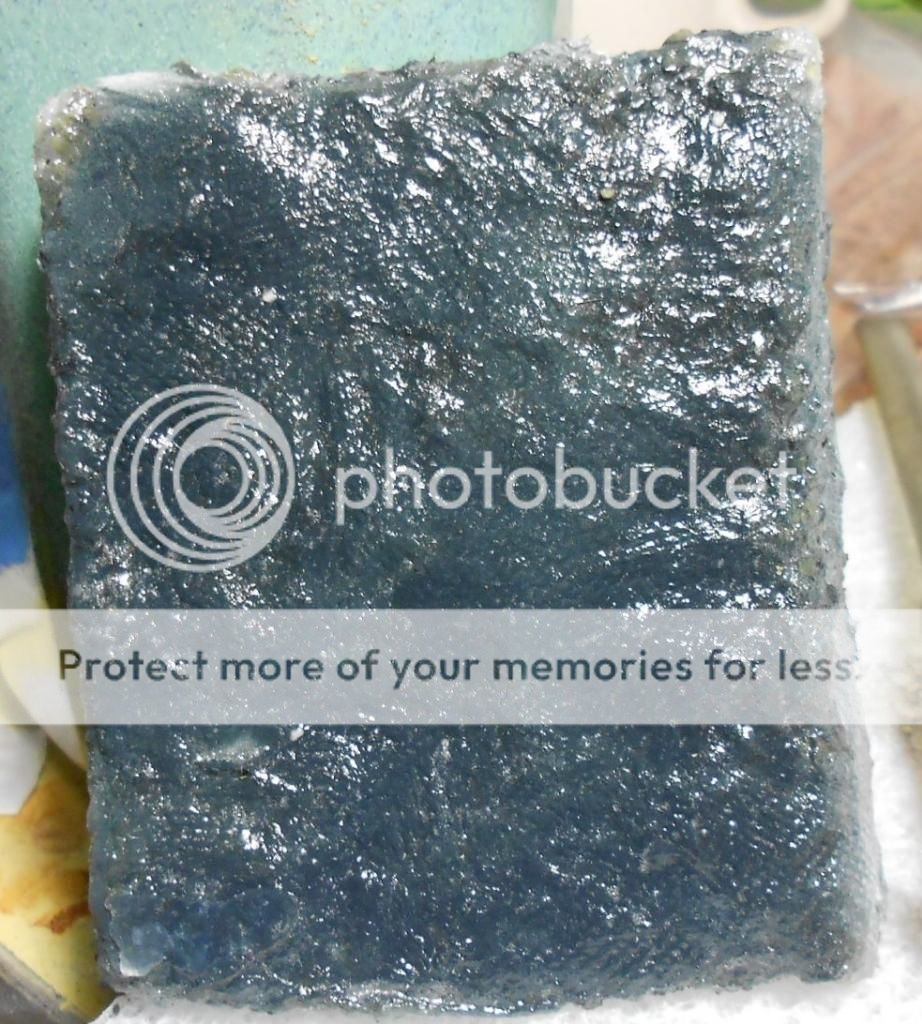
Sorry to pester you again, but the more time I sink into this the more I want to avoid utter debacle.
I've been exploring several techniques. I found the one with foam and a cigarette lighter very interesting and did a couple of small pieces with about 2"x3"x1/4" thick styrofoam. Melting the stuff has great promise - I've also been messing around with a soldering iron. From a distance I think the bit pictured would have a nice swell effect. (The color is considerably darker than the flash makes it appear. I'm going back and forth between Liquitex gloss medium/varnish and Woodland Scenics Realistic Water. The later is very clear, does not shrink and has zero bubbles. It's thinner, however, so it collects a bit in the lower parts of the swells. The Liqutex is thicker and goes on more uniformly. But I can see why railroaders wanting to make ponds or streams like the Woodland stuff - it's the brighter of the two.)
In the tutorial page where you introduce the lighter/foam technique you recommend paper towels instead of normal paper, so I followed along. Must say that both samples I did showed the paper towel texture. It's just normal stuff, no patterns. Why do you think that paper towel is better for this than normal paper?
Eric

A model boat is much cheaper than a real one and will not sink with you in it.
-
sargentx

- Posts: 924
- Joined: Wed May 22, 2013 7:20 pm
Re: Calm water photo-tutorial with plaster
It's good that you're investing some time investigating solutions to the water problem. It took me over a year to come up with some of the things I'm doing now not to mention hundreds of dollars in materials.
This build was done with carved styrofoam, coated with regular white paper. http://www.modelshipgallery.com/gallery ... /index.htm
This KGV class battleship was done with carved foam, also coated with regular paper. You can see that it is virtually as smooth as glass. If I have to put on 5 coats of epoxy, sanding in-between coats before painting I will. I go to great lengths to control the surface before painting so that there is no indication of lumps, grits, textures, or anything un-water like.
The finish on the attached image is LIquitex HIGH GLOSS varnish. This stuff is in an orange bottle and must say 'high gloss' on it. It is as shiny as epoxy and totally clear and glass like. It goes on beautifully. It must be said though, that no matter how great your shiny final coat is, it will never hide imperfections and un-water-like artifacts. The surface of the sea must be a thing of absolute beauty before you paint it. Then the gloss is the icing on top!
-Carve you styrofoam. Maybe even melt it.
-sand it thoroughly.
-coat it with regular bits of paper (2" square). Use clear acrylic gloss medium to do this.
-Sand it thoroughly.
-repeat if necessary.
-Paint it (with an airbrush if possible) the base sea color.
-airbrush minty subsurface churn
-add cotton
-Apply numerous coats of liquitex high gloss varnish keeping it smooth. Apply in a textural way if you want.
-put ship in and resolve cracks with more cotton.
This is exactly how I'd do a sea today.
HOpe this helps.
This build was done with carved styrofoam, coated with regular white paper. http://www.modelshipgallery.com/gallery ... /index.htm
This KGV class battleship was done with carved foam, also coated with regular paper. You can see that it is virtually as smooth as glass. If I have to put on 5 coats of epoxy, sanding in-between coats before painting I will. I go to great lengths to control the surface before painting so that there is no indication of lumps, grits, textures, or anything un-water like.
The finish on the attached image is LIquitex HIGH GLOSS varnish. This stuff is in an orange bottle and must say 'high gloss' on it. It is as shiny as epoxy and totally clear and glass like. It goes on beautifully. It must be said though, that no matter how great your shiny final coat is, it will never hide imperfections and un-water-like artifacts. The surface of the sea must be a thing of absolute beauty before you paint it. Then the gloss is the icing on top!
-Carve you styrofoam. Maybe even melt it.
-sand it thoroughly.
-coat it with regular bits of paper (2" square). Use clear acrylic gloss medium to do this.
-Sand it thoroughly.
-repeat if necessary.
-Paint it (with an airbrush if possible) the base sea color.
-airbrush minty subsurface churn
-add cotton
-Apply numerous coats of liquitex high gloss varnish keeping it smooth. Apply in a textural way if you want.
-put ship in and resolve cracks with more cotton.
This is exactly how I'd do a sea today.
HOpe this helps.
Every time the PE sticks to your tweezers, you lose a minute off your life.
-
Eric Bergerud
- Posts: 359
- Joined: Thu Apr 01, 2010 10:24 pm
Re: Calm water photo-tutorial with plaster
I'll keep plugging. It's clear you're right about the right surface being the key and not the gloss. I'm going to try to find something that will work okay - foam looks like it. (I've done a couple of oat bran experiments and one worked pretty well. I really wish I could have figured out how to get the plaster textured correctly before it set.) The challenge to come up with something is there and would be hard to walk away from. But if I can't make a base that enhances the ship, I'll buy a wooden stand and use it as the "eternal base" for ship photos, and stick the DD in some nook or cranny like I've done with my other ships. Nobody sees my models except myself and, ironically, I can't think of a single place in my very cramped quarters to put the ship where the base would be readily visible. I have other models I want to get to, and this whole destroyer project has ate a lot of time.
I believe that the Liquitex gloss varnish you're using is for putting on a final protective coat over acrylic paintings. Blick Arts warns that the Liquitex Gloss Medium/Varnish (the green label) should not be considered a "varnish" because it's almost impossible to remove. Interestingly Blick advises that Liquitex Soluvar Varnish (orange label) should be put over their green label medium/varnish: don't really see how that would allow it to be removed.
Golden makes something that I thought was similar but now I'm not sure. They have a gloss medium. But for the final coat they recommend Polymer Varnish with UVLS (UltraViolet Light Stabilizers). The stuff is supposed to be mixed before use - at least 2 parts water. It's thinner and more clear than their medium. I'm thinking that the Woodland Scenics stuff may be something exactly like that: water soluble, thin, and extremely bright. Perhaps they bought the Golden stuff or something like it, mixed it with water, and sold it for a nice profit. Wooland Scenics makes a matte varnish "scenery cement" (really useful for sticking foliage on tanks) that's clearly a matte medium that's been watered down with some kind of conditioner.
We'll worry about that if we find something to gloss up. BTW, I've been using the Golden High Flow acrylics and they're very nice. I'll put some ocher in with white and see if that won't make a nice linen color to use on the WWI plane that's next up and see how it compares with my other paints under heavy airbrush use.
Thanks again
Eric
I believe that the Liquitex gloss varnish you're using is for putting on a final protective coat over acrylic paintings. Blick Arts warns that the Liquitex Gloss Medium/Varnish (the green label) should not be considered a "varnish" because it's almost impossible to remove. Interestingly Blick advises that Liquitex Soluvar Varnish (orange label) should be put over their green label medium/varnish: don't really see how that would allow it to be removed.
Golden makes something that I thought was similar but now I'm not sure. They have a gloss medium. But for the final coat they recommend Polymer Varnish with UVLS (UltraViolet Light Stabilizers). The stuff is supposed to be mixed before use - at least 2 parts water. It's thinner and more clear than their medium. I'm thinking that the Woodland Scenics stuff may be something exactly like that: water soluble, thin, and extremely bright. Perhaps they bought the Golden stuff or something like it, mixed it with water, and sold it for a nice profit. Wooland Scenics makes a matte varnish "scenery cement" (really useful for sticking foliage on tanks) that's clearly a matte medium that's been watered down with some kind of conditioner.
We'll worry about that if we find something to gloss up. BTW, I've been using the Golden High Flow acrylics and they're very nice. I'll put some ocher in with white and see if that won't make a nice linen color to use on the WWI plane that's next up and see how it compares with my other paints under heavy airbrush use.
Thanks again
Eric
A model boat is much cheaper than a real one and will not sink with you in it.
-
sargentx
- Posts: 924
- Joined: Wed May 22, 2013 7:20 pm
Re: Calm water photo-tutorial with plaster
It's easy to get all silly with the how's and whats of acrylic varnishes. In short, acrylic polymer emulsion is fine as a final coat. High gloss varnish is just a variation of acrylic gloss medium. You're right in that it's impossible to remove. but as a final gloss, and/or medium, the high gloss varnish is fantastic.
I'd stick with gloss mediums and would stay away from the soluble MSA type 'varnishes' etc. that's getting into some unecessarily complex conservation issues etc. For our purposes, really, gloss medium/varnish is great.
I'd stick with gloss mediums and would stay away from the soluble MSA type 'varnishes' etc. that's getting into some unecessarily complex conservation issues etc. For our purposes, really, gloss medium/varnish is great.
Every time the PE sticks to your tweezers, you lose a minute off your life.
-
MartinJQuinn

- Posts: 8561
- Joined: Tue Jan 11, 2005 1:40 pm
- Location: New Jersey
Re: Calm water photo-tutorial with plaster
Not to hijack the thread, but it appears you saved Howe. She looks great - hope to see more photos soon.
Martin
"Tomorrow is the most important thing in life. Comes into us at midnight very clean. It's perfect when it arrives and it puts itself in our hands. It hopes we've learned something from yesterday." John Wayne
Ship Model Gallery
"Tomorrow is the most important thing in life. Comes into us at midnight very clean. It's perfect when it arrives and it puts itself in our hands. It hopes we've learned something from yesterday." John Wayne
Ship Model Gallery
-
sargentx
- Posts: 924
- Joined: Wed May 22, 2013 7:20 pm
Re: Calm water photo-tutorial with plaster
Ya, fixed her up. It was painful to have re-do the mast and radars, but it came out all right in the end. I just submitted a full set of images.
Every time the PE sticks to your tweezers, you lose a minute off your life.
-
Eric Bergerud
- Posts: 359
- Joined: Thu Apr 01, 2010 10:24 pm
Re: Calm water photo-tutorial with plaster
Real world has been getting in my way, but I have to admit that making a base has been an uphill struggle. Here are two experiments both made with foam and a lighter. There are a lot of sloppy mistakes, but I know what most of them are. BTW: they're to fit a 1/700 DD hull from the DML Livermore kit.
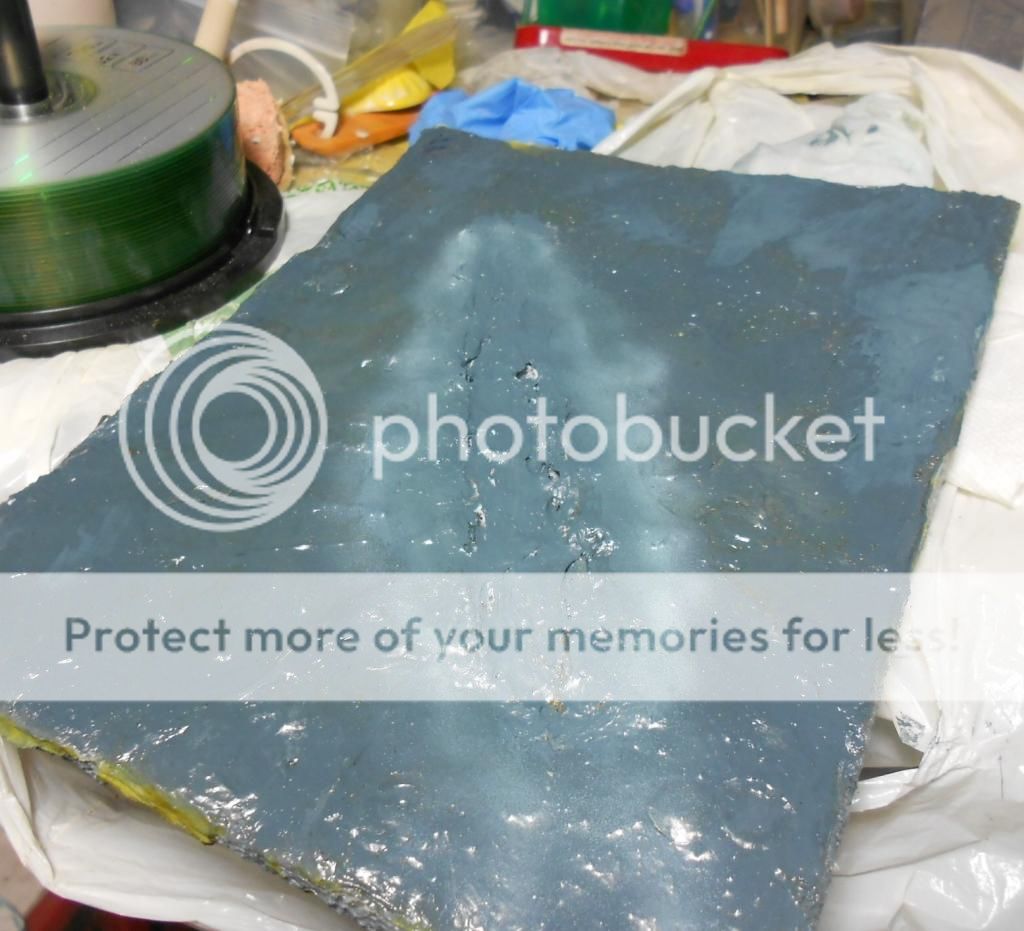
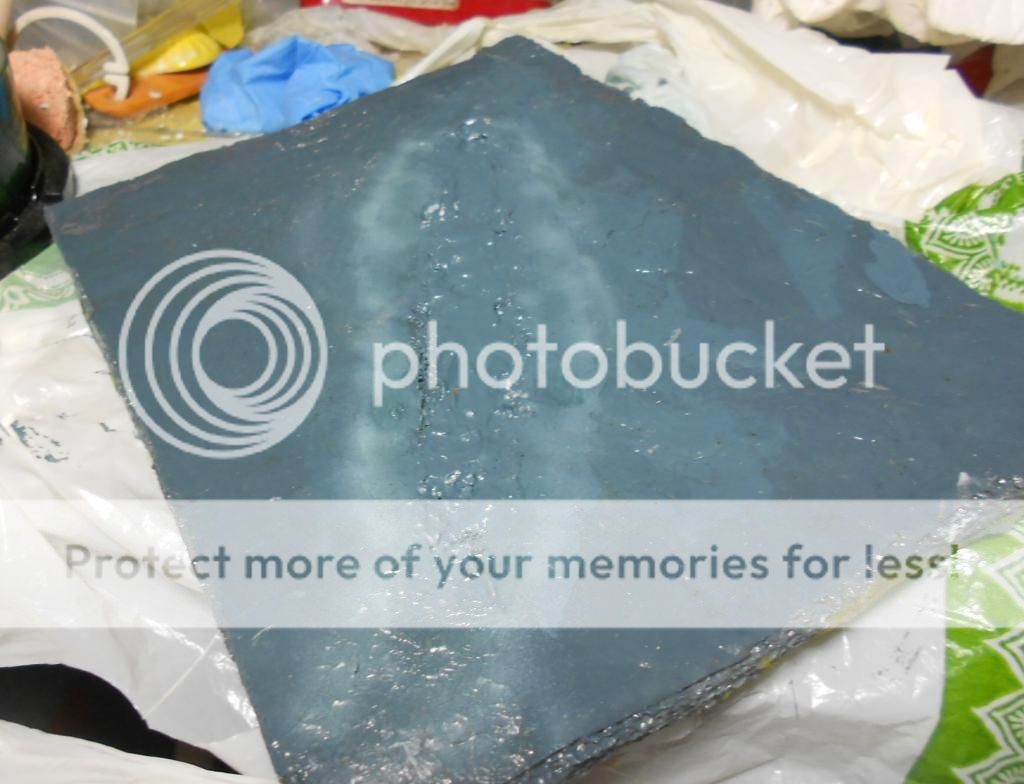
I think those are getting close to something that could be used. However, I am absolutely stumped about your cotton technique. You note in another of your tutorials that rayon balls are better than cotton cotton. How much better? I can't find them anywhere unless you buy them by the case for about $40. I think this is a complex technique under the best of circumstances - how much more complex am I making it using cotton cotton? I'll keep experimenting with it, but I'm thinking about gels, mediums and paint for foam. Opinion?
Eric


I think those are getting close to something that could be used. However, I am absolutely stumped about your cotton technique. You note in another of your tutorials that rayon balls are better than cotton cotton. How much better? I can't find them anywhere unless you buy them by the case for about $40. I think this is a complex technique under the best of circumstances - how much more complex am I making it using cotton cotton? I'll keep experimenting with it, but I'm thinking about gels, mediums and paint for foam. Opinion?
Eric
A model boat is much cheaper than a real one and will not sink with you in it.
-
sargentx
- Posts: 924
- Joined: Wed May 22, 2013 7:20 pm
Re: Calm water photo-tutorial with plaster
Those look fine. Man, i tell ya, for an entire year, every time I was bored a screwed around on scraps of foam and wood sorting things out. I made a lot of blue turds before I started making surfaces that looked like water! Practice makes perfect. It's a great investment for the willing!
Mind you, you haven't added any cotton whitewater or the ship yet; which will only improve things.
Mind you, you haven't added any cotton whitewater or the ship yet; which will only improve things.
Every time the PE sticks to your tweezers, you lose a minute off your life.
-
Eric Bergerud
- Posts: 359
- Joined: Thu Apr 01, 2010 10:24 pm
Re: Calm water photo-tutorial with plaster
I didn't photograph the current efforts to add cotton foam - might have damaged the camera. (The hull wasn't in either photo because I had two bases and one hull - it actually fits in pretty well.) Cotton strikes me as a tricky technique and I've tried nothing like it. From my futzing so far I can see it almost easier to use for making heavy seas than calm.
If you don't mind, could you give me an estimate on how much more difficult it is to get decent results with cotton cotton balls instead of the rayon variety you favor? I can certainly see that something stronger cohesion would be much easier to manipulate. But I don't think I'll be able to get rayon. Today I'm going to try applying the cotton in very small bits an apply medium with a detail brush as illustrated in one of your photos.
Realistically I have to face the possibility that I might not get this to work and if so I'll be looking for a Plan B.
Do appreciate the advice. Your work is simply splendid - if I get something 30% that good I'll be most happy.
Eric
If you don't mind, could you give me an estimate on how much more difficult it is to get decent results with cotton cotton balls instead of the rayon variety you favor? I can certainly see that something stronger cohesion would be much easier to manipulate. But I don't think I'll be able to get rayon. Today I'm going to try applying the cotton in very small bits an apply medium with a detail brush as illustrated in one of your photos.
Realistically I have to face the possibility that I might not get this to work and if so I'll be looking for a Plan B.
Do appreciate the advice. Your work is simply splendid - if I get something 30% that good I'll be most happy.
Eric
A model boat is much cheaper than a real one and will not sink with you in it.
-
sargentx
- Posts: 924
- Joined: Wed May 22, 2013 7:20 pm
Re: Calm water photo-tutorial with plaster
That's nice of you to say. Don't get discouraged! In the end, it's all relatively cheap and no biggie to chuck or sand down etc.
I've used both cotton and the rayon cotton balls. They're definitely comprable, but the cotton tends to soak up the medium quite a bit and become clear-ish. The Rayon is definitely better, but both can work fine.
Like I said before, experiment experiment experiment.
Making whitewater with the cotton and medium is IMO vastly more easy way more realistic than anything you'd ever be able to do with paint, dry-brushing, etc. There's no comparison. Put another way: A wake done badly with paint is WAY worse than cotton done badly. The cotton just feels right for what it's trying to depict.
I've used both cotton and the rayon cotton balls. They're definitely comprable, but the cotton tends to soak up the medium quite a bit and become clear-ish. The Rayon is definitely better, but both can work fine.
Like I said before, experiment experiment experiment.
Making whitewater with the cotton and medium is IMO vastly more easy way more realistic than anything you'd ever be able to do with paint, dry-brushing, etc. There's no comparison. Put another way: A wake done badly with paint is WAY worse than cotton done badly. The cotton just feels right for what it's trying to depict.
Every time the PE sticks to your tweezers, you lose a minute off your life.
-
Eric Bergerud
- Posts: 359
- Joined: Thu Apr 01, 2010 10:24 pm
Re: Calm water photo-tutorial with plaster
I got another private message from a fine modeller who also insists on cotton. So cotton it will be. I've been futzing more and I think I was just using way too much of it. So I yanked most of it out and have found that some of the stuff pulled out has a little medium still in it, giving it a stringy consistency that actually makes it easier to tuck next to the hull - still got a little fluff to it. On Dec 26 I'm off to the St. Paul for a month (yup, Minnesota in January - maybe I might make a ship modeller) and I'd like to have this in the outbox.
Last questions: first, do I take it that you put the final sealing coat of gloss medium on after the cotton is in place? I assume that means you want to keep the stuff away from the cotton itself. Second, I'm thinking about the final sea color. (There's a pic of my humble Hobson in the preceding page - a fair effort according to my standards.) It spent most of the war in the Atlantic and even the North Sea (went on the Ranger raid in early 44). Service highlight was Normandy support. I was thinking of the your example of English waters - maybe platho green (blue shade) with some gray and whatever. That would heighten the contrast between the ship and the water. Measure 22 is basically all blue gray of differing shades and when I put it on an earlier sample of a platho blue/gray etc, it fit right in to the point of being a little indistinct. I suppose that's the idea of camouflage. But I see you've recommended matching the ship to the water. I'll probably make two anyway. Lastly, you've got pics of hand painting the ocean color on the surface chosen. Do you think the brush strokes add to the overall ocean effect? Normally I'd do everything with an airbrush.
BTW: I'm a sucker for molding pastes, gels, mediums etc, so this project has been good for Blick Arts. (Made in the USA - got to do my bit to help economic recovery.) I got some Golden gloss medium and it has a really sweet texture. I've always liked their products. Also bought something they call gloss "self-levelling" gel which does indeed lay down differently - probably just a little thinner. Maybe an intermediate step between sanding the foam and putting paper on it. Also trying out some molds and putting mediums and the Wood Scenics stuff in them - a technique I've seen on model railroad videos to make gentle waves and ripples. Also like the Golden High Flow paints a lot - they'll work perfectly with the fluids I already have. It's all great fun - do hope it works.
Eric
Last questions: first, do I take it that you put the final sealing coat of gloss medium on after the cotton is in place? I assume that means you want to keep the stuff away from the cotton itself. Second, I'm thinking about the final sea color. (There's a pic of my humble Hobson in the preceding page - a fair effort according to my standards.) It spent most of the war in the Atlantic and even the North Sea (went on the Ranger raid in early 44). Service highlight was Normandy support. I was thinking of the your example of English waters - maybe platho green (blue shade) with some gray and whatever. That would heighten the contrast between the ship and the water. Measure 22 is basically all blue gray of differing shades and when I put it on an earlier sample of a platho blue/gray etc, it fit right in to the point of being a little indistinct. I suppose that's the idea of camouflage. But I see you've recommended matching the ship to the water. I'll probably make two anyway. Lastly, you've got pics of hand painting the ocean color on the surface chosen. Do you think the brush strokes add to the overall ocean effect? Normally I'd do everything with an airbrush.
BTW: I'm a sucker for molding pastes, gels, mediums etc, so this project has been good for Blick Arts. (Made in the USA - got to do my bit to help economic recovery.) I got some Golden gloss medium and it has a really sweet texture. I've always liked their products. Also bought something they call gloss "self-levelling" gel which does indeed lay down differently - probably just a little thinner. Maybe an intermediate step between sanding the foam and putting paper on it. Also trying out some molds and putting mediums and the Wood Scenics stuff in them - a technique I've seen on model railroad videos to make gentle waves and ripples. Also like the Golden High Flow paints a lot - they'll work perfectly with the fluids I already have. It's all great fun - do hope it works.
Eric
A model boat is much cheaper than a real one and will not sink with you in it.
-
biggles2
- Posts: 1980
- Joined: Thu May 30, 2013 1:50 pm
Re: Calm water photo-tutorial with plaster
Hi Sargentx; I tried brushing on epoxy glue with mixed results. Maybe because I didn't use Lepage's, but some unknown brand from a $+ store. It was very stiff to brush on and set up very quickly, and didn't really self-level well, but did give a very shiny surface. Is there something to mix with epoxy to thin it a bit, or to retard hardening? 
-
sargentx
- Posts: 924
- Joined: Wed May 22, 2013 7:20 pm
Re: Calm water photo-tutorial with plaster
When I use epoxy, i use "Pour ON" that's the brand. It's a two part epoxy with a 10 hour cure time. I don't think you can thin it.
As a final finish, I rarely use epoxy anymore. I put all my effort into making sure that the surface of the sea is perfectly smooth (no lumpy, gritty artifacts etc.) and undulating in a natural way. It shouldn't look like a lumpy surface that you shined up. It's got to look like, well, water! lol.
I spend hours sanding it through various grades, filling it, etc. so that's a thing of beauty in itself. If your sea is smoothly sanded, undulating like water and convincing, all you need is a a few coats of a high gloss acrylic varnish after you paint it and it'll work. I use Liquitex high gloss varnish. This stuff is as shiny as epoxy.
The thing I don't like about epoxy as well is that it's thick (which is nice), but is settles in all the recesses making pools. These don't look good.
However you make a sea, the sculpt portion has to be smooth, naturally undulating, and free of grits, dents, divits, grains etc. If you can achieve this, then it's easy to paint it and gloss it up.
The surface sculpt is the key i think
As a final finish, I rarely use epoxy anymore. I put all my effort into making sure that the surface of the sea is perfectly smooth (no lumpy, gritty artifacts etc.) and undulating in a natural way. It shouldn't look like a lumpy surface that you shined up. It's got to look like, well, water! lol.
I spend hours sanding it through various grades, filling it, etc. so that's a thing of beauty in itself. If your sea is smoothly sanded, undulating like water and convincing, all you need is a a few coats of a high gloss acrylic varnish after you paint it and it'll work. I use Liquitex high gloss varnish. This stuff is as shiny as epoxy.
The thing I don't like about epoxy as well is that it's thick (which is nice), but is settles in all the recesses making pools. These don't look good.
However you make a sea, the sculpt portion has to be smooth, naturally undulating, and free of grits, dents, divits, grains etc. If you can achieve this, then it's easy to paint it and gloss it up.
The surface sculpt is the key i think
Every time the PE sticks to your tweezers, you lose a minute off your life.
-
sargentx
- Posts: 924
- Joined: Wed May 22, 2013 7:20 pm
Re: Calm water photo-tutorial with plaster
What cotton You use is obviously a preference. I've used cotton and rayon balls and find the rayon to be way easier to work with and find that they produce a far more realistic water effect. When I lay down my cotton, I kind of stamp it with a brush which causes it to string together and web-up. This look quite convincing. I find that some of the cotton balls out there to be plagued with seeds and bits which are obviously no good! As with all things, I advocate trying different things to find what works best for you. At 5 bucks a bag what's the harm in trying both? lolEric Bergerud wrote:I got another private message from a fine modeller who also insists on cotton. So cotton it will be. I've been futzing more and I think I was just using way too much of it. So I yanked most of it out and have found that some of the stuff pulled out has a little medium still in it, giving it a stringy consistency that actually makes it easier to tuck next to the hull - still got a little fluff to it. On Dec 26 I'm off to the St. Paul for a month (yup, Minnesota in January - maybe I might make a ship modeller) and I'd like to have this in the outbox.
Last questions: first, do I take it that you put the final sealing coat of gloss medium on after the cotton is in place? I assume that means you want to keep the stuff away from the cotton itself. Second, I'm thinking about the final sea color. (There's a pic of my humble Hobson in the preceding page - a fair effort according to my standards.) It spent most of the war in the Atlantic and even the North Sea (went on the Ranger raid in early 44). Service highlight was Normandy support. I was thinking of the your example of English waters - maybe platho green (blue shade) with some gray and whatever. That would heighten the contrast between the ship and the water. Measure 22 is basically all blue gray of differing shades and when I put it on an earlier sample of a platho blue/gray etc, it fit right in to the point of being a little indistinct. I suppose that's the idea of camouflage. But I see you've recommended matching the ship to the water. I'll probably make two anyway. Lastly, you've got pics of hand painting the ocean color on the surface chosen. Do you think the brush strokes add to the overall ocean effect? Normally I'd do everything with an airbrush.
BTW: I'm a sucker for molding pastes, gels, mediums etc, so this project has been good for Blick Arts. (Made in the USA - got to do my bit to help economic recovery.) I got some Golden gloss medium and it has a really sweet texture. I've always liked their products. Also bought something they call gloss "self-levelling" gel which does indeed lay down differently - probably just a little thinner. Maybe an intermediate step between sanding the foam and putting paper on it. Also trying out some molds and putting mediums and the Wood Scenics stuff in them - a technique I've seen on model railroad videos to make gentle waves and ripples. Also like the Golden High Flow paints a lot - they'll work perfectly with the fluids I already have. It's all great fun - do hope it works.
Eric
The sea color is a personal choice. My seas are almost always a combination of black, thalo blue, and white. Blue plus white to lighten it, then black to kill the intensity a bit. A touch of yellow in the mix would green it up a bit. AGain, these are personal choices. While we could attempt to capture the look of a particular region of sea, it gets silly because ultimately, water is more or less the same worldwide and its look is distorted by weather, sunlight, plankton, depth etc. In general, water is a dark navy blue because water absorbs the other colors in the spectrum except blue. Again...it's personal, and less 'factual'. Try different colors, and do what you think looks the best. It's your baby and you have to love it. I'll mix a color, brush it around, see if I like it, re-mix, try again, etc.
Every time the PE sticks to your tweezers, you lose a minute off your life.
-
Eric Bergerud
- Posts: 359
- Joined: Thu Apr 01, 2010 10:24 pm
Re: Calm water photo-tutorial with plaster
What do you think? It's 1/2" styrafoam, done with a butane lighter, paper, Golden mediums. With a few exceptions pretty much according to your drill. BTW - the YouTube Videos were a great help.

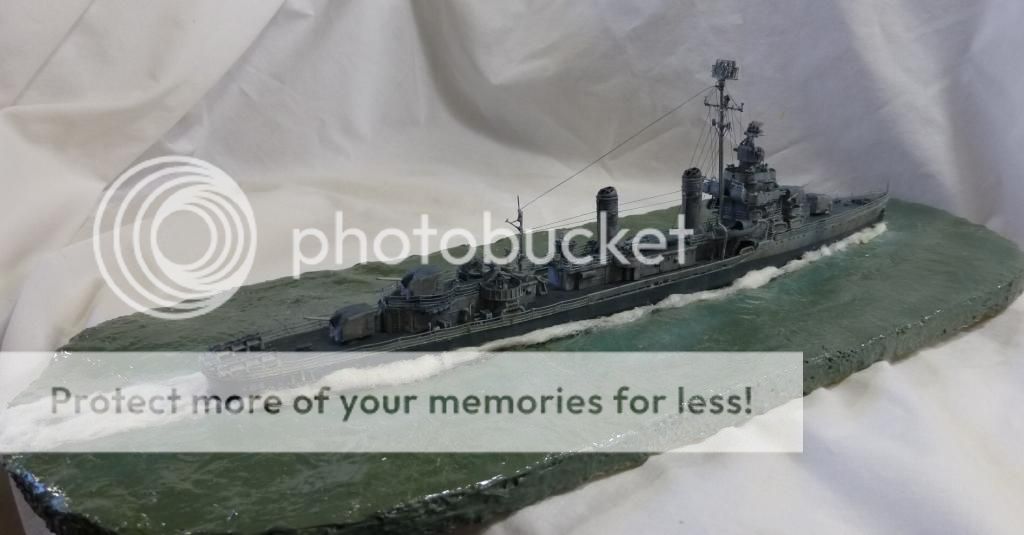
Eric


Eric
A model boat is much cheaper than a real one and will not sink with you in it.