Thank you for sharing with micro photography. Such closeups always make even the finest work look horrible. Yours is also the finest works, thank you for sharing your development of this rather cutting edge hand work!
Best regards: Tom
1:160 S.M.S. WESPE Armoured Gunboat (1876)
Moderators: MartinJQuinn, JIM BAUMANN, HMAS, Tiny69, Dave Wooley
-
Fliger747
- Posts: 5068
- Joined: Wed Jan 02, 2013 1:15 am
-
wefalck

- Posts: 2080
- Joined: Wed Sep 28, 2011 12:04 pm
- Location: Paris
- Contact:
Re: 1:160 S.M.S. WESPE Armoured Gunboat (1876)
More horrible and sobering close-up photographs to come ...
**************************************************************
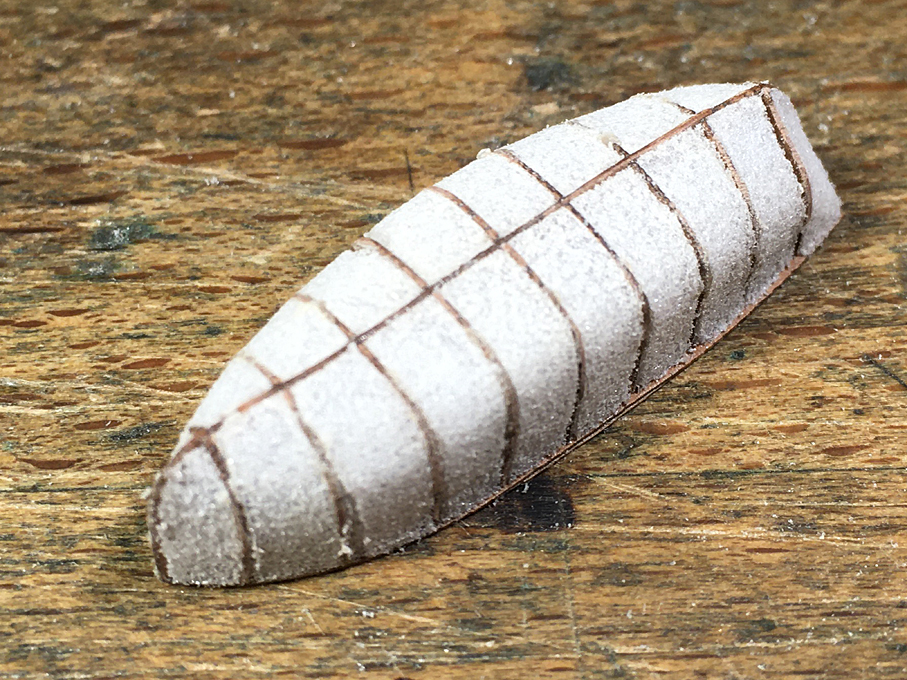
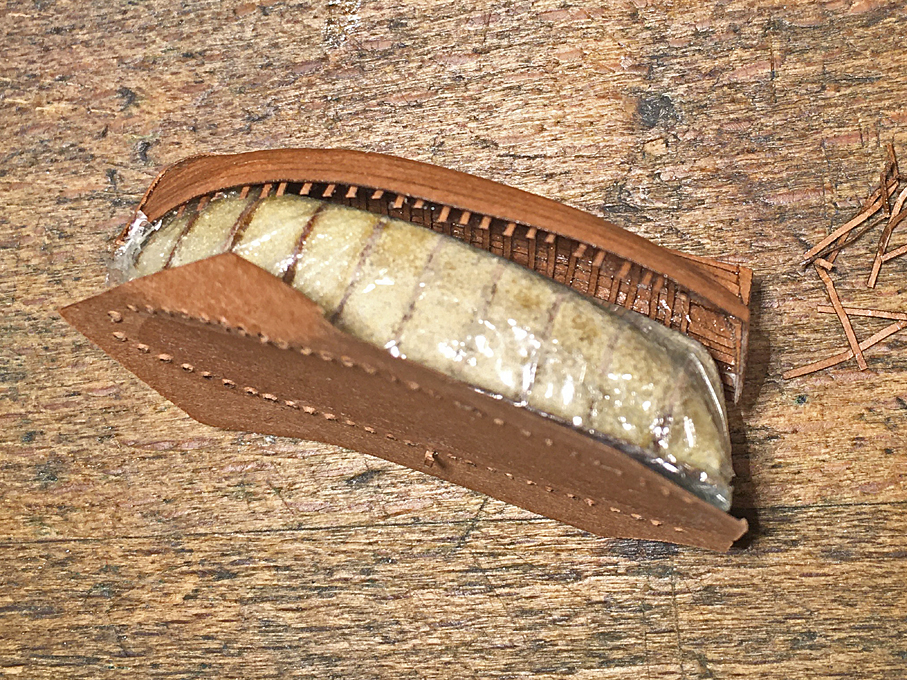
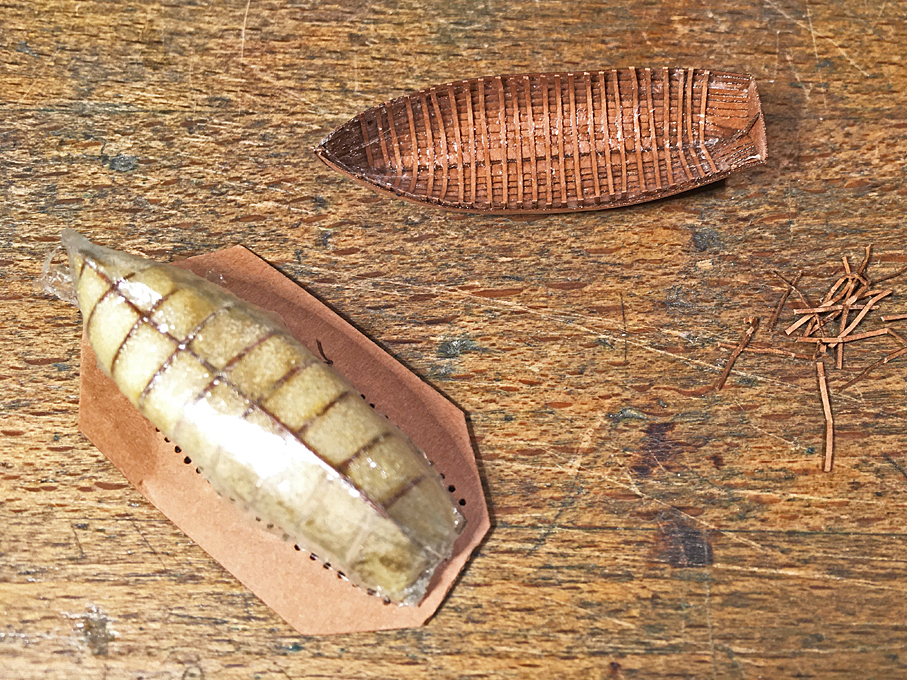
Further completion of the cutter
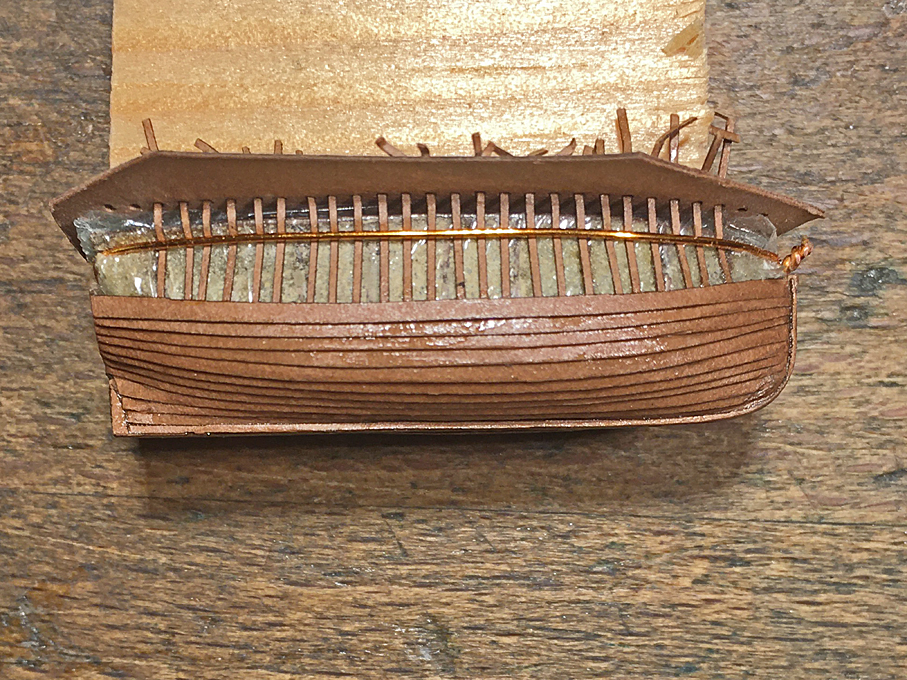
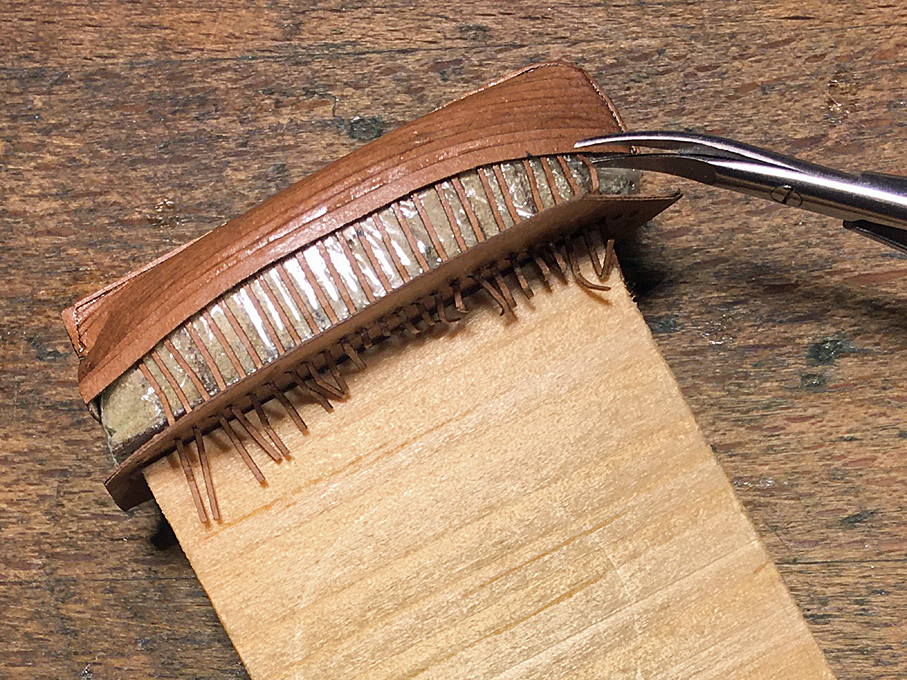
The hull was now cut off the �building-board� and the infilling and the bulkheads shaped in a way I think the tarpaulin-covered sailing-gear, oars etc. which would be stowed in the boat would have looked like.
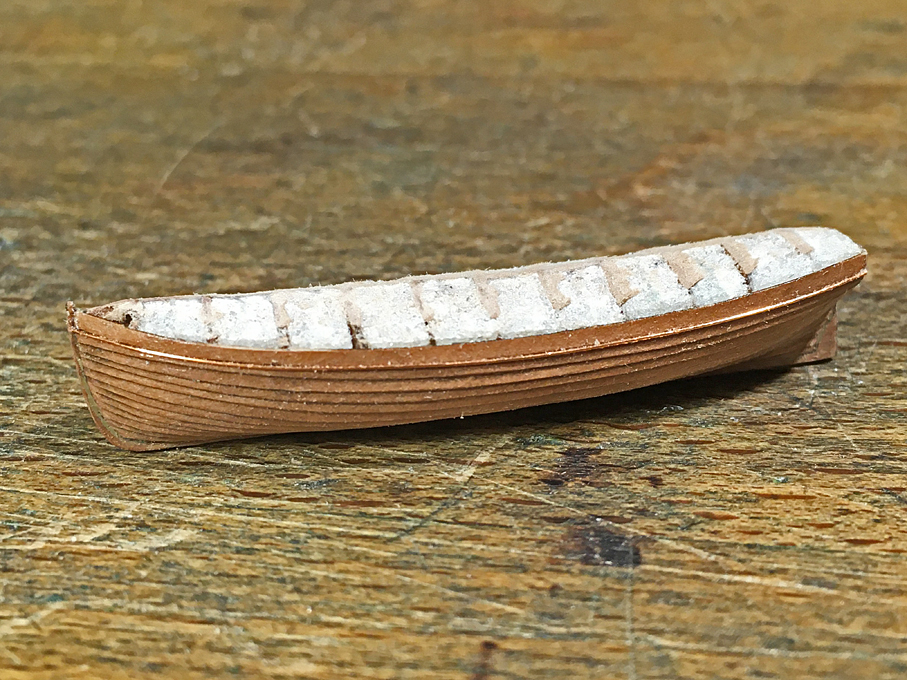
The hull with the shaped �interior�
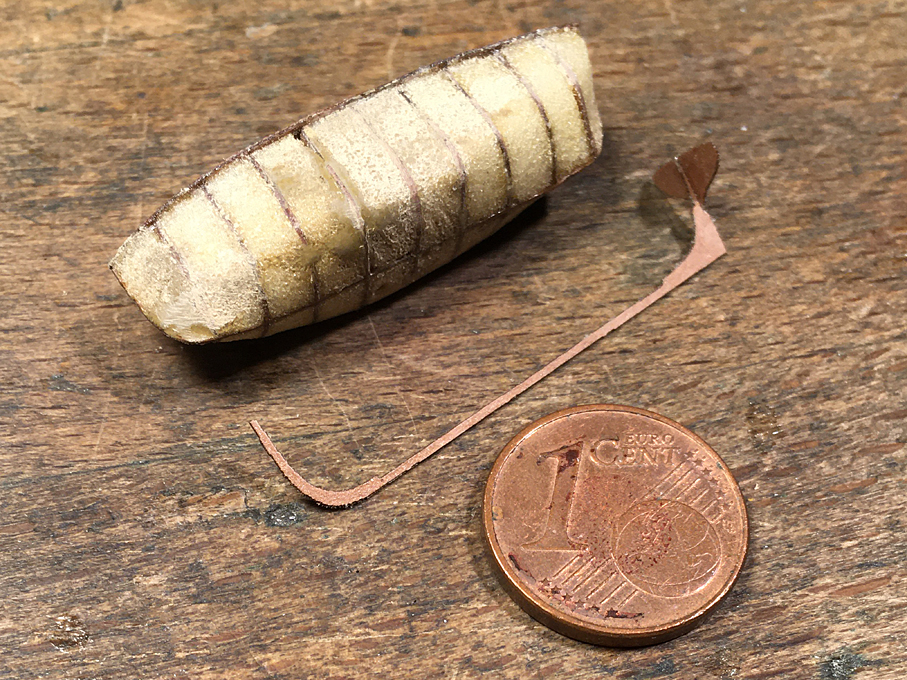
The use of toilet-paper to simulate the tarpaulin had only be moderately successful, but I remembered just in time, that a few months ago I had purchased some very light-weight (9 g/m2) Japanese silk-paper as a basis for sails.
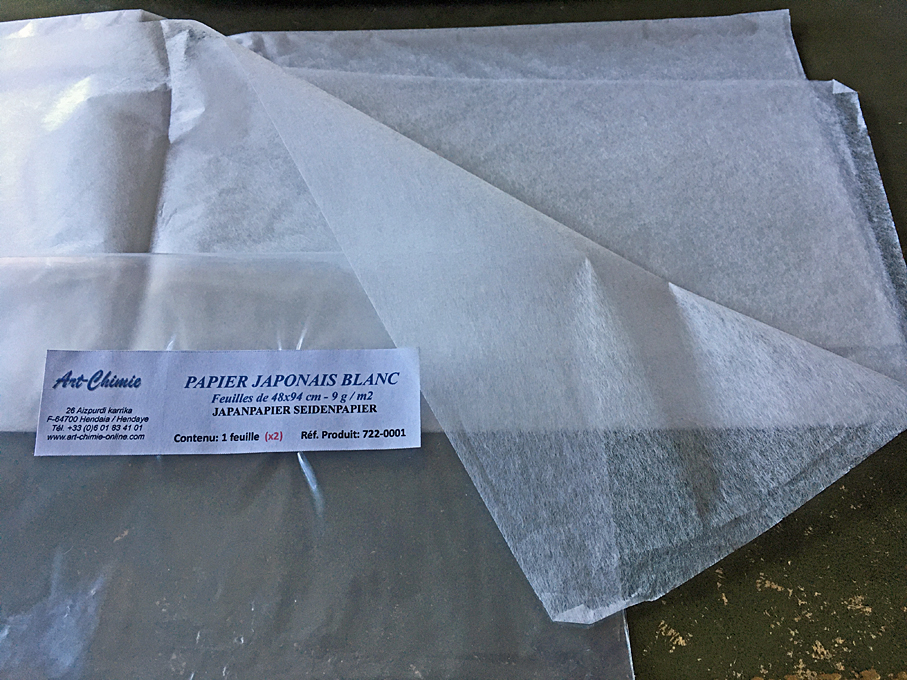
Very light-weight Japanese silk-paper
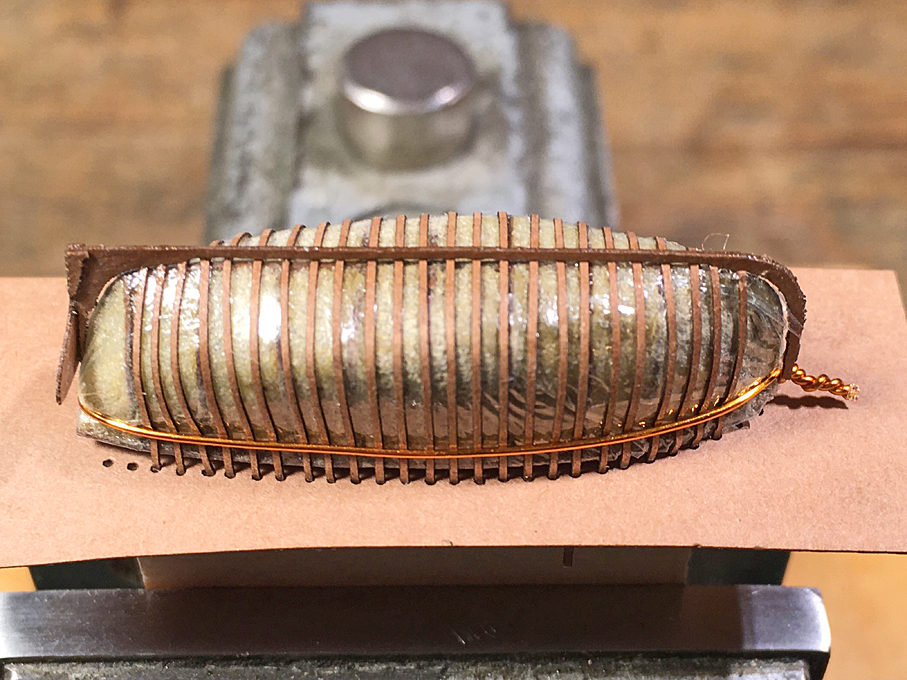
An appropriate piece was cut, draped over the boat and thoroughly wetted with zapon-varnish. It was glued in place so that it just covered the top-strake down to the rubbing strake. Once dry, it was trimmed back with a new scalpel blade to just the rubbing strake.
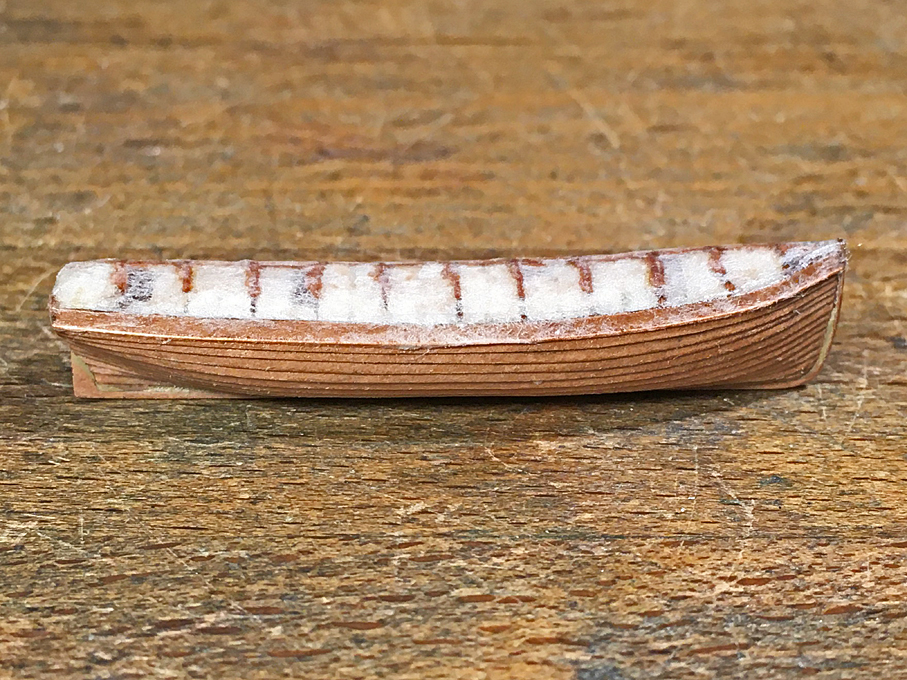
The cutter with tarpaulin in place, before painting
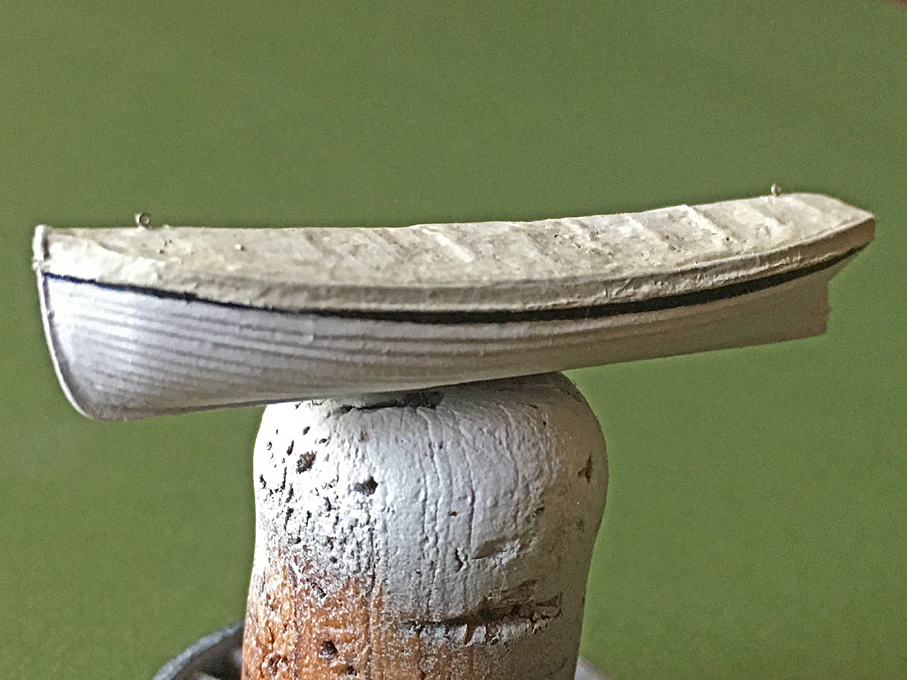
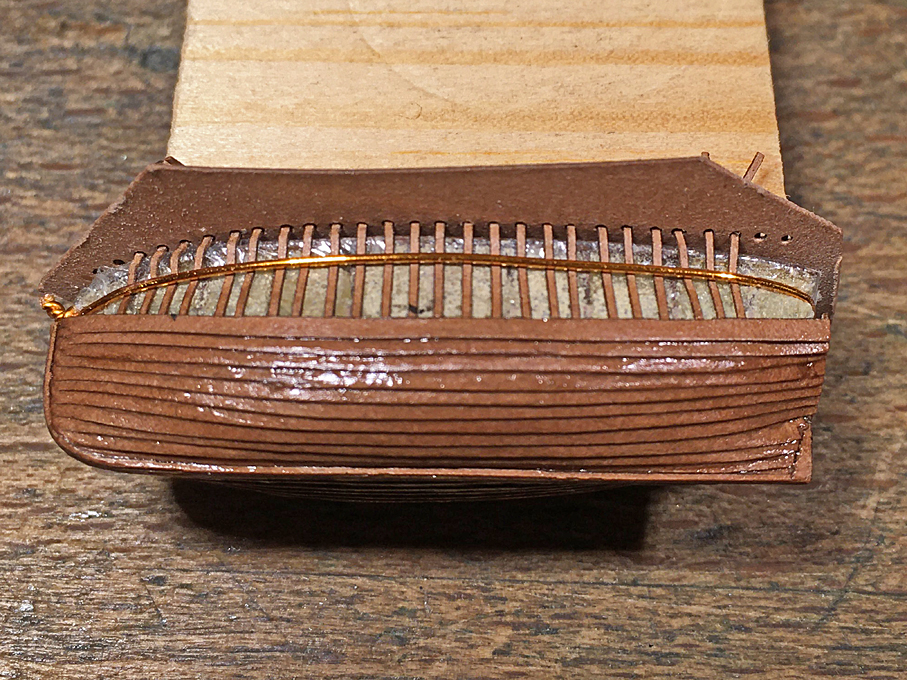
Installing the rudder while the gig was on the davits turned out to be misconception on my side, the boats were stowed with the rudder unshipped. So this time I only simulated the lower pintle with some flattened wire and a wire upright.
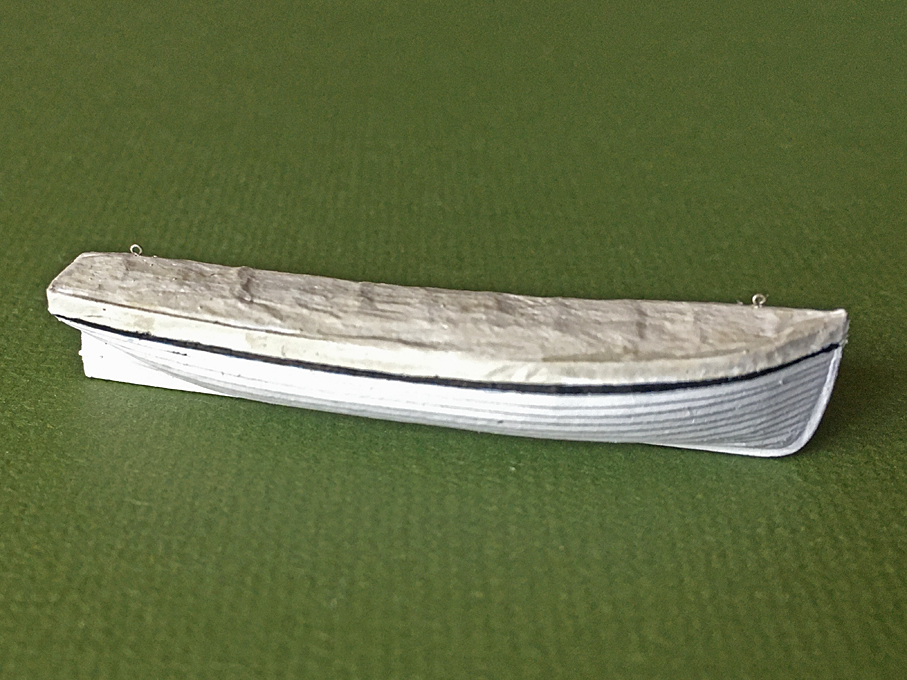
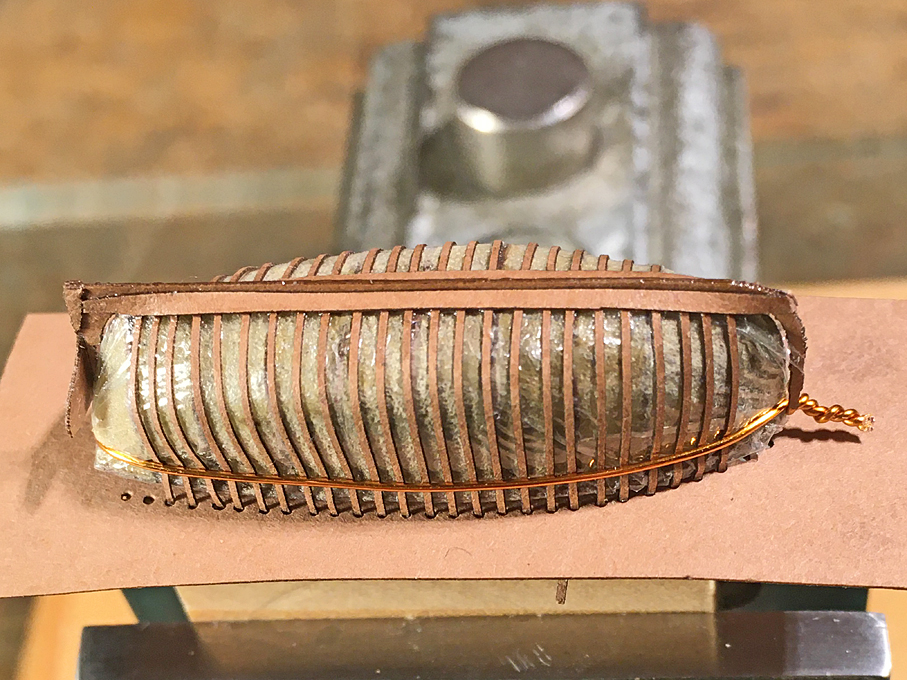
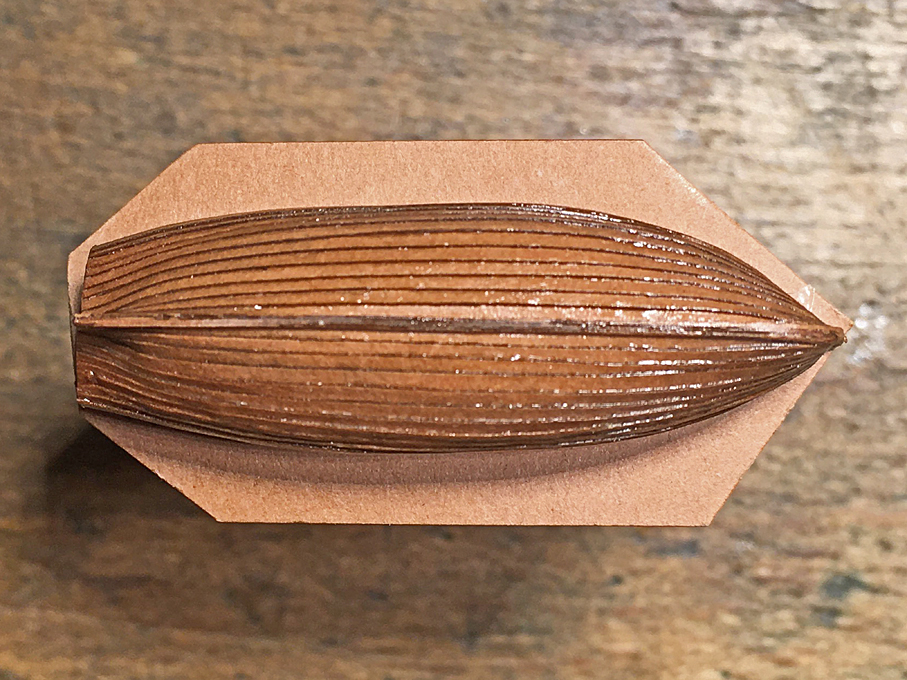
Finally, the cutter was ready for painting and was given a good coat of Vallejo model-air �white� all over.
The painted cutter
In the next step the second strake from the top was painted in black, as the regulations in force at the time demanded that the two topmost strakes to be black.
The painted cutter
The tarpaulin the was given a wash of Vallejo white with a dash of Vallejo model-air �hemp�.
Finally the two hoisting-rings made from twisted, tinned 0.2 mm copper wire were installed.
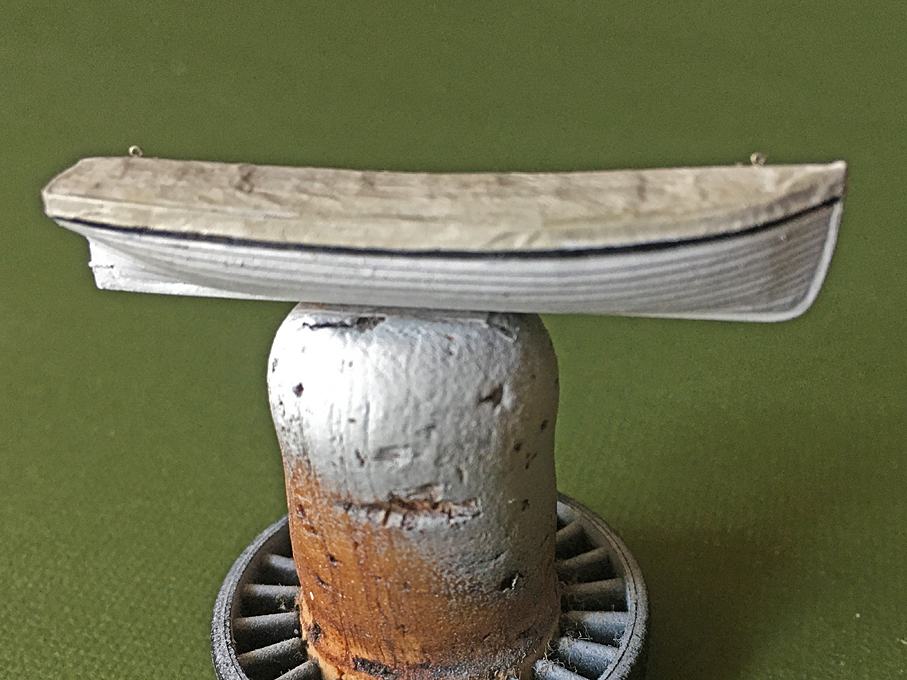
The painted cutter
To be continued ....
**************************************************************
Further completion of the cutter
The hull was now cut off the �building-board� and the infilling and the bulkheads shaped in a way I think the tarpaulin-covered sailing-gear, oars etc. which would be stowed in the boat would have looked like.
The hull with the shaped �interior�
The use of toilet-paper to simulate the tarpaulin had only be moderately successful, but I remembered just in time, that a few months ago I had purchased some very light-weight (9 g/m2) Japanese silk-paper as a basis for sails.
Very light-weight Japanese silk-paper
An appropriate piece was cut, draped over the boat and thoroughly wetted with zapon-varnish. It was glued in place so that it just covered the top-strake down to the rubbing strake. Once dry, it was trimmed back with a new scalpel blade to just the rubbing strake.
The cutter with tarpaulin in place, before painting
Installing the rudder while the gig was on the davits turned out to be misconception on my side, the boats were stowed with the rudder unshipped. So this time I only simulated the lower pintle with some flattened wire and a wire upright.
Finally, the cutter was ready for painting and was given a good coat of Vallejo model-air �white� all over.
The painted cutter
In the next step the second strake from the top was painted in black, as the regulations in force at the time demanded that the two topmost strakes to be black.
The painted cutter
The tarpaulin the was given a wash of Vallejo white with a dash of Vallejo model-air �hemp�.
Finally the two hoisting-rings made from twisted, tinned 0.2 mm copper wire were installed.
The painted cutter
To be continued ....
Eberhard
Former chairman Arbeitskreis historischer Schiffbau e.V. (German Association for Shipbuilding History)
--------------------------------------------------------------------------------------------------------------------------------------------------------------------------------------------


Former chairman Arbeitskreis historischer Schiffbau e.V. (German Association for Shipbuilding History)
--------------------------------------------------------------------------------------------------------------------------------------------------------------------------------------------
-
Fliger747
- Posts: 5068
- Joined: Wed Jan 02, 2013 1:15 am
Re: 1:160 S.M.S. WESPE Armoured Gunboat (1876)
The cutter looks very good, The "hemp" works well on the cover and looks very authentic. I used to have a similar tissue, somewhat like used covering model airplanes in the old days. It was packing in shoe boxes. I used it for the Gig on Alaska, first hand made model. Those were dyed ship measure colors rather than raw canvass. However might be good for awnings etc.
Closeup model photography always make everything look much worse than in reality, these are spectacular in the flesh!
Cheers: Tom
Closeup model photography always make everything look much worse than in reality, these are spectacular in the flesh!
Cheers: Tom
-
wefalck
- Posts: 2080
- Joined: Wed Sep 28, 2011 12:04 pm
- Location: Paris
- Contact:
Re: 1:160 S.M.S. WESPE Armoured Gunboat (1876)
Thanks, Tom.
I actually don't know, whether the boat covers were painted or oiled canvas. On photographs they look rather white, so I gather the choice of colour gives reasonably realistic impression without deciding what the material actually was.
Indeed, such silk-paper (also called silk-span in some parts of the world, though this term may also refer to silk-fabric) was used to cover model airplanes. It seems not so easy to come by these days. I still have a good supply of the lightest silk-fabric on the German market (14 g/m2) that I bought some 40 years ago. At this scale the weave is too coarse, however.
Eberhard
Former chairman Arbeitskreis historischer Schiffbau e.V. (German Association for Shipbuilding History)
--------------------------------------------------------------------------------------------------------------------------------------------------------------------------------------------
Former chairman Arbeitskreis historischer Schiffbau e.V. (German Association for Shipbuilding History)
--------------------------------------------------------------------------------------------------------------------------------------------------------------------------------------------
-
Iceman 29

- Posts: 1945
- Joined: Tue Sep 29, 2020 4:35 pm
- Location: Bretagne, France
Re: 1:160 S.M.S. WESPE Armoured Gunboat (1876)
It looks great. Not easy at this size. 
For the Japanese paper ( Papier japon ). You can find it in France, in model airplane stores online. The thickness is not indicated on the first site:
https://www.pb-modelisme.com/Matprem/li ... =6&scat=58
https://www.weymuller.fr/index.php?modc ... pier+japon
For the Japanese paper ( Papier japon ). You can find it in France, in model airplane stores online. The thickness is not indicated on the first site:
https://www.pb-modelisme.com/Matprem/li ... =6&scat=58
https://www.weymuller.fr/index.php?modc ... pier+japon
Pascal
�Battleship Bretagne 3D: https://vu.fr/FvCY
�SS Delphine 3D: https://vu.fr/NeuO
�SS Nomadic 3D: https://vu.fr/tAyL
�USS Nokomis 3D: https://vu.fr/kntC
�USS Pamanset 3D: https://vu.fr/jXGQ
�Battleship Bretagne 3D: https://vu.fr/FvCY
�SS Delphine 3D: https://vu.fr/NeuO
�SS Nomadic 3D: https://vu.fr/tAyL
�USS Nokomis 3D: https://vu.fr/kntC
�USS Pamanset 3D: https://vu.fr/jXGQ
-
wefalck
- Posts: 2080
- Joined: Wed Sep 28, 2011 12:04 pm
- Location: Paris
- Contact:
Re: 1:160 S.M.S. WESPE Armoured Gunboat (1876)
It seems that the paper in the first links comes from the US American model supplier Dumas. The second link gives the various weights in g/m2.
I got this extremely light paper from an Internet art supply house in Dept. 64 ... together with various 'chemicals' such as shellac flakes to make my own shellac solution.
I got this extremely light paper from an Internet art supply house in Dept. 64 ... together with various 'chemicals' such as shellac flakes to make my own shellac solution.
Eberhard
Former chairman Arbeitskreis historischer Schiffbau e.V. (German Association for Shipbuilding History)
--------------------------------------------------------------------------------------------------------------------------------------------------------------------------------------------
Former chairman Arbeitskreis historischer Schiffbau e.V. (German Association for Shipbuilding History)
--------------------------------------------------------------------------------------------------------------------------------------------------------------------------------------------
-
Fliger747
- Posts: 5068
- Joined: Wed Jan 02, 2013 1:15 am
Re: 1:160 S.M.S. WESPE Armoured Gunboat (1876)
This makes me smile, one is a hard core artist to make their own shellac from flakes (Lac bug shells). Using the silk paper of equivalent misting with water makes it shrink when it dries which can be useful. I hadn't thought of it before but an airbrush would be much better in misting small items than the spray bottle I used before.
Model scratch building is a small portion of a small hobby and it is interesting to read and share all the clever solutions.
Best regards: Tom
Model scratch building is a small portion of a small hobby and it is interesting to read and share all the clever solutions.
Best regards: Tom
-
Neptune

- Posts: 2453
- Joined: Sun Mar 13, 2005 11:51 am
- Location: Belgium
Re: 1:160 S.M.S. WESPE Armoured Gunboat (1876)
Great results indeed. Very sharp planking result at this scale. Love how that canvas came out, I agree with the argument that it doesn't really matter what the real cover was, as long as your model of it "looks right".
The merchant shipyard
-
marijn van gils
- Posts: 2686
- Joined: Tue Feb 06, 2007 10:24 am
- Location: Belgium
Re: 1:160 S.M.S. WESPE Armoured Gunboat (1876)
That looks great! Your experiment turned out very successful!
-
wefalck
- Posts: 2080
- Joined: Wed Sep 28, 2011 12:04 pm
- Location: Paris
- Contact:
Re: 1:160 S.M.S. WESPE Armoured Gunboat (1876)
The shipyard has been on a somewhat extended summer-shutdown, including the drawing-office (which was not quite planned so, but the heat at my abode in Spain, just made me not feel like working too much on the computer �).
Thank you very much for all encouragement that has been accumulating since the last update!
*****************
The Jolly-Boat
Rather than doing the second cutter, I am now tackling the jolly-boat. This is the smallest boat of the complement, at 6 m (= 19�8�). I am in for challenge, as I plan to build this open and fully equipped, ready to be lowered in case of man-over-board or a similar emergency.
I did not find an earlier drawing, but the drawing in the 1911 issue of the �BRIX� is quite detailed, although it is for the karweel-planked version, while I will kit out WESPE all with clinker-built boats. It appears that the frames are drawn to the inside of the planking, which is exactly what I need. The arrangements for the keel and stem-/stern-post will be somewhat different from what I did for the other boats, as the bulkheads will only act as formers.
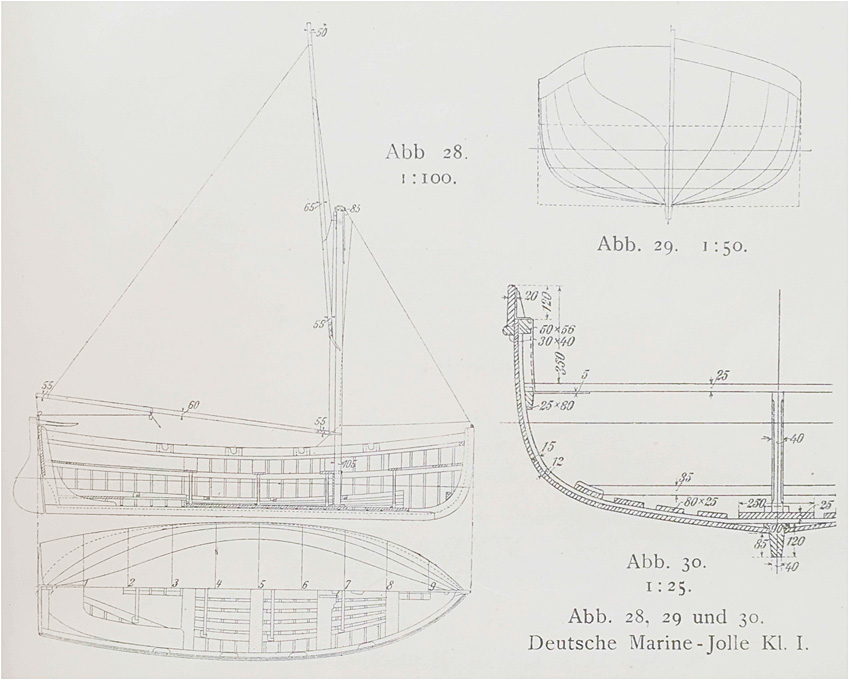
Drawing of Class 1 jolly-boat from Brix (1911)
The laser-cut framework will be infilled with hard foam (Rohacell�) as before and then covered in cling-film to prevent the frames etc. from sticking to it. Below is the laser-cutting template for the main structural components. The thin strips on the right will become the �bent-in� frames. Other parts will be drawn to fit as I am going along.
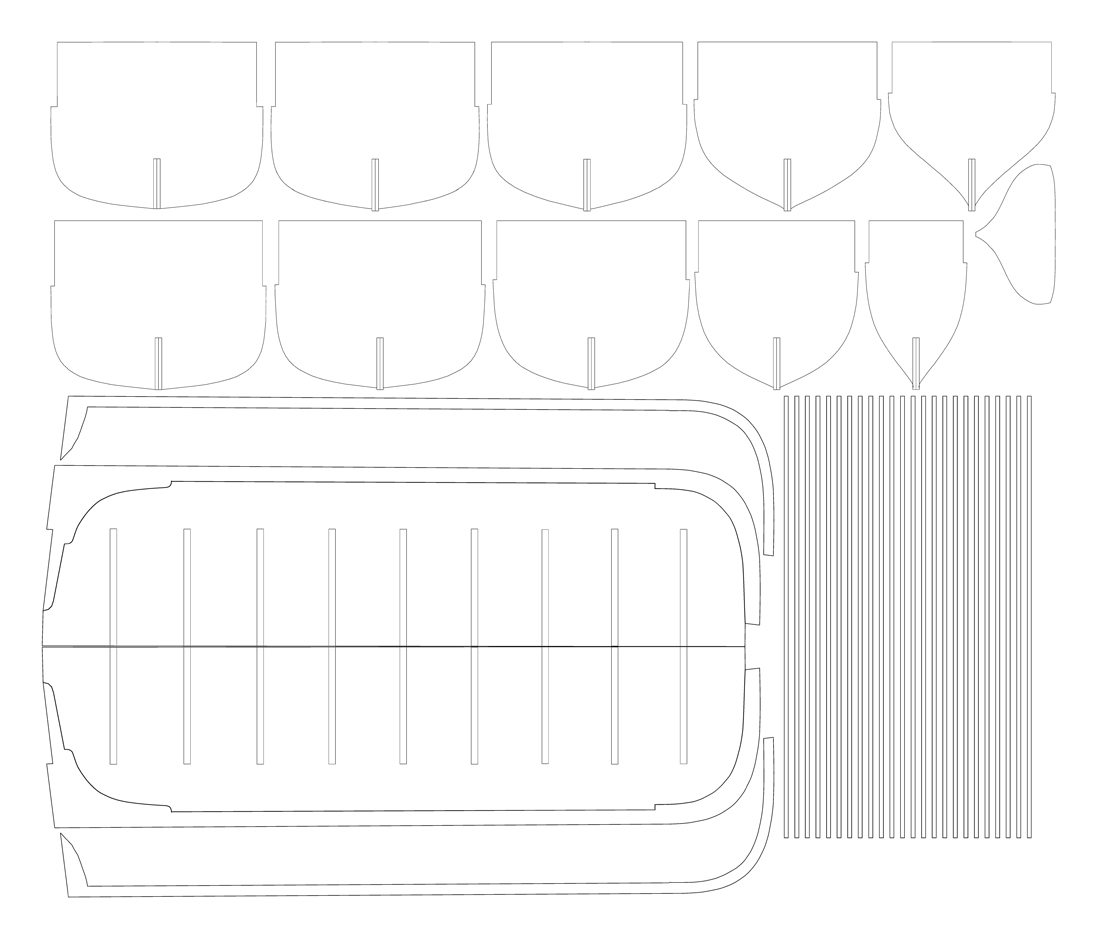
Laser-cutting templates for the formers and main structural components of the jolly-boat.
I will also need to still draw a base-board for the construction process, that has notches for the upper ends of the frames to rest in.
To be continued ....
Thank you very much for all encouragement that has been accumulating since the last update!
*****************
The Jolly-Boat
Rather than doing the second cutter, I am now tackling the jolly-boat. This is the smallest boat of the complement, at 6 m (= 19�8�). I am in for challenge, as I plan to build this open and fully equipped, ready to be lowered in case of man-over-board or a similar emergency.
I did not find an earlier drawing, but the drawing in the 1911 issue of the �BRIX� is quite detailed, although it is for the karweel-planked version, while I will kit out WESPE all with clinker-built boats. It appears that the frames are drawn to the inside of the planking, which is exactly what I need. The arrangements for the keel and stem-/stern-post will be somewhat different from what I did for the other boats, as the bulkheads will only act as formers.
Drawing of Class 1 jolly-boat from Brix (1911)
The laser-cut framework will be infilled with hard foam (Rohacell�) as before and then covered in cling-film to prevent the frames etc. from sticking to it. Below is the laser-cutting template for the main structural components. The thin strips on the right will become the �bent-in� frames. Other parts will be drawn to fit as I am going along.
Laser-cutting templates for the formers and main structural components of the jolly-boat.
I will also need to still draw a base-board for the construction process, that has notches for the upper ends of the frames to rest in.
To be continued ....
Eberhard
Former chairman Arbeitskreis historischer Schiffbau e.V. (German Association for Shipbuilding History)
--------------------------------------------------------------------------------------------------------------------------------------------------------------------------------------------
Former chairman Arbeitskreis historischer Schiffbau e.V. (German Association for Shipbuilding History)
--------------------------------------------------------------------------------------------------------------------------------------------------------------------------------------------
-
Iceman 29
- Posts: 1945
- Joined: Tue Sep 29, 2020 4:35 pm
- Location: Bretagne, France
Re: 1:160 S.M.S. WESPE Armoured Gunboat (1876)
I'm going to borrow this plan from you, I was looking for one for the battleship Bretagne. It should be suitable by modifying the bow which is straighter. The ones in front were 5 meter long. I'm going to reduce it a bit.
Can't wait to see the construction of your boat.
Can't wait to see the construction of your boat.
Pascal
�Battleship Bretagne 3D: https://vu.fr/FvCY
�SS Delphine 3D: https://vu.fr/NeuO
�SS Nomadic 3D: https://vu.fr/tAyL
�USS Nokomis 3D: https://vu.fr/kntC
�USS Pamanset 3D: https://vu.fr/jXGQ
�Battleship Bretagne 3D: https://vu.fr/FvCY
�SS Delphine 3D: https://vu.fr/NeuO
�SS Nomadic 3D: https://vu.fr/tAyL
�USS Nokomis 3D: https://vu.fr/kntC
�USS Pamanset 3D: https://vu.fr/jXGQ
-
wefalck
- Posts: 2080
- Joined: Wed Sep 28, 2011 12:04 pm
- Location: Paris
- Contact:
Re: 1:160 S.M.S. WESPE Armoured Gunboat (1876)
Apologies to all, who visited over the past three weeks this building log and found that nothing happened. Real life gets in our way quite often and also a bit of travelling for fun �
*******************
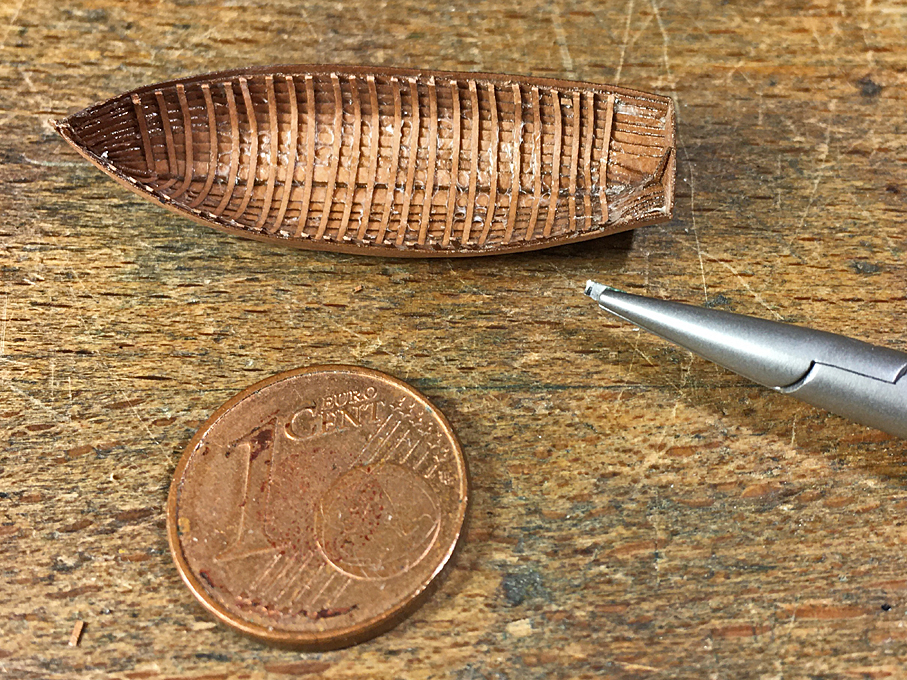
Jolly-Boat continued
The main pieces for the core over which this boat will be constructed as plank-on frame build were laser-cut from Canson-paper and assembled in the manner described previously. The spaces between the bulkheads were filled with hard acrylic foam (Rohacell�) and the foam sanded back to the bulkheads using diamond needle files. Some gaps were filled with putty and then the whole thing soaked in wood sanding-filler to provide a hard surface.
Core for the POF construction
The keel-stem combination and the transom were also cut out by laser in two copies to be stuck together to arrive at the correct thickness.
The back-bone of the jolly-boat
A base�board� for building was cut from the same paper in double and the two copies stuck together for more rigidity. This baseboard had holes laser-cut in for the bent frames in order to give the exact spacing as per plan.
The core then was covered in a layer of cling-film to prevent the lacquer to be used during the construction from sticking to the core (hopefully). Using again very thin double-sided mounting tape, the core was stuck to the baseboard.
The bent frames were cut using the laser to the required width of 0.2 mm which translates at 1:160 scale to a width of 32 mm. They should be only 0.1 mm thick (15 mm in the original), but the paper is a tad thicker. These frames were inserted into the pre-cut holes and aligned carefully. Then the keel-stem-transom assembly was lacquered into place. It should be noted that there are a couple of cant-frames that but against the keel/stem, rather than running under it.
The framed structure
It should be noted that this is the reverse construction order compared to the original. The clinker-built boat would be built over a couple of templates, with the planks going in first and the frames bent in afterwards. I chose this method, because having the frames in place is likely to make a stronger shell, when trying to remove it from the core.
The garboard-plank installed
On any clinker-built boat the garboard-plank is the most difficult to install due to its torsion and bending. Here it was no exception. It needed a fair amount of coercion, but it looks promising.
I only hope, that I will be able to remove the shell from the core in the end �
To be continued ....
*******************
Jolly-Boat continued
The main pieces for the core over which this boat will be constructed as plank-on frame build were laser-cut from Canson-paper and assembled in the manner described previously. The spaces between the bulkheads were filled with hard acrylic foam (Rohacell�) and the foam sanded back to the bulkheads using diamond needle files. Some gaps were filled with putty and then the whole thing soaked in wood sanding-filler to provide a hard surface.
Core for the POF construction
The keel-stem combination and the transom were also cut out by laser in two copies to be stuck together to arrive at the correct thickness.
The back-bone of the jolly-boat
A base�board� for building was cut from the same paper in double and the two copies stuck together for more rigidity. This baseboard had holes laser-cut in for the bent frames in order to give the exact spacing as per plan.
The core then was covered in a layer of cling-film to prevent the lacquer to be used during the construction from sticking to the core (hopefully). Using again very thin double-sided mounting tape, the core was stuck to the baseboard.
The bent frames were cut using the laser to the required width of 0.2 mm which translates at 1:160 scale to a width of 32 mm. They should be only 0.1 mm thick (15 mm in the original), but the paper is a tad thicker. These frames were inserted into the pre-cut holes and aligned carefully. Then the keel-stem-transom assembly was lacquered into place. It should be noted that there are a couple of cant-frames that but against the keel/stem, rather than running under it.
The framed structure
It should be noted that this is the reverse construction order compared to the original. The clinker-built boat would be built over a couple of templates, with the planks going in first and the frames bent in afterwards. I chose this method, because having the frames in place is likely to make a stronger shell, when trying to remove it from the core.
The garboard-plank installed
On any clinker-built boat the garboard-plank is the most difficult to install due to its torsion and bending. Here it was no exception. It needed a fair amount of coercion, but it looks promising.
I only hope, that I will be able to remove the shell from the core in the end �
To be continued ....
Last edited by wefalck on Wed Oct 05, 2022 3:00 pm, edited 1 time in total.
Eberhard
Former chairman Arbeitskreis historischer Schiffbau e.V. (German Association for Shipbuilding History)
--------------------------------------------------------------------------------------------------------------------------------------------------------------------------------------------
Former chairman Arbeitskreis historischer Schiffbau e.V. (German Association for Shipbuilding History)
--------------------------------------------------------------------------------------------------------------------------------------------------------------------------------------------
-
Iceman 29
- Posts: 1945
- Joined: Tue Sep 29, 2020 4:35 pm
- Location: Bretagne, France
Re: 1:160 S.M.S. WESPE Armoured Gunboat (1876)
A damn fine job..
Pascal
�Battleship Bretagne 3D: https://vu.fr/FvCY
�SS Delphine 3D: https://vu.fr/NeuO
�SS Nomadic 3D: https://vu.fr/tAyL
�USS Nokomis 3D: https://vu.fr/kntC
�USS Pamanset 3D: https://vu.fr/jXGQ
�Battleship Bretagne 3D: https://vu.fr/FvCY
�SS Delphine 3D: https://vu.fr/NeuO
�SS Nomadic 3D: https://vu.fr/tAyL
�USS Nokomis 3D: https://vu.fr/kntC
�USS Pamanset 3D: https://vu.fr/jXGQ
-
Fliger747
- Posts: 5068
- Joined: Wed Jan 02, 2013 1:15 am
Re: 1:160 S.M.S. WESPE Armoured Gunboat (1876)
Innovative construction technique for a challenging work. Such challenges and successful solving provide great satisfaction in miniature ship construction.
Best regards: Tom
Best regards: Tom
-
wefalck
- Posts: 2080
- Joined: Wed Sep 28, 2011 12:04 pm
- Location: Paris
- Contact:
Re: 1:160 S.M.S. WESPE Armoured Gunboat (1876)
Thanks!
I fact, the technique is not quite so new, it can be found in Underhill's 'Plank-on-Frame Construction' for instance. I am just using some different materials and new cutting technology.
I fact, the technique is not quite so new, it can be found in Underhill's 'Plank-on-Frame Construction' for instance. I am just using some different materials and new cutting technology.
Eberhard
Former chairman Arbeitskreis historischer Schiffbau e.V. (German Association for Shipbuilding History)
--------------------------------------------------------------------------------------------------------------------------------------------------------------------------------------------
Former chairman Arbeitskreis historischer Schiffbau e.V. (German Association for Shipbuilding History)
--------------------------------------------------------------------------------------------------------------------------------------------------------------------------------------------
-
wefalck
- Posts: 2080
- Joined: Wed Sep 28, 2011 12:04 pm
- Location: Paris
- Contact:
Re: 1:160 S.M.S. WESPE Armoured Gunboat (1876)
Jolly-Boat continued 2
Just a short update to show that the planking as such is finished. I am not 100% satisfied with my work. The plank widths could/should have been more equal, but I somehow struggled with the shape of this boat more than with the others. Also, it was easier to glue the planks to the solid core than just to the framework and the edge of the plank underneath.
Jolly-boat starboard side � overall length is 36 mm
After the planks were on, a doubling for the keel and stem was attached to both side, kind of faking a landing of the planks in a rabbet.
Jolly-boat port side
There are several little gaps and other imperfections that need to be touched up with a bit of putty, but I will do this only after having separated (hopefully) the boat from the former. The putty is quite brittle and my fall out during the procedure.
Looking down onto the planking
Once the boat has been released and the frames trimmed back, the wash-strake can be sanded to its final width and shape. Some additional (cant)frames will have to go in before the further fitting out can begin.
To be continued ....
Eberhard
Former chairman Arbeitskreis historischer Schiffbau e.V. (German Association for Shipbuilding History)
--------------------------------------------------------------------------------------------------------------------------------------------------------------------------------------------
Former chairman Arbeitskreis historischer Schiffbau e.V. (German Association for Shipbuilding History)
--------------------------------------------------------------------------------------------------------------------------------------------------------------------------------------------
-
Iceman 29
- Posts: 1945
- Joined: Tue Sep 29, 2020 4:35 pm
- Location: Bretagne, France
Re: 1:160 S.M.S. WESPE Armoured Gunboat (1876)
Excellent and delicate method which is crowned with success.
Pascal
�Battleship Bretagne 3D: https://vu.fr/FvCY
�SS Delphine 3D: https://vu.fr/NeuO
�SS Nomadic 3D: https://vu.fr/tAyL
�USS Nokomis 3D: https://vu.fr/kntC
�USS Pamanset 3D: https://vu.fr/jXGQ
�Battleship Bretagne 3D: https://vu.fr/FvCY
�SS Delphine 3D: https://vu.fr/NeuO
�SS Nomadic 3D: https://vu.fr/tAyL
�USS Nokomis 3D: https://vu.fr/kntC
�USS Pamanset 3D: https://vu.fr/jXGQ
-
Fliger747
- Posts: 5068
- Joined: Wed Jan 02, 2013 1:15 am
Re: 1:160 S.M.S. WESPE Armoured Gunboat (1876)
Almost clever way of working achieve your construction. Most real items have been achieved by subtractive construction, removing material to achieve a shape of a board or frame and the assembling these to an object. 3D is beginning to creep into actual modern processes, but mostly ships we will model will be assembled of parts that were cut down to correct dimensions and then assembled. There is something satisfying about working in this way, creating your miniature boards and frames.
Best regards: Tom
Best regards: Tom
-
wefalck
- Posts: 2080
- Joined: Wed Sep 28, 2011 12:04 pm
- Location: Paris
- Contact:
Re: 1:160 S.M.S. WESPE Armoured Gunboat (1876)
Thanks for the kind words. And yes, it gives you the feeling of working on a 'real' boat when putting together the keel, stem, frames and the planking, although 3D-printing might give a crisper result.
**********************
Jolly-Boat continued 3
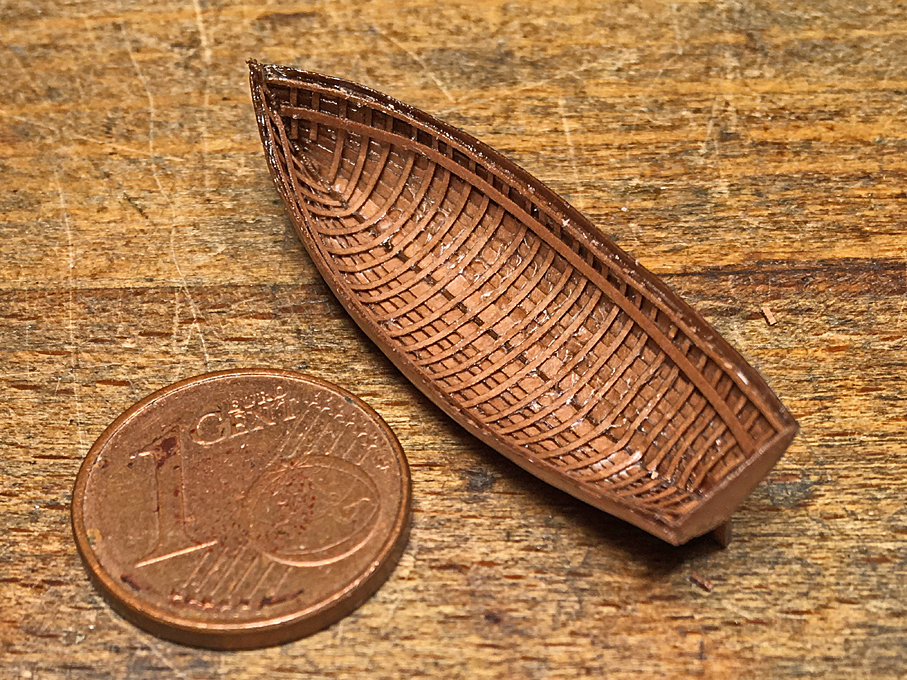
The moment of truth: I removed the copper wire and cut the extended frames with my micro-scissors.
Cutting the extended frames with micro-scissors
With some cautious rocking of the shell, it came off cleanly.
The result is a quite strong hull with the typical exterior and interior look of a clinker-built boat. Unfortunately, some of the frames have moved a bit, but with a drop of acetone this can be fixed.
Hull begins to detach from the former
I noticed, that the frames did not glue to the wash-strake, which is actually good, because on the prototype they did not continue to this strake, but ended under an in-whale. I will have find a way to cleanly cut the frames at the appropriate height and then continue with installing the cant-frames, in-whales, floor-boards, seats, etc.
Hull successfully taken off the former
I am actually wondering now, whether I could have assembled the hull in traditional clinker-fashion, with �edge-fastening� the strakes only and then inserted the frames prototype-fashion afterwards. On the other hand, gluing the stem-keel-combination to the tied-down frames gave a rigid back-bone to work from. So this was probably the best way.
To be continued ....
**********************
Jolly-Boat continued 3
The moment of truth: I removed the copper wire and cut the extended frames with my micro-scissors.
Cutting the extended frames with micro-scissors
With some cautious rocking of the shell, it came off cleanly.
The result is a quite strong hull with the typical exterior and interior look of a clinker-built boat. Unfortunately, some of the frames have moved a bit, but with a drop of acetone this can be fixed.
Hull begins to detach from the former
I noticed, that the frames did not glue to the wash-strake, which is actually good, because on the prototype they did not continue to this strake, but ended under an in-whale. I will have find a way to cleanly cut the frames at the appropriate height and then continue with installing the cant-frames, in-whales, floor-boards, seats, etc.
Hull successfully taken off the former
I am actually wondering now, whether I could have assembled the hull in traditional clinker-fashion, with �edge-fastening� the strakes only and then inserted the frames prototype-fashion afterwards. On the other hand, gluing the stem-keel-combination to the tied-down frames gave a rigid back-bone to work from. So this was probably the best way.
To be continued ....
Eberhard
Former chairman Arbeitskreis historischer Schiffbau e.V. (German Association for Shipbuilding History)
--------------------------------------------------------------------------------------------------------------------------------------------------------------------------------------------
Former chairman Arbeitskreis historischer Schiffbau e.V. (German Association for Shipbuilding History)
--------------------------------------------------------------------------------------------------------------------------------------------------------------------------------------------
-
wefalck
- Posts: 2080
- Joined: Wed Sep 28, 2011 12:04 pm
- Location: Paris
- Contact:
Re: 1:160 S.M.S. WESPE Armoured Gunboat (1876)
Thanks to all the numerous unknown people who visited this project!
**********************************************************************
Jolly-Boat continued 4
After some deliberations, I decided to cut the top of the frames back to gunwale level using a sort of micro-scalpel made from a piece of razor-blade just under 1 mm wide and held in a holder meant for that purposes (they come from the biological/medical realm).
Hull with frames cut back to gunwale level
Next went in the gunwale, laser-cut strips of paper 0.35 mm wide and 0.12 mm thick, and the inwales on which the seats rest, 0.5 mm x 0.12 mm. These were all lacquered in.

Hull with gunwales and inwales
On the prototype the floorboard, of course, were individual planks, but aligning them properly would have been rather difficult, so I cheated a bit and joined them. This will be barely visible under the seats eventually.
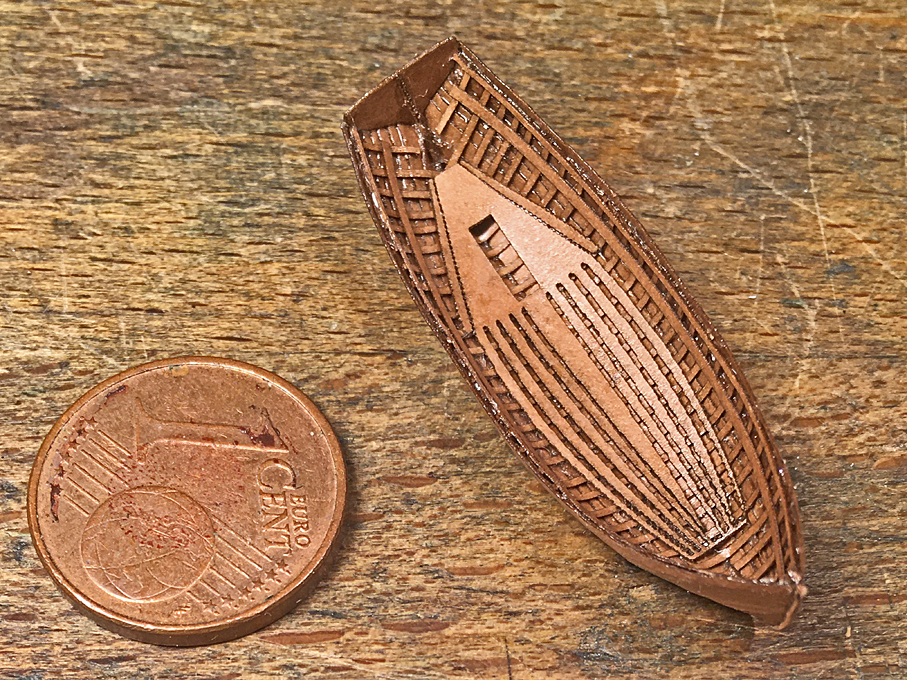
Floorboards installed in the hull
As my building was not as precise to the drawings, as I would have wished, the stern-sheets and the little platform in the bow required a bit of trial and error, and re-drawing for the laser-cutting. Still a bit of sanding to fit was required.
Sanding paper is not that much fun, but re-soaking it in lacquer after a few strokes with a diamond-file keeps fraying under control.
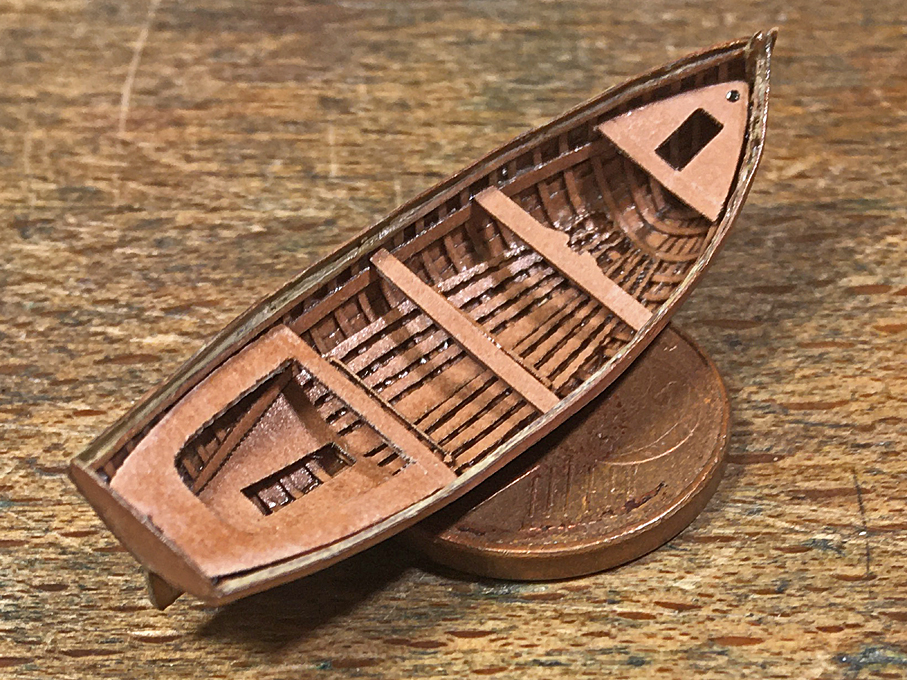
Stern-sheets, rowing seats and bow-platform installed
I also laser-cut some foot-rests for the rowers � these parts are double layers of paper, with the actual rest about 0.2 mm x 0.2 mm in cross-section
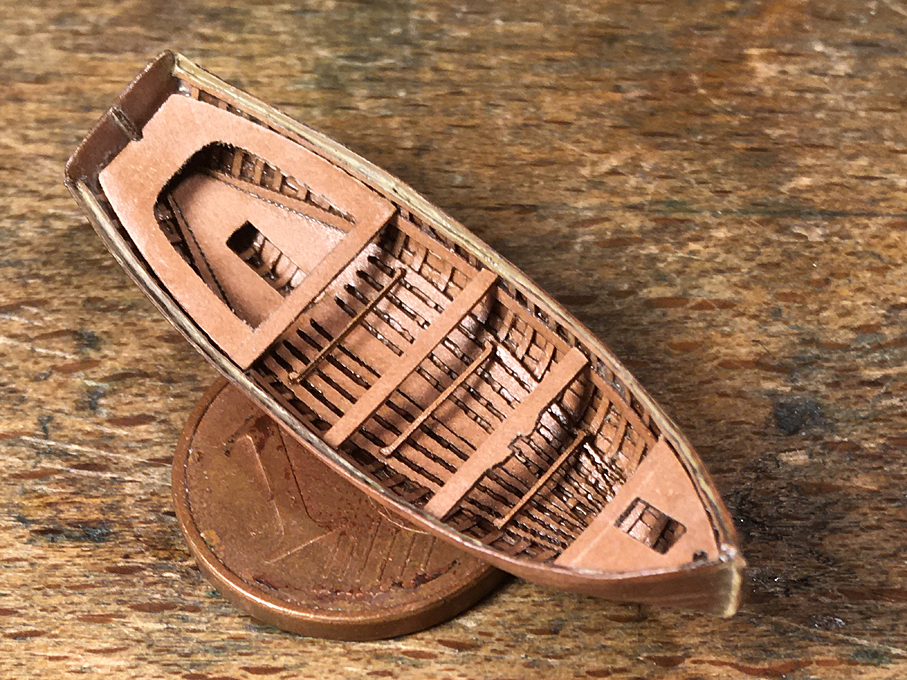
The footrests for the rowers are visible just before the rowing seat behind
This concludes the main structural parts, but a lot of small bits and pieces need to be done.
To be continued ....
**********************************************************************
Jolly-Boat continued 4
After some deliberations, I decided to cut the top of the frames back to gunwale level using a sort of micro-scalpel made from a piece of razor-blade just under 1 mm wide and held in a holder meant for that purposes (they come from the biological/medical realm).
Hull with frames cut back to gunwale level
Next went in the gunwale, laser-cut strips of paper 0.35 mm wide and 0.12 mm thick, and the inwales on which the seats rest, 0.5 mm x 0.12 mm. These were all lacquered in.
Hull with gunwales and inwales
On the prototype the floorboard, of course, were individual planks, but aligning them properly would have been rather difficult, so I cheated a bit and joined them. This will be barely visible under the seats eventually.
Floorboards installed in the hull
As my building was not as precise to the drawings, as I would have wished, the stern-sheets and the little platform in the bow required a bit of trial and error, and re-drawing for the laser-cutting. Still a bit of sanding to fit was required.
Sanding paper is not that much fun, but re-soaking it in lacquer after a few strokes with a diamond-file keeps fraying under control.
Stern-sheets, rowing seats and bow-platform installed
I also laser-cut some foot-rests for the rowers � these parts are double layers of paper, with the actual rest about 0.2 mm x 0.2 mm in cross-section
The footrests for the rowers are visible just before the rowing seat behind
This concludes the main structural parts, but a lot of small bits and pieces need to be done.
To be continued ....
Eberhard
Former chairman Arbeitskreis historischer Schiffbau e.V. (German Association for Shipbuilding History)
--------------------------------------------------------------------------------------------------------------------------------------------------------------------------------------------
Former chairman Arbeitskreis historischer Schiffbau e.V. (German Association for Shipbuilding History)
--------------------------------------------------------------------------------------------------------------------------------------------------------------------------------------------