Page 15 of 18
Re: 3D printing
Posted: Thu Jun 01, 2023 9:20 pm
by DrPR
Hank,
I'll be watching to see how this new machine works for you. I have been happy with my basic Anycubic Photon Mono. And Chitubox works for me.
But it would be nice to step up into the big league!
Phil
Re: 3D printing
Posted: Thu Jun 01, 2023 9:27 pm
by BB62vet
DrPR wrote:Hank,
I'll be watching to see how this new machine works for you. I have been happy with my basic Anycubic Photon Mono. And Chitubox works for me.
But it would be nice to step up into the big league!
Phil
Phil - Great to hear from you!! Yes, this machine is quite a bear - seems to be totally quality built - all metal construction (unlike the Ph Sonic Printers being plastic, etc.) - I think the basic printer weighs in the 30+/- lb range? Anyhow, I DID get it unboxed tonight -
I'm in my office now and will print out the manual and over the next few days, get it up and running. I just spoke w/Tom at his Snow Fortress near Fairbanks and we exchanged info/notes/settings etc. for me to get started.
Yes, I think we all agree that this is still an art and the science will come later - but, I also think fun and an educational experience to find ways to overcome obstacles.
Later,
Hank
Re: 3D printing
Posted: Sat Jun 03, 2023 7:43 am
by BB62vet
OK, so I put the follow up over on my A/C Crane thread - My Bad!! - As of last night, here is the new printer -
It's all ready for loading the resin and making a 1st test print - maybe today, maybe tomorrow - depends on other activities that The Admiral has posted on the POD....

Hank
Re: 3D printing
Posted: Sat Jun 03, 2023 2:57 pm
by Iceman 29
Excellent choice, Hank.

Re: 3D printing
Posted: Sun Jun 04, 2023 11:24 pm
by BB62vet
Iceman 29 wrote:Excellent choice, Hank.
Thanks, Pascal - appreciate you chiming in!!!
I've done two print runs today - both with mixed results. So, I'm adjusting the settings in Chitubox to take these issues into account. Also talked w/Tom re. his settings for the same resin and then making more adjustments. I was surprised at one of my 1/200 scale parts - ALL the minute details came out nice and clean - I think this is partially due to the 6K resolution vs my older printer. Just a guess!!
Hank
Re: 3D printing
Posted: Mon Jun 05, 2023 1:02 pm
by Fliger747
Hank:
Should work well once you get your settings and supports dialed in. Just curious, has anyone invested in the "Pro" version of Chitubox? Does this actually have magic capabilities we can't do without?
Cheers: Tom
Re: 3D printing
Posted: Mon Jun 05, 2023 1:11 pm
by BB62vet
Fliger747 wrote:Hank:
Should work well once you get your settings and supports dialed in. Just curious, has anyone invested in the "Pro" version of Chitubox? Does this actually have magic capabilities we can't do without?
Cheers: Tom
Tom,
Yes, I've got the a/c crane now printing at 1:96 and 1:200 (I think
) - we'll see around 6:30 PM as to whether these settings are working as they did with the morning print run - all items came out very nice and are drying under the fan. I do thank you for your input on getting these settings figured out.
As for Chitubox Pro - I don't know, and don't feel the need at this point to pay to find out

- the free version works ok, so why tinker with the unknown?
Hank
Re: 3D printing
Posted: Tue Jun 06, 2023 1:20 pm
by NavyShooter
Looks like you've got a fancy new toy to learn and play with!
Enjoy!
I'm hammering out a 1/144 Titanic on my FDM Prusa, and have another project related to recent wild-fires here in Nova Scotia that's puttering along on my other printer.
Re: 3D printing
Posted: Tue Jun 06, 2023 3:35 pm
by BB62vet
NavyShooter wrote:Looks like you've got a fancy new toy to learn and play with!
Enjoy!
I'm hammering out a 1/144 Titanic on my FDM Prusa, and have another project related to recent wild-fires here in Nova Scotia that's puttering along on my other printer.
Brad,
Thanks - so far, so good. FYI - v.5 of DMS appears to have gone belly up today. The powers that be asked for a Username/PW and then nothing....

Of course, I had already downloaded v.6 so I'm using that version now. Just so you are aware...

Hank
Re: 3D printing
Posted: Tue Jun 06, 2023 5:37 pm
by Fliger747
Same here on DSM V5... went TU (Totally unusable). So far not as happy with V6 but there must be something better about it, as yet to be discovered. Back in the day with Flight Sim FS9 one needed the #4 disc installed in the drive for it to work. Eventually these disks went bad and someone provided a #4 disk hack.
Happy D Day to all!
Re: 3D printing
Posted: Sat Jul 08, 2023 9:44 am
by BB62vet
Recently I've had issues with the larger scale FC director body parts not curing properly and liquid resin still remaining trapped inside (due to poor or unthought out desisgn on my part!). So, I am going back and redesigning the director body as well as the barbette or director tower that the director resides on. In doing so, I'm trying to make these parts as hollow as possible to allow for drainage of liquid resin from the interiors of these parts.
Mk. 38 director - this worked out fairly well as I had designed the body hollow from the start. At 1/96 scale or thereabouts, I think 1mm to 1.5 mm in thickness is enough to make the part strong while using internal bracing for structural strength. The only real issues with this director were in the arms and I've since gone back and hollowed them out and after curing/drying, etc. will fill those in with putty or other material to close up the bottom of the arms.
Mk. 34 director - I've had drying/curing issues with this part as well as the supporting barbette - since then I've corrected the barbette and now only have minor issues with the external handrails printing and will make adjustments to those next -
This shows the barbette with a basically hollowed out interior. The director body is another story - I have the outer mounting ring corrected, but still have to work on the body of the director without losing any of the details I've already created. This may require a new file and starting with the body of the director, getting it corrected (hollowed out) and then adding back the detailed parts from the original design. Time consuming, but doable and probably the better way to address this. Here's the underside of the director body at present -
This will probably be a two or three stage process to ensure I don't lose anything in the rebuild. Proper drainage during printing is essential to leave the part without any uncured resin inside and this was something that somehow I had forgotten to follow in the design process.
As for the drying/curing end of things my current small turntable and lamp may need upgrading. The lamp works fine, but without an enclosure, UV light is not concentrated in one direction. I'm considering one of the commercial curing boxes w/UV lites & timer. Still under review.
Hank
Re: 3D printing
Posted: Sat Jul 08, 2023 11:53 pm
by DrPR
Hank,
Chitubox "hollow" function. I have taken the time to hollow out some of the larger objects that I printed. But then I learned of the "Hollow" function. You can define what wall thickness you want. It does a good job and can leave an "Infill Structure" internal lattice for support. You need to look at some tutorials to learn about the types of infill structures. I use the free version and it offers only the "Grid3D" option. This is a rectangular grid of parts that occupies something like 1/4 to 1/3 the interior volume. It is adequate for the job.
After hollowing the object you can use "Dig Hole" function to make holes through the walls to the interior so resin can drain. You specify the shape, size and depth of the hole.
This is a LOT easier than trying to hollow out the interior of complex shape objects!!!!
I have had no trouble draining and rinsing uncured resin from the interiors of a Mk 37 director, the director barbette, a Mk 7 Talos missile launcher and launcher arms (all 1:96 scale).
****
Curing enclosure. I used an ordinary cardboard box for my curing enclosure. I cut an opening in one end to hold the UV lamp. Then I lined all sides with aluminum foil with the shiny side out. A small light powered turntable sits in the bottom of the box. I get good all around curing with about a 5 minute exposure for thin objects, and about eight minutes for thick solid objects.
The light is a 20 Watt ("200 Watt equivalent") unit with 20 UV LEDs.
Phil
Re: 3D printing
Posted: Sun Jul 09, 2023 10:17 am
by BB62vet
Phil,
Thanks so much for the "knock on the head" regarding those additional features of Chitubox. I have never played around with those, but will NOW!! Today's a t-stormy day and good for experimenting on the computer!!
I'll see what I can achieve with the Mk. 34 director as that is the one that's giving me the most problems.
As for the curing box, I did order one of the available items on Amazon and will see how it performs. My current (little) turntable is just about worn out from use and a larger one (which is included in the curing box kit) was next to be replaced. Larger parts just about forced it to a complete stop, so time for upgrade!
Once again, I appreciate your timely input.
Hank
Re: 3D printing
Posted: Sun Jul 09, 2023 2:10 pm
by Fliger747
I used the hollow function to clean out the insides of the Hull for Whitehurst, it seemed to work well. However considerable washing of the interior was necessary through the holes, some small ones at the keel lined larger ones where the hull blocks joined.
The SL Radar unit (a dome of sorts) for Whitehurst split and was threatening to leak resin so I removed it and re designed and printed it hollow last night. That is so far the only part I have had such an issue with and one that took some time to come to light.
Re: 3D printing
Posted: Thu Jul 20, 2023 3:26 pm
by Iceman 29
Sorry Hank, there are my setting:
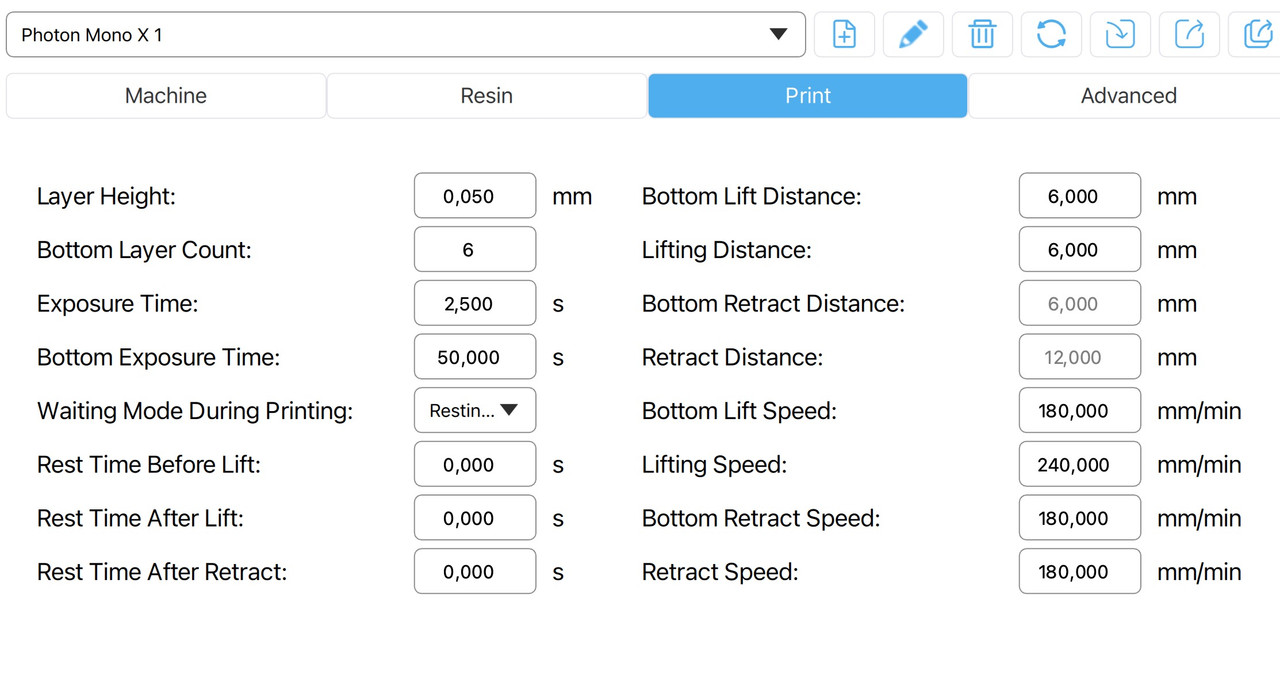
Re: 3D printing
Posted: Fri Jul 21, 2023 7:35 am
by BB62vet
Pascal,
Thanks - much appreciated. I will get my queue of print files sliced with these settings and see what happens!
Hank
Re: 3D printing
Posted: Fri Jul 21, 2023 3:51 pm
by Iceman 29
My exposure time is longer than normal because of the protective film on the screen.
Re: 3D printing
Posted: Fri Jul 21, 2023 5:56 pm
by BB62vet
Iceman 29 wrote:My exposure time is longer than normal because of the protective film on the screen.
Thanks, Pascal - that makes sense. I also have that protective film over the LCD screen.
Hank
Re: 3D printing
Posted: Sun Jul 23, 2023 11:30 am
by Fliger747
In the way of printing failures I recently had a HON3 tank car split. These are a but hard to wash inside as well as necessary, so perhaps that is the issue. However another possibility is I weighted the car with fine lead shot and dribbled thin CA in there to stabilize it.. The inside of the car was slightly sticky?
Re: 3D printing
Posted: Sun Jul 23, 2023 5:44 pm
by BB62vet
Looks like we're on the same train (printing failures!) -
After 3 print runs of various parts, I'm not pleased with the results using Elegoo ABS-Like Gray resin. Maybe it's that the settings still aren't correct, I don't know. But what HAS printed doesn't have the high level of detail I was getting with the old Phrozen ABS-Like Rapid Black resin. I've also noted that when I have 3 or 4 of the same items on the print run, only one or two will print; the others drop off the build platform and into the vat - a waste of time & resin. And I even increased the normal exposure time to 3 seconds and decreased the layer height to 0.040mm - still made no difference.
So, tomorrow the vat gets cleaned out and I try the Any Cubic ABS-Like Black Resin and see how that performs. I've also adjusted the exposure time on it from 1.6 seconds to 2 seconds to see if that makes a difference.
Once again, perhaps someday there will be a chart where you can find general settings info for most printers and most commonly used resins all in one place!
Hank