Page 16 of 21
Re: 1:160 S.M.S. WESPE Armoured Gunboat (1876)
Posted: Fri Oct 21, 2022 2:06 am
by Maarten Sch�nfeld
Hi Wefalck,
I missed out on the latter part of you building the boats, for some reason I didn't receive any automated updates anymore although I subscribed on your build. Annoying feature of the website...
But enough chagrin! Your boats are really marvellous! Much. much better than I've ever mastered myself. Your Canson paper building technique leaves me in awe...
Re: 1:160 S.M.S. WESPE Armoured Gunboat (1876)
Posted: Fri Oct 21, 2022 12:17 pm
by JIM BAUMANN
Oh wow!!
like Maarten--I must have once neglected to follow up a notification ( the system drops you after that ...)=! argghh!
My word--you reaaaallly have been very busy-- the wee boats do look most splendid !

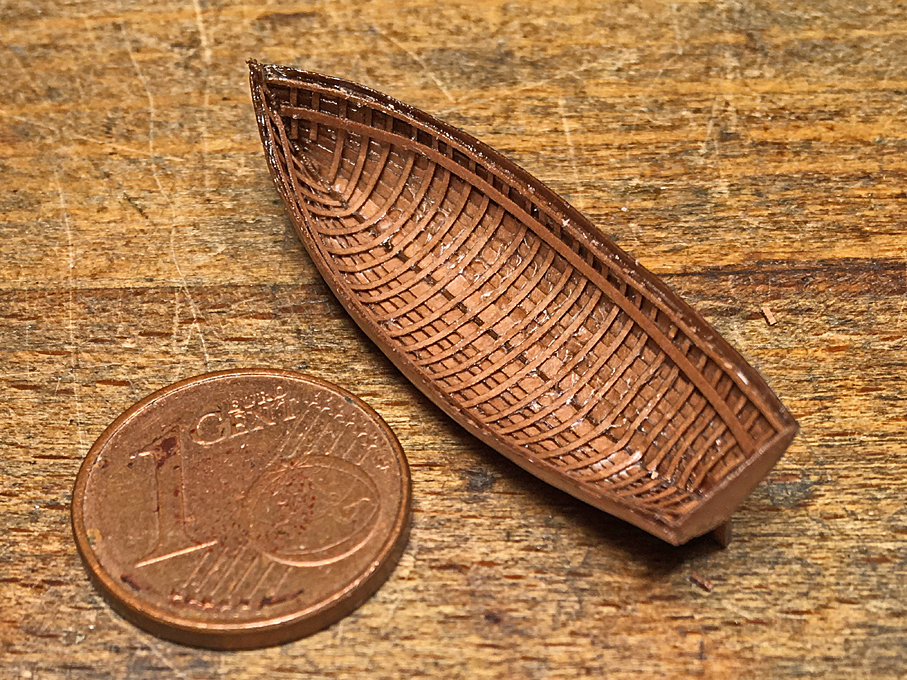
almost a shame to add floorboards !! -- truly beautiful

JIM B
Re: 1:160 S.M.S. WESPE Armoured Gunboat (1876)
Posted: Sun Oct 23, 2022 1:44 pm
by wefalck
Well, I think the boat-crew would have greatly appreciated floor-boards - even though sailors' feet are quite hardened, even as late as the late 1870s, walking on the frames is not fun ...
*****************************************
Jolly-Boat continued 5
A short update before painting begins. A couple of small details were still missing, including the rubbing strake, for which again 0.2 mm copper wire was used, the stanchions under the seats, and the row-locks.
The stanchions were composed from three layers of laser-cut paper. Perhaps I should have milled them from brass rod, but I was somehow too lazy to take out my micro-mill.
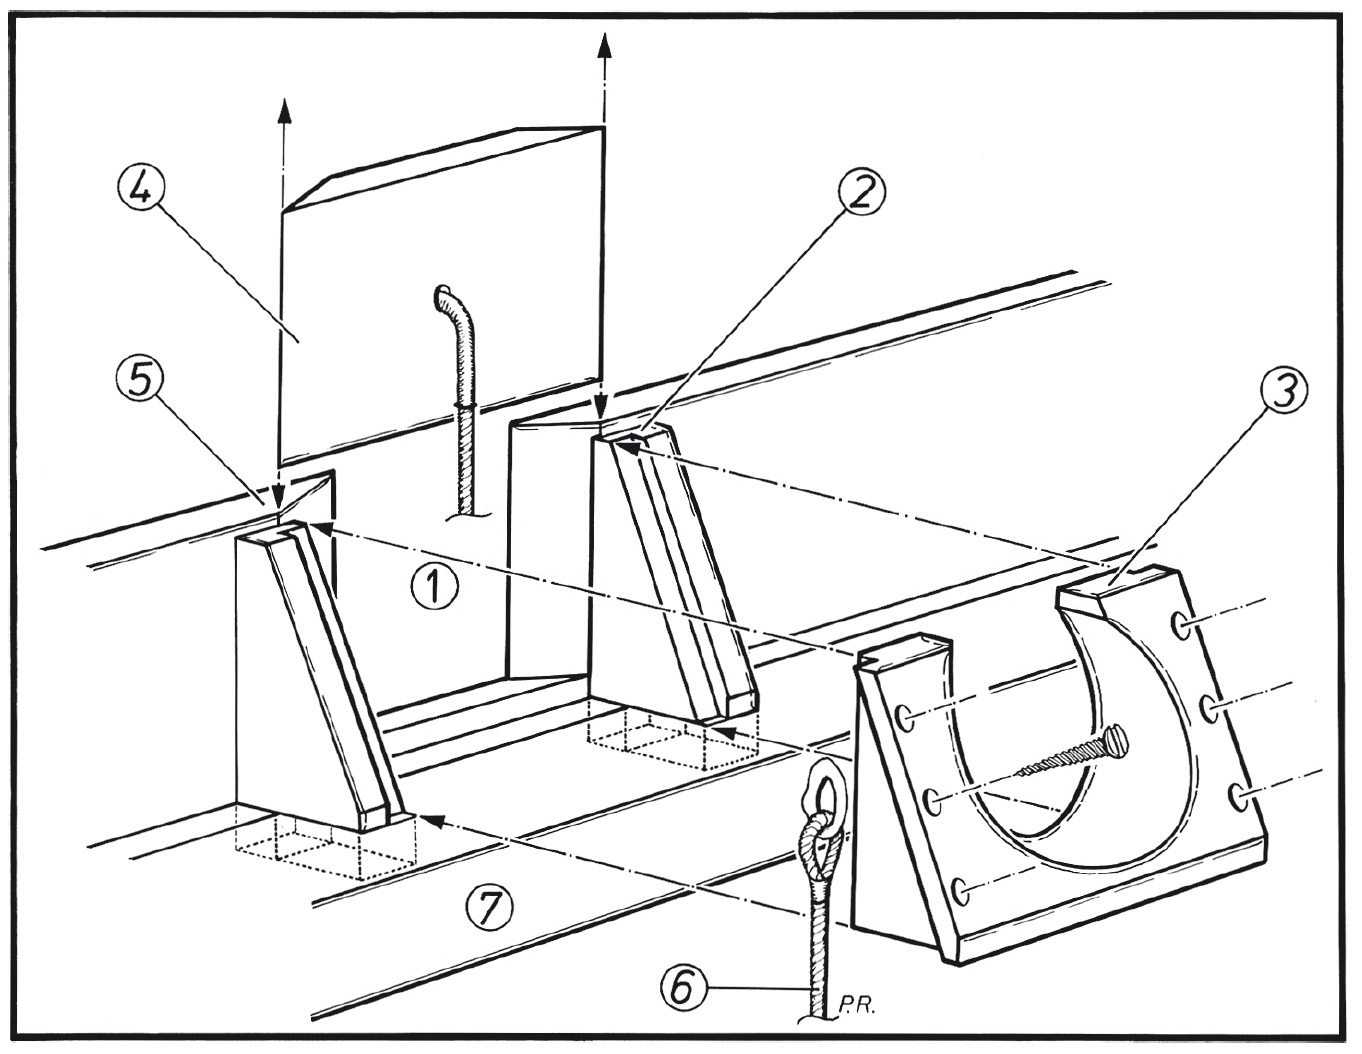 Design of the row-locks. Drawing by Peter R�ckert in LOGBUCH 2-2019.
The row-locks actually form the stanchions for the wash-strake, which structurally and strictly speaking is not part of the hull, but attached to it to heighten the free-board of the boat. They consist of two wooden clamps on which the actual row-lock in cast bronze sits. The wash-strake has square cut-outs for the oars, which are closed with wooden �shutters� fitting into bevelled slots. To illustrate this, I enclose a drawing by a colleague and expert on the Imperial Navy boats, who sadly died last year much too young.
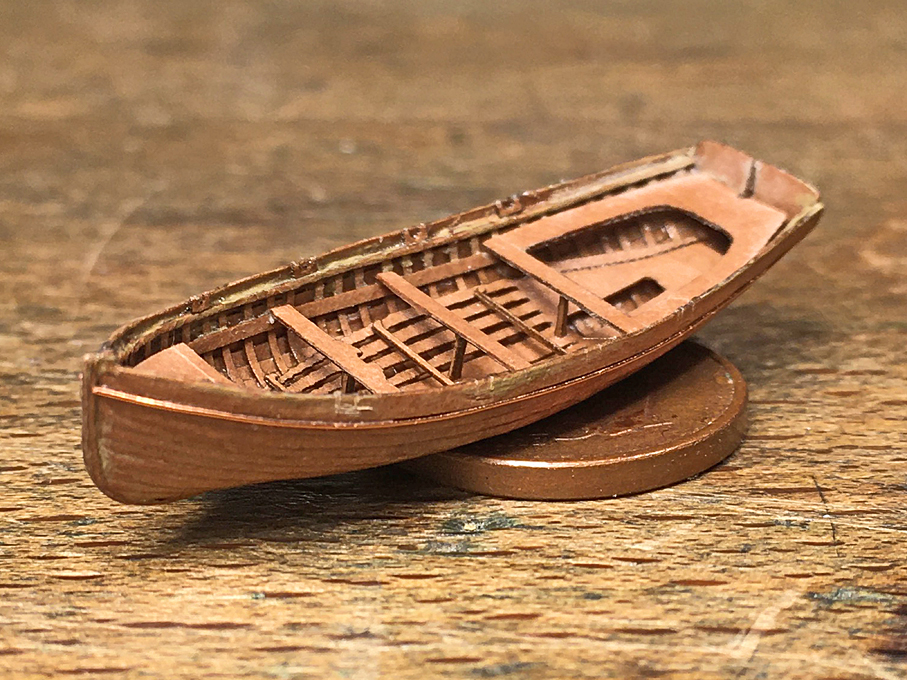
The basic shape of these tiny specs of paper were cut out using the laser-cutting and lacquered into place. Originally, I had envisaged to fashion them from brass, but had the feeling that they were just too small to make this practical.
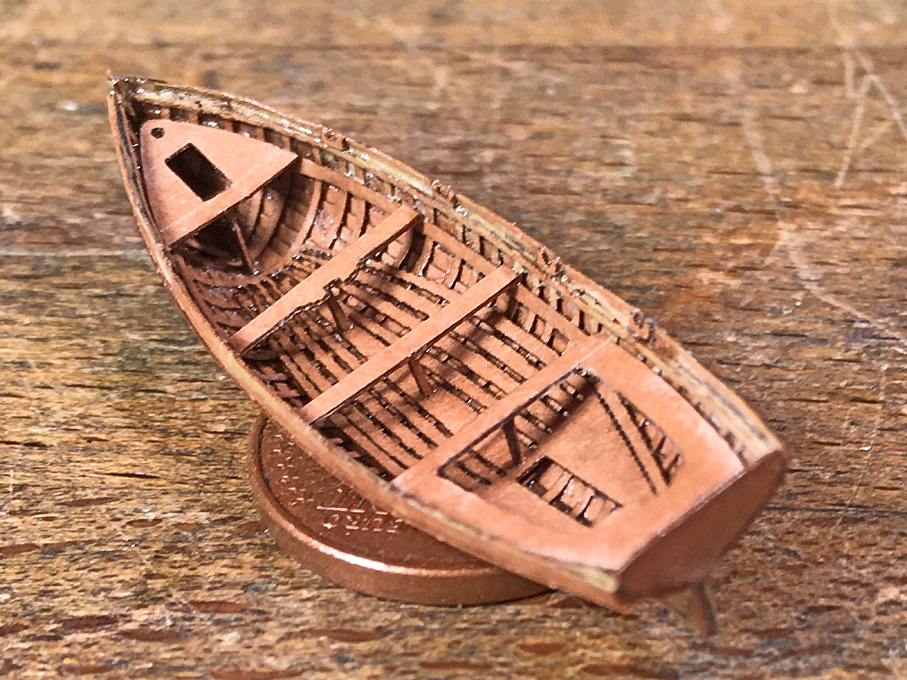
I decided to show the locks closed, which saved me the trouble of having to cut out the square openings in the wash-strake. I just little scored them with a not too sharp scalpel.
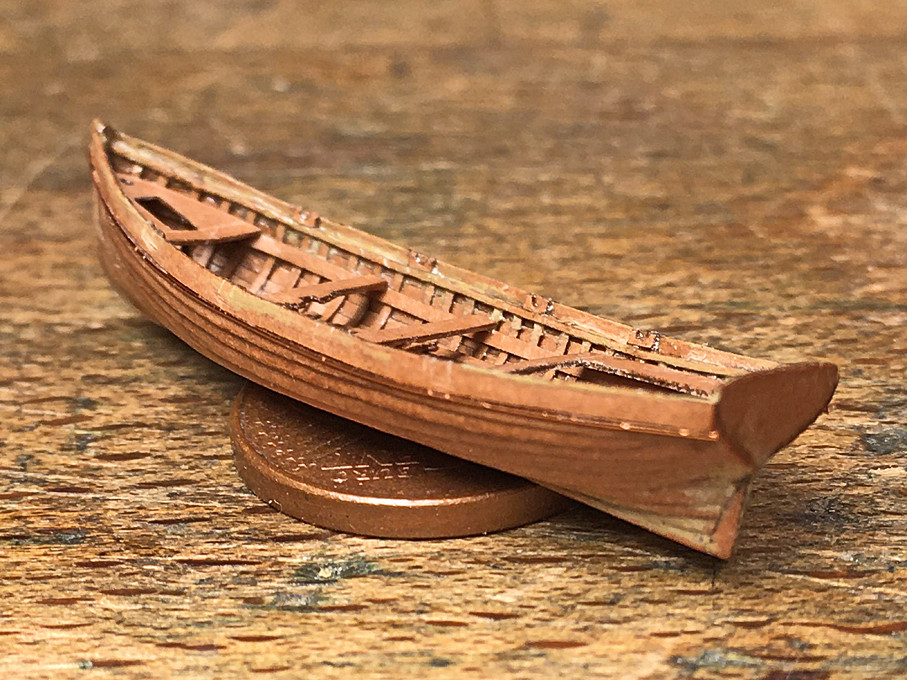
With this, the boat is ready to be painted. There is still some iron hardware that has to go on, but this will be installed after the painting, as it is supposed to be galvanized iron. I am actually not sure, whether the iron-work was painted over or left bare, but think it will add more detail to leave it bare.
The first of paint on the outside is now drying �
To be continued ....
Re: 1:160 S.M.S. WESPE Armoured Gunboat (1876)
Posted: Sun Oct 23, 2022 4:31 pm
by Iceman 29
She's beautiful!

Re: 1:160 S.M.S. WESPE Armoured Gunboat (1876)
Posted: Sun Dec 11, 2022 4:39 pm
by Fliger747
Sir Wefalck!
As always, impressive work. Having watched this for a whileI am interested in your thoughts as to laser cutter and what is practical, somewhat cost effective (no such thing in modeling) and what you would see useful in the current or future laser cutting technology. My local craft store has one for (very nice) $6,000 US which might be more than a hobby item.
Thanks! Tom
Re: 1:160 S.M.S. WESPE Armoured Gunboat (1876)
Posted: Mon Dec 12, 2022 2:45 am
by Neptune
Very nice boat.
Galvanized iron would turn to rust, like pretty much everything except high grades of stainless steel or CuNi. So I'd assume it would be painted. On the other side I have difficulty imagining painted parts on a small boat like that, not sure why...
Re: 1:160 S.M.S. WESPE Armoured Gunboat (1876)
Posted: Mon Dec 12, 2022 5:55 am
by wefalck
For some family reasons work in the workshop is stalling at the moment, so no progress probably until after Christmas ...
According to specifications, all ferrous metal parts had to be galvanized. Parts that were in painted areas would be painted over, while the fittings on the bare wood would be left unpainted. This will concern mainly the mast-fittings.
Tom, I am not really a laser-cutting specialist, as I only have a small, cheapo solid-state laser cutter of 6 W. For serious cutting, you would need to look into upwards of 20 W. Unfortunately, such laser-tubes need cooling and you need a ventilation system to take the fumes out. This calls for some dedicated workshop(-space). In smaller systems cooling water can be supplied from a bucket, while for bigger ones you would need to connect it to a tap and lead the waste-water somewhere. You would also need an opening in the wall or something like that for the exhaust of the extraction fan (like for a kitchen extraction hood). There are boxed systems that one can connect to such services directly, but there are also open systems, for which you would need to build an appropriate enclosure (also to keep stray laser beams inside. So the bottom line is, that all but the very small 'engravers' need quite a bit of infrastructure.
Re: 1:160 S.M.S. WESPE Armoured Gunboat (1876)
Posted: Mon Dec 12, 2022 6:24 am
by Maarten Sch�nfeld
wefalck wrote:Well, I think the boat-crew would have greatly appreciated floor-boards - even though sailors' feet are quite hardened, even as late as the late 1870s, walking on the frames is not fun ...
*****************************************
Jolly-Boat continued 5
A short update before painting begins. A couple of small details were still missing, including the rubbing strake, for which again 0.2 mm copper wire was used, the stanchions under the seats, and the row-locks.
The stanchions were composed from three layers of laser-cut paper. Perhaps I should have milled them from brass rod, but I was somehow too lazy to take out my micro-mill.
Design of the row-locks. Drawing by Peter R�ckert in LOGBUCH 2-2019.
The row-locks actually form the stanchions for the wash-strake, which structurally and strictly speaking is not part of the hull, but attached to it to heighten the free-board of the boat. They consist of two wooden clamps on which the actual row-lock in cast bronze sits. The wash-strake has square cut-outs for the oars, which are closed with wooden �shutters� fitting into bevelled slots. To illustrate this, I enclose a drawing by a colleague and expert on the Imperial Navy boats, who sadly died last year much too young.
The basic shape of these tiny specs of paper were cut out using the laser-cutting and lacquered into place. Originally, I had envisaged to fashion them from brass, but had the feeling that they were just too small to make this practical.
I decided to show the locks closed, which saved me the trouble of having to cut out the square openings in the wash-strake. I just little scored them with a not too sharp scalpel.
With this, the boat is ready to be painted. There is still some iron hardware that has to go on, but this will be installed after the painting, as it is supposed to be galvanized iron. I am actually not sure, whether the iron-work was painted over or left bare, but think it will add more detail to leave it bare.
The first of paint on the outside is now drying �
To be continued ....
A bit late to react, but this little boat is a gem in itself. Considering the coin (5 Eurocent?) is 21mm in diameter, the boat is under two inches long, right? But so immensely detailed... hat in hand, Wefalck!
Re: 1:160 S.M.S. WESPE Armoured Gunboat (1876)
Posted: Mon Dec 12, 2022 7:31 am
by wefalck
Thanks, Marten! It's actually a 1 Eurocent coin of 16.2 mm diameter ... the boat is 36 mm long ...
Re: 1:160 S.M.S. WESPE Armoured Gunboat (1876)
Posted: Mon Dec 12, 2022 8:53 am
by Maarten Sch�nfeld
Wow, even much smaller then I guessed...
Re: 1:160 S.M.S. WESPE Armoured Gunboat (1876)
Posted: Mon Dec 12, 2022 4:52 pm
by Iceman 29
A pure "micro-beauty! "
Re: 1:160 S.M.S. WESPE Armoured Gunboat (1876)
Posted: Tue Dec 20, 2022 4:43 pm
by wefalck
Jolly-Boat continued 6
For some family-related reasons the boat-workshop had been nearly closed for a few weeks. Nevertheless, I managed to apply a few coats of white overall. Then the real painting begun.
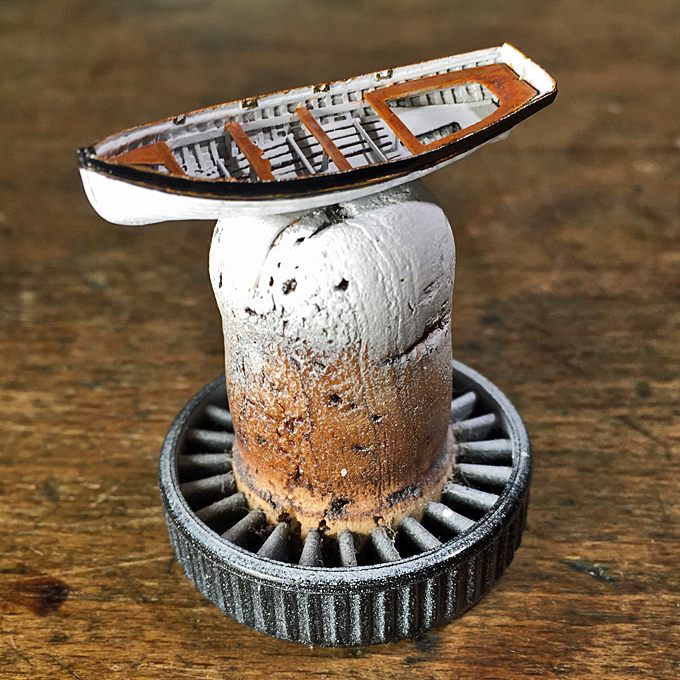
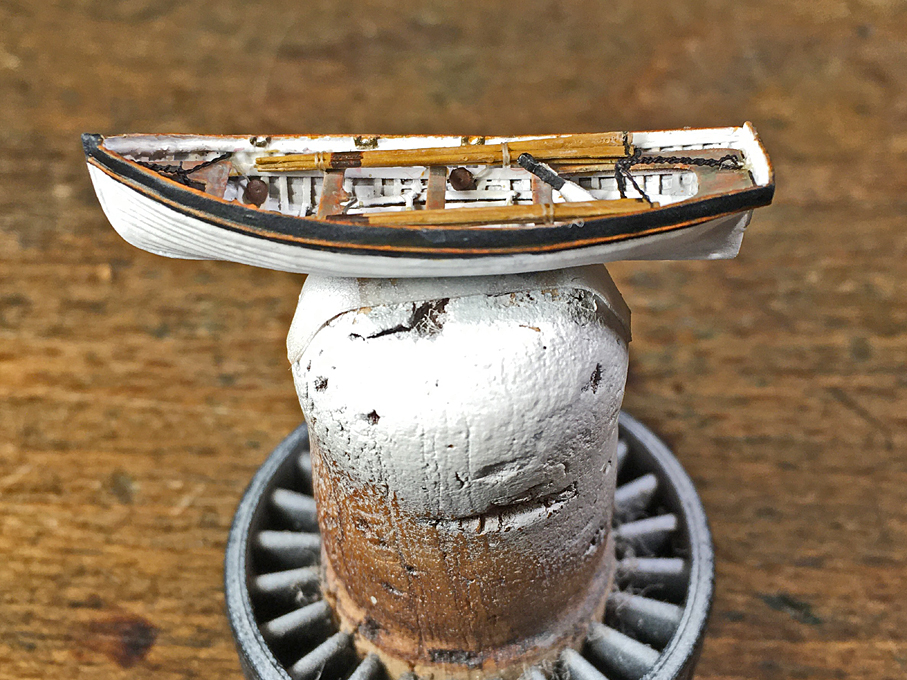
According, to a 1874 ordinance, the boats where to be painted white outside and inside, the top two strakes black, while the rubbing strake between them was left natural wood, as was the top of the wash-strake. Natural wood were also the seats and stern-sheets. The rowing-locks were bronze and were left bare.
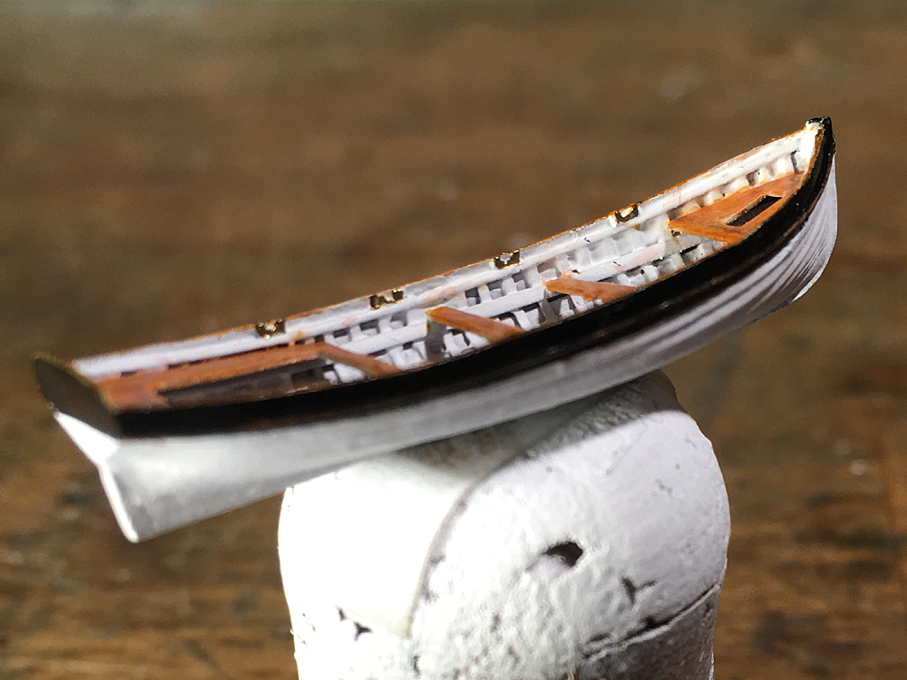
The boat still has to be kitted out with some galvanised iron-work and, of course, all the equipment such as the oars, fenders, a water-cask etc. There is conflicting information, as to whether the mast and the sails would have been stowed in the �ready-boat�.
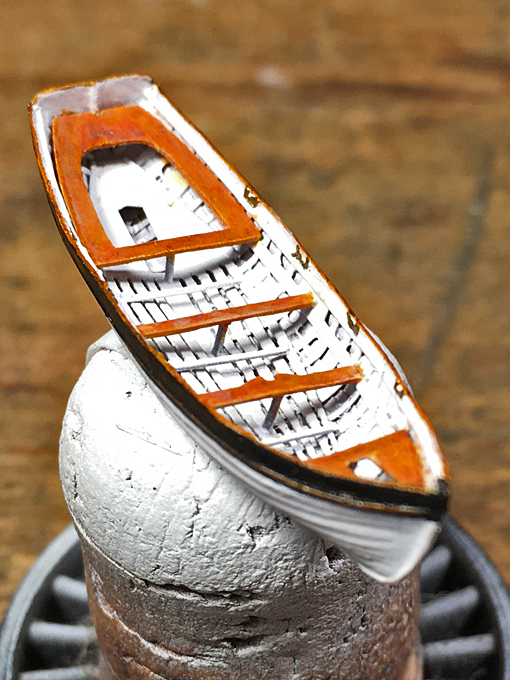
Somehow, I am not really satisfied with my paint-job. I didn�t get the colour of the seats etc. right, they look too reddish. I hope a wash of light ochre will correct this. I also had great difficulty to paint the rubbing-strake from a 0.2 mm wire cleanly. I tried to do it freehand, but perhaps should have masked it �
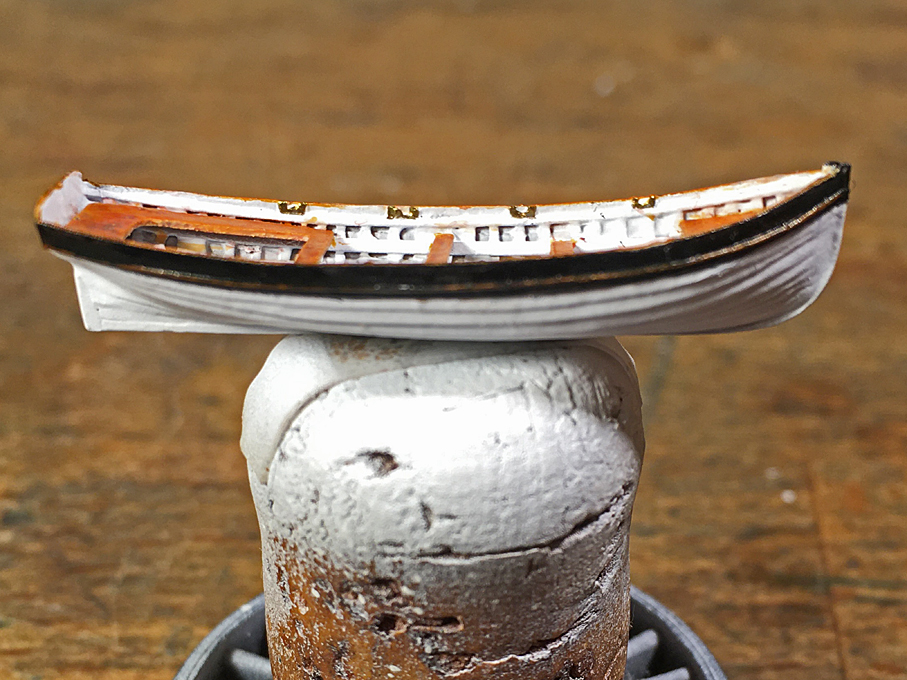
With this, the workshop will close for the holiday-period.
To be continued ....
Re: 1:160 S.M.S. WESPE Armoured Gunboat (1876)
Posted: Wed Dec 21, 2022 2:18 am
by Neptune
Still looks gorgeous though. Macro photos are never do justice to such small items. I'm sure in real size, you'll hardly see the rubbing strake.
Great job in any case, I wouldn't succeed in painting more than 1 colour on something like that without making a mess.

Re: 1:160 S.M.S. WESPE Armoured Gunboat (1876)
Posted: Fri Dec 23, 2022 2:17 pm
by marijn van gils
Fantastic boat Eberhart! Beautiful detail, and your clinker technique worked very well.
wefalck wrote:I also had great difficulty to paint the rubbing-strake from a 0.2 mm wire cleanly. I tried to do it freehand, but perhaps should have masked it...
Masking can help to get a crisp edge. But I usually have some paint bleed, peeling or uneven edge somewhere that needs correcting anyway. With small items like that rubbing strake, especially since it is present in reli�f, I would personally prefer to handpaint.
I find that the secret to precise handpainting is correcting. Nobody gets paint perfectly applied right away, there are always small mistakes and uneven edges that need correcting.
For painting something like the rubbing-strake, I would usually use an enamel like Humbrol. I would paint the strake as precisely as I can, but I will clean up the inevitable mistakes when the paint is dry to the touch but not really hard (after a couple of minutes). I do that with a fine clean brush, moistened with White Spirit (but most of the WS removed on a paper tissue, so it won't flow).
I would also use two or even three thin coats of paint to paint the strake, which will give a more even coat, and which makes these adjustments easier.
If you prefer acrylics, correcting is also possible. You just have to use the other colour again to correct mistakes or uneveness. It helps to thin the paint very much and correct with a multitude of very thin passes (3, 5, 10, ...), rahter than one thick coat.
Pff, these things would be so much simpler to show in real life, instead of trying to describe them in words...

Re: 1:160 S.M.S. WESPE Armoured Gunboat (1876)
Posted: Wed Dec 28, 2022 5:31 am
by wefalck
Thanks, Marijn, for your thoughts. Indeed, painting, touching up and touching up again until everything is right is the way to go here. Painting three-dimensional surfaces is not so straightforward, as painting on a flat surface.
Perhaps my problems also come from the fact that I am using acrylics. They just dry too fast, so that you have to have a lot of paint in the brush to keep the paint flowing, but then there is a risk that the 3D-features suddenly take the paint from the brush. May be such features are better painted in either oils or enamels. I used to paint faces on 1/35 scale figures in oils, but it takes a long time for them to harden.
I also made a mistake out of lazyness: when I painted the top two strakes in black, I painted over the rubbing strake in between them. I should have painted carefully around it, to have the white paint as a basecoat for the wood colour.
Last weekend, I bought some pigmented ink markers (Staedtler Pitt artist brush pens) that gave somewhat better results then my acrylics with a fine brush. But perhaps using some oil-paint would be better.
Re: 1:160 S.M.S. WESPE Armoured Gunboat (1876)
Posted: Sun Feb 12, 2023 4:09 pm
by wefalck
Apologies to all, who visited this log over the last few weeks and did not see any progress ... again real life with various obligations and diversions got in the way.
***********************************************************************************************
Completion of the Boats
There has been a lot of correction work and making small details that are not a lot to show, but take time.
https://www.maritima-et-mechanika.org/m ... ss-462.jpg
I adjusted the colour of the seats etc. somewhat and also worked on the rubbing strakes. For this I got myself a couple of markers with acrylic pigment paint (Faber-Castell Pitt Artist Pens with fine hard tip and soft brush-like tips) in various �wood� colours, which really turned out to be useful for touching up etc.
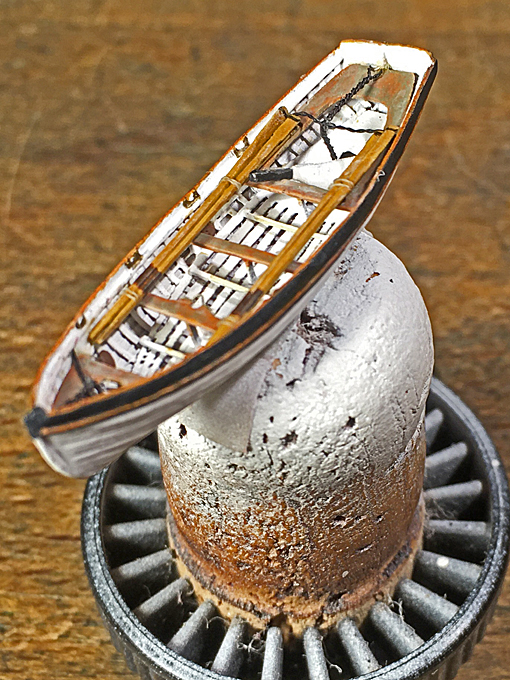
Then I turned my attention to the oars and with a bit of trial and error managed to produce relatively reasonable laser-cut parts. Each oar is lacquered together from three layers to simulate the shaping. The round was build up with more varnish and they were finally painted in wood colour and the iron band around the blade simulated with my 0.1 mm marker pen. Not sure, whether they should be black though, as the original specification called for copper bands. There are a lot of unknown details. I know from the sources that the oars should be stowed ready for use in order of the benches, the outer pair for the first bench in the bow and so on. However, I don�t know how they would have been secured for the sea, probably with a rope around the benches. However, laying out the oars like that would have meant that there would have been no space for the men to step into the boat when lowered. So, I arranged them in bunches alongside.
I also realised that I forgot the spur for the heel of the mast, so this was added.
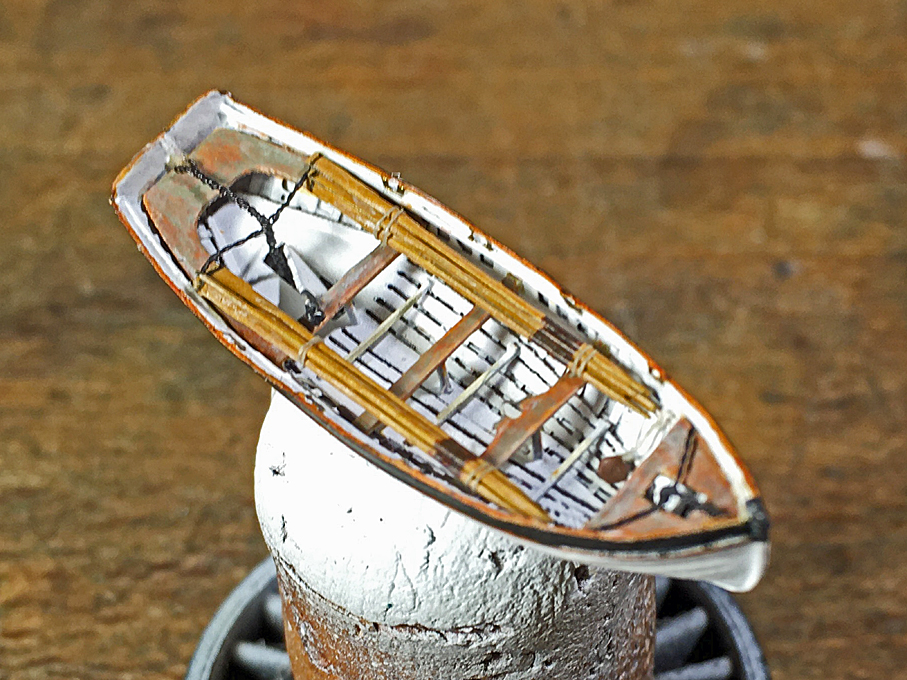
While arranging for the hoisting chains on the covered boats was easy, here it is a rather flimsy affair and I am not sure that it will work, as they are only glued. Likewise, the stays. The chains were simulated by drilling together two 0.2 mm wires until the pitch was about (without measuring) the length of a ring in the chain. Two of those drilled-together wires were drilled together. The overall appearance is roughly like a twisted chain.
Boats need rudders, so I drew one and cut it from Canson-paper in the usual way. When hoisted, the rudders are unshipped and stowed in the boat. However, I don�t really know where and how.
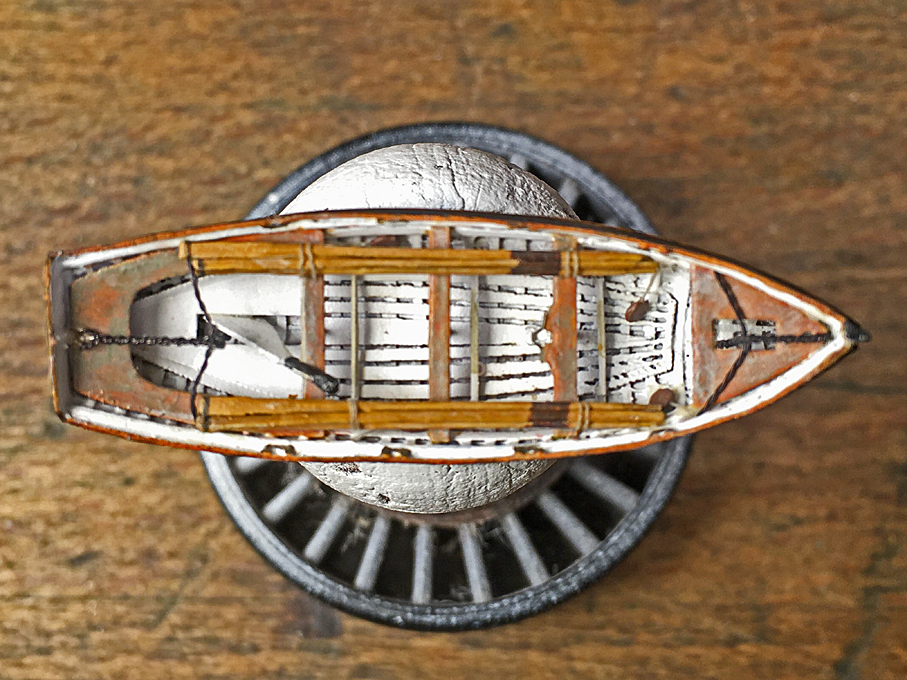
Stowage of various items is another uncertain point. There are a lot of items in the surviving inventories, such as an anchor, a small water-cask, a compass and a boat-hook, but I do not know how and where they were stowed. So I will omit them from the already quite crowded looking jolly-boat. The only thing I made were four fenders that are hung inside the boat.
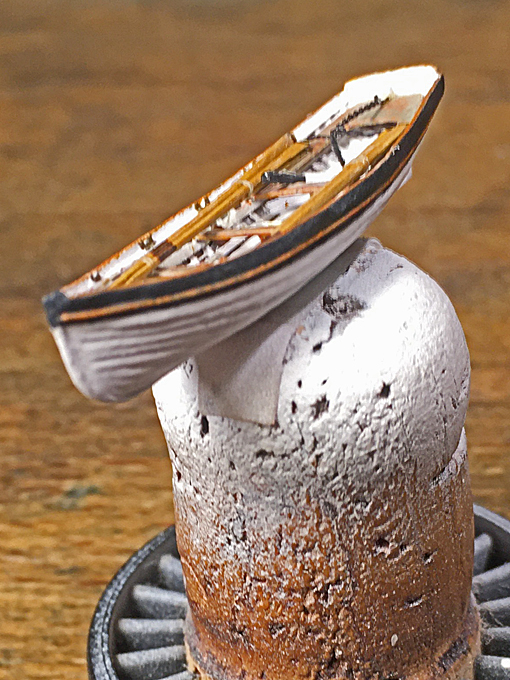
With this the jolly-boat is complete.
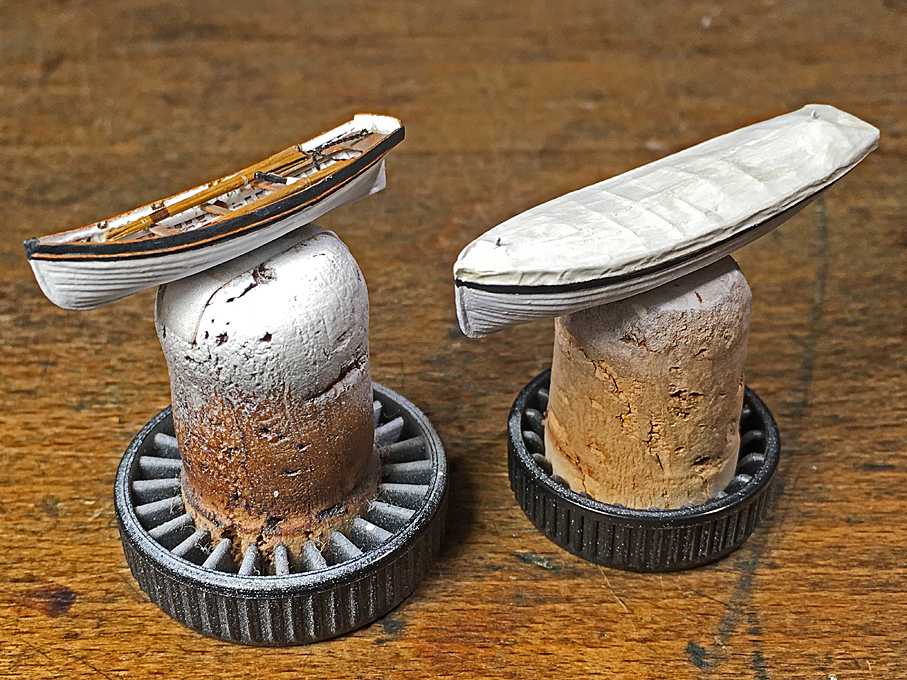
In parallel I worked on the second cutter that also will be shown covered. As this is the same process as for the other covered boats, I do not show the process again. Just a couple of shots of the collection of finished boats.
 To be continued ....
Re: 1:160 S.M.S. WESPE Armoured Gunboat (1876)
Posted: Sun Feb 12, 2023 5:36 pm
by JIM BAUMANN
all very good!
I like the canvas cover on hoops, is it on a drawcord undernmeath rubbing strake?
or will there be under-hull ties !
best wishes
JIM B

Re: 1:160 S.M.S. WESPE Armoured Gunboat (1876)
Posted: Mon Feb 13, 2023 5:14 am
by wefalck
Jim, I know this is a subject close to your heart

... I am currently editing a set of manuscripts by some colleagues who have undertaken several decades of research. This will become eventually a book on the Prussian/Imperial Germany Navy's ships' boats 1852-1918 published by our association. However, we have not been able to find useful information on the boat covers for this period. Later it seems that triangular patches with underhull-ties were used, but on photographs from the 1880s covers are visible, but no triangular patches. Therefore, I assumed that it would be a drawcord in the seam that would pull against the rubbing-strake and hoping that nobody would ask this question ...
The hoops were not actually intentional, but I didn't cut away the internal structure low enough. On the hand, I suppose there must have been something that holds the tarpaulin up, otherwise all the water collects in it. We do have some boat-inventories in the archives, but they do not mention any hoops. Not sure from when on the covers actually came into use. This would require more archival research.
Re: 1:160 S.M.S. WESPE Armoured Gunboat (1876)
Posted: Tue Feb 14, 2023 12:11 am
by DrPR
wefalck,
This is turning into a real teaser! Months ago you showed pictures of the almost finished ship, with the gun mount in the gun pit, small arms racks and other details. But it has been years since we have seen that magnificent gun you started this build with. I have been waiting with anticipation to see the gun mounted in position on this beautiful model!
Phil
Re: 1:160 S.M.S. WESPE Armoured Gunboat (1876)
Posted: Tue Feb 14, 2023 3:09 am
by marijn van gils
Beautiful boats! And good job on adjusting the paint!
I'll have to try your technique of making thin chain. It looks much more three-dimensional than PE chain.