Page 3 of 6
Re: An excessively ambitious 1/72 Revell Gato build...
Posted: Sun Aug 19, 2012 11:40 pm
by LE BOSCO
Channell wrote:
Le Bosco, did you do an online build log of that one? It sure looks familiar...
I was going to wait to do the 1/200 Bismarck .......... despite my lack of mad modeling skills.
HI Channel
you did not dream ,I had a thread on the subject,but for the moment ,it is still not finished
make a Bismarch at 1/200 its a big project (a little mad,no?

),but with ,despite what you're writing, you will going realized with talent, saw your work on the Gato
regards
Nicolas
Re: An excessively ambitious 1/72 Revell Gato build...
Posted: Mon Aug 27, 2012 6:36 pm
by smokey2
Great job Channell, been following with great interest in your build. I have two of these and looking at doing what you did on yours. Probably pick a sub that would be after or close to wars end for my first one. The second one I want to do it as the Grunion since it has a very interesting story. Dan
Re: An excessively ambitious 1/72 Revell Gato build...
Posted: Mon Aug 27, 2012 6:59 pm
by Channell
Thanks all! I'm surprised at all the attention this build is getting!
Sorry for the lack of progress this week but I only just got back from vacationing in Great Basin National Park.
Sometimes you have to balance the modeling of ambitious submersible ships with sitting atop 13,000 foot mountains!


I finally got all the glue and paint residue off my fingers, the small razor knife cuts healed, and I even managed to completely forget about the Cobia for a couple of days!

I'll be back to work on the boat soon...stay tuned!
Re: An excessively ambitious 1/72 Revell Gato build...
Posted: Tue Aug 28, 2012 11:49 am
by Channell
It's always nice to get to the point in your build when you finally have something resembling your endpoint

Here's the Cobia posing on my front room floor wearing a fresh coat of primer after cleaning up the seams. (the fairwater is not yet painted or glued on, BTW).
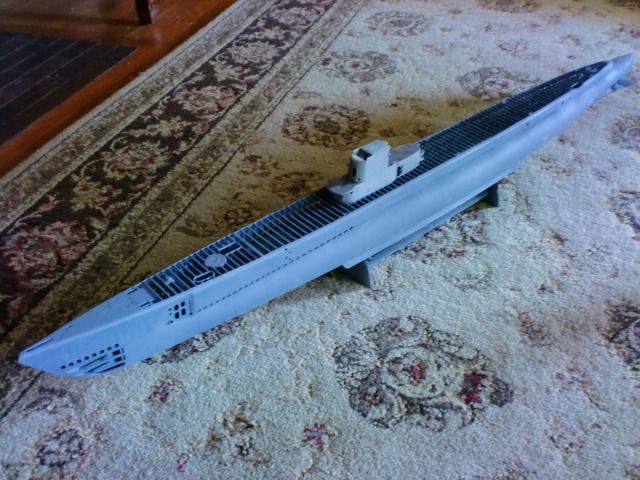

The skeletonized kit forward sideplates with the PE skin look great from the inside and will add a lot of detail when looking into that area...and it
will be visible as there is a stairwell from the deck to the escape chamber.

This area will soon be planked with .030 X .030 evergreen strips...

I inleted the PE bow grills earlier; they make an interesting view as you can look straight through, just like on the real thing.

I added the kit ladder bars and PE rings/waterproof locker doors on the fairwater...

My modified stern planes and propshafts look great and were very much worth the effort. I don't like the "plates" I added to ape some pics I saw on Navsource (covering the holes left from removing the propguards on the real boats) so I might redo them. There are a lot of holes that need to be drilled back here too.

It's proving very difficult to hide the sideplate seams without destroying the rivets; I might have to just sand them off and replace the rivets with dry transfers...

These (and the aft end at the "turtleback") are the worst seams to hide on the whole boat; where the PE sideplates end and the indentations for the diveplanes begin. I'm still not quite there... but at least I'm getting close...

There is still A LOT of work to be done. It's funny (and I do it every time) but I think I'm done sanding and have completely obliterated all my seams only to have show up again practically glowing in neon after the primer coat goes on.

It's a bit difficult to blend the PE sideplates into the hull so they look like part of it instead of just being tacked onto the outside. I wanted to inlet the ends into the plastic
at least but it would have thrown off the gaps along the edges of sideplates and the PE deck surface so I had to do things the hard way and build up the exterior of the plastic with putty to match the PE. As you can see, there are some spots that still need cleaning up.
I still need to repair/add weld lines too, and do quite a bit of cleanup where the deck trusses meet the sideplates, not to mention add about a million braces and supports between the deck and the pressure hull.
This is always the hard part of a build for me, as it's when I've started to get bored with my project and get tempted to cut corners... cut corners that will be easy to see. I wish I could bottle "new project enthusiasm" at the beginning to use later on.

Re: An excessively ambitious 1/72 Revell Gato build...
Posted: Mon Sep 03, 2012 11:54 pm
by Channell
This week's report is yet more tedious, frustrating detail that nobody will see but is gonna be necessary to get a great gato in the end.

The kit completely ignores the fact there are dozens of metal supports running from the pressure hull to the deck sideplates at an approximately 45 degree angle along the drain channels which make up 2/3rds of the sides of the ship... and rightfully so, because you can hardly see them from the outside anyway.
But since I'm going crazy on this boat I knew I had to add them but I wasn't looking forward to the prospect. In retrospect, I probably should have done this before attaching the deck, but it's too late now.
I first cut equally sized pieces out of styrene strip:

then carefully glued them in piece by piece using tweezers and super glue gel.


They are barely visible on the exterior but will most likely completely vanish once they are painted, unless someone puts their eye right up next to the keel and looks up.
... but I did said they were necessary, right?

I don't have a good photo to show as an example yet but with the PE deck top in place, light from the drain channels is clearly visible through it. Leaving it as-is would have created an awkward, inaccurate 2 1/2 foot long sliver of light on each side from above. But with the supports in place, I will now get a more realistic shadow effect that will better approximate the real thing and help a great deal to avoid throwing off the cool effect the open deck will hopefully give me in the end. Plus, it has removed the last bit looseness in the deck left over from my modifications.

Re: An excessively ambitious 1/72 Revell Gato build...
Posted: Tue Sep 04, 2012 7:45 am
by carr
..
Re: An excessively ambitious 1/72 Revell Gato build...
Posted: Tue Sep 04, 2012 9:21 am
by Channell
Thanks! For my whole life, building models was pretty much a solitary experience... It's A LOT more fun to share the pains and joys of a big project like this!
I
do hope to see more superdetailed gatos out there too! The only thing more fun that building one is to watch someone else do all the work!
I hope I can inspire more highly skilled hands to take the concept and run with it!
Here's an idea for the ultimate diorama: The USS Darter shot up and grounded on a reef in 1/72 scale:
http://www.navsource.org/archives/08/08227.htm
I wanna see it. Anybody brave enough to do it?

Re: An excessively ambitious 1/72 Revell Gato build...
Posted: Tue Sep 04, 2012 9:54 am
by sgtryan13
Great, great, great work and even more impressive attention to detail! really inspirational. It is almost going to be a shame to put a deck over that thing! Speaking of decks, if you are going to individully plank the deck with styrene strips, have you considered doing the same planking with real wooden planks instead of the styrene? It may present you with a more accurate deck to stain and have some actual wood show through on the wear ad tear.
Re: An excessively ambitious 1/72 Revell Gato build...
Posted: Tue Sep 04, 2012 10:06 am
by Channell
sgtryan13 wrote:Great, great, great work and even more impressive attention to detail! really inspirational. It is almost going to be a shame to put a deck over that thing! Speaking of decks, if you are going to individully plank the deck with styrene strips, have you considered doing the same planking with real wooden planks instead of the styrene? It may present you with a more accurate deck to stain and have some actual wood show through on the wear ad tear.
I thought about it... especially after seeing some really beautiful wood decks done on some batleship models here on the forum.
But to keep in scale wood planks would be difficult to manage, plus they would appear "fuzzy" from the wood grain even if I used larger wood strips instead of the clean look styrene will give me.
The other major difference is the gato planks aren't butted up right next to each other; there is a space between each so the air between the pressure hull and deck can escape as the sub dives. I need very small but very defined strips to make it work, which leaves me with either styrene or metal as the best options.
Re: An excessively ambitious 1/72 Revell Gato build...
Posted: Tue Sep 04, 2012 10:23 am
by LE BOSCO
Hi Channell
I missed your update, as usual, it is a work of great finesse
congrats! your job is superb
cheers
Nicolas
Re: An excessively ambitious 1/72 Revell Gato build...
Posted: Tue Sep 04, 2012 1:21 pm
by Channell
LE BOSCO wrote:Hi Channell
I missed your update, as usual, it is a work of great finesse
congrats! your job is superb
cheers
Nicolas
Many thanks Le Bosco!
Re: An excessively ambitious 1/72 Revell Gato build...
Posted: Wed Sep 05, 2012 1:08 pm
by modelnut
Beautiful and ambitious build! Some of the stuff you are doing would give me the shakes as well as nightmares. Wow!
Good luck with the rest of it! I look forward to seeing what comes next.
- Leelan
Re: An excessively ambitious 1/72 Revell Gato build...
Posted: Sat Sep 08, 2012 10:57 pm
by Channell
Update for the week:
The time has finally come to put a deck on this puppy. I have been dreading this moment since I started cutting up the deck in the very beginning!
I realized after I had glued the PE sideplates on that I had botched something. In my excitement and careful placement of the bottom of the sideplates so they would be
just right, I had forgotten to account for the joint on the other end, where the sideplates curve around and meet the PE deck surface!
So I basically ended up with a deck that has a big, ugly, uneven gap between the sideplates that looks like crap:

Unsolvable problem? Hell no! I didn't get this far to give up now!
The solution was to get excessive (In case you haven't noticed, that's the main theme of this build

):

The metal portion of the deck of the real Cobia is made up of dozens of metal plates that are attached to the frame. Eduard kindly etched their PE as plates connected by tiny joints of metal too. So I started cutting, and soon turned the beautiful 4 piece PE deck in to dozens of tiny plates which I superglued to the frame piece by piece.
Here's the result (I haven't done the bow; I have more detail to add onto the pressure hull still):


And for fun, a comparison with the standard solid kit deck:

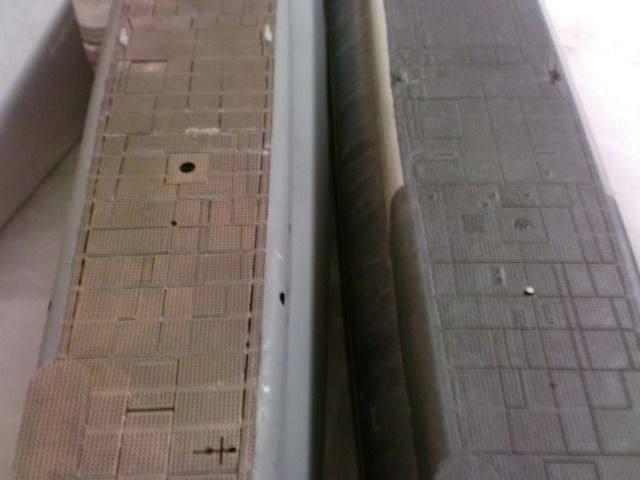
Despite a little bit of mess here and there which will be easy to clean up, I think it turned out better than if I had installed the sideplates around the complete deck pieces. It now has just the right amount of crooked randomness to make it look very much like the real thing! There are quite a few little detail pieces and I need to rebuild the hatches too, but I'm very pleased with how things are going so far.
Until next week....
Re: An excessively ambitious 1/72 Revell Gato build...
Posted: Mon Sep 10, 2012 6:15 pm
by taskforce48
Now that is what I call detail!
Keep up the fantastic work
Matt
Re: An excessively ambitious 1/72 Revell Gato build...
Posted: Mon Sep 10, 2012 8:11 pm
by Dan K
Outrageous detail.
Re: An excessively ambitious 1/72 Revell Gato build...
Posted: Sat Sep 15, 2012 5:32 pm
by Channell
Work continues on the Cobia...
This week I got started on the deck hatches, using styrene to get the hatch plates level with the PE decking and cutting the hatches out of the old gato to replace the molded-in hatches (which were too low and... well,
molded in to look good to my eyes.


The Eduard PE set has lots of extra details to improve the hatches and I plan on replacing the molded hatch springs with scratchbuilt springs for extra detail
In the fairwater I added a floor and scratchbuilt a bulkhead and storage locker so there will be stuff to see inside the fairwater doors that I opened up before:


And I got started on the planking:

The planking is a very special bit of madness; I'm doing it with .030 X.030 strips one by one. I first tried to create a "jig" of sorts to try to keep the space equal but it didn't work so I'm trying to do it by eye. It's not coming out as straight as I'd like and it's gonna take A LOT of evergreen strips; that little section took 2 packages alone.
If it's any consolation, the real Cobia's planking isn't exactly straight either, as time has taken it's toll on the wood, but I'm still a bit discouraged by how it's turning out so far...

Re: An excessively ambitious 1/72 Revell Gato build...
Posted: Sun Sep 16, 2012 1:49 am
by LE BOSCO
HI Channell
I wish you a "good courage"
This is your "dealer" of evergreen , which must "rubbing their hands"
cheers
Nicolas
Re: An excessively ambitious 1/72 Revell Gato build...
Posted: Sun Sep 16, 2012 6:17 am
by Guest
Channell wrote:
The planking is a very special bit of madness; I'm doing it with .030 X.030 strips one by one. I first tried to create a "jig" of sorts to try to keep the space equal but it didn't work so I'm trying to do it by eye. It's not coming out as straight as I'd like and it's gonna take A LOT of evergreen strips; that little section took 2 packages alone.
If it's any consolation, the real Cobia's planking isn't exactly straight either, as time has taken it's toll on the wood, but I'm still a bit discouraged by how it's turning out so far...
Just a perhaps rather naive thought...
Looking at the images, the planks stretch across numerous deck supports. Perhaps using spacers made of cardboard or plastic card at some points (above or in between some supports) might help. My guess is it would not turn out completely even/precise, but might help even things up a bit...
I know it might be a tedious solution, but judging by the rest of the build that seems to be parr for the course
Overall awesome build to see though... and yes, I do htink many of the tedious details have added to the look of the model!
Kind regards,
Harm
Re: An excessively ambitious 1/72 Revell Gato build...
Posted: Sun Sep 16, 2012 2:54 pm
by pbudzik
Channel,
I would strongly urge you not to settle for your current result. In an earlier post, you correctly identified the visual features necessary for the planking. Your current photo shows a result that negates all the exemplary work that you've done so far. I would suggest that you are going to find it difficult with the approach you are taking. The only way to do it with individual strips is to cement from the center out. Find the midline and work out. Cement the first strip with the aide of a good metal straightedge. The strip needs to be cemented with the cut edges on the top and the bottom. That ensures that all the widths are the same (you can't rely on the cuts being perfect). When the strip is thoroughly secure, place a shim between the secure piece and the new piece that you are laying. Tack the new strip in place with a small amount of something like Tamiya extra thin cement. It gives you a little time to work. Use your metal straight edge against the new piece so everything is firm and straight. Keep the shim and straight edge in place until the new strip is solid. Repeat, repeat, repeat. It will take time, but I believe you can do it. When everything is in place, you can run a block and sandpaper over top surface to ensure that all the decking is even.
My two cents
Paul
Re: An excessively ambitious 1/72 Revell Gato build...
Posted: Sun Sep 16, 2012 7:39 pm
by Channell
pbudzik, I'd have to agree with you. I'm just not satisfied with the look of the planks; they spoil the effect and being "front and center" on the model that's a very bad thing. I'm gonna rip them out and try again later.
Anyway, this project *might* be a bit too ambitious for me to keep up the pace and continue to enjoy it (this IS a hobby after all... it stops being a hobby when it stops being fun
).
I'm feeling some burnout and am also noticing my work is starting to get a bit sloppy as a result so I think I'm gonna put the Cobia aside for a bit until the enthusiasm returns (and I know it will or I wouldn't be doing a second gato in the first place!

). I'm already A LOT further along than I thought I would be after only 2 months so I'd have to say I deserve the break!
But while the desire to work on a sub is waning, I don't think the desire to build every really goes away...
I've been kicking an idea around for a few weeks and couldn't resist any longer:

A "just for fun" fantasy pirate boat will give me a chance to let my imagination run wild for a bit and hopefully be a cure for the "cobia blues". I'm not sure if it's appropriate for the forum but I could open a build log on that one too...
I promise I'll be back to work here before too long.