Page 3 of 15

Re: 1/700 Post War - One of each class.

Posted: Sun Nov 23, 2008 8:10 pm
by Cadman
Looking good. :thumbs_up_1: That LCP kit should be a cool project..

At this rate you should have your own scale version of a 600 ship Navy.

Re: 1/700 Post War - One of each class.

Posted: Sun Nov 23, 2008 10:19 pm
by Hippy Ed
Cadman wrote:Looking good. :thumbs_up_1: That LCP kit should be a cool project..

At this rate you should have your own scale version of a 600 ship Navy.
Roger that!! :woo_hoo:

Re: 1/700 Post War - One of each class.

Posted: Fri Nov 28, 2008 4:55 pm
by NukeMM
100% Complete!

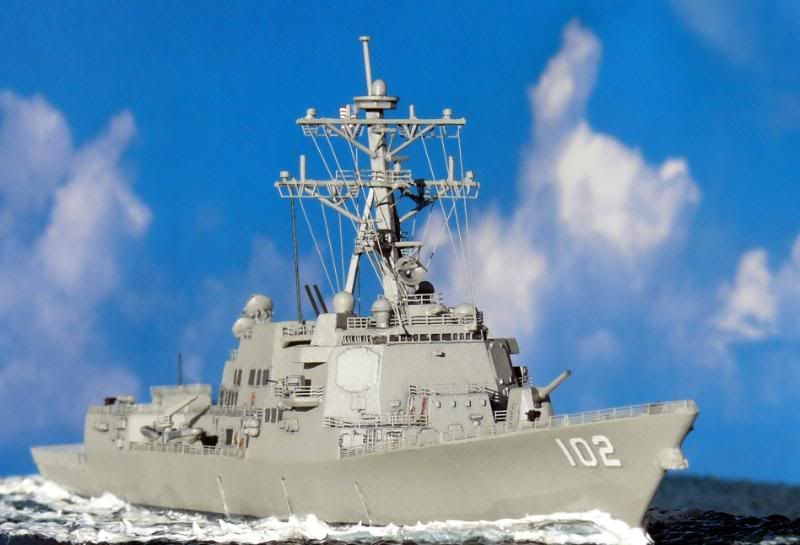
This is the latest addition to my 1/700 Post War USN One of Each Class collection.

USS Sampson DDG-102 converted from the DRAGON USS Mustin kit.

Image

Image

Image

Re: 1/700 Post War - One of each class.

Posted: Fri Nov 28, 2008 5:37 pm
by Nektarios
:good_job: Carl.

Re: 1/700 Post War - One of each class.

Posted: Sat Nov 29, 2008 12:34 pm
by ASFC
:good_job: :thumbs_up_1: You put my work to shame.

:wave_1:

Re: 1/700 Post War - One of each class.

Posted: Sat Nov 29, 2008 3:17 pm
by NukeMM
Thanks for the compliments, Gents!

ASFC,
There's is absolutely no shame in your work. (But, I know that you were just being nice.)
I find myself staring and studying what you do. I just wish that you had a real name that we could call you by. :jest:

I always like to leave room for improvement. I have no perfect models, yet. There's always something not quite right with each build.

I'm having fun with the Loose Cannon USS John S. McCain resin kit. It is actually very, nice. The parts look ugly on the sprue, but I think it is the sprue's falt. The ugly sprue overshadows the nicely molded parts on it. And that's perfectly okay, with me.

Like every resin kit, there is clean up to be done on them, and this one isn't so bad. The parts fit nicely together, too. The PE is terrific! I'm trying to build it OOB, but I've had to add some GMM ladders and doors to the DASH hangar. I sanded them off while cleaning the flash and angles on the hangar. This also resulted in a little modification of the hangar door area. I'll probably replace the whaleboat that came with it, but the gigs aren't too, bad.

The foremast's platforms aren't quite horizontal, but that's my falt, not the kit's. I'm going to live with it.

I'm having trouble understanding the instructions for the aft mast PE framing and how to bend it to resemble the real ship's mast. I can't seam to wrap my brain around the 3D part of the whole thing. I've emailed LCP for any tutoring that can provide me.

I wish that there were more close-up and aerial photos of this class of ship on the Internet. I've seen all of them on NavSource.org and Googled the hell out of the Mitscher class DLs, to not much avail.

Image

Image

Image

Re: 1/700 Post War - One of each class.

Posted: Sun Nov 30, 2008 2:31 am
by NukeMM
The John S. McCain is ready for paint!

Image

Image

Image

Re: 1/700 Post War - One of each class.

Posted: Mon Dec 01, 2008 12:17 am
by NukeMM
I added some paint, this weekend.

Image

Image

Image

Re: 1/700 Post War - One of each class.

Posted: Mon Dec 01, 2008 10:34 am
by Sauragnmon
Hey Carl, had a thought for you - I don't know if you've done a Kidd Class, but you could use the Arii Spruance for the Kidd - it comes with the mk26 launchers on the sprues, and still has the mountings for at least the forward one. The aft one wouldn't be too hard to come by, if you ask around, likely. I'm considering doing a Mod Kidd with my Spruance, in hindsight, thought you might benefit the idea.

Re: 1/700 Post War - One of each class.

Posted: Mon Dec 01, 2008 11:10 am
by NukeMM
Sauragnmon wrote:Hey Carl, had a thought for you - I don't know if you've done a Kidd Class, but you could use the Arii Spruance for the Kidd - it comes with the mk26 launchers on the sprues, and still has the mountings for at least the forward one. The aft one wouldn't be too hard to come by, if you ask around, likely. I'm considering doing a Mod Kidd with my Spruance, in hindsight, thought you might benefit the idea.
Hey, thanks for thinking of me! I do want to take another crack at a SPRUCAN by maybe bashing a few kits together. I have also considered the Kidd class DD for my collection of One of Each Class.

I was just thinking of you, actually, and the gun director issue. Are you soliciting for some like the ones on my Sampson DDG-102? The big dish types? I don't know the nomenclature for them. Anyway, I have some on my Skywave Equipment Sets, that I can send to you.

Which reminds me.............were you, or were you not, going to use the captain's gig from your Missouri kit? I'd still like to add one to my Iowa, on a portable rack on the fantail.

Re: 1/700 Post War - One of each class.

Posted: Mon Dec 01, 2008 11:52 am
by Sauragnmon
Actually, far as I know, none of the AB's have the AN/SPQ-9B, which is supposed to be the gun director radar associated to the mk45 5" guns - they have a fire control computer that can interpret data off the SPY-1D, so the redundancy of the SPQ-9B was lost due to budget constraints, far as John can figure. I'm not aware if later Burkes have the SPQ-9B radar, but the Ticons have the 9A set, which is what they use for Their mk45's. I wish to god I could find some information on each radar set. The Burke's ability to use its SPY-1D would be somewhat moot in my Mightier Mo because of the fact that its SPY-1D goes inactive when firing the BFG's, so I need Something for them that won't be disabled during those operations.

I'm considering a Mod-Sprucan/Kidd, basically using the ABL's and ASROC launchers forward, but dispensing with the Sea Sparrows for RIM-66 Standards on the aft deck.

As to the Gig, I don't see why I can't hand it to you. I'm not sure what I'm going to do with the boat compliment, in truth, since the mk5 SOC won't fit properly. I might consider RHIB's or Something.

Re: 1/700 Post War - One of each class.

Posted: Mon Dec 01, 2008 12:34 pm
by Nektarios
Sauragnmon wrote:Hey Carl, had a thought for you - I don't know if you've done a Kidd Class, but you could use the Arii Spruance for the Kidd - it comes with the mk26 launchers on the sprues, and still has the mountings for at least the forward one. The aft one wouldn't be too hard to come by, if you ask around, likely. I'm considering doing a Mod Kidd with my Spruance, in hindsight, thought you might benefit the idea.
Why convert another kit since there is around the Kidd class DML kit ???

Re: 1/700 Post War - One of each class.

Posted: Mon Dec 01, 2008 1:40 pm
by NukeMM
Nektarios wrote:
Sauragnmon wrote:Hey Carl, had a thought for you - I don't know if you've done a Kidd Class, but you could use the Arii Spruance for the Kidd - it comes with the mk26 launchers on the sprues, and still has the mountings for at least the forward one. The aft one wouldn't be too hard to come by, if you ask around, likely. I'm considering doing a Mod Kidd with my Spruance, in hindsight, thought you might benefit the idea.
Why convert another kit since there is around the Kidd class DML kit ???

Because of that error on the port side of the hangar on the DML kit.

Re: 1/700 Post War - One of each class.

Posted: Mon Dec 01, 2008 2:03 pm
by ASFC
NukeMM wrote: Because of that error on the port side of the hangar on the DML kit.
That is not difficult to fix with a bit of prior thought surely? Its not like your last Sprucan where you did not notice until you had started building it.

Re: 1/700 Post War - One of each class.

Posted: Mon Dec 01, 2008 2:15 pm
by Nektarios
The DML U.S.S. kit is totally different from their Spruance kit and the hangar is widened so it doesn t have the mistake you mention. Check my Taiwanese Kidd DDGs photos.

Image

Image

Re: 1/700 Post War - One of each class.

Posted: Mon Dec 01, 2008 2:36 pm
by NukeMM
Nektarios wrote:The DML U.S.S. kit is totally different from their Spruance kit and the hangar is widened so it doesn t have the mistake you mention. Check my Taiwanese Kidd DDGs photos.

Oh! Cool! I understand!

Re: 1/700 Post War - One of each class.

Posted: Mon Dec 01, 2008 2:51 pm
by Hippy Ed
NukeMM wrote:
Nektarios wrote:The DML U.S.S. kit is totally different from their Spruance kit and the hangar is widened so it doesn t have the mistake you mention. Check my Taiwanese Kidd DDGs photos.

Oh! Cool! I understand!
Uh-oh... We'z in fer it now!!!! :help_1: :help_1: and it's Nektarios' fault :heh: :heh:

Re: 1/700 Post War - One of each class.

Posted: Mon Dec 01, 2008 10:35 pm
by AndrexP
NukeMM wrote:I added some paint, this weekend.
She shore looks bootiful!
:thumbs_up_1:

Ok, I'll be the one to ask...

How did you paint so neatly around all that PE? How about the walkways, nestled in among the railings?

Could you give us a bit of a rundown here? Any in-progress pictures of the painting task?

Thanks,

Re: 1/700 Post War - One of each class.

Posted: Mon Dec 01, 2008 11:44 pm
by NukeMM
AndrexP wrote:
NukeMM wrote:I added some paint, this weekend.
She shore looks bootiful!
:thumbs_up_1:

Ok, I'll be the one to ask...

How did you paint so neatly around all that PE? How about the walkways, nestled in among the railings?

Could you give us a bit of a rundown here? Any in-progress pictures of the painting task?

Thanks,
Hey, Andrew!

Thanks for the compliment.

Sorry, no in-progress photos of the painting. Not enough hands to take photos and paint at the same time; and nobody else around to help.

I don't know why this dumbfounds so many guys. It just came natural to me after hearing that others brush painted their decks. I find masking superstructure or decks so, tedious and I always ended up brush painting the touch-ups at the deck-to-bukhead interfaces, anyway.

With thinned acrylic paints, the brush painting is easier and nicer looking than the enamel paints.

The first tool is the magnifying lamp. And then I cut all of my paint brushes down to about 3 inches long to keep them from hitting the mag lamp all of the time.

I use CA clue on my railings. With a tweezers, I just barely touch it to a drop of glue at the tip of the bottle's nozzle, not even breaking the surface tension of the glue drop. If I get too much glue, I just touch the railing to my finger to take off the extra glue. If you can't see the glue on the railing, then you've done it right. I was amazed when I learned that such a tiny amount of CA glue will hold so strongly. Sometimes, its hard to rip off a piece of railing if its screwed up.

I like to attach the PE to bare plastic or resin, rather than to an already painted surface. I think it holds more securely and if it breaks off, not so much paint comes with it making for more paint touch ups. Sometimes, I will put the railings on after the paint in the areas that will be hard to get paint brush into if the railings were already put into place. This time, I just went for it and put most of the railing on, no matter what. "I'll worry about it later." was my thoughts this time. Don't tell anybody, but there's no deck paint between the foreward outboard superstructure and the O2 level railings. Shhhh!

Also, I prefer an air brushed railing instead of a brush painted railing. But, I do sometimes (most times) have to touch up the railings after the deck paint has been laid down, but I do this with a very thinned acrylic paint and I'm not having to cover the bare brass with this thin color, just the stray deck paint color.

(Are you sorry you asked, yet? :sleepy: )

With a short, thin brush that is squared off at the tip I slide the tip of the brush along the bottom rail that is touching the deck. This bottom rail acts as a stop / edge for the tip of the brush to glide along. The more hoizontal the brush can get, the better, especially at the point where the deck meets any bulkheads. When I do get stray deck color on a bulkhead, I'll go back later with the bulkhead color and come down at angle from above and creap up (more like creap down) to the deck covering the stray deck paint on the bulkhead and sliding along the deck-to-bulkhead interface to make clean, sharp line. It is very similar to painting the walls around the door and window trim in the house.

Sometimes my technique is a back and forth between deck and bulkhead colors until it is just right.

I don't think that I had to put the non-skid along the outboard walkways, but I saw it in the photos that I have of the McCain. The non-skid patterns between the masts and around the DASH hangar and torpedo platforms were made up by me. But they make sense, I think. I just painted the outboard walkway non-skid with the same brush described above and came down perpendicular to the deck, with it. This, too, was a back and forth method between the deck color and the non-skid color. (Gunship Gray and Grimey Black) A lot of fine tuning to make as straight a lines as possible.

Another thing that I do, and I know that you didn't ask, is I use a Testors Gloss Black paint pen to do the boot topping on waterline models. This takes a steady hand, but I'm getting better at it. I have found that the gloss black paint glides better than the flat black and leaves a more consistent trail of paint behind it. I start with a thin boot topping and if I screw up, I just make it a little wider stripe. And if it still isn't perfect, I cover the flaws up with the water wake when its mounted to the water base.

I have such a hard time with masking tape ripping off the hull paint. Pactra, Tamiya, etc. masking tapes just aren't working for me. I have even tried sticking the tape to a different surface before applying it to the model. Sometimes, I get lucky..............most times I don't. It's always a hold-your-breath moment.


"And that's the truth :jest: !"

Re: 1/700 Post War - One of each class.

Posted: Tue Dec 02, 2008 5:37 pm
by AndrexP
Thank you for the detailed explanation. I often find that the digital camera reveals my flaws... but I can find no fault with your painting!

I have not yet dared to put PE on a kit before painting, but you have nudged me in that direction. First, though, I have to get this pair off the ways: http://picasaweb.google.com/ARP1757/CG47Project#

As far as paint lifting, I pretty much solved that problem by improving the profile of the underlying surface. For me, the easiest way is with a good primer -- I use Krylon grey from the rattle can. Sanding just enough to roughen the surface a bit seems to work well enough to make acrylics stay put. too. Alternately, I found that if I lightly wipe styrene surfaces with a swab soaked in acetone, the solvent will roughen the surface enough to make it ready to receive paint.