Where can one buy those nice big fingers for the pictures ?
XXXDAn
1/700 Amagi diorama
Moderators: MartinJQuinn, JIM BAUMANN, Jon, Dan K
-
dafi

- Posts: 1004
- Joined: Mon Mar 12, 2012 11:13 am
- Location: Ludwigsburg/Germany
- Contact:
Re: 1/700 Amagi diorama
To Victory and beyond ...
viewtopic.php?f=59&t=99050&start=60
See also our german forum for the age of Sail and History:
http://www.segelschiffsmodellbau.com
viewtopic.php?f=59&t=99050&start=60
See also our german forum for the age of Sail and History:
http://www.segelschiffsmodellbau.com
-
Dan K
- Posts: 9052
- Joined: Tue Jan 11, 2005 10:56 am
- Location: New York City
Re: 1/700 Amagi diorama
I'm up to "astounding". The rust effect especially so.
-
marijn van gils
- Posts: 2686
- Joined: Tue Feb 06, 2007 10:24 am
- Location: Belgium
Re: 1/700 Amagi diorama
Many thanks guys! 
Cheers,
Marijn
I'm not sure... I grew this one myself. Organic is always the best!dafi wrote:Where can one buy those nice big fingers for the pictures ?
Cheers,
Marijn
-
zs180

- Posts: 670
- Joined: Sun Oct 12, 2008 3:55 am
- Location: Budapest, Hungary
Re: 1/700 Amagi diorama
Mightily impressive work, just what I expected from you!
-
Strategos Augustus

- Posts: 537
- Joined: Sat Feb 08, 2014 1:58 pm
- Location: New Hampshire , United States
Re: 1/700 Amagi diorama
I have stickied your thread Marijn for future reference.
I feel a wholesale, blatant borrowing of ideas is in the pipeline.
I wish I could see this in person, it looks like you may have hit a very happy aggregate surface finish. Very plausible for an outdoor lump of wrecked metal.
The dark drybrushing in particular looks like a real success.
I am curious as to what inspired you to do the shadow effect after the other weathering? I have always implemented this type of effect very early in the process where the lack of control with an enamel pinwash is not a problem.
Si hortum in bibliotheca habes, nihil deerit.
- Consul Marcus Tullius Cicero
-
EJFoeth
- Posts: 2915
- Joined: Wed Jan 21, 2009 1:51 pm
Re: 1/700 Amagi diorama
The interesting part about lining in shadows (and adding highlights) by brush, is that you have much more control than a pin wash; the colour is more concentrated and there's little (or no) risk for flooding adjacent parts. When you make an error you can correct it very easily with a wet brush, or remove a bit of the wash if the effect is too strong. It takes more time but in the end the effect is much better. If you add the shadows first, then subsequent washes that are also present fade out the effect a bit, especially lighter washes.
I tried applying Marijn's painting technique with shadows and highlights and I encourage everyone to try it. I'm not expecting to get the same level of quality (because this takes some practice ), but I did get much better results than with pinwashes. Adding highlights works much better than drybrushing; if you're not careful you can add that 'faded' , sun-bleached look that is very difficult to undo.
I tried applying Marijn's painting technique with shadows and highlights and I encourage everyone to try it. I'm not expecting to get the same level of quality (because this takes some practice
Last edited by EJFoeth on Tue Nov 07, 2017 5:47 pm, edited 1 time in total.
-
Bangor lad

- Posts: 47
- Joined: Sat Dec 20, 2014 6:22 am
Re: 1/700 Amagi diorama
Outstanding!
Dave
Currently on the workbench: Tamiya USS Enterprise; Airfix 1/1200 Ark Royal
Currently on the workbench: Tamiya USS Enterprise; Airfix 1/1200 Ark Royal
-
MartinJQuinn

- Posts: 8543
- Joined: Tue Jan 11, 2005 1:40 pm
- Location: New Jersey
Re: 1/700 Amagi diorama
Fantastic work! Your attention to detail is astounding!
Martin
"Tomorrow is the most important thing in life. Comes into us at midnight very clean. It's perfect when it arrives and it puts itself in our hands. It hopes we've learned something from yesterday." John Wayne
Ship Model Gallery
"Tomorrow is the most important thing in life. Comes into us at midnight very clean. It's perfect when it arrives and it puts itself in our hands. It hopes we've learned something from yesterday." John Wayne
Ship Model Gallery
-
marijn van gils
- Posts: 2686
- Joined: Tue Feb 06, 2007 10:24 am
- Location: Belgium
Re: 1/700 Amagi diorama
Many thanks guys!
But I always apply filters before shading, as the colours of the thinned paints also run into the corners and details like a wash, obliterating the shading in places. I can apply some extra dusty or rusty filters or washes after the shading, but the more general main work is done before.
With Amagi, an important weathering effect is the flaked and rusted areas. As the chipped effect was mostly done with hairspray technique, it was part of the airbrushing process and therefore had to precede shading too. Because of the dusty and rusty effects, the filters also provide a lot of 'effect'. Therefore it may look like I did the shading very late in the weathering process, but in fact it is not.
Other effects follow after the shading: highlighting, reverse drybrushing, dark and rusty streaks and spots, local paint chipping, plate effect, ... while in fact only the filters precede it.
The island didn't receive some of the above effects (simulation of plate seams, paint chipping, rusty streaks) or only very little (dark streaks), so I could finish it more quickly than the rest of the model.
Evert-Jan is also correct about the nature of the control I mean, which is more about the result than about the process: to get the shadows painted exactly where I want them to be, as finely as possible, while having as much contrast as possible.
But there is nothing wrong with a pinwash when done properly, and it does take a lot less time. Lining the shadows with more opaque paint just enables one to go that last 5% further in finesse and contrast, but the time it requires is certainly not for everyone.
Cheers,
Marijn
Evert-Jan already wrote the most important part:Strategos Augustus wrote:I am curious as to what inspired you to do the shadow effect after the other weathering? I have always implemented this type of effect very early in the process where the lack of control with an enamel pinwash is not a problem.
I do apply the shading as early as possible, as it is an important defining aspect in my painting style and gives a good bases to continue work on.EJFoeth wrote:If you add the shadows first, then subsequent washes that are also present fade out the effect a bit, especially lighter washes.
But I always apply filters before shading, as the colours of the thinned paints also run into the corners and details like a wash, obliterating the shading in places. I can apply some extra dusty or rusty filters or washes after the shading, but the more general main work is done before.
With Amagi, an important weathering effect is the flaked and rusted areas. As the chipped effect was mostly done with hairspray technique, it was part of the airbrushing process and therefore had to precede shading too. Because of the dusty and rusty effects, the filters also provide a lot of 'effect'. Therefore it may look like I did the shading very late in the weathering process, but in fact it is not.
Other effects follow after the shading: highlighting, reverse drybrushing, dark and rusty streaks and spots, local paint chipping, plate effect, ... while in fact only the filters precede it.
The island didn't receive some of the above effects (simulation of plate seams, paint chipping, rusty streaks) or only very little (dark streaks), so I could finish it more quickly than the rest of the model.
Evert-Jan is also correct about the nature of the control I mean, which is more about the result than about the process: to get the shadows painted exactly where I want them to be, as finely as possible, while having as much contrast as possible.
But there is nothing wrong with a pinwash when done properly, and it does take a lot less time. Lining the shadows with more opaque paint just enables one to go that last 5% further in finesse and contrast, but the time it requires is certainly not for everyone.
Cheers,
Marijn
-
GewoonWouter

- Posts: 225
- Joined: Sat Mar 26, 2016 2:58 am
- Location: Belgium
Re: 1/700 Amagi diorama
Amazing work again Marijn, and the before and after photos clearly show the effectiveness of the methods used. This is just godsmackingly good I must say. I will try to incorporate some of those techniques on my Yamato once I find the time again to continue.
Needless to say I'm looking forward to see your next update
Cheers
Needless to say I'm looking forward to see your next update
Cheers
-
Aop Aur

- Posts: 972
- Joined: Thu Jul 02, 2015 1:06 am
- Location: Bangkok, Thailand
Re: 1/700 Amagi diorama
...........(no words).... 
On the way:
--1/350 Tamiya DKM Tirpitz Nov 1944
--1/350 scratch-build HMS Lion never built battleship (1938)
And our artworks!
--1/350 Tamiya DKM Tirpitz Nov 1944
--1/350 scratch-build HMS Lion never built battleship (1938)
And our artworks!
-
SilverGhost

- Posts: 421
- Joined: Wed Jul 29, 2015 3:37 am
- Location: Moscow, Russia
- Contact:
-
marijn van gils
- Posts: 2686
- Joined: Tue Feb 06, 2007 10:24 am
- Location: Belgium
Re: 1/700 Amagi diorama
Many thanks guys!
Cheers,
Marijn
Cheers,
Marijn
-
LE BOSCO

- Posts: 2261
- Joined: Thu Aug 27, 2009 11:05 am
- Location: Paris France
Re: 1/700 Amagi diorama
HI Marijn
at each progress, I take a big slap in the face just sublim ...your are the "Werner" of our hobby
bravo maitre
cheers
Nicolas
at each progress, I take a big slap in the face
bravo maitre
cheers
Nicolas
-
marijn van gils
- Posts: 2686
- Joined: Tue Feb 06, 2007 10:24 am
- Location: Belgium
Re: 1/700 Amagi diorama
Merci beaucoup Nicolas!
Again some time since the last update� I have been busy though! But the painting effect was pretty time-consuming�
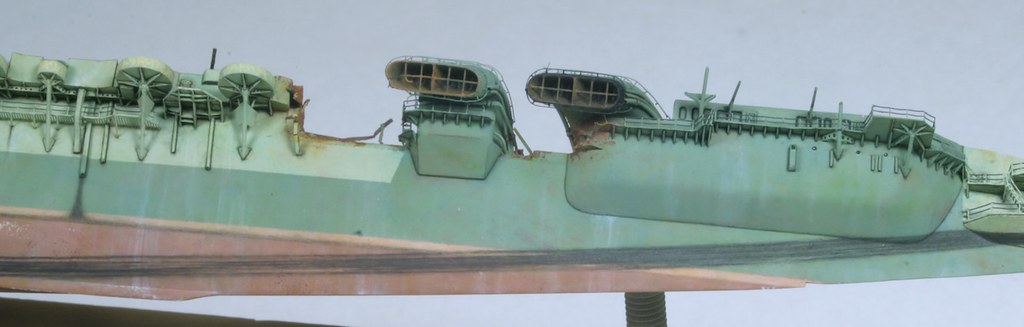
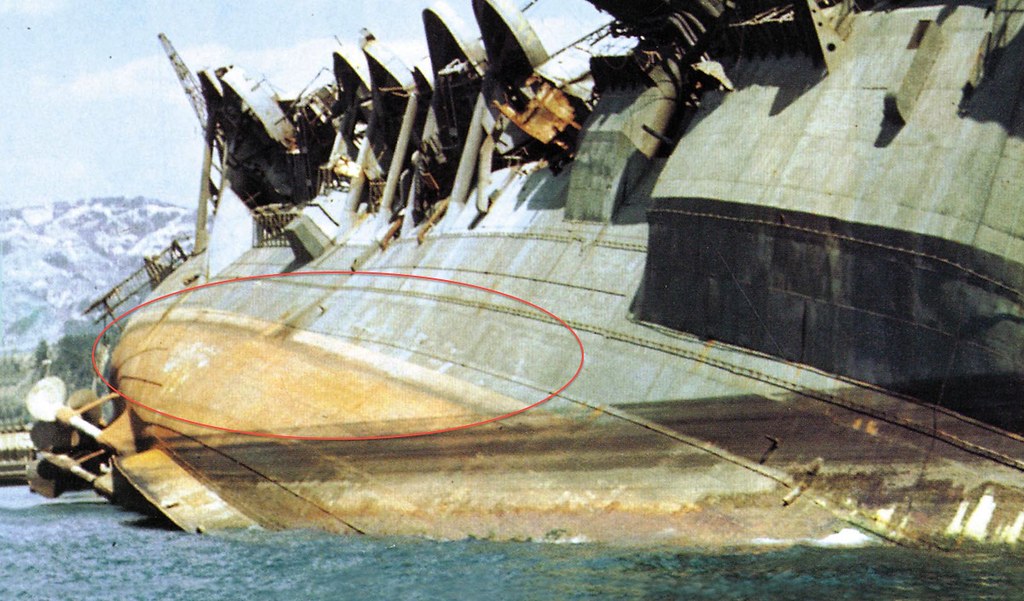
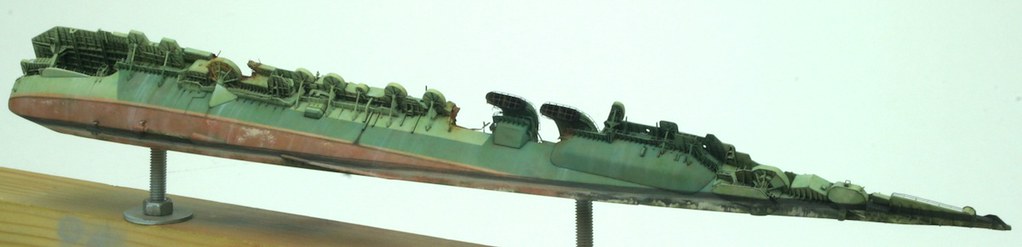
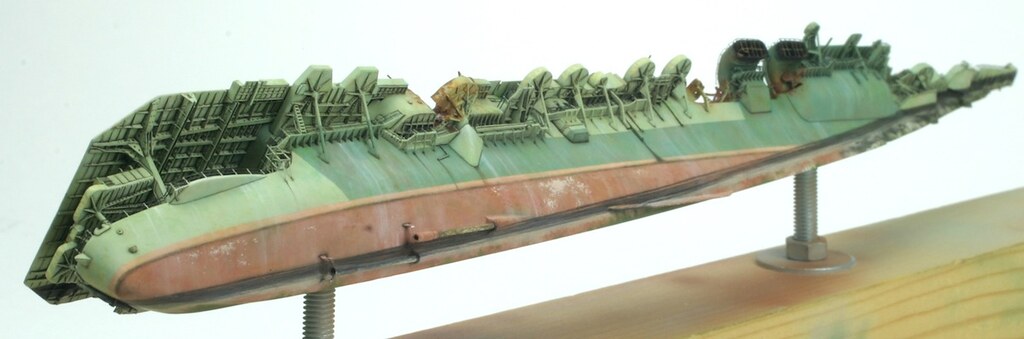
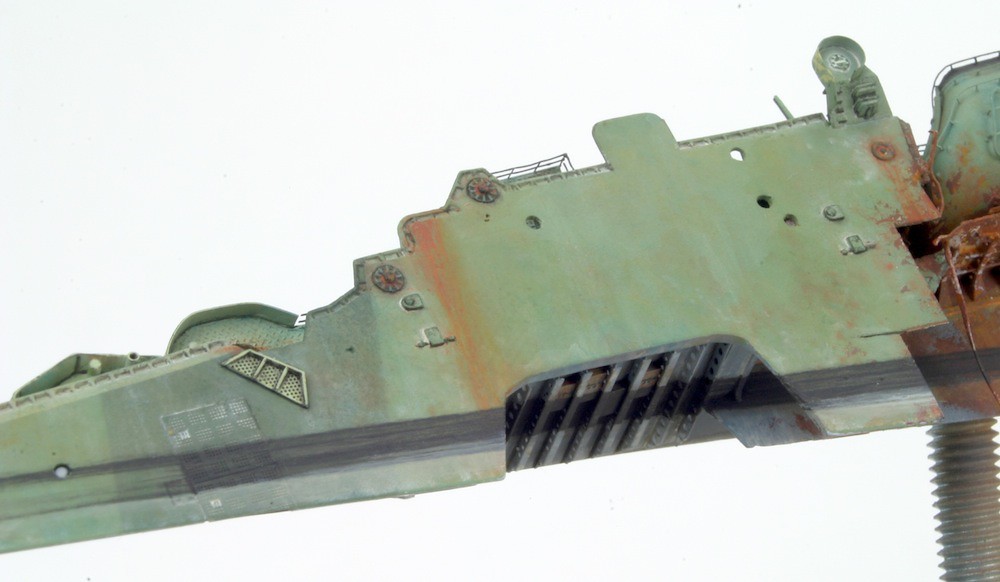
I finished the dirty tidal lines all around the ship, as clearly seen here:
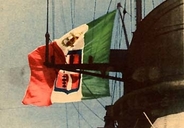
But I followed the (darker) colours of the video, as I used the video as the main reference for the rest of the colours too:

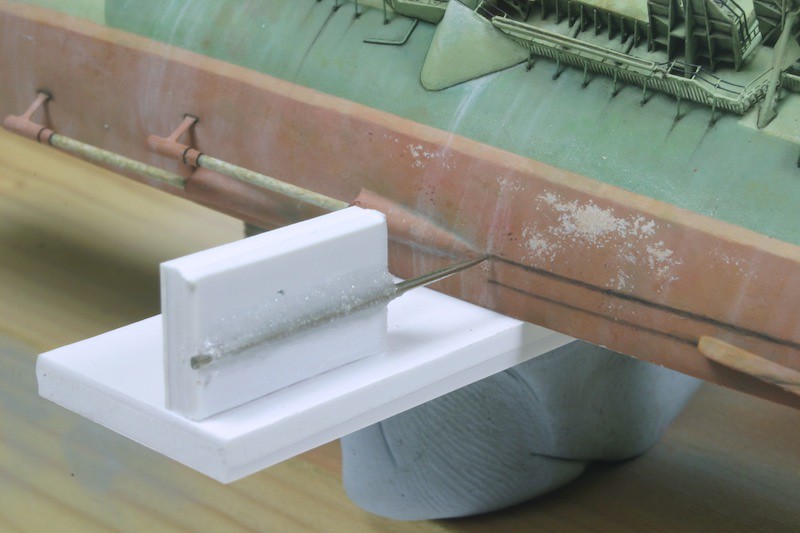
I started by painting a thin line at the top. With a simple homemade device to keep the exact level, I painted tiny faint dots. Then, I connected these dots to a line, eyeballing to get it strait and checking with the device. The edges of the line were blended for soft transitions.
The lower line was painted by eye, using the top line as a visual reference. Next, more lines were painted in between, and the remaining space darkened to varying levels.
The dark lines finished. Note that the intensity is varied a bit, so the effect doesn�t become too uniform. All of this was hand painted around the entire model. That was very time-consuming (about 25 hours I think?), but the only way I could achieve my desired level of control and finesse.
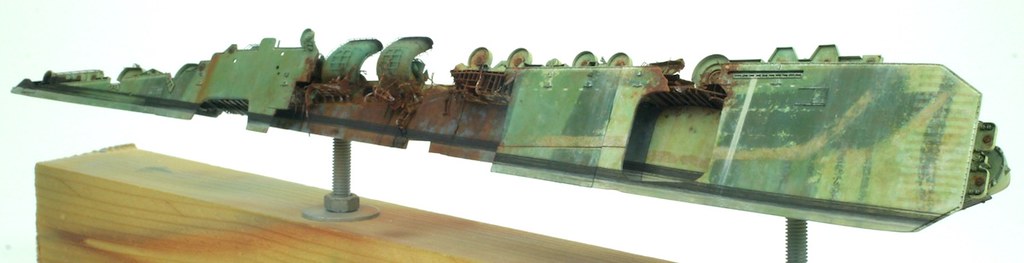
Next, more dirt was painted below the dark lines. I didn�t take step-by-step photo�s of this, as I had to mess around to find what works.
But I will try to summarize:
- Paint a more or less transparent brownish grey zone below dark lines, often overlapping the dark lines too. Blend downwards. Locally paint some transparent ochre and flesh over it to break uniformity.
- Locally paint some base colour (anti-fouling red for example) in irregular line and splodges below the grey zone. Blend downwards, but leave sharp transition to the grey.
- Paint green growth and dirt to the bottom edge, but only here and there. Blend the edges a bit.
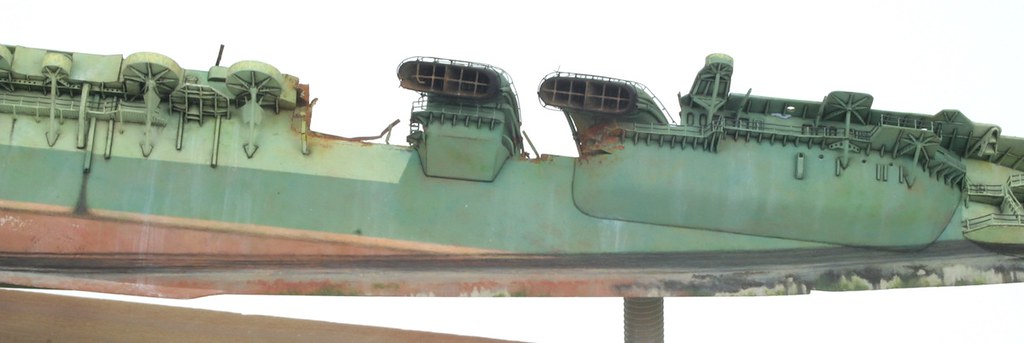
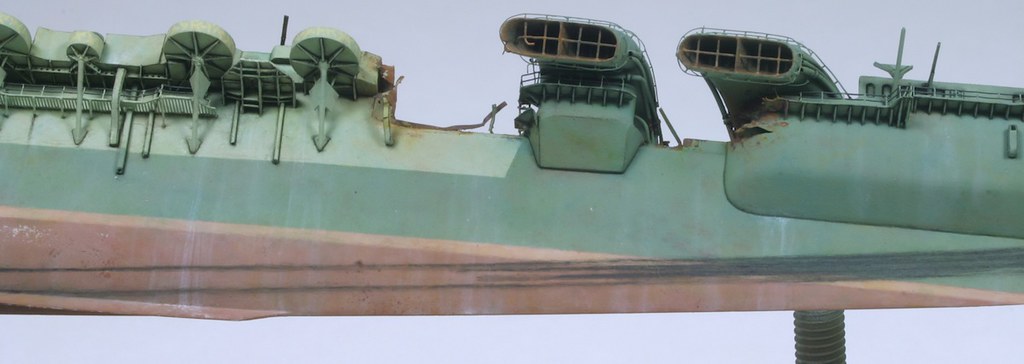
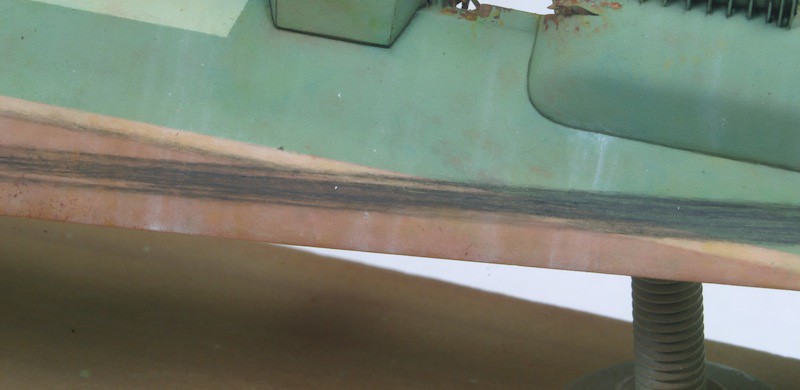
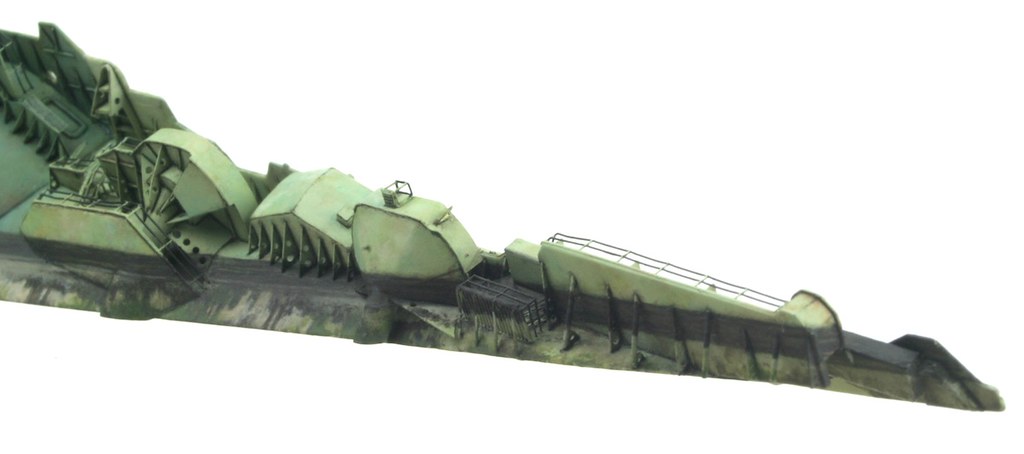
Close-up with only the dark lines:
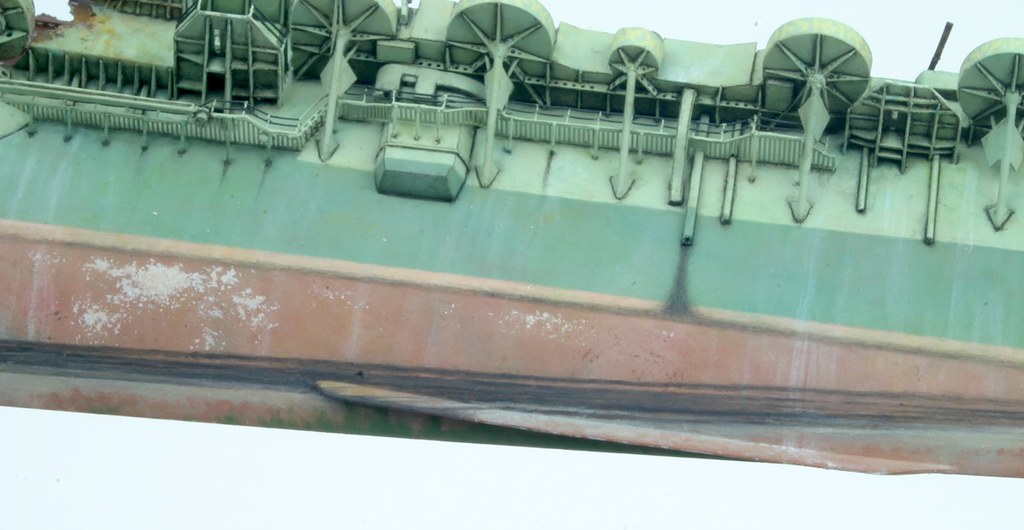
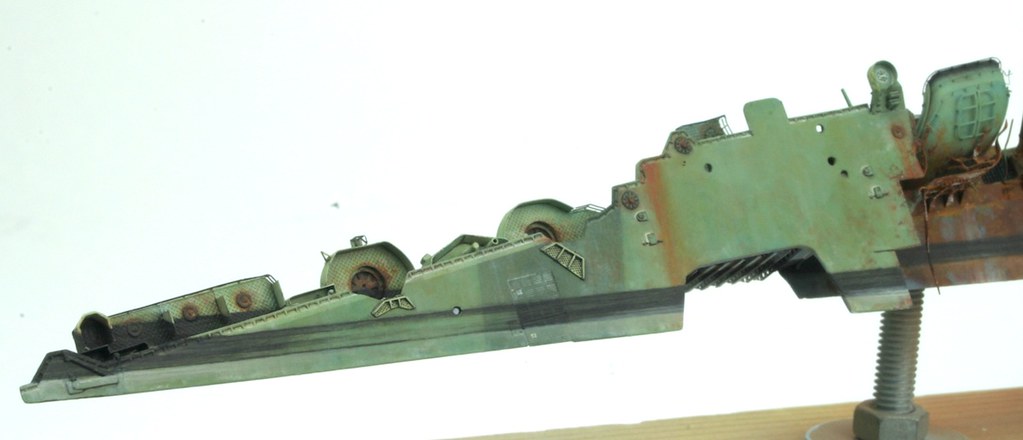
And with the dirt below.
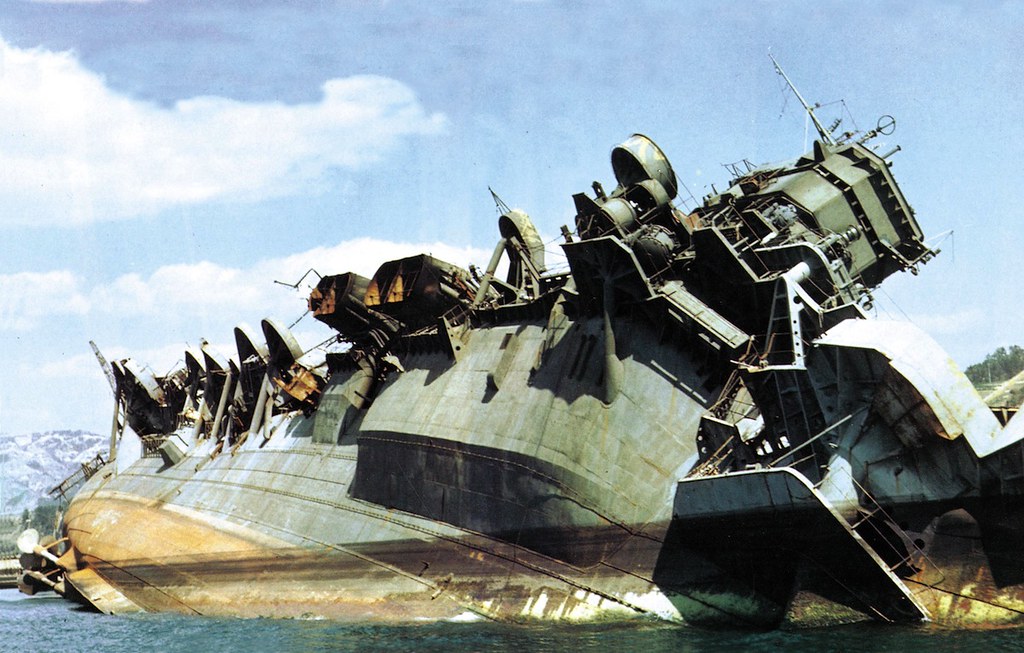
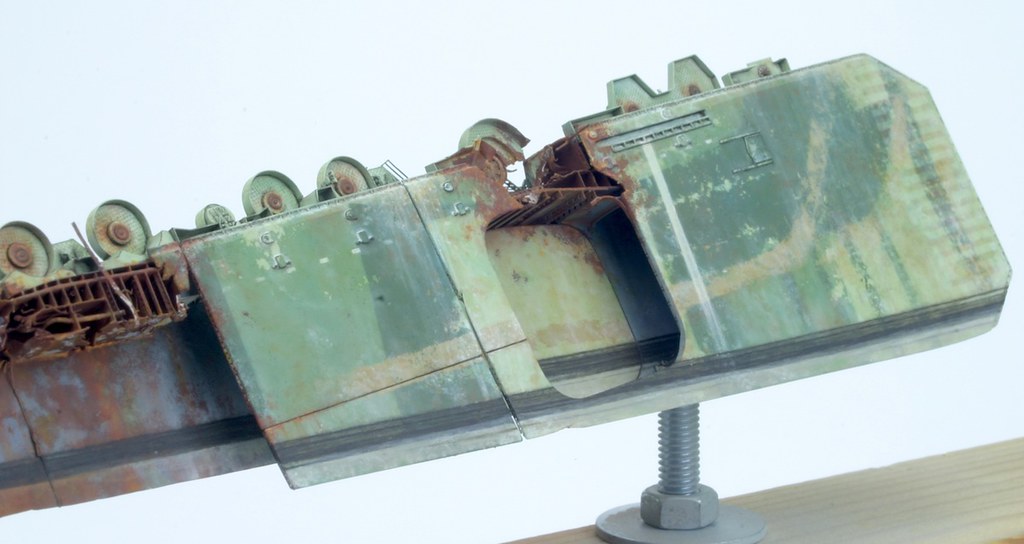
Towards the starboard bow, the photos show some heavier wear, where the paint seems to have been worn away completely. This was painted with light grey paint, with several filters over it (flesh, ochre, brown) to vary the tones. Very dark brown (the same as the dark lines) was used for the dirty �transition� to the grey zone.

Note I also added the dirty waterline stain, from when the ship was still floating upright (compare with historical photos below). Now the sun-bleached anti-fouling red above this line makes more visual sense.
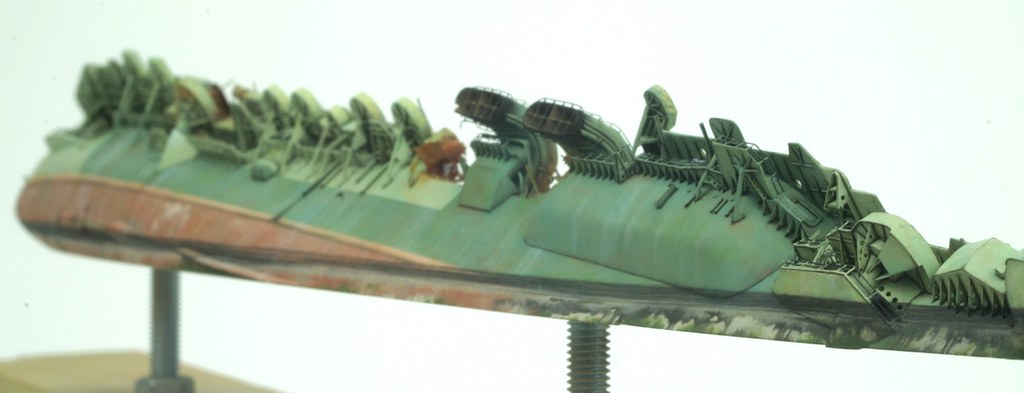
Working around these kind of details while keeping level lines was especially time-consuming:
The decks are only tacked in place with Blu-Tack, necessary to get the levels correct for both flight deck and hangar deck.

The rusted areas didn�t receive a grey zone below the dark lines, but rather a light rusty zone:
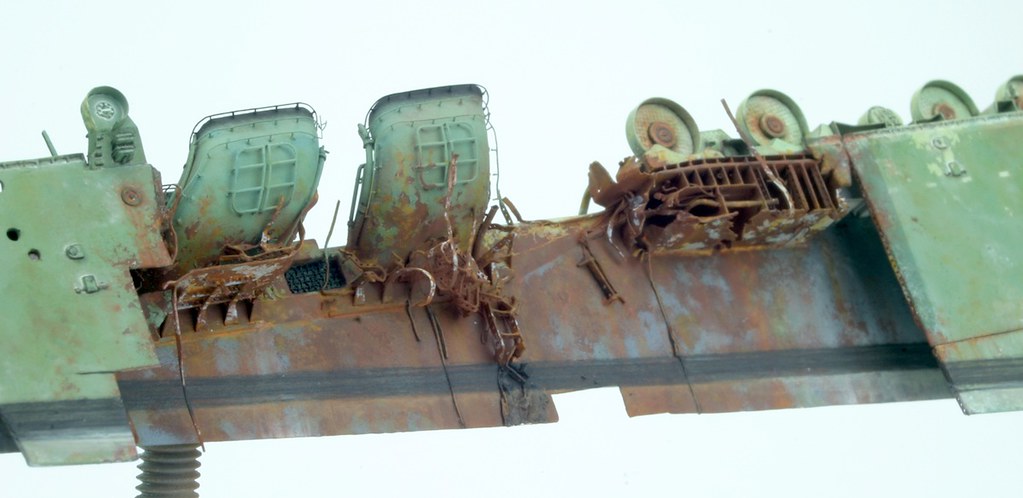

Everything was done with Humbrol enamels by the way.
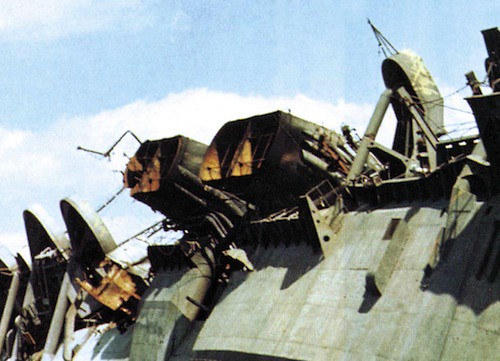
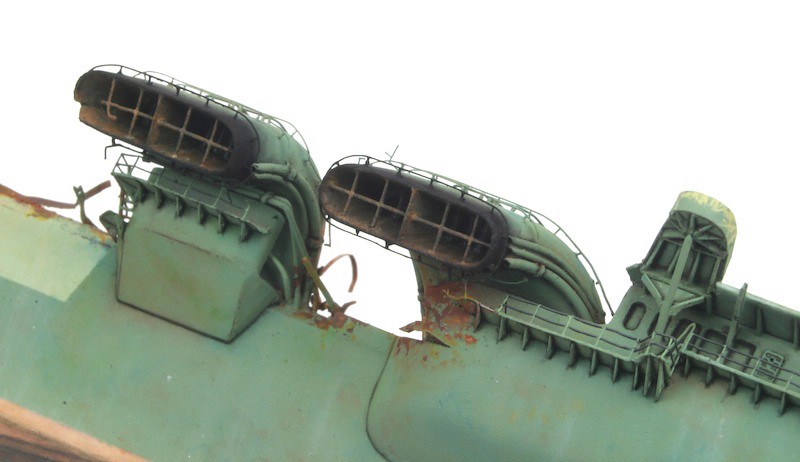
In between, I also finished the stacks.
On the photographs, their interior looks rusted while there is some black soot around the outside edge. I have no idea why it is like that, but I painted accordingly.
First some rust inside with Humbrol enamels:
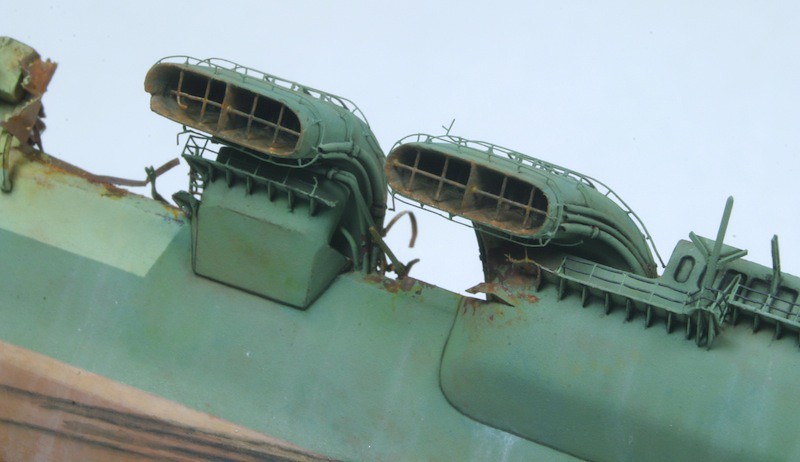
And soot with black enamel and some black pigment powders:
Cheers!
Marijn
Again some time since the last update� I have been busy though! But the painting effect was pretty time-consuming�
I finished the dirty tidal lines all around the ship, as clearly seen here:
But I followed the (darker) colours of the video, as I used the video as the main reference for the rest of the colours too:
I started by painting a thin line at the top. With a simple homemade device to keep the exact level, I painted tiny faint dots. Then, I connected these dots to a line, eyeballing to get it strait and checking with the device. The edges of the line were blended for soft transitions.
The lower line was painted by eye, using the top line as a visual reference. Next, more lines were painted in between, and the remaining space darkened to varying levels.
The dark lines finished. Note that the intensity is varied a bit, so the effect doesn�t become too uniform. All of this was hand painted around the entire model. That was very time-consuming (about 25 hours I think?), but the only way I could achieve my desired level of control and finesse.
Next, more dirt was painted below the dark lines. I didn�t take step-by-step photo�s of this, as I had to mess around to find what works.
But I will try to summarize:
- Paint a more or less transparent brownish grey zone below dark lines, often overlapping the dark lines too. Blend downwards. Locally paint some transparent ochre and flesh over it to break uniformity.
- Locally paint some base colour (anti-fouling red for example) in irregular line and splodges below the grey zone. Blend downwards, but leave sharp transition to the grey.
- Paint green growth and dirt to the bottom edge, but only here and there. Blend the edges a bit.
Close-up with only the dark lines:
And with the dirt below.
Towards the starboard bow, the photos show some heavier wear, where the paint seems to have been worn away completely. This was painted with light grey paint, with several filters over it (flesh, ochre, brown) to vary the tones. Very dark brown (the same as the dark lines) was used for the dirty �transition� to the grey zone.
Note I also added the dirty waterline stain, from when the ship was still floating upright (compare with historical photos below). Now the sun-bleached anti-fouling red above this line makes more visual sense.
Working around these kind of details while keeping level lines was especially time-consuming:
The decks are only tacked in place with Blu-Tack, necessary to get the levels correct for both flight deck and hangar deck.
The rusted areas didn�t receive a grey zone below the dark lines, but rather a light rusty zone:
Everything was done with Humbrol enamels by the way.
In between, I also finished the stacks.
On the photographs, their interior looks rusted while there is some black soot around the outside edge. I have no idea why it is like that, but I painted accordingly.
First some rust inside with Humbrol enamels:
And soot with black enamel and some black pigment powders:
Cheers!
Marijn
-
Goodwood

- Posts: 1257
- Joined: Mon Nov 11, 2013 11:01 pm
- Location: Detroit area
Re: 1/700 Amagi diorama

Sean Nash, ACG (aircraft camo gestapo)
On the ways:
1/200 Trumpeter HMS Nelson
1/700 Tamiya USS Yorktown CV-5
In the stash:
1/35 Italiari PT-109
1/35 Tamiya "Pibber" Patrol Boat
1/350 Trumpeter USS Yorktown CV-10
On the ways:
1/200 Trumpeter HMS Nelson
1/700 Tamiya USS Yorktown CV-5
In the stash:
1/35 Italiari PT-109
1/35 Tamiya "Pibber" Patrol Boat
1/350 Trumpeter USS Yorktown CV-10
-
Vladi

- Posts: 810
- Joined: Mon Feb 21, 2011 6:38 am
- Location: Czech Republic
- Contact:
Re: 1/700 Amagi diorama
Really hard to find the right word... absolutely wonderfull!
Battle of Savo Island Collection (all 1/700)
Recently completed: HMAS Australia | USS Patterson DD-392
At works: USS Astoria CA-34
Prep stage: USS Vincennes CA-44 | Yubari | Kako
Recently completed: HMAS Australia | USS Patterson DD-392
At works: USS Astoria CA-34
Prep stage: USS Vincennes CA-44 | Yubari | Kako
-
pascalemod
- Posts: 2011
- Joined: Sat Jul 30, 2016 5:33 pm
- Location: Stockholm, Sweden
Re: 1/700 Amagi diorama
Will you mount it on water? Kinda feel like it deserves some perfect water base...
- @Shipific on IG
my gallery
my gallery
-
EJFoeth
- Posts: 2915
- Joined: Wed Jan 21, 2009 1:51 pm
Re: 1/700 Amagi diorama
Nice progress! Is the dust applied per brush and left there? Does it need fixation?
And 25 hours on the lines?
And 25 hours on the lines?
-
Koppalakki
- Posts: 581
- Joined: Wed Aug 22, 2012 6:19 pm
- Location: Finland
Re: 1/700 Amagi diorama
Oh yes, this gets me going!
These are those small things that separate you from the rest (putting 25h into painting some black lines )!
)!
Not many realize how long such small things take if you really want to pull them off!
Damn
These are those small things that separate you from the rest (putting 25h into painting some black lines
Not many realize how long such small things take if you really want to pull them off!
Damn