Page 24 of 72

Re: HMS Victory and Le Redoutable at Trafalgar (1/300)

Posted: Mon Jan 25, 2021 7:01 am
by Maarten Sch�nfeld
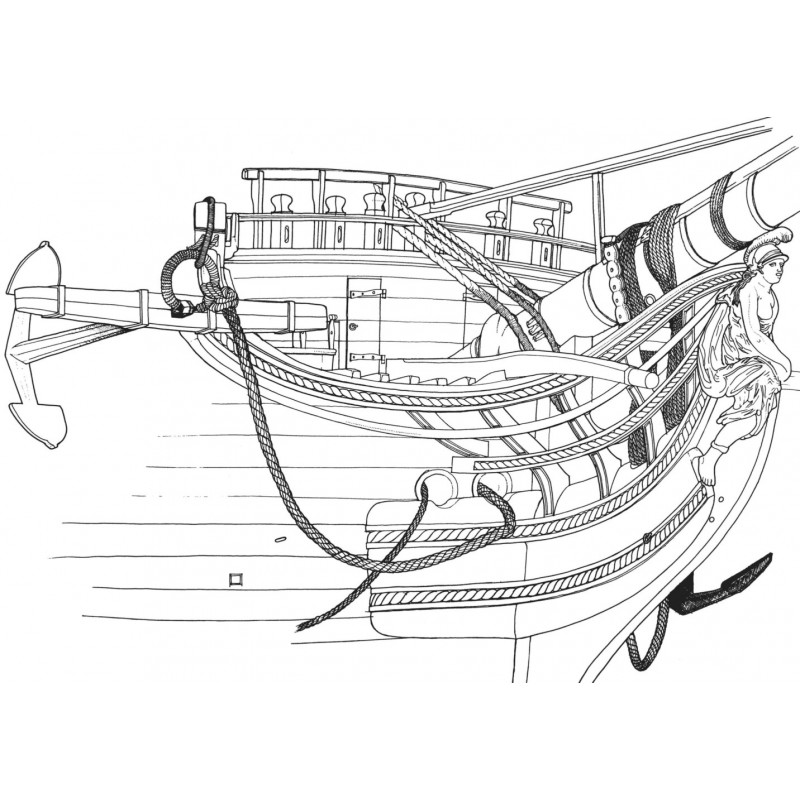
A small sidestep: the 'cheeks' are often missed in kits. here my corrections to the Airfix Vasa. Look at the considerable curves, if the part would be an angle (or worse: two separate parts) it would definitely be too weak. It is essential to be cut from an appropriate grown curved oak.
P1030121 reduced.jpg
P1030120 reduced.jpg
Btw: the Revell Wasa has these cheeks added correctly, but the Revell Batavia is also missing them completely!

Re: HMS Victory and Le Redoutable at Trafalgar (1/300)

Posted: Mon Jan 25, 2021 8:19 am
by Maarten Sch�nfeld
Hi Marijn,
The shape was modelled after Boudriot's plans of a typical French 74, which don't show an uninterupted curve like the cheecks of British ship of the period but show this 'kink'
Thanks for explaining and naming your reference. I have no opinion on the accuracy of Boudriot's plans, but just from an engineer's point of view the curve is essential to make the strain minimal. So the rather sharp 'kink' would be very suspect in my point of view. Even a little bit more gradual slope from one side to the other will make a great improvement in strain reduction.

And remember: these parts were always taken right out of the trees, with great effort to cut as little wood grain as possible, to preserve the natural strength. So imagine a very knurled old oak tree providing their bended trunk to cut these timbers from...

Re: HMS Victory and Le Redoutable at Trafalgar (1/300)

Posted: Mon Jan 25, 2021 1:17 pm
by Martocticvs
Trawling back to nearer the beginning of this thread, you posted this photo of a model of Redoutable:
Image

which appears to show a reasonably smooth blend between both 'arms' of the very wide unified cheek, rather than the kink you have.


French ships of this era were generally more lightly built than British or Spanish ships, since, in part, the French had the idea that it was beneficial for ships to 'work', or flex a bit. This may be one more visible example of this. Of course, this notion was comprehensively disproven during the mid-19th century and ships started growing larger as a result.

Re: HMS Victory and Le Redoutable at Trafalgar (1/300)

Posted: Mon Jan 25, 2021 2:11 pm
by Christian Bruer
wefalck wrote:Tempering in a baking oven at 100�C or so may be the solution. The pieces will need to be fixed in the desired postion during tempering. A hot-air gun at low temperature may do the job as well. The idea is to relieve the stresses from bending, while keeping the part in shape during the process. It's like in injection moulding, but staying below the flow-temperature of the styrene.
To heat the styrene in a baking oven sounds like a good idea. I will try this the next time. Thank you for your hint :thumbs_up_1:

Re: HMS Victory and Le Redoutable at Trafalgar (1/300)

Posted: Mon Jan 25, 2021 2:17 pm
by Christian Bruer
marijn van gils wrote: Hello Christian!
I did not bend these pieces, but I cut them to this shape. Since they form the main structure for the beakhead shape they need a very specific shape, so I didn't want to risk their shape being unstable in any way. The lower rail is also cut to shape, but the middle rail (both not yet in place in these pics) was bent. The latter is very thin and not really structural. Gluing was no problem there, because there were plenty of attachment points to the head, head timbers and hull.

Cutting thin curved shapes takes some care and time. I never cut directly to the final 'line', but leave some distance and gently carve the last bit away, and finish with sanding. The concave side is the hardest, so I do that first, while leaving the piece as part of the larger plastic sheet. So basically I'm carving a concave shape out of a (stable!) edge of plastic sheet. When that is finished, I cut the piece out of the sheet, and finish the convex side.
I'll try to do a little step-by-step the next time I'm doing this, that will show this better... ;)

I have used the boiling method before, but only for very thin items. It works very well, and I can imagine it would work with thicker items too. For simple circular curves it is quite easy (just need a glas or metal item with the correct diameter). But for more complex shapes like the main rail or head timbers some kind of former would need to be made to hold them in shape during submersion, which would be as difficult or time-consuming (or more!) as simply cutting the piece itself to shape...
I have not tried the oven yet.
Thank you for all the detailed information :smallsmile:
The more I think about the methods and techniques you use, the more I admire your work and passion for this project. Excellent work and craftsmanship in all aspects :thumbs_up_1:

Re: HMS Victory and Le Redoutable at Trafalgar (1/300)

Posted: Wed Feb 03, 2021 6:44 am
by marijn van gils
Many thanks Christian, Maarten and Martocticvs!

That (beautiful BTW!!!) model was made completely after Boudriot's plans.
But Boudriot draws the cheeks like this:
Image

So, it shows the kink I modelled, unlike the wooden model...

I also checked the text. The cheeks themselves are only the parts with rope-shaped moulding. The area under the lower cheek and the filling between both cheeks are added as a protection against slamming of the seas, but are not structurally part of the cheeks. The part above the top cheek protects against the anchor cables. Together they form an elegant entity.
So, this can explain why the moulded part follows a gentle curve while the 'flat' parts show a kink.

But then again, I have been looking at admiralty drawings of captured French 74's, and none of them show the cheeks really like he does. Many of them don't have anything in between, above or below them, and it never is as thick as in Boudriot's drawings (let alone like the wooden model).
So I don't know where Boudriot took his information (French sources I guess?), but maybe his rendition is also not really correct?
Anyway, I probably should have modelled the moulded parts (the cheeks themselves) with a gentler curve indeed! ;)

Great job on your Vasa by the way Maarten! :thumbs_up_1:
Will you display her as a full-hull model, or maybe like this: ;)
Image

Re: HMS Victory and Le Redoutable at Trafalgar (1/300)

Posted: Wed Feb 03, 2021 6:48 am
by marijn van gils
Meanwhile, I built the spars of Victory:

Image

1: spritsail yard
2: boomkins
3: fore: a) royal, b) topgallant, c) top, and d) main yards
4: main: a) royal, b) top, and c) main yards
5: mizzen: a) crossjack yard, b) spanker gaff, and c) spanker boom

This time, I used aluminium to keep their weight down while maintaining stiffness. It was also much easier to model the damage of the fore top yard than it would have in brass.
Only the main royal yard and the spanker boom were made in styrene, as they certainly won�t have any stress from rigging.

The only disadvantage of aluminium was that I could only find 3mm diameter rod. This was ok for the main yards (max. diameter of about 2mm), but for the smaller spars it necessitated an excessive amount of filing down.
If anyone knows of a supplier of thinner aluminium rod, please let me know!


I didn�t make any step-by-step photo�s, except this:
Shaping the cleats is often easier when they are already in place. So, I glued oversized bits of plastic to the yard (top), and then filed them down to their final shape (bottom):
Image

A close-up to the spanker gaff and boom jaws. These were made in the same way: I glued 2 oversized pieces to each side of the spar, and then carved and filed them to their final shape.
Image

And everything in place on the ship:
Image

Image


A close-up of the bow, with spritsail yard and boomkins in place. She lost her sprit topsail, and I will later position the spritsail yard at an awkward angle too (it was lost by the end of the battle too).
Image

Lucas� report describes that Victory lost her for topsail before she reached the combined line. So I �broke� the topsail yard and draped it over the top, where it will be hanging from the remains of its rigging. The damaged sail will hang over the main yard.
Image

Image


Lucas also wrote that Victory lost the main topgallant mast before reaching the line. I decided I will have part of it hanging down from its rigging, with the royal yard still attached. A section of the mast and the topgallant yard are missing.
Image

And the mizzen came down completely, with only a stump about 3 metres above the poop deck remaining. I decided to keep a broken part of the spanker boom lying on the deck.
Image

Image


Now, I have to make the masts and spars of the Redoutable too! But first, I�ll do some other details for variation�s sake�

Re: HMS Victory and Le Redoutable at Trafalgar (1/300)

Posted: Wed Feb 03, 2021 9:30 am
by Maarten Sch�nfeld
marijn van gils wrote:So, it shows the kink I modelled, unlike the wooden model...

I also checked the text. The cheeks themselves are only the parts with rope-shaped moulding. The area under the lower cheek and the filling between both cheeks are added as a protection against slamming of the seas, but are not structurally part of the cheeks. The part above the top cheek protects against the anchor cables. Together they form an elegant entity.
So, this can explain why the moulded part follows a gentle curve while the 'flat' parts show a kink.

But then again, I have been looking at admiralty drawings of captured French 74's, and none of them show the cheeks really like he does. Many of them don't have anything in between, above or below them, and it never is as thick as in Boudriot's drawings (let alone like the wooden model).
So I don't know where Boudriot took his information (French sources I guess?), but maybe his rendition is also not really correct?
Anyway, I probably should have modelled the moulded parts (the cheeks themselves) with a gentler curve indeed! ;)
Hi Marijn,

Now I'm on familiar ground again! In fact there are two cheeks (slooiknie�n) each side of the beakhead. These are the parts with the rope embellishment to their narrow side. Because of the angle Boudriaut shows them it is inpossible to see that these are curved in planview. So in fact these two knees are still very similar as in the Vasa of a century and a half before! I have been looking at several other Temeraire class models now and in fact these al show the two cheeks curved.

The areas above, below and between is where the difference per ship lies, understandibly. These can be empty or filled up in one way or another, but have no structural importance.

Maarten

PS: thanks for your nice comment on Vasa! The model has progressed much further now, but still a long way to go. And in fact your build of Redoutable makes me ponder doing the same ship (not a diorama, I don't feel confident for that) using either the Heller Superbe or Glorieux kit as a basis.

Re: HMS Victory and Le Redoutable at Trafalgar (1/300)

Posted: Wed Feb 03, 2021 10:31 am
by wefalck
Look for aluminium welding rod on fleabay or in hardware stores. They are normally not pure alumnium, but Al-Mg-alloys and quite stiff. They seem to come from diameters of 1.5 mm upward. Aluminium wire comes in diameters of 1 mm up, but is probably too soft for the purpose.

Personally I would use steel (welding rods), but that is tough to work with, if you don't have a lathe. The copper-clad steel welding rods machine well and also soft and hard solder well. They are also cheap. I know some people frown on steel in shipmodelling, but I prefer it over brass for thin parts, because it is difficult to find hard brass.

Re: HMS Victory and Le Redoutable at Trafalgar (1/300)

Posted: Wed Feb 03, 2021 1:00 pm
by JIM BAUMANN
excellent yardage Marjinn !!! :thumbs_up_1: very good works!

wefalck wrote:

...>>> I know some people frown on steel in shipmodelling, <<< ....

I must confess I prefer using stainless steel welding rods--especially for long thin masts that carry plenty of rigging

equally hard to work with-
==> but no danger of ever corroding, unlike mild steel;
especially on a damp Island like the UK ! :big_grin:

cases in point,,,
the masts on my Mauretania
http://www.modelwarships.com/reviews/sh ... eview.html

were surprisingly long--as I embedded them into the seabed base of the ship
so to cantilever agiant the deck so as to carry the long antennas
they were very rigid!

On my model of the TS Winston Churchill--the real thing had one piece aluminium pole masts - silver anodised

so that just perfect for s/s welding rod !

see here the making method of teh tapered masts --almost identical to yours,...

viewtopic.php?f=60&t=165003#p718286

Re: HMS Victory and Le Redoutable at Trafalgar (1/300)

Posted: Thu Feb 04, 2021 3:39 am
by marijn van gils
Many thanks guys! :smallsmile:


Thanks for the tips Wefalck and Jim! :thumbs_up_1:

I do have steel rod at home for this purpose, but I found it important to keep the weight of the spars down. I want to connect them to the masts after painting and installing their sails and part of the rigging. So the connection will never be really strong, so I want to avoid stress caused by their own weight as much as possible.
Also, workability was important here for me. The octagonal sections would be very difficult to file in steel without proper machinery, but were pretty easy to do in aluminium. I also drilled the ends of the main and topsail yards for later addition of stunsail boom irons, which I could do manually in aluminium but not in steel.

But if I do have very tall and thin masts to make one day, I'll certainly be using stainless steel too!
JIM BAUMANN wrote:see here the making method of teh tapered masts --almost identical to yours,...
viewtopic.php?f=60&t=165003#p718286
I know; I 'stole' it from you! :big_grin: :big_grin: :big_grin:
I didn't adopt the top board to hold the tips yet, but I probably should for safety reasons... ;)
Maarten Sch�nfeld wrote:And in fact your build of Redoutable makes me ponder doing the same ship (not a diorama, I don't feel confident for that) using either the Heller Superbe or Glorieux kit as a basis.
Good idea! The scale is more in your ballpark, and it seems to be a very good kit (both are nearly identical). The major thing to modify will be to remove the unrealistic wood texture. That will take a bit of work, but shouldn't be too difficult.

And regarding the cheeks: yes, I think you got it completely correct! ;)

Re: HMS Victory and Le Redoutable at Trafalgar (1/300)

Posted: Thu Feb 04, 2021 5:27 am
by GewoonWouter
That's starting to look like a ship alright. Nice update ^^

Re: HMS Victory and Le Redoutable at Trafalgar (1/300)

Posted: Thu Feb 04, 2021 8:13 am
by Dan K
Ditto.

Re: HMS Victory and Le Redoutable at Trafalgar (1/300)

Posted: Thu Feb 04, 2021 9:18 am
by Devin
Looks amazing, Marijn. If I'm able to make it to SMC this fall, will you have this and the Lexington with you?

Re: HMS Victory and Le Redoutable at Trafalgar (1/300)

Posted: Thu Feb 04, 2021 9:39 am
by marijn van gils
Many thanks guys! :smallsmile:
Devin wrote:If I'm able to make it to SMC this fall, will you have this and the Lexington with you?
Absolutely! :big_grin: :thumbs_up_1: :wave_1:

Re: HMS Victory and Le Redoutable at Trafalgar (1/300)

Posted: Thu Feb 04, 2021 2:28 pm
by Christian Bruer
Hi Marijn,
Your clean and sharp work let me forget the real size of the model. I am always amazed by the high standard when I remind the real size of all the fine details :thumbs_up_1:

Re: HMS Victory and Le Redoutable at Trafalgar (1/300)

Posted: Fri Feb 05, 2021 10:39 am
by marijn van gils
Christian Bruer wrote:Hi Marijn,
Your clean and sharp work let me forget the real size of the model. I am always amazed by the high standard when I remind the real size of all the fine details :thumbs_up_1:
Thanks Christian!
Yes, macro photography is not always flattering, and I tend to zoom in a lot... :big_grin:
But the best solution is to see models in the flesh! Photo's can be deceptive anyway... ;)


Before moving on, I decided to first correct some mistakes I made earlier, and adjust some details.

The poop deck skylight is one of the few kit parts I used, but it stands too tall (thanks for the info Dafi!).
Image

So I sunk it deeper down. It is only 1mm deeper now, but that makes quite a difference in 1/300�
I also added three deck beams that run below it.
Image

I liked the detail Dafi added to his Victory �slice� of the rail that can open for the big carronades on the forecastle, so I added this too.
Before:
Image

After:
Image

On the port side, I left it closed (no close engagement on that side), but scribed the seams and added a sprue �hinge�:
Image

The marines walk is another of the few kit parts I�m using. The PE is very thick, but still too thin for this item, so I thickened it:
Image

That pattern may be very wrong, but you can only see the sides once in position (not glued yet):
Image

And for the gun port position of the Redoutable, I followed Boudriot but forgot to check admiralty drawings of actual T�m�raire class ships. This caused me to cut one port too little on the lower deck:
Image

So I cut an extra one on each side:
Image

Backtracking never seems fun, but these corrections were all much easier, faster and satisfying than I had imagined. Next time, I shouldn�t postpone them like I did this time!

Re: HMS Victory and Le Redoutable at Trafalgar (1/300)

Posted: Fri Feb 05, 2021 12:37 pm
by GewoonWouter
Well, the backtracking sure was worth it. It's this attention to detail which makes it stand out even more in regards to other built model ships.

Although I can imagine some of those alterations can be quite scary to undertake. You make adding an extra gun port look easy but I can only reckon that can easily go wrong if you don't take care. So - again - well done skipper :big_grin:

Re: HMS Victory and Le Redoutable at Trafalgar (1/300)

Posted: Sat Feb 06, 2021 4:14 am
by Frank Spahr
My thoughts exactly - that is utterly amazing work and stuff for another book for sure.

Re: HMS Victory and Le Redoutable at Trafalgar (1/300)

Posted: Mon Feb 08, 2021 7:27 am
by marijn van gils
Thanks Wouter and Frank!
GewoonWouter wrote:You make adding an extra gun port look easy but I can only reckon that can easily go wrong if you don't take care.
The cutting is exactly the same as for the other ones:
- measure carefully and draw the outline
- dril a 'big' hole
- cut with a 11P scalpel to size (but just a little too small)
- file to the final size (with sandpaper stuck to a strip of plastic sheet)
- clean the filed/sanded surfaces by scraping with the 11P scalpel

But indeed, care has to be taken indeed not to do damage to any other part of the ship while holding it. While focussing your attention on that gunport, it is too easy to forget the rest...
The decks are removable, but I had to be extra carefull not to damage the bow details (especially the railing on top of the beakhead bulkhead) and the railing around the poop deck.
Frank Spahr wrote:stuff for another book for sure.
Haha, I wouldn't know what to extra write in a book that I'm not writing here already! :big_grin: :big_grin: :big_grin: