Page 5 of 15
Re: 1/200 Pre dreadnought battleship IJN Mikasa after 1905
Posted: Sun May 25, 2025 10:47 am
by wefalck
Nice work as usual

Re: 1/200 Pre dreadnought battleship IJN Mikasa after 1905
Posted: Mon Jun 09, 2025 6:24 am
by Joelle
Thank you very much, Eberhard.
I'm particularly pleased to receive praise from someone with your expertise.
After a short break, I�m continuing.
The lower bridge houses are finished weathering and can be put on the deck for a test run.

Now I have to think about the most logical way to proceed.

I think the rear bridge house is not glued to the deck yet.

Because directly behind it the steam pinasses come onto their cradles.

It�s probably better to have a little more room for my fat fingers.

For the armored control center, I lined the entrance with a profile. It was clearly too thin.

And there isn�t much space in front of the bridge houses up to the tower.
So I�ve already fitted the lower parts of the tower into their barbettes and made them move freely. They were practically impossible to move.
And I�ve also prepared the lower ladders that belong on the mast.

Re: 1/200 Pre dreadnought battleship IJN Mikasa after 1905
Posted: Mon Jun 09, 2025 8:11 am
by wefalck
Yep, working out the sequence of assembly of such complex project is not so easy. The sequence may need to be different compared to the prototype.
Re: 1/200 Pre dreadnought battleship IJN Mikasa after 1905
Posted: Tue Jun 10, 2025 9:57 am
by Joelle
How true, Eberhard, this model demands everything from me. Building the Bismarck, in comparison, was like putting Lego bricks together. Simple geometric segments, a little brass, thread, and paint, and that's it.
But the Mikasa, everything so intricately and delicately held together, that ship really drives me crazy.
I'm curious to see if I'll be able to complete this build without a catastrophe.
Re: 1/200 Pre dreadnought battleship IJN Mikasa after 1905
Posted: Sat Jun 14, 2025 5:11 am
by Joelle
Just another small update that I had to do before moving further toward the bow.
I was still missing the bollards and other small items that would go directly in front of the bridge houses.

These are now also attached to the deck.

This had to be done so that I could install the companionways that lead to the main deck.

This means the inner area is almost complete.

And so the bridgehouse was glued in front of the steam pinnaces towards the stern. Otherwise, it would have been difficult to install the companionways behind the pinnaces.

Now I can start with the anchor area at the bow and have cut everything I need out of the boards.

Re: 1/200 Pre dreadnought battleship IJN Mikasa after 1905
Posted: Sat Jun 14, 2025 11:20 am
by MartinJQuinn
Really nice work. Love the weathering.
Re: 1/200 Pre dreadnought battleship IJN Mikasa after 1905
Posted: Sun Jun 15, 2025 6:12 am
by ModelMonkey
Brilliant.
Re: 1/200 Pre dreadnought battleship IJN Mikasa after 1905
Posted: Sun Jun 15, 2025 10:10 am
by pascalemod
looks alive!
Re: 1/200 Pre dreadnought battleship IJN Mikasa after 1905
Posted: Sun Jun 15, 2025 10:11 am
by marijn van gils
Re: 1/200 Pre dreadnought battleship IJN Mikasa after 1905
Posted: Mon Jun 16, 2025 7:59 am
by Joelle
Thanks guys for the great comments.
At first, I wasn't sure how much I should age the skin and was worried I'd done too much. But apparently, I'm on the right track if you say you like the weathering.
Re: 1/200 Pre dreadnought battleship IJN Mikasa after 1905
Posted: Sun Jun 22, 2025 4:35 am
by Joelle
Today we�ll continue without much ado.
I had time over the long weekend to finish the anchor section.

That was fiddly.

In this area, the Pontos set was used exclusively. KA failed to score points here.

Of course, double-link chains had to be purchased again.
It�s disappointing that two very expensive aftermarket kits like KA and Pontos don�t consider it necessary to include proper chains.

Re: 1/200 Pre dreadnought battleship IJN Mikasa after 1905
Posted: Tue Jun 24, 2025 6:59 am
by marijn van gils
Re: 1/200 Pre dreadnought battleship IJN Mikasa after 1905
Posted: Tue Jun 24, 2025 7:03 am
by SG1
I love that bow section!

Re: 1/200 Pre dreadnought battleship IJN Mikasa after 1905
Posted: Sun Jun 29, 2025 3:49 am
by Joelle
Thanks a lot, guys.
Yes, these chains do make a difference.
Let�s continue unspectacularly.
We�re still missing skylights, handwheels, and a winch on the main deck at the stern.
First, another small collection in my printed organizer.

Nothing complicated, so straight to the result.

The deck continues to fill, both front and back.

The small stuff on deck is now roughly completed.

I would like to show you this wonderfully detailed skylight a la Pontos again in a close-up.

That�s what sets these kits apart. Molded plastic can�t replicate that.
Re: 1/200 Pre dreadnought battleship IJN Mikasa after 1905
Posted: Sat Jul 05, 2025 8:18 am
by Joelle
And immediately, I have the next nerve-wracking construction phase ahead of me.
But I was particularly looking forward to this part. I�m starting to incorporate a miniature marvel of 3D printing technology into my model.
The 50-foot steam pinnace.
But first, I have to get it into the cradles and onto the struts.
I made a jig for that.

One each for the starboard and port sides. The stripes aren�t exactly evenly spaced on the two sides, and I have to take that into account.

I now glue the cradles onto the gauge and can then align and change them easily without damaging the now quite delicate Mikasa.
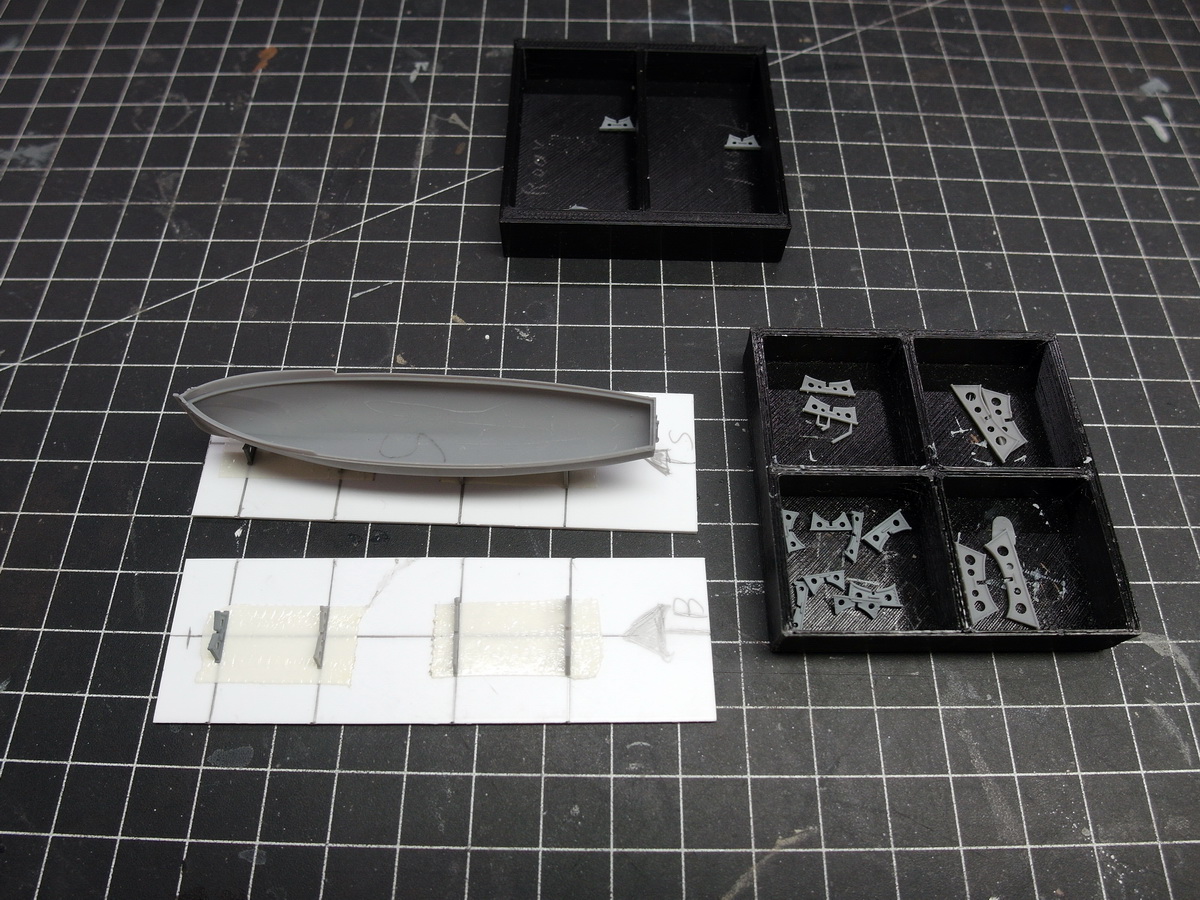
For example, the distance to the access to the higher deck is important, as the pinnace�s rudder extends quite far out. And toward the bow, I have to pay attention to the funnel rigging.

I have the same problem with the cradles as I did with the cutter amidships.
They don�t fit where they were originally printed. And besides, only three were planned. But the pinnace rests on four struts, so I need one more cradle. It�s nice that four boats will be hanging from the davits at the stern later, so I can repurpose the cradles.
Then I took out the profiles and adjusted them. It�s better.

And so the first pinnace could be placed in its cradles and placed on the deck for testing. You can see a faulty print in the hull. This has already been claimed, and I�m getting a new one.
In front of the boat, you can see a thin round rod. This is supposed to simulate the funnel rigging. You really have to think of everything. At least you should try to, so you don�t end up on your backside in the next step.

Re: 1/200 Pre dreadnought battleship IJN Mikasa after 1905
Posted: Sun Jul 20, 2025 1:29 am
by Joelle
I didn�t do much last week, as it was my wedding anniversary and I was traveling with my wife.
But the pinnaces have come a little further.
First, we had to negotiate this small edge on the upper deck.

I solved this by padding the front part of the cradles with a little styrene.

Fits quite well.

Afterwards I did a little more research on steam pinnaces and found this pretty good site with lots of pictures.
https://www.navtechlife.com/Steam-Pinna ... enders.htm
At first I wasn�t quite sure about the color scheme of the little boats, but then I found this rather simple model on the site.

So I�ll be able to encase them in the simple gray war dress, which is my favorite.
Then I�ll apply the base color. A real test of patience with these highly detailed little gems.

Then the obligatory aging.

First washing and dry painting.

Man, these boats look great.

Finally, the small pinnaces were put on the deck again for testing.

Re: 1/200 Pre dreadnought battleship IJN Mikasa after 1905
Posted: Sun Aug 17, 2025 12:20 pm
by Joelle
Ahoy, landlubbers.
After a short creative break, I�d like to return with a mini update.
I�ve pushed the pinnaces back again because I first have to take care of the funnel�s shrouds.
I�ve given this a few thoughts. Rope tensioners definitely need to be installed; anything else would be illogical.
How can I best do this without too much effort?
Here�s my solution:
First, I cut stanchions into small pieces. The green arrow points to pre-cut stanchions in a scale of 1:200. I want to use them as rope tensioners. The yellow arrow shows some in a scale of 1:350. They�ll serve as eyelets on the funnel.

First, the rigging twine was attached to the eyelet and glued into the lower hole of the funnel. It�s working very well so far.
It�s important for me to always use enough twine. This simplifies the whole knotting and threading process. Being cheap isn�t cool here.

Then I thread the yarn through the two holes in the cut-off railing support.

The yarn is passed through the deck eye and the second rope tensioner is put into position.

The first piece of rigging on the funnel is finished. Painted with aluminum paint, the thread running along the outside of the rope tensioner is almost invisible.

I�m happy with that and can now focus on the next pardunes.

Re: 1/200 Pre dreadnought battleship IJN Mikasa after 1905
Posted: Mon Aug 18, 2025 3:08 am
by marijn van gils
Re: 1/200 Pre dreadnought battleship IJN Mikasa after 1905
Posted: Fri Aug 22, 2025 8:35 am
by Joelle
Thank you, Marijn.
The pinnaces are really a highlight.
Today just two pictures of the finished guyed funnels.

This completes the first piece of rigging work.

Now I can devote myself to the pinnaces again.
Re: 1/200 Pre dreadnought battleship IJN Mikasa after 1905
Posted: Sat Aug 23, 2025 4:40 am
by SG1
Beautiful outcome!
