Was wondering if anybody out there has any tips or could share their experience with using a pressure pot during their resin casting? I have made a few masters of my own for a few things over the years. Mostly warship turrets and other things that are easy to cast without the use of any type of vacuum etc. and still come out looking decent. I was thinking of taking my casting to the next level however and possibly purchasing a pressure pot as I have been told this will help to eliminate a good deal of the air bubbles and ensure that the resin gets into all the smaller crevices, nooks and cranny's of more intricate or detailed molds.
I've found a couple of five gallon pressure pots online, is there anything special I should be looking for when buying something like this?
Does anybody have good experience with a specific model of pot they can recommend?
Is there anything special to keep in mind with regards to RTV molds that I want to use in a pressure pot? Special type of RTV needed or anything special with regards to how I set up my mold?
Any insight, details or stories that anyone could share with regards to pressure pot resin casting or resin casting in general would be appreciated.
Thanks much in advance.
Resin Casting With Pressure Pot etc.
Moderator: JIM BAUMANN
-
JasonW

- Posts: 543
- Joined: Wed Dec 23, 2009 1:05 pm
- Location: Massachusetts, USA
Resin casting with pressure pot etc.
"There seems to be something wrong with our bloody ships today"
-
NukeMM
- Back-Aft Models

- Posts: 2980
- Joined: Tue Feb 05, 2008 12:44 am
- Location: Omaha, NE, USA
Re: Resin casting with pressure pot etc.
Jason,
Here are the two pressure pots that I use.
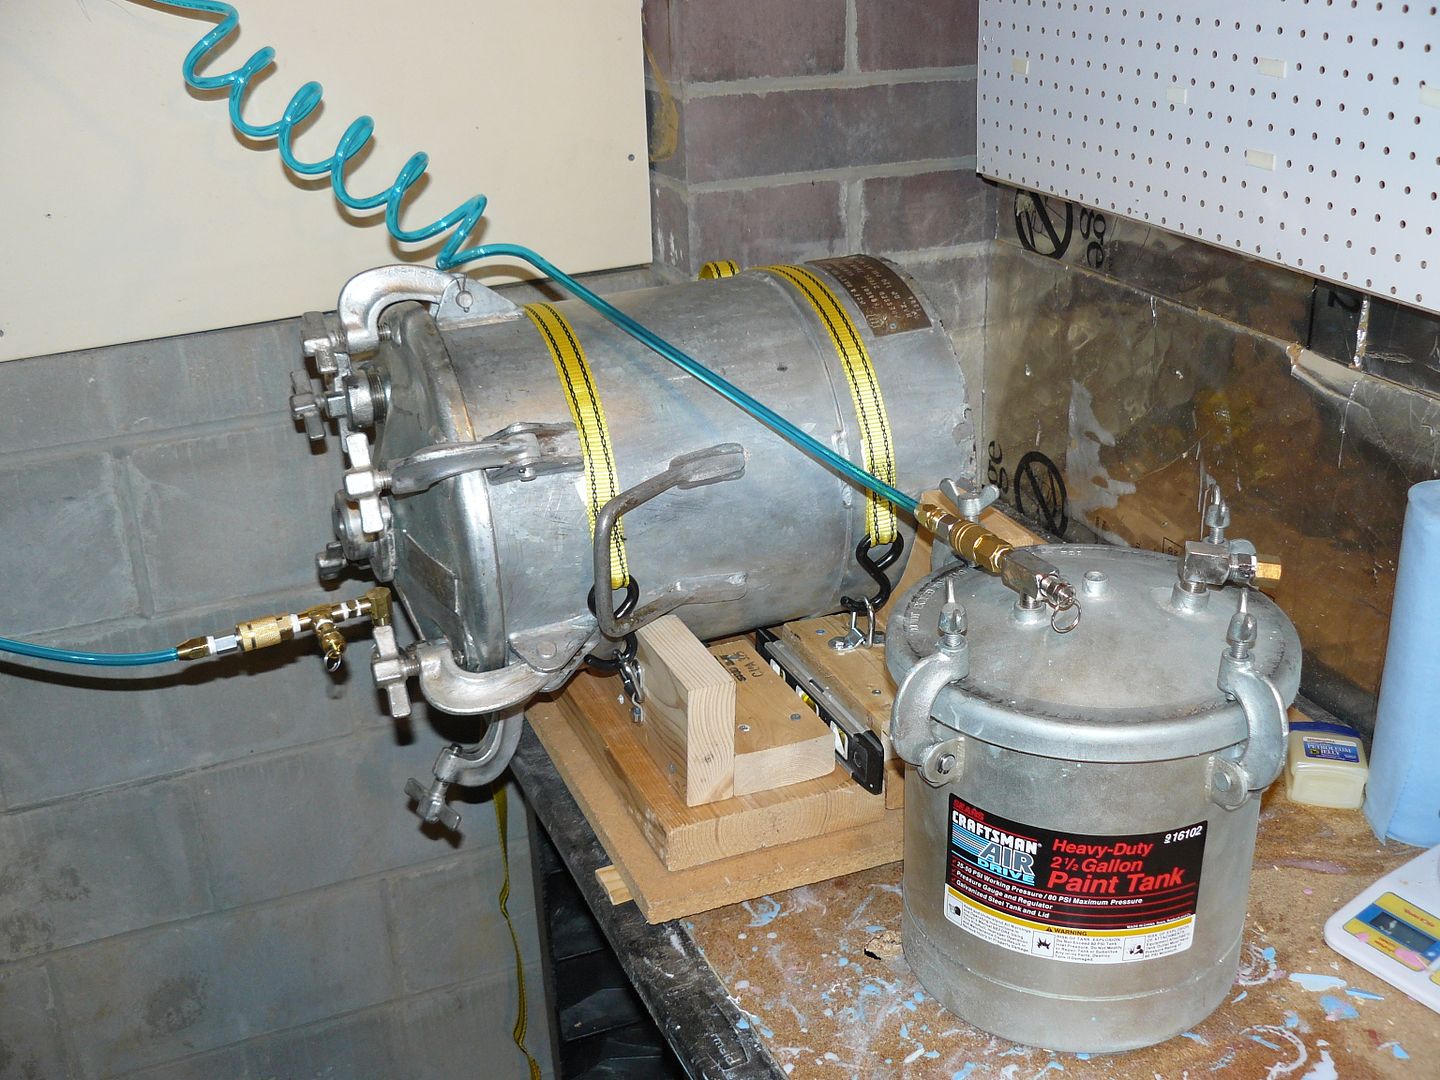

The small one is a SEARS paint spraying pot and is probably what you have. The large one is also a paint spraying pot with the air motor and mixing paddle attachements removed and extra holes brazed / welded shut. It is oriented horizontally with two shelves inside.
I use Smooth-On's Mold Max RTV and Smooth Cast resin from Reynolds.
http://www.reynoldsam.com/
Although the instructions for these materials do not indicate use of any pressure or vacuum, I use about 40-50 psi when creating molds and casting resin in the molds.
I don't have a vacuum chamber. The vacuum chamber can be used to evacuate the air from the rubber before pouring into the mold and can be used to remove the air bubbles from the resin in the mold before placing into the pressure pot. In lieu of a vacuum chamber, I use a toothpick to agitate the air bubbles out of the resin from the small recesses of the mold.
Using pressure vs. atmospheric, the additional pressure can force the air out of the rubber and if not all air is pressed out, it can make any remaining air bubbles in the rubber smaller or microscopic thus making any pourous-looking surfaces on the resin part much less noticable.
I have found that if you used pressure on a mold, you need to use about the same pressure on the resin in that same mold.
Here are the two pressure pots that I use.
The small one is a SEARS paint spraying pot and is probably what you have. The large one is also a paint spraying pot with the air motor and mixing paddle attachements removed and extra holes brazed / welded shut. It is oriented horizontally with two shelves inside.
I use Smooth-On's Mold Max RTV and Smooth Cast resin from Reynolds.
http://www.reynoldsam.com/
Although the instructions for these materials do not indicate use of any pressure or vacuum, I use about 40-50 psi when creating molds and casting resin in the molds.
I don't have a vacuum chamber. The vacuum chamber can be used to evacuate the air from the rubber before pouring into the mold and can be used to remove the air bubbles from the resin in the mold before placing into the pressure pot. In lieu of a vacuum chamber, I use a toothpick to agitate the air bubbles out of the resin from the small recesses of the mold.
Using pressure vs. atmospheric, the additional pressure can force the air out of the rubber and if not all air is pressed out, it can make any remaining air bubbles in the rubber smaller or microscopic thus making any pourous-looking surfaces on the resin part much less noticable.
I have found that if you used pressure on a mold, you need to use about the same pressure on the resin in that same mold.
Carl Musselman
(Formerly Back-Aft Models)
Photobucket
https://app.photobucket.com/u/carlomaha
YouTube Channel:
https://www.youtube.com/channel/UCcH4XX ... IHgFtIYhAg
(Formerly Back-Aft Models)
Photobucket
https://app.photobucket.com/u/carlomaha
YouTube Channel:
https://www.youtube.com/channel/UCcH4XX ... IHgFtIYhAg
-
NukeMM
- Back-Aft Models
- Posts: 2980
- Joined: Tue Feb 05, 2008 12:44 am
- Location: Omaha, NE, USA
Re: Resin casting with pressure pot etc.
This is how I set up my molds using Legos for the mold walls. Modeling clay will be wrapped and pressed around the outside perimeter of the Legos wall to prevent the draining of the rubber through the seams of the Legos.

This is a two-part mold in the first step of the process. There are details on top and underneath these parts so, the parts are inserted into the modeling clay and the edges at the level of the clay are carefully sealed with clay to prevent the rubber from oozing underneath.
Not shown in this photo are shallow holes that should be made in the clay, around the parts, to form alignment pegs for between the upper and lower halves of the mold.

This is in between the first and second steps of the two-part mold where the rubber has curred and the clay removed from the underside of the parts. Some rubber has oozed under these parts and the excess must be removed before the next pouring of rubber. I do this with an X-acto #17 chisel blade pulling the excess rubber from the edge of the part towards the center of the part, at diagnal to the part's edge. Then styrene rods are attached to the parts to act as vents for air to escape. The alignment pegs can be seen, here, as well. Additional Legos are added to heighten the walls for the second rubber pour.
DON'T FORGET TO SPRAY THIS WITH MOLD RELEASE BEFORE POURING THE SECOND APPLICATION OF RUBBER!


DON'T FORGET TO SPRAY THIS WITH MOLD RELEASE BEFORE POURING THE SECOND APPLICATION OF RUBBER!
If no mold release is used (spray at least three times to make sure) the second rubber pour will adhere to the first rubber pour and you'll have a block of rubber with your parts stuck inside.

This is a single mold with the parts pressed onto "light duty" double-sided tape which has been applied to a piece of plexiglass.
When casting the resin parts from the single/one-part mold place a sheet of plexi-glass (with the protective film still on it) on top of the mold after the resin has been poured into it; ensuring all of the air has been pressed out from between the mold and the plexi-glass. Then place something on top of the plexi-glass to weigh it down a little. I use other molds for these weights. The plexi-glass provides for a nice flat resin wafer that the parts will be attached to. More weight can make for a thinner wafer (as can pressing the plexi-glass extra tight to the mold) but, too, much weight can distort the mold depending on the flexibility of the rubber that was used.


I learned all of this from one of the best................Harold Abbott at Battlefleet Models.
This is a two-part mold in the first step of the process. There are details on top and underneath these parts so, the parts are inserted into the modeling clay and the edges at the level of the clay are carefully sealed with clay to prevent the rubber from oozing underneath.
Not shown in this photo are shallow holes that should be made in the clay, around the parts, to form alignment pegs for between the upper and lower halves of the mold.
This is in between the first and second steps of the two-part mold where the rubber has curred and the clay removed from the underside of the parts. Some rubber has oozed under these parts and the excess must be removed before the next pouring of rubber. I do this with an X-acto #17 chisel blade pulling the excess rubber from the edge of the part towards the center of the part, at diagnal to the part's edge. Then styrene rods are attached to the parts to act as vents for air to escape. The alignment pegs can be seen, here, as well. Additional Legos are added to heighten the walls for the second rubber pour.
DON'T FORGET TO SPRAY THIS WITH MOLD RELEASE BEFORE POURING THE SECOND APPLICATION OF RUBBER!
DON'T FORGET TO SPRAY THIS WITH MOLD RELEASE BEFORE POURING THE SECOND APPLICATION OF RUBBER!
If no mold release is used (spray at least three times to make sure) the second rubber pour will adhere to the first rubber pour and you'll have a block of rubber with your parts stuck inside.
This is a single mold with the parts pressed onto "light duty" double-sided tape which has been applied to a piece of plexiglass.
When casting the resin parts from the single/one-part mold place a sheet of plexi-glass (with the protective film still on it) on top of the mold after the resin has been poured into it; ensuring all of the air has been pressed out from between the mold and the plexi-glass. Then place something on top of the plexi-glass to weigh it down a little. I use other molds for these weights. The plexi-glass provides for a nice flat resin wafer that the parts will be attached to. More weight can make for a thinner wafer (as can pressing the plexi-glass extra tight to the mold) but, too, much weight can distort the mold depending on the flexibility of the rubber that was used.
I learned all of this from one of the best................Harold Abbott at Battlefleet Models.
Carl Musselman
(Formerly Back-Aft Models)
Photobucket
https://app.photobucket.com/u/carlomaha
YouTube Channel:
https://www.youtube.com/channel/UCcH4XX ... IHgFtIYhAg
(Formerly Back-Aft Models)
Photobucket
https://app.photobucket.com/u/carlomaha
YouTube Channel:
https://www.youtube.com/channel/UCcH4XX ... IHgFtIYhAg
-
JasonW
- Posts: 543
- Joined: Wed Dec 23, 2009 1:05 pm
- Location: Massachusetts, USA
Re: Resin casting with pressure pot etc.
This is absolutely great info Nuke, thanks for taking the time to post this info. It will come in handy going forward.
Great info, thanks so much.
Great info, thanks so much.
"There seems to be something wrong with our bloody ships today"
-
Raverdave

- Posts: 157
- Joined: Thu May 12, 2011 11:52 pm
Re: Resin casting with pressure pot etc.
This thread should be moved to "tips and tricks" so it does not get lost.
Never argue with an idiot, he will only drag you down to his level and beat you with experience.
-
roy allen

- Posts: 654
- Joined: Wed Dec 14, 2005 4:42 am
- Location: Staffordshire Moorlands UK
Re: Resin casting with pressure pot etc.
Jason you have just had one of the best how to do's going.
Nice going Carl
Jason, the psi is very important anything less than 40psi will cause massive problems with the resin.
You'll get there
Roy
Nice going Carl
Jason, the psi is very important anything less than 40psi will cause massive problems with the resin.
You'll get there
Roy
IPMS Fine Waterline special interest group www.finewaterline.com
-
CLASSIC WARSHIPS
- Classic Warships

- Posts: 731
- Joined: Mon Jun 23, 2008 12:12 pm
- Location: Tucson, AZ USA
Re: Resin casting with pressure pot etc.
Look for the tour of my old casting on this web site under the business name of Classic Warships.
http://www.modelwarships.com/features/t ... -tour.html
I had 6x pressure chambers to make a production line. When I finished loading the 6th chamber the first was ready to unload and de-mold. I was able to manufacture about 8x 1/350 cruiser kits per day with this shop.
Steve Wiper
www.classicwarships.com
http://www.modelwarships.com/features/t ... -tour.html
I had 6x pressure chambers to make a production line. When I finished loading the 6th chamber the first was ready to unload and de-mold. I was able to manufacture about 8x 1/350 cruiser kits per day with this shop.
Steve Wiper
www.classicwarships.com
-
NukeMM
- Back-Aft Models
- Posts: 2980
- Joined: Tue Feb 05, 2008 12:44 am
- Location: Omaha, NE, USA
Re: Resin casting with pressure pot etc.
Nice shop layout, Steve! Very, cool!CLASSIC WARSHIPS wrote:Look for the tour of my old casting on this web site under the business name of Classic Warships.
http://www.modelwarships.com/features/t ... -tour.html
I had 6x pressure chambers to make a production line. When I finished loading the 6th chamber the first was ready to unload and de-mold. I was able to manufacture about 8x 1/350 cruiser kits per day with this shop.
Steve Wiper
http://www.classicwarships.com
This gives me some ideas for laying out my basement shop (room permitting) to be a little more efficient.
What purpose does the plastic under sheet serve in your process?
Carl Musselman
(Formerly Back-Aft Models)
Photobucket
https://app.photobucket.com/u/carlomaha
YouTube Channel:
https://www.youtube.com/channel/UCcH4XX ... IHgFtIYhAg
(Formerly Back-Aft Models)
Photobucket
https://app.photobucket.com/u/carlomaha
YouTube Channel:
https://www.youtube.com/channel/UCcH4XX ... IHgFtIYhAg
-
Mike@IHP
- Posts: 706
- Joined: Tue Feb 01, 2005 5:48 pm
Re: Resin casting with pressure pot etc.
Wow, my casting shop doesn't look anything like that! Of course, never weres generally don't warrant space for large production lines.CLASSIC WARSHIPS wrote:Look for the tour of my old casting on this web site under the business name of Classic Warships.
http://www.modelwarships.com/features/t ... -tour.html
I had 6x pressure chambers to make a production line. When I finished loading the 6th chamber the first was ready to unload and de-mold. I was able to manufacture about 8x 1/350 cruiser kits per day with this shop.
Steve Wiper
http://www.classicwarships.com
Two things: plastic sheets (replaceable and disposable) under your work prevent any resin from sticking to the work surfaces, either waste or otherwise. (And you will need every inch of work surface you can get.) Don't allow any little stray chunks or pieces of resin to get underneath your molds sitting on the work surfaces while casting because they will distort the casting right through the rubber. Make sure you store your molds each separately; don't stack or pile them or allow them to make contact, because they will dent easily, which will show up in the castings, and you can't fix that. Some rubbers will break down after a few years in storage if not used, so order a good quality silicone rubber. Also, if you're going to build any kind of casting facility in your basement for regular work, make sure you discuss it with anyone else who lives in the house because you will need to provide adequate ventilation and make sure you can contain the mess of the process and noise that the compressors make.
I'm glad I am starting to get out of it, though. Resin as a process is messy, imprecise, prone to too many errors and mistakes, slow, labor intensive, and you often don't get out of it what you put into it. Plus, it's a health hazard, all that exposure to the chemicals. And, resin kits are still intimidating and harder to sell to those not familiar with them. It's why after 20 years of doing it professionally, I have grown to hate it. Sorry to go off on the dark side of resin like this, but it needs to be mentioned.
Plastic is the way, the truth and the light.
 As an example: http://ihphobby.tripod.com/hopages/hoselrvpage.html. I did this car in resin for years, including painting and assembly, and for all my experience there's no way to match this kind of quality (or quantity) in resin.
Mike Bartel
IHP
http://ihphobby.tripod.com
-
Harry @ BFM
- Posts: 350
- Joined: Mon Jul 11, 2005 9:51 pm
- Location: Colorado
Re: Resin casting with pressure pot etc.
Nice �how to� Carl, and thanks for the complement!!!
I have always enjoyed my time casting in resin.
It can be a challenge at times, but when that certain part comes out just right�what joy.
I have always enjoyed my time casting in resin.
It can be a challenge at times, but when that certain part comes out just right�what joy.
Harry
BattleFleet Kits, PE & Decals
Alliance PE & Kits
Orange Hobby
Lifecolor Naval Paints
Testors Naval Paints
WEM
ABER Barrels
Atlantic Models PE
LionRoar PE
ModelArt
Available from our Online Store
http://www.battlefleetmodels.com
BattleFleet Kits, PE & Decals
Alliance PE & Kits
Orange Hobby
Lifecolor Naval Paints
Testors Naval Paints
WEM
ABER Barrels
Atlantic Models PE
LionRoar PE
ModelArt
Available from our Online Store
http://www.battlefleetmodels.com
-
JasonW
- Posts: 543
- Joined: Wed Dec 23, 2009 1:05 pm
- Location: Massachusetts, USA
Re: Resin casting with pressure pot etc.
I agree sir. I've learned a lot in the posts here.Raverdave wrote:This thread should be moved to "tips and tricks" so it does not get lost.
Perhaps the mods can take care of that for us?
"There seems to be something wrong with our bloody ships today"
-
NukeMM
- Back-Aft Models
- Posts: 2980
- Joined: Tue Feb 05, 2008 12:44 am
- Location: Omaha, NE, USA
Resin Casting With Pressure Pot etc.
This thread has been moved from Main Forum to Tips and Tricks.
Carl Musselman
(Formerly Back-Aft Models)
Photobucket
https://app.photobucket.com/u/carlomaha
YouTube Channel:
https://www.youtube.com/channel/UCcH4XX ... IHgFtIYhAg
(Formerly Back-Aft Models)
Photobucket
https://app.photobucket.com/u/carlomaha
YouTube Channel:
https://www.youtube.com/channel/UCcH4XX ... IHgFtIYhAg
-
JasonW
- Posts: 543
- Joined: Wed Dec 23, 2009 1:05 pm
- Location: Massachusetts, USA
Re: Resin Casting With Pressure Pot etc.
So I finally got a pressure pot to try to start some of my own casting.
http://www.amazon.com/gp/product/B008FQ ... UTF8&psc=1
I'm not about to start a casting business by any stretch, this is just to make my own minor castings for replacement parts or turrets etc. I have a couple of hull ideas to try to cast as well.
The pot was delivered yesterday, now I have to do some work to get it set up for casting......
http://www.amazon.com/gp/product/B008FQ ... UTF8&psc=1
I'm not about to start a casting business by any stretch, this is just to make my own minor castings for replacement parts or turrets etc. I have a couple of hull ideas to try to cast as well.
The pot was delivered yesterday, now I have to do some work to get it set up for casting......
"There seems to be something wrong with our bloody ships today"