Page 1 of 2
1/350 CV-6 Enterprise by Merit w/ Infini PE
Posted: Wed Feb 15, 2017 3:44 pm
by tjwerdel
Hello all,
First time post here so be patient. If I get a little to wordy just tell me to tighten it up. I've been wanting to build a 1/350, CV-6 Enterprise for decades. It's one of those ships thats gone down in history and with good reason - beautiful lines, battle tested and pivotal to winning a war. HMS Victory and USS Constitution are like that in that sense, but as you can still walk through history on their decks, we'll never be able to do the same with Enterprise. Tragic really. Modelling her is the closest thing I can do to walking her decks.
I started a few months ago so I'll post what I've done and work up to the present. I'll also be using the Infini Yorktown PE, which was the only thing available when I got the kit. I see now that Infini released the Enterprise PE...such is the life of a modeler.
First was the hull. I don't like the faux plating so decided to sand it off. There were some other things I fixed too.
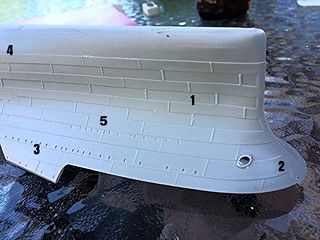
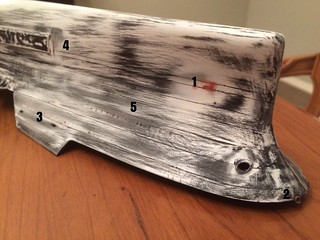
1) filled a small sink mark at the narrowest part of the bow port and starboard, 2) replaced the poorly molded bow leads, 3) made two more leads on the port and starboard that aren't included, 4) made the below waterline armor blister and 5) removed the plating.
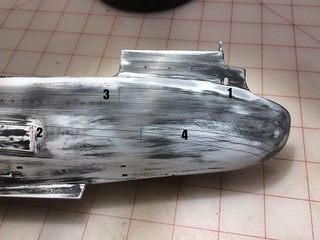
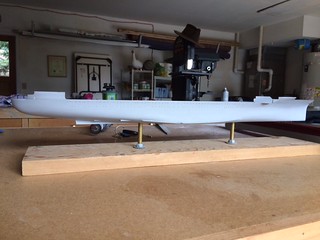
On the stern, 1) there's an open arch that's molded solid. I opened this up and moved it forward a little to avoid the stern/hanger bulkhead that's located right where the arch is molded. 2) is the armor blister, 3) are drilled out portholes that were later puttied over when I noticed from pictures that most were welded over as the war progressed. I'm modelling the Midway fit-out and the only portholes I see are amidship. More and more were welded over as the war progressed until pretty much all of them were gone by the end of the war. 4) is an attempt to scribe horizontal joints at each deck to add visual interest. This was a fail. Then I tried to mask every other scribed area and build up the adjacent area with primer. This also failed. So, I sanded it all off back to flat...hence the crazy quit of colors in my pictures. The smooth hull really looks nice so I decided to keep it smooth and add interest with paint and weathering.
Re: 1/350 CV-6 Enterprise by Merit w/ Infini PE
Posted: Wed Feb 15, 2017 11:36 pm
by taskforce48
Terry,
Glad to see you finally sharing your amazing work. For a Midway fit Big E the Yorktown set is better for you anyway. Hope to see it in person next Tuesday.
Matt
Re: 1/350 CV-6 Enterprise by Merit w/ Infini PE
Posted: Thu Feb 16, 2017 12:00 am
by Mgunns
It's nice to see somebody actually working on this model. I will be following with interest.
Re: 1/350 CV-6 Enterprise by Merit w/ Infini PE
Posted: Thu Feb 16, 2017 10:07 am
by MartinJQuinn
Nice start. Consider using the function which allows you to upload pictures to the post, instead of using a hosting site. That way they'll be here "forever", instead of disappearing when you clean up or shut down your hosting account.
Looking forward to more!
Re: 1/350 CV-6 Enterprise by Merit w/ Infini PE
Posted: Fri Feb 17, 2017 3:34 pm
by tjwerdel
Hey Matt - I'll be there next week. Also, you're right about the Yorktown Infini set. It is better to use in my case. The kit appears to depict the Santa Cruz fit out. I want to depict Midway. I looked at the Enterprise Infini and I'd need to do a lot of PE surgery to back date it. The only bummer is that the Yorktown set doesn't have a PE Secondary Fight Control. I don't want to have the PriFly in PE and the Secondary in plastic. I'll have to cross that bridge when I get there.
Martin - I'll try and import the images directly. I was having trouble with it but I'll give it another try.
Re: 1/350 CV-6 Enterprise by Merit w/ Infini PE
Posted: Sun Feb 26, 2017 10:59 pm
by tjwerdel
The hanger deck is heavily scribed and I filled these in and gave it a primer coat of deck blue. It will eventually be the dark gloss gray that I�ve read is correct. Next I dry fit all the bulkheads around the hanger deck to see what I had to work with.
One thing that bothered me was that the kit did not show the angled bulkhead for the uptakes. This is an iconic feature of any American WWII carrier and it had to be corrected. Here's a picture of Enterprise that made Life Magazine.
Using the Yorktown Booklet of General Plans from maritime.org, I rebuilt the sloped uptake bulkhead, created the Fire and Hanger Control Station and a recess for the bomb elevators and island access. I also made two bulkheads that boarder a portion of the main elevator, installed stair access to the gallery deck and opened various doors. I have multiple photoetch doors, railings and stairs and installed these as appropriate.
On the exterior of this area, there is a narrow access walkway that the kit makes too narrow. I widened it by moving the island section inboard one thickness of the molded plastic. To do this, I had to cut this kit part into two pieces and shim the aft piece back to its original location. I also opened up the air intakes and backed them with grilles and finally installed all the Infini photoetch that fit in this location.
As an aside, I make my own sanding sticks. I cut whatever grit I need into 1/8"x1/4" rectangles and hot glue them to toothpicks. I can make about 50 in 15 minutes. You can cut them to any size or shape you need...round, wedge, thin. When the edge gets frayed, just cut the edge off and you have a fresh surface. They work great and you can get into any area you need.

While piecing all this together, I found the kit rendering of the gallery deck (running from the island to the port side above the hanger) to be very odd. The gallery is an 8� deep deck that fits within the flight deck truss structure. The captain�s quarters, admiral�s quarters and various other ship support spaces are here. To model this, Merit created a solid flat box piece (8 scale feet deep) that is glued between the island structure and port side bulkhead. Then curiously, they molded the walls (that are supposed to be inside the gallery deck) to the bottom of the flat box so they hang down (another 8 scale feet deep) into the hanger.
Aside from not having any reason to do this, it makes the overhead hanger space too low at this point with walls hanging from above.
For fun, I sawed them away and put them inside the box like they should be and set them next to the plans.
I'm going to replace this piece because the whole assembly doesn't make sense.
Re: 1/350 CV-6 Enterprise by Merit w/ Infini PE
Posted: Sun Feb 26, 2017 11:07 pm
by tjwerdel
Here's the exterior build of the Island.
Re: 1/350 CV-6 Enterprise by Merit w/ Infini PE
Posted: Mon Feb 27, 2017 1:36 pm
by MartinJQuinn
Wow. Superb work.
Re: 1/350 CV-6 Enterprise by Merit w/ Infini PE
Posted: Wed Mar 01, 2017 3:26 pm
by tjwerdel
Thank you Martin. This forum is inspirational and such a treasure trove of information and good suggestions. Any helpful comments or Enterprise history is always appreciated.
Re: 1/350 CV-6 Enterprise by Merit w/ Infini PE
Posted: Thu Mar 02, 2017 12:22 pm
by PetrolGator
Definitely following all this work. Given the reputation this kit has for accuracy, this all surprises me. Enterprise is going to be something I plan to put a LOT of effort into, so your WIP is definitely appreciated!
Re: 1/350 CV-6 Enterprise by Merit w/ Infini PE
Posted: Wed Mar 08, 2017 12:12 am
by TOMLABEL
I'm watching this one too - and will be!!! Thanks for posting your progress!! I am excited about the changes that you have made to the hangar deck and it all looks very good! Yes! Great job thus far!!!
I've been away for a while, but I'm working on the Merit Yorkie with the Infinti set for it.
Kelley
Re: 1/350 CV-6 Enterprise by Merit w/ Infini PE
Posted: Mon Mar 20, 2017 8:36 pm
by tjwerdel
PetrolGator � the kit is great and builds into a spectacular model. I�d recommend it to anyone. Only OCD types like me can find fault. My comments are for those �special� modelers who suffer from Advanced Modeler's Syndrome - we just can't leave well enough alone. The "bones" are spot on, in fact if they weren�t, I wouldn�t be able to make the changes I want. I just add or subtract elements and everything fits right in place as if it were made to go there. I give Merit huge credit for tackling this ship...it's just that I'm a little fussy.
I've moved to the starboard forward quarter and dove into the Yorktown Infini PE.
The Infini is spectacularly engineered and worth every penny. The designer, Sang Hyun Park is a genius. I could go on but I�ll just leave it at that. The detail is so fine that I was concerned that priming would cover the best stuff up. Giving the brass some tooth for paint and getting good cover on the gold gave me an idea. I had a bottle of brass antiquing solution in the garage and experimented with antiquing the PE. It worked, etching the surface so there�s no need to prime and turned everything dark bronze so I don�t have to worry about gold showing through.
I painted some recently and it worked like a charm.
Anyway, there�s a lot of back and forth between the Kit and Infini instructions that�s essential to know what to use and not use. I pulled everything together and dry fit it all before I glued. It went together great and I was super happy until I remembered this PE was for Yorktown and I might want to check if this section was the same between ships. Nope, turns out at Midway, Yorktown had 50 cal�s on the catwalks and no splinter shields.
Picture is from Warship Pictorial #9, Yorktown Class Carriers by Steve Wiper. Enterprise had splinter shields and 20mm's installed in the June '42 refit.
I had to somehow join the shields to the PE. What a pain. It took a lot of tries but acrylic powder and liquid resin that I got from a lady�s finger nail kit finally did the trick�so far.
I cut out brass flooring at the stairs running from the catwalk to the gallery. The kit doesn�t have this level of detail and the PE is made to match the kit - so it doesn�t either. I also cut out door and arch openings, added PE doors and fussed with the gallery. I don't know why I fussed with the gallery. No one's going to see it. I swear I just like to punish myself.
Re: 1/350 CV-6 Enterprise by Merit w/ Infini PE
Posted: Mon Mar 20, 2017 11:04 pm
by taskforce48
Terry,
I am glad you are posting in detail like this, there simply isn't enough time to soak it all up when you see it in person! Fantastic work my friend.
Matt
Re: 1/350 CV-6 Enterprise by Merit w/ Infini PE
Posted: Tue Mar 21, 2017 2:57 pm
by tjwerdel
Thanks Matt. I'm walking the decks!
Re: 1/350 CV-6 Enterprise by Merit w/ Infini PE
Posted: Tue Mar 21, 2017 3:25 pm
by ModelMonkey
Re: 1/350 CV-6 Enterprise by Merit w/ Infini PE
Posted: Wed Apr 19, 2017 8:16 pm
by tjwerdel
Re: 1/350 CV-6 Enterprise by Merit w/ Infini PE
Posted: Thu Apr 20, 2017 9:35 am
by MartinJQuinn
Holy cow -that's some fine work.
Re: 1/350 CV-6 Enterprise by Merit w/ Infini PE
Posted: Thu Apr 20, 2017 1:57 pm
by Brett M
Great work on everything you've done. That's going to be a mighty fine ship once you're done!
Re: 1/350 CV-6 Enterprise by Merit w/ Infini PE
Posted: Fri Apr 21, 2017 7:24 pm
by tjwerdel
Thanks guys, I appreciate it!
Re: 1/350 CV-6 Enterprise by Merit w/ Infini PE
Posted: Fri Mar 16, 2018 7:20 pm
by tjwerdel
Okay�sorry to fall away for a while but I came down with a wicked case of AMS. The port hanger bulkhead section just killed me. This is an area that I�ve been fascinated with since a kid and was really looking forward to figuring out how the catwalks and platforms worked. I�ve never seen a kit or finished model that accurately depicted this area. In virtually all cases, the catwalks are molded (or attached) directly to (and just below) the flight deck and this just simply isn�t the case.
Under the catwalks is often a funny molded offset that kicks back to the hull. Even as a kid I could tell something was �off� between the models I was building and pictures I was seeing. Here�s a view of the kit piece to illustrate what I�m talking about.
I�m going to spend a little time exploring this area with you in the hopes we can all come to a better understanding for future builders. I don�t pretend to have this all figured out so please take this as a foundation to build from. Very few close-up photos of the port side exist � especially from below looking up. When the ship was in port, the portside was always outboard from the dock. Portside aerial fly-bys are too far away and from above giving very little detail. Refueling was done from the port side but shots are often in shadow. The best images I�ve been able to find are of the abandoning of the USS Hornet taken from the destroyer USS Russell or USS Mustin.

- CV8 Hornet Port 01_.jpg (34.84 KiB) Viewed 4070 times

- CV8 Hornet Port 02_.jpg (39.26 KiB) Viewed 4070 times
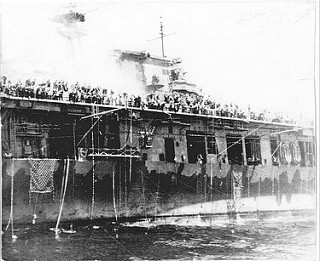
- CV8 Hornet Port 03_.jpg (32.09 KiB) Viewed 4070 times
Between these, the plans and limited portside photos, I�ve pieced together this much.
First, most of the port side catwalk sits proud of the hull by about 4 feet and is supported on cantilevered gussets or beams about 4 feet below the flight deck.
Second, the flight deck also extends 4 feet beyond the hull and attaches to the catwalk in some places but not continuously. There are a few plates that run vertically between the two but they�re really there to close off the opening to the sea below. The whole assembly looks like it�s continuously joined � from a distance, but it�s not.
Third, by looking at available pictures, you might assume the deck edge is flush with the hull, but this is an optical illusion. There�s really a 4-foot-wide void (covered by the flight deck) between the hull and catwalk. Why they did this, I have no idea. The only reason I can think of is that perhaps they needed to make the deck wider without also making the hull wider. At any rate, this gap is spanned by all sorts of storage areas and numerous gallery platforms that function as exterior landings from the gallery deck.
Fourth, the gallery deck is another 4 feet below the catwalk (+/-8� below the flight deck). From the gallery platforms (mentioned directly above) several stairs connect to the catwalks above or hanger deck below. It�s a complicated and fascinating area - and it�s all neatly covered by the flight-deck, so you never see it except from below.
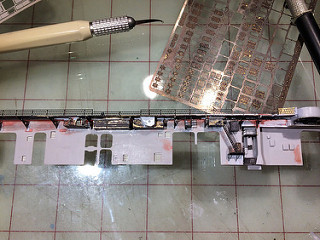
- Port 02_.JPG (34.16 KiB) Viewed 4070 times
Why do manufacturers mold all this solid? Well, I think there�re several reasons.
First is that it would be costly and difficult to mold for a simple mass-produced kit.
Second � It�s all pretty much hidden from view so there wouldn�t be much benefit in getting all super detailly here.
Third � Manufacturers aren�t rivet counters. They�re interested in mass producing a reasonable representation of an actual object for a profit. And given one and two, I don�t blame them for simplifying things to kick a good kit out - and I�m super thankful.
