Page 1 of 2
1/700 Auto Eco car carrier
Posted: Tue Sep 26, 2017 4:10 am
by Neptune
Hello,
Although I was about to stop modelling, I really couldn't do it

. So I found a way around my time issues and went back to my old small scale stuff. In order to be able to finish something relatively fast I went for a Pure Car and Truck carrier (PCTC). I have some plans of the ship and found out that even with only a general arangement plan you can make quite a good model of these ships. They have so many decks that the resolution to create frames for the bow is pretty good.
The ship itself is one of the first ships designed to run on LNG for her voyages. This is a preparation for the new regulations to curb Nitrogen and Sulphur oxydes in ship's exhausts in Europe. There's two options, either go for a scrubber, which cleans the exhaust of diesel engines or go for LNG, which doesn't create Sox and Nox.
This ship, along with her sister are doing a two week round trip starting in Zeebrugge (where she bunkers the LNG fuel) going through Germany to Sweden, Russia, Poland, UK and back to Zeebrugge, along with some other places.
I did not make many pictures since I wasn't going to make a build log, but here is what I've got. Will try to keep it up to date as we go.
Built it on my classic styrene frame method with milliput for the bow area. Noticed in previous projects that thin side walls (parallel body side of the ship) is not working well, often gives a wobly appearance. Although 1.5mm is not easy to cut, it works much better. For the bow curve I used 0.5mm bent and glued to an upper and lower outline of the bow. It was then merged with the 1.5mm sides where you can see the filler. In order to get a decent merge, the inside frames were cut-out for this.
Thanks for looking in and if there are any questions or remarks, go ahead!
Re: 1/700 Auto Eco car carrier
Posted: Tue Sep 26, 2017 10:52 am
by Pieter
Good progress and nice to have you back.
Re: 1/700 Auto Eco car carrier
Posted: Tue Sep 26, 2017 2:22 pm
by Neptune
Hi Pieter, never really left...

Forgot to put a link to the real deal:
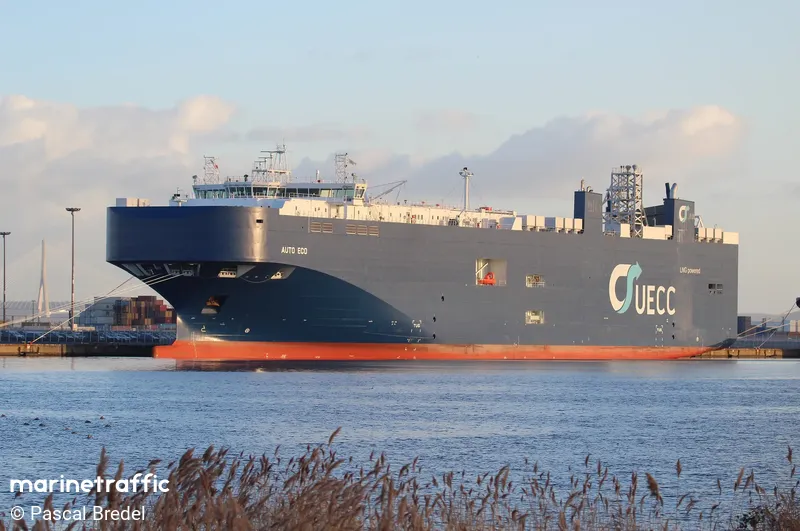 http://www.marinetraffic.com/nl/photos/ ... 4/#forward
And I got a lot more progress than I was showing before, but as mentioned, not so many pics. So here was the next step. After adding the milliput, she was put in primer, something I wasn't really doing on small scale scratchbuilds before. I guess I'm using a lot of things (and tools) that I've gained over the past years of large scale building to improve my small scale stuff. This is a sacrificial coat to show the warts and uneven edges in order to sand them smooth.
On these pictures, the openings to the mooring areas were closed by masking tape. In reality the model actually does have these mooring areas installed, so bollards, mooring winches etc. are there. It's also painted in light grey, like the real ship. Also the car ramp will be in open position since I'll depict her as being alongside at Zeebrugge port.
I also nearly finished the accomodation/bridge and car ramp, but I'll take some pictures of those later.
While building this and during my own operations in Zeebrugge I found out that almost all car carriers have their ramps (centre and stern) towards starboard. Some of them are really completely built for that mooring arrangement and have very assymetrical lay-outs, including offset anchors etc. I also noticed how assymetric these ships are above the waterline.
Re: 1/700 Auto Eco car carrier
Posted: Thu Sep 28, 2017 2:45 am
by Neptune
And here's a more up-to-date pic with most of the attachments dry-fit. It needs some more detailing though.
Re: 1/700 Auto Eco car carrier
Posted: Tue Jan 16, 2018 7:25 am
by Neptune
And a small update.
After the red primer I put on a white primer. After that, I added the red waterline part and sprayed the blue as a last, with the large lettering and arrow sign masked off. The letters were relatively easy to cut from masking tape, but the arrow sign was too large. After a couple of efforts, I ended up putting 4 strips of masking tape (only had 6mm width available) and drawing and cutting the sign on the model itself. This made sure it was in line and appropriately sized for the lettering. I do think the letters are a bit too high vs the real thing. In any case I'll keep it as it is for now.
The last addition was the filling of the arrow itself. Took a me a while to get a colour that at least resembles the actual color.
Currently I'm adding details to the superstructure and top before painting the top. I also toned down the original grey I used on the superstructure decks since the real color looks very light, nearly white.
Re: 1/700 Auto Eco car carrier
Posted: Tue Jan 16, 2018 1:41 pm
by Pieter
Very nice finish.
Re: 1/700 Auto Eco car carrier
Posted: Mon Jan 29, 2018 7:39 am
by Neptune
Despite this being an easy ship, still it has some detailing to do. I also wanted to have some markings.
The top is now grey and I started making some markings from masking tape. I did notice that the markings from the drawings are different from the real ship.
I have also added some doors on the top level.
She'll be displayed alongside her berth at Zeebrugge, so you can see the beginning of that berth in the pics as well. I already drilled the holes for the bollards.
Currently busy with the piping on the top and the small details (rescue boat, pilot ladders, accomodation ladder) for the recessed parts on both sides of the ship.
Re: 1/700 Auto Eco car carrier
Posted: Mon Jan 29, 2018 8:48 am
by Silenoz
Nice scratchbuild so far, and something completely different then what we are used to see here...
Re: 1/700 Auto Eco car carrier
Posted: Fri Feb 02, 2018 6:46 am
by Neptune
Thanks, I indeed always strive to do something rare (and colourful). No competition that way
Small update, making some nice progress on this one. Some parts are dry fitted like the winches and rescue boat as well as the piping on top.
Re: 1/700 Auto Eco car carrier
Posted: Fri Feb 02, 2018 1:48 pm
by Dan K
Pretty cool.
Re: 1/700 Auto Eco car carrier
Posted: Sat Feb 03, 2018 7:12 pm
by dwkr
Neptune wrote:Despite this being an easy ship, still it has some detailing to do. I also wanted to have some markings.
The top is now grey and I started making some markings from masking tape. I did notice that the markings from the drawings are different from the real ship.
I have also added some doors on the top level.
She'll be displayed alongside her berth at Zeebrugge, so you can see the beginning of that berth in the pics as well. I already drilled the holes for the bollards.
Currently busy with the piping on the top and the small details (rescue boat, pilot ladders, accomodation ladder) for the recessed parts on both sides of the ship.
Very well done! Thanks for sharing with us.
Re: 1/700 Auto Eco car carrier
Posted: Mon Feb 19, 2018 4:13 am
by Neptune
Thanks for the feedback guys.
Some small updates. Since the major works are done, here is some more detailing.
The brackets to lift the aft gate/hatch were placed and the winches to lift it as well. In order to get it as accurate as possible, I had to use some screenshots from small youtube films by UECC, since it is difficult to find good pictures of the top deck of these traditionally high ships.
That's where I found out that the winches had the area around them painted slightly darker grey than the regular deck color.
Furthermore the rescue boat and gangways are placed in the recesses on both sides.
As you can see in the pictures, I'm busy now with the most tedeous job of building 17 ventilators (always present on car carriers and very important to remove the car's exhaust gases from all decks).
Re: 1/700 Auto Eco car carrier
Posted: Thu Feb 22, 2018 1:59 am
by JIM BAUMANN
How did I miss this?///!
That is REALLY good and very sharp looking
welcome back to the small scale stuff!

JIM B

Re: 1/700 Auto Eco car carrier
Posted: Thu Feb 22, 2018 10:57 am
by Neptune
Hi Jim, thanks. Guess the faster progress is very appealing. I must admit however that even on my large scale Chaconia, some pieces are being added from time to time, when the small scale boat is drying. Looks like I'll be working on my backlog of unfinished small scale ships after this one. I still have an unfinished Colombo Express as well as a USS Cole in this scale.
Below you will see the reason why I did not drill holes for the vents. Normally I would do that, to get it stronger, however I considered the lining up of the vent sides with the hull side more important. The support/tubes are not entirely centred and also drilling the hole would mean drilling on the edge of the side and the deck, very likely splitting them...
By putting the ship on its side on a flat surface I could line the vents up properly.
Re: 1/700 Auto Eco car carrier
Posted: Tue May 08, 2018 2:31 pm
by Neptune
And finally a new update.
For the small fans I used a jig to align them next to each other and get them shaped and sized equally. Not a total success, but quite fast and acceptable results I guess. The thickness of the jig is adjusted to the required height of the fan bases, so by sanding them flat at the bottom I had them more or less exactly at same height and perpendicular.
She got her free fall lifeboat as well. A common practice for car carriers, since almost all of them have their ramp on starboard, so portside is free for a lifeboat.
Re: 1/700 Auto Eco car carrier
Posted: Wed May 09, 2018 8:49 am
by Pieter
I love the way the colors stand out on this built. Better than all that gray on this site. Will you be adding a detailed base to this?
Re: 1/700 Auto Eco car carrier
Posted: Fri May 11, 2018 7:21 am
by amdownunder
Hi Neptune, awesome build, have to agree the colours sure stand out, my ship be a similar colour scheme blue and white.
What is the red ship in the background, she is huge, looks to be a bulk tanker.
You must b glad to see the warm weather at last, now it is my turn down to single digits tonight where I live SE/QLD, can drop down to -5 heavy frost, winter not far away.
Tony from down under.
Re: 1/700 Auto Eco car carrier
Posted: Sun May 13, 2018 3:18 pm
by Neptune
Hi Pieter,
yes indeed, the intension is to put her alongside her regular quay at Zeebrugge. I'm not very experienced in diorama's, so I'll see what the result is.
Tony, thanks for the comments. The red ship in the back is the Chaconia LPG tanker. The build log can be seen somewhere over here, haven't finished her yet, although from time to time I'm still adding bits and pieces.
Unfortunately pictures have disappeared on that build log. Might upload them again later on, like I did on the 1/100 Union Eagle build.
Currently working on the LNG vent masts for this build. Already at attempt No 3.
Re: 1/700 Auto Eco car carrier
Posted: Thu May 17, 2018 1:12 pm
by Neptune
And a small update. One of the show-stoppers was that vent mast. I'm always a bit reluctant to start such things, but once I found the way, it worked out ok. Due to the zoom it looks rather crude, but all in all I'm satisfied with the result. I guess if you want to make it better, you have to start with PE.
Still only dry fitted, additional supports have to be added once she is glued (out of CA glue at the moment).
As you might see, I've also started the main mast located just aft of the accomodation.
Re: 1/700 Auto Eco car carrier
Posted: Tue May 22, 2018 2:41 am
by Neptune
Due to lack of CA, I continued with the stern ramp as well as the radar mast platform and its supports.
For the radar mast platform supports I used stretched CA and as can be seen in below picture I made a supporting block of styrene (1.5mm and 2mm glued together to come to the correct 3.5mm height). First I drilled and placed the supports. I then used this block as an anvil to cut all stanchions at more or less the same height. A slight difference is acceptable, since the glue will partially melt the stanchion tip to the platform and this allows for a slight adjustment.
I then added the diagonals in the centre, which in reality support one of the 3 radars. The other diagonals will follow after the platform is in place.
On the stern ramp I added a small platform which has a winch on it and I added the "hinges" of the gate as well as the wire rollers.