IJN Yunagi at Battle of Savo Island (1/700) / COMPLETED
Posted: Fri Apr 06, 2018 12:11 pm
I decided to post my first Work in Progress here mostly to get feedback on some of the tricky decisions I will have to make in this build. Thanks for your interest and help!
My obscession (quite likely already noticed on this forum ) is the Battle of Savo Island. My aim is to build at least one ship per class of all direct participants. Yunagi is #6 out of 11.
The kit
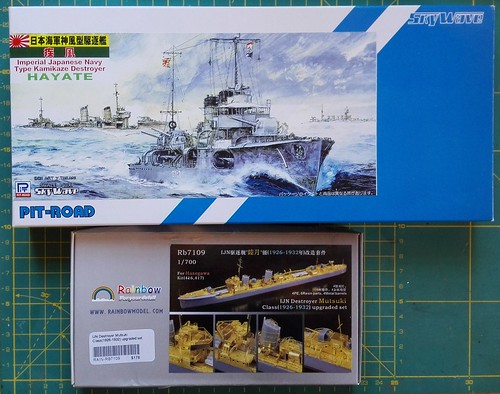
I am using the Pit-Road 1/700 IJN Destroyer Hayate kit as a basis for my build. Although Pit-Road also offers a Yunagi kit, that one depicts Yunagi in her late-war fit when she lost the aft set of her dual torpedo tubes as well as the aft and mid-ship 4,7� guns were replaced with dual 25mm AA guns, so I thought it was not useful for a Yunagi at the time of the Battle of Savo Island. Actually, now it seems I will make use of only SEVEN parts of the original Pit-Road kit (the hull, waterline plate, forecastle deck and funnels) and I suspect these are present in any of the Kamikaze-class kits. There�ll be lots of leftover plastic - sorry to the environment...
The PE set
As I wanted to improve the kit further so I checked for available PE sets. There were none directly for the Kamikazes so I considered the Tetra Mutsuki set but in the end I bought the more comprehensive Rainbow IJN Destroyer Mutsuki Class 1926-1932 upgrade set. This set is intended for the Hasegawa Mutsuki kit but I decided to take the risk, especially because of the largely open bridge structure that I wanted to improve. The Mutsukis were originally very similar to the Kamikazes (obviously except the bow, torpedo armament and some other details) before their refits in mid-thrities.
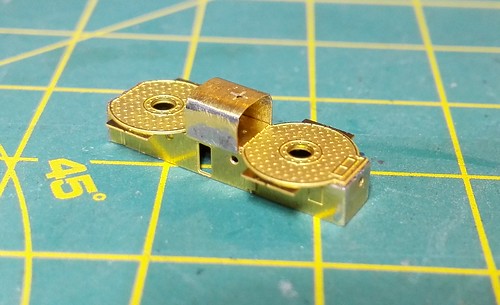
The set is really extensive, apart from four PE sheets it includes resin mounts and brass barrels for the main guns (that are incorrect/oversize in the Pit-Road kit), two resin triple 24in torpedo mounts (not to be used for a Kamikaze-class destroyer) and even a brass foremast. Some modifications would indeed be necessary because of differences between Mutsuki- and Kamikaze-classes and also to account for the different mold, but it seemed it will be possible to use many parts of the set.
First steps
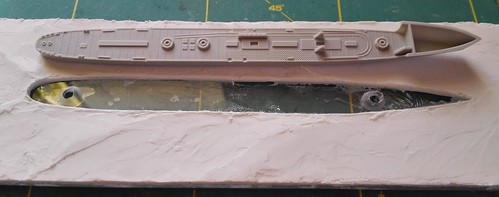
I always start with attaching two nuts into the hull allowing the ship to be screwed to a working pad during the build and later on to a seabase. Then I glued on the waterline plate and after treating some discrepancies with liquid putty and sandpaper I drilled out the portholes. Next step was preparing a crude start for the future seabase using the bare hull of the ship to avoid damage to details later. I use wall filler to sculpt the larger waves/wake while the hull is wrapped in a food film (shrink-wrap) for protection.
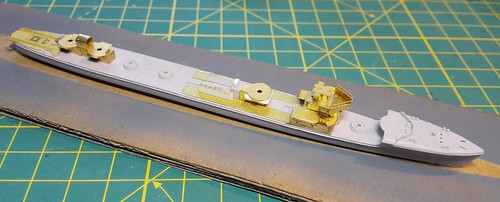
Now this is when the real fun starts. The Pit-Road kit represents the Kamikaze-class deck arrangement correct for the first batch of the class but - as was suspected already in the CASF thread and finally confirmed to me by a Japanese modeler nicked VAN- there was a change in the design applied for the last 4 ships (Asanagi, Hayate, Oite and Yunagi). For the late type the fore torpedo reload rails were relocated from port to starboard so this needs to be modified for the Yunagi. This is rather unpleasant as most of the deck is affected. There was also an additional spare torpedo stowage to starboard for the late type and some additional changes that will be discussed later.
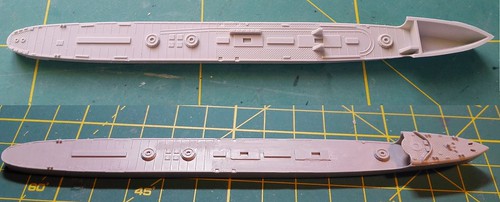
So I removed the "Aztec steps", torpedo stowage and reload rails on the main deck where the real Yunagi differed from the Pit-Road kit. I decided to replace also the quarterdeck details with those provided in the Rainbow set - there were two options available and the one with mine-laying rails and two depth charge racks between them are correct for Yunagi. The fit around the bollards aft is not ideal but I hope it will not be too obvious in the end. I tried to do as little damage to linoleum attachment stripes as possible in the process as the Pit-Road stripes were fine and I did not want to have to replace all of them.
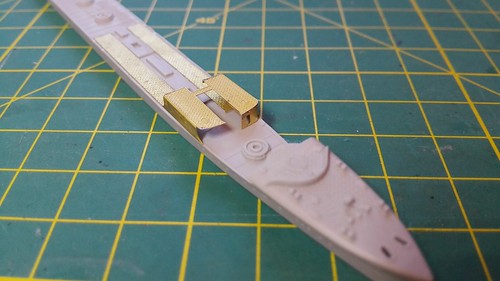
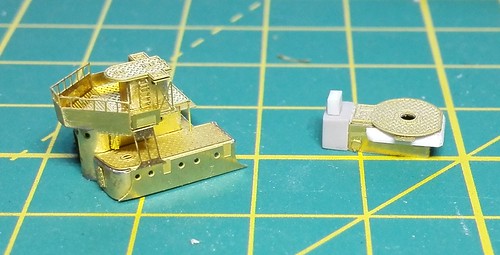
I still need to attach the degaussing cable to be mostly done with the hull but I simply had to check about the Rainbow bridge first (the main reason for me getting the Rb set). Will it fit onto a hull different from Hasegawa? Well, not exactly, but with some little tweaking I think it will work out just fine. I also addressed one additional detail where the Mutsukis differed � a large opening on the starboard side had to be deleted for Yunagi.
That�s it for now - watch this space for more
My obscession (quite likely already noticed on this forum
The kit
I am using the Pit-Road 1/700 IJN Destroyer Hayate kit as a basis for my build. Although Pit-Road also offers a Yunagi kit, that one depicts Yunagi in her late-war fit when she lost the aft set of her dual torpedo tubes as well as the aft and mid-ship 4,7� guns were replaced with dual 25mm AA guns, so I thought it was not useful for a Yunagi at the time of the Battle of Savo Island. Actually, now it seems I will make use of only SEVEN parts of the original Pit-Road kit (the hull, waterline plate, forecastle deck and funnels) and I suspect these are present in any of the Kamikaze-class kits. There�ll be lots of leftover plastic - sorry to the environment...
The PE set
As I wanted to improve the kit further so I checked for available PE sets. There were none directly for the Kamikazes so I considered the Tetra Mutsuki set but in the end I bought the more comprehensive Rainbow IJN Destroyer Mutsuki Class 1926-1932 upgrade set. This set is intended for the Hasegawa Mutsuki kit but I decided to take the risk, especially because of the largely open bridge structure that I wanted to improve. The Mutsukis were originally very similar to the Kamikazes (obviously except the bow, torpedo armament and some other details) before their refits in mid-thrities.
The set is really extensive, apart from four PE sheets it includes resin mounts and brass barrels for the main guns (that are incorrect/oversize in the Pit-Road kit), two resin triple 24in torpedo mounts (not to be used for a Kamikaze-class destroyer) and even a brass foremast. Some modifications would indeed be necessary because of differences between Mutsuki- and Kamikaze-classes and also to account for the different mold, but it seemed it will be possible to use many parts of the set.
First steps
I always start with attaching two nuts into the hull allowing the ship to be screwed to a working pad during the build and later on to a seabase. Then I glued on the waterline plate and after treating some discrepancies with liquid putty and sandpaper I drilled out the portholes. Next step was preparing a crude start for the future seabase using the bare hull of the ship to avoid damage to details later. I use wall filler to sculpt the larger waves/wake while the hull is wrapped in a food film (shrink-wrap) for protection.
Now this is when the real fun starts. The Pit-Road kit represents the Kamikaze-class deck arrangement correct for the first batch of the class but - as was suspected already in the CASF thread and finally confirmed to me by a Japanese modeler nicked VAN- there was a change in the design applied for the last 4 ships (Asanagi, Hayate, Oite and Yunagi). For the late type the fore torpedo reload rails were relocated from port to starboard so this needs to be modified for the Yunagi. This is rather unpleasant as most of the deck is affected. There was also an additional spare torpedo stowage to starboard for the late type and some additional changes that will be discussed later.
So I removed the "Aztec steps", torpedo stowage and reload rails on the main deck where the real Yunagi differed from the Pit-Road kit. I decided to replace also the quarterdeck details with those provided in the Rainbow set - there were two options available and the one with mine-laying rails and two depth charge racks between them are correct for Yunagi. The fit around the bollards aft is not ideal but I hope it will not be too obvious in the end. I tried to do as little damage to linoleum attachment stripes as possible in the process as the Pit-Road stripes were fine and I did not want to have to replace all of them.
I still need to attach the degaussing cable to be mostly done with the hull but I simply had to check about the Rainbow bridge first
That�s it for now - watch this space for more
