Page 1 of 29
1/72 USS Moffett DD362 (13.07.1944)
Posted: Sun Jul 30, 2006 5:51 pm
by ARH
Posted: Mon Jul 31, 2006 11:20 am
by ARH
Thanks Guys, You may ask why MOFFETT, Well she is my 3rd american ship, and I live at #62 , hence, 362, also she launched on 11th Dec 1935, I was born 11th dec 1938.
I look for unusual subjects, over in the U/K I have never seen a Porter class built, plenty of other DD,s.


Posted: Mon Jul 31, 2006 12:03 pm
by ARH
Posted: Mon Jul 31, 2006 12:45 pm
by ARH
Dave Wooley wrote:Hi Ron When is the keel laying ceremony?
Dave Wooley
Dave, There will be no keel laying a sutch, there will be no plank on frame on this model, different idea,s while the model is only 6 1/2 inches wide, need all the room I can find. it will be a fibra glass hull,

Posted: Mon Jul 31, 2006 3:44 pm
by ARH
Hi Guys, This is measure 22 as dated 13/7/1944
Posted: Tue Aug 01, 2006 4:49 pm
by ARH
Posted: Wed Aug 02, 2006 5:09 pm
by ARH
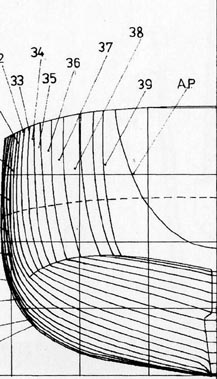
Here's the drawings I will be working from.
Enjoy, ARH
Posted: Wed Aug 02, 2006 6:01 pm
by ARH
These are the rib shapes you will find on the drawings, these need enlarging to the inside measurement of your hull. For this project they need to be 5 3/4 inches.
enjoy,
Posted: Mon Aug 07, 2006 8:36 am
by ARH
The next job is to separate each section.
- m006.jpg (26.03 KiB) Viewed 18793 times
enjoy. ARH
Posted: Mon Aug 07, 2006 8:49 am
by ARH
The next job is to flip this section over and join them together.
We now have ribs 0-17, 18 in total.
enjoy.ARH
Posted: Mon Aug 07, 2006 9:05 am
by spikesliew
Thanks for posting this, Admiral!
I have to admit that i'm a twit at all this, but finally the frame diagrams start making sense....

Looking forward to more progress updates!
best regards,
Chin Wen
Posted: Wed Aug 09, 2006 9:23 am
by ARH
The next job is to cut out all your rib shapes and number them.
0-8
9-17
When that's done, cut out the shape of your hull. All this is going to be transferred on to PLYWOOD and cut out.
Enjoy, ARH.
Posted: Sun Aug 13, 2006 9:18 am
by ARH
First I have pinned the hull shape on my plywood and marked around it. The keel section is cut off because we do not need it for the moment.
Next I have cut out the shape. You have to remember this is not going to be a plank on frame type build, this is going to be a solid plug hull first.
Next all the ribs were marked with a straight line from the outer edge of the rib.
This was then folded at an angle and placed on the edge of my ply and marked off, then cut out.
0 - 8 Cut out and stacked ready for next process.
enjoy , ARH
Posted: Mon Aug 14, 2006 5:28 pm
by ARH
Hi Guys, I marked off the positions of the frames and cut half way into the frame and then the hull. Then slid the first section in position, this is a trial fit, no glue.
All 0 - 8 frames dry fit.
enjoy. ARH
Posted: Tue Aug 15, 2006 5:16 pm
by ARH
Hi Guys, I have marked out all the next set of frames on the board these are numbers 9 - 17.
All frames cut out, waiting for the sections to be cut for interlocking them together.
enjoy. ARH
Posted: Wed Aug 16, 2006 12:57 pm
by ARH
Hi Guys, The ribs are cut out and glued in position.
You may notice an extra rib 15A, this is to give me a better shape at the stern
enjoy, ARH
Posted: Wed Aug 16, 2006 4:43 pm
by ARH
RNfanDan wrote:Nice, Ron--
Two questions, if i may?
1) In the pic showing all 0-8 after dry fit, what is the model I see in the background?
2) Is the plywood you are using for the keel and frames, a "marine-grade" or special plywood--if not, what do you use to keep it from warping and splitting, in the long run or in case the "unsinkable" happens?
TIA,
Dan
Well Dan, That's HMS IRON DUKE.
The ply is just standard ply, all this work you are seeing at the moment will be going in the trash can, it will not be used for any part of the ship. It is the male plug for making the fibreglass hull. The hull will be cast over it and the inner discarded, you will see as the thread continues. Thanks for posting, ARH
Posted: Thu Aug 17, 2006 6:20 pm
by ARH
Hi Guys, just a start of the filling of the timber work with polystryne and plaster.
1 bucket
2 sharp knife
3 plaster
4 polystyrene.
5 brush
6 water, not in the picture, but in the bucket,

Posted: Fri Aug 18, 2006 4:17 pm
by ARH
Hi Guys, Let me explain, I have never liked spending a lot of money on models, I work to hard to give it away, so I think of ways in my modelling to be able to use some of the materials I work with.
The stage we are at we could easily use thin ply or balsa or expensive timbers but I choose to use block styrene and plaster. Both are cheap and I usually have some hanging around, this plug will be discarded when I mould off it what I need.
Up to now it has cost.
ply �11.00 ----------- $17.00
styrene �0 ----------- $0
Plaster �2.45 ------- $4.00
It could get a bit messy around here for awhile, but it will turn out OK in the end, you will have to bare with me for awhile. ARH

Posted: Fri Aug 18, 2006 5:18 pm
by ARH
Hi Guys, I make a start by roughly cutting the styrene and placing it in between the rib sections.
Then I mix the plaster with the water in to a semi stiff paste and trowel it over the styrene level with the ribs. You do not have to mix a lot at a time just enough for what your going to do.
Carrying on you do the sides and the top, as it begins to set you can put some water on it with a brush and run the trowel over it for a slight finish, it does not have to be perfect at this stage.
The hull on its side showing the round of the hull below the water line.
Two sides nearly complete, they need scrapping down with a blade, this helps to get a more flowing shape.
Enjoy. ARH


