Page 1 of 1
CSS Texas photo etch
Posted: Sun Jan 15, 2012 11:06 pm
by Flagship Models
Here is the finished CSS Texas photo etch sheet for the next kit I'll be releasing very soon. It really wasn't too hard to design. The only thing one has to keep in mind is what the minimum line width is for the thickness of metal the parts are being etched to.
I'll post the instructions as I complete them to give you idea how everything goes together. As always, questions and comments are welcome.

Re:Drawing CSS Texas photo etch and Instructions
Posted: Mon Jan 16, 2012 2:24 am
by Rusty White
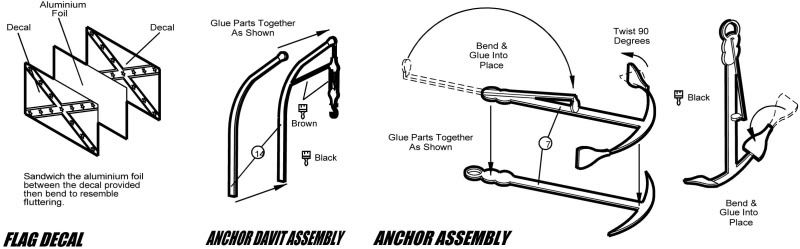
For those who do not know, each color represents either a different line width, single, or multiple layers. Since the finished product will have relief etching, two layers were needed to be created; a "front" layer for the raised etch and text, and a "back" layer for all the line work and the lower layer. The text was not included in the back layer so that it would etch into the top layer and not go all the way through the brass. There really is a lot more detail than can be seen in the drawing if one was to zoom in. The gun port covers all are relief etched, as well as relief etching on most of the parts. The parts I am most proud of are the anchors. With relief etching and multiple line widths, they fold into beautiful replicas of the real thing.
Re: CSS Texas photo etch
Posted: Mon Jan 16, 2012 3:05 am
by DrPR
Rusty,
Who does your photoetching?
What is the "formula" you use for the relationship between minimum line width and metal thickness. For minimum opening width and metal thickness?
I have tried several times to etch 1:96 catwalks for the smoke pipes of the Cleveland class cruiser, with no success. The bars that make up the walkway are 0.005" and the spaces between are 0.019" minimum. The failures have been caused by incomplete removal of the mask so one side of the catwalk etches perfectly and the other is etched incompletely. I have had no problem etching less detailed parts.
I have attached an image. You can see the ladder-like catwalk deck - the black is the areas to be etched away.
Any suggestions?
Phil
Re: CSS Texas photo etch
Posted: Mon Jan 16, 2012 12:07 pm
by Roscoe
Very nice, looking forward to seeing the finished etchings, and how they look on the model. Should look great.
Dean
Re: CSS Texas photo etch
Posted: Mon Jan 16, 2012 1:25 pm
by Rusty White
DrPR wrote:Rusty,
Who does your photoetching?
Photofabrication Engineering
Talk to Karen Shapiro, Customer Service | 508.478.2025 x114 | kshapiro@photofabrication.com
What is the "formula" you use for the relationship between minimum line width and metal thickness. For minimum opening width and metal thickness?
It really depends on the company one uses for photo etching and thickness of the metal sheet used. Each company has their own "formula" because of the chemical mixture they use and brand of machinery they have. Karen can supply you with that information. Whichever photo etch company you use, they probably have a web site or flier with all the info you need to produce artwork for their company. Also, (if you have the money) they can do the artwork for you. Obviously, you don't require that.
I have tried several times to etch 1:96 catwalks for the smoke pipes of the Cleveland class cruiser, with no success. The bars that make up the walkway are 0.005" and the spaces between are 0.019" minimum. The failures have been caused by incomplete removal of the mask so one side of the catwalk etches perfectly and the other is etched incompletely. I have had no problem etching less detailed parts.
Unfortunately, home photo etching can do only so much. Your line spacing is correct for.005 brass. However, when the details get so fine and the spacing between the lines get so close, only PRECISELY mixed chemicals and computers PRECISELY timed to remove the parts from the etchant, can create the finished product you want. The catwalk screening is exactly what I am talking about. You need a commercial photo etcher to handle it. If the lines are even the slightest amount too close together, you will experience the problems you describe. Believe me, I know. I used to do home photo etching too.
I have attached an image. You can see the ladder-like catwalk deck - the black is the areas to be etched away.
Any suggestions?
Phil
Re: CSS Texas photo etch
Posted: Mon Jan 16, 2012 1:33 pm
by Rusty White
"I have tried several times to etch 1:96 catwalks for the smoke pipes of the Cleveland class cruiser, with no success."
Phil,
Are you actually building that USS Oklahoma City? The "Cleveland" class drawings got me to wondering.
Re: CSS Texas photo etch
Posted: Tue Jan 17, 2012 2:56 am
by DrPR
Rusty,
Well, I am supposed to be building a 1:96 USS Oklahoma City CLG-5 in the 1971 configuration. I got sidetracked into making a CAD model after I found a number of inconsistencies in the blueprints and had to use CAD to determine how the parts fit together. My goal is to finish the 3D CAD model, prepare a set of 2D drawings from the 3D model, and then resume construction of the 1:96 model.
Here are a few photos of the start of the 1:96 model:
http://www.okieboat.com/Ship%20model%20page.html
The smoke pipes were almost exactly the same on the original USS Oklahoma City CL-91 and the modified CLG-5. The siren and associated piping were removed from the forward smoke pipe during the conversion. The searchlight platforms were removed from the aft smoke pipe and the ladder was relocated on the CLGs.
There were two (at least) variations in the tops of the smoke pipes on the original Clevelands. The OK City had hand rails concentric around the opening. I think that was to make it easier to stretch canvas covers over the tops of the pipes in port. Earlier Clevelands had hand rails parallel to the deck/waterline.
Thanks for the photo etch information. I suspect I will have to try a commercial photo etch shop for the catwalks and some other details. Many of the decks in the radar towers had hole patterns in the metal, presumably to let water drain so it didn't add to topside weight. I might try to make parts of the AN/SPS-10 and AN/SPS-43 antennas with photo etch. Window frames, doors and hatches are other candidates.
Phil
Re: CSS Texas photo etch
Posted: Tue Jan 17, 2012 12:52 pm
by Rusty White
Good luck on the project. Better get a grip on your wallet too. Soon you'll know why photo etched parts are so expensive!

Tool costs, set up fees, postage and minimum sized orders would make anyone gag. To keep the cost down, you need to have ALL the parts you want photo etched submitted together on one sheet. Otherwise the previously mentioned costs will eat you alive.
Re: CSS Texas photo etch
Posted: Tue Jan 17, 2012 6:07 pm
by Rusty White
Here's the first of the instruction drawings for the CSS Texas kit. As you can see, I prefer working with 2D style "plan" drawings. Mostly due to the simplicity of the assembly procedure for ironclads. In short, there are just not many parts to glue together, so 2D works best. Most of the 3D stuff will involve assembling and bending the photo etched parts to come.

Re: CSS Texas photo etch
Posted: Thu Jan 19, 2012 12:55 am
by DrPR
Rusty,
I have seen the photoetch prices! That's why I have been doing a lot of it myself. I haven't had problems with the simple things like the skirts around the smoke pipes, the smoke pipe caps and platforms.
I have a new set of chemicals and lights to play with. If that doesn't work I'll try a commercial etcher.
Phil
Re: CSS Texas photo etch
Posted: Fri Jan 20, 2012 2:50 pm
by Rusty White
Here's the latest installment to the CSS Texas instructions. I'm moving into the photo etch stuff so 3D is mostly the order of the day. Doing photo etch instructions isn't too time consuming since the art work has already been done for the etcher. Just copy and paste into 3D, bend, fold, then save as 2D, clean up the drawings and adjust line widths. The part numbers appear to off a little, but they're not. The PDF program chose to translate the drawing that way for some reason.
I chose to start including painting directions after some requests by customers. I created a neat little paint brush and stored it in the symbol file for future use.
Re: CSS Texas photo etch
Posted: Fri Jan 20, 2012 5:36 pm
by tea monster
I'd love to see some of the parts after manufacture, or when you have your prototype built.
Again, those are some of the nicest instruction sheets I've ever seen.
Re: CSS Texas photo etch
Posted: Fri Jan 20, 2012 5:47 pm
by Rusty White
Thank you for the kind words. I should be getting the test shot in the next week or so for the photo etch. I'll post a pic when it arrives. I still have some patterns to make. The lower and upper hull are complete with the shaft braces and stack left to do. It should come together pretty quick once the photo etch arrives.
Re: CSS Texas photo etch
Posted: Fri Jan 20, 2012 8:08 pm
by Roscoe
Really superb work, and I'm also looking forward to seeing the Texas and your etchings when they are done. You do such a great job on these under modeled subjects, it's really nice to see them come together.
Dean
Re: CSS Texas photo etch
Posted: Sat Jan 21, 2012 6:07 pm
by Rusty White
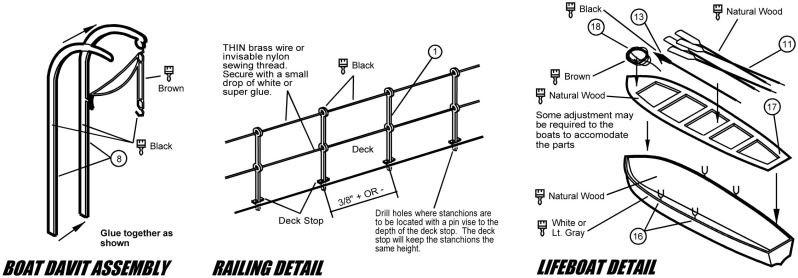
Below are the latest drawings for the CSS Texas instructions. I added a few new details to the life boats this around which will be standard equipment for all the boats from now on.
Re: CSS Texas photo etch
Posted: Mon Jan 23, 2012 1:32 pm
by Rusty White
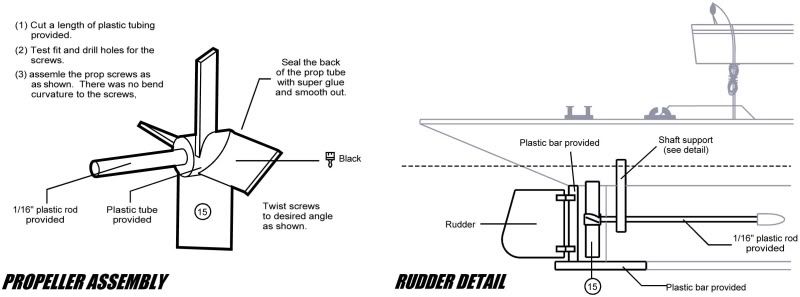
Moving on the the rudder and propeller assembly.
Re: CSS Texas photo etch
Posted: Wed Jan 25, 2012 4:38 pm
by Rusty White
Grills will be custom made to fit to the grill coamings. To save time and space on the instruction sheet, I decided to make a "typical" installation drawing that applies to all the grills. Painting suggestion are given add depth to the finished model that should make the grills very 3D looking. The coaming frames stand slightly higher than deck holding the grills just above the deck height.

Re: CSS Texas photo etch
Posted: Fri Jan 27, 2012 2:40 pm
by Rusty White
The final drawings consist of the parts list. When I started selling model kits I was determined to offer a parts list that you can actually use. After building several ship kits from an unnamed company, my major frustration was the poorly designed parts list (supposedly) to aid the modeler to accurately account for all the parts. Many of the drawings provided by this company were so poor I couldn't make out what the hell they were. They looked more like small hand drawn blobs than the parts they were supposed to represent. CAD now makes an unusable parts list inexcusable. Anyway, enough ranting.

Re: CSS Texas photo etch
Posted: Sat Jan 28, 2012 4:25 pm
by Rusty White
Here's the box art for now. I'll add a photo of the built up kit as soon as I can get a prototype constructed.
